

Latest & Greatest

Air Fryer Ranch Chicken Tenders Crispy and Flavorful
Ready for a tasty twist on chicken tenders? Air Fryer Ranch Chicken Tenders are crispy, flavorful, and easy to make.
Read more…
Maple Walnut Muffins Scrumptious and Easy Recipe
If you love warm, sweet treats, you’re in for a treat! These Maple Walnut Muffins are not only scrumptious, but
Read more…
Spicy Peanut Noodles with Veggies Quick and Easy Meal
Looking for a quick, tasty meal? Try my Spicy Peanut Noodles with Veggies! This dish combines soft rice noodles, fresh
Read more…
Savory Sheet Pan Garlic Herb Salmon & Potatoes Dish
Looking for a tasty, easy meal? My Savory Sheet Pan Garlic Herb Salmon & Potatoes dish is perfect! With just
Read more…
No Bake Matcha White Chocolate Bars Delightful Treat
Looking for a sweet treat that’s quick and easy? Dive into my No Bake Matcha White Chocolate Bars! These bars
Read more…
Minute Spicy Garlic Chicken Wraps Flavorful Meal Idea
Are you ready to spice up your meal routine? My Minute Spicy Garlic Chicken Wraps deliver bold flavor in a
Read more…
Cranberry Orange Pound Cake Delightful and Flavorful Treat
If you’re craving a sweet treat, you’ll love this Cranberry Orange Pound Cake. This delightful cake is bursting with flavor,
Read more…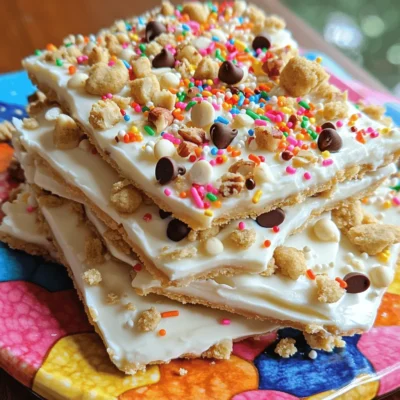
Cookie Dough Yogurt Bark Simple and Tasty Treat
Looking for a sweet treat that’s both fun to make and healthy? You’ll love Cookie Dough Yogurt Bark! This simple
Read more…browse recipes


Minute Chicken Ramen Quick and Flavorful Meal
If you’re in a hurry but crave a tasty meal, this Minute Chicken Ramen recipe is perfect for you. It’s quick, easy, and packed…
My Latest Drinks

Strawberry Cheesecake Smoothie Creamy Refreshing Treat
Craving something delicious and cool? The Strawberry Cheesecake Smoothie is your answer! It blends creamy cheesecake flavors with sweet strawberries Read Full Recipe-
Mocktail Pink Punch Refreshing and Easy Recipe
Are you ready to impress your guests with a delightful drink? This Mocktail Pink Punch recipe is both refreshing and Read Full Recipe -
Blue Lagoon Tropical Lemonade Refreshing and Zesty Drink
Looking for a drink that’s both refreshing and fun? Say hello to Blue Lagoon Tropical Lemonade! This colorful beverage packs Read Full Recipe -
Pumpkin Spice Coffee Creamer Flavorful Fall Treat
Are you ready to embrace the cozy vibes of autumn? In this blog post, I’ll guide you through making your Read Full Recipe -
Apple Cider Margarita Mocktail Refreshing Fall Drink
Fall is here, and that means it’s the perfect time for a cozy drink! The Apple Cider Margarita Mocktail offers Read Full Recipe -
Pumpkin Spice Latte Copycat Cozy and Comforting Recipe
Craving that warm, cozy feeling of fall? You can enjoy a delicious Pumpkin Spice Latte at home! In this article, Read Full Recipe


My Latest Dinners
-
White Bean Soup Simple and Hearty Delight
Looking for a warm and filling meal? Let me introduce you to white bean soup! This simple and hearty delight Read Full Recipe -
Garlic Herb Roasted Sweet Potatoes Flavorful Side Dish
Looking for a side dish that’s both tasty and easy to make? Garlic Herb Roasted Sweet Potatoes are the answer! Read Full Recipe -
One Pot Beef Taco Pasta Easy and Flavorful Meal
Looking for a quick and tasty meal? One Pot Beef Taco Pasta is the perfect dish! This recipe packs bold Read Full Recipe -
Garlic Chicken Zucchini Noodles Stir Fry Delight
Are you ready for a tasty twist on dinner? My Garlic Chicken Zucchini Noodles Stir Fry is a quick and Read Full Recipe -
Stuffed Italian Meatloaf Easy and Tasty Recipe
Are you ready to elevate your dinner game? This Stuffed Italian Meatloaf is both easy and tasty! In this article, Read Full Recipe -
One Pot French Onion Pasta Flavorful Comfort Dish
Looking for a cozy dinner that warms your soul? Try my One Pot French Onion Pasta! This creamy, rich dish Read Full Recipe


hey,
i’m !
I’m so happy you’re here!
Every dish I share is made with love and care. I hope they bring you the same comfort and joy they bring me. Let’s make memories, one recipe at a time.

![- 8 ounces rotini pasta - 6 strips turkey bacon - 1 cup cherry tomatoes - 1 cup romaine lettuce - 1/2 cup red onion - Dressing components: - 1/2 cup mayonnaise - 2 tablespoons apple cider vinegar - 1 teaspoon Dijon mustard - Salt and pepper to taste Choosing fresh ingredients makes a big difference. Look for bright, firm tomatoes. For lettuce, select crisp romaine. Fresh herbs add flavor, too. For mayonnaise, I recommend brands like Hellmann's or Duke's. They create a rich and creamy dressing. Always check for freshness dates on all products. Start by boiling a large pot of salted water. Once it boils, add 8 ounces of rotini pasta. Cook the pasta until it is al dente, following the package instructions. Usually, this takes about 8 to 10 minutes. After cooking, drain the pasta well. Rinse it under cold water to stop the cooking process. This helps the pasta stay firm and not gummy. In a large mixing bowl, combine the cooled pasta with the other ingredients. Add 6 strips of crumbled turkey bacon, 1 cup of halved cherry tomatoes, 1 cup of chopped romaine lettuce, and 1/2 cup of finely chopped red onion. Mix gently with a spatula or wooden spoon. This ensures all the ingredients blend well without crushing them. For the dressing, take a separate bowl and whisk together 1/2 cup of mayonnaise, 2 tablespoons of apple cider vinegar, and 1 teaspoon of Dijon mustard. Mix until the dressing is smooth and creamy. It should not be too thick. Season it with salt and pepper to taste. Pour the dressing over the pasta mixture and toss gently to coat everything evenly. For full details, check the Full Recipe. To make your BLT pasta salad shine, adjust the seasoning. Start with salt and pepper. Taste your salad after mixing in the dressing. Add more salt or pepper if needed. You can also try adding garlic powder or smoked paprika for a twist. These small changes can make a big difference in flavor. Garnishing makes your salad look great. Use fresh basil leaves on top for color. You can also add more halved cherry tomatoes around the edges. This adds visual appeal. A sprinkle of black pepper can finish the look nicely. Serve it in a clear bowl to show off the colors. Timing is key for the best taste. Prepare the salad at least 30 minutes before serving. This helps the flavors blend well. If you can, let it chill longer in the fridge. This extra time makes the salad even better. If you want to serve it later, keep the dressing separate until just before eating. This keeps everything fresh and crunchy. For the full recipe, see the [Full Recipe]. {{image_2}} For your BLT Pasta Salad, you can switch up the pasta. Try penne or farfalle for fun shapes. They will still hold the dressing well. For a gluten-free option, use chickpea or quinoa pasta. Changing the protein is also easy. You can swap turkey bacon for regular bacon. If you want a vegetarian dish, use chickpeas or lentils instead. They add protein and a nice texture. The dressing is key for flavor. You can try ranch or vinaigrette for a twist. A zesty Italian dressing gives a nice kick too. Adding fresh herbs can change the taste. Try parsley, dill, or even chives. A sprinkle of garlic powder or smoked paprika can add depth. Experiment with what you like. In summer, add fresh corn or diced cucumbers. They bring a refreshing crunch. You can also use ripe avocado for creaminess. For fall or winter, think about roasted vegetables. Roasted red peppers or butternut squash will warm the dish. You can even add nuts for extra crunch and flavor. For the full recipe, check out the [Full Recipe]. To keep your BLT pasta salad fresh, use an airtight container. Glass or plastic containers work well. Make sure to store it in the fridge. This will help keep the flavors strong and the texture intact. If you want to keep the lettuce crisp, store it separately. Mix it in just before serving. Pasta salad is best cold, but you can serve it at room temp too. If you heat it, do so gently. Use a microwave and heat for short bursts. Stir it often to avoid hot spots. You can also add a splash of dressing to refresh the flavors. Your BLT pasta salad lasts about 3 to 5 days in the fridge. Always check for changes in smell or texture. If it looks or smells off, it's best to toss it. To enjoy the best taste, eat it within the first few days. For the full recipe, you can refer back to the earlier section. Yes, you can make BLT Pasta Salad ahead of time. This is great for events. Just prepare the salad and store it in the fridge. Let the flavors mix for a few hours. For best taste, serve it cold after chilling. You can make it a day ahead. This saves time on busy days. Absolutely, this recipe works well for meal prep. You can batch cook the pasta and bacon. Store them in separate containers. Mix the salad just before serving. This keeps everything fresh. To store, use airtight containers. The salad stays good in the fridge for up to four days. Just remember to add fresh lettuce right before eating. If you want a different option, try regular bacon or leave it out. You can also use veggie bacon for a meatless version. Another option is diced ham or chicken for added protein. If you prefer a lighter choice, use smoked tofu. Each of these gives a unique flavor to the salad. Experiment with what you like best! This blog post covered making a tasty BLT Pasta Salad. You learned about key ingredients like rotini pasta and turkey bacon, along with how to mix them correctly. I shared storage tips to keep your salad fresh and variations to try based on seasons or personal taste. In the end, making this salad offers fun and flavor. Enjoy experimenting with different ingredients and watching your loved ones enjoy it!](https://easycookingbite.com/wp-content/uploads/2025/06/f3cefba7-3b06-45bd-baef-fac7dd60a52f-300x300.webp)


Strawberry Shortcake Icebox Cake Delightful Treat
If you’re looking for a quick and tasty dessert, you’re in the right place! Strawberry Shortcake Icebox Cake combines fresh strawberries, rich whipped cream,…
![- 1 pound fresh strawberries, hulled and sliced - 1/3 cup granulated sugar - 1 cup heavy whipping cream - 1/2 cup powdered sugar - 1 teaspoon vanilla extract - 1 package (14.1 ounces) of store-bought shortcake biscuits - 1/2 cup Greek yogurt (optional for creaminess) - Fresh mint leaves for garnish Using fresh strawberries makes this dessert bright and sweet. The sugar helps the berries release their juices. It gives your cake a nice flavor. The heavy cream and powdered sugar create a light and fluffy whipped topping. The vanilla adds a bit of warmth to the mix. The store-bought shortcake biscuits save time and keep it easy. You can use Greek yogurt for extra creaminess if you like. Fresh mint leaves add a nice touch on top. They also give a fresh taste that pairs well with strawberries. - Mixing bowls - Whisk or hand mixer - Baking dish (8-inch square or round) - Plastic wrap You will need a few simple tools. Mixing bowls help you combine the ingredients. A whisk or hand mixer is great for whipping the cream. The baking dish holds all the layers together. Finally, plastic wrap keeps your cake fresh while it chills in the fridge. For the full recipe, check out the Berry Bliss Strawberry Shortcake Icebox Cake 🥯. - First, slice 1 pound of fresh strawberries. - Place them in a medium bowl. - Sprinkle 1/3 cup of granulated sugar over the strawberries. - Toss the berries gently. - Let them sit for about 20 minutes. - This helps the strawberries release their sweet juices. - In a large bowl, combine 1 cup of heavy whipping cream, 1/2 cup of powdered sugar, and 1 teaspoon of vanilla extract. - Use a whisk or hand mixer to whip the mixture. - Whip until soft peaks form. - If you want creaminess, fold in 1/2 cup of Greek yogurt gently. - This adds a rich texture that makes the cake extra yummy. - Grab a biscuit from the package of shortcake biscuits. - Dip it briefly in the strawberry juice from the bowl. - Place the dipped biscuit at the bottom of an 8-inch baking dish. - Spread a layer of whipped cream over the biscuit. - Add a layer of the macerated strawberries on top. - Repeat this process, layering biscuits, whipped cream, and strawberries. - Keep going until you reach the top of the dish. - Finish with a final layer of whipped cream. - Decorate with a few whole strawberries. - Cover the dish with plastic wrap and refrigerate for at least 4 hours. - For best results, let it chill overnight. - Before serving, add fresh mint leaves for a nice touch. Check the [Full Recipe] for all the details. Chilling is key for a great icebox cake. When you chill the cake, it lets the flavors blend well. The biscuits soften and soak up all the yummy juices. I suggest letting it sit overnight for the best taste. If you want a different texture for your whipped cream, try using a hand mixer. You can also use an electric mixer if you prefer a quicker way. To make your cake pop with flavor, add lemon zest or a little lemon extract. This gives a fresh taste that contrasts nicely with the strawberries. You can also use flavored biscuits instead of plain ones. Strawberry or vanilla biscuits add an extra layer of flavor to your cake. Garnishing makes your cake look fantastic. Use fresh mint leaves on top for a vibrant touch. You can also sprinkle some crushed biscuits for added crunch. When serving at a party, cut the cake into squares. Place each piece on a colorful plate for a fun display. You can even add a drizzle of strawberry sauce on the plate for a nice touch. {{image_2}} You can switch up the strawberries for other berries. Blueberries and raspberries work great. They add unique flavors and colors. You can also use seasonal fruits like peaches or cherries. Just slice them thin for even layers. This makes your cake even more exciting! If you need a gluten-free version, use gluten-free biscuits. Many brands offer tasty options that fit this need. For a vegan cake, replace heavy cream with coconut cream. It whips up nicely and adds a tropical twist. Both options keep the cake delicious and enjoyable for everyone. Get creative with your layers! You can use different creams or fillings. Consider a layer of chocolate mousse for a rich taste. You can also add flavored creams like lemon or almond. This keeps each bite interesting and packed with flavor. Use your imagination to make a one-of-a-kind dessert! For the full recipe, check out the Berry Bliss Strawberry Shortcake Icebox Cake. To keep your Strawberry Shortcake Icebox Cake fresh, store it in the fridge. Use an airtight container or cover it tightly with plastic wrap. This will prevent it from drying out or absorbing other smells in the fridge. Always try to keep it away from strong-smelling foods. If you want to save some cake for later, freezing works great. Cut the cake into slices and wrap each piece in plastic wrap. Then, place them in a freezer-safe bag or container. This keeps the cake fresh for up to three months. When you want to enjoy a slice, take it out and let it thaw in the fridge overnight. For the best quality, eat the cake within three to four days when stored in the fridge. After this time, the biscuits may become mushy, and the flavors can fade. Signs that the cake is no longer good include an off smell or a change in texture. If it looks or smells funny, it’s best to toss it. Enjoy your cake while it’s fresh! Yes, you can use frozen strawberries. Just remember to thaw them first. Drain off excess juice to avoid sogginess. Frozen strawberries can be a bit softer, but they still taste great. This choice can save time, especially when fresh strawberries are out of season. Let the cake chill for at least 4 hours. I recommend overnight for the best flavor. This cooling time allows the biscuits to soak in the juicy strawberry goodness. The longer it sits, the better it tastes. You will enjoy a creamy and delightful dessert. If you need a substitute for heavy whipping cream, try coconut cream. It adds a nice flavor and works well in desserts. You can also use a non-dairy whipped topping for a lighter option. Greek yogurt can add creaminess, too, if mixed in. Yes! You can prepare this icebox cake a day or two in advance. Store it in the fridge until you are ready to serve. This makes it perfect for parties or gatherings. Just remember to garnish it with fresh mint right before serving for a pop of color. For the full recipe, check out the Berry Bliss Strawberry Shortcake Icebox Cake 🥯. This blog post covered how to make a delicious icebox cake. We discussed key ingredients, helpful tools, and step-by-step instructions. I shared tips for the best flavor and texture, as well as fun variations. Remember, you can customize the cake for different diets and tastes. Finally, store it correctly to enjoy later. Enjoy creating your icebox cake and impressing friends and family with your tasty treat.](https://easycookingbite.com/wp-content/uploads/2025/06/440830f9-bee2-4e33-a49b-cf581d024dc3.webp)
