
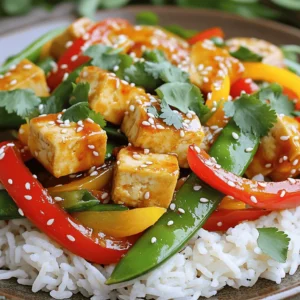
Latest & Greatest
Spicy Garlic Udon Stir-Fry 15-Minute Zesty Delight
Are you ready for a quick and tasty meal? This Spicy Garlic Udon Stir-Fry takes only 15 minutes to whip
Read more…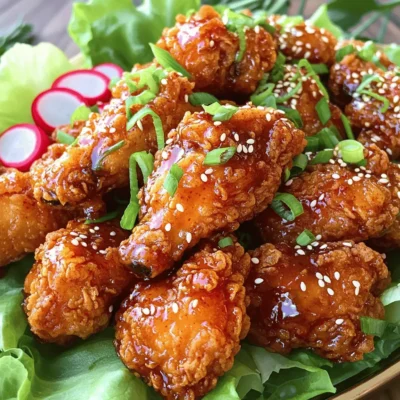
Korean Fried Chicken Better Than Takeout Delight
Are you ready to discover how to make Korean Fried Chicken Better Than Takeout Delight? I’ll guide you through simple
Read more…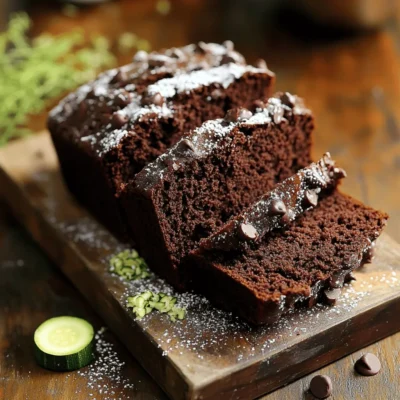
Chocolate Zucchini Bread Bakery Delightful Recipe
Welcome to your new favorite treat: Chocolate Zucchini Bread! This delightful recipe combines the rich taste of chocolate with the
Read more…
Savory Chicken Enchilada Soup Slow Cooker Delight
If you’re craving a warm, satisfying meal that practically cooks itself, you’re in the right place. My Savory Chicken Enchilada
Read more…
Strawberry Cheesecake Bars No Bake Easy Sweet Treat
Looking for a delicious dessert that’s quick and easy? These No-Bake Strawberry Cheesecake Bars are the perfect treat! With a
Read more…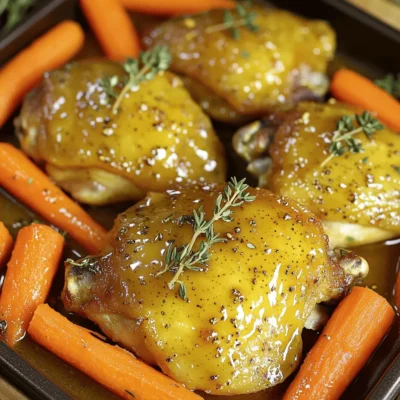
Maple Dijon Chicken & Carrots Sheet Pan Delight
Are you ready for a meal that’s simple, tasty, and easy to clean up? My Maple Dijon Chicken & Carrots
Read more…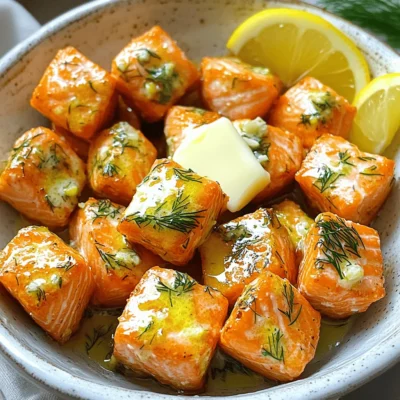
Garlic Butter Salmon Bites Air Fryer Recipe Delight
Are you ready to impress your family with a delicious meal in no time? These Garlic Butter Salmon Bites made
Read more…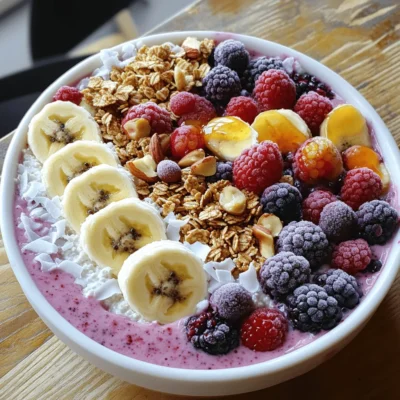
Cottage Cheese Smoothie Bowl Protein Packed Delight
Dive into the world of Cottage Cheese Smoothie Bowls! Packed with protein, this dish fuels your body and delights your
Read more…browse recipes


![To make tasty Air Fryer Apple Chips, you need just a few simple items. Here’s what you need: - 2 medium-sized apples (choose your favorite variety) - 1 teaspoon cinnamon - 1 tablespoon sugar (optional) - Pinch of salt These ingredients make the perfect blend for a crunchy snack. You can use any apple you like. Sweet apples, like Fuji or Honeycrisp, work great. Tart apples, like Granny Smith, add a nice contrast. The cinnamon adds warmth and depth to the flavor. If you want it sweeter, add sugar. If you prefer a healthier snack, skip the sugar. A pinch of salt helps to enhance the apple's natural taste. Gather these ingredients, and you're ready to create a delicious treat! For detailed steps, check the Full Recipe. - Wash and dry apples. - Slice apples into thin rounds. - Remove apple seeds. Start by washing your apples well. This step ensures they are clean and safe to eat. Once dried, grab a sharp knife or a mandoline slicer. Slice the apples into thin rounds, about 1/8 inch thick. Thin slices cook evenly and get extra crispy. As you slice, take a moment to remove any seeds. This will make your chips tastier and more enjoyable. - Prepare the cinnamon mixture. - Toss apple slices in the mixture. Next, it’s time to make a cinnamon mixture. In a small bowl, combine 1 teaspoon of cinnamon, a pinch of salt, and 1 tablespoon of sugar if you like a sweeter chip. Mix these well. Now, place your apple slices in a larger bowl. Sprinkle the cinnamon mixture over the slices. Toss gently until every slice is coated. This step adds flavor and makes your apple chips delicious. - Preheat air fryer to 350°F (175°C). - Arrange apple slices in the air fryer. - Cooking time and flipping instructions. Now we get to the fun part: air frying! Preheat your air fryer to 350°F (175°C). While it heats, arrange the apple slices in a single layer in the basket. Make sure they don’t overlap so they cook evenly. If you have a lot of slices, you might need to do this in batches. Cook them for about 10-15 minutes. Flip the slices halfway through the cooking time. Start checking at the 10-minute mark. You want them crisp but not burnt. When done, let them cool on a wire rack. This will help them get even crunchier. Enjoy your tasty air fryer apple chips! For the full recipe, check out the earlier section. When making air fryer apple chips, choose the right apples. Some good choices are: - Honeycrisp - Fuji - Gala - Granny Smith Honeycrisp and Fuji are sweet. They give a great taste. Gala apples are also sweet but a bit softer. Granny Smith apples add a nice tartness. You can mix sweet and tart apples for more flavor. To get crispy apple chips, slice the apples thin. Aim for about 1/8 inch thick. Thin slices cook better and crisp up nicely. Use a sharp knife or a mandoline for even cuts. Keep an eye on the cooking time. Start checking at 10 minutes. Flip the slices halfway through. If they aren't crispy yet, let them cook a bit longer. Just don’t let them burn! Adding spices can take your apple chips to the next level. Try these options: - Nutmeg - Ginger - Vanilla extract For sweet chips, use cinnamon and sugar. For savory, try a sprinkle of chili powder or salt. You can even mix sweet and savory spices for a fun twist. Experiment and find your favorite blend. {{image_2}} You can change the taste of your apple chips easily. One fun way is to use spices. Instead of just cinnamon, try adding nutmeg or ginger. They give a warm flavor that pairs well with apples. Just a pinch can make a big difference. Another option is to add extracts. A few drops of vanilla or almond will enhance the flavor. These small changes can make your chips taste unique and exciting. Experiment with these spices and extracts to find your favorite mix. Mixing different fruits can create a tasty twist. Try adding pears with your apples. Pears add a soft sweetness that works well. You can slice them thin and mix with apple slices before air frying. You can also add dried fruits for extra flavor. Raisins or cranberries can bring a nice chewiness to the crunch. This mix of fresh and dried fruit can make your apple chips more interesting. Feel free to explore these combinations to make your snack special. For the full recipe, check out the [Full Recipe]. To keep your apple chips fresh, store them in an airtight container. This helps lock in their crunchiness. You can use glass jars or resealable plastic bags. Make sure to remove all air before sealing. Proper storage can keep your apple chips tasty for about one week. After that, they may lose some crispness. If your apple chips lose their crunch, don't worry! You can easily regain their crispiness. Simply place them in the air fryer at 350°F (175°C) for about 3-5 minutes. This will refresh them without adding extra oil. Check them often to avoid burning. Enjoy your crispy apple chips again just like when they were fresh! Air fryer apple chips can stay fresh for about one week. Store them in an airtight container. This keeps moisture out and helps them stay crunchy. If you notice any softness, they may need to be eaten sooner. For best results, enjoy them within a few days of making. Yes, you can make tasty apple chips without sugar. Simply skip the sugar in the recipe. The natural sweetness of the apples shines through. You can also use spices like cinnamon or nutmeg for flavor. If you want a little sweetness, try a sprinkle of honey or maple syrup after cooking. Some great apples for chips include Fuji, Honeycrisp, and Granny Smith. Fuji apples are sweet and juicy, while Granny Smith adds a nice tartness. Honeycrisp offers a balance of sweet and tart. Choose apples based on your taste. Mix different varieties for a fun flavor twist! You now know how to make delicious air fryer apple chips. Start with your favorite apples and add cinnamon for flavor. The process is simple: slice, coat, and fry for a crispy treat. Don't forget to experiment with different spices or fruit combos. Storing them in an airtight container keeps them fresh. With these tips, you're fully ready to impress friends or enjoy a healthy snack. Get cooking and enjoy your crispy creations!](https://easycookingbite.com/wp-content/uploads/2025/07/ad3ab38e-2c6e-4bde-ac32-927f70ac9d23.webp)
Air Fryer Apple Chips Crunchy and Tasty Recipe
If you love crunchy snacks, you’ll adore making Air Fryer Apple Chips! This simple recipe transforms fresh apples into tasty bites, perfect for any…
My Latest Drinks

Strawberry Cheesecake Smoothie Creamy Refreshing Treat
Craving something delicious and cool? The Strawberry Cheesecake Smoothie is your answer! It blends creamy cheesecake flavors with sweet strawberries Read Full Recipe-
Mocktail Pink Punch Refreshing and Easy Recipe
Are you ready to impress your guests with a delightful drink? This Mocktail Pink Punch recipe is both refreshing and Read Full Recipe -
Blue Lagoon Tropical Lemonade Refreshing and Zesty Drink
Looking for a drink that’s both refreshing and fun? Say hello to Blue Lagoon Tropical Lemonade! This colorful beverage packs Read Full Recipe -
Pumpkin Spice Coffee Creamer Flavorful Fall Treat
Are you ready to embrace the cozy vibes of autumn? In this blog post, I’ll guide you through making your Read Full Recipe -
Apple Cider Margarita Mocktail Refreshing Fall Drink
Fall is here, and that means it’s the perfect time for a cozy drink! The Apple Cider Margarita Mocktail offers Read Full Recipe -
Pumpkin Spice Latte Copycat Cozy and Comforting Recipe
Craving that warm, cozy feeling of fall? You can enjoy a delicious Pumpkin Spice Latte at home! In this article, Read Full Recipe


My Latest Dinners
-
White Bean Soup Simple and Hearty Delight
Looking for a warm and filling meal? Let me introduce you to white bean soup! This simple and hearty delight Read Full Recipe -
Garlic Herb Roasted Sweet Potatoes Flavorful Side Dish
Looking for a side dish that’s both tasty and easy to make? Garlic Herb Roasted Sweet Potatoes are the answer! Read Full Recipe -
One Pot Beef Taco Pasta Easy and Flavorful Meal
Looking for a quick and tasty meal? One Pot Beef Taco Pasta is the perfect dish! This recipe packs bold Read Full Recipe -
Garlic Chicken Zucchini Noodles Stir Fry Delight
Are you ready for a tasty twist on dinner? My Garlic Chicken Zucchini Noodles Stir Fry is a quick and Read Full Recipe -
Stuffed Italian Meatloaf Easy and Tasty Recipe
Are you ready to elevate your dinner game? This Stuffed Italian Meatloaf is both easy and tasty! In this article, Read Full Recipe -
One Pot French Onion Pasta Flavorful Comfort Dish
Looking for a cozy dinner that warms your soul? Try my One Pot French Onion Pasta! This creamy, rich dish Read Full Recipe


hey,
i’m !
I’m so happy you’re here!
Every dish I share is made with love and care. I hope they bring you the same comfort and joy they bring me. Let’s make memories, one recipe at a time.


Easy Chicken and Broccoli Bake Simple Family Meal
Looking for a quick and tasty meal? My Easy Chicken and Broccoli Bake is perfect for busy families! In just a few steps, you…
![To make Easy Chicken and Broccoli Bake, you need some simple ingredients. Here is the detailed list: - 2 cups cooked chicken, shredded - 2 cups broccoli florets (fresh or frozen) - 1 cup cooked quinoa (or rice) - 1 cup shredded cheddar cheese - 1/2 cup cream cheese, softened - 1/2 cup sour cream - 1/4 cup chicken broth - 1 teaspoon garlic powder - 1 teaspoon onion powder - Salt and pepper to taste - 1/2 cup breadcrumbs (optional, for topping) - 2 tablespoons olive oil Each ingredient has a role in making the dish tasty. The chicken provides protein, while broccoli adds vitamins. Quinoa or rice gives the bake a hearty base. The cheese and cream ingredients create a creamy texture that makes this dish special. Seasonings like garlic and onion powder add flavor. Finally, breadcrumbs can give a nice crunch on top. All these ingredients work together to create a delightful meal. For the full recipe, check out the [Full Recipe]. Preheating the Oven First, you need to preheat your oven to 375°F (190°C). This step helps cook the dish evenly. While the oven heats, you can focus on the next steps. Mixing the Ingredients In a large bowl, mix the cooked chicken, broccoli florets, and quinoa. Add half of the cheddar cheese, cream cheese, sour cream, and chicken broth. Then, sprinkle in garlic powder, onion powder, salt, and pepper. Stir until everything is well combined. This mix creates a creamy and tasty base for your bake. Preparing the Baking Dish Next, grab a 9x13 inch baking dish and grease it lightly with olive oil. This helps prevent sticking and makes serving easier. Spoon the chicken and broccoli mixture into the dish, spreading it out evenly. Covering and Baking Now, cover the baking dish with aluminum foil. Place it in your preheated oven for 20 minutes. This helps the flavors meld together and keeps the dish moist. Crisping the Top After 20 minutes, remove the foil. Sprinkle the remaining cheddar cheese on top. If you want a crunchy finish, add breadcrumbs. Drizzle a little olive oil over the top to help it brown. Bake uncovered for another 10 to 15 minutes until the top is golden and bubbly. You can now enjoy a delicious Easy Chicken and Broccoli Bake. Check out the Full Recipe for more details! Choosing the Right Chicken For this dish, I prefer using cooked chicken. You can use rotisserie chicken for ease. It adds flavor and makes prep quick. Shredded chicken blends well with the sauce and other ingredients. You can also use grilled chicken for a smoky taste. Just ensure it’s cooked through and tender. Variations for Creaminess If you want a creamier texture, add more cream cheese or sour cream. You can also mix in some plain Greek yogurt. This adds a tangy flavor while keeping it rich. Consider using a mix of cheeses like mozzarella or gouda. Each will bring its own unique taste to your bake. Pairing Ideas with Sides This Easy Chicken and Broccoli Bake goes well with simple sides. Consider serving it with a fresh salad or crusty bread. You can also pair it with steamed veggies for extra nutrients. Rice or quinoa on the side adds more fiber and fills you up. Presentation Tips For a beautiful presentation, sprinkle some fresh herbs on top before serving. Chopped parsley or chives work great. Use a nice baking dish to showcase your meal. A colorful dish makes it inviting and appetizing. Remember, we eat with our eyes first! For the full recipe, check out the details above. {{image_2}} Substituting Chicken You can easily swap chicken for other meats. Turkey works well in this bake. It gives a nice flavor and is lean. You might also try cooked pork or beef. Just remember to adjust cooking times slightly. Each protein brings its own taste and texture to the dish. Vegetarian Alternatives If you want a meatless option, go for beans or tofu. Chickpeas are a great choice, adding protein and fiber. For a heartier dish, use lentils. They soak up flavors well. You can also add extra veggies like mushrooms or bell peppers. This keeps the bake satisfying and full of nutrients. Adding Herbs and Spices Herbs and spices can elevate your bake. Try adding thyme, basil, or oregano for fresh flavors. A pinch of red pepper flakes gives a nice kick. Experiment with paprika for a smoky taste. Just sprinkle to your liking; you can always add more. Different Cheese Combinations Cheese is key in this dish. While cheddar is classic, consider mixing it up. Gruyère offers a nutty flavor that melts beautifully. Mozzarella gives a stretchy, gooey texture. You can even blend different cheeses for depth. Just remember to keep the total cheese amount balanced to maintain the bake's creaminess. Explore these variations to find what your family loves best! For the complete recipe, check out the Full Recipe section. How do you store leftovers? After enjoying your Easy Chicken and Broccoli Bake, let it cool. Transfer any leftovers to an airtight container. You can keep it in the fridge for up to three days. When you're ready to eat, just reheat in the oven or microwave until warm. What are the best practices for freezing and reheating? If you want to save some for later, freezing is a great option. Allow the dish to cool completely before packing it. Use a freezer-safe container or wrap it tightly in plastic wrap. You can freeze it for up to three months. To reheat, let it thaw overnight in the fridge. Then, bake it in the oven at 350°F (175°C) until hot and bubbly. Enjoy your delicious meal again! Can I use frozen broccoli? Yes, you can use frozen broccoli. It saves time and cooks well. Just thaw the broccoli before mixing it in. This helps it blend nicely with the other ingredients. Can I prepare it in advance? Absolutely! You can make it ahead of time. Just mix all the ingredients and place them in the baking dish. Cover it and keep it in the fridge. Bake it when you are ready to eat. What to serve with Easy Chicken and Broccoli Bake? This dish pairs well with a fresh salad or garlic bread. You can also serve it with rice if you want more carbs. They add a nice contrast to the creamy bake. Can I skip the breadcrumbs? Yes, you can skip the breadcrumbs. The dish will still taste great without them. If you want some crunch, try crushed crackers or nuts instead. They can add a nice texture. For the complete recipe, check the [Full Recipe]. This dish combines simple ingredients like chicken, broccoli, and rice for a tasty meal. I shared step-by-step instructions to help you bake it perfectly. Use the tips to choose the best chicken and add your favorite flavors. Remember, you can store leftovers easily in the fridge or freezer. With these ideas, you can make this dish your own. Enjoy the process and make it a family favorite!](https://easycookingbite.com/wp-content/uploads/2025/06/1d2282e3-efae-4323-b7bd-b10d7441ae91.webp)
