
Latest & Greatest

Cinnamon Sugar Pretzel Bites Irresistible Snack Idea
Craving a sweet and salty snack? Look no further! Cinnamon Sugar Pretzel Bites are the ultimate treat to satisfy your
Read more…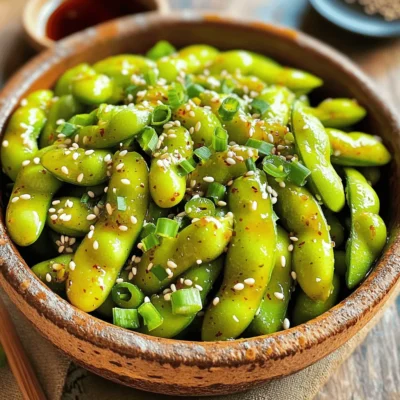
Spicy Garlic Edamame Flavorful and Easy Recipe
Are you ready to spice up your snack game? Today, I’ll share my simple recipe for Spicy Garlic Edamame. This
Read more…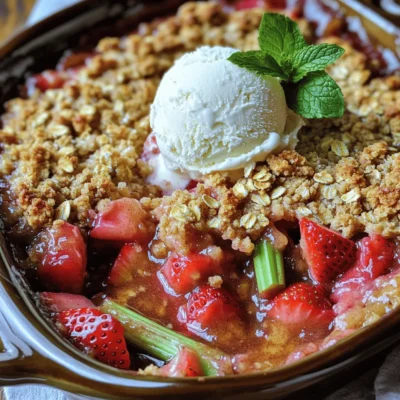
Strawberry Rhubarb Crisp Simple and Delicious Recipe
Craving a dessert that’s easy to make and bursting with flavor? You’re in the right place! This Strawberry Rhubarb Crisp
Read more…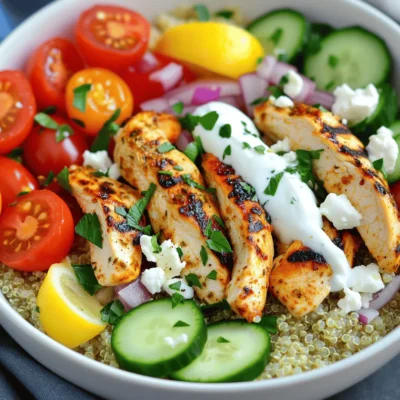
Greek Chicken Gyro Bowls Flavorful and Easy Recipe
Looking for a fresh and tasty meal idea? You’ll love Greek Chicken Gyro Bowls! This simple recipe combines juicy chicken
Read more…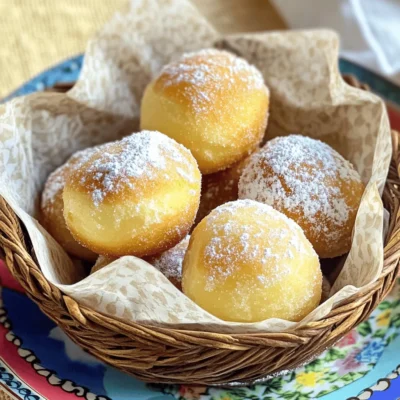
Air Fryer Donut Holes Tasty and Easy Recipe
Craving a sweet treat that’s simple and delicious? These Air Fryer Donut Holes are your answer! Made with common pantry
Read more…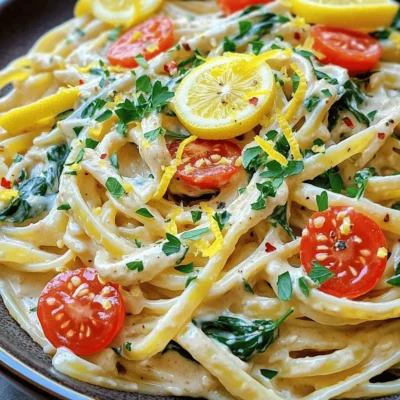
Creamy Lemon Garlic Hummus Pasta Delightful Dish
If you’re craving a simple yet flavorful dish, try my Creamy Lemon Garlic Hummus Pasta. This delightful recipe combines creamy
Read more…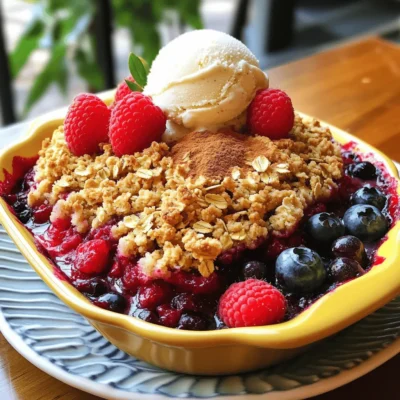
Triple Berry Crumble Delightful Berry Dessert Recipe
Are you ready to indulge in a delicious dessert? This Triple Berry Crumble is easy to make and packed with
Read more…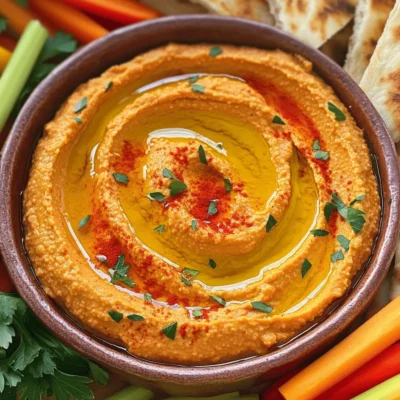
Roasted Red Pepper Hummus Simple and Tasty Recipe
Looking for a simple, tasty dip that packs a punch? This Roasted Red Pepper Hummus is perfect for any snack
Read more…browse recipes


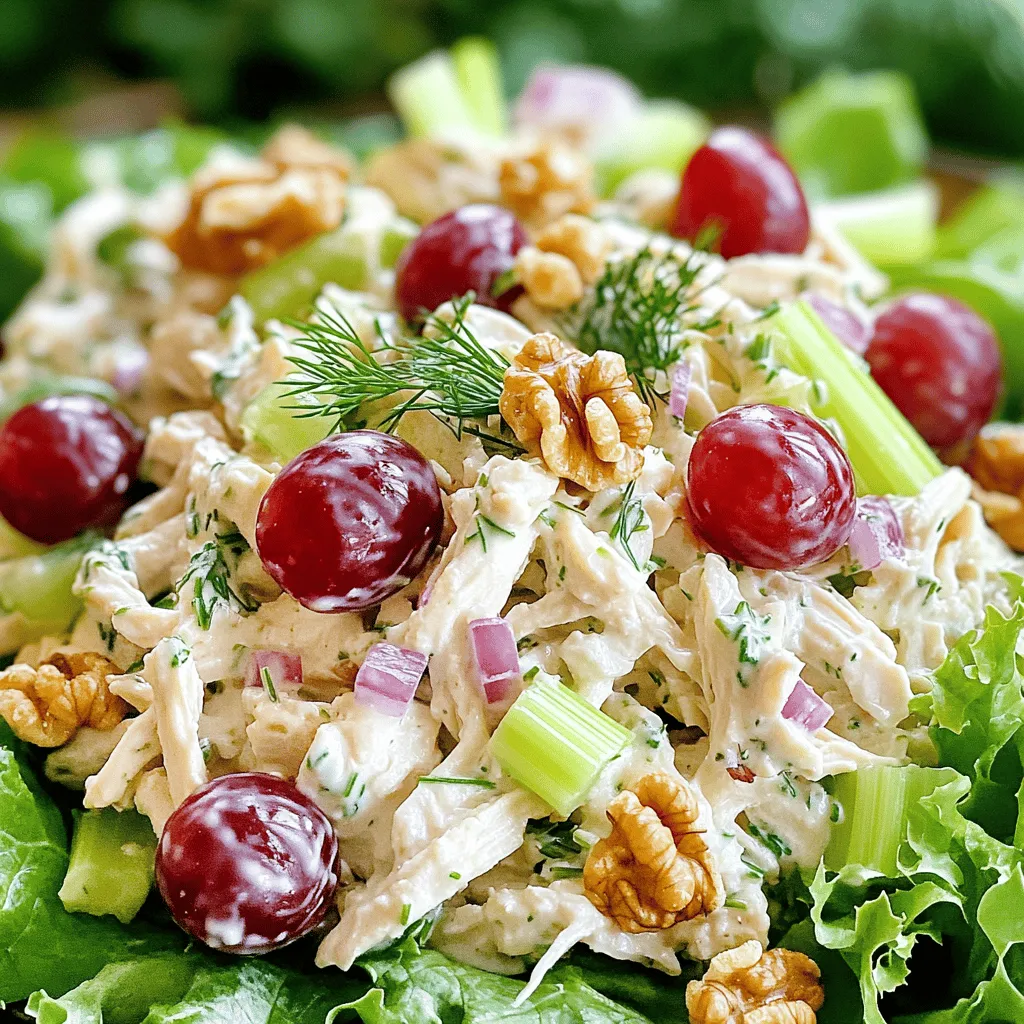
Greek Yogurt Chicken Salad Fresh and Flavorful Recipe
Looking for a fresh twist on a classic chicken salad? My Greek Yogurt Chicken Salad recipe is here to save your lunch! Packed with…
My Latest Drinks

Strawberry Cheesecake Smoothie Creamy Refreshing Treat
Craving something delicious and cool? The Strawberry Cheesecake Smoothie is your answer! It blends creamy cheesecake flavors with sweet strawberries Read Full Recipe-
Mocktail Pink Punch Refreshing and Easy Recipe
Are you ready to impress your guests with a delightful drink? This Mocktail Pink Punch recipe is both refreshing and Read Full Recipe -
Blue Lagoon Tropical Lemonade Refreshing and Zesty Drink
Looking for a drink that’s both refreshing and fun? Say hello to Blue Lagoon Tropical Lemonade! This colorful beverage packs Read Full Recipe -
Pumpkin Spice Coffee Creamer Flavorful Fall Treat
Are you ready to embrace the cozy vibes of autumn? In this blog post, I’ll guide you through making your Read Full Recipe -
Apple Cider Margarita Mocktail Refreshing Fall Drink
Fall is here, and that means it’s the perfect time for a cozy drink! The Apple Cider Margarita Mocktail offers Read Full Recipe -
Pumpkin Spice Latte Copycat Cozy and Comforting Recipe
Craving that warm, cozy feeling of fall? You can enjoy a delicious Pumpkin Spice Latte at home! In this article, Read Full Recipe


My Latest Dinners
-
White Bean Soup Simple and Hearty Delight
Looking for a warm and filling meal? Let me introduce you to white bean soup! This simple and hearty delight Read Full Recipe -
Garlic Herb Roasted Sweet Potatoes Flavorful Side Dish
Looking for a side dish that’s both tasty and easy to make? Garlic Herb Roasted Sweet Potatoes are the answer! Read Full Recipe -
One Pot Beef Taco Pasta Easy and Flavorful Meal
Looking for a quick and tasty meal? One Pot Beef Taco Pasta is the perfect dish! This recipe packs bold Read Full Recipe -
Garlic Chicken Zucchini Noodles Stir Fry Delight
Are you ready for a tasty twist on dinner? My Garlic Chicken Zucchini Noodles Stir Fry is a quick and Read Full Recipe -
Stuffed Italian Meatloaf Easy and Tasty Recipe
Are you ready to elevate your dinner game? This Stuffed Italian Meatloaf is both easy and tasty! In this article, Read Full Recipe -
One Pot French Onion Pasta Flavorful Comfort Dish
Looking for a cozy dinner that warms your soul? Try my One Pot French Onion Pasta! This creamy, rich dish Read Full Recipe


hey,
i’m !
I’m so happy you’re here!
Every dish I share is made with love and care. I hope they bring you the same comfort and joy they bring me. Let’s make memories, one recipe at a time.


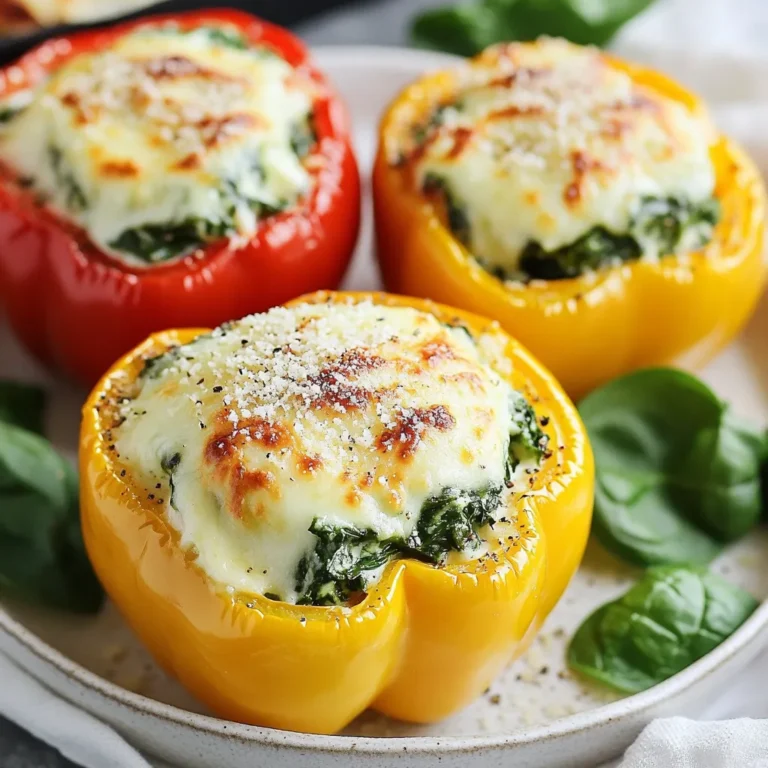
![- Bell peppers and their preparation Use 4 large bell peppers of any color. Cut off the tops and remove the seeds. Lightly brush the outside with olive oil. This helps them stay moist while baking. - Ground turkey and additional protein options You need 1 pound of ground turkey. For a different taste, you can swap it for chicken, beef, or plant-based meat. - Essential herbs and spices Add 1 teaspoon of cumin, 1 teaspoon of chili powder, and 1/2 teaspoon of smoked paprika. These spices give the dish a warm, rich flavor. Don’t forget to add salt and pepper to taste. - Optional toppings for serving Top your stuffed peppers with 1 cup of shredded cheese, like cheddar or Monterey Jack. Fresh cilantro adds a nice touch. You can also serve with a lime wedge for extra zest. For the full recipe, check out the details above. Prepping the bell peppers First, choose your bell peppers. I like using red, yellow, and green ones. Cut off the tops and take out the seeds. You want them hollow for stuffing. Brush the outside lightly with olive oil. This helps them roast nicely. Cooking the ground turkey Next, heat a medium skillet on medium heat. Add one pound of ground turkey. Cook it until it's brown, about five to seven minutes. Use a wooden spoon to break it apart as it cooks. This step adds flavor and keeps the turkey moist. Combining the filling ingredients Once the turkey is browned, add the filling. Mix in one cup of cooked quinoa, one can of black beans (drained and rinsed), one cup of corn, and one cup of diced tomatoes. Then add one teaspoon of cumin, one teaspoon of chili powder, and half a teaspoon of smoked paprika. Don’t forget salt and pepper to taste. Stir everything together and let it cook for another five minutes. Stuffing the peppers Now it’s time to fill the peppers. Carefully spoon the turkey mixture into each pepper. Pack it tightly to make sure they are full. Top each pepper with half of a cup of shredded cheese. Baking covered and uncovered Cover your baking dish with foil. Bake the stuffed peppers at 375°F (190°C) for 30 minutes. After that, take off the foil and bake them for another 10-15 minutes. You want the peppers to be tender and the cheese bubbly and golden. Cooling and garnishing When the peppers are done, take them out of the oven. Let them cool for a few minutes. This makes them easier to handle. Finally, garnish with fresh cilantro for a pop of color and flavor. Serve them up and enjoy! For the full recipe, check out the link above. To ensure even cooking, choose bell peppers of the same size. This helps them cook evenly. Also, make sure to pack the filling tightly. This keeps the peppers from falling over. For the perfect texture, don’t skip the pre-baking step. Bake the stuffed peppers covered for the first part of the time. This helps them soften. When you uncover them, the cheese gets golden. You want a nice, crispy top! For plate presentation, use a colorful platter. Stack the stuffed peppers upright for a fun look. Garnish with fresh cilantro and a lime wedge. This adds a bright touch. Pair your stuffed peppers with a light salad or some rice. A side of guacamole or chips adds crunch. You could even serve them with a zesty salsa for a flavor boost. Watch out for overfilling your peppers. This can cause them to spill over. Underfilling is also a mistake. You want them full but not overflowing. Keep an eye on the cooking times. If they bake too long, they can get mushy. Check them at the 30-minute mark. You want them tender but still firm enough to hold their shape. For more details, check out the Full Recipe. {{image_2}} You can easily adapt this recipe for different diets. For a vegetarian or vegan option, replace the ground turkey with lentils or chickpeas. These options provide protein and are tasty. Use quinoa as a base. You can also add veggies like mushrooms or zucchini for more texture. If you need gluten-free options, this recipe is already safe! All the ingredients are gluten-free. Just double-check your spice blends and sauces to ensure they are gluten-free too. To boost flavor, think about adding spices or sauces. A splash of hot sauce can give your peppers a nice kick. You could also mix in some taco seasoning for a fun twist. Creative ingredient swaps can change the dish. For instance, try adding olives or capers for a briny flavor. You can also use brown rice or farro instead of quinoa for a different texture. You can explore different styles with stuffed peppers. For a Mexican flair, add black beans, corn, and top with avocado slices. You could also mix in salsa for a fresh taste. For a Mediterranean twist, use feta cheese and add olives or artichokes. You can even substitute the ground turkey with lamb. This gives a rich and savory flavor that pairs well with herbs like oregano and thyme. These variations bring new life to stuffed bell peppers with ground turkey. Try them out for fun and tasty meals! For the complete recipe, check out the [Full Recipe]. To store leftovers safely, let the peppers cool first. Place them in an airtight container. You can keep them in the fridge for up to three days. When you want to reheat them, use the oven to keep them moist. Heat at 350°F for about 15-20 minutes, or until warm. This method ensures even heating without drying them out. If you want to freeze stuffed peppers, cool them completely. Wrap each pepper tightly in plastic wrap. Then, place them in a freezer-safe bag. They can last up to three months in the freezer. When ready to enjoy, take them out and thaw overnight in the fridge. Reheat in the oven at 350°F for 25-30 minutes. Cooked stuffed peppers last about three to four days in the fridge. Always check for freshness before eating. Signs of spoilage include a sour smell or mushy texture. If you notice either, it’s best to toss them out. Keeping an eye on these signs helps you enjoy your meal safely. Yes, you can prepare stuffed bell peppers in advance. Assemble the peppers and cover them. Store them in the fridge for up to 24 hours. When ready to cook, just pop them in the oven. This saves time on busy days. You can swap ground turkey for several other proteins. Ground chicken is a great choice. You could also use lean beef or pork. For a vegetarian option, try lentils or mushrooms. These options keep the dish tasty. The peppers are done when they are tender. You can test them with a fork. The cheese should be bubbly and slightly golden. This usually takes about 40 to 45 minutes in the oven. This recipe is not low-carb due to rice and beans. However, you can make it low-carb. Replace quinoa with cauliflower rice or skip beans. This keeps the flavor while lowering carbs. Absolutely! You can use any cheese you like. Mozzarella or feta cheese add unique flavors. Feel free to experiment with your favorites for a twist. Just ensure it melts well. For the full recipe, check out the details above. Stuffed bell peppers are easy and fun to make. We covered ingredients, cooking steps, and storage tips. Remember to adjust flavors to your liking, and don't fear exploring new variations. Cooking should be an adventure. Keep practicing and enjoy the tasty rewards. Use these insights to impress your family and friends with your cooking skills. You can serve healthy meals without stress. Embrace the whole process and create your perfect stuffed peppers!](https://easycookingbite.com/wp-content/uploads/2025/05/f5facf56-13d6-434d-b444-26971d31e743-300x300.webp)
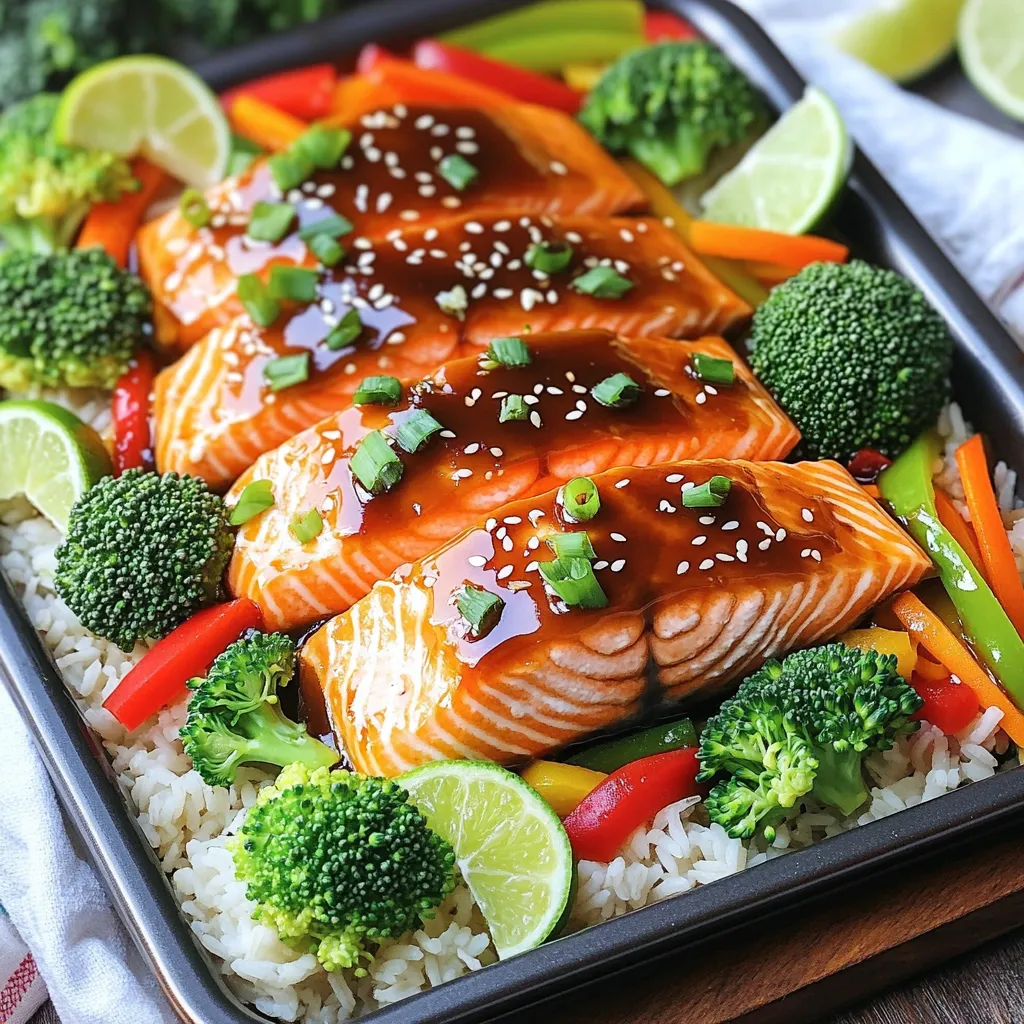
Sheet-Pan Teriyaki Salmon Rice Bowls Simple Recipe
Looking for a quick and tasty dinner idea? Try my Sheet-Pan Teriyaki Salmon Rice Bowls! This simple recipe packs healthy salmon, vibrant veggies, and…