


Latest & Greatest
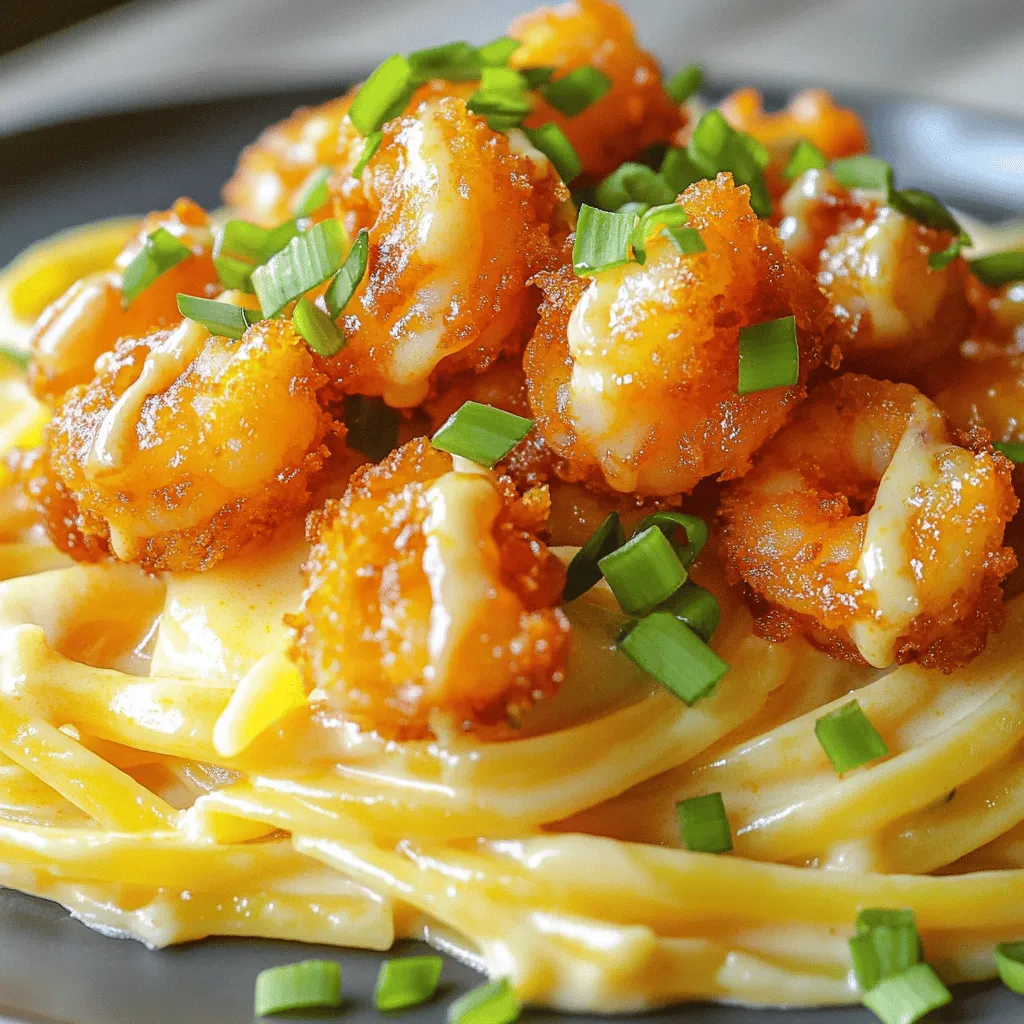
Bang Bang Shrimp Pasta Quick and Tasty Recipe
Craving a quick and tasty dinner? Look no further! This Bang Bang Shrimp Pasta recipe combines the perfect blend of
Read more…
Chorizo & Potato Egg Casserole Flavorful Comfort Dish
If you’re after a warm, filling dish that delights your taste buds, you’ve found it! The Chorizo & Potato Egg
Read more…
Banana Pudding Cheesecake Irresistible Dessert Recipe
Are you ready to indulge in a dessert that combines the best of two worlds? This Banana Pudding Cheesecake is
Read more…
Chinese Style Shrimp Fried Rice Flavorful Dinner Dish
If you’re craving a quick and tasty dinner, you’ve come to the right place! Chinese Style Shrimp Fried Rice is
Read more…
German Potato Dumplings Easy Recipe for Beginners
Are you ready to master a classic dish with ease? German potato dumplings are a warm and filling delight that
Read more…
Spinach Garlic Mozzarella Meatballs Tasty and Simple
Are you ready to spice up your dinner routine? Discover my Spinach Garlic Mozzarella Meatballs, a simple and tasty way
Read more…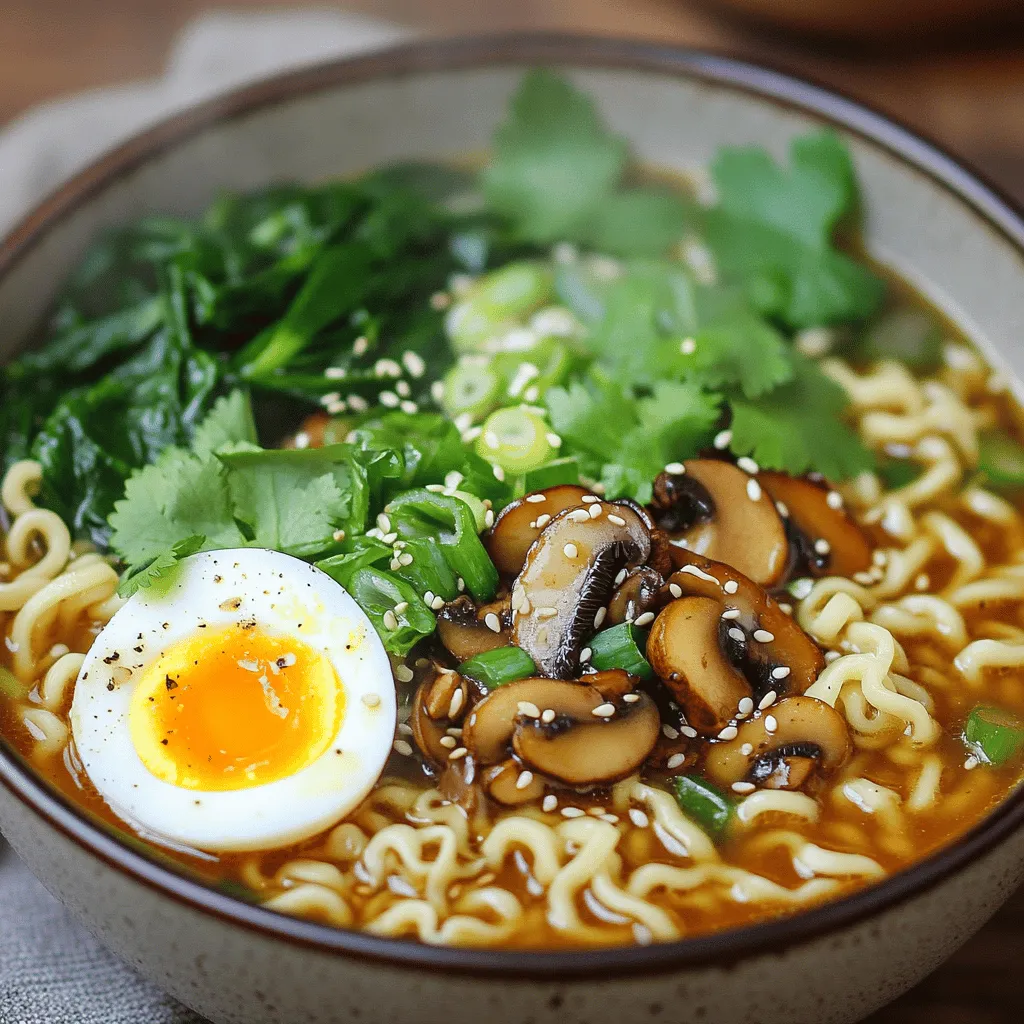
Asian Mushroom Ramen Noodles Flavorful and Simple Dish
Are you ready to dive into a bowl of comfort? Asian Mushroom Ramen Noodles offer you a tasty and simple
Read more…
Herb & Garlic Swirl Rolls Fluffy and Flavorful Delight
Welcome to your new favorite recipe: Herb & Garlic Swirl Rolls! These rolls are light, fluffy, and packed with flavor.
Read more…browse recipes


![To make Spicy Thai Peanut Noodles, you need the following fresh and vibrant ingredients: - 8 oz rice noodles - 1 cup bell peppers (mixed colors), thinly sliced - 1 cup carrots, julienned - 1 cup snap peas, trimmed - 1/4 cup green onions, chopped - 1/4 cup roasted peanuts, roughly chopped - 1 tablespoon sesame oil - 2 cloves garlic, minced - 1 tablespoon fresh ginger, minced - 1/4 cup peanut butter (creamy) - 3 tablespoons soy sauce - 1 tablespoon sriracha (adjust to taste) - 1 tablespoon lime juice - Salt and pepper to taste - Fresh cilantro, for garnish (optional) Gathering these ingredients sets you up for a quick and tasty meal. The rice noodles provide a soft base, while the veggies add crunch and color. Roasted peanuts give a delightful crunch, and the spicy sauce ties everything together. You can find the full recipe in the next section to guide you through the cooking process. Enjoy the mix of flavors! First, get a large pot and fill it with water. Bring the water to a boil. Once it boils, add 8 oz of rice noodles. Cook them according to the package instructions until they are al dente. This usually takes about 4 to 6 minutes. After that, drain the noodles in a colander. Rinse them under cold water to stop the cooking process. Set the noodles aside for later. Next, take a large skillet or wok. Heat 1 tablespoon of sesame oil over medium-high heat. Once the oil is hot, add 2 cloves of minced garlic and 1 tablespoon of minced ginger. Stir-fry these for about 30 seconds until they smell great. Add 1 cup of thinly sliced bell peppers, 1 cup of julienned carrots, and 1 cup of trimmed snap peas. Stir-fry the vegetables for about 3 to 4 minutes until they are tender but still crisp. In a small bowl, whisk together 1/4 cup of creamy peanut butter, 3 tablespoons of soy sauce, 1 tablespoon of sriracha, and 1 tablespoon of lime juice. Mix until the sauce is smooth. If it feels too thick, add a little warm water. Keep adding until it is just right for you. Now, add the cooked noodles to the skillet with the veggies. Pour the peanut sauce over the noodles. Toss everything together well so all the noodles are covered with sauce and mixed with veggies. Cook for another 2 to 3 minutes to heat everything through. Remove the skillet from heat. Stir in 1/4 cup of chopped green onions and 1/4 cup of roughly chopped roasted peanuts. Season with salt and pepper to taste. Serve the noodles in bowls. You can add garnishes like fresh cilantro or more crushed peanuts for extra flavor. Enjoy your delicious meal! For the full recipe, check the section above. To make the best Spicy Thai Peanut Noodles, always cook the noodles al dente. This means they should be firm but not hard. Overcooked noodles can turn mushy and lose their texture. Adjust the heat level with sriracha to fit your taste. Start with a little, then add more for extra spice. Using high heat for stir-frying is key. It helps the veggies stay crisp and bright. When you rinse the cooked noodles with cold water, it stops the cooking process. This keeps them from sticking together and helps them stay separate. Garnish your dish with fresh cilantro and extra peanuts for crunch. You can also add lime wedges on the side. A squeeze of lime adds a nice zing and enhances the flavors. For a fun twist, try serving the noodles in bowls for a pop of color. For the full recipe, visit [Full Recipe]. {{image_2}} You can easily make this dish gluten-free. Just swap rice noodles for gluten-free noodles made from rice or quinoa. For vegan options, skip the honey and use maple syrup or agave nectar instead. You can also choose a vegan-friendly sauce instead of soy sauce. If you want to change the veggies, try using zucchini, broccoli, or green beans instead of bell peppers, carrots, and snap peas. Seasonal veggies like asparagus or mushrooms can also work great. They add a fresh twist to your meal. For extra protein, add tofu or chicken. If using tofu, choose firm tofu for the best texture. Sauté it until golden brown before adding it to the dish. For chicken, slice it thinly and cook it in the skillet first. Make sure it is cooked through before adding the noodles. These variations keep your meal exciting and allow you to cater to your taste or dietary needs while preparing Spicy Thai Peanut Noodles. For the complete recipe, check out the Full Recipe section. To keep your Spicy Thai Peanut Noodles fresh, store leftovers in a tight container. Make sure the lid seals well. This helps prevent air and moisture from ruining your meal. In the fridge, these noodles will last for about 3 to 4 days. Always check for any signs of spoilage before eating. You can freeze this dish for later use. To do this, let the noodles cool completely first. Then, place them in a freezer-safe container. Make sure to remove as much air as possible before sealing. This will help prevent freezer burn. When you want to eat them, thaw the noodles overnight in the fridge. When it’s time to enjoy your noodles again, the best way to reheat them is in a skillet. Heat it over medium-low heat and add a splash of water or broth. This helps keep the noodles from drying out. Stir often until everything is hot. Avoid using a microwave if you want to keep the texture nice. Microwaves can make them soggy, which isn't ideal for this tasty dish. Spicy Thai Peanut Noodles can last about 3 to 4 days in the fridge. To keep them fresh, store them in an airtight container. This helps prevent them from drying out or absorbing other odors. Always check for any signs of spoilage before eating. Yes, you can prepare Spicy Thai Peanut Noodles ahead of time. Cook the noodles and veggies, then store them separately from the sauce. Mix everything together just before serving. This keeps the noodles and veggies crisp and fresh. If you have a peanut allergy, you can use sunflower seed butter or almond butter. Both options give a creamy texture. You can also try tahini, which is made from sesame seeds. Each choice will alter the flavor slightly, but they all work well. The spice level of Spicy Thai Peanut Noodles depends on how much sriracha you use. For a mild dish, reduce the sriracha. For more heat, add more sriracha or even some chili flakes. You can always adjust it to match your taste. To make Spicy Thai Peanut Noodles nut-free, simply skip the peanut butter. Use sunflower seed butter or tahini instead. You can also omit the peanuts on top and use crispy rice or seeds for crunch. This way, everyone can enjoy the dish safely. For the complete recipe, check out the Full Recipe section. This recipe for Spicy Thai Peanut Noodles is a great way to enjoy tasty food. We used fresh rice noodles, colorful veggies, and a creamy peanut sauce. Each step is easy to follow, from cooking the noodles to stir-frying your ingredients. You can tweak the spice and swap ingredients based on your diet. Don't forget, storing leftovers correctly can save you time later. With these tips and tricks, you can create a dish that's not only delicious but fills you with pride. Enjoy cooking and sharing this flavorful meal!](https://easycookingbite.com/wp-content/uploads/2025/05/1422fd01-6c3b-4009-bff6-77db76e1965e.webp)
Spicy Thai Peanut Noodles Flavorful and Quick Recipe
Are you craving a delicious, quick meal? Look no further! My Spicy Thai Peanut Noodles offer bold flavors in under 30 minutes. With vibrant…
My Latest Desserts
-

Peach Streusel Coffee Cake Delightful and Simple Recipe
If you love a good coffee cake, you’ll adore my Peach Streusel Coffee Cake recipe. It’s sweet, moist, and full Read Full Recipe -

Easy Lemon Loaf Cake Simple and Tasty Recipe
If you love bright, citrusy treats, then this Easy Lemon Loaf Cake is for you! It’s simple to make and Read Full Recipe -

Frozen Yogurt Granola Cups Delightful and Healthy Treat
Looking for a cool and tasty treat? Frozen yogurt granola cups are the answer! These delightful snacks blend creamy yogurt Read Full Recipe -

Raspberry Lemon Yogurt Parfait Tasty and Simple Treat
Looking for a quick, delicious treat? My Raspberry Lemon Yogurt Parfait is simple to make and bursting with flavor! This Read Full Recipe -
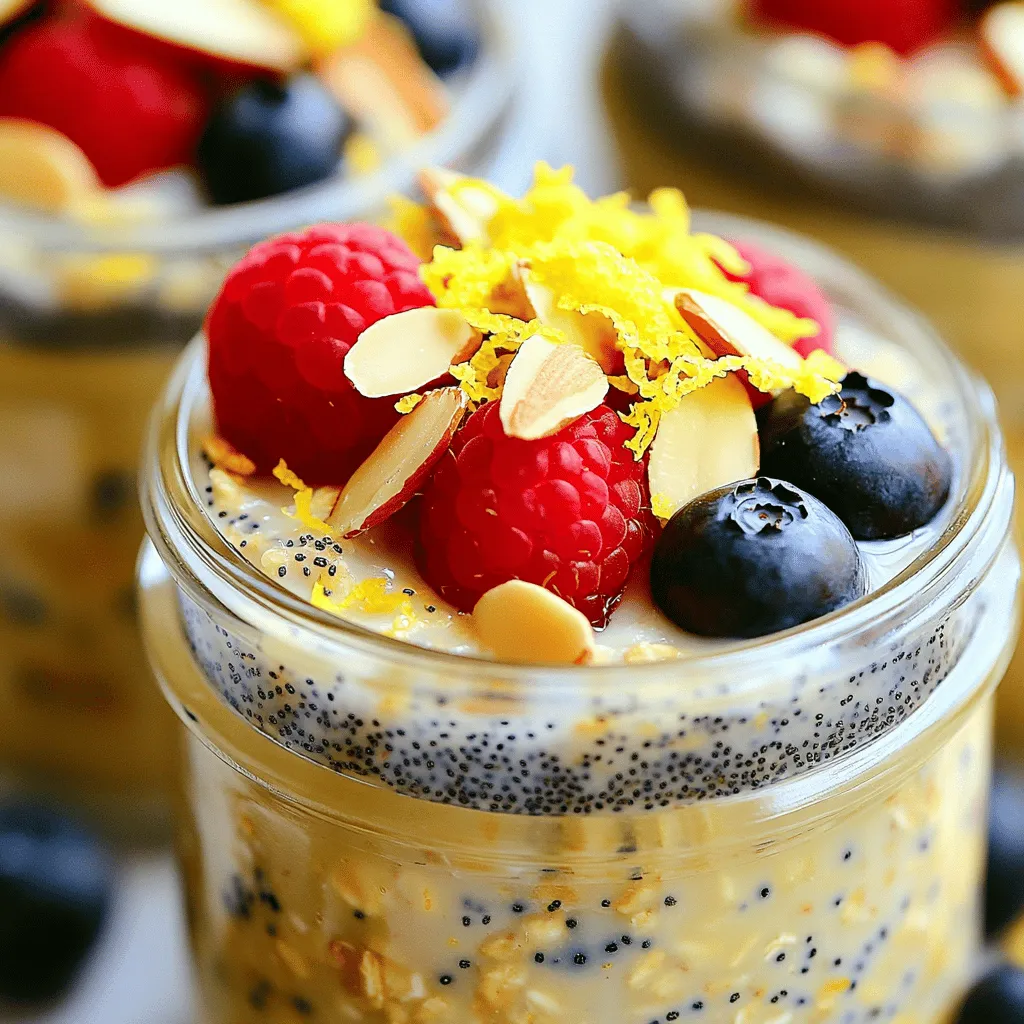
Lemon Poppyseed Overnight Oats Quick and Easy Recipe
Wake up to a burst of fresh flavor with my Lemon Poppyseed Overnight Oats recipe! This quick and easy breakfast Read Full Recipe -

Peanut Butter Energy Balls Easy Healthy Snack Recipe
Looking for a tasty treat that’s also healthy? Peanut Butter Energy Balls are your answer! This easy snack recipe packs Read Full Recipe -

Banana Nut Muffins Delightfully Soft and Tasty Recipe
Are you ready to bake the softest, tastiest banana nut muffins ever? I’ll take you through a simple recipe that Read Full Recipe -

Chocolate Peanut Butter Nice Cream Easy and Tasty Treat
Craving a delicious treat that’s both easy and healthy? Chocolate Peanut Butter Nice Cream is your answer! This creamy dessert Read Full Recipe -

Vegan Chocolate Mousse Rich and Creamy Dessert Recipe
Craving a rich, creamy dessert that’s completely plant-based? Look no further! This Vegan Chocolate Mousse is simple to make and Read Full Recipe -

Delicious Banana Oatmeal Pancakes Healthy Breakfast Option
Start your day right with delicious banana oatmeal pancakes! These pancakes are healthy, easy to make, and full of flavor. Read Full Recipe
My Latest Recipes

hey,
i’m !
I’m so happy you’re here!
Every dish I share is made with love and care. I hope they bring you the same comfort and joy they bring me. Let’s make memories, one recipe at a time.
![- 4 cups chicken broth (or vegetable broth for vegetarian option) - 1 tablespoon fresh ginger, grated - 2 green onions, finely chopped (plus extra for garnish) - 2 large eggs, beaten - 2 tablespoons cornstarch - 3 tablespoons water - Salt and pepper to taste - Sesame oil, for drizzling - Optional: A handful of fresh spinach or kale To make Easy Egg Drop Soup, you need simple, fresh ingredients. Start with chicken or vegetable broth for a warm base. Fresh ginger adds a nice zing. Green onions give it a bright flavor. The eggs will create those lovely silky ribbons in the soup. Cornstarch and water help thicken it slightly. Don’t forget salt and pepper for seasoning, along with a drizzle of sesame oil for depth. If you want, toss in some fresh spinach or kale for added nutrition. This recipe is not just quick; it’s also flexible. You can mix and match based on what you have on hand. For the full recipe, check out the details provided above. 1. First, grab a medium pot. Pour in 4 cups of chicken or vegetable broth. 2. Heat the broth over medium heat. Add 1 tablespoon of grated ginger. 3. Bring this mix to a gentle boil. Now it’s time for the next step! 4. In a small bowl, mix 2 tablespoons of cornstarch with 3 tablespoons of water. Stir until smooth. 5. Slowly whisk this mix into the boiling broth. This will help thicken the soup. 6. Let the broth simmer for about 5 minutes. Season with salt and pepper to taste. 1. If you want extra greens, add a handful of fresh spinach or kale. Let it wilt for a minute. 2. Next, reduce the heat to low. Slowly drizzle in the beaten eggs while stirring gently. 3. This creates silky ribbons of egg in the soup. Watch as they swirl beautifully! 1. Once the eggs are mixed in, remove the pot from heat. 2. Stir in 2 finely chopped green onions for added flavor. 3. Drizzle a few drops of sesame oil on top. This gives a nice finish to your soup. 4. Serve hot and enjoy your warm bowl of Easy Egg Drop Soup! For the complete recipe, check out the [Full Recipe]. To bring more flavor to your egg drop soup, try adding spices. A pinch of white pepper can add warmth. You can also mix in a dash of chili oil for some heat. Fresh herbs like cilantro or parsley can brighten the soup. If you want deeper flavor, use low-sodium chicken broth. For a vegetarian option, vegetable broth works well too. You might even try adding a splash of soy sauce for umami. When you add eggs, whisk them gently in a circular motion. This helps create lovely ribbons in your soup. If you pour too quickly, you could end up with clumps. For the right thickness, add cornstarch slowly. If your soup seems too thick, just add a bit more broth. No need to worry; you can always adjust the thickness as you cook. Egg drop soup is best served hot. A simple bowl works fine, but a nice china bowl can elevate the meal. Add extra green onions on top for a burst of color. You can also serve it with crispy wontons or rice. For a full meal, pair it with a light salad or some steamed dumplings. This adds both taste and texture to your meal. {{image_2}} For a vegetarian egg drop soup, use vegetable broth instead of chicken broth. This choice keeps the flavor light and fresh. If you want a vegan option, consider using silken tofu or chickpea flour mixed with water as an egg substitute. Silken tofu gives a creamy texture, while chickpea flour creates a similar consistency to eggs. If you want to make your soup heartier, add shredded chicken or tofu. Shredded chicken brings a nice protein boost, making the soup filling. Tofu is a great choice for a plant-based meal and absorbs the broth's flavors. For seafood lovers, try adding shrimp or crab. These ingredients bring a new taste and texture to the dish. To enhance the taste, you can add Asian-inspired flavors. A splash of soy sauce or a sprinkle of sesame seeds will elevate the soup. If you like spice, consider adding chili oil or red pepper flakes. These options give the soup a warm kick, making it exciting and flavorful. Store your egg drop soup in the fridge. Use an airtight container to keep it fresh. Let the soup cool before sealing the container. This helps avoid extra moisture. You can keep it in the fridge for up to three days. Reheat your soup gently on the stove. Use low heat to avoid overcooking the eggs. Stir the soup often to keep the texture smooth. You can also use the microwave, but do it in short bursts. Stir in between to ensure even heating. You can freeze egg drop soup, but it may change texture. To freeze, let it cool completely. Pour it into a freezer-safe container, leaving space for expansion. It can last for up to three months. When ready to eat, thaw it in the fridge overnight. Reheat gently to restore its flavor. Egg drop soup can last about 3 to 4 days in the fridge. Store it in an airtight container. If you see any signs of spoilage, like a sour smell or mold, do not eat it. Always check the soup before you eat it again. Yes, you can use egg substitutes if you have an egg allergy. Silken tofu works well to mimic the texture of eggs. You can also try flaxseed meal mixed with water. Another option is to use commercial egg replacers. Each substitute can change the final taste, so pick one that you like best. Egg drop soup pairs well with many dishes. Try serving it with steamed rice or dumplings for a hearty meal. You can also add a fresh salad or some spring rolls. These options will make your meal more complete and tasty. You can make egg drop soup easily with basic ingredients like broth, eggs, and ginger. Follow the steps for adding flavors and egg ribbons for a perfect texture. Don’t forget to try variations for different diets, and enjoy your delicious soup with the right sides. Store leftovers properly to keep them fresh. With this guide, you can impress your family and friends with your cooking skills. Enjoy creating your own bowls of comfort!](https://easycookingbite.com/wp-content/uploads/2025/06/c2e32b75-3f87-4cbc-b297-4e3cc569c19b-300x300.webp)
![- Fresh spinach leaves - Strawberries - Feta cheese - Almonds - Red onion - Balsamic vinegar - Honey - Olive oil - Salt and pepper When I create a Strawberry Spinach Salad, I always choose fresh ingredients. Fresh spinach leaves serve as the base of the salad. They provide a crisp texture and a vibrant green color. Strawberries add a sweet and juicy touch that brightens up the dish. Feta cheese brings a creamy and tangy flavor. It pairs well with the sweet strawberries. I like to use crumbled feta for an even spread of flavor. Sliced almonds add a nice crunch and nutty taste. They also enhance the salad's texture. Red onion gives a mild bite to the salad. I recommend slicing it thin for best results. The dressing consists of balsamic vinegar, honey, and olive oil. This mix balances sweetness and acidity. A touch of salt and pepper brings out all the flavors. - Health benefits of spinach - Nutritional value of strawberries - Feta cheese and its pros Spinach is a powerhouse of nutrients. It's rich in vitamins A, C, and K. It also has iron and antioxidants. Eating spinach may help improve bone health and boost immunity. Strawberries are low in calories and high in fiber. They provide vitamin C, which is great for your skin. These sweet berries may also support heart health and reduce inflammation. Feta cheese is lower in fat than many other cheeses. It offers calcium and protein. The creamy texture enhances the salad while adding essential nutrients. - Mixing bowls - Whisk - Salad spinner (optional) - Serving platter To make this salad, you need a few simple tools. Mixing bowls help combine the dressing and salad. A whisk is great for mixing the dressing smoothly. If you want to dry your spinach, a salad spinner is useful but not required. Finally, a serving platter presents the salad beautifully. It makes the vibrant colors pop and invites you to dig in. If you want to impress guests, use a nice platter for serving. For the complete recipe, check out the Full Recipe. To make the dressing, start by whisking together balsamic vinegar, honey, and olive oil. Add a pinch of salt and pepper for taste. Mix until smooth. This blend gives the salad a nice zing and a touch of sweetness. You can adjust the sweetness and acidity to your liking. If you want it sweeter, add more honey. If you prefer a tangy taste, add extra balsamic vinegar. It's all about what you enjoy! Next, grab a large mixing bowl. Add fresh spinach leaves as your base. This leafy green packs a punch of nutrients. Layer in the sliced strawberries, crumbled feta cheese, sliced almonds, and thinly sliced red onion. Gently fold in the ingredients. This keeps your spinach nice and crisp. You don’t want to bruise the leaves. Each bite should be fresh and full of flavor! Now, drizzle your prepared dressing over the salad. Toss gently until everything is evenly coated. This step makes sure each ingredient shines. Taste your salad, and adjust with more salt or pepper if needed. Transfer the salad to a serving platter or individual bowls. For a lovely presentation, garnish with whole strawberries and a sprinkle of feta on top. Serve chilled for the best flavor. Enjoy your fresh and colorful strawberry spinach salad! For the complete recipe, check out the Full Recipe. Choosing ripe strawberries Look for strawberries that are bright red with no white spots. They should feel firm but slightly soft to the touch. Smell them too! Ripe strawberries have a sweet fragrance. You want the best flavor for your salad. Storing spinach properly Keep spinach fresh by storing it in the fridge. Use a paper towel to wrap the leaves. Place them in a plastic bag, but don't seal it tight. This way, the spinach gets air and stays crisp longer. Overdressing the salad Less is more with dressing. If you add too much, it can drown the fresh flavors. Start with a small amount and add more if needed. Remember, you can always add more, but you can't take it out! Cutting ingredients too large Cut strawberries and onions into small pieces. This helps them mix well with spinach. Large pieces can be hard to eat and may not blend the flavors right. Adding herbs like basil or mint Fresh herbs bring a new level of flavor. Try adding chopped basil or mint leaves to your salad. They add a cool taste that pairs well with the strawberries. Using flavored oils or vinegars Switch up your dressing! Use flavored olive oils or vinegars for a twist. Try garlic-infused oil or raspberry vinegar to make your salad pop. These small changes make a big difference in taste. For a full guide on making this salad, check out the [Full Recipe]. {{image_2}} You can switch up the cheese in your salad for new flavors. Goat cheese adds a creamy, tangy taste. It pairs well with strawberries. Blue cheese gives a bold flavor; it adds a nice contrast to the sweet fruit. Each cheese brings its unique touch, making the salad even more special. Want to make your salad heartier? Adding proteins is a great way. Grilled chicken or shrimp brings a savory element. They also provide great texture. For a vegetarian option, toss in chickpeas. They are filling and add a nice crunch. This way, you can enjoy a balanced meal all in one bowl. Fruits can really change the game! In addition to strawberries, think about adding blueberries or peaches. They add sweetness and color. You can also use citrus fruits like mandarin oranges. Their bright flavor cuts through the richness of the cheese and dressing. This adds a refreshing twist, perfect for any season. Don't forget to check the Full Recipe for all the details you need to create your delightful Strawberry Spinach Salad! To keep your strawberry spinach salad fresh, store it in an airtight container. This will help prevent it from wilting. Place it in the fridge right after serving. The salad stays good for about 1 to 2 days. If you notice the spinach gets soggy, toss the salad before eating. You can make parts of the salad ahead of time. Wash and dry the spinach, then store it in the fridge. Slice the strawberries and store them separately. You can crumble the feta cheese in advance, too. Just keep all the components separate. Assemble the salad just before serving. This keeps everything fresh and crunchy. You cannot freeze the entire salad. Freezing salad will ruin the texture. However, you can freeze some individual parts. For example, you can freeze sliced strawberries or crumbled feta. Just remember to use them within 3 months. Thaw them in the fridge before adding to your salad. This helps maintain flavor and texture. For the best taste, refer to the Full Recipe before freezing. To make this salad without feta, you can use other cheeses. Goat cheese works well. If you want a dairy-free option, try avocado or tofu. Both add creaminess and nutrition. You can also skip the cheese altogether. The salad will still taste great. Yes, you can prepare this salad ahead of time. To keep it fresh, store the dressing separately. Mix the spinach, strawberries, and other toppings in a bowl. Add the dressing only when you are ready to serve. This will prevent the salad from getting soggy. You can use many nuts in this salad. Walnuts or pecans are great alternatives to almonds. They add a nice crunch and flavor. Each type of nut has health benefits. Walnuts are high in omega-3s, while pecans are full of antioxidants. Feel free to mix and match to find your favorite! This blog post covered a delicious Strawberry Spinach Salad. We explored its fresh ingredients, like spinach, strawberries, and feta. The salad is not only tasty, but it also offers great health benefits. I shared tips for making it, from mixing dressing to assembling the salad. Variations can boost your meal, like adding proteins or using different fruits. Remember to store leftovers properly for later enjoyment. Now you can make this salad with confidence and creativity. Enjoy your healthy eating journey!](https://easycookingbite.com/wp-content/uploads/2025/06/a5225d00-7f20-47a1-b695-8fe3b5fa3309-300x300.webp)

![- 2 cups cooked jasmine rice (preferably day-old) - 1 cup diced chicken breast - 1 cup mixed frozen vegetables (carrots, peas, corn) - 2 tablespoons sesame oil - 1 tablespoon vegetable oil - 2 eggs, beaten - 2 green onions, finely sliced - 3 tablespoons soy sauce - 2 cloves garlic, minced - Salt and pepper to taste Using the right ingredients makes your chicken fried rice shine. Day-old jasmine rice gives the best texture. Freshly cooked rice can be too sticky. Diced chicken breast adds protein and keeps the meal light. Mixed frozen vegetables are quick and colorful. They bring nutrients and crunch. You can add sesame oil for a nutty flavor. Vegetable oil helps fry ingredients without burning. Beaten eggs give creaminess and richness. Green onions add a fresh bite and color. For flavor, soy sauce is key. It gives that savory umami taste. Minced garlic adds a lovely aroma. Finally, season with salt and pepper. This perfect blend makes a tasty chicken fried rice. For the full recipe, check out the cooking instructions. To start, use cooked jasmine rice. I recommend day-old rice. It dries out a bit, which helps the fried rice stay fluffy. If you don’t have day-old rice, cook the jasmine rice and let it cool completely. Next, take your chicken breast and dice it into small pieces. Aim for uniform sizes. This helps the chicken cook evenly. Now, heat a large skillet or wok over medium-high heat. Add vegetable oil and let it warm. This step is crucial for a nice sear on your chicken. Once the oil is hot, add the diced chicken to the skillet. Cook it for about 5 to 7 minutes. You want it browned and fully cooked. When done, remove the chicken and set it aside. In the same skillet, add minced garlic. Sauté it for about 30 seconds. You want it fragrant but not burnt. Next, push the garlic to one side. Add beaten eggs to the other side of the skillet. Scramble them until cooked, then mix them with the garlic. Now, add your mixed frozen vegetables. Stir-fry them for 2 to 3 minutes. You want them heated through but still crisp. Return the cooked chicken to the skillet. Add the cooked jasmine rice, soy sauce, and sesame oil. Stir everything together. Make sure the rice gets well-coated with the sauces. Finally, add sliced green onions. Season with salt and pepper to taste. Mix well for another minute. Your easy chicken fried rice is now ready! Check out the Full Recipe for more details. Using day-old rice is key. Freshly cooked rice can be too wet. It clumps together when you fry it. Day-old rice dries out a bit, making it perfect for stir-frying. This keeps each grain separate and fluffy. When cooking chicken, ensure it cooks evenly. Cut the chicken into small, even pieces. This helps it cook faster and more evenly. Brown the chicken for flavor. It adds depth to the dish. Soy sauce is a main ingredient. Adjust its amount to match your taste. If you like it salty, add more. For a lighter flavor, use less. Experiment with spices for extra zing. Ginger or chili flakes work well. They can change the whole dish. A little can make your fried rice exciting. High heat is essential for stir-frying. It cooks food quickly and gives a nice char. Make sure your skillet or wok is hot. This helps seal in flavors and keeps ingredients crisp. Timing is crucial when cooking each item. Cook chicken first, then add garlic and eggs. This ensures everything is cooked perfectly. Add vegetables next and stir-fry quickly. Lastly, mix in the rice and sauces. This order keeps each part tasty and fresh. {{image_2}} You can mix up the protein in your chicken fried rice. Shrimp is a great choice. It cooks quickly and adds a nice flavor. Just toss it in at the same time as you would the chicken. Tofu is another option. It’s perfect for a vegetarian meal. Use firm tofu and cube it. Sauté it until golden for the best taste. If you want something heartier, try pork or beef. Diced pork works well and has great flavor. Beef adds a rich taste, too. Just cook it until brown before adding the rice. Fresh veggies can change the flavor of your fried rice. You can add bell peppers, broccoli, or snap peas. Each veggie brings a new crunch and taste. Think about the season, too. In summer, fresh corn or zucchini is tasty. In winter, use carrots and green beans for a warm touch. Customizing your veggies keeps the dish exciting. Sauce can really boost the taste of your fried rice. You might like teriyaki sauce for a sweet twist. Just add a bit when mixing in the rice. Try new herbs and spices to create depth. Ginger adds warmth, while chili flakes give some heat. Experiment to find your perfect blend! For the full recipe, check out the [Full Recipe]. After you finish your meal, let the chicken fried rice cool. This step helps keep it fresh. Place the cooled rice in airtight containers. This way, it stays tasty for a few days. You can store it in the fridge for up to four days. If you need to keep it longer, freezing is a good option. When you want to enjoy your leftovers, there are great ways to reheat fried rice. The best method is to use a skillet. Heat it on medium heat and add a splash of water. This helps steam the rice and keep it moist. Stir it often to avoid burning. Another option is the microwave. Use a microwave-safe bowl, cover it, and heat in short bursts. To prevent sogginess, never add too much water. If you do, the rice will turn mushy. A little goes a long way! If you want to freeze chicken fried rice, start by packing it in freezer-safe bags. Make sure to remove as much air as possible. This keeps the rice from getting freezer burn. You can freeze it for up to three months. When you’re ready to eat it, take it out of the freezer. Leave it in the fridge overnight to thaw. After it’s thawed, use the skillet method to reheat. This keeps the rice fluffy and delicious. Enjoy your meal again with ease! For the full recipe, check out the details above. No, you should not use uncooked rice for fried rice. Fried rice needs pre-cooked rice. Using day-old cooked rice gives you the best texture. Fresh rice can be too sticky. It clumps together and does not fry well. When you use cold, cooked rice, it separates nicely in the pan. This makes the dish light and fluffy. You can easily add some heat to your chicken fried rice. Here are a few ways to spice it up: - Add chopped fresh chili peppers or jalapeños while cooking. - Mix in some red pepper flakes with the soy sauce. - Use spicy soy sauce or sriracha for a kick. - Stir in some chili paste to the oil before cooking. Experiment with these options to find your favorite heat level. Fried rice pairs well with many dishes. Here are some delicious options: - Serve with sweet and sour chicken for a tasty combo. - Pair it with spring rolls for a crunchy side. - Enjoy it with a bowl of hot soup. - Try it alongside grilled veggies for extra color. These sides will enhance your meal and make it even better. In this guide, we explored how to make delicious chicken fried rice. We covered essential ingredients like jasmine rice and chicken, plus tasty options like eggs and green onions. The steps included prepping and cooking, along with tips for perfecting flavors. You can also customize with different proteins and veggies. For storage, remember to cool and use airtight containers. Now, with these skills, you can create your own tasty fried rice at home! Enjoy experimenting and make it your own!](https://easycookingbite.com/wp-content/uploads/2025/06/0f7e139d-bd89-4d69-a6bd-2d2e6fd22afb-300x300.webp)
Peanut Butter Cup Brownies Indulgent and Simple Treat
Are you ready for a treat that blends rich chocolate with creamy peanut butter? These Peanut Butter Cup Brownies are not just delicious; they’re…