


Latest & Greatest
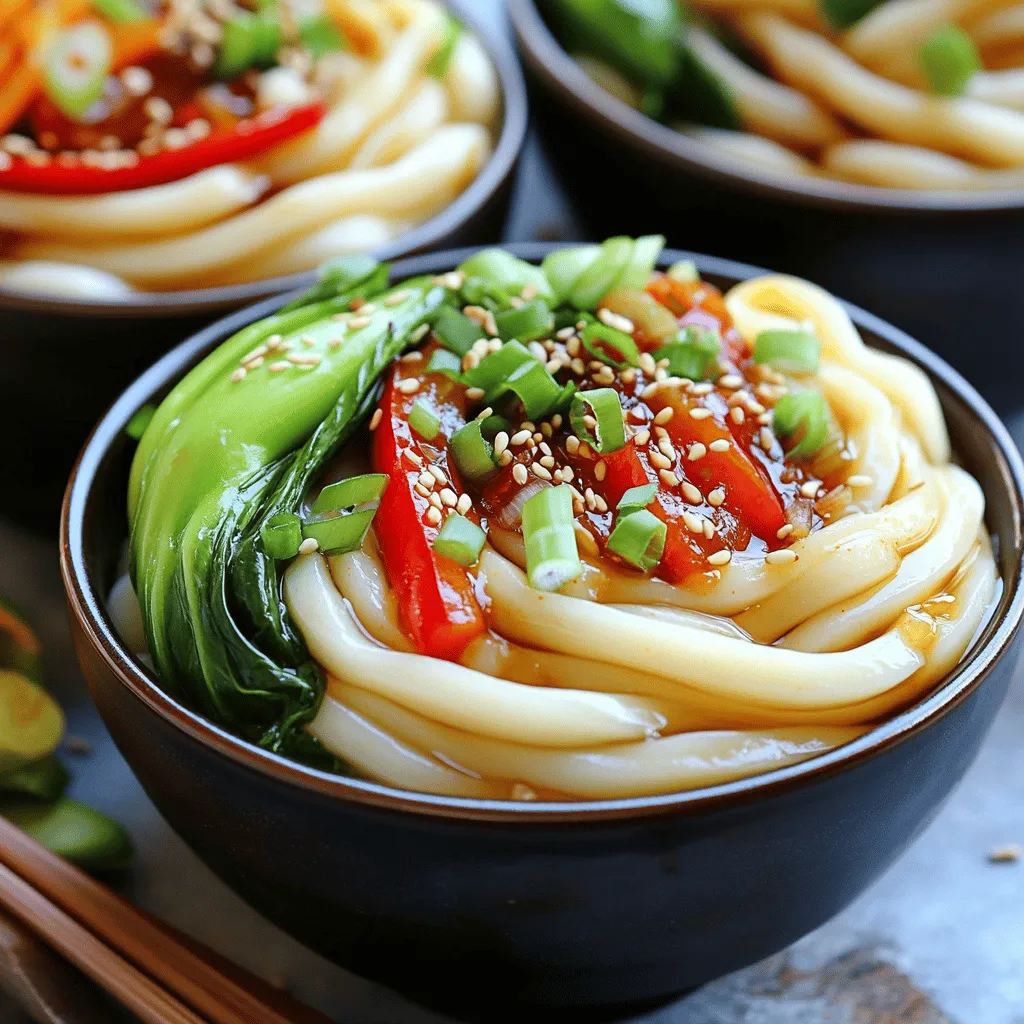
Chili Oil Udon Noodles Quick and Flavorful Stir-Fry
Are you ready to spice up your dinner routine? Chili Oil Udon Noodles are quick, tasty, and perfect for a
Read more…
Coconut Cream Pie Scrumptious and Simple Recipe
If you love desserts that are sweet and creamy, you will adore this Coconut Cream Pie recipe. It’s easy to
Read more…
Crispy Fried Chicken Delightfully Easy to Prepare
Do you crave crunchy, juicy fried chicken that’s easy to make? You’re in the right place! I’ll guide you through
Read more…
Tangy Lemon Garlic Roasted Carrots Flavorful Side Dish
Are you ready to elevate your dinner game with a vibrant, delicious side dish? Tangy Lemon Garlic Roasted Carrots are
Read more…
Crockpot Mexican Chicken Flavorful and Easy Recipe
Looking for a simple, tasty dinner idea? This Crockpot Mexican Chicken recipe is your answer. With just a few easy
Read more…
Spring Hash Brown Crust Quiche Flavorful and Easy Meal
Spring Hash Brown Crust Quiche offers a fresh twist on an easy classic. With crispy hash browns as the crust,
Read more…browse recipes


![- 4 chicken thighs (bone-in, skin-on for best flavor) - 1/4 cup honey - 1/4 cup soy sauce (low-sodium preferred) - 2 cloves garlic, minced - 1 tablespoon ginger, minced - 1 tablespoon rice vinegar - 2 green onions, sliced - Sesame seeds (for garnish, optional) - 1/4 teaspoon crushed red pepper flakes (optional, for heat) Gather these ingredients before starting. The chicken thighs give a juicy bite. Honey adds sweetness, while soy sauce gives depth. Garlic and ginger bring warmth and spice. Rice vinegar balances the flavors. For a little crunch, use green onions and sesame seeds. The crushed red pepper flakes can add heat if you like spice. This simple list makes for a tasty dish. Check the [Full Recipe] for more details. How to marinate the chicken To marinate the chicken, mix honey, soy sauce, garlic, ginger, rice vinegar, sesame oil, black pepper, and red pepper flakes in a bowl. Place the chicken thighs in a zip-top bag or a shallow dish. Pour the marinade over the chicken and seal or cover it. Let it sit in the fridge. Importance of marinating time Marinating time is key. It allows the chicken to soak up all the flavors. I recommend at least one hour. For the best taste, let it marinate overnight. This makes the chicken juicy and full of flavor. Preheat the oven: Why it matters Preheating your oven to 400°F (200°C) is important. It helps the chicken cook evenly. A hot oven gives the skin a nice crisp. Without preheating, your chicken may turn out soggy. Arrangement and baking guidelines After marinating, take the chicken out. Let the excess marinade drip off. Place the chicken on a baking sheet lined with foil or parchment paper, skin side up. This makes cleanup easy. Bake the chicken for 35 to 40 minutes. Use a meat thermometer to check that it reaches 165°F (75°C). Creating the sauce: Optional step While the chicken bakes, you can make a sauce. Take the leftover marinade and boil it in a small saucepan. Then, reduce to a simmer for 5 to 10 minutes until it thickens. This adds more flavor to your dish. Serving suggestions for Honey Soy Glazed Chicken Once the chicken is done, let it rest for a few minutes. Serve it with the thickened sauce drizzled over the top. Garnish with sliced green onions and sesame seeds for a nice touch. You can pair it with rice or veggies to complete your meal. For the full recipe, check the section above. Using low-sodium soy sauce is key. It cuts down on salt but still gives great taste. Too much salt can overpower your dish. You want the honey to shine through. Adjust the sweetness with honey to your liking. If you want it sweeter, add a bit more honey. If you prefer less sweet, use less. To get crispy skin, start with dry chicken. Pat the skin with a paper towel before cooking. This helps it crisp up nicely in the oven. Basting the chicken adds extra glaze and flavor. Use the reserved marinade during the last 10 minutes of baking. This gives the chicken a beautiful shine and rich taste. If you need a soy sauce alternative, try tamari. It has a similar taste and is gluten-free. Coconut aminos are a great choice too. They add sweetness without the soy taste. For sweeteners, you can use maple syrup or agave nectar. Each one will change the flavor slightly but will still be delicious. {{image_2}} You can use different cuts of chicken for this dish. I often choose bone-in, skin-on thighs for rich flavor. They stay juicy while cooking. However, boneless chicken thighs also work well. They cook faster, so keep an eye on them. Chicken breasts are another option. They are leaner but can dry out if overcooked. If you prefer breasts, try brining them first. This adds moisture and flavor. You can change the flavors to suit your taste. Adding citrus can brighten the dish. Lime or orange juice mixed with the marinade works great. You can also add spices for a kick. Try smoked paprika or five-spice powder. These spices can enhance the glaze and add depth. Experiment with your favorites to create a unique taste. Honey soy glazed chicken pairs well with many sides. Steamed rice is a classic choice. It soaks up the delicious sauce. You can also serve it with stir-fried veggies. Broccoli and bell peppers add color and crunch. For a lighter meal, a simple salad works too. Choose fresh greens with a light vinaigrette. This creates a balanced and complete meal. If you want to make it extra special, try serving it with the full recipe. To keep your honey soy glazed chicken fresh, store it in the fridge. Use an airtight container for the best results. Make sure it cools to room temperature before sealing. Your leftovers will last up to four days. If you want to keep it longer, freezing is a great option. You can freeze honey soy glazed chicken for later use. Place the chicken in a freezer-safe bag or container. Squeeze out as much air as possible to prevent freezer burn. It will stay good for up to three months. When you’re ready to eat, thaw it overnight in the fridge. Reheat in the oven at 350°F (175°C) until hot. This keeps the chicken juicy and flavorful. Preparing your honey soy glazed chicken ahead saves time. You can marinate the chicken a day in advance. Then, store it in the fridge until you’re ready to cook. Use glass or BPA-free plastic containers for storage. This way, your meal prep stays safe and easy. You can also portion out the chicken into single servings for quick lunches or dinners. You should marinate the chicken for at least 1 hour. However, for the best taste, marinate overnight. This gives the chicken time to soak in all the flavors. The longer it sits, the more flavorful it becomes. Yes, you can use other proteins. Salmon, pork, or beef all work well. Just make sure to adjust the cooking time. For example, salmon cooks much faster than chicken. If you need a substitute for honey, use maple syrup or agave nectar. Both options work great. They add a similar sweetness to the glaze. You can also use brown sugar, but mix it with a bit of water. This recipe is perfect for meal prep. You can cook a batch and store it in containers. It keeps well in the fridge for 3-4 days. Just reheat it when you’re ready to eat. For freezing, place it in airtight containers. You now have all the tools to make Honey Soy Glazed Chicken. We covered key ingredients like chicken thighs, honey, and soy sauce. You learned how to prep and cook this tasty dish step by step. Tips for flavor and variations help you customize it to your liking. Don’t forget about proper storage methods to enjoy leftovers later. This recipe is perfect for meal prep or a quick weeknight dinner. Dive in and make this sweet and savory delight your own!](https://easycookingbite.com/wp-content/uploads/2025/06/e3b1fe1c-32f3-4da7-b8ab-3a5cb85f4804.webp)
Honey Soy Glazed Chicken Tasty and Simple Recipe
Are you ready to enjoy a new favorite dish that’s both tasty and simple? This Honey Soy Glazed Chicken recipe is just what you…
My Latest Desserts
-

Classic Apple Pie Delightful and Simple Recipe
There’s nothing quite like a warm slice of classic apple pie straight from the oven. In this article, I’ll share Read Full Recipe -

Chocolate Chip Banana Bread Irresistible and Soft
Are you ready to make the softest, most delicious Chocolate Chip Banana Bread ever? This easy recipe gives you the Read Full Recipe -

No-Bake Energy Bites Simple and Flavorful Snack
Looking for a quick and tasty snack? You’ll love these No-Bake Energy Bites! Made with simple ingredients like oats, peanut Read Full Recipe -

No-Bake S’mores Bars Irresistible and Easy Recipe
Craving a sweet treat without turning on the oven? You’re in the right place! With my easy no-bake S’mores bars Read Full Recipe -

Peach Streusel Coffee Cake Delightful and Simple Recipe
If you love a good coffee cake, you’ll adore my Peach Streusel Coffee Cake recipe. It’s sweet, moist, and full Read Full Recipe -

Easy Lemon Loaf Cake Simple and Tasty Recipe
If you love bright, citrusy treats, then this Easy Lemon Loaf Cake is for you! It’s simple to make and Read Full Recipe -

Frozen Yogurt Granola Cups Delightful and Healthy Treat
Looking for a cool and tasty treat? Frozen yogurt granola cups are the answer! These delightful snacks blend creamy yogurt Read Full Recipe -

Raspberry Lemon Yogurt Parfait Tasty and Simple Treat
Looking for a quick, delicious treat? My Raspberry Lemon Yogurt Parfait is simple to make and bursting with flavor! This Read Full Recipe -

Lemon Poppyseed Overnight Oats Quick and Easy Recipe
Wake up to a burst of fresh flavor with my Lemon Poppyseed Overnight Oats recipe! This quick and easy breakfast Read Full Recipe -

Peanut Butter Energy Balls Easy Healthy Snack Recipe
Looking for a tasty treat that’s also healthy? Peanut Butter Energy Balls are your answer! This easy snack recipe packs Read Full Recipe
My Latest Recipes

hey,
i’m !
I’m so happy you’re here!
Every dish I share is made with love and care. I hope they bring you the same comfort and joy they bring me. Let’s make memories, one recipe at a time.
![- 1 lb beef sirloin, thinly sliced against the grain - 2 cups broccoli florets - 1 cup bell peppers (red or yellow), sliced - Soy sauce (low sodium) - Oyster sauce (or alternative for vegetarian) - Sesame oil - Garlic and ginger - Cornstarch, salt, and pepper - Sesame seeds and green onions for garnish To make a tasty beef and broccoli stir fry, you need fresh ingredients. Start with one pound of beef sirloin. Slice it thin against the grain for the best texture. Next, grab two cups of broccoli florets. These add a nice crunch and color. Also, include one cup of sliced bell peppers. Red or yellow will both work well. For the pantry staples, you will want low sodium soy sauce. This gives your dish the salty kick without too much sodium. You can also use oyster sauce, or choose a vegetarian option. Lastly, sesame oil adds a nutty flavor that really enhances the dish. For seasoning and garnishes, use fresh garlic and ginger for a strong flavor. You will need cornstarch to help thicken the sauce. Don’t forget salt and pepper to taste. Sesame seeds and sliced green onions make great garnishes, adding both flavor and a nice look to your plate. For the full recipe, check out the complete details. This mix of fresh and pantry ingredients creates a stir fry that is quick and full of flavor. To start, take your beef sirloin and slice it thinly against the grain. This helps it stay tender. In a large bowl, add the beef, 1 tablespoon of cornstarch, a pinch of salt, and pepper. Mix it well to coat the beef evenly. Let it marinate for about 15 minutes. This step adds flavor to the beef. Heat 1 tablespoon of olive oil in a large skillet or wok over medium-high heat. Once hot, add the marinated beef in a single layer. Cook for 2-3 minutes until browned on each side, then remove it from the pan and set it aside. In the same skillet, add 3 cloves of minced garlic and 1 tablespoon of minced ginger. Stir-fry for about 30 seconds until fragrant. Next, add 2 cups of broccoli florets and 1 cup of sliced bell peppers. Stir-fry for about 3-4 minutes. You want the broccoli to be bright green and tender-crisp. Return the beef to the skillet. Pour in 3 tablespoons of soy sauce, 2 tablespoons of oyster sauce, and 1/4 cup of beef broth. Stir everything together and cook for another 2-3 minutes. This helps the sauce thicken slightly. Drizzle 1 tablespoon of sesame oil over the stir fry and toss to combine. Taste the dish and adjust the seasoning with extra salt and pepper if needed. For a beautiful presentation, serve the stir fry hot. Garnish with sesame seeds and sliced green onions. For the complete recipe, refer to the Full Recipe section. To make a great stir fry, heat is key. High heat helps cook the beef quickly. It gives a nice sear and keeps the meat tender. If your pan isn't hot enough, the meat will steam instead of sear. This can make it chewy, not tasty. Avoid crowding the pan. When you add too much food, it lowers the heat. This makes the food cook unevenly. Cook in batches if you need to. This way, everything gets that nice char and flavor. You can add more veggies to your stir fry. Try carrots, snow peas, or mushrooms. They add color and crunch. You can also swap out the beef. Chicken, shrimp, or tofu work well too. For sauce, you can experiment. Try adding hoisin sauce for sweetness or chili paste for heat. Mixing soy sauce with rice vinegar adds a nice tang. These small changes can make a big difference! A good skillet or wok is a must. A non-stick surface helps food release easily. A wide pan allows for even cooking. If you can, invest in a well-made wok. It can handle high heat and gives great results. For utensils, use a spatula or wooden spoon. These tools help toss the food without damaging the pan. Tongs are also useful for flipping the beef. With the right tools, your cooking will be easier and more fun! For a full recipe of this dish, check the [Full Recipe]. {{image_2}} For a vegetarian twist, you can swap beef for tofu or tempeh. Both options soak up flavors well. Tofu is soft, while tempeh has a nutty taste. When making the sauce, replace oyster sauce with more soy sauce. You can add a splash of vegetable broth for depth. This keeps the dish rich and tasty without meat. To make this dish gluten-free, choose tamari instead of soy sauce. Tamari offers a similar taste but without gluten. Always check labels on sauces and broth. Some brands add gluten as a filler. Ensure all other ingredients, like cornstarch, are gluten-free. Fresh ingredients like broccoli and bell peppers are naturally gluten-free. This way, everyone can enjoy this meal. If you love heat, try adding chili flakes or fresh peppers. Start with a small amount to test the spice level. You can always add more later. Balance the heat by adjusting other seasonings. Use less soy sauce if you add hot elements. This keeps the dish flavorful without overwhelming your taste buds. To keep your beef and broccoli stir fry fresh, store leftovers in an airtight container. Make sure to cool it to room temperature before sealing. This helps prevent moisture buildup, which can make the food soggy. You can keep it in the fridge for up to three days. Freezing stir fry is simple. First, let it cool completely. Then, portion it into freezer-safe bags. Try to remove as much air as possible to prevent freezer burn. When you’re ready to eat, thaw it overnight in the fridge. Reheat in a pan over medium heat. Add a splash of water or broth to keep it moist. Meal prep makes busy days easier. You can make this stir fry ahead of time and store it for quick meals. Pair it with cooked rice or noodles for a complete dish. Store them separately to keep the noodles or rice from getting mushy. This way, you will have tasty meals ready to go! For more details, check out the Full Recipe. To enhance the flavors, try these tips: - Use fresh ginger and garlic for a stronger taste. - Add a splash of rice vinegar for acidity. - Toss in some red pepper flakes for a spicy kick. - Include a sprinkle of sesame seeds at the end for crunch. - Marinate the beef longer for deeper flavor. These small changes can make a big difference in your dish. Yes, you can use frozen broccoli. Frozen broccoli is quick and easy. It is picked at peak freshness and frozen right away. This keeps nutrients intact. However, fresh broccoli has a better texture and taste. If you use frozen, cook it for a shorter time to avoid mushiness. Beef and broccoli stir fry pairs well with: - Steamed jasmine rice - Fried rice for added flavor - Noodles for a heartier meal - A side of spring rolls for a crunchy bite These sides create a balanced and satisfying meal. Beef and broccoli stir fry lasts about 3 to 4 days in the fridge. Store it in an airtight container. Always cool it down before placing it in the fridge. If it smells off or looks weird, it’s best to toss it. Yes, beef and broccoli stir fry can be healthy. It offers a good balance of protein and vegetables. Beef provides iron and protein, while broccoli adds fiber and vitamins. Keep an eye on your sauce choices. Low-sodium soy sauce helps keep sodium levels in check. This dish can fit well into a balanced diet. For the full recipe, check out the Beef & Broccoli Delight. Beef and broccoli stir fry is a tasty and simple meal to make. You learned about the fresh ingredients needed and how to cook them in a few easy steps. I shared tips on stir-fry techniques and how to store leftovers. You can even try vegetarian or gluten-free options to suit your needs. This dish is both enjoyable and customizable. Enjoy making it at home and sharing it with family!](https://easycookingbite.com/wp-content/uploads/2025/06/0bcd589c-7c81-4cef-a6ce-6fc16aad1ef1-300x300.webp)

![To make Cajun Potato Soup, gather these fresh ingredients: - 4 large russet potatoes, peeled and diced - 1 medium onion, finely chopped - 2 cloves garlic, minced - 1 bell pepper (any color), chopped - 2 stalks celery, diced - 4 cups vegetable broth - 1 cup heavy cream (or coconut cream for a dairy-free option) - 2 tablespoons Cajun seasoning - 1 teaspoon smoked paprika - 1 tablespoon olive oil - Salt and pepper to taste - ¼ cup green onions, sliced (for garnish) - ¼ cup crispy bacon bits (optional, for topping) Cajun seasoning and smoked paprika are essential. They give the soup its warm and spicy flavor. If you like it spicy, add a bit more seasoning. For toppings, green onions add a fresh crunch. Bacon bits give a nice salty bite, but they are optional. Check out the full recipe for step-by-step instructions and tips. Enjoy your cooking! 1. Sauté the aromatics: Start by heating the olive oil in a large pot over medium heat. Add the chopped onion, minced garlic, chopped bell pepper, and diced celery. Cook for about 5 minutes. You want the veggies to be soft and smell great. Stir them often to avoid burning. 2. Adding potatoes and broth: Next, stir in the diced russet potatoes, vegetable broth, Cajun seasoning, and smoked paprika. Turn up the heat and bring the mix to a boil. Once boiling, lower the heat and let it simmer for about 20 minutes. You want the potatoes to be tender enough to pierce with a fork. 3. Blending for creaminess: After the potatoes are tender, grab your immersion blender. Blend the soup right in the pot until it’s smooth. If you don’t have an immersion blender, pour half of the soup into a traditional blender. Blend it well and return it to the pot. This gives you that creamy texture everyone loves. 1. Stirring in the cream: Now, it’s time to add the heavy cream. This makes your soup rich and velvety. Stir it in and heat the soup for another 5 minutes. Taste it and add salt and pepper as needed. If you want more spice, adjust the Cajun seasoning. 2. Serving suggestions: Serve the soup in wide bowls for a nice touch. Top each serving with sliced green onions and crispy bacon bits if you like. For a perfect pairing, consider serving crusty bread on the side. It’s great for dipping! For the full recipe, check out the detailed list above! To make your Cajun potato soup just right, focus on the texture. You want it creamy but not too thick. Here are some tips: - Use an immersion blender: This helps you keep some potato chunks for texture while making it creamy. - Adjust the broth: If your soup is too thick, add more vegetable broth to reach the desired consistency. To balance the spices, start with the Cajun seasoning. It packs a punch! Here’s how to enhance the flavor: - Taste as you cook: Add seasoning gradually and taste along the way. This helps you find the perfect heat level. - Add a splash of vinegar: A little acidity can brighten flavors and enhance the spice. When serving your soup, think about sides and presentation to wow your guests. Here are a few ideas: - Perfect sides: Pair the soup with crusty bread or a fresh salad. A simple green salad adds a nice crunch. - Garnish for flair: Top the soup with green onions and crispy bacon bits. They add color and texture. For presentation, use wide bowls. This gives an elegant look. Drizzle some cream on top and sprinkle more green onions for a pop of color. {{image_2}} You can easily change the spice level of your Cajun potato soup. If you like it mild, use less Cajun seasoning. Start with one tablespoon and taste as you go. For a spicy kick, add more seasoning or a pinch of cayenne pepper. You can also add some hot sauce to boost the heat. For a dairy-free option, use coconut cream instead of heavy cream. The coconut adds a subtle sweetness and a rich texture. It works well with the spices and still keeps the soup creamy. Feel free to mix in other vegetables to change the flavor. Carrots, corn, or even spinach can add a nice twist. You can also use sweet potatoes instead of russet potatoes for a sweeter taste. If you want to switch up the broth, try chicken broth for a heartier flavor. You can also use cream alternatives, like almond or oat milk, if you prefer. These swaps keep your soup fresh and exciting while still tasting amazing. For the full recipe, check out the details shared previously. Enjoy exploring these variations! To store leftover Cajun Potato Soup, let it cool first. Pour the soup into an airtight container. Seal it well to keep out air. Place it in the fridge. Leftover soup will stay fresh for about 3 to 4 days. If you want to enjoy it later, make sure to check for any signs of spoilage before eating. For freezing, use a freezer-safe container. Leave some space at the top, as soup expands when frozen. Label the container with the date. The soup can last in the freezer for up to 3 months. When you're ready to eat, move the container to the fridge to thaw overnight. For a quick option, you can thaw it in the microwave. Reheat it on the stove over low heat until it's warm. Stir occasionally to get an even heat. Add some extra cream if it seems too thick after freezing. Enjoy your comforting bowl of Cajun Potato Soup! What can I serve with Cajun Potato Soup? You can serve the soup with crusty bread or cornbread. A side salad also pairs well. Add some spicy sausage for a heartier meal. For a fun twist, try pairing it with a classic gumbo. Can I make this soup vegetarian or vegan? Yes! To make it vegetarian, use vegetable broth and skip the bacon. For a vegan version, replace heavy cream with coconut cream. Make sure your Cajun seasoning is vegan too, as some blends may contain animal products. How long does Cajun Potato Soup last in the fridge? Cajun Potato Soup lasts about 3 to 4 days in the fridge. Store it in an airtight container for the best results. Always reheat it thoroughly before serving. How to scale the recipe for larger servings? If you want to make more soup, double or triple the ingredients. Keep the same cooking times but check the potatoes for doneness. A larger pot can help prevent spills. Can I use instant potatoes instead of fresh? Yes, you can use instant potatoes. They will cook faster, so add them after sautéing the aromatics. Follow the package instructions for the right water amounts. What if I don't have Cajun seasoning? If you don’t have Cajun seasoning, mix paprika, garlic powder, and cayenne pepper. This blend can mimic the flavors well. Adjust the spice levels to match your taste preferences. For the complete preparation guide, check out the [Full Recipe]. Cajun Potato Soup blends bright flavors and easy steps. You learned about key ingredients, from potatoes to spices. I walked you through preparation, blending for creaminess, and final touches. The tips enhance your cooking and serving experience. You discovered variations for any taste and helpful storage methods for leftovers. In closing, this soup is more than just comfort food; it’s a creative dish for all. Enjoy making it your own!](https://easycookingbite.com/wp-content/uploads/2025/05/0548827b-cd29-4cb8-aef1-c952ec58e76b-300x300.webp)

Loaded Veggie Frittata Flavorful and Nutritious Dish
If you’re looking for a tasty way to pack in your veggies, you’ve found it! This Loaded Veggie Frittata is not just flavorful; it’s…
![To make a tasty Loaded Veggie Frittata, you need fresh and vibrant ingredients. Here are the main items: - 6 large eggs - 1 cup milk (or plant-based milk) - 1 cup diced bell peppers (red, yellow, green) - 1 cup spinach, chopped - 1 small zucchini, diced - 1/2 cup cherry tomatoes, halved - 1/2 onion, finely chopped - 1 cup shredded cheese (cheddar or mozzarella) - 1 teaspoon olive oil - Salt and pepper to taste - Fresh herbs (basil or parsley) for garnish These ingredients create a colorful frittata that is full of flavor and nutrition. The eggs provide protein, while the veggies add vitamins and minerals. For an extra kick, consider adding some additional flavors. You can use: - Garlic (minced or powder) - Red pepper flakes for spice - Fresh herbs like thyme or oregano - A splash of hot sauce These ingredients enhance the taste of your frittata. They make every bite exciting and full of life. You can easily swap ingredients based on what you have at home. Here are some ideas: - Instead of spinach, try kale or arugula. - Use different cheeses like feta or goat cheese. - If you want more protein, add cooked ham, bacon, or tofu. - Use any seasonal veggies you like, such as asparagus or broccoli. These swaps keep your frittata fresh and fun. Experiment with flavors to find your perfect mix. For the full recipe, check out the Loaded Veggie Frittata details. To start, gather all your veggies. I love using bell peppers, zucchini, spinach, and cherry tomatoes. Wash them well. Dice the bell peppers and zucchini into small pieces. Chop the spinach into smaller bits. Halve the cherry tomatoes for a nice touch. Next, finely chop the onion. This gives the frittata great flavor. In a large bowl, crack the six eggs. Add one cup of milk. You can use plant-based milk if you prefer. Whisk them together. Make sure to mix in salt and pepper to taste. This adds a nice flavor. Set the egg mixture aside for now. Heat one teaspoon of olive oil in an oven-safe skillet over medium heat. Once hot, add the chopped onion. Sauté for two to three minutes until it becomes clear. Then, add the diced bell peppers and zucchini. Cook these for three to four minutes. Stir well until they soften. Finally, toss in the chopped spinach and halved cherry tomatoes. Cook until the spinach wilts. Pour the egg mixture over the cooked veggies in the skillet. Gently shake the pan to spread the eggs evenly. Now, sprinkle one cup of shredded cheese on top. Cook on the stovetop for three to four minutes until the edges set. Then, transfer the skillet to your preheated oven at 375°F (190°C). Bake for 15 to 20 minutes until the eggs are set and the top is golden. Allow it to cool slightly before slicing. Garnish with fresh herbs for a bright finish. Enjoy this Loaded Veggie Frittata as a delightful meal! For the complete process, check the full recipe. Start with a good non-stick skillet. This helps the frittata slide out easily. Use medium heat when cooking the veggies. This cooks them well without burning. When the edges of your frittata begin to set, gently shake the pan. This helps the eggs mix well with the veggies. Remember to bake the frittata until it is golden on top. This gives it a nice look and taste. Add spices to your egg mix for more flavor. A pinch of paprika or chili powder works well. Fresh herbs, like basil or parsley, can brighten the dish. Stir them into the egg mixture or sprinkle them on top before serving. You may also try different cheeses. Goat cheese or feta can add a tangy twist. Lastly, consider adding a splash of hot sauce for a kick. Slice the frittata into wedges for easy serving. A colorful platter makes it look great on any table. For a nice touch, garnish each slice with herbs. This adds color and freshness. You can also serve it with a side salad. This adds crunch and balances the meal. Enjoy warm or at room temperature to savor the flavors. For the full recipe, see the section above. {{image_2}} You can add protein to your Loaded Veggie Frittata in many ways. Ham or bacon gives a savory flavor. Both work well with the veggies. If you prefer plant-based options, tofu is a great choice. Crumble firm tofu and cook it with the veggies. This adds protein without meat. You can also use smoked tofu for a richer taste. Just remember to adjust the seasoning to keep it tasty. The beauty of a frittata is its versatility with vegetables. You can mix and match based on what you have. Try mushrooms for a hearty bite. Broccoli adds a nice crunch and color. Carrots can give a sweet touch. You can also use kale instead of spinach for a stronger flavor. The key is to chop the veggies small so they cook evenly. Feel free to experiment with what’s in season! Cheese adds creaminess to your frittata, but you can switch it up. If you don’t like cheddar or mozzarella, try goat cheese. It brings a tangy flavor that pairs well with veggies. Feta is another great option; it crumbles nicely and adds a salty kick. For a dairy-free choice, use vegan cheese. Just make sure it melts well. Whatever cheese you choose, it will add richness to your dish. For the full recipe, check out the Loaded Veggie Frittata section. Enjoy your cooking adventure! After making the Loaded Veggie Frittata, let it cool completely. Wrap individual slices tightly in plastic wrap. You can also place the slices in an airtight container. Store the frittata in the fridge for up to 4 days. Keeping it well-sealed helps maintain its flavor and texture. To freeze, slice the frittata into wedges. Wrap each piece in plastic wrap and then in aluminum foil. This extra layer prevents freezer burn. Place the wrapped slices in a freezer bag. You can freeze the frittata for up to 2 months. Label the bag with the date for easy tracking. Reheating your frittata is easy. For the best texture, use the oven. Preheat the oven to 350°F (175°C). Place the frittata slice on a baking sheet. Heat for about 10-15 minutes until warm. You can also use the microwave. Place the slice on a microwave-safe plate and cover it with a damp paper towel. Heat for about 1-2 minutes. Enjoy your frittata warm or at room temperature! For the full recipe, check out Loaded Veggie Frittata. A veggie frittata can last up to five days in the fridge. To keep it fresh, store it in an airtight container. This helps lock in flavor and moisture. If you notice any change in smell or texture, it’s best to toss it. Yes, you can make a Loaded Veggie Frittata ahead of time. It holds well in the fridge. This makes it perfect for meal prep. Just follow the [Full Recipe] and cool it before storing. You can slice it into portions for easy servings. The best way to reheat a frittata is in the oven. Preheat your oven to 350°F (175°C). Place the frittata on a baking sheet and cover it with foil. Heat for about 10-15 minutes. This keeps the frittata moist and prevents it from drying out. To make the frittata gluten-free, simply use certified gluten-free ingredients. For a dairy-free option, swap regular milk with plant-based milk like almond or oat milk. You can also use dairy-free cheese. These swaps keep the frittata tasty and healthy for everyone. In this blog post, we explored how to make a Loaded Veggie Frittata. We covered key ingredients, from veggies to flavor boosters and possible swaps. You learned step-by-step instructions for prepping, cooking, and baking to get the best texture. We shared tips for perfecting your technique and enhancing flavor, plus how to present your dish nicely. With these ideas, you can enjoy a delicious, healthy meal. Get creative with variations and enjoy this dish any way you like!](https://easycookingbite.com/wp-content/uploads/2025/07/4602b032-462a-44a8-8398-2369a71a4aa5.webp)
