

Latest & Greatest

Spring Hash Brown Crust Quiche Flavorful and Easy Meal
Spring Hash Brown Crust Quiche offers a fresh twist on an easy classic. With crispy hash browns as the crust,
Read more…browse recipes

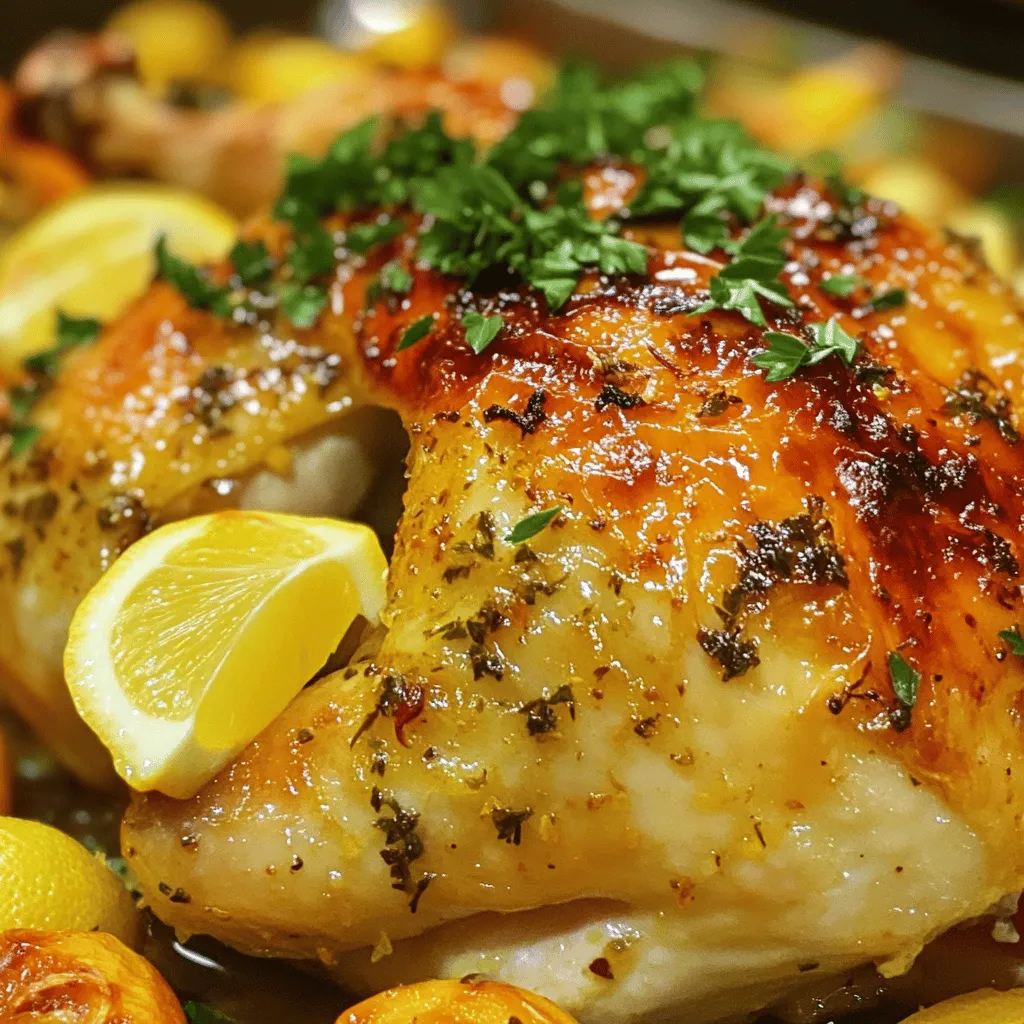
Lemon Garlic Roasted Chicken Flavorful and Simple Recipe
Looking for a dinner that impresses without the stress? My Lemon Garlic Roasted Chicken recipe is both simple and bursting with flavor. You’ll discover…
My Latest Desserts
-

Pumpkin Spice Cream Cheese Swirl Muffins Delight
Ready to elevate your fall baking? These Pumpkin Spice Cream Cheese Swirl Muffins will soon be your favorite treat! With Read Full Recipe -

Lemon Poppy Seed Yogurt Loaf Moist and Flavorful Treat
Looking for a fun and tasty treat? This Lemon Poppy Seed Yogurt Loaf is the answer! Bursting with fresh flavor, Read Full Recipe -

Giant Cinnamon Roll Skillet Cake Easy Dessert Delight
If you crave the warm, sweet goodness of cinnamon rolls but want something more fun, you’re in the right place! Read Full Recipe -

Cherry Coffee Cake Muffins Simple and Tasty Recipe
If you’re craving a fun and tasty twist on classic muffins, I’m here to share a simple and delicious recipe Read Full Recipe -
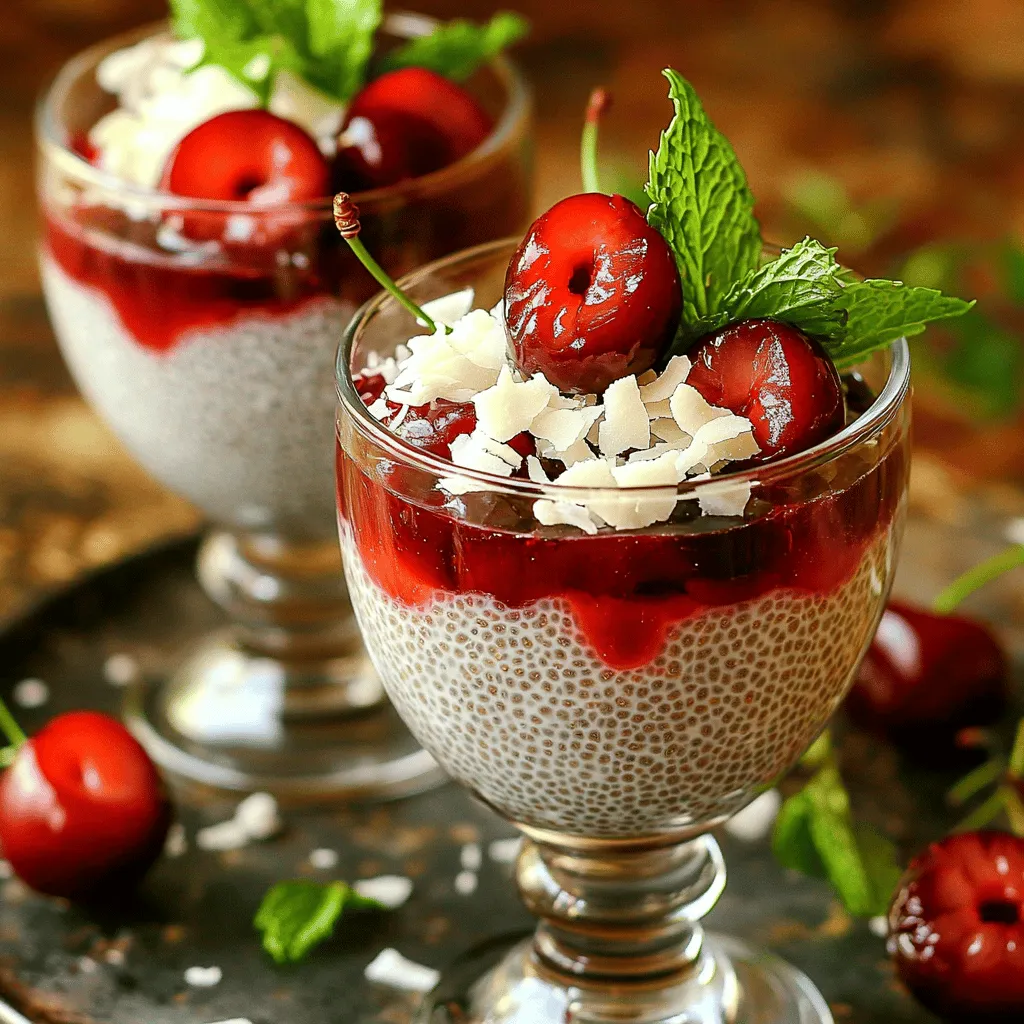
Cherry Coconut Chia Pudding Energizing Healthy Snack
Looking for a quick, tasty snack that’s both sweet and nutritious? Cherry Coconut Chia Pudding hits the mark perfectly! This Read Full Recipe -

Cherry Chocolate Chunk Cookies Irresistible Treat Recipe
Get ready to indulge in a treat that combines the sweet tang of cherries with rich, dark chocolate. In this Read Full Recipe -

Cherry Nut Energy Bars Quick and Easy Recipe
Looking for a quick snack that fuels your day? These Cherry Nut Energy Bars are perfect for you! Packed with Read Full Recipe -
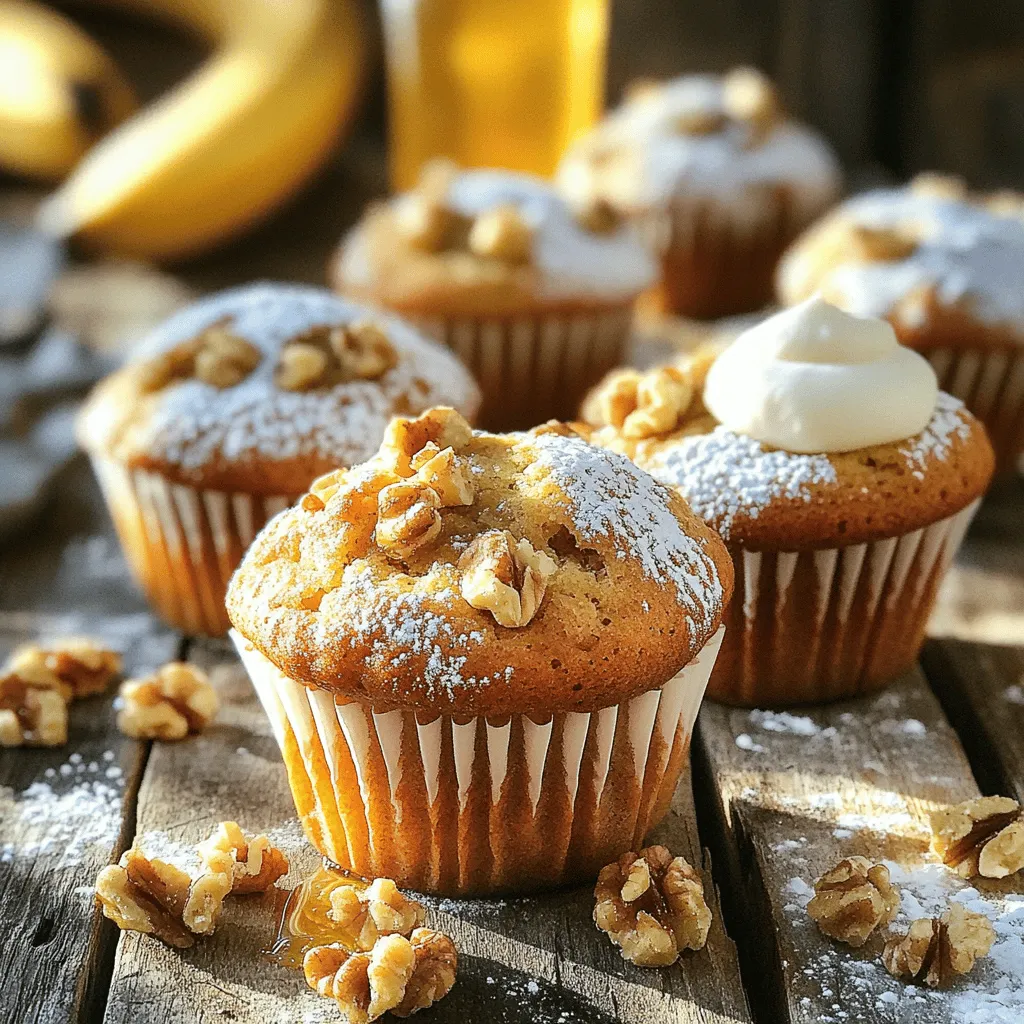
Banana Nut Muffins Quick and Easy Recipe Guide
Welcome to your new favorite baking adventure! In this guide, I’ll show you how to make delicious Banana Nut Muffins Read Full Recipe -
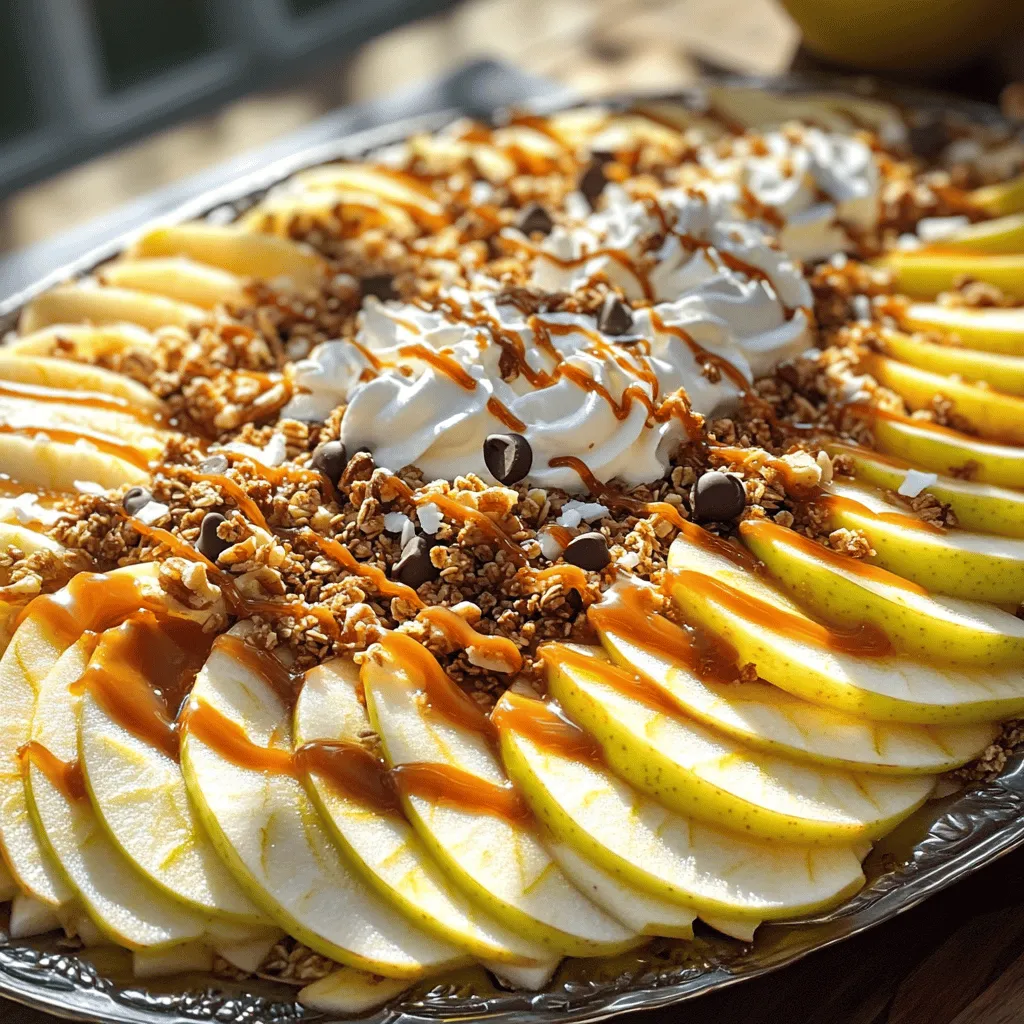
Caramel Apple Nachos Deliciously Simple Treat
Get ready for a snack that’s fun, easy, and oh-so-delicious: Caramel Apple Nachos! This treat lets you enjoy the crispiness Read Full Recipe -

Blueberry Lemon Muffins Flavorful and Simple Recipe
If you crave a delightful treat that bursts with flavor, look no further than my Blueberry Lemon Muffins. This simple Read Full Recipe
My Latest Recipes

hey,
i’m !
I’m so happy you’re here!
Every dish I share is made with love and care. I hope they bring you the same comfort and joy they bring me. Let’s make memories, one recipe at a time.
![- 4 large bell peppers (any color) - 1 cup cooked quinoa - 1 cup black beans, rinsed and drained - 1 cup corn (fresh or frozen) - 1 cup diced tomatoes (canned or fresh) - 1 small red onion, finely chopped - 2 cloves garlic, minced - 1 teaspoon cumin - 1 teaspoon chili powder - Salt and pepper to taste - 1 cup shredded cheese (cheddar or a dairy-free alternative) - Fresh cilantro or parsley, for garnish To make veggie stuffed bell peppers, you need fresh and healthy ingredients. Bell peppers provide a sweet base. Quinoa adds protein and fiber. Black beans bring a hearty texture. Corn gives sweetness and crunch, while tomatoes add moisture. Red onion and garlic pack in flavor. Cumin and chili powder bring warmth and spice. Salt and pepper balance the dish. Cheese melts on top for a creamy finish. Lastly, fresh herbs like cilantro or parsley brighten the meal. Using the right ingredients makes your dish taste great. Each component adds something special. You can find this full recipe in the article. - Preheat the oven to 375°F (190°C). - Cut the tops off the bell peppers and remove seeds and membranes. To start, you need to preheat your oven. This step is important. A hot oven cooks food evenly. While that heats up, grab your bell peppers. I love using bright colors for fun meals. Cut off the tops carefully, then scoop out the seeds and membranes. This makes space for your tasty filling. - Combine cooked quinoa, black beans, corn, diced tomatoes, onion, garlic, spices, salt, and pepper. - Spoon the mixture into each bell pepper. Next, let’s mix the filling. In a big bowl, add cooked quinoa, black beans, corn, and diced tomatoes. Then, toss in the chopped onion and minced garlic. Don’t forget the spices—cumin and chili powder add great flavor. Add salt and pepper to taste. Mix everything until combined. Now, it’s time to fill those bell peppers! Spoon the mixture in tightly, making sure each pepper is packed full of goodness. - Top each pepper with shredded cheese and add water to the baking dish. - Cover with foil and bake, then remove foil to finish cooking. Now for baking! Sprinkle shredded cheese on top of each stuffed pepper. This gives a nice cheesy finish. Pour a little water into the baking dish. This helps steam the peppers, keeping them moist. Cover the dish with foil and bake for 25-30 minutes. After that time, take off the foil. Bake for another 10-15 minutes. This will melt the cheese and get the peppers tender. You’ll love the smell wafting through your kitchen! For the complete recipe, check out the [Full Recipe]. Choosing the right colors of bell peppers can make your dish pop. I like to mix red, yellow, and green peppers. This adds visual appeal and different flavors. Each color has its unique taste. Red peppers are sweeter, while green ones are more earthy. This variety enhances your meal. To avoid soggy peppers, try this simple trick. Before baking, add a splash of water to the bottom of your baking dish. Cover the dish with foil for the first part of cooking. This helps steam the peppers while keeping them firm. Remove the foil later to let the tops brown. Adding moisture to your stuffing is key for great flavor. I recommend using cooked quinoa or black beans, as they hold moisture well. Incorporate diced tomatoes into your filling. This not only adds flavor but also keeps the stuffing moist as it cooks. To ensure even cooking, pack the stuffing tightly into each pepper. This helps the filling cook uniformly. Use a spoon to press down gently, making sure the mixture is snug inside. This technique helps everything cook at the same rate. Pair your stuffed peppers with a fresh side salad. A light salad with lemon vinaigrette complements the dish well. You might also serve them with some crusty bread. This adds a nice texture contrast to the meal. For garnishing, fresh herbs like cilantro or parsley brighten the plate. Chop them finely and sprinkle on top just before serving. This adds a burst of color and freshness. You can also use a dollop of sour cream or yogurt to add creaminess. For the complete dish, check out the Full Recipe. {{image_2}} You can change grains for your stuffed peppers. Try rice, farro, or even couscous. Each grain adds a unique taste and texture. You can also switch out beans. Use kidney beans, chickpeas, or lentils instead of black beans. If you want protein, add ground turkey or tofu. These swaps will keep meals fresh and interesting. To boost flavor, add spices. Try paprika, oregano, or a dash of hot sauce. These spices give your dish a great kick. You can also mix in sauces like salsa or barbecue sauce. For a cheesy twist, use different cheese types. Feta, goat cheese, or pepper jack can change the taste. Each option makes your stuffed peppers special. If you want a vegan option, leave out cheese and use plant-based protein. You can also use nutritional yeast for a cheesy flavor. For gluten-free adjustments, check the grains and beans. Most of the ingredients are gluten-free, but always check labels. These changes help you enjoy stuffed peppers no matter your diet. For the full recipe, check the Veggie Stuffed Bell Peppers 🥗 section. To store leftovers of veggie stuffed bell peppers, let them cool first. Place them in an airtight container. You can keep them in the fridge for up to four days. If you want to save them for longer, freezing is a great option. To freeze stuffed peppers, wrap each one tightly in plastic wrap. Then, place them in a freezer bag. They can last for three months in the freezer. When you are ready to eat, just thaw them overnight in the fridge. To reheat your stuffed peppers, the oven works best. Preheat it to 350°F (175°C). Place the peppers in a baking dish. Cover with foil to keep them moist. Heat for about 20 minutes, or until warm. You can also use the microwave for faster reheating. Place a pepper on a microwave-safe plate. Heat for 2-3 minutes. Check if it's warm all the way through. Be careful, as the texture may change a bit. These methods help keep your stuffed peppers tasty and enjoyable! For the full recipe, check out the details above. How long to cook frozen stuffed peppers? Cook frozen stuffed peppers for about 45-50 minutes at 375°F (190°C). If they are not warm in the center, cook them longer. Can I make stuffed peppers ahead of time? Yes, you can make stuffed peppers a day before. Just prepare them, cover, and store in the fridge. Bake them when you are ready to eat. What to do if my peppers are too tough to eat? If your peppers are tough, try cooking them longer. You can also cut them in half, scoop the filling out, and cook them more. Are stuffed peppers healthy? Yes, stuffed peppers are healthy! They are full of nutrients from veggies, beans, and quinoa. They are low in fat and high in fiber. Can I reduce calories in this recipe? Absolutely! Use less cheese or a low-fat cheese. You can also cut down on oil or use less quinoa for fewer calories. How do I know when the peppers are done? Peppers are done when they are tender and the cheese is melted. You can poke them with a fork to check. Can I use mini peppers for this recipe? Yes, you can use mini peppers! They make great bite-sized snacks. Just adjust the cooking time to about 20-25 minutes. For the full recipe, check out the Veggie Stuffed Bell Peppers. In this guide, you learned how to make tasty stuffed peppers. We covered the ingredients, step-by-step preparation, and smart tips for success. You can mix and match fillings or adjust for diets. Proper storage and reheating will keep them fresh and delicious. Stuffed peppers are fun to make and share. Enjoy cooking, and let your creativity shine!](https://easycookingbite.com/wp-content/uploads/2025/07/4c553bee-6c2b-4634-b2b3-7311afcfcf43-300x300.webp)
![To make a tasty cauliflower fried rice, gather these main ingredients: - 1 medium head of cauliflower, grated or riced - 1 cup mixed vegetables (carrots, peas, bell peppers) - 2 eggs, lightly beaten - 2 green onions, chopped - 2 cloves garlic, minced - 1 tablespoon ginger, minced - 3 tablespoons soy sauce (or tamari for gluten-free) - 1 tablespoon sesame oil - 2 tablespoons olive oil - Salt and pepper to taste These ingredients give you a great base for flavor and texture. The cauliflower acts as a low-carb rice substitute. The eggs provide protein, while the mixed vegetables add color and nutrients. You can customize your cauliflower fried rice with these optional ingredients: - Cooked chicken, shrimp, or tofu for added protein - Other vegetables like broccoli, corn, or zucchini - Red pepper flakes for heat - Fresh herbs like cilantro or basil for extra flavor Feel free to mix and match these extras to suit your taste. This recipe is flexible and can adapt to what you have on hand. To make this dish, you'll need a few simple tools: - A food processor or box grater for ricing cauliflower - A large non-stick skillet or wok for cooking - A spatula for stirring - Measuring spoons and cups for accuracy Having the right tools makes cooking easier and more fun. They help you create a delicious meal with minimal fuss. Follow the [Full Recipe] for step-by-step guidance on how to prepare your meal. Start with the cauliflower. Remove the leaves and stem. Cut the florets into small chunks. Use a food processor or box grater to make rice-sized pieces. This gives your dish a great texture. Next, gather your other ingredients. Chop the green onions, mince the garlic, and ginger. You want everything ready to go. This makes cooking quick and easy. Heat 1 tablespoon of olive oil in a large skillet or wok over medium-high heat. Add the minced garlic and ginger. Stir for about 30 seconds until they smell good. Now, toss in the mixed vegetables. Cook them for 3-4 minutes. Stir often until they are tender and bright. Push the veggies to one side of the skillet. Pour the beaten eggs on the empty side. Scramble the eggs until they are fully cooked. Then, mix them with the veggies. It's time for the riced cauliflower! Add it to the skillet along with the soy sauce. Stir everything together well. Cook for 5-7 minutes, stirring often. This helps the cauliflower soften a bit. Drizzle the sesame oil over your dish and mix it in. Season with salt and pepper to taste. Remove the skillet from the heat. Garnish with chopped green onions and sesame seeds if you like. Your cauliflower fried rice is now ready to serve! For the full recipe, check the earlier section. To make great cauliflower rice, choose a firm head of cauliflower. Start by removing the leaves and stem. Cut the florets into smaller pieces. Use a food processor or box grater to turn the florets into rice-sized bits. Aim for a fine consistency, but avoid making it mushy. You can swap some ingredients for a personal touch. If you don’t have green onions, use chives or shallots. For a different flavor, try coconut aminos instead of soy sauce. If you want it spicy, add chili flakes or fresh peppers. You can also use any veggies you like, such as zucchini or broccoli. Cauliflower fried rice is a great main dish or side. Serve it with grilled chicken or shrimp for protein. You can also top it with a fried egg for an extra treat. Garnish with sesame seeds and fresh herbs to add color and flavor. For a fun twist, try serving it in a lettuce wrap. For the complete recipe, check out the Full Recipe section. {{image_2}} You can easily add chicken to your cauliflower fried rice. Start with one cup of diced cooked chicken. Add it to the skillet after cooking the vegetables. This boosts protein and makes the dish heartier. Use grilled or rotisserie chicken for a quick option. Stir it well with the vegetables before adding the cauliflower. For a vegan twist, simply skip the eggs. You can add more veggies like mushrooms or zucchini. Tofu is a great option too. Use firm tofu and cube it before cooking. Sauté it with the garlic and ginger for flavor. You can also add nutritional yeast for a cheesy taste. This keeps the meal tasty without animal products. If you like heat, try adding chili paste or sriracha. Mix in one tablespoon at the end for a spicy kick. You can also include sliced jalapeños while cooking the veggies. Another option is to sprinkle red pepper flakes on top before serving. Adjust the spice to fit your taste. Explore the full recipe to find more ideas and flavor combinations. After you enjoy your meal, cool the leftover cauliflower fried rice. Transfer it to an airtight container. This helps keep the flavors fresh. Store it in the fridge for up to four days. If you want it to last longer, think about freezing it. When you're ready to eat the leftover fried rice, take it out of the fridge. You can reheat it in a microwave or on the stove. For the microwave, place it in a bowl and cover it. Heat for 1-2 minutes, stirring halfway through. On the stove, add a little oil to a skillet over medium heat. Add the rice and stir for about 3-5 minutes until it's hot. To freeze your cauliflower fried rice, make sure it is cool first. Use freezer-safe bags or containers. Remove as much air as you can. This helps prevent freezer burn. You can freeze it for up to three months. When you’re ready to eat, thaw it overnight in the fridge before reheating. Check out the Full Recipe for more details on making this dish. Yes, cauliflower fried rice is a healthy meal. It has fewer carbs than regular rice. Cauliflower is low in calories and high in fiber. This dish also contains veggies, which add vitamins and minerals. Using eggs boosts protein, making it filling. Overall, it's a great choice if you want a lighter meal. Yes, you can use frozen cauliflower rice. It saves time and is easy to find. Just heat it in the pan without thawing first. This keeps it from getting mushy. Make sure to adjust cooking time as needed. Check the package for instructions to ensure the best results. To change the serving size, simply scale the ingredients up or down. For fewer servings, halve the ingredients. For more, double or triple them. Keep the same ratios for flavor. This way, you can make just what you need. It’s that easy! For the full recipe, refer back to the beginning. Cauliflower fried rice is a simple and healthy dish that you can make at home. We explored key ingredients, cooking steps, and tips for perfect results. You can customize it with various proteins and spices. Remember to store leftovers properly to keep them fresh. With this guide, you can enjoy delicious, easy meals that fit your taste. Embrace the creativity this dish offers and share it with others. Enjoy your cooking journey!](https://easycookingbite.com/wp-content/uploads/2025/07/b1bb70d2-e365-4bdb-8c01-6ad82f6bdde8-300x300.webp)
![- 8 ounces rotini pasta - 6 strips turkey bacon - 1 cup cherry tomatoes - 1 cup romaine lettuce - 1/2 cup red onion - Dressing components: - 1/2 cup mayonnaise - 2 tablespoons apple cider vinegar - 1 teaspoon Dijon mustard - Salt and pepper to taste Choosing fresh ingredients makes a big difference. Look for bright, firm tomatoes. For lettuce, select crisp romaine. Fresh herbs add flavor, too. For mayonnaise, I recommend brands like Hellmann's or Duke's. They create a rich and creamy dressing. Always check for freshness dates on all products. Start by boiling a large pot of salted water. Once it boils, add 8 ounces of rotini pasta. Cook the pasta until it is al dente, following the package instructions. Usually, this takes about 8 to 10 minutes. After cooking, drain the pasta well. Rinse it under cold water to stop the cooking process. This helps the pasta stay firm and not gummy. In a large mixing bowl, combine the cooled pasta with the other ingredients. Add 6 strips of crumbled turkey bacon, 1 cup of halved cherry tomatoes, 1 cup of chopped romaine lettuce, and 1/2 cup of finely chopped red onion. Mix gently with a spatula or wooden spoon. This ensures all the ingredients blend well without crushing them. For the dressing, take a separate bowl and whisk together 1/2 cup of mayonnaise, 2 tablespoons of apple cider vinegar, and 1 teaspoon of Dijon mustard. Mix until the dressing is smooth and creamy. It should not be too thick. Season it with salt and pepper to taste. Pour the dressing over the pasta mixture and toss gently to coat everything evenly. For full details, check the Full Recipe. To make your BLT pasta salad shine, adjust the seasoning. Start with salt and pepper. Taste your salad after mixing in the dressing. Add more salt or pepper if needed. You can also try adding garlic powder or smoked paprika for a twist. These small changes can make a big difference in flavor. Garnishing makes your salad look great. Use fresh basil leaves on top for color. You can also add more halved cherry tomatoes around the edges. This adds visual appeal. A sprinkle of black pepper can finish the look nicely. Serve it in a clear bowl to show off the colors. Timing is key for the best taste. Prepare the salad at least 30 minutes before serving. This helps the flavors blend well. If you can, let it chill longer in the fridge. This extra time makes the salad even better. If you want to serve it later, keep the dressing separate until just before eating. This keeps everything fresh and crunchy. For the full recipe, see the [Full Recipe]. {{image_2}} For your BLT Pasta Salad, you can switch up the pasta. Try penne or farfalle for fun shapes. They will still hold the dressing well. For a gluten-free option, use chickpea or quinoa pasta. Changing the protein is also easy. You can swap turkey bacon for regular bacon. If you want a vegetarian dish, use chickpeas or lentils instead. They add protein and a nice texture. The dressing is key for flavor. You can try ranch or vinaigrette for a twist. A zesty Italian dressing gives a nice kick too. Adding fresh herbs can change the taste. Try parsley, dill, or even chives. A sprinkle of garlic powder or smoked paprika can add depth. Experiment with what you like. In summer, add fresh corn or diced cucumbers. They bring a refreshing crunch. You can also use ripe avocado for creaminess. For fall or winter, think about roasted vegetables. Roasted red peppers or butternut squash will warm the dish. You can even add nuts for extra crunch and flavor. For the full recipe, check out the [Full Recipe]. To keep your BLT pasta salad fresh, use an airtight container. Glass or plastic containers work well. Make sure to store it in the fridge. This will help keep the flavors strong and the texture intact. If you want to keep the lettuce crisp, store it separately. Mix it in just before serving. Pasta salad is best cold, but you can serve it at room temp too. If you heat it, do so gently. Use a microwave and heat for short bursts. Stir it often to avoid hot spots. You can also add a splash of dressing to refresh the flavors. Your BLT pasta salad lasts about 3 to 5 days in the fridge. Always check for changes in smell or texture. If it looks or smells off, it's best to toss it. To enjoy the best taste, eat it within the first few days. For the full recipe, you can refer back to the earlier section. Yes, you can make BLT Pasta Salad ahead of time. This is great for events. Just prepare the salad and store it in the fridge. Let the flavors mix for a few hours. For best taste, serve it cold after chilling. You can make it a day ahead. This saves time on busy days. Absolutely, this recipe works well for meal prep. You can batch cook the pasta and bacon. Store them in separate containers. Mix the salad just before serving. This keeps everything fresh. To store, use airtight containers. The salad stays good in the fridge for up to four days. Just remember to add fresh lettuce right before eating. If you want a different option, try regular bacon or leave it out. You can also use veggie bacon for a meatless version. Another option is diced ham or chicken for added protein. If you prefer a lighter choice, use smoked tofu. Each of these gives a unique flavor to the salad. Experiment with what you like best! This blog post covered making a tasty BLT Pasta Salad. You learned about key ingredients like rotini pasta and turkey bacon, along with how to mix them correctly. I shared storage tips to keep your salad fresh and variations to try based on seasons or personal taste. In the end, making this salad offers fun and flavor. Enjoy experimenting with different ingredients and watching your loved ones enjoy it!](https://easycookingbite.com/wp-content/uploads/2025/06/f3cefba7-3b06-45bd-baef-fac7dd60a52f-300x300.webp)
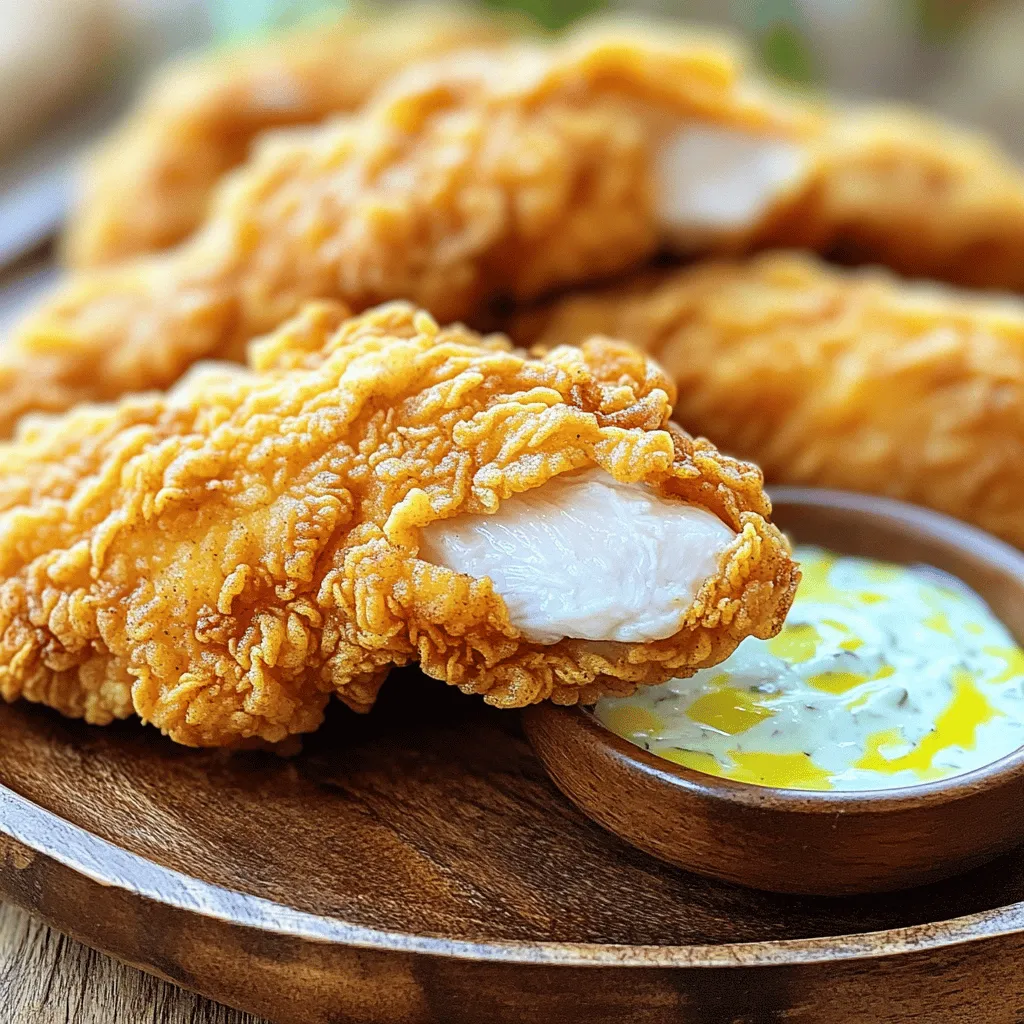
Crispy Buttermilk Chicken Tenders Simple and Tasty
Are you ready to make mouth-watering Crispy Buttermilk Chicken Tenders? This simple recipe will allow you to create tender, juicy chicken with a crunchy…