


Latest & Greatest
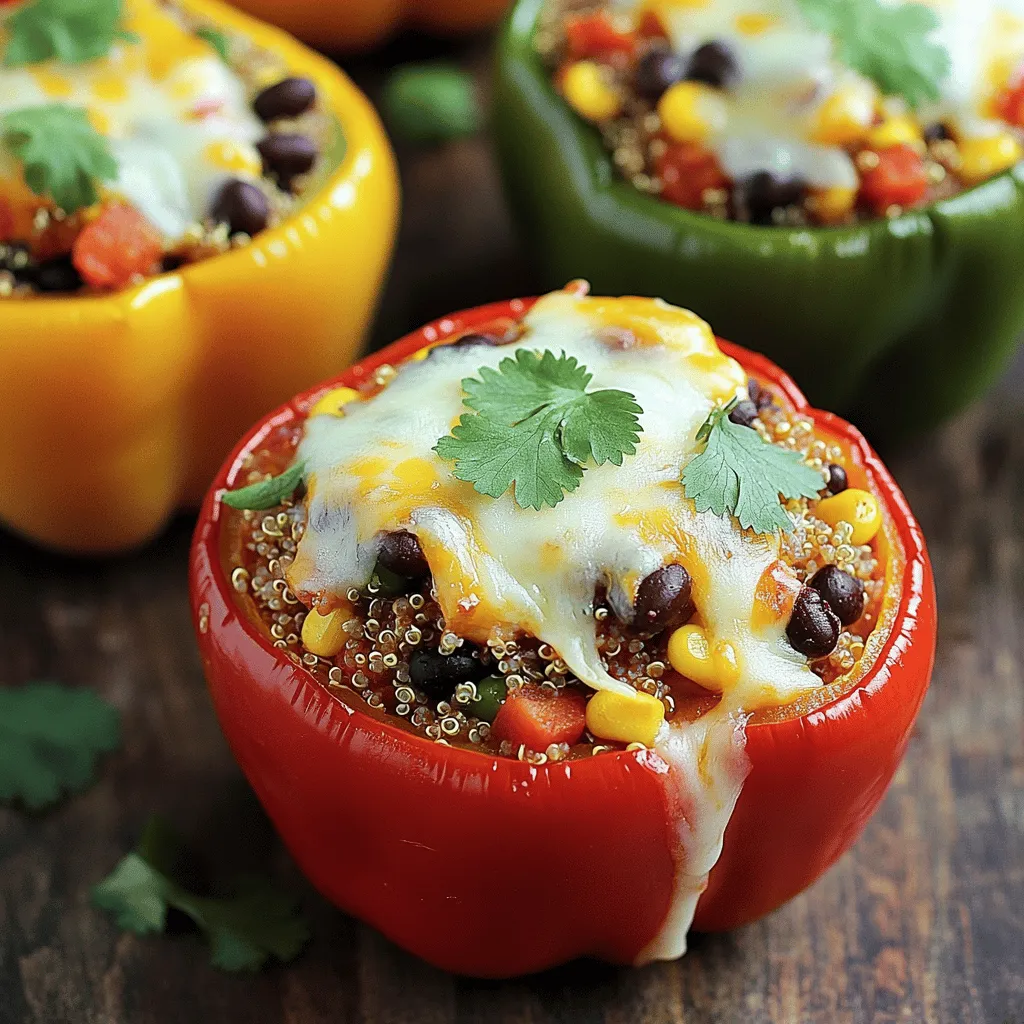
Delicious Stuffed Bell Peppers with Quinoa Recipe
Are you ready to impress your taste buds? In this post, I’ll guide you through making delicious stuffed bell peppers
Read more…
Lemon Blueberry Muffins Simple and Delicious Recipe
Are you ready to bake the perfect lemon blueberry muffins? This simple and delicious recipe will brighten your day with
Read more…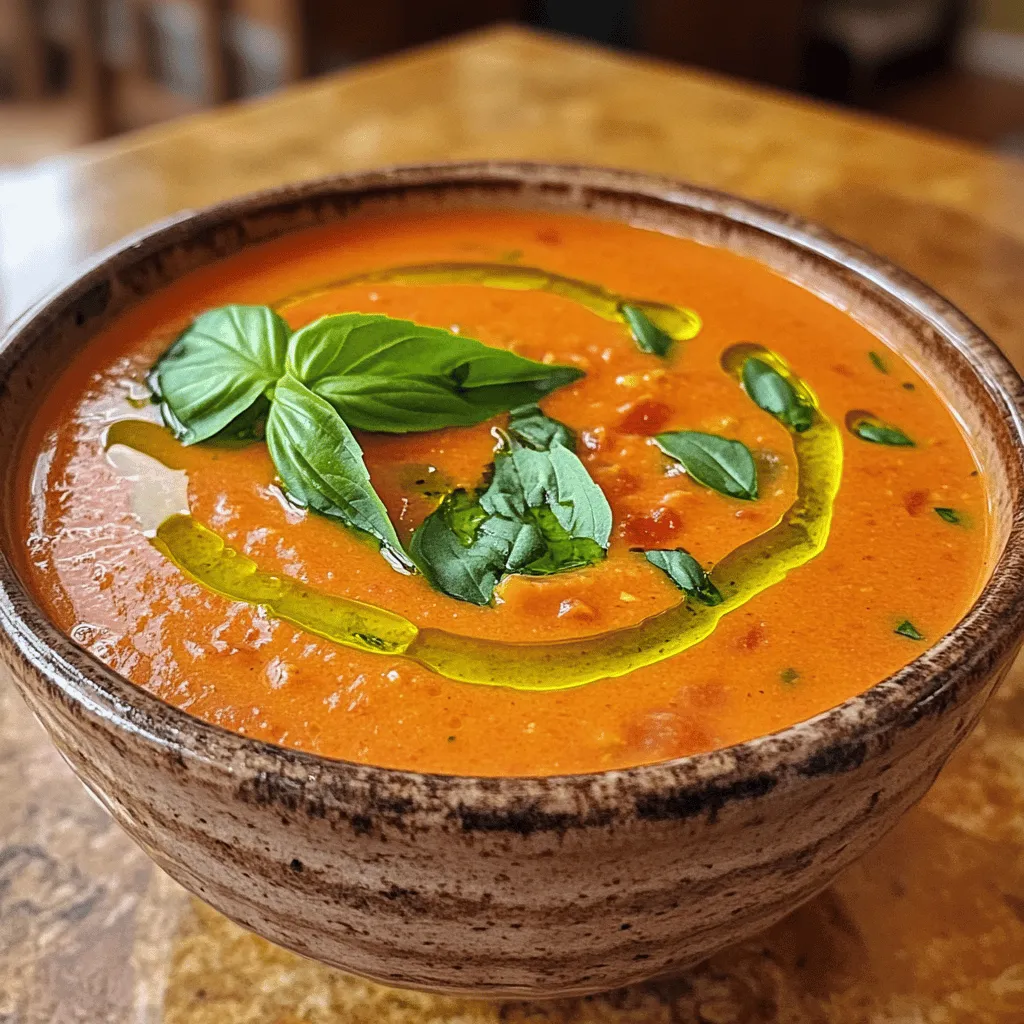
Homemade Tomato Basil Soup Easy and Flavorful Recipe
Are you ready to warm up with a bowl of delightful Homemade Tomato Basil Soup? This easy and flavorful recipe
Read more…
Grilled Vegetable Skewers Flavorful and Simple Delight
Looking to impress your friends with a simple yet delicious dish? Grilled vegetable skewers are a perfect choice! They bring
Read more…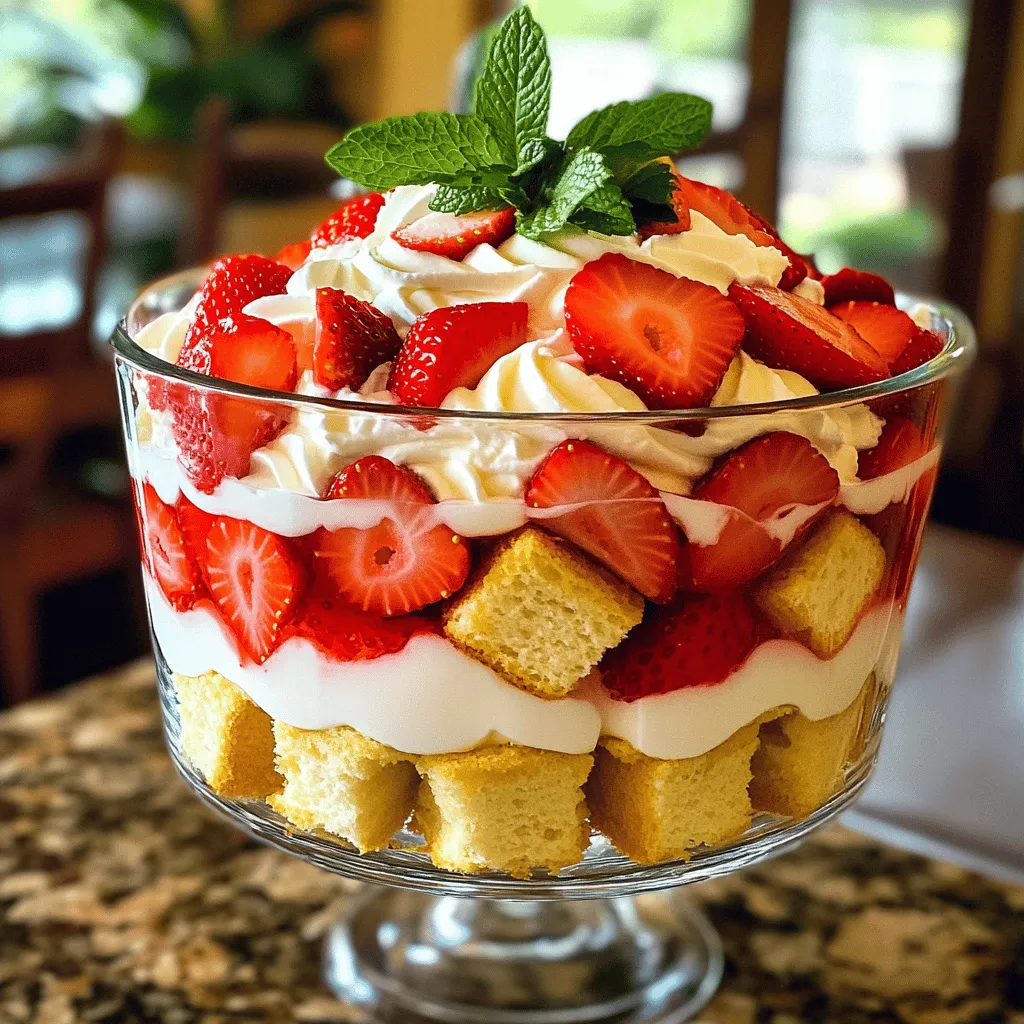
Strawberry Shortcake Trifle Easy Layered Delight
Are you ready to impress friends and family with a delicious dessert? This Strawberry Shortcake Trifle is an easy, layered
Read more…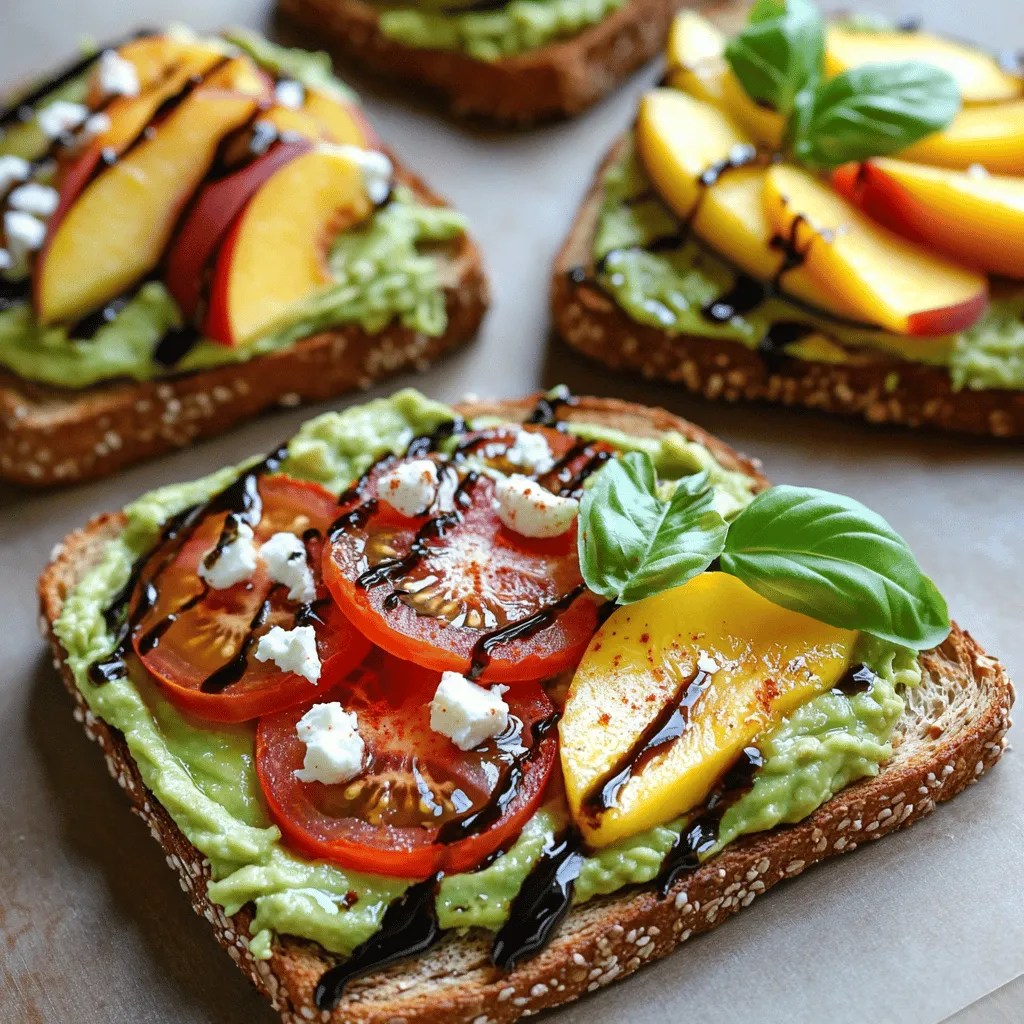
Avocado Toast Variations Flavorful and Simple Ideas
Are you ready to elevate your breakfast game? Avocado toast is a simple yet tasty way to start your day.
Read more…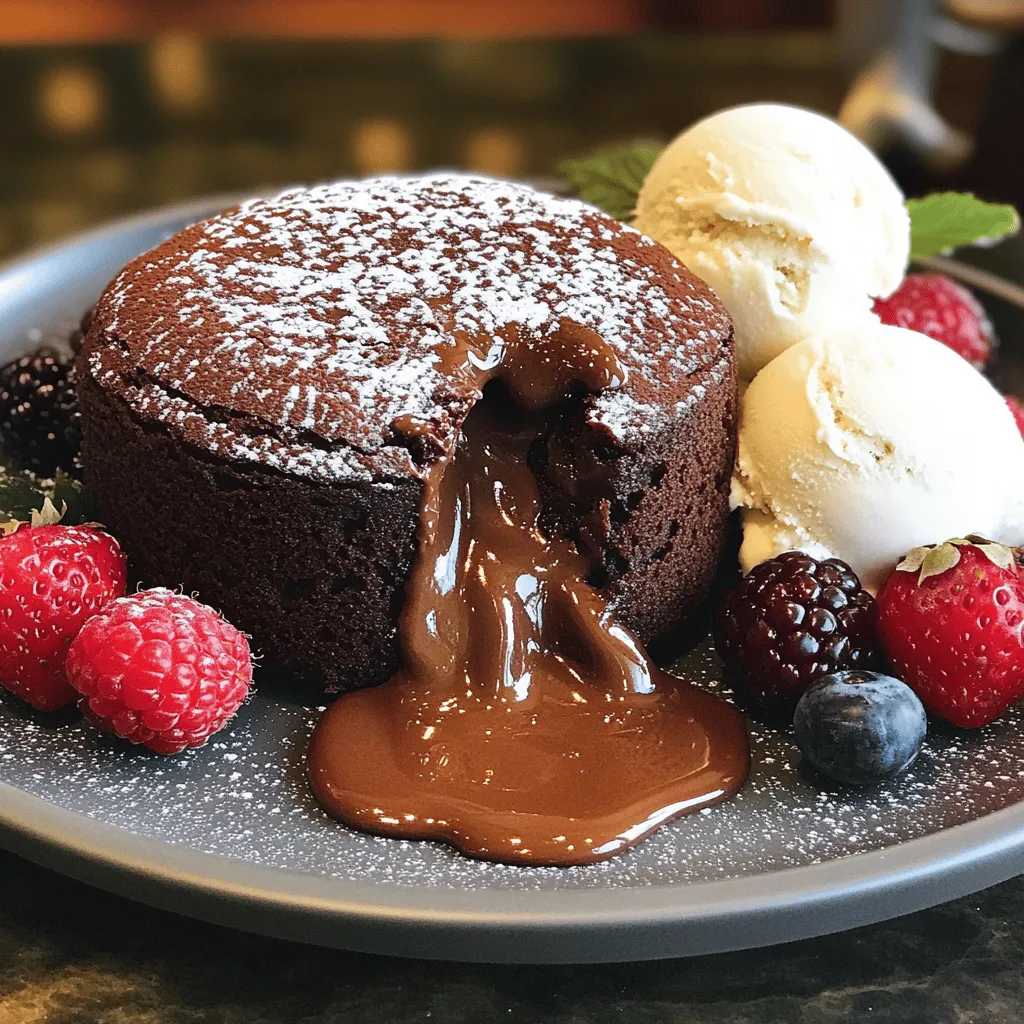
Chocolate Lava Cake Irresistible Gooey Delight
Are you ready to impress your friends with a dessert everyone loves? Chocolate Lava Cake is the ultimate indulgence, combining
Read more…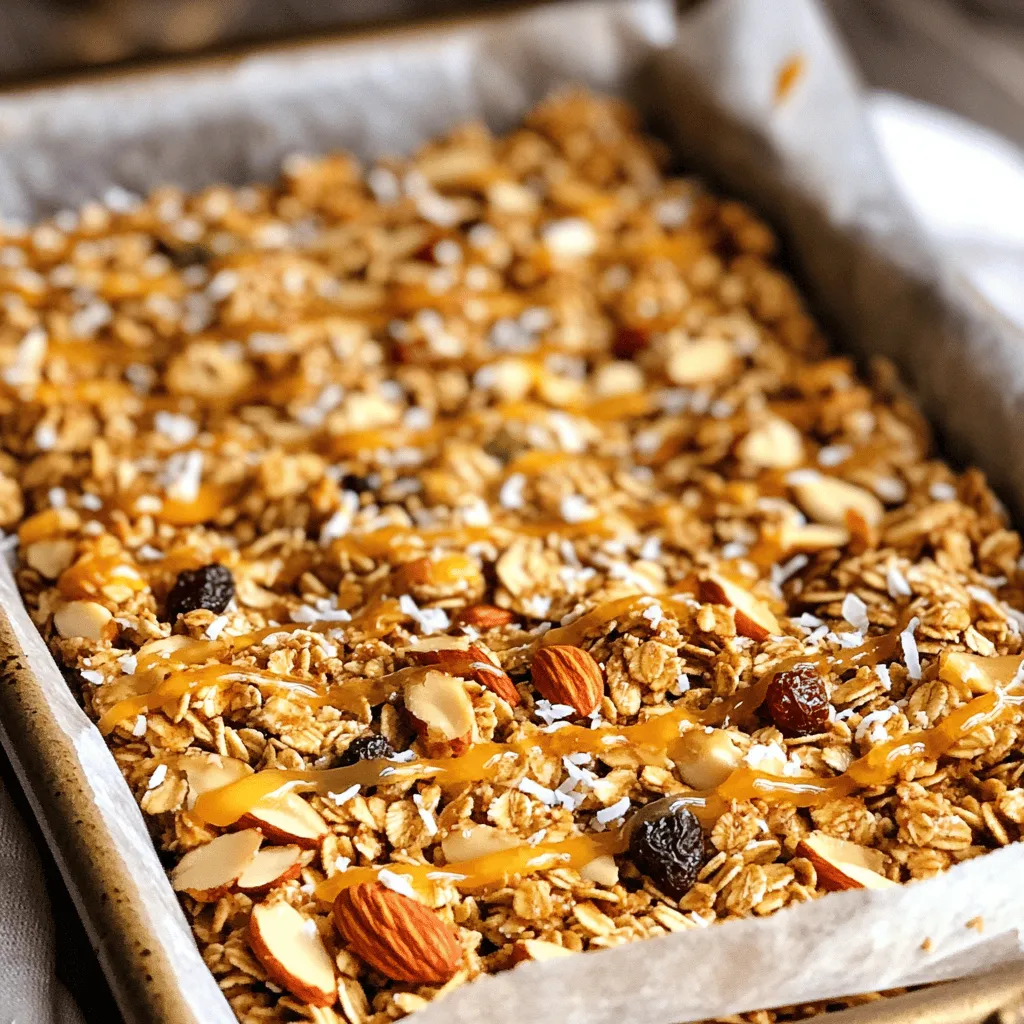
Nutty Granola Bars Simple and Tasty Recipe
Looking for a quick and easy snack that’s both delicious and healthy? You’ve come to the right place! In this
Read more…browse recipes

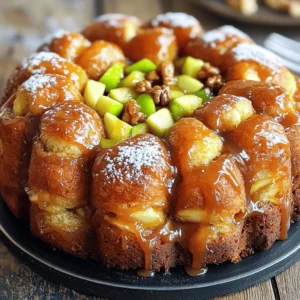


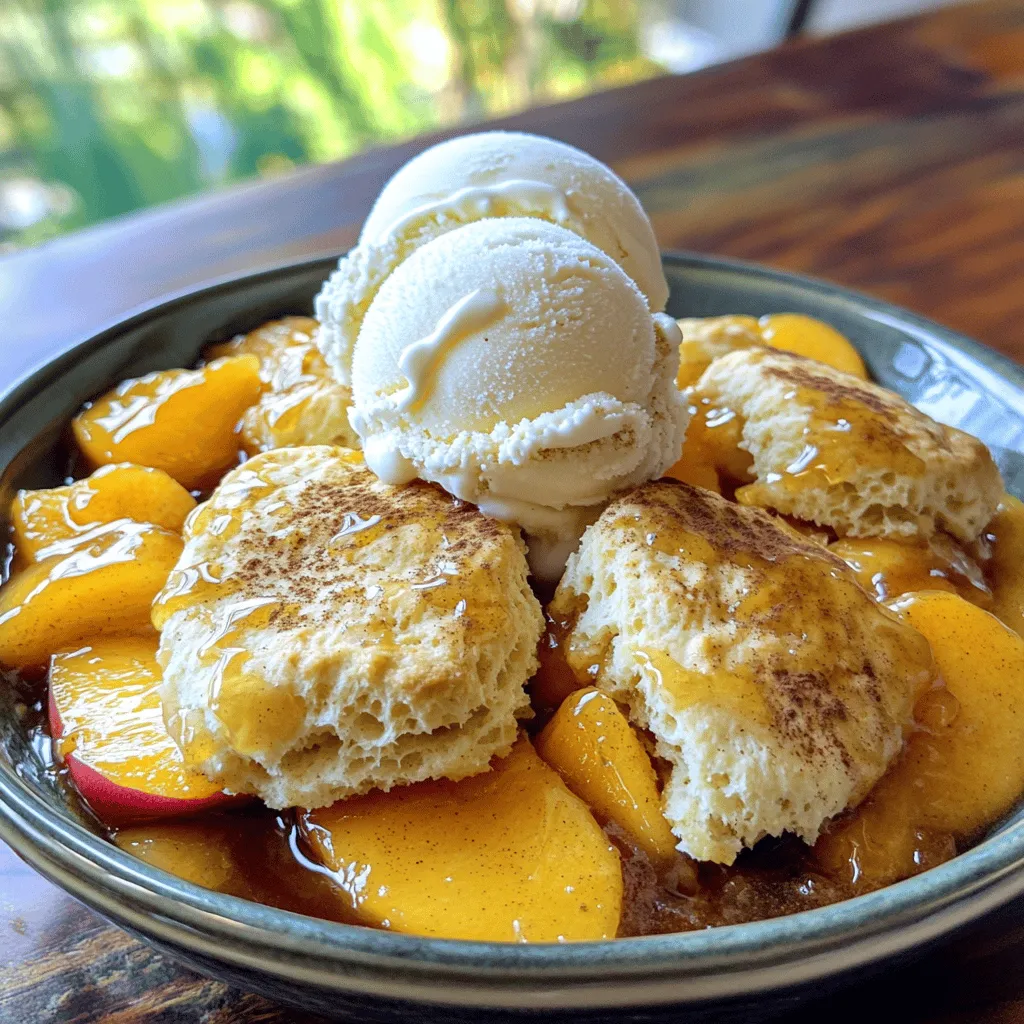
Peach Cobbler with Biscuit Topping Simple and Delicious
Craving a warm, gooey dessert that’s simple to make? Look no further! This Peach Cobbler with Biscuit Topping is the answer to your sweet…
My Latest Drinks

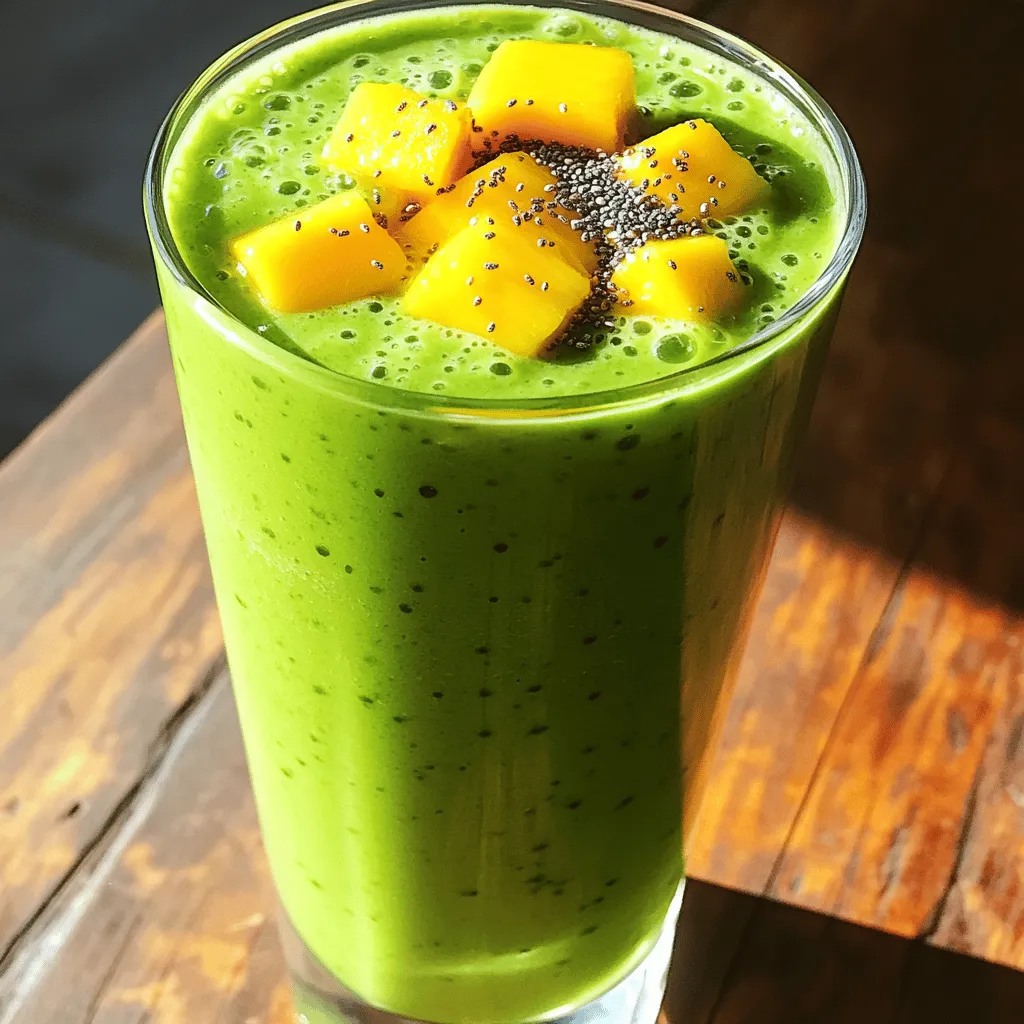
Tropical Green Smoothie Refreshing Health Boost Recipe
Looking for a refreshing drink that packs a health punch? My Tropical Green Smoothie is the perfect blend of fruits Read Full Recipe-
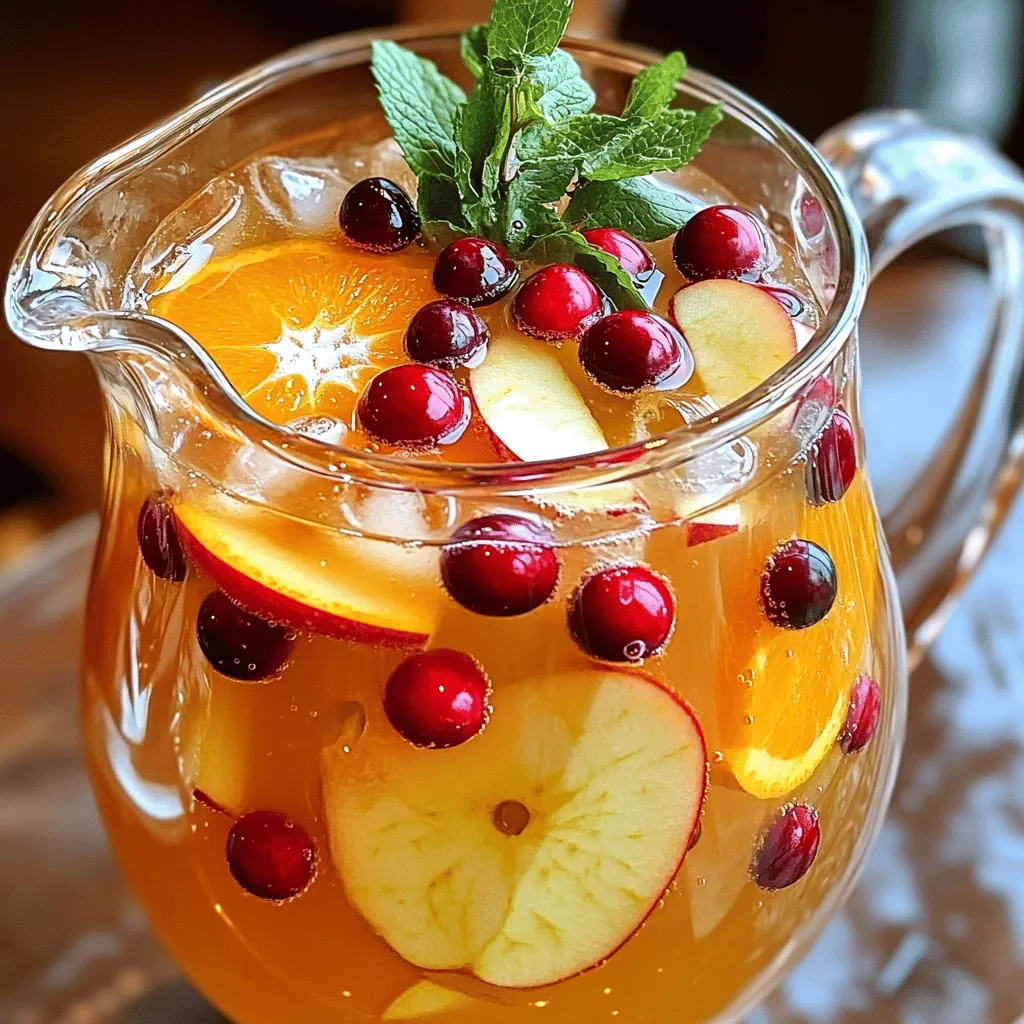
Apple Cider Harvest Punch Refreshing Fall Delight
Get ready for fall with my delicious Apple Cider Harvest Punch! This easy recipe blends fresh flavors that celebrate the Read Full Recipe -
Pineapple Coconut Smoothie Creamy and Refreshing Drink
Are you craving a drink that’s both creamy and refreshing? Look no further than my Pineapple Coconut Smoothie! This easy-to-make Read Full Recipe -
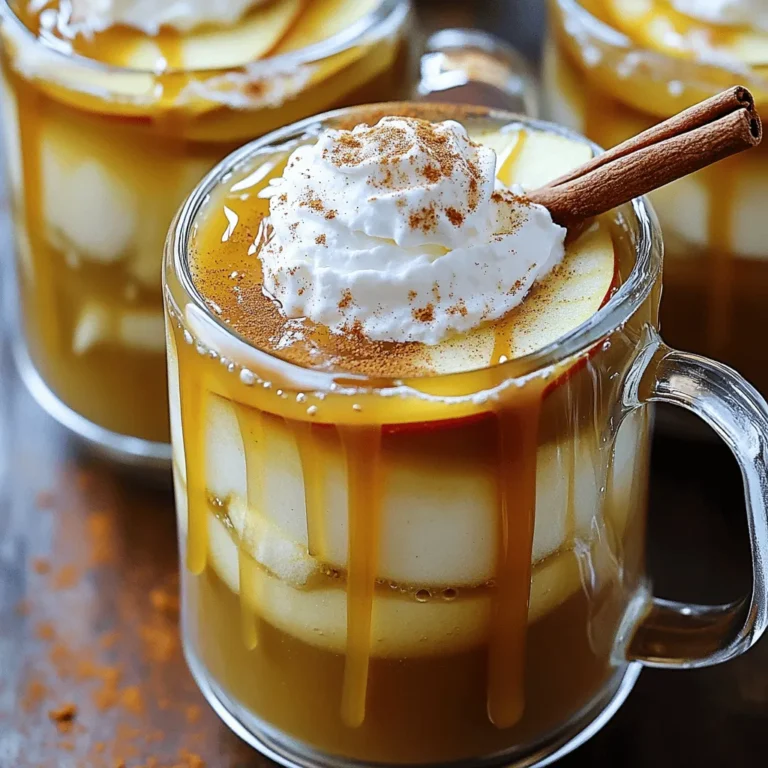
Delicious Caramel Apple Cider Cozy Fall Drink Recipe
Fall is here, and nothing says cozy like a warm cup of Caramel Apple Cider. This drink combines the sweet Read Full Recipe -
Instant Pot Apple Cider Quick and Flavorful Recipe
Looking for a quick and delicious way to make apple cider? The Instant Pot is your best friend! I’ll share Read Full Recipe -
Chocolate Covered Strawberry Smoothie Delicious Treat
Craving something delicious and healthy? The Chocolate Covered Strawberry Smoothie is the perfect treat! With fresh strawberries, cocoa powder, and Read Full Recipe


My Latest Dinners
-
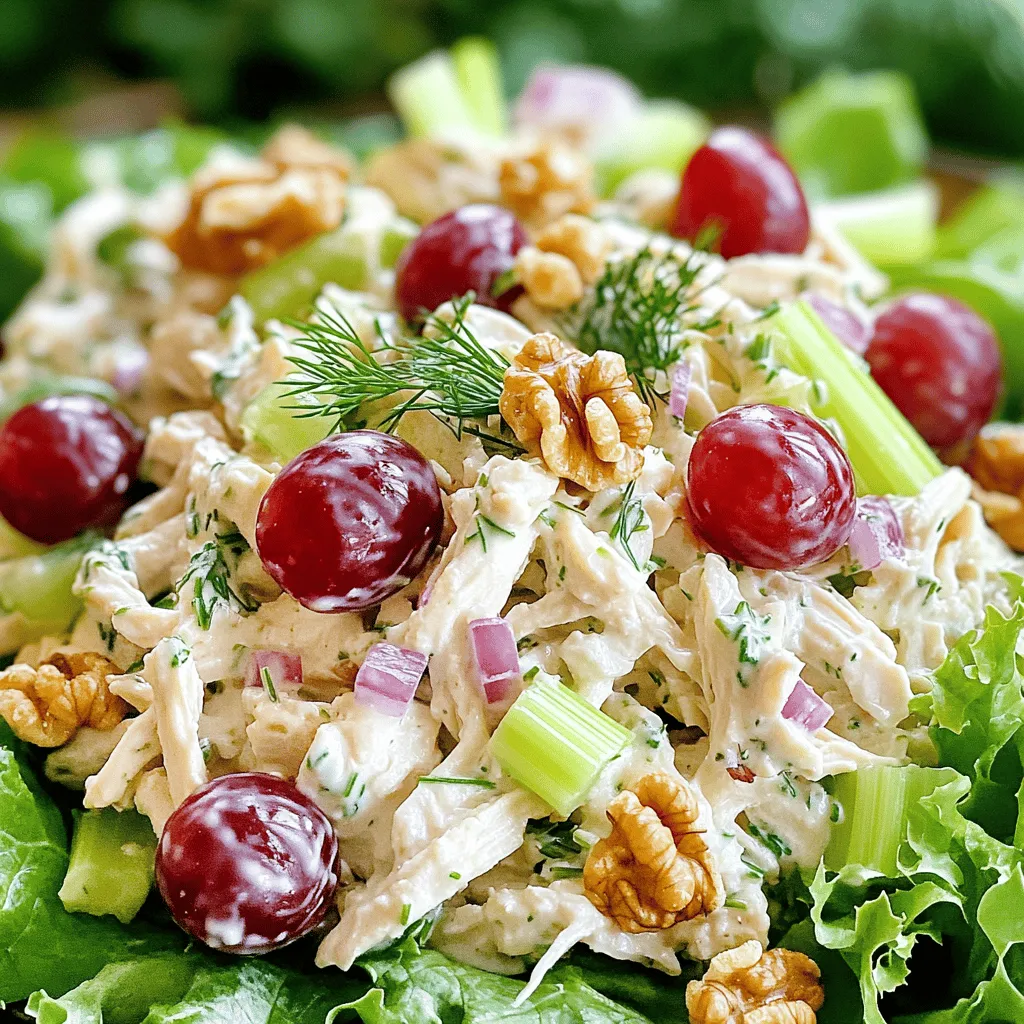
Greek Yogurt Chicken Salad Fresh and Flavorful Recipe
Looking for a fresh twist on a classic chicken salad? My Greek Yogurt Chicken Salad recipe is here to save Read Full Recipe -
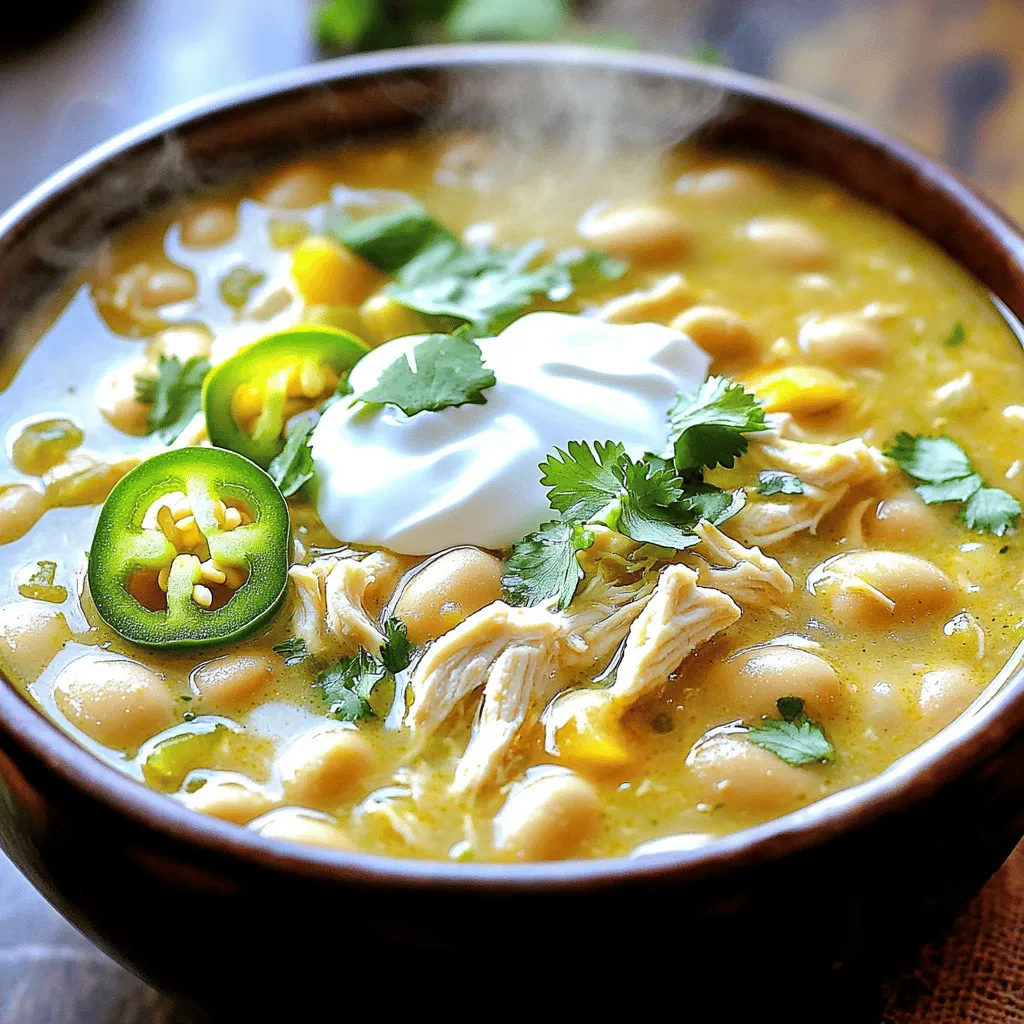
Slow Cooker White Chicken Chili Easy and Flavorful Recipe
Looking for a warm, comforting meal that’s easy to make? My Slow Cooker White Chicken Chili is just what you Read Full Recipe -
Taco Stuffed Zucchini Boats Flavorful and Simple Dish
Looking for a fun, flavorful dish that packs a punch? Taco Stuffed Zucchini Boats are the answer! This easy recipe Read Full Recipe -
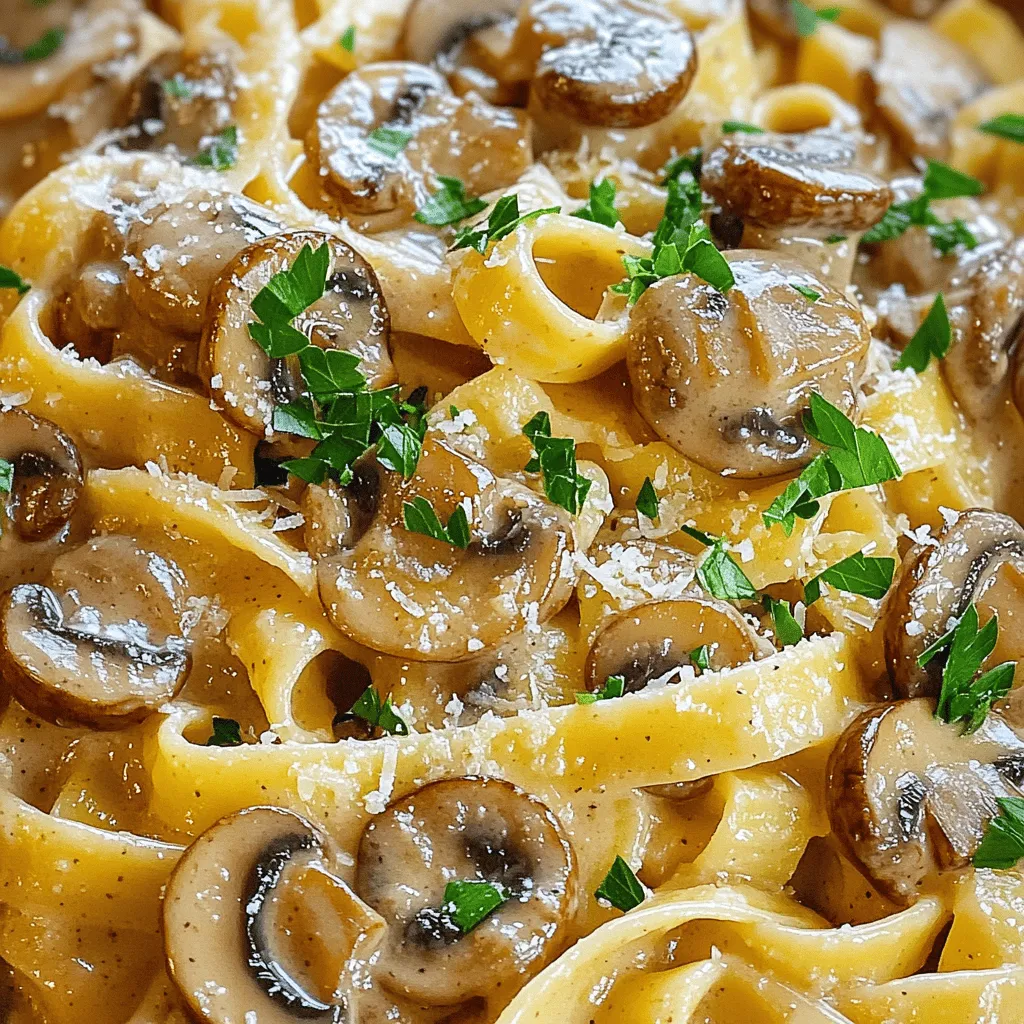
Creamy Mushroom Marsala Flavorful Dinner Delight
Are you ready to impress at dinner tonight? My Creamy Mushroom Marsala is a flavorful delight that will wow your Read Full Recipe -
Coconut Curry Chickpeas Flavorful and Easy Recipe
If you’re seeking a simple, tasty meal, look no further! My Coconut Curry Chickpeas recipe is a delightful blend of Read Full Recipe -
One-Pot Taco Rice Flavorful and Simple Dinner Delight
Looking for an easy and tasty dinner? Try my One-Pot Taco Rice! This simple dish combines savory flavors and requires Read Full Recipe


hey,
i’m !
I’m so happy you’re here!
Every dish I share is made with love and care. I hope they bring you the same comfort and joy they bring me. Let’s make memories, one recipe at a time.
![To make a tasty Chinese Style Shrimp Fried Rice, you need the right ingredients. Here’s what you’ll need: - 2 cups cooked jasmine rice (preferably cold) - 1 cup medium shrimp, peeled and deveined - 2 tablespoons vegetable oil - 2 eggs, beaten - 1 cup mixed vegetables (peas, carrots, corn) - 3 green onions, sliced (white and green parts separated) - 3 garlic cloves, minced - 2 tablespoons soy sauce (low sodium) - 1 tablespoon oyster sauce (optional) - 1 teaspoon sesame oil - Salt and pepper to taste - Fresh cilantro for garnish (optional) These ingredients work together to create bold flavors. The cold jasmine rice helps achieve the perfect texture. Using shrimp adds a nice protein boost. Fresh vegetables and green onions bring color and crunch. The soy sauce and oyster sauce provide that classic umami taste. Garlic gives a punch of flavor, while sesame oil adds richness. Feel free to adjust the ingredients based on your taste. For a full recipe, check out the details above. Enjoy making your shrimp fried rice! - Prepare Shrimp: Start by seasoning the shrimp in a bowl with salt and pepper. This simple step makes a big taste difference. Set the shrimp aside to soak in those flavors. - Scramble Eggs: Heat 1 tablespoon of vegetable oil in a large skillet over medium heat. Pour in the beaten eggs. Stir until they are fully cooked and fluffy. Remove the eggs from the pan and set them aside. - Cook Shrimp: In the same skillet, add the remaining tablespoon of oil. When it’s hot, add your seasoned shrimp. Cook for about 2-3 minutes. The shrimp should turn pink and opaque. Remove them from the skillet and set aside. - Sauté Vegetables: Using the same skillet, toss in the minced garlic, the white parts of the green onions, and the mixed vegetables. Sauté for about 2-3 minutes. You want the veggies to be tender but still bright. - Combine Ingredients: Add the cold jasmine rice to the skillet. Break up any clumps as you stir. Mix the rice with the vegetables until everything is well combined. - Flavor the Rice: Pour in the soy sauce and the optional oyster sauce. Mix well to coat the rice evenly. Add the scrambled eggs and cooked shrimp back into the pan. Stir everything together and heat through. - Finish with Sesame Oil: Drizzle sesame oil over the fried rice. This adds a nutty flavor. Toss everything again to incorporate the oil. - Garnish and Serve: Taste your dish and adjust seasoning if needed. Garnish with the green parts of the green onions and fresh cilantro if you like. Serve hot and enjoy! For the full recipe, check the details above. Choosing the Right Rice Use jasmine rice for the best flavor and texture. It has a nice aroma and a slightly sticky quality. Day-old rice works best since it dries out a bit, making it easy to fry. Perfecting Shrimp Texture To keep shrimp tender, avoid overcooking them. Cook just until they turn pink. This usually takes 2 to 3 minutes. Make sure they are peeled and deveined for a better bite. Achieving Authentic Flavor Use soy sauce for saltiness. Add oyster sauce for depth if you like. Fresh garlic adds a kick, while sesame oil gives a nice finish. Don’t skip the green onions; they add freshness. Importance of Cold Rice Cold rice helps prevent clumping. It fries better and mixes well with other ingredients. If you don’t have leftover rice, spread freshly cooked rice on a tray to cool it down quickly. For more details on making this dish, check the Full Recipe. {{image_2}} Vegetarian Option: Replacing Shrimp and Adding Tofu If you want a vegetarian dish, swap the shrimp for tofu. Use firm tofu for the best texture. Cut the tofu into small cubes and sauté it until golden. This gives you a protein boost while keeping the dish tasty. Add the tofu after cooking the vegetables for a nice blend of flavors. Different Proteins: Chicken or Pork Fried Rice You can also use chicken or pork instead of shrimp. Dice the meat into small pieces. Cook it in the same way as shrimp, until it is no longer pink. Chicken or pork adds a different flavor and makes the dish heartier. Flavor Enhancements: Adding Spices or Hot Sauce Want to spice things up? Add your favorite spices or hot sauce. A pinch of chili flakes or a splash of sriracha can add a nice kick. Experiment with different sauces, like teriyaki or sweet chili, for unique flavors. These changes can make your fried rice even more exciting. For a full recipe and detailed instructions, check out the [Full Recipe]. Refrigeration Guidelines After enjoying your shrimp fried rice, let it cool for about 30 minutes. Place it in an airtight container. Store it in the fridge for up to 3 days. Always ensure the container is tightly sealed to keep it fresh. Freezing Instructions If you need to store it longer, you can freeze the fried rice. Use a freezer-safe container or bag. Remove as much air as possible. It can last in the freezer for up to 3 months. When ready to eat, thaw it in the fridge overnight. Reheating Tips for Maintaining Flavor and Texture To reheat, use a skillet or wok. Heat a little oil over medium heat. Add the fried rice straight from the fridge or thawed. Stir frequently to heat it evenly. You can add a splash of soy sauce to boost the flavor. Enjoy your meal just like the first time! For the complete recipe, check the Full Recipe above. Yes, you can use frozen shrimp. Just make sure to thaw them first. Place them in a bowl of cold water for about 15 minutes. This way, they cook evenly and taste great. To make this dish gluten-free, use gluten-free soy sauce. Many brands offer this option. You can also skip oyster sauce, as it often contains gluten. I recommend using low-sodium soy sauce. It adds flavor without being too salty. This way, you can enjoy the taste without overpowering the dish. To add some heat, try using chili sauce or a pinch of red pepper flakes. You can also add diced jalapeños for a fresh kick. Adjust the spice level to your liking. This dish pairs well with steamed vegetables or a light salad. You can also enjoy it with egg rolls or spring rolls for a complete meal. For the full recipe, check out the steps above. In this post, we explored the ingredients and steps for making Chinese Style Shrimp Fried Rice. You learned about the key ingredients needed and step-by-step instructions to cook this dish perfectly. We shared tips for choosing rice and cooking shrimp, plus variations to try. You now know how to store leftovers well and answers to common questions. With this knowledge, you're ready to create a delicious meal at home. Enjoy the process and experiment with flavors to make it your own.](https://easycookingbite.com/wp-content/uploads/2025/05/cd935795-0dc6-4338-84d8-ae04be4788f1-300x300.webp)

![- 2 ½ pounds Granny Smith apples, peeled, cored, and sliced - 1 ½ cups granulated sugar - 2 teaspoons cinnamon - ½ teaspoon nutmeg Granny Smith apples are perfect for this pie. They are tart and firm. Their crispness holds up well during baking. Granulated sugar adds sweetness and balances the tart apples. The spices, cinnamon and nutmeg, bring warmth and depth to the flavor. - 2 tablespoons lemon juice - 1 tablespoon all-purpose flour (for thickening) - 1 tablespoon unsalted butter, cut into small pieces - 1 egg (for egg wash) - 1 tablespoon milk (for egg wash) Lemon juice brightens the apple flavor and helps prevent browning. The flour thickens the filling, giving it the right texture. Butter adds richness and creates a lovely top layer. The egg wash, made from egg and milk, gives the crust a golden color. Using these ingredients, you can create a classic apple pie that delights everyone. For the full recipe, check the details above. First, preheat your oven to 425°F (220°C). This step helps the pie bake evenly. Next, take your refrigerated pie crusts out. If you want to make homemade crusts, start preparing those now. Roll out one pie crust and fit it into a 9-inch pie pan. Make sure the edges hang over slightly. In a large mixing bowl, combine the sliced Granny Smith apples with 1 ½ cups of granulated sugar. Add 2 tablespoons of lemon juice, 2 teaspoons of cinnamon, and ½ teaspoon of nutmeg to the apples. Sprinkle in 1 tablespoon of all-purpose flour for thickening. Toss everything together until the apples are well-coated. Let the mixture sit for about 15 minutes. This time helps release the apple juices and enhances the flavor. Now, pour the apple filling into the pie crust. Spread it out evenly. Dot the filling with small pieces of 1 tablespoon of unsalted butter for richness. Next, cover the pie with the second pie crust. Crimp the edges to seal the pie and cut a few slits in the top crust. These slits allow steam to escape while baking. Place the pie in the preheated oven for 15 minutes. After that, reduce the temperature to 350°F (175°C). Continue baking for another 35-45 minutes. The pie is done when the apples are tender and the crust is golden brown. To check, insert a knife into the filling. If it goes in easily, your pie is ready! Enjoy your homemade classic apple pie! For the full recipe, refer to the earlier section. To slice apples well, start with a sharp knife. Cut the apple in half from top to bottom. Then, take each half and slice it into thin pieces. Aim for slices that are about 1/4 inch thick. This size helps the apples cook evenly. To stop browning, squeeze a little lemon juice on the cut apples. This simple trick keeps them looking fresh. A flaky crust makes the pie special. Use cold butter when making your crust. Cut the butter into the flour until it looks like small crumbs. Don’t overwork the dough; mix just until it holds together. Chill the dough for at least 30 minutes before rolling it out. This step helps achieve that perfect flaky texture. To boost the flavor of your pie, try adding more spices. Besides cinnamon and nutmeg, consider a pinch of allspice or ginger. A splash of vanilla extract can also add a nice touch. If you want to be adventurous, toss in some caramel bits or raisins. These ingredients can make your pie unique and tasty. For the complete recipe, check out the [Full Recipe]. {{image_2}} You can use many apples for your pie. While Granny Smith apples are popular, there are great alternatives. Try Honeycrisp apples for a sweet and tart flavor. Fuji apples offer a juicy and crisp bite. If you like softer apples, use McIntosh. They break down nicely when baked. Mixing different types can add depth to your pie's flavor. Want to make your apple pie even better? Consider adding flavor infusions. A splash of caramel can bring a rich sweetness. You can also stir in some raisins for a chewy texture. If you like spice, add a pinch of ginger or cloves. These little changes can make your classic apple pie unique and exciting. Not everyone can eat regular crust. You can make a gluten-free crust using almond flour or oat flour. These options are tasty and healthy. If you love a buttery crust, use a mix of butter and cream cheese. This creates a rich, flaky texture. Each crust offers a new twist to the classic apple pie. For the full recipe, refer to the section above. To keep your apple pie fresh, refrigerate it. Wrap the pie in plastic wrap. You can also use aluminum foil. This prevents it from drying out. Store it in the fridge for up to four days. Always let pie cool before wrapping. This helps keep the crust flaky. Freezing your apple pie is easy. You can freeze it uncooked or cooked. - For uncooked pie: Wrap it tightly in plastic wrap. Place it in a freezer bag. This keeps it fresh for up to three months. - For cooked pie: Let it cool completely. Wrap it in plastic wrap and foil. It can last for two to three months. To enjoy your pie again, reheating is key. - In the oven: Preheat to 350°F (175°C). Place the pie on a baking sheet. Heat for about 15 to 20 minutes. This keeps the crust crisp. - In the microwave: Use a microwave-safe plate. Heat a slice for about 30 seconds. This method is quick but may soften the crust. Using these methods, your apple pie will taste fresh and delicious! Enjoy your Classic Apple Pie Delightful and Simple Recipe! For the complete recipe, check the Full Recipe section. The best type of apple for apple pie is Granny Smith. These apples are tart, crisp, and hold their shape when baked. Their tartness balances the sweetness of sugar. Other great choices include Honeycrisp and Braeburn. Mixing different apples can add depth to the flavor. You want a firm apple that won't turn mushy. Yes, you can make apple pie ahead of time. To do this, prepare the pie filling and store it in the fridge. You can also assemble the pie and freeze it before baking. If you freeze it, wrap it tightly in plastic wrap and foil. This keeps it fresh. When ready to bake, do not thaw. Just add extra time to the baking. An apple pie lasts about 3 to 4 days in the fridge. Make sure to cover it well. If you freeze it, it can last up to 6 months. Signs of spoilage include a strange smell or mold. If you notice either, throw it away. Enjoy your pie fresh for the best taste! Making classic apple pie is simple and fun. We explored key ingredients like Granny Smith apples and sugar. I shared step-by-step instructions to mix and bake your pie perfectly. With tips for crust and flavor, you can impress anyone. Remember, variations let you get creative, adding your twist. Store leftovers right or freeze them for later. Finally, I hope this guide helps you enjoy making apple pie as much as I do! Happy baking!](https://easycookingbite.com/wp-content/uploads/2025/07/85a767df-abdc-414b-aa69-5983a6f1ac45-300x300.webp)

Sweet Potato Black Bean Chili Hearty and Filling Meal
Are you ready for a meal that warms your soul? Sweet potato black bean chili is not just hearty; it’s filled with flavor and…

