
Latest & Greatest

Homemade Chicken Stroganoff Creamy and Savory Dish
Get ready to dive into a warm bowl of Homemade Chicken Stroganoff! This creamy, savory dish combines tender chicken, fresh
Read more…
Loaded Baked Potato Gnocchi Simple and Tasty Recipe
Craving something warm and comforting? You’ve come to the right place! My Loaded Baked Potato Gnocchi recipe combines the classic
Read more…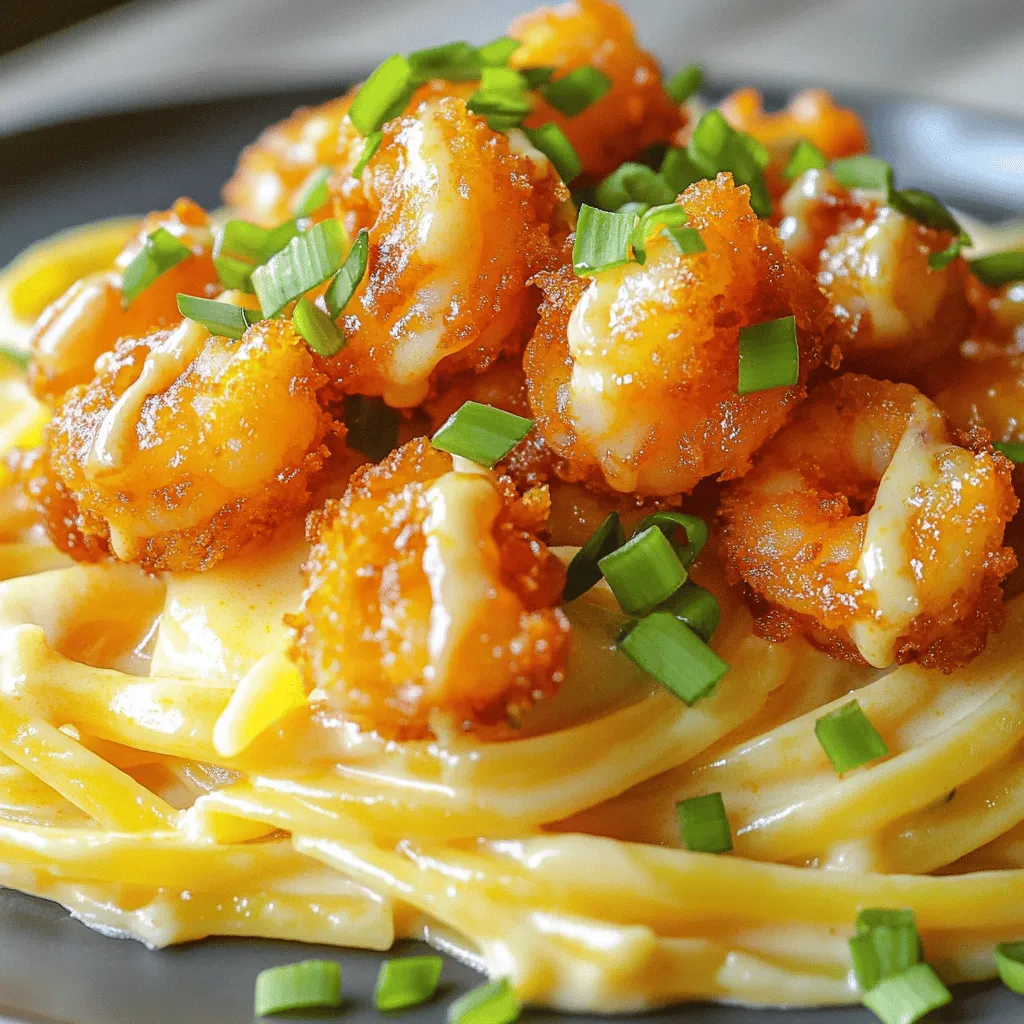
Bang Bang Shrimp Pasta Quick and Tasty Recipe
Craving a quick and tasty dinner? Look no further! This Bang Bang Shrimp Pasta recipe combines the perfect blend of
Read more…
Chorizo & Potato Egg Casserole Flavorful Comfort Dish
If you’re after a warm, filling dish that delights your taste buds, you’ve found it! The Chorizo & Potato Egg
Read more…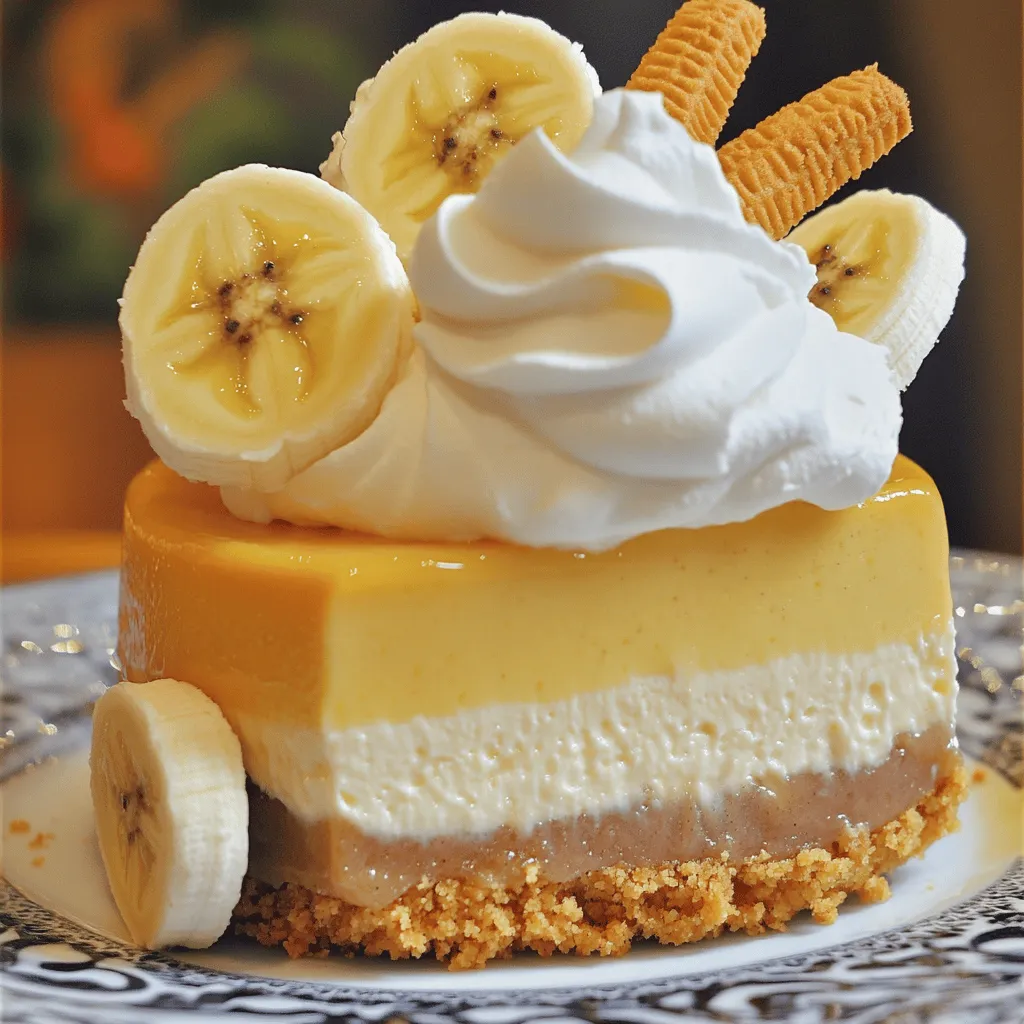
Banana Pudding Cheesecake Irresistible Dessert Recipe
Are you ready to indulge in a dessert that combines the best of two worlds? This Banana Pudding Cheesecake is
Read more…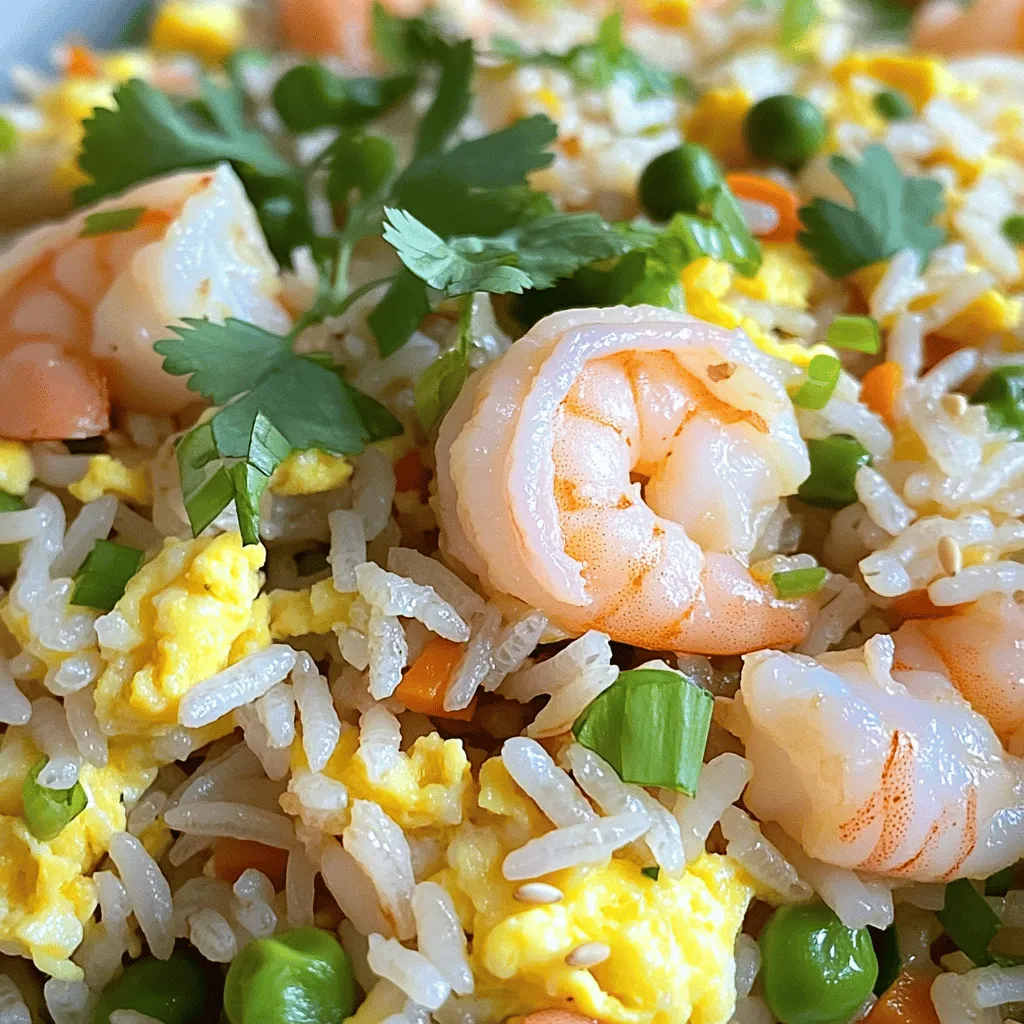
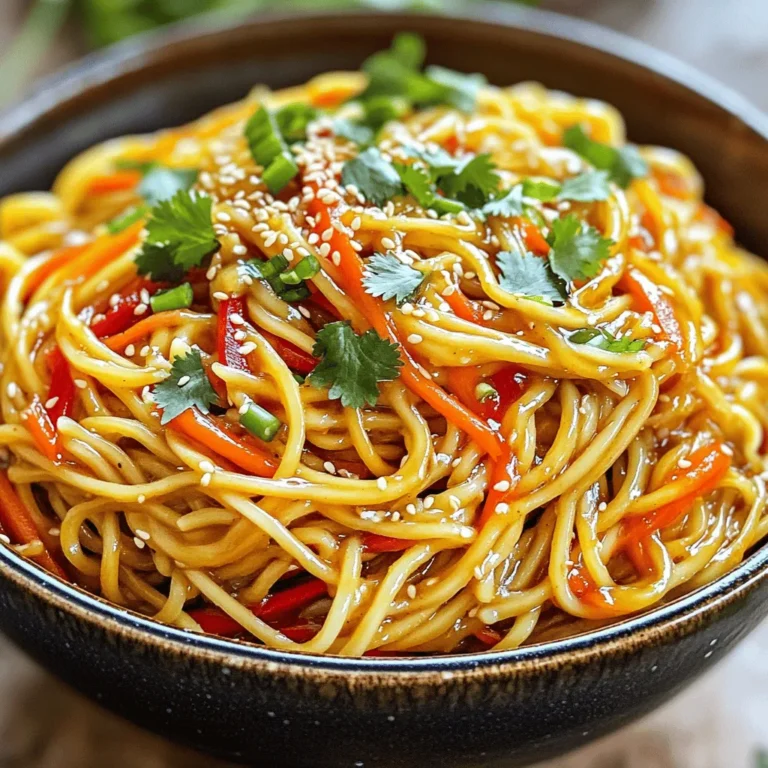
Chinese Style Shrimp Fried Rice Flavorful Dinner Dish
If you’re craving a quick and tasty dinner, you’ve come to the right place! Chinese Style Shrimp Fried Rice is
Read more…
German Potato Dumplings Easy Recipe for Beginners
Are you ready to master a classic dish with ease? German potato dumplings are a warm and filling delight that
Read more…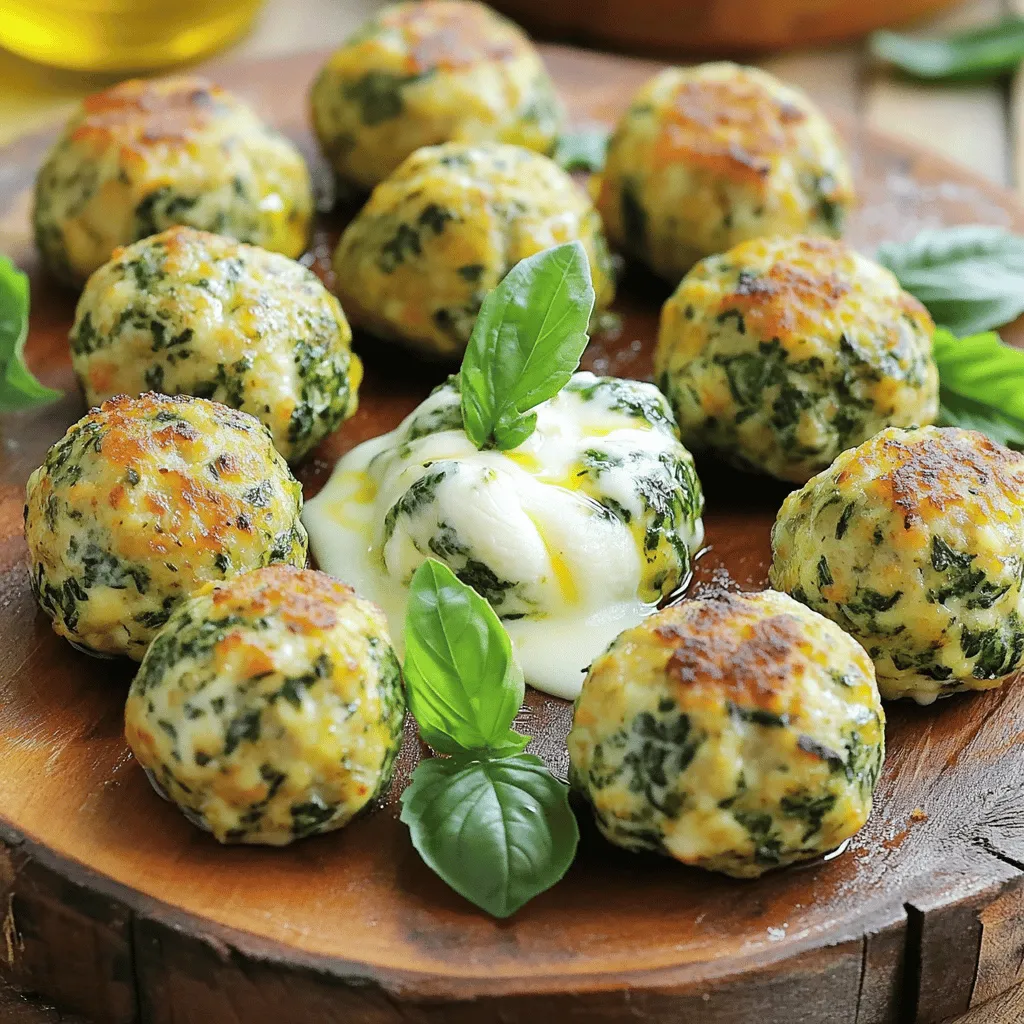
Spinach Garlic Mozzarella Meatballs Tasty and Simple
Are you ready to spice up your dinner routine? Discover my Spinach Garlic Mozzarella Meatballs, a simple and tasty way
Read more…browse recipes


S’mores Cookies Irresistible and Simple Treat Recipe
Get ready to indulge in a sweet treat that combines all your favorite campfire flavors! My S’mores Cookies recipe is easy and fun, perfect…
My Latest Drinks

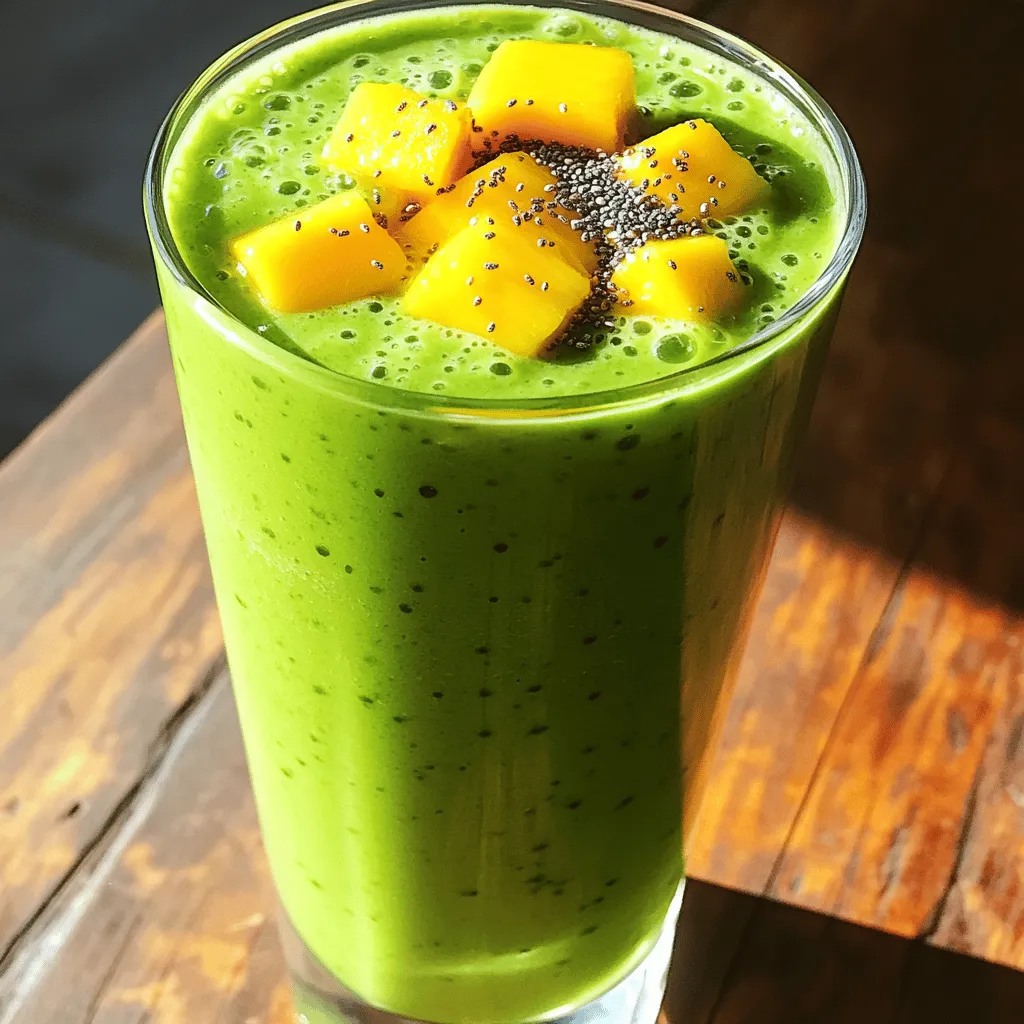
Tropical Green Smoothie Refreshing Health Boost Recipe
Looking for a refreshing drink that packs a health punch? My Tropical Green Smoothie is the perfect blend of fruits Read Full Recipe-
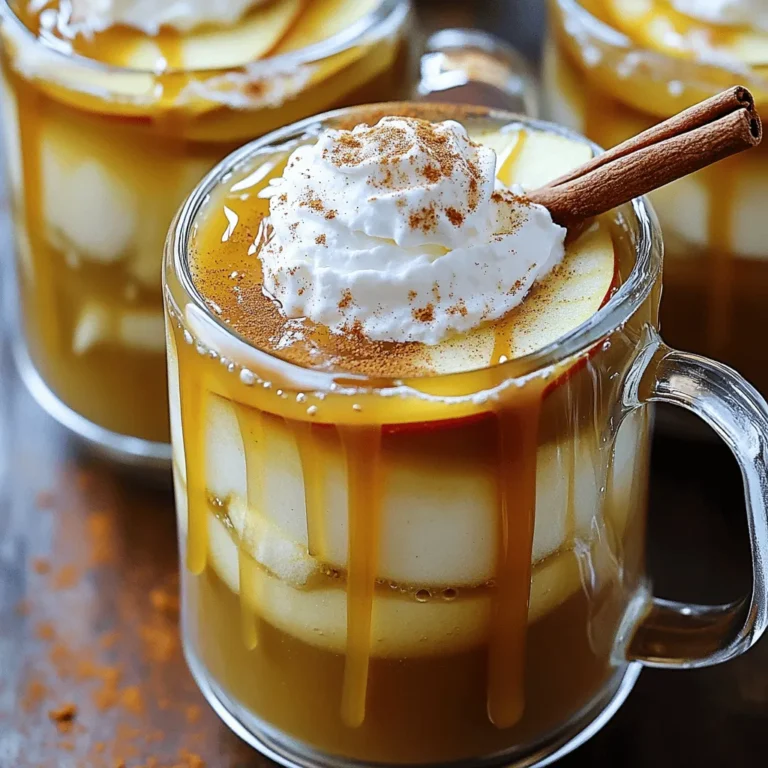
Apple Cider Harvest Punch Refreshing Fall Delight
Get ready for fall with my delicious Apple Cider Harvest Punch! This easy recipe blends fresh flavors that celebrate the Read Full Recipe -
Pineapple Coconut Smoothie Creamy and Refreshing Drink
Are you craving a drink that’s both creamy and refreshing? Look no further than my Pineapple Coconut Smoothie! This easy-to-make Read Full Recipe -
Delicious Caramel Apple Cider Cozy Fall Drink Recipe
Fall is here, and nothing says cozy like a warm cup of Caramel Apple Cider. This drink combines the sweet Read Full Recipe -
Instant Pot Apple Cider Quick and Flavorful Recipe
Looking for a quick and delicious way to make apple cider? The Instant Pot is your best friend! I’ll share Read Full Recipe -
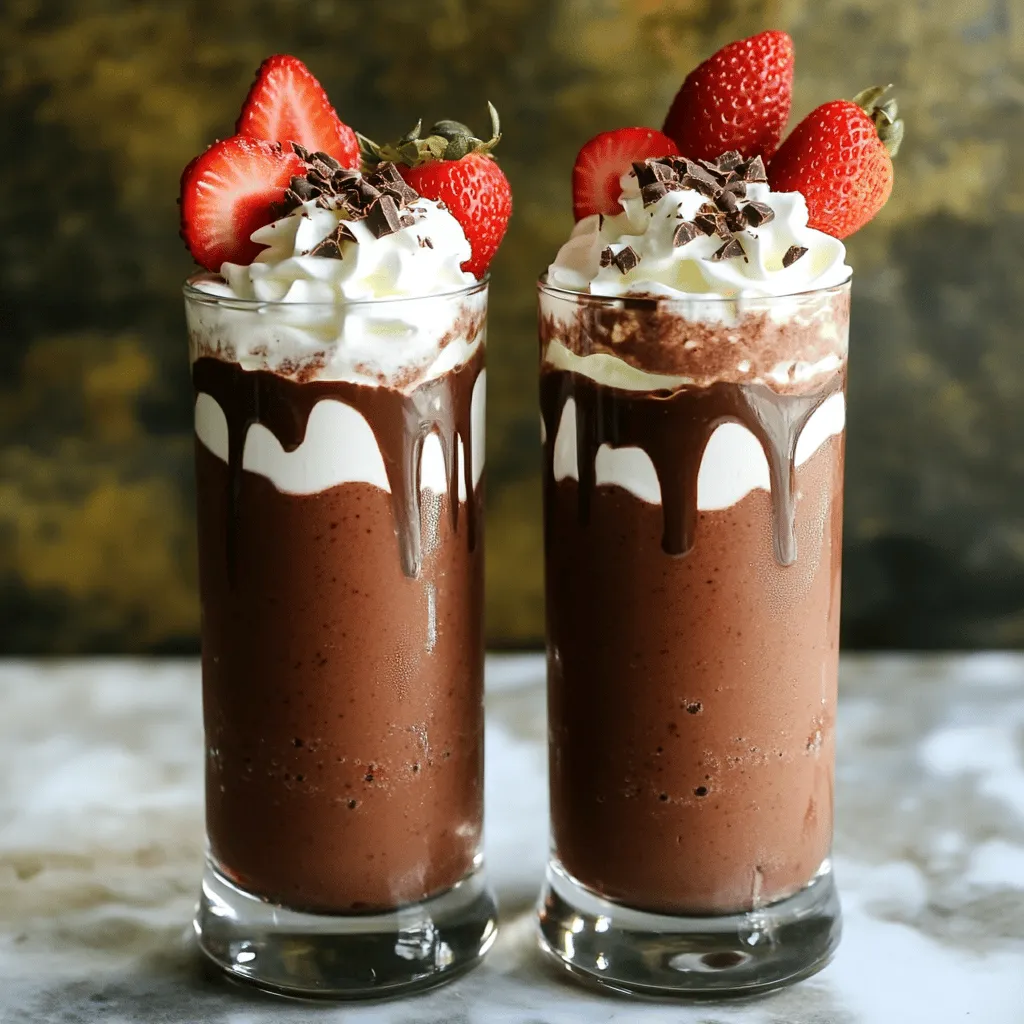
Chocolate Covered Strawberry Smoothie Delicious Treat
Craving something delicious and healthy? The Chocolate Covered Strawberry Smoothie is the perfect treat! With fresh strawberries, cocoa powder, and Read Full Recipe


My Latest Dinners
-
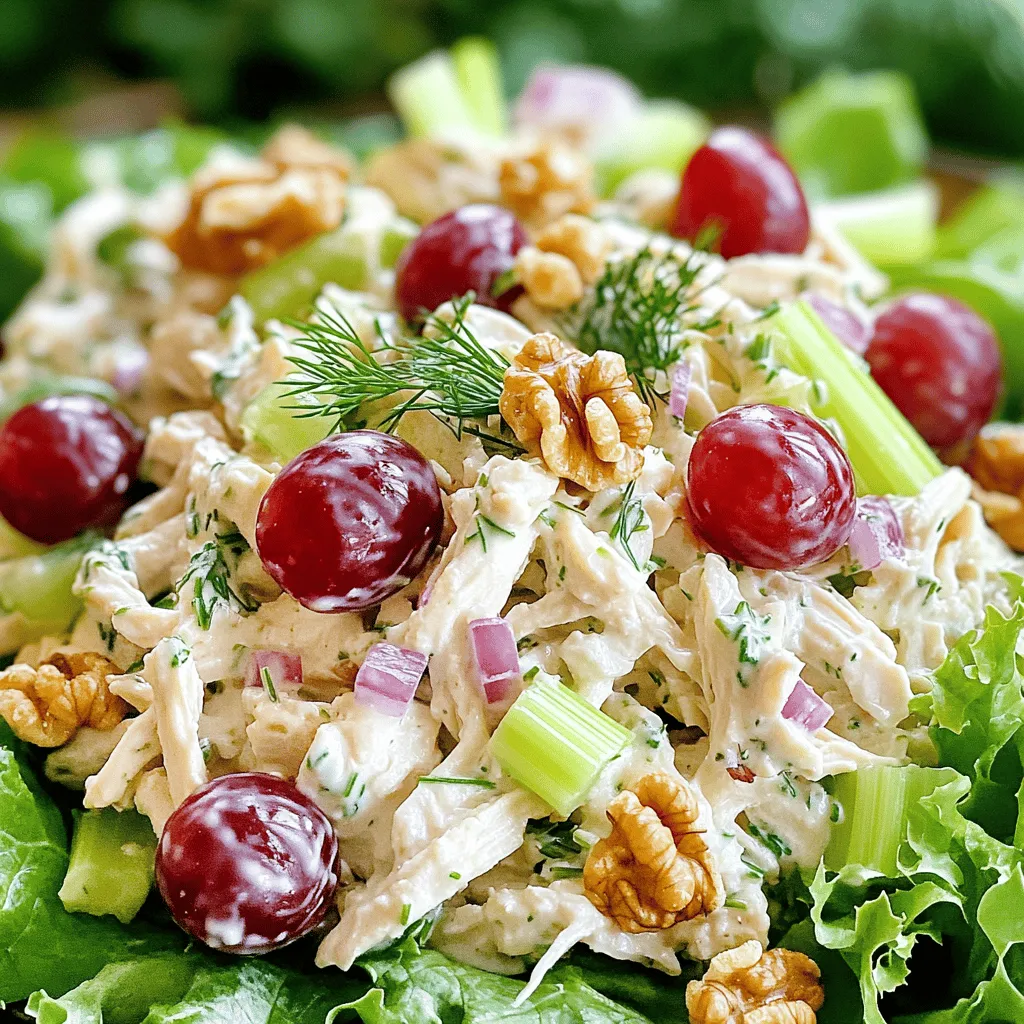
Greek Yogurt Chicken Salad Fresh and Flavorful Recipe
Looking for a fresh twist on a classic chicken salad? My Greek Yogurt Chicken Salad recipe is here to save Read Full Recipe -
Slow Cooker White Chicken Chili Easy and Flavorful Recipe
Looking for a warm, comforting meal that’s easy to make? My Slow Cooker White Chicken Chili is just what you Read Full Recipe -
Taco Stuffed Zucchini Boats Flavorful and Simple Dish
Looking for a fun, flavorful dish that packs a punch? Taco Stuffed Zucchini Boats are the answer! This easy recipe Read Full Recipe -
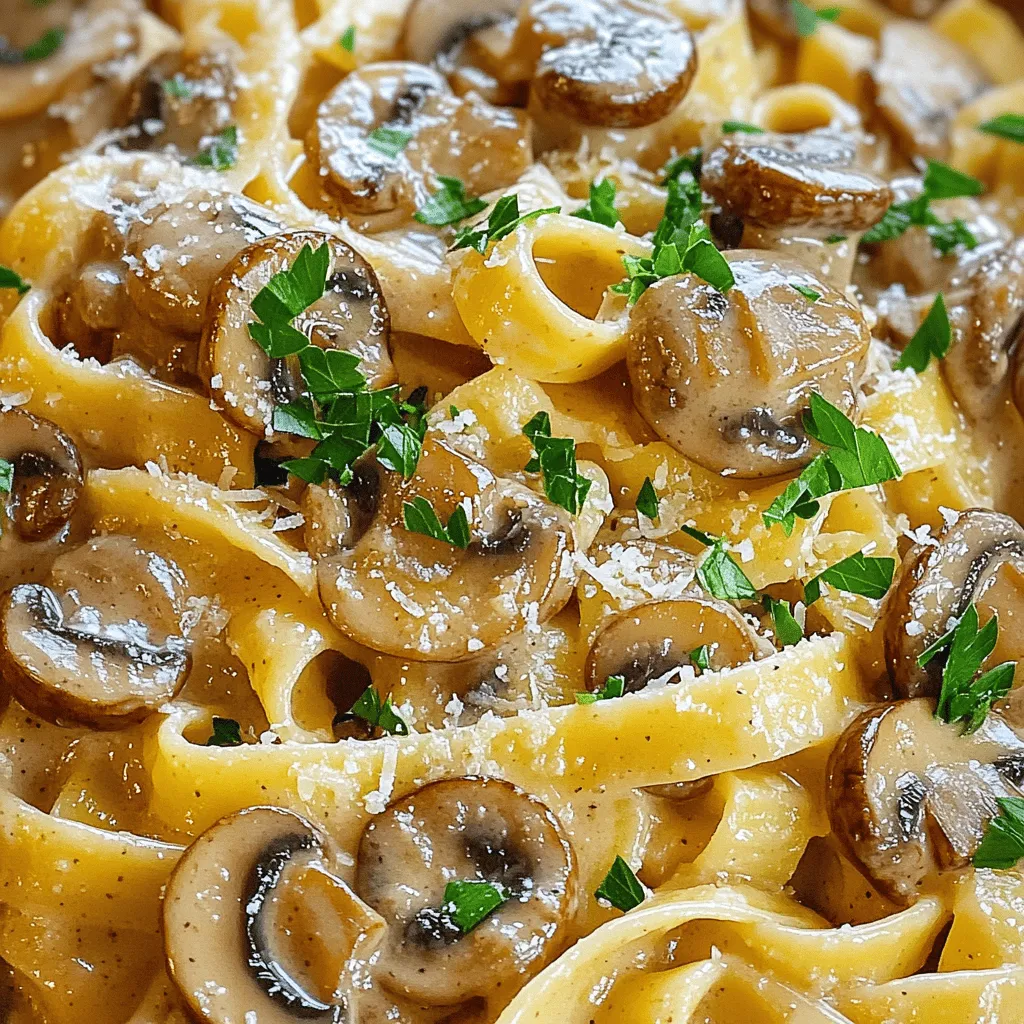
Creamy Mushroom Marsala Flavorful Dinner Delight
Are you ready to impress at dinner tonight? My Creamy Mushroom Marsala is a flavorful delight that will wow your Read Full Recipe -
Coconut Curry Chickpeas Flavorful and Easy Recipe
If you’re seeking a simple, tasty meal, look no further! My Coconut Curry Chickpeas recipe is a delightful blend of Read Full Recipe -
One-Pot Taco Rice Flavorful and Simple Dinner Delight
Looking for an easy and tasty dinner? Try my One-Pot Taco Rice! This simple dish combines savory flavors and requires Read Full Recipe


hey,
i’m !
I’m so happy you’re here!
Every dish I share is made with love and care. I hope they bring you the same comfort and joy they bring me. Let’s make memories, one recipe at a time.

![- 2 cups all-purpose flour - 1 cup granulated sugar - 1 tablespoon baking powder - ½ teaspoon salt - 1 teaspoon ground cinnamon - 1 cup whole milk - ½ cup unsalted butter, melted - 2 large eggs - 1 teaspoon vanilla extract - ½ cup packed brown sugar - 2 tablespoons ground cinnamon - 4 tablespoons unsalted butter, softened - 4 oz cream cheese, softened - 1 cup powdered sugar - 2 tablespoons milk - ½ teaspoon vanilla extract This recipe for cinnamon roll cake uses simple ingredients. You need both dry and wet items to create a soft and flavorful base. The dry ingredients mix together easily. First, whisk the flour, sugar, baking powder, salt, and cinnamon. The wet ingredients blend well too. Mix the milk, melted butter, eggs, and vanilla extract in another bowl. The cinnamon swirl adds a tasty twist. You’ll want brown sugar, cinnamon, and softened butter for that. The cream cheese glaze is a nice finish. It combines cream cheese, powdered sugar, milk, and vanilla extract. This glaze makes the cake even more special. For the full recipe, check the earlier section. Enjoy baking this delicious treat! 1. Preheat the Oven: First, set your oven to 350°F (175°C). Grab a 9x13 inch baking dish and grease it well. This helps the cake release easily after baking. 2. Mixing Dry Ingredients: In a large bowl, add 2 cups of all-purpose flour, 1 cup of granulated sugar, 1 tablespoon of baking powder, ½ teaspoon of salt, and 1 teaspoon of ground cinnamon. Whisk these together until they blend well. 3. Combining Wet Ingredients: In another bowl, combine 1 cup of whole milk, ½ cup of melted unsalted butter, 2 large eggs, and 1 teaspoon of vanilla extract. Mix them until smooth. Gradually add this wet mix to the dry mix. Stir until just combined, but don't overmix. 1. Making the Cinnamon Swirl Paste: In a small bowl, combine ½ cup of packed brown sugar, 2 tablespoons of ground cinnamon, and 4 tablespoons of softened unsalted butter. Mix until it forms a smooth paste. 2. Layering the Batter with Cinnamon Swirl: Pour half of the cake batter into the greased dish. Spread it evenly. Next, spoon dollops of the cinnamon swirl paste over the batter. Make sure to distribute it as evenly as you can. 1. Pouring the Remaining Batter: Carefully pour the rest of the cake batter over the cinnamon swirl. Use a spatula to spread it out evenly. 2. Baking the Cake to Perfection: Place the baking dish in your preheated oven. Bake for 28-35 minutes. To check if it’s done, insert a toothpick into the center. If it comes out clean, the cake is ready. 3. Making the Cream Cheese Glaze: While the cake bakes, prepare your glaze. In a medium bowl, whisk 4 oz of softened cream cheese until smooth. Gradually add 1 cup of powdered sugar, 2 tablespoons of milk, and ½ teaspoon of vanilla extract. Mix until creamy and pourable. 1. Cooling Time After Baking: Once the cake is done, take it out of the oven. Let it cool in the pan for about 10 minutes. This helps it set and makes it easier to cut. 2. Drizzling the Glaze Over the Cake: After cooling, drizzle your cream cheese glaze over the warm cake. Let it soak in for extra flavor. Enjoy making this cinnamon roll cake! For the full recipe, check out the [Full Recipe]. To keep your cake moist, follow these tips: - Use fresh ingredients. Old flour or baking powder can ruin your cake. - Avoid overmixing the batter. Mix just until combined for the best texture. - Consider adding a little more milk if the batter feels too thick. For the best cinnamon swirl, try this: - Make sure your cinnamon swirl paste is smooth. This helps it spread easily. - When layering the batter, use dollops of the swirl. This makes it easier to mix in. - After adding the top layer of batter, swirl gently. A knife or skewer works well. For a beautiful finish, slice the cake into squares. Serve on a nice platter. Here are some garnishing ideas: - Sprinkle additional cinnamon on top for color and flavor. - Add chopped nuts for a crunchy texture. - Drizzle extra cream cheese glaze over the top for a sweet touch. For pairing options, consider serving with: - Fresh fruit, like berries or sliced bananas. - A scoop of vanilla ice cream to complement the warmth of the cake. - A hot cup of coffee or tea to balance the sweetness. You can find the full recipe to make this delightful treat! {{image_2}} You can change this cinnamon roll cake to fit your taste. Adding nuts or fruits boosts flavor and texture. Consider adding walnuts, pecans, or even apples. These additions bring a lovely crunch and sweetness. Swirls of chocolate or caramel also make a fun twist. Just swirl in melted chocolate or caramel sauce into the batter. This adds richness and makes the cake even more delightful. Feel free to mix and match these ideas for a unique treat. If you need gluten-free options, you can use a gluten-free flour blend. Brands like Bob's Red Mill or King Arthur offer great choices. This way, everyone can enjoy this cake. For a vegan adaptation, replace eggs with flax eggs. Mix one tablespoon of flaxseed meal with three tablespoons of water for each egg. Use almond milk or oat milk instead of whole milk. Choose plant-based butter for a rich flavor. These adjustments keep the cake tasty and enjoyable for all diets. For the full recipe, refer to the Cinnamon Swirl Dream Cake section. To keep your cinnamon roll cake fresh, store it in the fridge. Use an airtight container or cover it tightly with plastic wrap. This helps keep moisture in and prevents the cake from drying out. In the fridge, the cake lasts for about 3 to 5 days. It's best to eat it sooner for the best taste. If you want to save your cake for later, freezing is a great option. First, let the cake cool completely. Then, cut it into slices. Wrap each slice in plastic wrap. Place the wrapped slices in a freezer bag or container. This method helps to keep the cake fresh for up to 3 months. When you're ready to enjoy the cake, take it out of the freezer. Place the slices in the fridge to thaw overnight. If you're in a hurry, you can thaw them at room temperature for a few hours. To reheat, pop the slices in the microwave for about 15-20 seconds. This adds warmth and makes the glaze nice and gooey. Can I use a different type of flour? Yes, you can use whole wheat flour or gluten-free flour. Each option gives a unique taste. Whole wheat may add a nutty flavor. Gluten-free flour can work well, too. Just ensure you check the blend for best results. How do I know when the cake is done baking? Check the cake at 28 minutes. Insert a toothpick in the center. If it comes out clean, the cake is ready. If it has wet batter on it, bake for a few more minutes. Can I make this cake in advance? Absolutely! You can bake the cake a day before. Let it cool, then cover it tightly. Store it in the fridge. Just reheat slices in the microwave for a few seconds. What can I use instead of cream cheese for the glaze? You can use Greek yogurt or a dairy-free cream cheese. Greek yogurt gives a nice tang. If using dairy-free, check the texture to ensure it can drizzle well. For the full recipe, refer back to the beginning of this article. You learned how to make a delicious cinnamon roll cake. We covered ingredients, step-by-step instructions, and helpful tips. I shared variations you can try, as well as storage info for your cake. This treat is perfect for any occasion. With practice, you can refine your skills. Have fun in the kitchen, and share your tasty results!](https://easycookingbite.com/wp-content/uploads/2025/04/7b32adac-7396-4868-adcd-6443a928d7af-300x300.webp)

![For the Savory Quinoa Salad with Feta, gather your ingredients to create a tasty dish. This salad is full of vibrant flavors and textures. You can find the complete recipe included below. Fresh ingredients make this salad pop. You will need: - 1 cup cherry tomatoes, halved - 1 cucumber, diced - 1 red bell pepper, diced - 1/2 red onion, finely chopped - 1/4 cup fresh parsley, chopped - 1/4 cup Kalamata olives, pitted and sliced These fresh items add crunch and color. The tomatoes bring sweetness, while cucumbers add a refreshing bite. The red onion gives a nice zing, and olives add a briny touch. Quinoa is the star of this dish. You will need: - 1 cup quinoa - 2 cups vegetable broth (or water) - 1 cup feta cheese, crumbled Quinoa is a great source of protein and fiber. It cooks up fluffy and light. Feta cheese adds creaminess and tang, bringing it all together. The broth makes the quinoa even more flavorful. Enjoy this nutrient-packed dish that balances flavors and textures! Start by rinsing the quinoa. Use a fine mesh strainer. This step removes the bitter taste. Next, bring two cups of vegetable broth or water to a boil in a medium saucepan. Add one cup of rinsed quinoa. Lower the heat, cover the pot, and let it simmer for 15 to 20 minutes. The quinoa will absorb all the liquid and turn fluffy. After cooking, remove it from heat and let it cool. While the quinoa cools, take a large bowl. In the bowl, combine one cup of halved cherry tomatoes, one diced cucumber, one diced red bell pepper, and half a finely chopped red onion. Add one-fourth cup of sliced Kalamata olives. Mix these fresh ingredients well to blend the colors and flavors. Once the quinoa is cool, add it to the bowl with the vegetables. Drizzle three tablespoons of olive oil and two tablespoons of lemon juice over the mixture. Sprinkle in one teaspoon of dried oregano, and season with salt and pepper to taste. Toss everything gently to combine. Finally, fold in one cup of crumbled feta cheese and one-fourth cup of chopped parsley. This adds a fresh aroma and enhances the dish. Allow the salad to sit for at least 15 minutes. This waiting time helps the flavors meld. For serving, use a large bowl or individual bowls. Garnish with a sprig of parsley and some extra feta for a stunning display. Enjoy this nutrient-packed dish, inspired by the [Full Recipe]. To boost flavor, try adding fresh herbs. Basil or mint works well. You can also add more lemon juice for a brighter taste. A pinch of chili flakes gives it a nice kick. Mix in some garlic for a savory touch. Always taste and adjust the seasoning to your liking. For a crunchy bite, add nuts or seeds. Almonds or sunflower seeds are great options. You can also switch up the quinoa. Use tri-color quinoa for more color and texture. If you like creaminess, try mixing in avocado. This will make the salad richer and smoother. Presentation matters! Serve the salad in a large bowl for sharing. Top it with a sprinkle of feta and parsley for color. For individual servings, use small bowls. You can layer the ingredients to show off the colors. A drizzle of olive oil on top adds a nice shine. For the complete recipe, check out the Full Recipe section. {{image_2}} You can change up the salad by adding more veggies. Try using spinach, kale, or arugula for a fresh twist. Carrots add a nice crunch, while roasted zucchini gives a warm flavor. You can also toss in some sweet corn or peas for extra sweetness. Each vegetable brings its own taste and nutrients. Want to boost the protein? Add cooked chicken, shrimp, or chickpeas. Black beans also work well for a hearty touch. If you like fish, grilled salmon adds a rich flavor. These protein options make the salad even more filling and satisfying. For a vegan version, skip the feta cheese. Use avocado or a dairy-free cheese instead. You can also mix in hemp seeds for extra protein and healthy fats. These swaps keep the salad tasty and nutrient-rich while fitting a vegan diet. Don't forget to check out the Full Recipe to create your own savory quinoa salad! After enjoying your savory quinoa salad, store leftovers in an airtight container. This will keep the salad fresh for up to three days in the fridge. Make sure to keep it cool. If you notice any moisture, drain it before sealing the container. Always check for any signs of spoilage before eating. You can freeze this salad, but it might change the texture of some ingredients. To freeze, place the salad in a freezer-safe container. It can last up to three months. However, I suggest freezing only the quinoa and veggies, leaving out the feta and fresh herbs. Add these back in when you thaw and serve. When you're ready to eat, thaw the salad overnight in the fridge. You can gently reheat the quinoa in the microwave. Add a splash of water or olive oil to keep it moist. Avoid reheating the feta, as it tastes best fresh. Mix the feta back in after reheating for the best flavor. Enjoy your meal! Yes, you can make this salad ahead of time. It tastes great when chilled. Just keep it in the fridge for up to three days. The flavors will blend nicely as it sits. To keep the feta fresh, add it just before serving. This way, it stays creamy and doesn’t get soggy. Quinoa cooks quickly. It usually takes about 15 to 20 minutes. Start by bringing your vegetable broth or water to a boil. Once you add the rinsed quinoa, reduce the heat and cover it. You’ll know it’s done when all the liquid is absorbed and the grains are fluffy. This salad pairs well with many dishes. Here are a few favorites: - Grilled chicken or fish adds protein. - Serve it with roasted veggies for more flavor. - A slice of crusty bread complements the meal nicely. - You can also enjoy it with a light soup on the side. These pairings make your meal even more satisfying and delicious. For more ideas, check the Full Recipe. This blog post covered a tasty salad recipe. We looked at fresh produce, grains, and dairy options. You learned step-by-step instructions for preparation, mixing, and serving. Our tips provided ways to enhance flavor and texture. We also explored variations, storage info, and answered common questions. Overall, making this salad is fun and easy. Enjoy your healthy dish any day!](https://easycookingbite.com/wp-content/uploads/2025/05/2ac94acb-0930-49f9-a95e-b04137fb382e-300x300.webp)
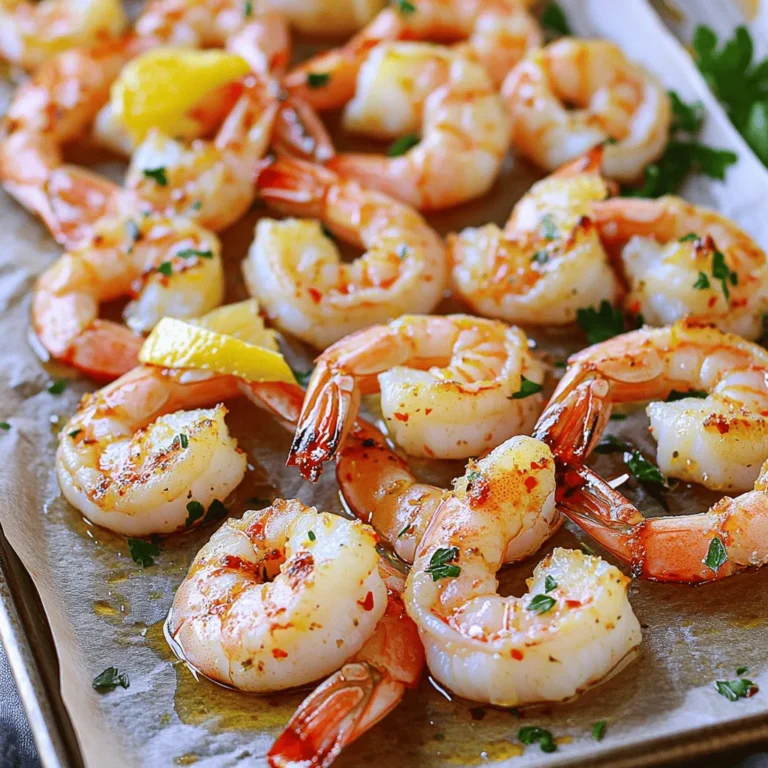
Lemon Garlic Shrimp Skewers Flavorful and Simple Recipe
Are you ready to elevate your dinner game? My Lemon Garlic Shrimp Skewers recipe is both flavorful and easy to make. With just a…
![- 1 pound large shrimp, peeled and deveined - 3 cloves garlic, minced - 1/4 cup fresh lemon juice - Zest of 1 lemon - 3 tablespoons olive oil - 1 teaspoon smoked paprika - 1 teaspoon dried oregano - Salt and pepper to taste - Fresh parsley, chopped for garnish - Bamboo or metal skewers (if using bamboo, soak in water for 30 minutes before grilling) You will need some simple tools to make this dish. First, grab a large bowl for mixing. A whisk helps blend the marinade. Use a grill or grill pan for cooking. Finally, have a set of skewers ready for threading the shrimp. These tools make cooking easy and fun! Now, let’s dive into the flavors. The garlic adds a strong taste, while lemon juice brightens each bite. The smoked paprika gives a warm touch. Together, they create a tasty mix that makes shrimp shine. This recipe is quick and perfect for gatherings. You can serve these skewers as a main dish or a fun appetizer. Whip them up for friends or family, and watch them disappear! For the full details, check out the Full Recipe. To start, gather all your ingredients for the marinade. In a large bowl, mix the minced garlic, lemon juice, lemon zest, olive oil, smoked paprika, oregano, salt, and pepper. Whisk them together until smooth. This marinade adds a burst of flavor to the shrimp. The garlic and lemon work well together, creating a bright taste that shines through. Next, add your shrimp to the bowl with the marinade. Make sure each shrimp is well coated. This step is key; it allows the flavors to soak in. Cover the bowl with plastic wrap and place it in the refrigerator. Let it marinate for 30 minutes. This wait time helps the shrimp absorb all that tasty goodness. While the shrimp marinates, preheat your grill or grill pan over medium-high heat. Once it’s hot, take the marinated shrimp and thread them onto skewers. Aim for about 4-5 shrimp per skewer. This makes them easy to handle. Cook the skewers on the grill for 2-3 minutes on each side. The shrimp should turn pink and opaque. You can check their doneness with a meat thermometer; they should reach 120°F (49°C). After grilling, let the skewers rest for a couple of minutes. Then, garnish them with chopped parsley before serving. For a fun touch, add lemon wedges on the side! For the full recipe, refer to the beginning of the article. Creating the best marinade is key to tasty shrimp skewers. Start with fresh garlic. Mince it finely for strong flavor. Use freshly squeezed lemon juice. The zest adds a bright touch. Olive oil helps the shrimp stay juicy. Smoked paprika gives a nice depth. Don’t forget salt and pepper to taste. Let the shrimp soak in the marinade for at least 30 minutes. This step is crucial for great flavor. Preheat your grill to medium-high heat. This ensures even cooking. If you use bamboo skewers, soak them first to prevent burning. Arrange the shrimp on skewers, about 4-5 per skewer. Keep space between each shrimp for even grilling. Cook them for 2-3 minutes on each side. Look for a pink, opaque color to know they are done. An internal temperature of 120°F (49°C) means they are safe to eat. Let them rest for a few minutes after grilling. Serve the skewers on a colorful platter. Add lemon wedges for a zesty pop. Fresh parsley not only looks great but also adds flavor. Pair the skewers with a crisp salad or rice. A light drink like lemonade or white wine complements the dish. For a fun twist, serve with a garlic aioli or a spicy dipping sauce. These choices enhance your meal and make it special. For the full recipe, check the section above. {{image_2}} You can mix veggies with your shrimp skewers. Bell peppers, zucchini, and cherry tomatoes work great. Cut them into bite-sized pieces. Toss them in the same marinade as the shrimp. This adds color, flavor, and texture. Plus, it makes the dish more filling. Grill the skewers as usual. The veggies will cook nicely alongside the shrimp. Want to change things up? Try different marinades! A honey soy glaze gives a sweet and salty taste. Simply mix honey, soy sauce, and ginger. For a spicy kick, use sriracha mixed with lime juice. You could even go for a creamy yogurt marinade with herbs for a Mediterranean twist. Each option will give your shrimp a new flavor profile. Not all shrimp are the same! You can use fresh or frozen shrimp, depending on what you find. Large shrimp are the best choice for skewers. They hold up well on the grill. But, you can also try smaller shrimp for a different look. Just adjust the cooking time, as smaller shrimp cook faster. For more details on how to make these skewers, check the Full Recipe. After enjoying your lemon garlic shrimp skewers, store any leftovers right away. Place them in an airtight container. This keeps them fresh and tasty. Try to use them within two days for the best flavor. Let the skewers cool down to room temperature before sealing. When it’s time to eat the leftovers, reheating is key. Preheat your oven to 350°F (175°C). Place the skewers on a baking sheet. Heat them for about 5 to 7 minutes. This method warms the shrimp evenly without drying them out. You can also use a microwave. Just heat for 30 seconds at a time, checking until warm. If you want to save some skewers for later, freezing is an option. Wrap each skewer tightly in plastic wrap. Then, place them in a freezer-safe bag. Remove as much air as possible to prevent freezer burn. You can freeze them for up to three months. When ready to cook, thaw in the fridge overnight before reheating. For the full recipe and more tips, check out the [Full Recipe]. You can tell shrimp are cooked when they turn pink and opaque. They should curl into a C shape. If they stay straight, they might be overcooked. The internal temperature should reach 120°F (49°C). Use a meat thermometer to check this. Cook them for about 2-3 minutes on each side. It’s quick, so keep an eye on them while grilling. Yes, you can use frozen shrimp for skewers. Just make sure to thaw them first. Do this in the fridge overnight or under cold water. Pat them dry before marinating. This helps the marinade stick better. Frozen shrimp are often just as tasty as fresh. They can be a great option for a quick meal. Lemon garlic shrimp skewers go well with many sides. Here are some tasty options: - Rice (white, brown, or jasmine) - Quinoa (light and fluffy) - Grilled vegetables (zucchini, bell peppers, or corn) - Salad (with mixed greens and a light dressing) - Garlic bread (to soak up the juices) These sides add color and flavor to your meal. They also help balance the dish. For more details, you can check the Full Recipe for Lemon Garlic Shrimp Skewers. In this blog post, we explored the full recipe for lemon garlic shrimp skewers. You learned how to prepare the marinade, marinate the shrimp, and grill the skewers to perfection. We also covered tips to enhance flavor, suggested variations like adding veggies, and provided storage info for leftovers. Try these shrimp skewers for a tasty meal. They are simple and fun to make. Enjoy experimenting with your favorite ingredients! Happy grilling!](https://easycookingbite.com/wp-content/uploads/2025/07/2fc01585-8b6c-4b9e-b706-a254e7e40e0d.webp)
