Are you ready to whip up a delightful treat that combines two fan favorites? Red Velvet Cheesecake Brownies are the perfect mix of rich chocolate and creamy cheesecake! In this post, I’ll guide you through easy steps to create these mouthwatering brownies. Whether you’re baking for a special event or just for fun, let’s dive into the sweet world of red velvet! You won’t want to miss these tips and tricks.
Why I Love This Recipe
- Decadent Flavor: The rich combination of red velvet and creamy cheesecake creates an indulgent treat that’s perfect for any occasion.
- Visual Appeal: The striking red color paired with the creamy white cheesecake layer makes these brownies as beautiful as they are delicious.
- Easy to Make: With straightforward steps and common ingredients, these brownies can be whipped up in no time!
- Perfect for Sharing: Cut into squares, these brownies are great for parties, potlucks, or just to enjoy with family and friends.
Ingredients
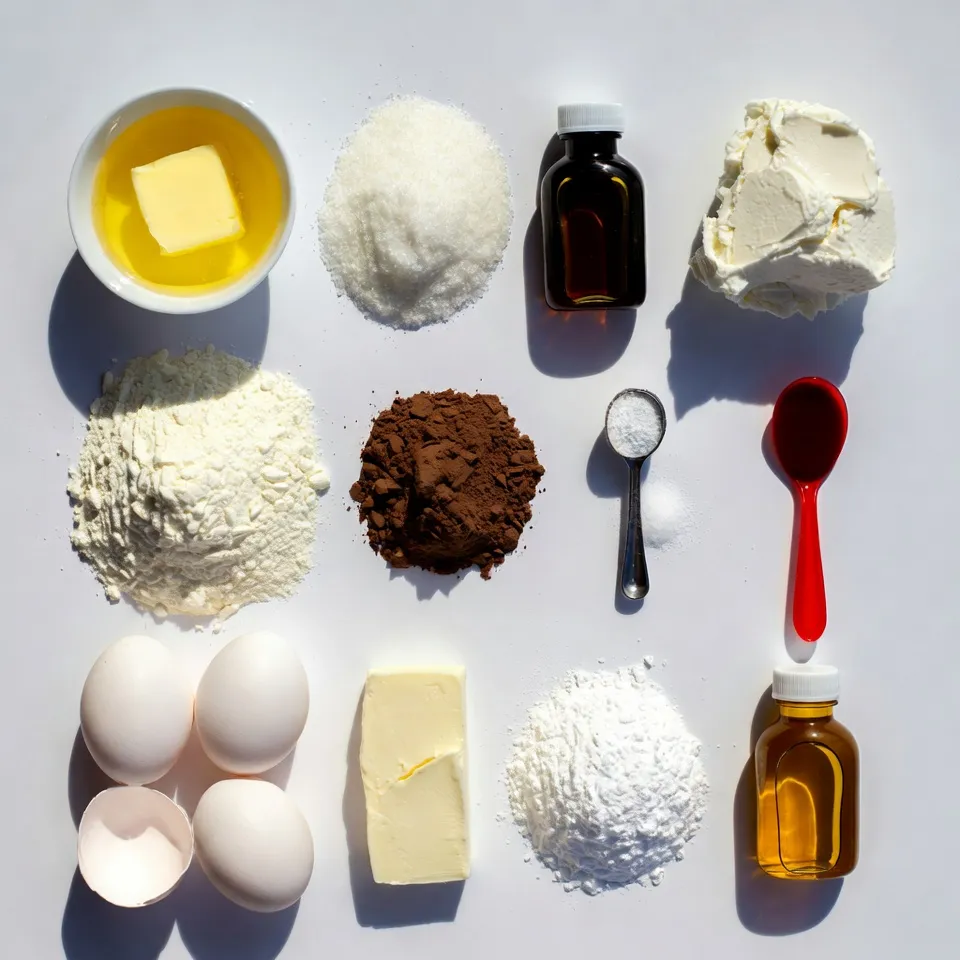
List of Ingredients with Measurements
To make these tasty red velvet cheesecake brownies, gather these ingredients:
– 1 cup unsalted butter, melted
– 1 ½ cups granulated sugar
– 1 teaspoon vanilla extract
– 4 large eggs
– 1 ¾ cups all-purpose flour
– ¼ cup unsweetened cocoa powder
– 1 teaspoon baking powder
– ½ teaspoon salt
– 1 tablespoon red food coloring
– 8 oz cream cheese, softened
– ½ cup powdered sugar
– 1 teaspoon vanilla extract (for cheesecake layer)
Essential Ingredients vs. Optional Additions
The key ingredients for this recipe are butter, sugar, eggs, flour, and cocoa powder. These create a rich brownie base. The red food coloring gives the brownies their signature look. The cream cheese layer is crucial too. It adds a creamy, sweet contrast.
Optional additions can include nuts or even chocolate chips if you want some crunch. These can enhance texture but are not needed for the main recipe.
Notes on Ingredient Quality
Use unsalted butter for a balanced flavor. It helps control the salt level in your brownies. For sugar, granulated is perfect for sweetness. Always use fresh eggs for the best texture.
When choosing flour, all-purpose works best. Make sure it is fresh to avoid a flat brownie. The cocoa powder should be unsweetened to balance the sweetness of the sugar.
For the red food coloring, gel or liquid options work. Gel gives a more vibrant color. Use high-quality cream cheese for a smooth cheesecake layer. A good brand will ensure a rich flavor.
Step-by-Step Instructions
Preparation of the Brownie Batter
Start by preheating your oven to 350°F (175°C). Grease a 9×13 inch baking pan. In a large bowl, mix 1 cup of melted butter, 1 ½ cups of granulated sugar, and 1 teaspoon of vanilla extract. Stir until smooth. Next, add 4 large eggs, one at a time. Mix well after each egg. In another bowl, sift together 1 ¾ cups of all-purpose flour, ¼ cup of cocoa powder, 1 teaspoon of baking powder, and ½ teaspoon of salt. Gradually add this dry mix to the wet mix. Stir just until combined. Finally, stir in 1 tablespoon of red food coloring. This gives the batter its bright color.
Making the Cream Cheese Layer
In a separate bowl, beat 8 oz of softened cream cheese until it’s creamy. Gradually add ½ cup of powdered sugar and 1 teaspoon of vanilla extract for the cheesecake layer. Mix until the cream cheese is smooth and fluffy. This layer adds a rich taste that pairs well with the red velvet brownie.
Baking and Cooling Process
Pour half of the brownie batter into the greased pan and spread it evenly. Spoon the cream cheese mixture over this layer, spreading it out. Then, pour the rest of the brownie batter on top. Use a knife to gently swirl the layers together for a marbled effect. Bake in the oven for 30-35 minutes. Check with a toothpick; it should come out with a few moist crumbs. Once done, let the brownies cool in the pan for about 15 minutes. Then, move them to a wire rack to cool completely before cutting them into squares.
Tips & Tricks
Common Mistakes to Avoid
When making red velvet cheesecake brownies, keep these points in mind:
– Overmixing the batter can lead to tough brownies. Mix just until combined.
– Not measuring ingredients correctly can change the texture. Always use a scale or measuring cups.
– Skipping the cooling time can make it hard to cut neat squares. Patience pays off!
How to Achieve the Perfect Swirl
Creating a beautiful swirl is key for presentation. Follow these steps:
– When layering the cheesecake mix, do not spread it too thin.
– Use a knife or a toothpick to gently create swirls.
– Don’t over-swirl! Too much mixing can make it look muddy. Aim for a marbled look.
Serving Suggestions for Presentation
Presentation is important for these brownies. Try these ideas:
– Serve on a bright plate to highlight the red color.
– Dust the top with powdered sugar for a snowy effect.
– Add fresh raspberries or strawberries on the side for color.
– A dollop of whipped cream adds richness and looks appealing.
Pro Tips
- Use Room Temperature Ingredients: Ensure that your cream cheese is at room temperature for a smoother cheesecake layer. This helps in achieving a creamy texture without lumps.
- Don’t Overmix the Batter: When combining the dry and wet ingredients, mix until just combined. Overmixing can lead to dense brownies instead of the desired fudgy texture.
- Swirl Carefully: When creating the marbled effect, use a gentle hand with the knife. Too much swirling can blend the layers too much, losing the striking red and white contrast.
- Cool Completely Before Cutting: Allow the brownies to cool completely on a wire rack before cutting. This helps them set up properly and makes for cleaner edges when slicing.
Variations
Adding Nuts or Chocolate Chips
You can make your brownies even better by adding nuts or chocolate chips. Walnuts or pecans add a nice crunch. Just chop them up and mix in about half a cup. If you love chocolate, add a cup of chocolate chips. They melt into the brownies and give a rich flavor. Mix these in right before you pour the batter into the pan. This small change makes a big impact.
Gluten-Free Adaptation
To make these brownies gluten-free, use a gluten-free flour blend. Many stores sell this blend, and it works well in most recipes. Replace the all-purpose flour with the same amount of gluten-free flour. This way, you keep the same chewy texture. Be sure to check that all other ingredients are also gluten-free. This option lets everyone enjoy these treats.
Different Flavor Combinations
You can also try new flavors to change things up. For a minty twist, add a teaspoon of peppermint extract to the cheesecake layer. If you prefer fruit flavors, mix in a bit of orange or lemon zest. This brightens the taste and adds freshness. Experiment with spices too; a pinch of cinnamon can add warmth. Each new flavor gives you a chance to enjoy these brownies in a whole new way.
Storage Info
Best Ways to Store Brownies
To keep your red velvet cheesecake brownies fresh, store them in an airtight container. Place parchment paper between layers to avoid sticking. You can also wrap them in plastic wrap for extra protection. Store the container in a cool, dry place. Avoid direct sunlight to maintain their texture and flavor.
Freezing Instructions
If you want to keep brownies longer, freezing works well. First, let them cool completely. Cut the brownies into squares. Wrap each piece tightly in plastic wrap. Then, place them in a freezer-safe bag or container. They can freeze for up to three months. When ready to eat, thaw them in the fridge overnight.
How Long They Stay Fresh
These brownies stay fresh for about 5 to 7 days at room temperature. If you store them in the fridge, they can last up to 10 days. However, the best taste comes when they are a few days old. Enjoy them while they are soft and creamy for the best experience!
FAQs
How can I make the cheesecake layer more flavorful?
To boost the flavor of the cheesecake layer, add a splash of lemon juice. This adds a nice tang. You can also mix in some chocolate chips or a hint of almond extract. These flavors blend well and make the cheesecake richer. Try using a flavored cream cheese, like strawberry, for a fun twist. Experiment with your favorite flavors to find what you love most!
Can I use a different food coloring?
Yes, you can use other food coloring options! While red is classic, you can try pink or purple for a unique look. Gel food coloring works best, as it gives vibrant color without changing the batter’s texture. Just remember to adjust the amount based on the brand and shade. Always start with a small amount and add more until you reach your desired color.
Where can I buy pre-made red velvet cheesecake brownies?
Finding pre-made red velvet cheesecake brownies can be fun! Check local bakeries or specialty dessert shops. Many grocery stores also offer them in their bakery section. If you prefer online options, several websites sell gourmet brownie assortments. Just make sure to read reviews to find a trusted source. Enjoy the convenience of having a sweet treat ready to go!
This blog post covered how to create delicious red velvet cheesecake brownies. We explored essential and optional ingredients, with a focus on quality. You learned step-by-step instructions for making the batter and cream cheese layer, baking, and cooling.
Remember to avoid common mistakes for the best results. Try different flavor combinations and adapt the recipe for gluten-free options. Store brownies correctly to enjoy them longer. With these tips, you can make a tasty treat that impresses. Enjoy sharing your masterpiec