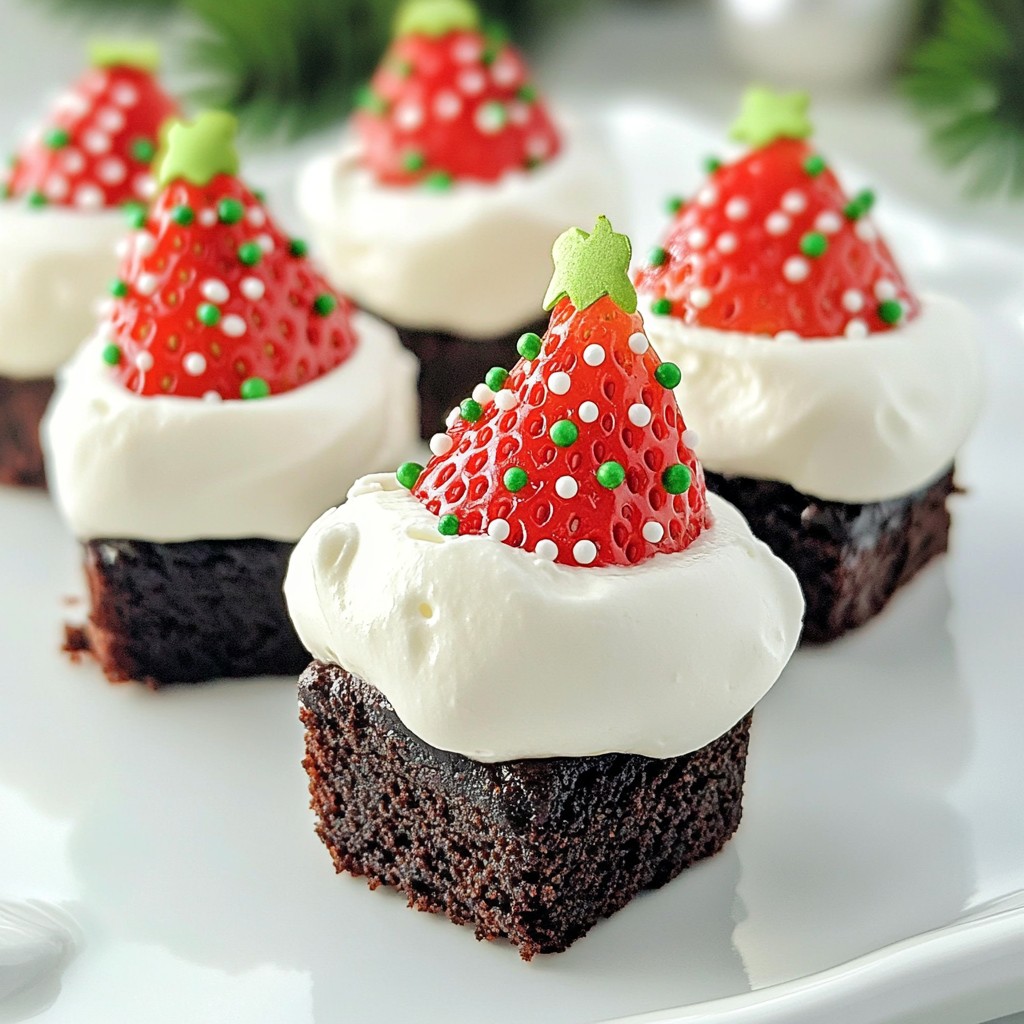
Get ready to spread some holiday cheer with Santa Hat Brownie Bites! These festive treats are super simple to make and perfect for parties. With just a few easy ingredients like brownie mix, strawberries, and whipped cream, you can create a fun dessert that will wow your guests. Follow my step-by-step guide to assemble these adorable bites and keep the holiday spirit alive. Let’s dive into this delicious project!
Why I Love This Recipe
- Festive Presentation: These Santa Hat Brownie Bites are not only delicious but also visually stunning, making them a perfect holiday treat.
- Easy to Make: With a simple brownie mix as the base, this recipe is quick and easy, allowing you to whip up a batch in no time.
- Customizable: You can easily adapt the toppings and decorations to suit your taste or the occasion, making them versatile for any celebration.
- Great for Sharing: These bite-sized treats are perfect for parties and gatherings, allowing everyone to enjoy a little taste of holiday cheer.
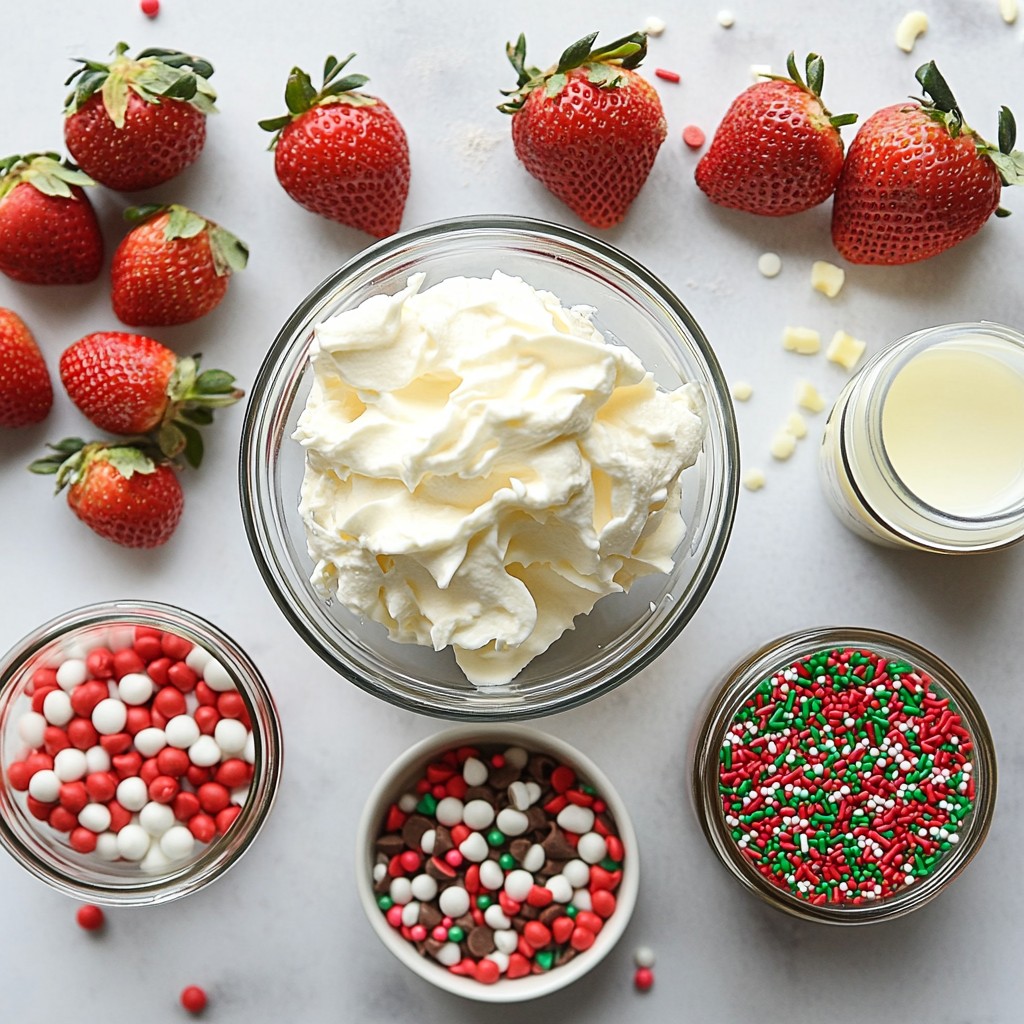
Ingredients
Main Ingredients Needed
- 1 box brownie mix (plus required ingredients: eggs, water, oil)
- 12 fresh strawberries (tops removed)
- 1 cup whipped cream (or canned whipped topping)
- 1/2 cup white chocolate chips
- Red and green sprinkles (for decoration)
- Optional: 1 tablespoon coconut oil (for melting chocolate)
To make Santa Hat Brownie Bites, you need simple ingredients. The brownie mix is the star. It gives us that rich, chocolaty base. You will also need fresh strawberries. These will make the hat's top. Whipped cream adds a fun touch. It looks like the fur on a Santa hat. White chocolate chips are for melting. They create a snowy layer on the brownie. Don't forget the sprinkles! They add a splash of color. If you want, use coconut oil to help melt the chocolate. This makes it smooth and easy to dip. Gather all these ingredients, and you're ready to bake.
Step-by-Step Instructions
Preparing the Brownie Batter
Start by preheating your oven. Follow the instructions on the brownie mix box. Next, take your mini muffin tin and grease it well or line it with paper liners. This helps the brownie bites come out easily. Now, grab your brownie mix and the needed ingredients, like eggs, water, and oil. Mix them together until you have a smooth batter.
Baking the Brownie Bites
Fill each muffin cup about two-thirds full with the brownie batter. Bake them according to the package instructions. This usually takes about 18 to 20 minutes. To know if they are done, insert a toothpick in the center. It should come out with a few moist crumbs. Once baked, let the brownie bites cool in the pan for a while. Then, move them to a cooling rack to cool completely.
Assembling Santa Hat Brownie Bites
While the brownie bites cool, it’s time to melt the white chocolate chips. You can mix in coconut oil if you want a smoother texture. Use a microwave-safe bowl and melt the chocolate in 30-second intervals. Stir after each interval until it is fully melted.
Now, dip the top of each cooled brownie bite into the melted white chocolate. Allow any extra chocolate to drip off. This creates a snowy base for your Santa hats. Next, take a fresh strawberry, remove the tops, and place it upside down on each chocolate-dipped brownie. The pointy end should face up.
Add a dollop of whipped cream on top of the strawberry. This looks like the fur of Santa’s hat. Finally, sprinkle red and green sprinkles around the base of the strawberries and on the whipped cream. This adds that festive touch! Serve your Santa Hat Brownie Bites on a nice platter and enjoy the fun of the season!
Tips & Tricks
Baking Tips for Perfect Brownies
To make your brownies perfect, follow these steps:
- Grease your mini muffin tin well to avoid sticking. You can use cooking spray or butter.
- Bake the brownies until a toothpick comes out with a few moist crumbs. This means they are done but still soft.
Decorating Ideas
Get creative with your toppings! Here are some fun ideas:
- Instead of whipped cream, try using cream cheese frosting for a richer taste.
- Add colorful sprinkles or crushed candy canes for extra festive flair.
Serving Suggestions
These brownie bites shine at holiday gatherings. Serve them at:
- Christmas parties or family get-togethers.
- School events or holiday bake sales.
For plating, use a festive platter. Arrange the brownie bites in a circle. Top with extra sprinkles for a cheerful look.
Pro Tips
- Use Room Temperature Ingredients: Ensure that your eggs and water are at room temperature for a smoother brownie batter.
- Don’t Overbake: Keep an eye on your brownie bites while baking; they are done when a toothpick comes out with a few moist crumbs.
- Chill the Strawberries: For a refreshing taste, chill your strawberries before using them as hats; this will enhance their flavor and make them firmer.
- Decorate Wisely: Be creative with your sprinkles! Use edible glitter or colored sugars to elevate the festive look of your Santa Hats.
Variations
Gluten-Free Option
You can easily make these Santa Hat Brownie Bites gluten-free. Just use a gluten-free brownie mix. These mixes taste great and work well in this recipe. Follow the box instructions just like you would with regular mix. This way, everyone can enjoy these festive treats!
Vegan Version
Want a vegan version? It's simple. Substitute the eggs with flax eggs or applesauce. Use plant-based whipped cream instead of regular cream. These changes keep the flavor rich while making it vegan. You still get a fun and festive treat!
Flavor Variations
You can add fun flavors to the brownie mix. Try adding a teaspoon of mint extract for a minty twist. If you love caramel, swirl some caramel sauce into the brownie batter. You can also mix in chocolate chips or nuts for extra texture. These small changes make each bite unique and delicious!
Storage Info
Short-Term Storage
To store Santa Hat Brownie Bites in the fridge, place them in an airtight container. Make sure they are completely cool before sealing. This will keep them fresh and moist for about three days. If you have leftover whipped cream, store it separately in the fridge.
Long-Term Storage
For long-term storage, you can freeze the brownie bites. First, place them on a baking sheet and freeze until firm. Then, transfer them to a freezer-safe bag or container. They can last up to three months in the freezer. To thaw, leave them in the fridge overnight before serving.
Shelf Life of Santa Hat Brownie Bites
These festive treats taste best when eaten within three days of making them. After that, the brownies may dry out, and the strawberries can lose their freshness. Enjoy them while they are at their best for a delightful holiday snack!
FAQs
Can I make these brownie bites ahead of time?
Yes, you can prepare these brownie bites in advance. Bake the brownie bites and let them cool. Store them in an airtight container at room temperature for up to two days. You can also freeze them for longer storage. Just wrap each bite in plastic wrap before placing them in a freezer bag. Thaw them in the fridge before decorating.
What can I substitute for white chocolate?
If you need a white chocolate substitute, try using dark chocolate or milk chocolate. Just melt it the same way as you would with white chocolate. You can also use yogurt chips for a slightly different taste. For a fun twist, try peanut butter chips for added flavor.
How do I make the whipped cream stay stable?
To make your whipped cream stable, add a bit of powdered sugar. This helps it hold its shape better. You can also mix in some cornstarch or instant pudding mix. These additions help keep the cream firm and fluffy. Make sure to whip until soft peaks form for the best results.
You learned how to make Santa Hat Brownie Bites in this post. We covered the ingredients, step-by-step instructions, and tips for success. You can create these treats for any festive occasion. Remember to try different flavors, toppings, and storage methods we discussed. These brownies are fun to make and share with friends and family. Enjoy your baking journey and the smiles these tasty treats bring!