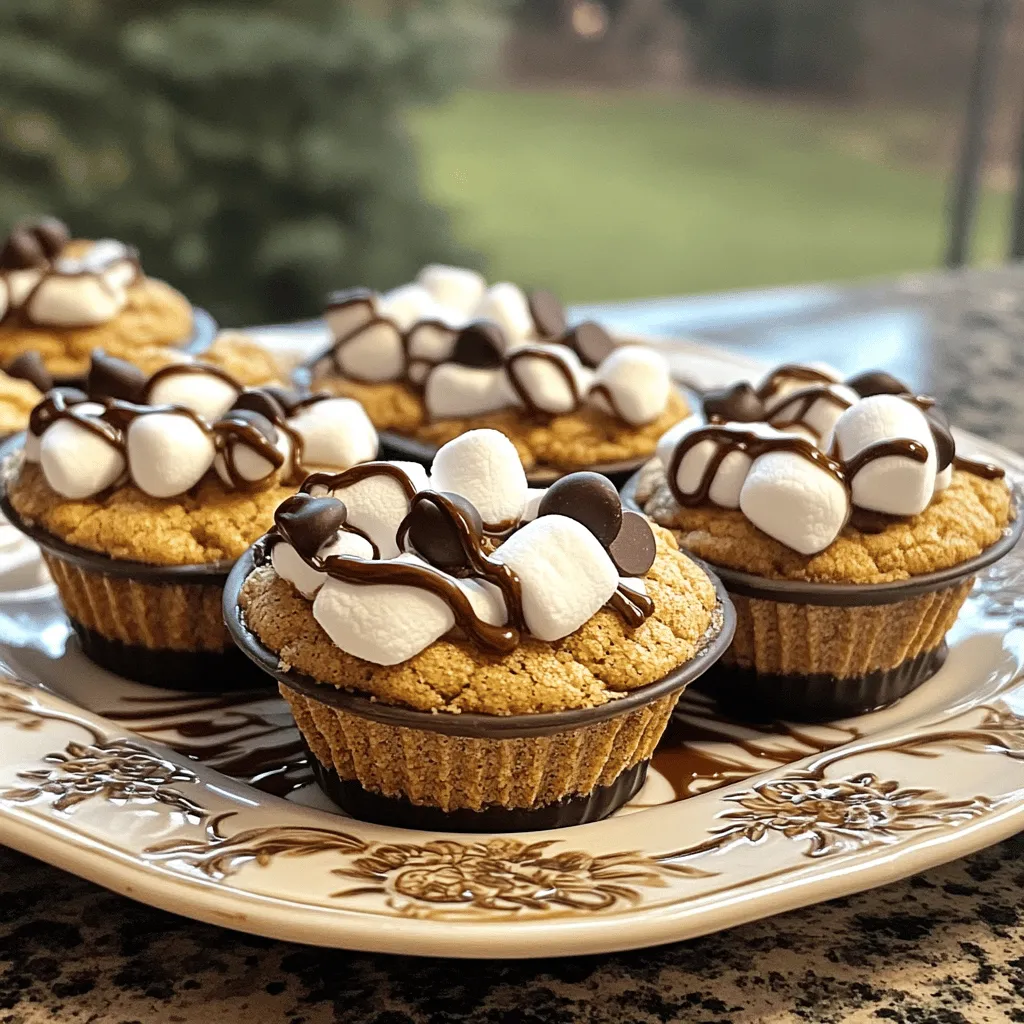
Are you ready to indulge in a sweet treat that combines the joy of s’mores with a cookie cup? In this easy recipe for S’mores Cookie Cups, I’ll guide you step-by-step to create a delicious dessert that’s perfect for sharing or enjoying solo. With simple ingredients and easy-to-follow directions, you’ll impress friends and family in no time. Let’s dive into the world of gooey chocolate and toasted marshmallows!
Ingredients
Complete List of Ingredients
To make S’mores Cookie Cups, gather these simple ingredients:
– 1 cup graham cracker crumbs
– 1/4 cup sugar
– 1/2 cup unsalted butter, melted
– 1 cup all-purpose flour
– 1/2 teaspoon baking soda
– 1/4 teaspoon salt
– 1 cup chocolate chips (milk or dark)
– 1 cup mini marshmallows
– 1/2 teaspoon vanilla extract
– Extra chocolate chips and marshmallows for topping
Ingredient Substitutions
You can swap some ingredients if needed. Here are some ideas:
– Use oat flour instead of all-purpose flour for a gluten-free option.
– Replace unsalted butter with coconut oil for a dairy-free choice.
– Dark chocolate chips can be used instead of milk chocolate for a richer taste.
– For a healthier sweetener, try honey or maple syrup in place of sugar.
Tips for Selecting Quality Ingredients
Choosing the right ingredients makes a big difference. Here are some tips to guide you:
– Look for fresh graham crackers. They should be crisp and not stale.
– Choose high-quality chocolate chips. They should melt well and have good flavor.
– Pick mini marshmallows that are soft and fluffy. This ensures they melt nicely.
– Use unsalted butter for better control over the sweetness of your cookie cups.
With these tips, you can create S’mores Cookie Cups that are not just tasty but also have great texture and flavor. Enjoy baking!
Step-by-Step Instructions
Prepping the Oven and Muffin Tin
First, you need to set your oven. Preheat it to 350°F (175°C). While it warms up, get your muffin tin ready. Use cooking spray or butter to grease each cup. This step helps the cookie cups come out easily after baking.
Preparing the Graham Cracker Base
Now, grab a medium bowl. Mix one cup of graham cracker crumbs with a quarter cup of sugar. Pour in half a cup of melted butter. Stir until you get a crumbly mix. This will be the base of your cookie cups.
Take about one tablespoon of this mixture. Press it firmly into the bottom of each muffin cup. Make sure it is even and packed tightly. This base will hold everything together.
Making the Cookie Dough Filling
In another bowl, mix one cup of all-purpose flour, half a teaspoon of baking soda, and a quarter teaspoon of salt. Combine these dry ingredients well. Gradually add this mix to your graham cracker base. Don’t forget to add half a teaspoon of vanilla extract. Mix until everything is just combined.
Assembling the Cookie Cups
It’s time to build your cookie cups. Spoon the cookie dough on top of the graham cracker base. Fill each cup about halfway. Then, sprinkle in about three to four chocolate chips. Add four to five mini marshmallows on top of that.
Use the leftover cookie dough to lightly cover the chocolate and marshmallows. It doesn’t have to look perfect. Just make sure everything is tucked in nicely.
Baking Time and Indicators
Place your muffin tin in the oven. Bake for 10 to 12 minutes. Watch for the cookie cups to turn lightly golden. They should look cooked through.
When they are done, take them out. Press a few extra chocolate chips and marshmallows into the top of each cup right away. Let them cool in the pan for about five minutes. Then, transfer them to a wire rack to cool completely. Enjoy the sweet scent while they cool!
Tips & Tricks
Achieving the Perfect Cookie Cup Texture
To get the best cookie cups, you need the right texture. Start by mixing the graham cracker crumbs and sugar well. Then, add melted butter and combine. This mix forms a crumbly base. Press this mixture firmly into each muffin cup. This step gives your cookie cups a strong foundation. For the cookie dough, mix flour, baking soda, and salt. Add this mix to the graham cracker base. Don’t over-mix; just combine until it looks good. This helps keep your cookie cups soft and chewy.
Recommended Baking Tools
Using the right tools makes baking easier. Here are a few must-haves:
– Muffin tin: A standard 12-cup muffin tin works best.
– Mixing bowls: Use medium bowls for mixing dry and wet ingredients.
– Measuring cups: Accurate measurements are key for great results.
– Spatula: A silicone spatula helps mix without sticking.
– Cooling rack: This allows air to circulate and cool the cookie cups evenly.
Common Mistakes to Avoid
Avoiding simple mistakes can save your cookie cups. Here are some tips:
– Not greasing the muffin tin: This can lead to sticking.
– Over-mixing the dough: This can make your cups tough.
– Skipping the extra toppings: Adding chocolate chips and marshmallows on top makes a big difference.
– Not cooling before removing: Wait five minutes before transferring them to a rack. This helps them hold their shape.
Variations
Flavor Variations
You can switch up the flavors in your S’mores Cookie Cups. For a nutty twist, add some chopped nuts. Walnuts or pecans work well. They add a nice crunch and flavor. You can also try fruit-infused cups. Add a spoonful of fruit jam or fresh berries. Strawberries or raspberries make a tasty addition. Mix these in with the chocolate and marshmallows for a fun surprise.
Dietary Alternatives
You can make these cookie cups fit different diets. For a gluten-free version, use gluten-free graham cracker crumbs and flour. They work just as well in this recipe. To make it vegan, swap the butter for coconut oil. Use dairy-free chocolate chips too. These changes keep the taste while fitting your needs.
Seasonal Twists
Seasonal flavors can make your S’mores Cookie Cups special. In winter, add peppermint extract to the cookie dough. This gives a fresh, festive taste. You can also top the cups with crushed candy canes. For autumn, mix in pumpkin spice. This will give your cookie cups a cozy flavor. Add a drizzle of caramel for a sweet touch. Each season brings new fun to this easy dessert!
Storage Info
Best Practices for Storing Cookie Cups
To keep your S’mores cookie cups fresh, store them in an airtight container. This helps lock in moisture and flavor. Place parchment paper between layers to avoid sticking. Keep them at room temperature if you plan to eat them within a few days. If you want to keep them longer, refrigeration is a good option.
How Long They Last
When stored properly, cookie cups last about 3-4 days at room temperature. They can last up to a week if kept in the fridge. However, I recommend eating them sooner for the best taste and texture. The chocolate and marshmallows are best when fresh.
Freezing and Reheating Instructions
You can freeze the cookie cups for up to three months. To freeze, wrap each cup in plastic wrap and place them in a freezer bag. When you are ready to enjoy, remove them from the freezer. Let them thaw in the fridge overnight. For a warm treat, heat them in the oven at 350°F (175°C) for about 5-7 minutes. This will melt the chocolate and make the marshmallows soft again.
FAQs
Can I make S’mores Cookie Cups in advance?
Yes, you can make S’mores Cookie Cups ahead of time. Prepare the cookie cups up to the baking step. Store them in the fridge for up to two days. When you’re ready to bake, just pop them in the oven. This saves time for parties or gatherings.
How can I adjust the sweetness level?
To adjust sweetness, use less sugar in the graham cracker mix. You can also choose dark chocolate instead of milk chocolate. Dark chocolate has less sugar and a bolder flavor. Tasting the batter can help you decide how much to add or remove.
What can I use instead of mini marshmallows?
If you don’t have mini marshmallows, you can use large marshmallows cut into smaller pieces. Another option is marshmallow fluff. Just spoon a little fluff on top before baking. Both substitutes will give you that gooey texture you want.
Can I use a different type of chocolate?
Absolutely! You can use white chocolate, dark chocolate, or even flavored chocolate. Each type adds a unique twist to your cookie cups. Experiment with different chocolates to find your favorite mix.
This blog post covered key points for making delicious cookie cups. You learned about ingredients, from quality picks to substitutions. We walked through each step, from prep to baking. Additionally, I shared tips for great texture and common mistakes. Variations allow for fun twists, while storage info helps keep your treats fresh.
In the end, making cookie cups can be easy and fun. Enjoy the process and get creative!