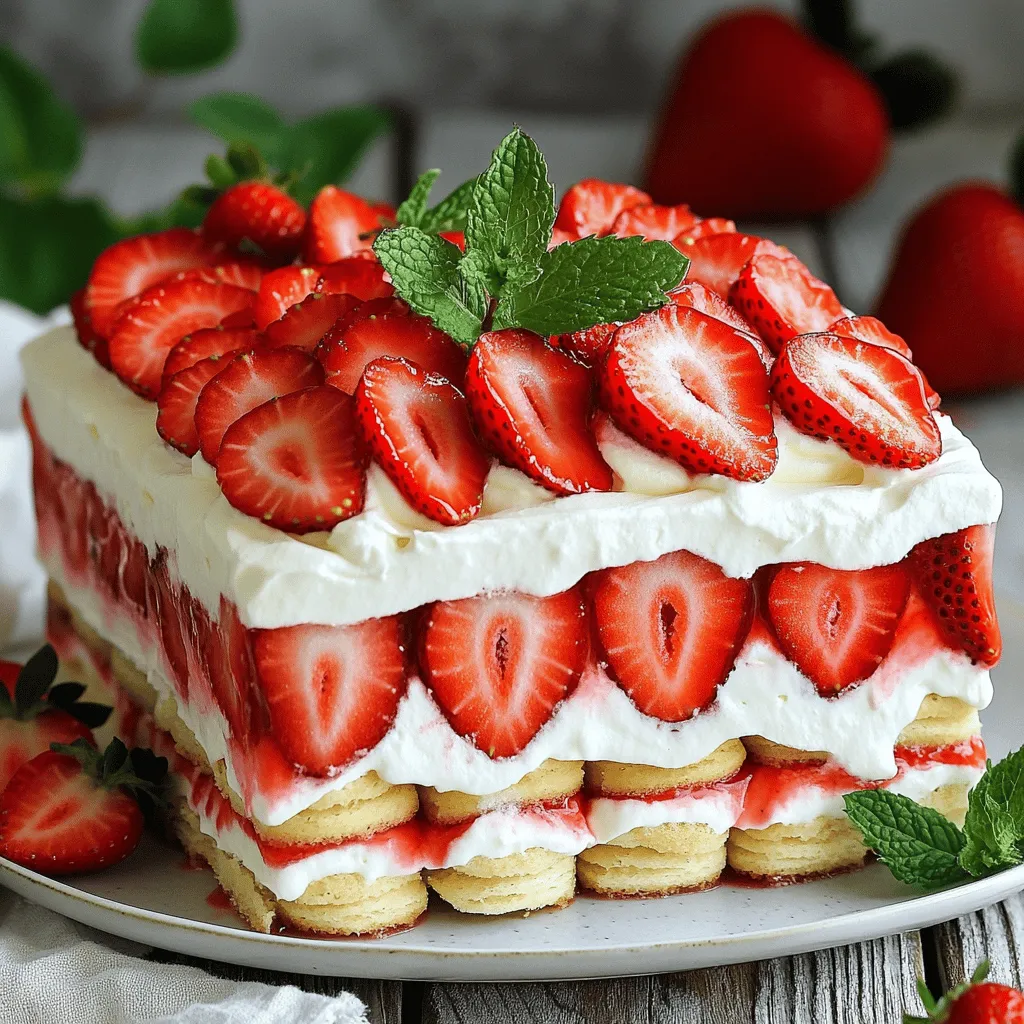
If you’re looking for a quick and tasty dessert, you’re in the right place! Strawberry Shortcake Icebox Cake combines fresh strawberries, rich whipped cream, and soft shortcake biscuits, all without any baking. This easy recipe is perfect for hot days or summer gatherings. In just a few simple steps, you’ll create a delightful treat that will impress family and friends. Ready to dive into the sweet layers of happiness? Let’s get started!
Ingredients
List of Ingredients
– 1 pound fresh strawberries, hulled and sliced
– 1/3 cup granulated sugar
– 1 cup heavy whipping cream
– 1/2 cup powdered sugar
– 1 teaspoon vanilla extract
– 1 package (14.1 ounces) of store-bought shortcake biscuits
– 1/2 cup Greek yogurt (optional for creaminess)
– Fresh mint leaves for garnish
Using fresh strawberries makes this dessert bright and sweet. The sugar helps the berries release their juices. It gives your cake a nice flavor. The heavy cream and powdered sugar create a light and fluffy whipped topping. The vanilla adds a bit of warmth to the mix.
The store-bought shortcake biscuits save time and keep it easy. You can use Greek yogurt for extra creaminess if you like. Fresh mint leaves add a nice touch on top. They also give a fresh taste that pairs well with strawberries.
Suggested Tools and Equipment
– Mixing bowls
– Whisk or hand mixer
– Baking dish (8-inch square or round)
– Plastic wrap
You will need a few simple tools. Mixing bowls help you combine the ingredients. A whisk or hand mixer is great for whipping the cream. The baking dish holds all the layers together. Finally, plastic wrap keeps your cake fresh while it chills in the fridge.
Step-by-Step Instructions
Preparing the Strawberries
– First, slice 1 pound of fresh strawberries.
– Place them in a medium bowl.
– Sprinkle 1/3 cup of granulated sugar over the strawberries.
– Toss the berries gently.
– Let them sit for about 20 minutes.
– This helps the strawberries release their sweet juices.
Making the Whipped Cream
– In a large bowl, combine 1 cup of heavy whipping cream, 1/2 cup of powdered sugar, and 1 teaspoon of vanilla extract.
– Use a whisk or hand mixer to whip the mixture.
– Whip until soft peaks form.
– If you want creaminess, fold in 1/2 cup of Greek yogurt gently.
– This adds a rich texture that makes the cake extra yummy.
Assembling the Icebox Cake
– Grab a biscuit from the package of shortcake biscuits.
– Dip it briefly in the strawberry juice from the bowl.
– Place the dipped biscuit at the bottom of an 8-inch baking dish.
– Spread a layer of whipped cream over the biscuit.
– Add a layer of the macerated strawberries on top.
– Repeat this process, layering biscuits, whipped cream, and strawberries.
– Keep going until you reach the top of the dish.
– Finish with a final layer of whipped cream.
– Decorate with a few whole strawberries.
– Cover the dish with plastic wrap and refrigerate for at least 4 hours.
– For best results, let it chill overnight.
– Before serving, add fresh mint leaves for a nice touch.
Tips & Tricks
Achieving the Best Texture
Chilling is key for a great icebox cake. When you chill the cake, it lets the flavors blend well. The biscuits soften and soak up all the yummy juices. I suggest letting it sit overnight for the best taste. If you want a different texture for your whipped cream, try using a hand mixer. You can also use an electric mixer if you prefer a quicker way.
Flavor Enhancements
To make your cake pop with flavor, add lemon zest or a little lemon extract. This gives a fresh taste that contrasts nicely with the strawberries. You can also use flavored biscuits instead of plain ones. Strawberry or vanilla biscuits add an extra layer of flavor to your cake.
Presentation Ideas
Garnishing makes your cake look fantastic. Use fresh mint leaves on top for a vibrant touch. You can also sprinkle some crushed biscuits for added crunch. When serving at a party, cut the cake into squares. Place each piece on a colorful plate for a fun display. You can even add a drizzle of strawberry sauce on the plate for a nice touch.

Variations
Fruit Substitutions
You can switch up the strawberries for other berries. Blueberries and raspberries work great. They add unique flavors and colors. You can also use seasonal fruits like peaches or cherries. Just slice them thin for even layers. This makes your cake even more exciting!
Dietary Modifications
If you need a gluten-free version, use gluten-free biscuits. Many brands offer tasty options that fit this need. For a vegan cake, replace heavy cream with coconut cream. It whips up nicely and adds a tropical twist. Both options keep the cake delicious and enjoyable for everyone.
Layering Ideas
Get creative with your layers! You can use different creams or fillings. Consider a layer of chocolate mousse for a rich taste. You can also add flavored creams like lemon or almond. This keeps each bite interesting and packed with flavor. Use your imagination to make a one-of-a-kind dessert!
Storage Info
Refrigeration Guidelines
To keep your Strawberry Shortcake Icebox Cake fresh, store it in the fridge. Use an airtight container or cover it tightly with plastic wrap. This will prevent it from drying out or absorbing other smells in the fridge. Always try to keep it away from strong-smelling foods.
Freezing Options
If you want to save some cake for later, freezing works great. Cut the cake into slices and wrap each piece in plastic wrap. Then, place them in a freezer-safe bag or container. This keeps the cake fresh for up to three months. When you want to enjoy a slice, take it out and let it thaw in the fridge overnight.
Shelf Life
For the best quality, eat the cake within three to four days when stored in the fridge. After this time, the biscuits may become mushy, and the flavors can fade. Signs that the cake is no longer good include an off smell or a change in texture. If it looks or smells funny, it’s best to toss it. Enjoy your cake while it’s fresh!
FAQs
Can I use frozen strawberries?
Yes, you can use frozen strawberries. Just remember to thaw them first. Drain off excess juice to avoid sogginess. Frozen strawberries can be a bit softer, but they still taste great. This choice can save time, especially when fresh strawberries are out of season.
How long should the cake sit before serving?
Let the cake chill for at least 4 hours. I recommend overnight for the best flavor. This cooling time allows the biscuits to soak in the juicy strawberry goodness. The longer it sits, the better it tastes. You will enjoy a creamy and delightful dessert.
What can I substitute for heavy whipping cream?
If you need a substitute for heavy whipping cream, try coconut cream. It adds a nice flavor and works well in desserts. You can also use a non-dairy whipped topping for a lighter option. Greek yogurt can add creaminess, too, if mixed in.
Can I make this recipe ahead of time?
Yes! You can prepare this icebox cake a day or two in advance. Store it in the fridge until you are ready to serve. This makes it perfect for parties or gatherings. Just remember to garnish it with fresh mint right before serving for a pop of color.
This blog post covered how to make a delicious icebox cake. We discussed key ingredients, helpful tools, and step-by-step instructions. I shared tips for the best flavor and texture, as well as fun variations. Remember, you can customize the cake for different diets and tastes. Finally, store it correctly to enjoy later. Enjoy creating your icebox cake and impressing friends and family with your tasty treat.