Skip to content
DisclaimerTerms Of UseGDPR PolicyCookie Policy

easycookingbite

  • Home
  • Drinks
  • Appetizers
  • Dinner
  • Dessert
  • About
  • Contact
  • Privacy Policy
DisclaimerTerms Of UseGDPR PolicyCookie Policy

NO-ING-IMG

- 2 cans (15 oz) white beans (cannellini or navy) - 1 medium onion, diced - 3 cloves garlic, minced - 2 large carrots, diced - 2 celery stalks, diced - 4 cups vegetable broth - 1 cup coconut milk (or heavy cream) - 1 teaspoon dried thyme - 1 teaspoon dried oregano - 1 cup kale, chopped - Salt and pepper to taste - 2 tablespoons olive oil - Fresh parsley for garnish This soup is easy to make with simple, fresh ingredients. You start with white beans, either cannellini or navy. They give the soup a creamy texture and are full of protein. Next, you need a medium onion. Dice it up to add flavor. Garlic plays a big role too. Use three cloves, minced, for a tasty kick. Carrots and celery provide sweetness and crunch. Dice two large carrots and two celery stalks to add to the mix. For the base, you will use vegetable broth. Four cups will create a rich flavor. Then, for that creamy finish, pick coconut milk or heavy cream. One cup works perfectly. Don't forget the herbs! One teaspoon each of dried thyme and oregano will heighten the taste. You’ll also need one cup of fresh kale for a burst of color and nutrients. Finally, season with salt and pepper to your liking. Use two tablespoons of olive oil to sauté the veggies and bring it all together. Top it off with fresh parsley for a nice garnish. Start by heating olive oil in a large pot over medium heat. Once hot, add the diced onion, carrots, and celery. Sauté these for about 5-7 minutes until they soften. The onion should turn translucent. Next, stir in the minced garlic, dried thyme, and dried oregano. Cook for another minute until you smell the herbs. This step builds a strong flavor base for your soup. Now, it’s time to add the white beans. You will use two cans of drained and rinsed beans, either cannellini or navy. Pour these into the pot, along with the vegetable broth. Bring everything to a gentle simmer. After it simmers, you can use a fork or a potato masher to lightly mash some of the beans. This will help thicken the soup and give it a nice texture. Pour in the coconut milk and stir well to mix. Let the soup simmer for another 5-10 minutes. This allows all the flavors to meld together. After that, add the chopped kale and cook for 2-3 minutes until it wilts. Finally, season your soup with salt and pepper to taste. Remove it from the heat and let it cool slightly before serving. To boost the flavor of your creamy one-pot Tuscan white bean soup, try adding spices like: - 1 teaspoon smoked paprika - 1 teaspoon cumin These spices add warmth and depth. Fresh herbs like basil or rosemary can also brighten the soup. Using homemade broth makes a big difference. Homemade broth has richer flavors than store-bought options. If you can, use your own. If not, choose a low-sodium store-bought broth to control salt levels. To thicken the soup, mash some of the white beans. This gives the soup a nice, creamy texture. You can use a fork or a potato masher for this. For a creamier soup, swap coconut milk for heavy cream. Coconut milk adds a light sweetness, while heavy cream makes it richer. You can also blend a portion of the soup for a smooth finish. Serve the soup in deep bowls. Garnish with chopped fresh parsley for a pop of color. Drizzle extra coconut milk on top for visual appeal. Pair the soup with crusty bread. A simple green salad also complements the meal well. Enjoy your delicious creation! {{image_2}} You can switch ingredients to fit your needs. For a dairy-free option, use coconut milk instead of cream. Almond milk works too but may alter the flavor. If you want more greens, try spinach or Swiss chard. Both add nutrients and taste. You can even mix in bell peppers or zucchini for extra flavor. Want to make this soup heartier? Add cooked chicken or sausage. These proteins boost nutrition and flavor. If you like heat, sprinkle in chili flakes or paprika. This will give your soup a nice kick. Adjust the amount based on your spice level preference. You can enjoy this soup in different ways. To make it thicker, let it simmer longer. This gives it a stew-like texture. If you want a fun snack, serve it as a dip with crusty bread or crackers. This makes for a great appetizer or party dish. Enjoy experimenting with your own variations! To store leftovers, let the soup cool completely. Transfer it to an airtight container. This soup lasts in the fridge for up to four days. When you want to reheat, pour the soup into a pot. Heat over medium until warm. Stir occasionally to avoid sticking. You can also use a microwave. Just place it in a microwave-safe bowl and heat in short bursts, stirring in between. For longer storage, you can freeze the soup. First, let it cool down completely. Then, pour it into freezer-safe bags or containers. Make sure to leave some space for expansion. This soup can last in the freezer for up to three months. To thaw, place the container in the fridge overnight. For a quicker option, you can use the microwave or place the bag in cold water. Once thawed, reheat it in a pot or microwave until hot. You can use several other beans. Here are some great options: - Chickpeas: They add a nutty flavor and a nice texture. - Pinto beans: These have a creamy feel and work well in soups. - Black beans: They offer a richer taste and color. Each type of bean brings its own unique flavor. You can mix and match based on your taste. Yes, using fresh herbs can enhance the soup's flavor. Fresh herbs are brighter and more fragrant. Here are some great choices: - Fresh thyme: Use about three times as much as dried. - Fresh oregano: It gives a nice punch to the dish. - Fresh basil: Add it at the end for a fresh twist. Fresh herbs can uplift your soup's taste. They add a lively flavor you will love. This soup is already vegetarian with its ingredients. To keep it vegetarian, focus on these tips: - Use vegetable broth instead of chicken broth. - Ensure your coconut milk is dairy-free. - Add more veggies like spinach or zucchini for extra flavor. By following these steps, you can enjoy a hearty, vegetarian soup. It will be just as creamy and delicious! This blog post covered how to make a delicious white bean soup. We discussed the key ingredients, steps to prepare the base, and how to build the soup's rich flavor. I shared tips to enhance taste and texture, plus fun variations to try. Finally, I outlined proper storage methods to keep leftovers fresh. Experiment with this soup in your own kitchen. Enjoy the process and make it your own!

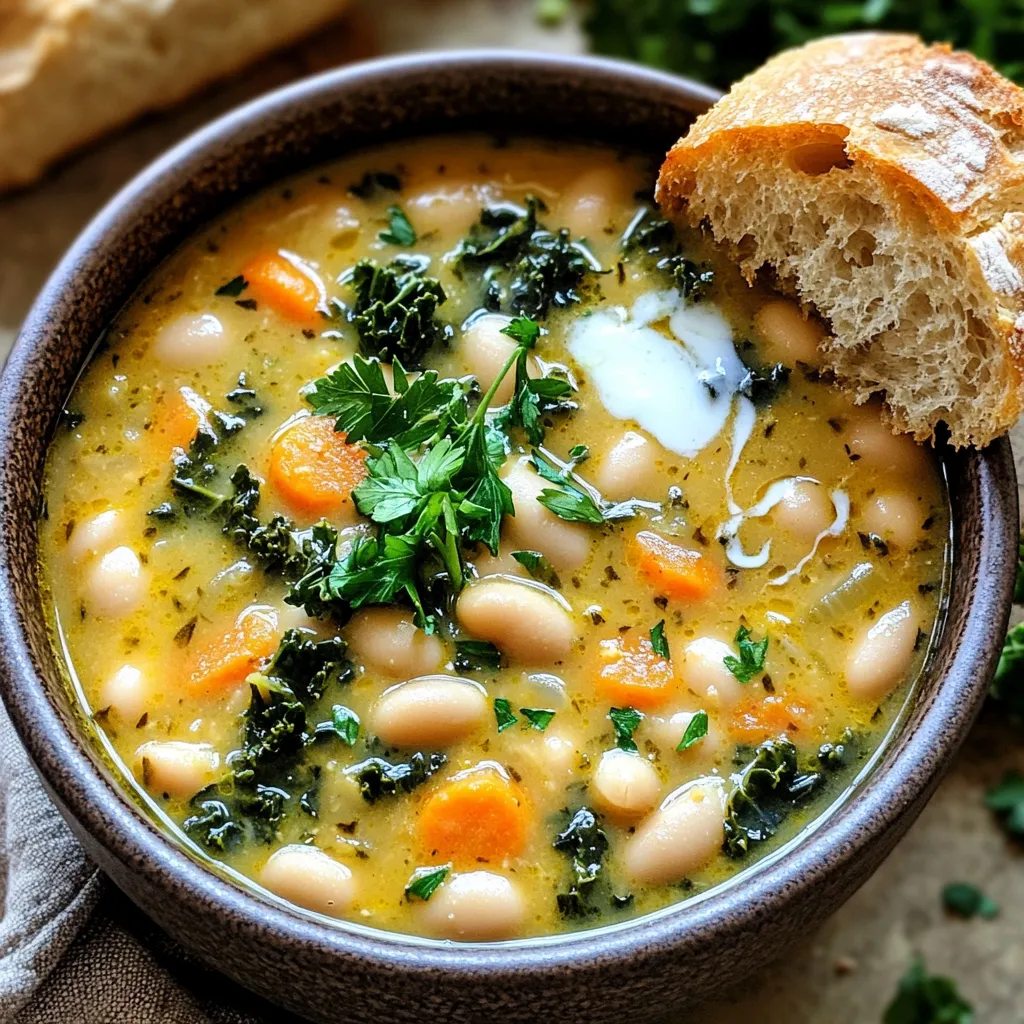
Creamy One-Pot Tuscan White Bean Soup Delight

Welcome to a comforting bowl of goodness! Today, I’ll show you how to make a creamy, one-pot Tuscan white bean

- 1 cup apple cider - 1 ½ cups all-purpose flour - 1 teaspoon baking powder - ½ teaspoon baking soda - ¼ teaspoon salt - 1 teaspoon ground cinnamon - ½ teaspoon ground nutmeg - ½ cup granulated sugar - 1 large egg - ½ cup milk - ¼ cup unsalted butter, melted - 1 teaspoon vanilla extract - 1 cup powdered sugar (for glaze) - 2-3 tablespoons apple cider (for glaze) If you have dietary needs, there are great swaps. You can use gluten-free flour instead of all-purpose flour. For a dairy-free version, try almond milk and coconut oil instead of milk and butter. If you need an egg-free option, use applesauce or a flax egg. These swaps keep the flavor rich and tasty. Using high-quality ingredients makes a big difference. Fresh apple cider gives a strong, sweet flavor. Good flour helps with texture and rise. Fresh spices add warmth and depth. Quality ingredients ensure your donuts taste great and look appealing. Always choose the best you can find for the best results. To start, you need to reduce the apple cider. Pour 1 cup of apple cider into a small pan. Heat it over medium heat until it boils. Then, lower the heat and let it simmer. You want the cider to thicken. This takes about 15 to 20 minutes. You should end up with about ⅓ cup of cider. Once it’s done, let it cool a bit before using. Next, get a large mixing bowl. In it, whisk together the dry ingredients. You will need 1 ½ cups of all-purpose flour, 1 teaspoon baking powder, ½ teaspoon baking soda, and ¼ teaspoon salt. Add 1 teaspoon of ground cinnamon and ½ teaspoon of ground nutmeg for flavor. Lastly, mix in ½ cup of granulated sugar. Make sure everything is well combined. Now, you’ll mix the wet ingredients. In a different bowl, whisk 1 large egg, ½ cup of milk, ¼ cup of melted unsalted butter, and 1 teaspoon of vanilla extract. Don't forget to add the reduced apple cider. Mix until the mixture is smooth. Slowly add this wet mixture to the dry ingredients. Stir gently until just combined. The batter should still be a bit lumpy, so don’t overmix. Preheat your oven to 375°F (190°C) and grease your donut pan with cooking spray. Spoon the batter into each well of the donut pan. Fill them about ¾ full to allow space for rising. Bake for 10 to 12 minutes. You know they’re done when they turn golden brown. Use a toothpick to check; it should come out clean. Let them cool in the pan for 5 minutes. Then, move them to a wire rack to cool completely. While the donuts cool, it’s time to make the glaze. In a small bowl, whisk together 1 cup of powdered sugar and 2 to 3 tablespoons of apple cider. Keep mixing until it’s smooth. You want a drizzle-like consistency for the glaze. Once the donuts are fully cool, dip the tops into the glaze. Let the excess drip off before placing them back on the wire rack. This will help the glaze set nicely. Enjoy your delicious homemade apple cider glazed donuts! To make your apple cider glazed donuts fluffy, you need the right mix. Here are some best practices: - Use fresh ingredients for the best flavor. - Measure your flour correctly. Too much flour makes dense donuts. - Mix the batter until it's just combined. Lumpy is okay! - Don’t open the oven door too soon while baking. This keeps the heat in. Even the best cooks make mistakes. Here are some common ones: - Overmixing the batter can lead to tough donuts. - Not reducing the apple cider enough affects flavor. Aim for about ⅓ cup. - Filling the donut pan too full can cause overflow. Fill only ¾ full. - Forgetting to grease the pan can ruin your donuts. Always grease it well! Having the right tools makes baking easier and more fun. Here’s what I recommend: - A non-stick donut pan helps the donuts release easily. - A whisk makes mixing dry and wet ingredients faster. - Measuring cups and spoons ensure accurate ingredient amounts. - A wire rack is essential for cooling and glazing the donuts. - A small bowl for mixing the glaze keeps it neat and easy. With these tips, you will create the perfect apple cider glazed donuts every time! {{image_2}} You can make these donuts even more special by adding flavors. For a chocolate twist, mix in some cocoa powder into your dry ingredients. Use about ¼ cup for a rich taste. You can also add chocolate chips to the batter for extra sweetness. Caramel is another great option. Drizzle warm caramel over the glazed donuts for a gooey treat. You can even mix caramel into the glaze. Just replace some apple cider with caramel syrup for a fun change. Glazing is where you can get creative! While the apple cider glaze is sweet and tangy, you can try other glazes too. A simple vanilla glaze is easy to make. Just mix powdered sugar with milk and vanilla extract. You might also want to top the donuts with a chocolate glaze. Melt chocolate chips with a little butter and dip the donuts in. For a crunchy finish, add chopped nuts or sprinkles on top of the glaze. If you need gluten-free donuts, swap the all-purpose flour with a gluten-free blend. Make sure it has xanthan gum for the right texture. For a vegan option, replace the egg with a flax egg. Mix 1 tablespoon of ground flaxseed with 2.5 tablespoons of water. Let it sit until it thickens. Use plant-based milk and butter as well. These swaps will give you tasty donuts that everyone can enjoy! To keep your apple cider glazed donuts fresh, place them in an airtight container. Make sure they cool completely before storing. If you leave them out, they may become dry. Store them at room temperature for up to two days. For longer storage, the fridge is a good option. When you want to enjoy a warm donut, use the microwave. Heat one donut for about 10-15 seconds. This will make it soft and tasty again. If you have an oven, preheat it to 350°F (175°C). Place the donuts on a baking sheet and heat for 5-7 minutes. This method helps keep the glaze nice. You can freeze apple cider glazed donuts for up to three months. Wrap each donut in plastic wrap and then place them in a freezer bag. When you want to eat one, take it out and let it thaw in the fridge overnight. For a warm treat, reheat it in the microwave or oven as noted above. Yes, you can use store-bought apple cider. It saves time and gives good flavor. Just choose a cider without added sugars or preservatives. This will keep the taste fresh and natural. To adjust for fewer donuts, cut the recipe in half. Use ½ cup apple cider, ¾ cup flour, and other ingredients accordingly. This will give you about six donuts. Just remember to bake them for a shorter time. If you don’t have a donut pan, you can use a muffin tin. Just fill the cups about halfway. This will give you donut holes instead of full donuts. They will still taste great! To make the glaze thicker, add more powdered sugar. If you want it thinner, add a bit more apple cider. Mix until you reach your desired consistency. It should drizzle nicely over the donuts. These donuts stay fresh for about two days at room temperature. Store them in an airtight container. For longer storage, refrigerate them for about a week or freeze them for up to a month. Just reheat before serving. In this post, we explored the key ingredients for making delicious donuts and how to prepare them step-by-step. We discussed tips for the best texture and common mistakes to avoid, plus ways to customize your recipe. Finally, we covered storage options to keep your treats fresh. Enjoy crafting your perfect batch of donuts. Remember, quality ingredients and a little creativity go a long way!

Apple Cider Glazed Donuts Irresistible Homemade Treat

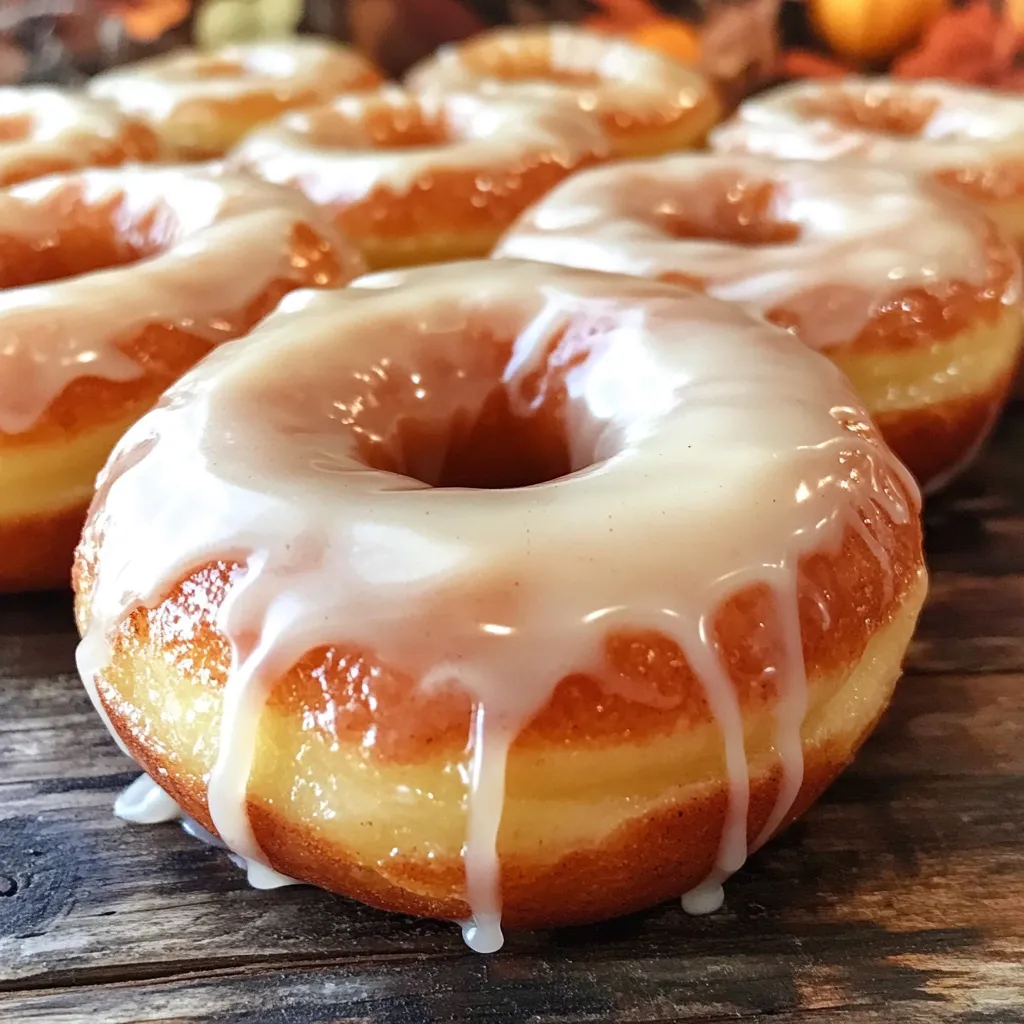
If you’re craving a sweet fall treat, look no further! In this guide, I’ll show you how to make Apple

To make bakery-style chocolate pumpkin muffins, you'll need the following ingredients: - 1 cup canned pumpkin puree - 1/2 cup granulated sugar - 1/2 cup brown sugar, packed - 1/2 cup vegetable oil - 2 large eggs - 1 teaspoon vanilla extract - 1 1/2 cups all-purpose flour - 1/2 cup unsweetened cocoa powder - 1 teaspoon baking soda - 1 teaspoon baking powder - 1/2 teaspoon salt - 1 teaspoon ground cinnamon - 1/2 teaspoon ground nutmeg - 1/2 cup chocolate chips (milk or dark) - Optional: Pumpkin seeds for topping These ingredients work together to create a rich, moist muffin. The pumpkin adds moisture and flavor, while the cocoa makes it chocolatey. The sugars give sweetness, and the spices add warmth. The chocolate chips melt into gooey pockets of goodness. You can use pumpkin seeds on top for a nice crunch. Each ingredient plays a key role in achieving that perfect bakery-style muffin. - Preheat the oven to 350°F (175°C). - Line a muffin pan with cupcake liners or grease it with cooking spray. - In a large bowl, whisk together the pumpkin puree, granulated sugar, brown sugar, vegetable oil, eggs, and vanilla extract. Mix until it is smooth and well combined. - In a separate bowl, sift the all-purpose flour, cocoa powder, baking soda, baking powder, salt, ground cinnamon, and ground nutmeg. This helps to mix the dry ingredients evenly. - Gradually fold the dry ingredients into the wet mixture. Stir gently until just combined, leaving a few lumps. - Then, fold in the chocolate chips until they are spread throughout the batter. - Spoon the batter into the muffin pan, filling each cup about 3/4 full. If you want, sprinkle some pumpkin seeds on top. - Bake in the preheated oven for 18-20 minutes. Check for doneness by inserting a toothpick into the center. It should come out clean. - Let the muffins cool in the pan for about 5 minutes. Then, transfer them to a wire rack to cool completely. To make the best muffins, avoid over-mixing the batter. Mix just until the dry and wet ingredients combine. A few lumps are okay. Over-mixing can make your muffins tough. Next, test for doneness with a toothpick. Insert it into the center of a muffin. If it comes out clean, your muffins are ready. If it has wet batter, bake a few more minutes. For even baking, rotate your muffin pan halfway through. This helps all muffins bake evenly. If your oven has hot spots, this step is key. Also, adjust for altitude or humidity. If you live in a high area, reduce the sugar a bit. This keeps the muffins from collapsing. In humid weather, you may need a bit more flour. Serve your muffins warm with a dusting of powdered sugar. You can also drizzle melted chocolate on top for a treat. Pair these muffins with coffee or tea for a cozy snack. The warm flavors of pumpkin and chocolate blend well with these drinks. Enjoy! {{image_2}} You can switch up the chocolate in your muffins. Use milk chocolate for a sweet bite. Dark chocolate gives a rich taste and pairs well with pumpkin. You can also add nuts like walnuts or pecans. Dried fruits like cranberries or raisins add a nice chew and sweetness. Want to change the spice game? Try adding ginger or cloves for a warm flavor. You can also make pumpkin spice muffins by boosting the cinnamon and nutmeg. This gives your muffins a classic fall taste that everyone loves. For a healthier twist, use whole wheat flour. It adds fiber and makes the muffins heartier. You can also replace the sugars with alternatives like honey or maple syrup. These swaps keep your treats tasty while cutting down on refined sugars. To keep your muffins fresh, store them in an airtight container. This helps seal in moisture. You can use a plastic container or a zip-top bag. Line it with a paper towel to absorb extra moisture. Make sure not to stack the muffins too high. This prevents them from getting squished. Store them at room temperature for up to three days. If you want them to last longer, consider freezing. Freezing muffins is easy and keeps them tasty. First, let the muffins cool completely. Then, wrap each muffin in plastic wrap. This keeps out air and prevents freezer burn. Place the wrapped muffins in a freezer-safe bag. Label the bag with the date. You can freeze them for up to three months. To reheat, take out a muffin and unwrap it. You can use the microwave for quick heating. Heat on medium for about 30 seconds. If you prefer, you can also use the oven. Preheat it to 350°F (175°C) and heat for about 10 minutes. Enjoy your delicious muffins as if they were fresh! Yes, you can use homemade pumpkin puree. Just make sure it is smooth. Homemade puree can add fresh flavor to your muffins. It’s best to drain any excess water from it. This helps keep your muffins from being too wet. You can replace eggs with applesauce or mashed bananas. Use 1/4 cup of either for each egg. This keeps the muffins moist and adds natural sweetness. You can also use flaxseed meal mixed with water. Combine 1 tablespoon of flaxseed with 2.5 tablespoons of water. Let it sit for a few minutes before adding. To make gluten-free muffins, swap all-purpose flour for a gluten-free blend. Look for blends that work for baking. Check that the blend contains xanthan gum, as it helps provide structure. This way, your muffins will still rise and be fluffy. The key to moist muffins is not over-mixing the batter. Mix just until combined; lumps are fine. Also, using the right amount of oil and adding pumpkin helps keep them moist. Don't skip the chocolate chips; they add moisture and flavor. Yes, you can double the recipe easily. Just use double the ingredients listed. Make sure your mixing bowls are large enough to hold the extra batter. This way, you can enjoy more muffins to share with friends or family. These pumpkin chocolate chip muffins are simple and fun to make. We covered ingredients, steps, and tips to perfect your bake. Remember to mix wet and dry ingredients carefully. Adjust flavors as you like, and don’t forget about storage tips. Bake these muffins for a tasty treat anytime. Your kitchen will smell amazing, and everyone will enjoy them. Try different variations to find your favorite. Happy baking!

Bakery-Style Chocolate Pumpkin Muffins Easy Recipe

Are you ready to bake some bliss? These Bakery-Style Chocolate Pumpkin Muffins combine the cozy taste of fall with rich

To make these tasty truffles, gather these simple items: - 1 cup all-purpose flour (heat-treated for safety) - 1/2 cup unsalted butter, softened - 1/3 cup granulated sugar - 1/3 cup brown sugar, packed - 2 tablespoons vanilla extract - 1/4 teaspoon salt - 1/2 cup mini chocolate chips - 1 cup chocolate chips (for coating) - 2 tablespoons coconut oil (for chocolate coating) You must heat-treat the flour for safety. Raw flour can contain harmful bacteria. To heat-treat, spread flour on a baking sheet. Bake it at 350°F (175°C) for just 5 minutes. Let it cool before mixing it into your dough. This step helps make the truffles safe to eat. If you need substitutes, here are some great options: - Use oat flour or almond flour in place of all-purpose flour. - Swap unsalted butter for coconut oil for a dairy-free option. - Use coconut sugar instead of brown sugar for a healthier twist. - Replace mini chocolate chips with chopped nuts for extra crunch. - For a vegan version, use a plant-based butter and nut milk instead of regular milk. These swaps keep the flavor while meeting different dietary needs. To make this treat safe, we need to prepare the flour. Start by spreading one cup of all-purpose flour on a baking sheet. Bake it at 350°F (175°C) for five minutes. This step kills any harmful bacteria. Once done, let the flour cool completely. This ensures our truffles are safe to eat. Next, grab a mixing bowl. Add half a cup of softened unsalted butter. Then, mix in one-third cup of granulated sugar and one-third cup of brown sugar. Cream these together until the mixture looks light and fluffy. Now, stir in two tablespoons of vanilla extract and a quarter teaspoon of salt. Mix these until they blend well. Now it’s time to shape the dough. Gradually add the cooled flour into the bowl. Mix until it all comes together. Then, gently fold in half a cup of mini chocolate chips. Scoop out tablespoon-sized portions and roll them into smooth balls. Place each ball on a parchment-lined baking sheet. Chill these cookie dough balls in the fridge for at least 30 minutes. This helps them firm up and makes coating easier. For the final step, we’ll coat our truffles. In a microwave-safe bowl, combine one cup of chocolate chips with two tablespoons of coconut oil. Microwave this mixture in 30-second intervals. Stir between each interval until smooth and melted. Now, take each chilled cookie dough ball and dip it into the melted chocolate. Make sure they are well-coated. Return them to the parchment-lined baking sheet. For the best results, chill the coated truffles for another 30 minutes to set the chocolate. To get the best truffle texture, chill your dough well. After rolling the dough into balls, refrigerate them for at least 30 minutes. This helps them hold their shape when you coat them in chocolate. When melting the chocolate, use a microwave in short bursts. Stir often to avoid burning the chocolate. A smooth coating makes your truffles shine. You can add more flavor to your truffles. Try mixing in a pinch of cinnamon or nutmeg for warmth. You can also use dark chocolate chips instead of mini ones for a richer taste. For a fun twist, add chopped nuts, like walnuts or pecans. If you love coconut, shredded coconut makes a great addition too. One common mistake is not heating the flour. Always heat-treat your flour to make it safe. Another mistake is overmixing the dough. Mix until just combined, or the truffles can become tough. Make sure your chocolate is not too hot when coating. If it is, it can melt the truffles. Finally, remember to chill your truffles after coating. This helps the chocolate set properly. {{image_2}} You can play with the coating of your truffles. While I love classic chocolate, you can try white chocolate or dark chocolate. Each type brings a unique taste. For a fun twist, sprinkle crushed nuts or colorful sprinkles on top. These add texture and a pop of color. You can also use melted candy melts for a quick and easy option. Each coating changes the look and taste, so feel free to experiment! If you want a lighter treat, swap some ingredients. Use almond flour instead of all-purpose flour for a nutty flavor. You can replace butter with coconut oil for a dairy-free version. Instead of sugar, try using maple syrup or honey. These swaps will make your truffles healthier without losing flavor. Remember, the goal is to keep it tasty while being mindful of health. Don't be afraid to mix in different flavors. Adding peanut butter gives a rich, nutty taste. You can also try peppermint extract for a refreshing twist. For a fun seasonal treat, add pumpkin spice in the fall. You can even fold in dried fruits like cranberries or cherries for extra sweetness. Each flavor change makes your truffles unique and exciting to eat! To keep your truffles fresh, store them in an airtight container. Place parchment paper between layers to avoid sticking. Keep the container in a cool, dry place. If you live in a warm area, refrigerate them. This will help keep the chocolate from melting. Enjoy them within one week for the best taste. If you want to save some truffles for later, freezing works great. Place the truffles in a single layer on a baking sheet. Freeze them for about 30 minutes until firm. Then, transfer them to a freezer-safe bag or container. They can last for up to three months in the freezer. When you're ready to eat, thaw them in the fridge overnight. Always check your truffles before enjoying them. If you see any mold or an off smell, it’s time to toss them. Chocolate can also develop white spots, known as bloom, which happens when it melts and cools. While not harmful, they can change the texture and taste. If you spot these signs, don’t eat them. No, do not use regular flour. Regular flour may contain harmful bacteria. Heat-treated flour is safe to eat raw. To heat-treat, bake it at 350°F for five minutes. Let it cool before mixing it into your dough. These truffles last about one week in the fridge. Store them in an airtight container. This keeps them fresh and tasty. If you want them to last longer, consider freezing them instead. Yes, it is safe if you use heat-treated flour. Regular flour can contain germs that cause illness. Always ensure the flour is heat-treated before using it in recipes. This makes the cookie dough safe for eating raw. Yes, you can make these truffles dairy-free or vegan. Use dairy-free butter and dark chocolate chips. Check that all ingredients are vegan-friendly. This way, everyone can enjoy these delicious treats! This blog post covered everything you need to know about making delicious truffles. We explored key ingredients and the importance of heat-treating flour for safety. You learned step-by-step instructions to mix, shape, and coat your truffles perfectly. Tips helped you avoid common mistakes and customize flavors. Lastly, we discussed proper storage to keep truffles fresh. With these details, you can create tasty treats that impress everyone. Now, it's time to gather your ingredients and start your truffle-making journey!

Chocolate Chip Cookie Dough Truffles No Bake Delight

Are you ready to indulge in a sweet treat that requires no baking? In this post, I’ll show you how

- 4 chicken thighs, skin-on and bone-in - 2 cups Brussels sprouts, halved - 1/4 cup pure maple syrup - 2 tablespoons Dijon mustard - 2 tablespoons soy sauce (or tamari for gluten-free) - 1 tablespoon olive oil - 3 cloves garlic, minced - Salt and pepper to taste - Fresh thyme sprigs for garnish Choosing quality ingredients is key. I always go for fresh chicken thighs with skin. They add flavor and moisture. The Brussels sprouts should be firm and bright green. You want them to caramelize nicely in the oven. Use pure maple syrup for the best taste. It gives the chicken a sweet and rich glaze. Dijon mustard adds a nice tang. It balances the sweetness of the maple syrup. Soy sauce brings umami and depth to the glaze. If you need it gluten-free, tamari works well. Olive oil helps everything cook evenly. Don’t forget the garlic! Its aroma fills the kitchen and adds flavor. Season with salt and pepper to your taste. Finally, fresh thyme makes a lovely garnish. It adds that pop of color and a fresh note. These ingredients come together for a dish that is both simple and delicious. - Preheat your oven to 400°F (200°C). - In a small bowl, mix together 1/4 cup of pure maple syrup, 2 tablespoons of Dijon mustard, 2 tablespoons of soy sauce, 3 minced garlic cloves, 1 tablespoon of olive oil, and a pinch of salt and pepper. This mix will be your glaze. - Take 2 cups of halved Brussels sprouts and toss them in a large bowl with a splash of olive oil, salt, and pepper until they are well coated. - Place 4 skin-on, bone-in chicken thighs on a large baking sheet, skin-side up. Pour half of your glaze over the chicken, making sure it is coated evenly. - Surround the chicken with the seasoned Brussels sprouts, spreading them out evenly. - Drizzle the remaining glaze over the Brussels sprouts for extra flavor. - Bake in the oven for 30-35 minutes. Check that the chicken is cooked through; it should reach an internal temperature of 165°F (75°C) and the Brussels sprouts should be tender and slightly crispy. - If you want extra crispy skin on the chicken, broil it for an additional 3-5 minutes. - How to achieve crispy chicken skin. Start with skin-on chicken thighs. Pat the skin dry before cooking. Season well with salt. This helps draw out moisture. Bake at a high temperature of 400°F. If you want it crispier, broil for a few minutes at the end. This gives a nice golden color. - Tips for evenly roasting Brussels sprouts. Cut Brussels sprouts in half for even cooking. Toss them in olive oil, salt, and pepper. Spread them out on the pan. Avoid crowding them. This helps them roast, not steam. Stir them halfway through baking for better browning. - Modify flavors with different mustards or sweeteners. You can switch the Dijon mustard for honey mustard. This adds a different flavor. For sweeteners, try maple syrup with a bit of brown sugar. This gives a rich taste. Adjust based on your preference. - Balancing sweetness and saltiness in the glaze. The glaze should have a good mix of sweet and salty. If it’s too sweet, add more soy sauce. If it’s too salty, add a touch more maple syrup. Taste as you go to find the right balance. - Presentation tips for rustic serving. Serve straight from the sheet pan for a cozy look. This makes it feel homey and inviting. If you prefer a fancier touch, transfer to a large platter. Drizzle extra glaze on top for shine and flavor. - Pairing ideas with sides or salads. This dish pairs well with rice or quinoa. A simple green salad adds freshness. You can also serve with mashed potatoes for comfort. Choose sides that balance the rich flavors of the chicken and glaze. {{image_2}} You can easily swap chicken thighs for chicken breasts or drumsticks. Both options work well and can change the dish's texture. If you want a twist, try using seasonal vegetables. Instead of Brussels sprouts, consider carrots, green beans, or sweet potatoes. These choices add color and flavor. To boost the flavor, add some spices. Paprika or cayenne gives a nice kick. If you prefer herbs, try fresh rosemary or sage. They add a lovely aroma and depth to the dish. You can mix and match these spices and herbs to suit your taste. If you need a gluten-free version, use tamari instead of soy sauce. This keeps the dish safe for those with gluten issues. For a dairy-free option, you can stick to the original ingredients since this recipe is already dairy-free. If you want a low-carb version, just reduce the maple syrup. This keeps the sweetness while lowering carbs. After enjoying your meal, let the chicken cool. Place it in an airtight container. This keeps the chicken and Brussels sprouts fresh. You can store it in the fridge for up to three days. For longer storage, freeze the leftovers. They last up to three months in the freezer. Make sure to use freezer-safe containers to avoid freezer burn. To reheat, use your oven or microwave. The oven helps keep the texture nice. Preheat your oven to 350°F (175°C). Place the chicken and sprouts on a baking sheet. Cover with foil to keep moisture. Heat for about 15-20 minutes. If using a microwave, add a splash of water to keep them moist. Heat in short bursts, checking often. This way, you won't dry out the chicken or sprouts. Enjoy your delicious leftovers! Can I use other types of chicken? Yes, you can swap chicken thighs for chicken breasts or drumsticks. Just adjust cooking time. Breasts cook faster, so check them early. Drumsticks may take longer, so keep an eye on them. What can I serve with maple glazed chicken? This dish pairs well with rice, quinoa, or a fresh salad. You can also serve it with roasted potatoes or crusty bread. These sides complement the sweet glaze nicely. Is there a vegetarian alternative for this recipe? You can use firm tofu or tempeh instead of chicken. Marinate them in the glaze for flavor. Roast them alongside the Brussels sprouts. This will add a nice crunch. How can I make this dish spicier? Add a pinch of cayenne pepper or red pepper flakes to the glaze. You can also use spicy mustard instead of Dijon. This will give your dish a nice kick. What is the best way to know when chicken is done? The best way is to use a meat thermometer. Chicken should reach an internal temperature of 165°F (75°C). If you don’t have one, cut into the chicken. It should be clear, with no pink inside. Can I make the glaze ahead of time? Yes, you can prepare the glaze a day in advance. Store it in the fridge in a sealed container. Just give it a stir before using it. This saves time on busy days. This recipe for maple-glazed chicken with Brussels sprouts combines simple ingredients and easy steps. You can adjust flavors and swap ingredients based on your taste. Remember, cooking should be fun and flexible. Explore variations to suit your needs and impress your family or friends. Enjoy your meal, and don't forget to try those storage tips for leftovers. Simple techniques make all the difference. Trust your instincts in the kitchen and keep experimenting. Happy cooking!

Maple Glazed Chicken with Brussels Sheet Pan Delight

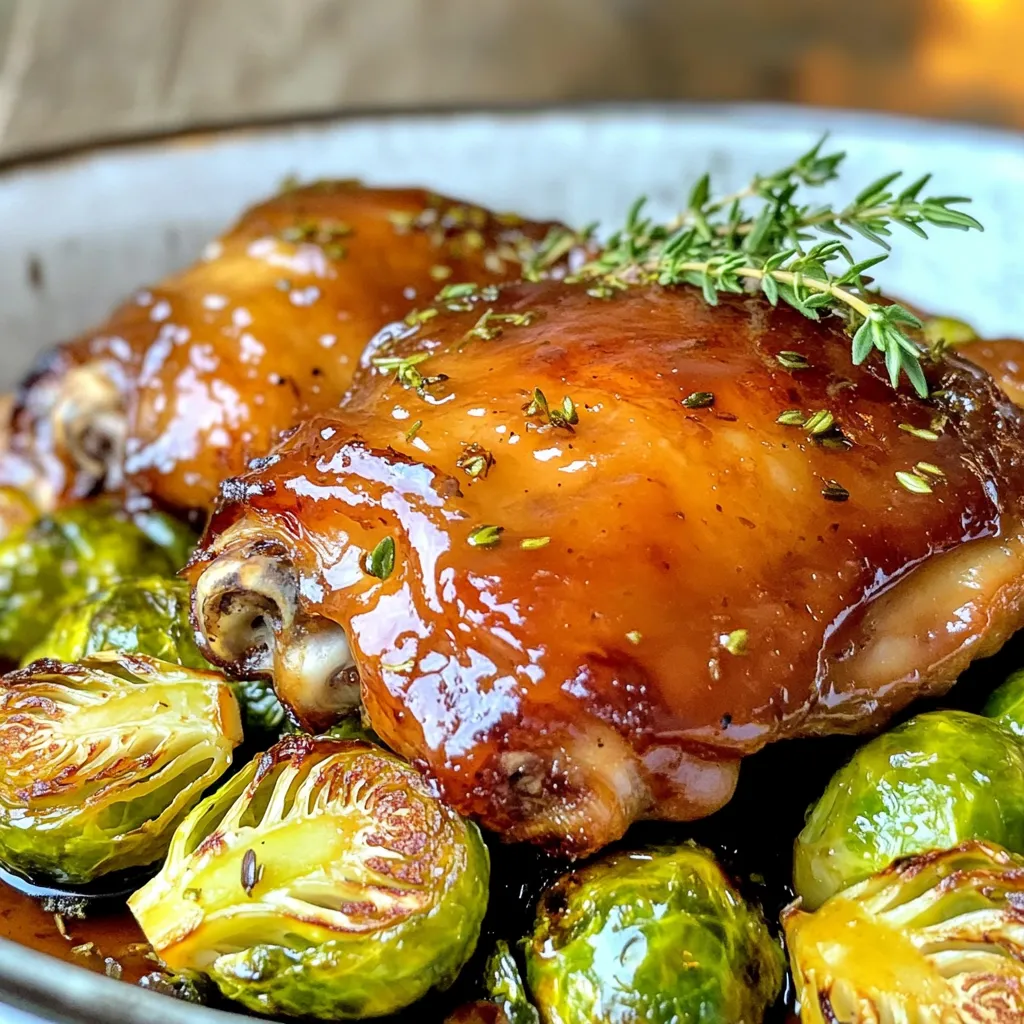
If you’re craving a meal that’s both easy to make and delicious, you’re in the right place. My Maple Glazed

- 1 cup warm water (110°F) - 1 packet (2 ¼ tsp) active dry yeast - 1 tablespoon granulated sugar - 2 ½ cups all-purpose flour - 1 teaspoon salt - ¼ cup baking soda - ½ cup unsalted butter, melted - 1 teaspoon garlic powder - ½ cup grated Parmesan cheese - Flaky sea salt for topping To make these garlic Parmesan pretzel bites, you need simple ingredients. Start with warm water. This helps wake up the yeast. Add some sugar to feed it. Together, these create the starter for your dough. Next, all-purpose flour brings the structure. Salt adds flavor. The baking soda is key for that classic pretzel taste. Butter makes the bites rich and soft. Garlic powder gives a bold kick. Finally, Parmesan cheese adds a savory touch, while flaky sea salt tops it all off for extra crunch. Using quality ingredients matters. Fresh yeast makes a big difference. Opt for high-quality butter for the best flavor. The right Parmesan cheese elevates your bites. Each ingredient works together to create a delicious treat. Start by mixing warm water, yeast, and sugar in a large bowl. Let it sit for about 5 minutes. You want the mixture to become frothy. This shows the yeast is active. Next, add all-purpose flour and salt. Knead until a soft dough forms. It should feel smooth and not sticky. Cover the bowl and let it rise in a warm place for 30 minutes. During this time, the dough will double in size. While the dough rises, preheat your air fryer to 380°F (193°C). This step is key for even cooking later on. In a large pot, bring 4 cups of water to a boil. Add ¼ cup of baking soda to the boiling water. This gives pretzel bites their classic flavor and texture. Once boiling, take your risen dough and divide it into small pieces, about 1 inch each. Shape each piece into a bite-sized pretzel. Carefully drop 3-4 pretzel bites into the boiling water for 30 seconds. This step helps to set the shape. Remove them and place them on a towel to drain excess water. Now it's time to cook. Brush each pretzel bite with melted butter. Sprinkle garlic powder and Parmesan cheese on top. This adds great flavor. Place the pretzel bites in a single layer in the air fryer basket. Make sure they have space to cook evenly. Air fry the pretzel bites for 8-10 minutes. Flip them halfway through cooking for even browning. Once they turn golden brown, remove them from the air fryer. Sprinkle flaky sea salt on top for extra taste. Enjoy your warm, tasty bites! To make perfect pretzel bites, you need good dough. The dough should feel soft but not sticky. Knead it well until smooth. This takes about 5 minutes. Let it rise in a warm spot for about 30 minutes. This helps it grow in size. Boiling the pretzel bites is key for texture. Use a pot with 4 cups of water and ¼ cup of baking soda. Boil the water, then drop in 3-4 bites at a time. Boil each bite for 30 seconds. This step gives them that great chewy texture. Do not overcrowd your air fryer. Lay the pretzel bites in a single layer. This allows hot air to flow around them. It helps them cook evenly and become golden brown. Want to kick up the flavor? You can add extra seasonings. Try a dash of smoked paprika or cayenne for heat. You could also mix in some Italian herbs for a twist. Pair your pretzel bites with delicious dips. Marinara sauce is a classic choice. You can also serve them with cheese sauce or a spicy mustard. These dips add extra fun to every bite. For serving, arrange the pretzel bites on a rustic wooden board. This makes for a great display. Serve them warm for the best taste. Don't forget to sprinkle with flaky sea salt before serving. It adds a nice crunch! {{image_2}} You can change up the flavor of your garlic parmesan pretzel bites in fun ways. Here are some ideas: - Cheese-stuffed pretzel bites: Take a small piece of dough and fill it with mozzarella cheese. Shape it into a ball and proceed as usual. When you bite in, you'll get a gooey surprise! - Spicy garlic parmesan variation: Add red pepper flakes to the garlic powder for a kick. You can mix in some cayenne pepper or even use pepper jack cheese for extra heat. - Sweet pretzel bites with cinnamon sugar: Skip the garlic and parmesan. Instead, brush with melted butter and roll in a mix of sugar and cinnamon. These make a perfect dessert! You can still enjoy these pretzel bites no matter your diet. Here are some adjustments: - Gluten-free flour alternatives: Use a gluten-free flour blend instead of all-purpose flour. Make sure it contains xanthan gum for the best texture. - Vegan options for butter and cheese: Swap unsalted butter for a plant-based version. Use nutritional yeast instead of Parmesan for a cheesy flavor without dairy. - Low-sodium modifications: Use less salt in the dough and skip the flaky sea salt on top. This way, you can enjoy the bites without the extra sodium. To keep your garlic parmesan pretzel bites fresh, let them cool first. Place them on a wire rack. This cooling method stops steam from making them soggy. Once cooled, wrap them tightly in plastic wrap or place them in an airtight container. This keeps them fresh for up to two days in the fridge. If you want to store them longer, freeze the pretzel bites. Arrange them in a single layer on a baking sheet. Freeze for about an hour until firm. Then, transfer them to a freezer-safe bag. They can last for up to three months in the freezer. To enjoy your pretzel bites again, you want to reheat them right. The air fryer is the best method to keep the texture. Preheat your air fryer to 350°F (175°C). Place the pretzel bites in the basket. Heat for about 5-7 minutes. This method keeps them crispy on the outside. You can also use a conventional oven. Preheat it to 350°F (175°C) as well. Place the bites on a baking sheet. Heat for about 10 minutes. This will also work well. Enjoy your pretzel bites warm and tasty! How do I make the pretzel dough softer? To make the pretzel dough softer, add more water. Start with a bit more than one cup. You can also try kneading it longer. This helps the dough become more elastic. Resting the dough for a longer time can make a big difference too. A warm spot helps the dough rise better. Can I use instant yeast instead of active dry yeast? Yes, you can use instant yeast. It works well and rises faster. You do not need to let it sit in warm water. Just mix it with the dry ingredients. This saves time and still gives great results. What dipping sauces pair well with pretzel bites? Many sauces go great with pretzel bites. Here are some popular choices: - Mustard: A classic choice, especially spicy mustard. - Cheese sauce: Creamy and cheesy, perfect for dipping. - Marinara sauce: Adds a nice touch of sweetness and acidity. - Ranch dressing: A cool and tangy dip that many enjoy. Try different sauces to find your favorite! Making pretzel bites at home is fun and rewarding. You need simple ingredients, from warm water to all-purpose flour and baking soda. Following clear steps, you knead the dough, boil it, and air fry it until golden. Keep in mind helpful tips for the best results, like avoiding overcrowding and trying new flavors. Don’t forget about storage and reheating for later enjoyment. With these insights, you can easily impress friends and family with delicious homemade pretzel bites. Enjoy every bite!

Garlic Parmesan Pretzel Bites Air Fryer Delight

Are you ready to elevate your snack game? In this guide, I’ll show you how to make Garlic Parmesan Pretzel

- 1 pound shrimp, peeled and deveined - 4 cups cooked jasmine rice (preferably day-old) - 2 eggs, lightly beaten - 1 cup mixed vegetables (peas, carrots, bell peppers) - 3 cloves garlic, minced - 1 teaspoon ginger, grated - 2 tablespoons soy sauce - 1 tablespoon sesame oil - 3 green onions, chopped - Sesame seeds - Additional salt and pepper This dish shines because of its fresh and vibrant ingredients. The shrimp brings a sweet and briny flavor that pairs well with the rice. The jasmine rice adds a lovely fragrance and a soft texture. Using day-old rice is key. It dries out a bit, making it perfect for frying. Fresh rice can get mushy, which we want to avoid. The mixed vegetables add color and nutrients. You can use frozen or fresh, depending on what you have. Garlic and ginger give depth to the dish, making every bite flavorful. For seasoning, soy sauce brings saltiness and umami. Sesame oil adds a nutty taste that rounds out the flavors. Garnishes like green onions and sesame seeds not only add taste but also make the dish look appealing. A sprinkle of salt and pepper enhances the overall flavor. With these ingredients, you create a dish better than takeout! Marinating the Shrimp Start by placing the shrimp in a medium bowl. Add salt, pepper, and half of the soy sauce. This mix helps the shrimp taste great. Let it sit for about 10 minutes to soak in the flavors. Seasoning Tips If you want extra flavor, try adding a pinch of red pepper flakes or a bit of lime juice. This can make your shrimp pop with taste. Techniques for Scrambling Heat 1 tablespoon of vegetable oil in a large frying pan or wok over medium heat. Pour in the beaten eggs. Swirl the pan to spread the eggs evenly. Scramble until they are just set. Remove them from the pan and set them aside. Timing Tips Keep an eye on the eggs. They cook quickly, so don’t walk away. You want them soft but not runny. Sautéing Shrimp In the same pan, add another tablespoon of vegetable oil. Turn the heat up high and toss in the marinated shrimp. Cook for about 2-3 minutes. You’ll know they are done when they turn pink and opaque. Remove them and set aside with the eggs. Cooking Vegetables Add the last tablespoon of oil to the pan. Toss in the minced garlic and ginger. Sauté for about 30 seconds until you smell the aroma. Then, add the mixed vegetables and half of the green onions. Cook for another 2-3 minutes until the veggies are tender but still bright. Combining Ingredients Now it’s time for the rice! Add the cooked jasmine rice to the pan. Use a spatula to break any clumps. Stir-fry for 2-3 minutes until it is heated through. Next, return the shrimp and scrambled eggs back to the pan. Drizzle in the rest of the soy sauce and sesame oil. Toss all the ingredients gently until everything is well mixed and hot. Using day-old rice is key for great fried rice. Fresh rice is moist and sticky. It clumps together and won’t fry well. Day-old rice dries out a bit, making it perfect for stir-frying. The grains stay separate, giving you that ideal texture. Balancing seasoning is also important. You want a mix of salty and savory. Soy sauce adds saltiness, while sesame oil gives a nutty flavor. Taste as you cook. You can always add more, but it’s hard to take away. High heat is crucial for stir-frying. It helps to sear the shrimp and veggies quickly. This way, they cook fast without losing their crunch. If you cook at lower heat, everything will steam instead of fry. Using a wok gives you more space to toss everything around. A frying pan works too, but a wok can handle high heat better. It also allows for more even cooking. If you have one, use it for the best results. For serving, use a large bowl or individual plates. This makes the dish look inviting. You can also garnish with sesame seeds and extra green onions. These add color and a nice crunch. Consider using chopsticks for an authentic feel. It’s a fun way to enjoy your meal. Plus, it adds to the overall experience of your shrimp fried rice. {{image_2}} You can change the protein in your shrimp fried rice. Chicken works well if you prefer it. Just cook it until it’s no longer pink. Tofu is a great choice for a vegan option. It soaks up flavor and adds a nice texture. For vegetables, you can get creative. Broccoli adds crunch. Snow peas bring a sweet taste. You can mix and match based on what you have at home. To boost flavor, adding spices can help. Try a pinch of chili flakes for heat. You can also add a dash of five-spice powder for depth. Sauces can enhance your dish too. A splash of oyster sauce adds richness. If you like tang, try a bit of rice vinegar. These small changes can make a big difference in taste. If you need a gluten-free dish, swap soy sauce for tamari. It tastes great and works well in this recipe. For a vegan version, simply skip the shrimp and eggs. Use extra veggies and tofu instead. This keeps the dish hearty and satisfying without animal products. To keep your shrimp fried rice fresh, you need proper storage. - Refrigeration Tips: Let the fried rice cool to room temperature. Place it in an airtight container. It will last for up to three days in the fridge. - Freezing Instructions: For longer storage, freeze the rice. Use a freezer-safe container or bag. It can stay good for up to three months. Just remember to label it with the date. When reheating, you have two main options: microwave or stovetop. - Microwave vs. Stovetop: The microwave is quick but may dry out the rice. The stovetop keeps the texture better. Heat it in a pan over medium heat. Add a splash of water to help steam it back to life. - Maintaining Texture: Stir the rice often while reheating. This helps keep it fluffy and prevents sticking. Knowing how long your shrimp fried rice lasts is key. - Duration in Fridge and Freezer: In the fridge, it lasts three days. In the freezer, it can be good for three months. - Signs of Spoilage: If you see mold or smell something off, toss it. Fresh shrimp fried rice should have a pleasant smell and bright colors. Always trust your senses! Yes, you can use frozen shrimp. Just ensure they are thawed before cooking. Place them in cold water for 10-15 minutes to speed up the process. This helps keep the shrimp tender and juicy. To lower the saltiness, use low-sodium soy sauce. You can also reduce the amount of soy sauce in the recipe. Add extra vegetables or rice to balance the flavors. This way, you keep the taste without too much salt. Best Pairings Shrimp fried rice pairs well with egg rolls or spring rolls. A light soup, like hot and sour soup, also complements the dish nicely. Side Dish Suggestions You can serve it with steamed broccoli or a fresh salad. A simple cucumber salad can add a nice crunch. These sides enhance the meal and make it more filling. This blog post covered how to make delicious shrimp fried rice. We explored key ingredients like shrimp, jasmine rice, and essential veggies. I shared step-by-step instructions for preparing shrimp and cooking eggs. You learned tips for authentic flavor and cooking techniques. We also discussed variations for different diets and storage tips. Try this recipe with your favorite proteins and veggies for a tasty twist. Enjoy your cooking!

Shrimp Fried Rice Better Than Takeout Delight

Are you tired of takeout shrimp fried rice? You’re in the right place! My recipe is fresh, flavorful, and simple,

To make the best creamy Parmesan risotto, gather these key items: - 1 cup Arborio rice - 4 cups vegetable broth - 1 medium onion, finely chopped - 2 cloves garlic, minced - 1 cup frozen peas - 1 cup grated Parmesan cheese - 2 tablespoons olive oil - 1 tablespoon butter - Salt and pepper to taste - Fresh parsley, chopped for garnish These ingredients work together to create a rich and creamy dish. Arborio rice is special because it absorbs broth well and gives risotto its creamy texture. You can make this dish your own by adding some extras. Consider these options: - Sliced mushrooms for earthiness - Cooked chicken or shrimp for protein - Lemon zest for a bright flavor - Spinach or asparagus for color and nutrients Feel free to mix and match. Each addition brings a new twist to the classic risotto. Having the right tools makes cooking easier. Here’s what you need: - A large pot or Dutch oven - A wooden spoon for stirring - A cutting board and knife - Measuring cups for accuracy - Serving bowls for presentation These tools will help you create a smooth and tasty risotto. Enjoy the process and have fun in the kitchen! Start by gathering your ingredients. You will need Arborio rice, vegetable broth, onion, garlic, peas, Parmesan cheese, olive oil, butter, salt, and pepper. In a large pot or Dutch oven, heat the olive oil and butter over medium heat. Wait for it to melt completely. Add the finely chopped onion and sauté it for about 3-4 minutes. You want the onion to turn translucent. Next, stir in the minced garlic. Cook it for 1 minute, being careful not to burn it. Now, add the Arborio rice to the pot. Stir well to coat the grains with oil. Toast the rice for about 2 minutes, letting it soak in the flavor. Gradually add 1 cup of vegetable broth to the rice. Stir continuously until the liquid is almost fully absorbed. Keep adding broth, one cup at a time. Stir after each addition, waiting for the rice to absorb the liquid. This process takes about 18-20 minutes. The rice should be creamy and tender yet still hold a slight bite. Once your rice is just right, stir in the frozen peas. Cook for an additional 2 minutes until they are heated through. Remove the pot from heat and fold in the grated Parmesan cheese. This will add a rich, creamy flavor to your dish. Season with salt and pepper to taste. Let the risotto sit for 2-3 minutes to thicken. This step is key for a perfect texture. Serve the risotto in shallow bowls. Top with extra Parmesan cheese and chopped parsley for a nice touch. A drizzle of olive oil adds great flavor! To get that creamy texture, use Arborio rice. This rice has more starch. The starch makes the risotto smooth and rich. Remember to add broth slowly. This lets the rice soak up the liquid well. Stir often while cooking. This keeps the rice from sticking and helps it release more starch. Don’t rush the cooking process. If you add all the broth at once, the rice won’t cook right. Avoid using low-quality broth. A good broth adds flavor. Make sure to taste your risotto as it cooks. This way, you can adjust the salt and pepper. Lastly, don’t skip the cheese. It’s key for that rich taste. Stirring is very important. Use a wooden spoon or a spatula. These tools help you scrape the bottom of the pot. This keeps the rice from burning. When adding broth, pour in one cup at a time. Stir until the liquid is almost gone before adding more. This method gives the risotto its signature creamy texture. {{image_2}} You can boost the flavor and nutrition of your risotto by adding protein. Chicken or shrimp work well. For chicken, use cooked, diced pieces. Stir them in when you add the peas. For shrimp, add them during the last few minutes of cooking. They cook quickly and add a nice touch. Both options make your meal heartier and more filling. You can also customize your risotto with different veggies. Mushrooms add a rich, earthy flavor. Sauté sliced mushrooms with the onion for a great taste. Asparagus brings a fresh crunch. Chop it into small pieces and add it in when you add the peas. These veggies not only add flavor but also color and nutrition. If you need gluten-free or dairy-free options, I have you covered. Simply use gluten-free vegetable broth to keep it safe. For the cheese, try nutritional yeast or a dairy-free cheese. This keeps the creaminess while making it suitable for your diet. You can still enjoy a rich and tasty risotto without gluten or dairy. To store leftover risotto, let it cool first. Once cool, place it in an airtight container. Make sure to seal it well. Store it in the fridge for up to three days. If you want to keep it longer, freezing is a great option. When reheating risotto, add a splash of broth or water. This helps bring back the creamy texture. Heat it slowly over low heat. Stir often to avoid sticking. Taste and adjust seasoning if needed. Freshly grated Parmesan on top adds extra flavor. If you freeze risotto, use a freezer-safe container. Divide portions for easy use later. Risotto can last up to three months in the freezer. When ready to use, thaw it in the fridge overnight. Reheat as described above for best results. Arborio rice is a short-grain rice from Italy. It has a high starch content, which creates a creamy texture when cooked. I love using Arborio rice in risotto because it absorbs liquid well. This rice gives risotto its signature richness. You can find Arborio rice in most grocery stores in the rice aisle. Yes, you can make risotto without cheese. Just skip the Parmesan cheese if you prefer. To keep it creamy, add extra broth and a splash of olive oil. You might miss the cheese flavor, but the dish will still taste good. Try adding herbs or spices to enhance the flavor further. You will know the risotto is done when the rice is creamy and al dente. It should be tender but still have a slight bite. If you taste it and it feels soft, it is ready. The cooking time is about 18 to 20 minutes. Keep stirring and adding broth gradually to achieve the right texture. This blog post covered everything you need to make creamy Parmesan risotto. You learned about key ingredients, helpful tools, and essential steps for cooking. We shared tips to get that perfect texture and highlighted tasty variations for customization. You now know how to store and reheat leftover risotto. With these insights, you can create a delicious meal that suits your taste. Enjoy making risotto your way, and impress your friends with your new skills!

Creamy Parmesan Risotto One Pot Delightful Meal

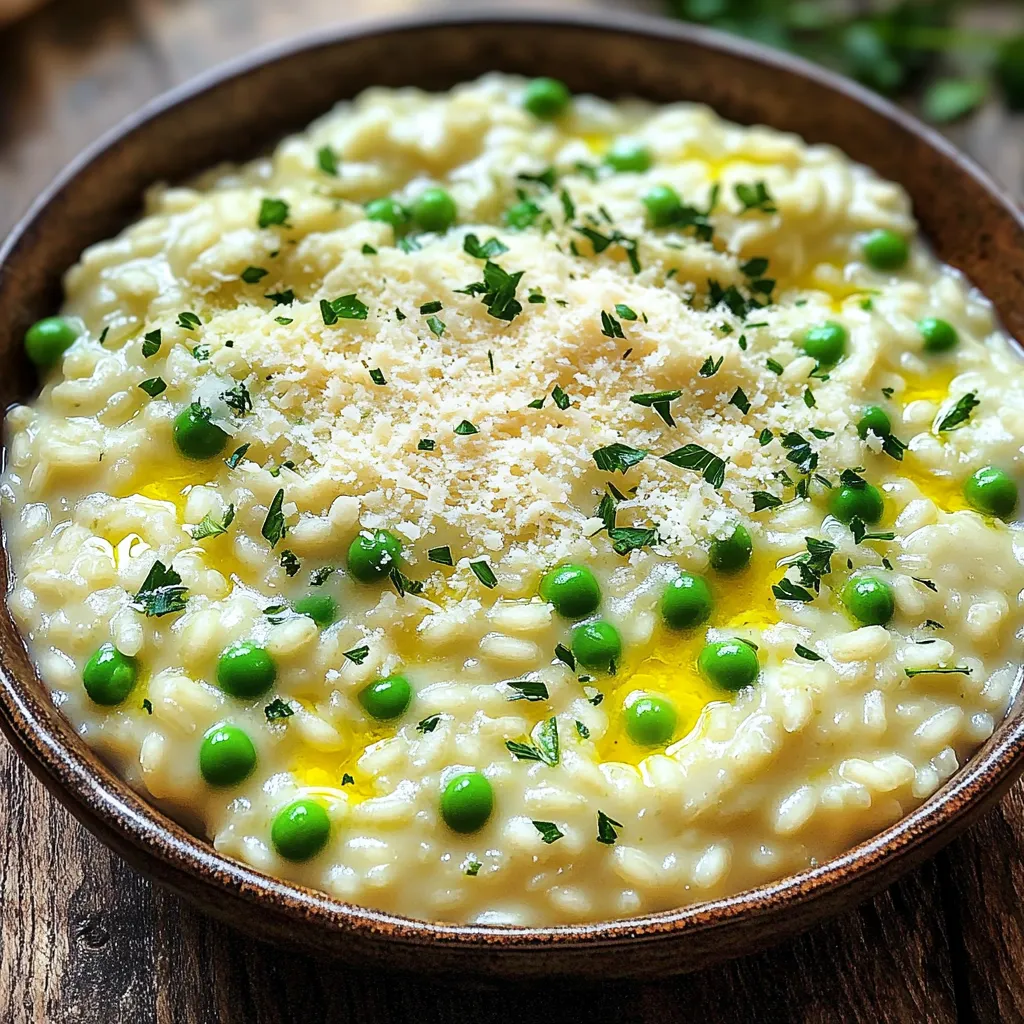
Welcome to your next favorite dish: Creamy Parmesan Risotto One Pot Delightful Meal! This easy recipe will guide you step-by-step

To make these tasty brownies, you need: - 1 box (15.25 oz) brownie mix (plus ingredients as required on the box) - 1 cup apples, peeled and diced - 1 teaspoon cinnamon - 1 cup cream cheese, softened - 1/3 cup granulated sugar - 1 large egg - 1 teaspoon vanilla extract - 1/2 cup caramel sauce (store-bought or homemade) These ingredients create a rich blend of flavors. The brownie mix serves as the base. The apples add a burst of freshness, while cinnamon gives warmth. Cream cheese makes the filling creamy and sweet. You can enhance your brownies with these options: - 1/4 cup chopped walnuts (optional) - Extra caramel sauce for drizzling on top Adding walnuts gives a nice crunch. Extra caramel sauce adds sweetness and makes them look great. To make this recipe, gather these tools: - A mixing bowl - A spatula - A 9x13-inch baking pan - Parchment paper (optional for easy removal) - An electric mixer or whisk Using the right equipment makes the process smooth and easy. Enjoy the fun of baking! First, we need to preheat the oven to 350°F (175°C). Grease a 9x13-inch baking pan or use parchment paper to help with easy removal later. In a mixing bowl, prepare the brownie mix according to the box instructions. After mixing, fold in 1 cup of diced apples and 1 teaspoon of cinnamon. This adds a lovely flavor. Once combined, pour half of the brownie batter into the pan. Use a spatula to smooth it out evenly. In another bowl, beat together 1 cup of softened cream cheese and 1/3 cup of granulated sugar until smooth. This will take just a minute. Then, add 1 large egg and 1 teaspoon of vanilla extract. Mix well until the filling is creamy and smooth. This layer is what makes the brownies rich and delicious. Next, spread the cream cheese mixture evenly over the brownie layer in the pan. Take the remaining brownie batter and spoon it over the cream cheese. You can drizzle and gently spread it for a nice marbled look. Now, drizzle 1/2 cup of caramel sauce on top. If you want, sprinkle some chopped walnuts. Bake the brownies for 30-35 minutes. Check if they are done using a toothpick. It should come out with a few moist crumbs. Let the brownies cool in the pan for about 20 minutes before cutting them into squares. For a fun touch, drizzle extra caramel sauce on top before serving. To create the best Caramel Apple Cheesecake Brownies, follow these tips: - Use fresh apples: Fresh apples give a crisp taste. I recommend Granny Smith or Honeycrisp. - Don't skip the cinnamon: This spice adds warmth and enhances the apple flavor. - Check your oven temperature: Use an oven thermometer to avoid under or overbaking. - Use a toothpick: Insert it into the center to check if the brownies are done. A few moist crumbs are okay. For a smooth cream cheese layer, keep these points in mind: - Soften the cream cheese: Leave it out for 30 minutes before mixing. - Mix well: Beating the cream cheese and sugar together thoroughly helps avoid lumps. - Add the egg slowly: Mix in the egg gradually to maintain a creamy texture. - Spread evenly: Use a spatula to spread the cream cheese layer, ensuring even coverage. Serve these brownies in fun and tasty ways: - Warm with ice cream: Add a scoop of vanilla ice cream on top for a delightful treat. - Garnish with walnuts: Sprinkle chopped walnuts for a crunchy texture. - Drizzle extra caramel: A drizzle of caramel sauce adds sweetness and looks great. - Present on a rustic board: Place brownies on a wooden board and serve with extra caramel for dipping. {{image_2}} For those with dietary needs, you can swap out some ingredients. Use gluten-free brownie mix for a gluten-free option. You can also use dairy-free cream cheese and milk substitutes for a dairy-free treat. Applesauce can replace the egg if you need a vegan option. You can add a twist to your brownies. Try adding chocolate chips for a rich taste. A pinch of nutmeg can enhance the apple flavor. If you love nuts, sprinkle in some pecans or almonds. Caramel bits can also add extra sweetness and texture. How you present your brownies can make them more fun. Serve them on a colorful plate with a scoop of ice cream. You can add a sprinkle of powdered sugar on top for a touch of elegance. A drizzle of extra caramel sauce adds a nice shine and extra flavor. For a festive look, use seasonal fruit to garnish your plate. To keep your caramel apple cheesecake brownies fresh, let them cool first. Once cooled, slice them into squares. Place the brownies in an airtight container. Store them at room temperature for up to three days. If you want them to last longer, refrigerate them. They will stay good in the fridge for about a week. Remember to separate layers with parchment paper to avoid sticking. You can freeze these brownies if you want to save some for later. First, let the brownies cool completely. Then, wrap each square tightly in plastic wrap. Place the wrapped brownies in a freezer-safe bag or container. They can stay in the freezer for up to three months. When you are ready to enjoy them, simply thaw them in the fridge overnight. To reheat your brownies, take them out of the container. If they are cold, let them sit at room temperature for about 15 minutes. You can warm them up in the oven at 350°F (175°C) for 5-10 minutes. If you prefer the microwave, heat them for about 10-15 seconds. This will make the brownies soft and gooey again. For extra deliciousness, drizzle some caramel sauce on top before serving! Yes, you can make these brownies ahead of time. They taste even better after a day. Just let them cool fully. Store them in an airtight container. You can keep them at room temperature for up to three days. For longer storage, place them in the fridge, where they last about a week. If you want a substitute for cream cheese, try Greek yogurt. It gives a creamy texture. You can also use mascarpone cheese for a rich taste. Silken tofu is another option if you want a dairy-free choice. Just blend it until smooth for best results. To make these brownies gluten-free, use a gluten-free brownie mix. Many brands offer great options. Always check the label to ensure it’s gluten-free. The rest of the ingredients are naturally gluten-free, so you’re good to go! Absolutely! You can use any apple you like. Granny Smith apples add tartness. Honeycrisp apples are sweet and crisp. Fuji apples are also a great choice for sweetness. Just make sure to peel and dice them before adding. To cut brownies neatly, wait until they cool. Use a sharp knife for clean cuts. You can warm the knife under hot water, then dry it off. This method helps you get smooth edges with every slice. These Caramel Apple Cheesecake Brownies blend rich flavors and textures for a fun dessert. From choosing the right ingredients to helpful baking tips, you now have a clear path to success. Remember, feel free to try different flavors and toppings. You can even make them fit your dietary needs. With proper storage, these treats stay fresh for future enjoyment. Now, gather your supplies and enjoy the sweet rewards of your efforts!

Caramel Apple Cheesecake Brownies Delightful Treat

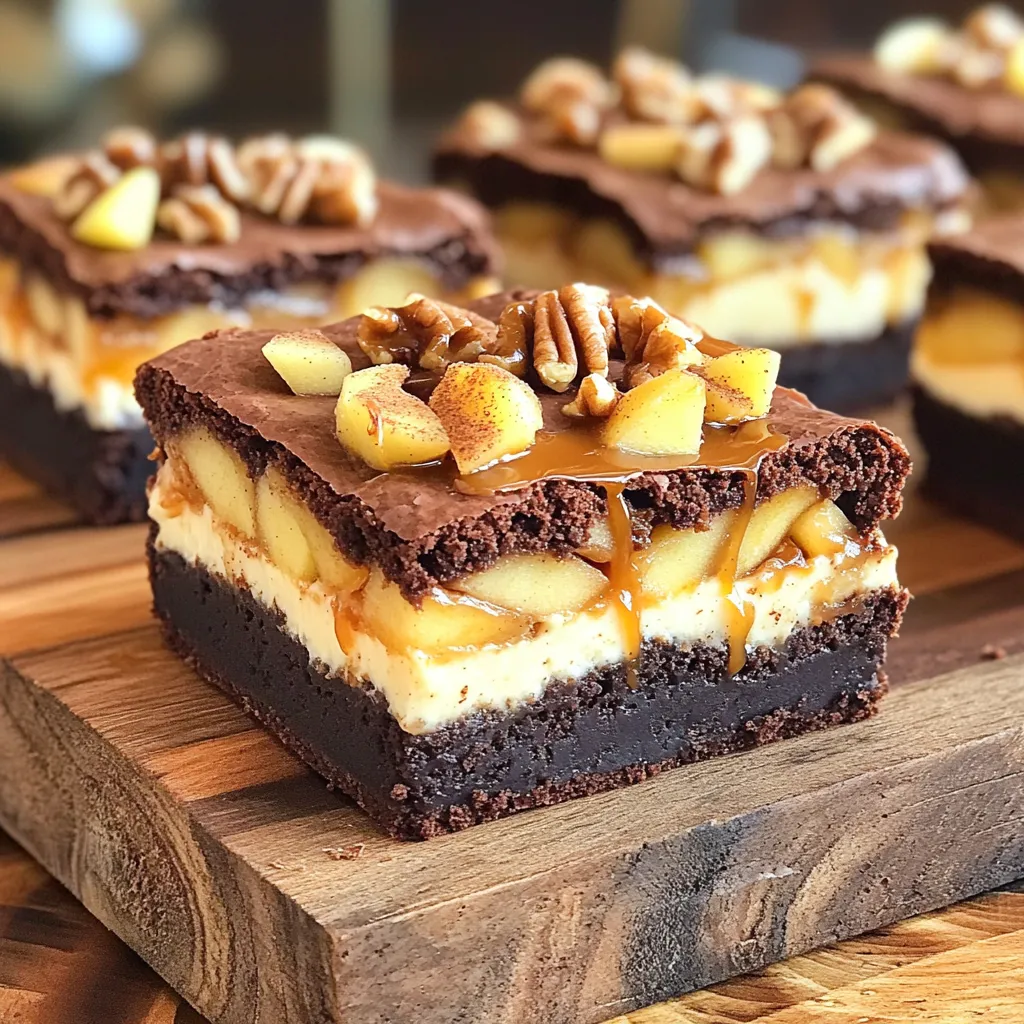
Get ready for a treat that combines the best of fall flavors! My Caramel Apple Cheesecake Brownies are the perfect

To make Peanut Butter Protein Balls, gather your ingredients first. Here’s what you need: - 1 cup rolled oats - 1/2 cup peanut butter or almond butter - 1/3 cup honey or maple syrup - 1/2 cup vanilla protein powder - 1/4 cup ground flaxseed - 1/4 cup mini chocolate chips (optional) - 1/2 teaspoon cinnamon - A pinch of salt These ingredients bring together great taste and healthy energy. Rolled oats give you fiber. Peanut butter adds protein and healthy fat. Honey or maple syrup offers natural sweetness. Vanilla protein powder boosts the protein level even more. Ground flaxseed contributes omega-3 fatty acids. Mini chocolate chips add a fun touch, if you like. Cinnamon brings warmth and flavor, while salt enhances everything. When you mix these ingredients, you create a nutritious snack. Each bite helps keep you full and energized. Enjoy making these while feeling good about what you eat! To start, gather your ingredients. In a large mixing bowl, combine: - 1 cup rolled oats - 1/2 cup peanut butter (or almond butter) - 1/3 cup honey (or maple syrup) - 1/2 cup vanilla protein powder Stir these ingredients well. You want to mix until they form a thick paste. This base is full of energy and flavor. Now, it's time to add some fun flavors. Incorporate: - 1/4 cup ground flaxseed - 1/4 cup mini chocolate chips (optional) - 1/2 teaspoon cinnamon - A pinch of salt Mix everything together until all ingredients are evenly blended. The chocolate chips add sweetness, while the flaxseed boosts nutrition. Next, take a tablespoon of your mixture and roll it into a ball. If your hands get sticky, dampen them slightly with water. Place each ball onto a baking sheet lined with parchment paper. Once all the mixture is rolled into balls, refrigerate them for at least 30 minutes. This helps them firm up and makes them easier to eat. Enjoy your tasty and healthy snack! To get the right texture for your protein balls, you can adjust the mixture. If it's too dry, add a little honey or more peanut butter. If it feels too wet, add more oats or protein powder. This helps you find the perfect balance. When handling the sticky mixture, dampen your hands with water. This simple trick makes rolling the balls easier. You won’t end up with a sticky mess on your hands. For serving, choose a nice decorative plate. Arrange the protein balls in a circle for a fun look. You can also sprinkle extra chocolate chips or nuts around them. This adds color and makes the dish more appealing. If you want to garnish, consider drizzling some melted chocolate over the top. This gives an extra touch and looks great for guests. To spice things up, try adding a dash of nutmeg or vanilla extract. These can boost the flavor without much work. You can also mix in coconut flakes for a tropical twist that pairs well with peanut butter. Consider adding dried fruits like cranberries or raisins for sweetness. These extra ingredients give more taste and nutrition to your protein balls. They make each bite even more enjoyable. {{image_2}} You can switch peanut butter for almond butter or cashew butter. Each nut butter adds a unique taste. Almond butter gives a rich, nutty flavor, while cashew butter is creamier and sweeter. Feel free to experiment and find your favorite! If you want to change up the sweetness, try agave syrup or date syrup instead of honey. Agave has a mild flavor, while date syrup adds a caramel-like taste. Both options keep the protein balls sticky and sweet. Adding dried fruits like cranberries or apricots boosts flavor and nutrition. You can also mix in seeds like chia or sunflower seeds. These add crunch and extra health benefits. Customize your protein balls to fit your tastes! Store your peanut butter protein balls in an airtight container. This keeps them fresh. You can use glass or plastic containers. Make sure the lid seals tightly. Keep them in the fridge for the best taste. They will stay good for up to one week. To freeze these protein balls, place them in a single layer on a baking sheet. Freeze them for about an hour. Once firm, move them into a freezer-safe bag. Make sure to remove as much air as possible. This helps them last longer. When you want to eat one, simply take it out and let it thaw for about 15 minutes at room temperature. You can also microwave them for 10-15 seconds. These protein balls last for about one week in the fridge. If you freeze them, they can last for about three months. Just remember to check for any changes in smell or texture before eating. Always trust your senses! Each peanut butter protein ball has about 100-120 calories. The exact number can change based on your choices. Here’s a quick breakdown of the nutrition per serving: - Rolled oats: 30 calories - Peanut butter: 50 calories - Honey: 20 calories - Protein powder: 25 calories - Flaxseed: 15 calories - Chocolate chips (if added): 20 calories This makes these protein balls a great snack that fills you up without too many calories. Yes, you can make these protein balls vegan! Here are some simple swaps: - Use almond butter or any nut butter instead of peanut butter. - Swap honey with maple syrup or agave nectar. Both are perfect for sweetness. - Choose a plant-based protein powder to keep it vegan-friendly. These changes keep the taste great while ensuring they fit a vegan diet. You can easily change the flavor of your protein balls. Here are some fun ideas: - Add spices like nutmeg or vanilla extract for extra taste. - Mix in dried fruits, like cranberries or apricots, for a chewy texture. - Try different nut butters, like cashew or sunflower seed butter, for a unique twist. - Toss in a scoop of cocoa powder if you love chocolate. These options let you make each batch special and fun! This blog post covered how to make protein balls using simple ingredients. You learned about the main components and how to mix them into a tasty snack. I shared tips for the right texture and tasty variations. Proper storage is key for freshness. With these easy recipes and suggestions, you'll enjoy delicious, healthy snacks anytime. Try different flavors and stay creative. These protein balls not only help your diet but also satisfy your cravings. Enjoy making your own healthy treats!

Peanut Butter Protein Balls High Protein Energizer

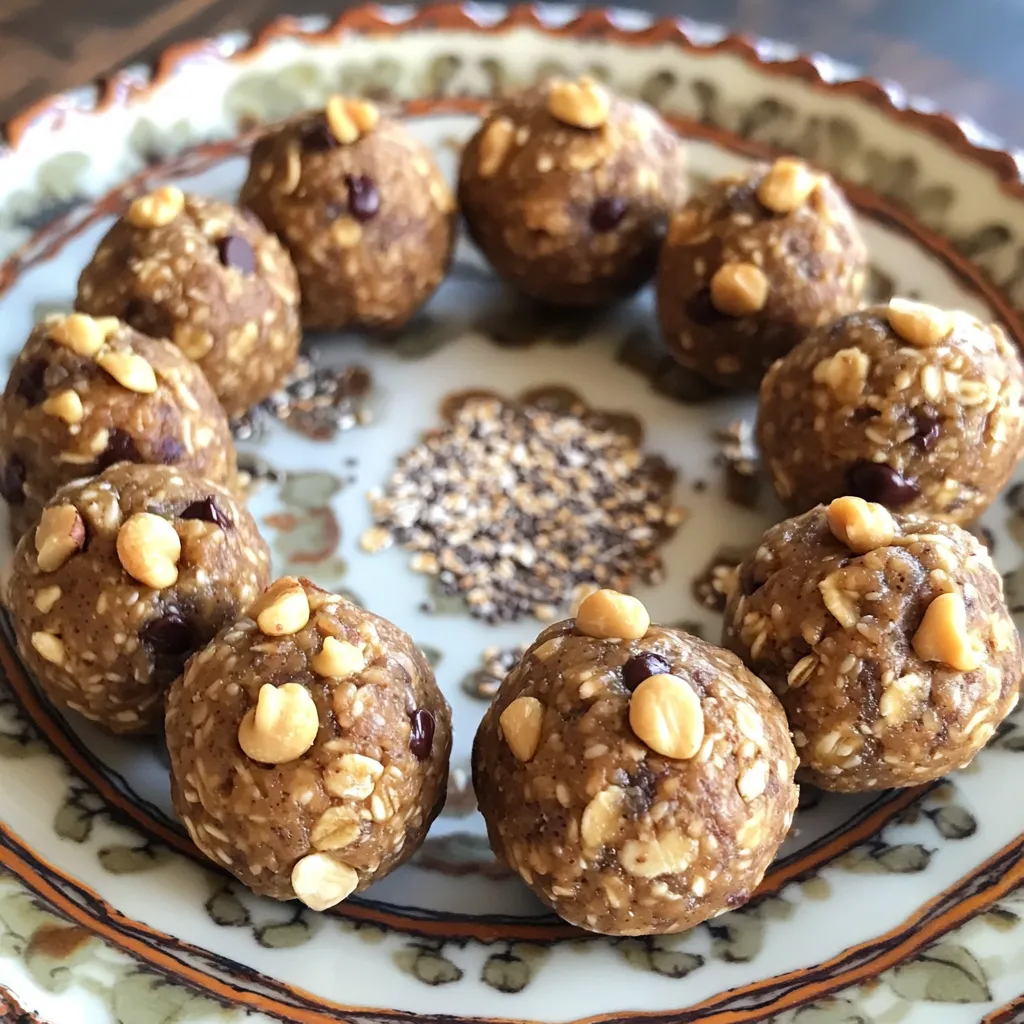
Looking for a tasty and easy snack that packs a protein punch? You’re in the right place! These Peanut Butter

Older posts
Newer posts
← Previous Page1 … Page14 Page15 Page16 … Page84 Next →

dsad

© 2026 easycookingbite • Built with GeneratePress

Our Policies

  • Copyright Policy
  • Cookie Policy
  • GDPR Policy
  • Privacy Policy
  • Disclaimer
  • Terms Of Use

More Information

  • Home
  • About
  • Contact
  • Appetizers
  • Dessert
  • Dinner
  • Drinks
©2026, easycookingbite About Back To Top