Skip to content
DisclaimerTerms Of UseGDPR PolicyCookie Policy

easycookingbite

  • Home
  • Drinks
  • Appetizers
  • Dinner
  • Dessert
  • About
  • Contact
  • Privacy Policy
DisclaimerTerms Of UseGDPR PolicyCookie Policy

NO-ING-IMG

- 2 cups all-purpose flour - 1 cup granulated sugar - 1/2 cup packed brown sugar - 1 teaspoon baking powder - 1/2 teaspoon baking soda - 1/2 teaspoon salt - 2 teaspoons pumpkin pie spice - 1/2 cup unsalted butter, softened - 1 cup canned pumpkin puree - 1/4 cup brewed coffee (cooled) - 2 large eggs - 1 teaspoon vanilla extract These ingredients form the base of your cake. The all-purpose flour gives structure, while the sugars add sweetness and moisture. The pumpkin pie spice brings that warm, cozy flavor we love in fall. - 1/2 cup chopped walnuts or pecans - 1/3 cup powdered sugar (for glaze) - 1 tablespoon milk (for glaze) Nuts add a nice crunch and flavor. If you love a sweet topping, make a glaze with powdered sugar and milk. It gives a lovely finish when drizzled over the cake. - Always use fresh spices. They make a big difference in taste. Old spices lose their kick and flavor. - For canned pumpkin, choose pure pumpkin puree, not pumpkin pie filling. The filling has added sugar and spices. Look for a brand you trust for the best flavor. Using high-quality ingredients ensures your Pumpkin Spice Latte Coffee Cake shines with flavor. 1. Preheating the oven: Start by preheating your oven to 350°F (175°C). This step is key. A hot oven ensures even baking. 2. Preparing the baking pan: Take a 9x13 inch baking pan and grease it well. Use butter or cooking spray. This helps the cake release easily after baking. 1. Combining dry and wet ingredients: In a large bowl, whisk together 2 cups of all-purpose flour, 1 cup of granulated sugar, 1/2 cup of brown sugar, 1 teaspoon of baking powder, 1/2 teaspoon of baking soda, 1/2 teaspoon of salt, and 2 teaspoons of pumpkin pie spice. Mix until everything is blended. 2. In another bowl, beat 1/2 cup of softened butter until creamy. Add 1 cup of canned pumpkin puree, 1/4 cup of cooled coffee, 2 large eggs, and 1 teaspoon of vanilla extract. Mix until smooth. 3. Gradually add the dry mix to the wet mix. Stir until just combined. Avoid overmixing; this keeps your cake tender. If you like nuts, fold in 1/2 cup of chopped walnuts or pecans now. 1. Baking time and temperature: Pour the batter into your prepared pan. Spread it evenly. Bake in your preheated oven for 30-35 minutes. 2. How to check for doneness: To test if your cake is done, insert a toothpick into the center. If it comes out clean, the cake is ready. If it has batter on it, bake for a few more minutes. To make the best pumpkin spice latte coffee cake, avoid common mistakes. One key mistake is overmixing the batter. Overmixing leads to a tough cake. Mix just until you see no dry flour. Another mistake is using cold ingredients. Always use room temperature eggs and butter. Room temperature helps the cake rise and stay soft. The best way to serve this cake is warm. You can slice it and enjoy it straight from the pan. For a delightful touch, pair it with your favorite coffee or tea. The warm drink enhances the spice flavors. To enhance your cake, consider adding toppings. Chopped nuts or a sprinkle of cinnamon work well. You can also decorate the cake with a simple glaze. Mix powdered sugar with milk for a smooth finish. Drizzle it over the cooled cake for a sweet touch. {{image_2}} You can change the flavor of your pumpkin spice latte coffee cake in fun ways. Instead of just using pumpkin pie spice, try adding cinnamon, nutmeg, or cardamom. These spices can bring new notes to your cake. If you love chocolate, stir in some chocolate chips. For a sweet twist, swirl in caramel sauce. Both options add richness and depth to your cake. If you need a gluten-free version, swap all-purpose flour for a gluten-free blend. This works well with cake recipes. For those who follow a vegan diet, replace eggs with flax eggs. Mix one tablespoon of ground flaxseed with three tablespoons of water. Let it sit for five minutes to thicken. Also, use plant-based butter and almond milk for the glaze. These swaps keep your cake tasty and friendly for different diets. You can make your coffee cake fit the season. For the holidays, add cranberries or pecans for a festive touch. You can even top the cake with whipped cream for a special treat. In summer, consider adding fresh berries like blueberries or strawberries. They add bright flavors and make the cake feel light and fresh. Each season brings a chance to try something new with this recipe! To keep your Pumpkin Spice Latte Coffee Cake fresh, store it in an airtight container. This helps seal in moisture and flavor. You can leave it at room temperature for up to three days. If you live in a warm area, refrigerate it to last a bit longer. In the fridge, the cake stays fresh for about a week. You can freeze this cake for later enjoyment. First, let the cake cool completely. Then, wrap it tightly in plastic wrap. After that, place it in a freezer bag. This way, it stays fresh for up to three months. When you're ready to eat it, move the cake to the fridge overnight. For a quick thaw, let it sit at room temperature for two hours. Reheat slices in the microwave for about 15 seconds. If you have leftover cake, you can get creative! Crumble it over yogurt for a tasty breakfast. You can also use it to make a trifle by layering it with whipped cream and fruit. Another fun option is to blend it into a milkshake for a sweet treat. Enjoy transforming your leftover cake into something new! Pumpkin spice flavors come from a mix of warm spices. They include cinnamon, nutmeg, and clove. These spices are found in many autumn recipes. The pumpkin spice latte started in the early 2000s. It quickly became a fall favorite. The cake combines this drink's flavors into a soft, sweet treat. Yes, you can make this cake ahead of time. It stays fresh for a few days. To prepare, bake the cake and let it cool. Once cool, cover it with plastic wrap. You can also freeze it for later. Just make sure to wrap it well. When ready to eat, thaw it in the fridge overnight. To check if the cake is done, use a toothpick. Insert it into the center of the cake. If it comes out clean, the cake is ready. If it has batter on it, bake for a few more minutes. This method works great for any cake. It helps to avoid overbaking and keeps the cake moist. In summary, we explored key ingredients for your pumpkin spice latte coffee cake. Fresh spices and good-quality canned pumpkin are vital. We also covered steps for mixing and baking, plus tips to avoid common mistakes. You can get creative with flavor and dietary variations too. Finally, proper storage methods will keep your cake fresh longer. Enjoy making this delightful treat for any occasion. Happy baking!

Pumpkin Spice Latte Coffee Cake Delightful Recipe

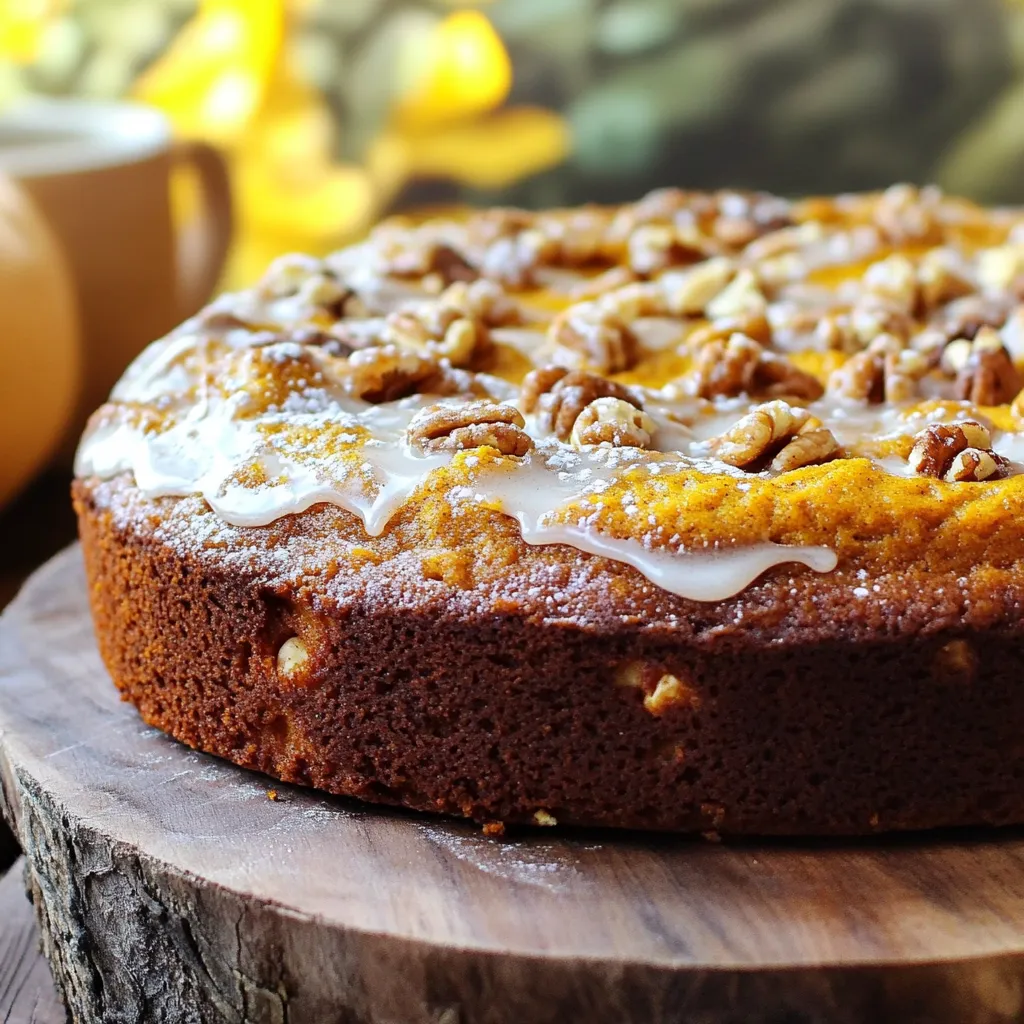
Are you ready to indulge in a warm slice of Pumpkin Spice Latte Coffee Cake? This delightful recipe combines the

Here’s what you need to make these tasty pecan pie muffins: - 1 cup all-purpose flour - 1 cup whole wheat flour - 1 cup packed brown sugar - 1/2 cup granulated sugar - 1 tablespoon baking powder - 1/2 teaspoon baking soda - 1/2 teaspoon salt - 2 large eggs - 1 cup buttermilk (or milk with a tablespoon of vinegar added) - 1/2 cup unsalted butter, melted - 1 teaspoon vanilla extract - 1 cup chopped pecans - 1/2 cup mini chocolate chips (optional) These ingredients make the muffins rich and full of flavor. The mix of all-purpose and whole wheat flour gives a nice texture. Brown sugar adds deep sweetness, while granulated sugar balances it out. Baking powder and baking soda help the muffins rise. The buttermilk makes them moist and fluffy. If you don't have buttermilk, try regular milk with vinegar. The melted butter adds richness, and vanilla extract enhances the taste. Chopped pecans give that classic pecan pie flavor. If you want a sweet twist, toss in the mini chocolate chips. Gather these ingredients, and you’re ready to bake! 1. Preheat your oven to 350°F (175°C). Line a muffin tin with paper liners or lightly grease it. 2. In a large mixing bowl, whisk together: - 1 cup all-purpose flour - 1 cup whole wheat flour - 1 cup packed brown sugar - 1/2 cup granulated sugar - 1 tablespoon baking powder - 1/2 teaspoon baking soda - 1/2 teaspoon salt 3. In another bowl, beat 2 large eggs. Then, whisk in: - 1 cup buttermilk (or milk mixed with vinegar) - 1/2 cup melted unsalted butter - 1 teaspoon vanilla extract - 1/4 cup maple syrup 4. Pour the wet ingredients into the dry ingredients and stir gently. Mix until just combined. The batter should be slightly lumpy, so do not overmix. 5. Fold in 1 cup chopped pecans and 1/2 cup mini chocolate chips if you want a sweet surprise. 1. Divide the batter evenly among the muffin cups. Fill each cup about 3/4 full. 2. Bake in the preheated oven for 18-20 minutes. Check doneness with a toothpick. If it comes out clean, the muffins are ready. 1. Let the muffins cool in the pan for 5 minutes. Then, transfer them to a wire rack to cool completely. 2. For a lovely presentation, serve the muffins warm. Dust them lightly with powdered sugar. Top each muffin with a whole pecan. You can also drizzle more maple syrup on top for an extra treat. To make bakery-style muffins, you must measure ingredients right. Use a kitchen scale for the best results. This helps you get the perfect texture. Also, avoid overmixing the batter. Mix the dry and wet ingredients just until you see no dry flour. Some lumps are okay. This keeps your muffins light and fluffy. You can change the buttermilk and butter for different flavors. If you don’t have buttermilk, mix regular milk with a tablespoon of vinegar. This works well for moisture. For butter, you can use coconut oil or a plant-based spread. Want more taste? Add spices like cinnamon or nutmeg. A splash of almond extract also adds a nice touch. To keep your muffins moist, store them in an airtight container. This helps them stay fresh longer. For even baking, rotate your muffin tin halfway through cooking. This ensures all muffins bake evenly and brown nicely. If your oven has hot spots, this small step makes a big difference. {{image_2}} You can spice up your pecan pie muffins in fun ways. Adding a bit of cinnamon or nutmeg gives warmth and depth. You can also switch up the nuts. Try walnuts or hazelnuts for a twist. If you love chocolate, toss in some mini chocolate chips. They melt and add a rich flavor. Need a gluten-free option? Use almond or coconut flour instead of regular flour. This keeps the muffins tasty and light. Want to make them vegan? Swap the eggs for flaxseed meal mixed with water. Use almond milk or oat milk instead of buttermilk. This way, everyone can enjoy these treats. Seasonal fruits can add a fresh touch. In the fall, add some chopped apples or pears. They pair well with pecans. In spring, try blueberries or strawberries for a burst of color and flavor. You can also use citrus zest for a bright note. Each season brings new flavors to explore! To keep your pecan pie muffins fresh, store them in an airtight container. If you want to refrigerate them, use a container that seals well. This helps prevent them from drying out. For long-term storage, freezing is a great option. Wrap each muffin tightly in plastic wrap, then place them in a freezer bag. This keeps them fresh for months. At room temperature, these muffins stay fresh for about three days. Make sure they are in a cool place, away from direct sunlight. If you freeze them, they can last up to three months. When you're ready to eat, take one out and let it thaw. You can leave it at room temperature for a few hours. Reheating your muffins is simple. You can use the microwave for a quick fix. Heat one muffin for about 15-20 seconds. For a crispier texture, use the oven. Preheat your oven to 350°F (175°C) and place the muffins on a baking sheet for about 5-7 minutes. Enjoy them warm for the best flavor! How do you make pecan pie muffins from scratch? To make pecan pie muffins from scratch, gather your ingredients first. You will need all-purpose flour, whole wheat flour, brown sugar, granulated sugar, baking powder, baking soda, salt, eggs, buttermilk, melted butter, vanilla extract, maple syrup, chopped pecans, and optional mini chocolate chips. Mix the dry and wet ingredients in separate bowls, then combine them gently. This will ensure a perfect batter for your muffins. Can I substitute ingredients in the recipe? Yes, you can substitute some ingredients. For example, if you don’t have buttermilk, mix regular milk with a tablespoon of vinegar for a quick homemade version. You can also replace unsalted butter with coconut oil for a dairy-free option. However, be careful with sugar types; they affect sweetness and texture. What type of flour is best for muffins? For pecan pie muffins, a mix of all-purpose and whole wheat flour gives great texture. All-purpose flour provides lightness, while whole wheat flour adds a nutty flavor. This blend creates a hearty muffin that is still soft. How do I know when the muffins are done baking? To check if the muffins are done, insert a toothpick into the center. If it comes out clean or with a few crumbs, your muffins are ready. If it comes out wet, bake them a few more minutes. Why does my muffin batter need to be lumpy? A lumpy batter is key to good muffins. Overmixing can make them tough and dry. The lumps help keep the muffins light and airy. Just mix until the dry ingredients are moistened, and you’ll have perfect muffins. Can I use regular milk instead of buttermilk? Yes, you can use regular milk in place of buttermilk. Just add a tablespoon of vinegar to the milk and let it sit for a few minutes. This simple trick gives you the same tangy flavor and helps activate the baking soda. In this post, I shared how to make delicious pecan pie muffins. We covered key ingredients, step-by-step instructions, and baking tips. Remember, accurate measurements and not overmixing are essential for success. You can adapt the recipe for different flavors and dietary needs. Follow the storage tips to keep muffins fresh. Lastly, I answered common questions to help you bake with confidence. Enjoy baking these tasty muffins and share them with friends and family!

Pecan Pie Muffins Bakery Style Irresistible Treat

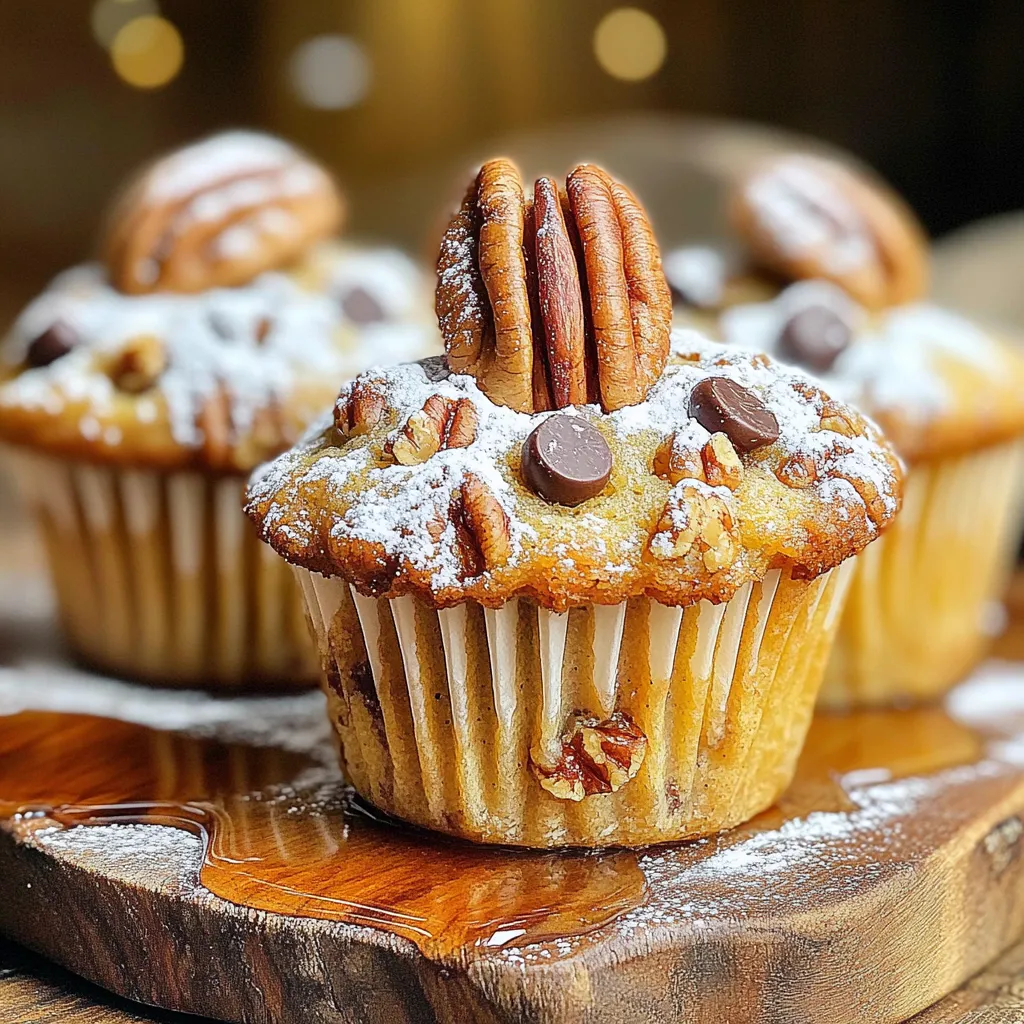
Are you ready for a sweet twist on a classic dessert? My Pecan Pie Muffins Bakery Style are the perfect

- 4 bone-in, skin-on chicken thighs - 4 cloves garlic, minced - 2 lemons (zest and juice of one, wedges from the other) - 2 tablespoons olive oil - 1 teaspoon dried oregano - 1 teaspoon dried thyme - 1 teaspoon paprika - Salt and pepper, to taste - 1 cup cherry tomatoes, halved - 1 red bell pepper, sliced - Fresh parsley, chopped (for garnish) The main ingredients set the stage for this dish. Chicken thighs with the skin on give a great flavor. Garlic adds a nice kick, while lemons brighten everything up. The olive oil helps the chicken cook well and keeps it moist. For seasonings, oregano, thyme, and paprika bring depth. Salt and pepper balance the flavors. You can adjust these to fit your taste. The vegetables make this meal colorful and tasty. Cherry tomatoes burst with juice, while red bell pepper adds sweetness. Fresh parsley gives a lovely touch when you serve the dish. Having these ingredients ready makes the cooking process smooth. Try to use fresh spices and herbs for the best taste. The mix of savory chicken, zesty lemon, and sweet veggies makes this recipe a standout. You can’t go wrong with these simple yet powerful ingredients. - Preheat the oven to 425°F (220°C). - In a large bowl, mix garlic, lemon zest, lemon juice, olive oil, oregano, thyme, paprika, salt, and pepper. This makes a tasty marinade. - Coat the chicken thighs in the marinade. Ensure each piece gets good coverage. - For more flavor, let it sit for at least 15 minutes. You can also marinate overnight. - Line your baking sheet with parchment paper. This helps with cleanup. - Place the chicken skin-side up on one side of the sheet. - Add halved cherry tomatoes and sliced red bell pepper on the other side. Drizzle them with olive oil and season lightly with salt and pepper. - Place lemon wedges around the chicken and veggies for extra flavor. - Bake in the preheated oven for 35-40 minutes. - Use a meat thermometer to check the chicken. It should reach 165°F (74°C) and have a crispy skin. - Let the chicken rest for about 5 minutes before serving. This helps keep it juicy. - Serve the chicken thighs with roasted vegetables on a large platter. Garnish with fresh parsley for color. Add extra lemon wedges for a fresh touch. For the best flavor, marinate your chicken thighs for at least 15 minutes. However, letting them sit overnight makes a big difference. If you want to adjust the taste, add more lemon juice for tang or extra herbs for depth. Tasting the marinade before adding the chicken helps you find the best balance. Spacing is key! Place the chicken thighs on the baking sheet so they don’t touch. This allows heat to circulate and cooks everything evenly. To get crispy skin, start with a hot oven at 425°F. This high heat helps the fat render, creating that golden finish we all love. Pair your chicken with roasted vegetables like the cherry tomatoes and red bell pepper from the recipe. A fresh salad or fluffy rice also works well. For a fun touch, garnish your dish with fresh parsley and extra lemon wedges. This not only adds color but enhances the flavor too. {{image_2}} You can change things up with different herbs and spices. Try rosemary or basil for a new twist. For a smokier flavor, use cumin or chipotle powder. If you prefer boneless chicken thighs, they work just as well. They cook faster, so check them at 25-30 minutes. You can grill the chicken thighs for a smoky flavor. Just marinate them as usual. Preheat your grill to medium heat. Cook each side for about 6-7 minutes or until they reach 165°F (74°C). If you want to use a skillet, heat olive oil in a pan. Sear chicken thighs skin-side down for 5-7 minutes. Flip them over and cover to cook through. If you prefer a slow cooker, add your marinated chicken and veggies. Cook on low for 6-8 hours or high for 3-4 hours. The chicken will be juicy and tender. You can add seasonal vegetables to your sheet pan. In summer, try zucchini or bell peppers. In fall, think about sweet potatoes or Brussels sprouts. For a touch of sweetness, toss in some apples or pears. You can also switch up the citrus. Use oranges for a sweeter taste or limes for a tangy kick. Each change gives this dish a fresh twist. To keep your lemon garlic herb chicken thighs fresh, cool them first. Place the cooled chicken in airtight containers. Glass containers work well, but plastic ones are fine too. You can store these in the fridge for up to four days. Make sure to include the veggies to enjoy all the flavors. When you want to enjoy leftovers, reheat them safely. The best way is to use the oven. Preheat it to 375°F (190°C). Place the chicken on a baking tray and cover it with foil. This keeps it moist. For crispy skin, remove the foil for the last 10 minutes. You can also use a microwave, but it may not keep the skin crispy. If you want to save some for later, freezing is a great option. Wrap each chicken thigh tightly in plastic wrap. Then, place them in a freezer bag. They can stay in the freezer for up to three months. To thaw, move them to the fridge overnight. This gives the best taste and texture when you reheat. It takes about 35-40 minutes to cook chicken thighs in the oven at 425°F (220°C). This high temperature helps the skin get crispy and golden while keeping the meat juicy. Always check that the internal temperature reaches 165°F (74°C) to ensure it is safe to eat. Yes, you can use other types of chicken for this recipe. Boneless chicken breasts can work well, but they cook faster. Chicken wings also taste great with the same flavors, but you may need to adjust the cooking time. Thighs are my favorite for their rich taste and moist texture. You can serve this chicken with many side dishes. Here are some ideas: - Roasted potatoes - Steamed green beans - A fresh garden salad - Quinoa or rice These sides complement the chicken's zesty flavors and make a balanced meal. This recipe offers a good balance of protein, healthy fats, and veggies. Chicken thighs provide iron and zinc, while garlic can boost your immune system. Olive oil adds heart-healthy fats, and the vegetables bring fiber and vitamins. Overall, it's a nutritious choice for a main dish. To add some heat, consider these tips: - Add red pepper flakes to the marinade. - Use spicy paprika instead of regular paprika. - Mix in some diced jalapeños or chili peppers. These options will give your dish a nice kick without overpowering the lemon and garlic flavors. This blog post has walked you through a flavorful lemon garlic chicken recipe. We covered ingredients, marination, baking, and tips to enhance your dish. Remember, the key is letting the chicken soak in the marinade for the best flavor. Whether you adapt the recipe or try different cooking methods, you can enjoy a tasty meal. Don't forget to store leftovers properly and choose creative side dishes. Enjoy making this dish, and happy cooking!

Lemon Garlic Herb Chicken Thighs Sheet Pan Delight

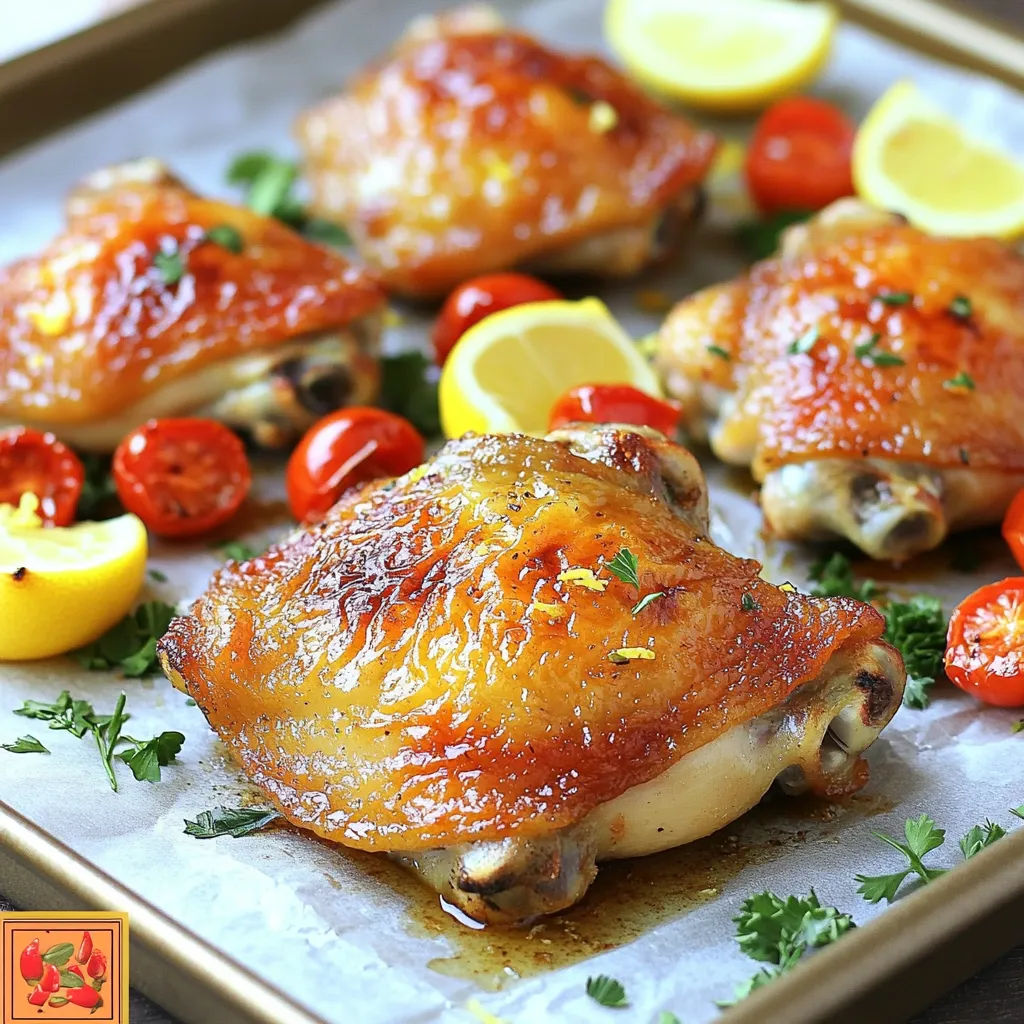
Get ready to savor a delicious meal with my Lemon Garlic Herb Chicken Thighs Sheet Pan Delight! This one-pan dish

- 1 lb large shrimp, peeled and deveined - 8 small corn tortillas - 2 tablespoons olive oil - 2 tablespoons honey - 1 tablespoon sriracha - 1 teaspoon garlic powder - 1 teaspoon paprika - Salt and pepper to taste - 1 cup cabbage, shredded - 1 avocado, sliced - Fresh cilantro for garnish - Lime wedges for serving Sweet and spicy shrimp tacos start with fresh, large shrimp. You want them peeled and deveined for easy eating. Corn tortillas are classic for these tacos, giving a tasty base. Next, we need to make the marinade. Mix olive oil, honey, sriracha, garlic powder, paprika, salt, and pepper in a bowl. This blend adds flavor and a slight kick. You can adjust the sriracha to suit your spice level. For toppings, we use crunchy cabbage and creamy avocado. Shredded cabbage adds texture, while avocado brings creaminess. Fresh cilantro is a must for garnish. Lime wedges add a bright touch when squeezed over the tacos. This combination makes every bite flavorful and exciting! Start by grabbing a medium bowl. In the bowl, combine 2 tablespoons of olive oil, 2 tablespoons of honey, and 1 tablespoon of sriracha. Add 1 teaspoon of garlic powder, 1 teaspoon of paprika, and a pinch of salt and pepper. Mix all the ingredients well to create a spicy marinade. This blend brings the sweet and spicy flavors to life. Next, take 1 pound of large shrimp that are peeled and deveined. Toss the shrimp into the marinade. Make sure each shrimp gets a good coat of the spicy mix. Let the shrimp sit in the marinade for 5 minutes. This helps the flavors soak in before cooking. While the shrimp marinates, heat a skillet over medium-high heat. Once it's hot, add the shrimp in a single layer. Cook them for about 2 to 3 minutes on each side. Look for the shrimp to turn pink and opaque. This means they are cooked perfectly. Remove them from heat so they don’t overcook. Now it’s time to warm the tortillas. Heat 8 small corn tortillas in a dry skillet or grill for about 30 seconds on each side. This will make them soft and warm. Warming tortillas adds a nice touch to your tacos. To assemble your tacos, place a few cooked shrimp in each tortilla. Top the shrimp with shredded cabbage and slices of avocado. For an extra pop of freshness, add fresh cilantro on top. Serve with lime wedges on the side for a zesty squeeze. Enjoy your tasty creation! To get the best taste, adjust the sriracha. If you want it spicy, add more. If not, use less. For garlic and paprika, stick to 1 teaspoon each. This mix gives the shrimp a great flavor without being too strong. Cook shrimp perfectly by not overcrowding the pan. Make sure each shrimp gets enough heat. Cook them for about 2-3 minutes on each side. They should turn pink and opaque. You can also grill or bake the shrimp. Grilling adds a nice smoky taste. Baking is easy and keeps shrimp juicy. For serving, arrange the tacos on a big platter. This makes them look nice. Add lime wedges around the tacos. This adds color and flavor. You can also use small plates for each taco. Garnish with fresh cilantro for a pop of green. It makes the dish look fresh and inviting. {{image_2}} You can swap shrimp for chicken or tofu. Chicken gives a hearty taste. Use boneless chicken thighs for juicy bites. Simply cut them into small pieces and marinate like the shrimp. Tofu offers a great plant-based option. Press the tofu to remove excess water, then cut it into cubes. Marinate and cook until golden brown. This way, you can enjoy these tacos with different flavors. Feel free to get creative with marinades. Try using teriyaki sauce for a sweet twist. A lime and garlic marinade adds a zesty flavor. You can even mix yogurt with spices for a rich taste. Experimenting with different spice blends can lead to unique tacos. Each sauce brings out new flavors, making each taco night special. Toppings can change your taco game. Mango salsa adds a sweet and juicy burst. It pairs nicely with the spicy shrimp. Crumbled cheese, like feta or cotija, adds a salty kick. Pickled onions bring tang and brightness to each bite. You can also add sliced jalapeños for extra heat. Customize your toppings to make each taco your own creation. To keep your shrimp tacos fresh, store each part separately. Place leftover shrimp in an airtight container. Use a paper towel to absorb any moisture. Keep tortillas in a zip-top bag. Store cabbage and avocado in separate containers. This way, they stay fresh longer. Shrimp will last up to three days in the fridge. Use within two days for the best taste. For the shrimp, reheat on the stove over low heat. Stir gently until warmed through. Avoid cooking too long to keep them juicy. For the tortillas, warm in a dry skillet for about 15 seconds on each side. You can also microwave them for about 10 seconds. This keeps them soft and pliable. Yes, you can freeze shrimp tacos! First, freeze the shrimp and tortillas separately. Place shrimp in a freezer bag, removing as much air as possible. They will keep for up to three months. To thaw, move shrimp to the fridge overnight. For tortillas, thaw at room temperature for about an hour. This way, you can enjoy them later with minimal fuss! It takes just 15 minutes to make sweet and spicy shrimp tacos. Here’s how the time breaks down: - Prep Time: 5 minutes to mix the marinade and coat the shrimp. - Cooking Time: 10 minutes to cook the shrimp and warm the tortillas. This quick process makes it easy to whip up a delicious meal any night. Yes, you can prepare parts in advance. - Shrimp Marinade: You can mix the marinade a few hours before cooking. Just toss the shrimp in right before cooking. - Shredded Cabbage and Avocado: You can chop these ahead of time too. Just store them in the fridge until you are ready to serve. This way, you save time when it's time to eat. Shrimp tacos pair well with various side dishes and drinks. Here are some ideas: - Side Dishes: - Mexican rice for a hearty touch. - Black beans for added protein. - Chips with salsa or guacamole for a crunchy snack. - Beverages: - A cold beer or margarita for a fun vibe. - Fresh lemonade for a refreshing drink. These sides enhance the meal and make it more enjoyable. Yes, this recipe is gluten-free. - Corn Tortillas: Using corn tortillas ensures a gluten-free option. They are tasty and complement the shrimp well. If you need a gluten-free meal, these tacos fit the bill perfectly. This blog post shared a simple and tasty way to make shrimp tacos. We covered main ingredients, marinade, cooking steps, and tips for great flavor. You can try different proteins and toppings, too. Remember to store leftovers properly and enjoy these tacos fresh. With the right seasonings and techniques, anyone can make delicious shrimp tacos at home. Dive in and get cooking; your taste buds will thank you!

Scrumptious Sweet & Spicy Shrimp Tacos 15 Minutes

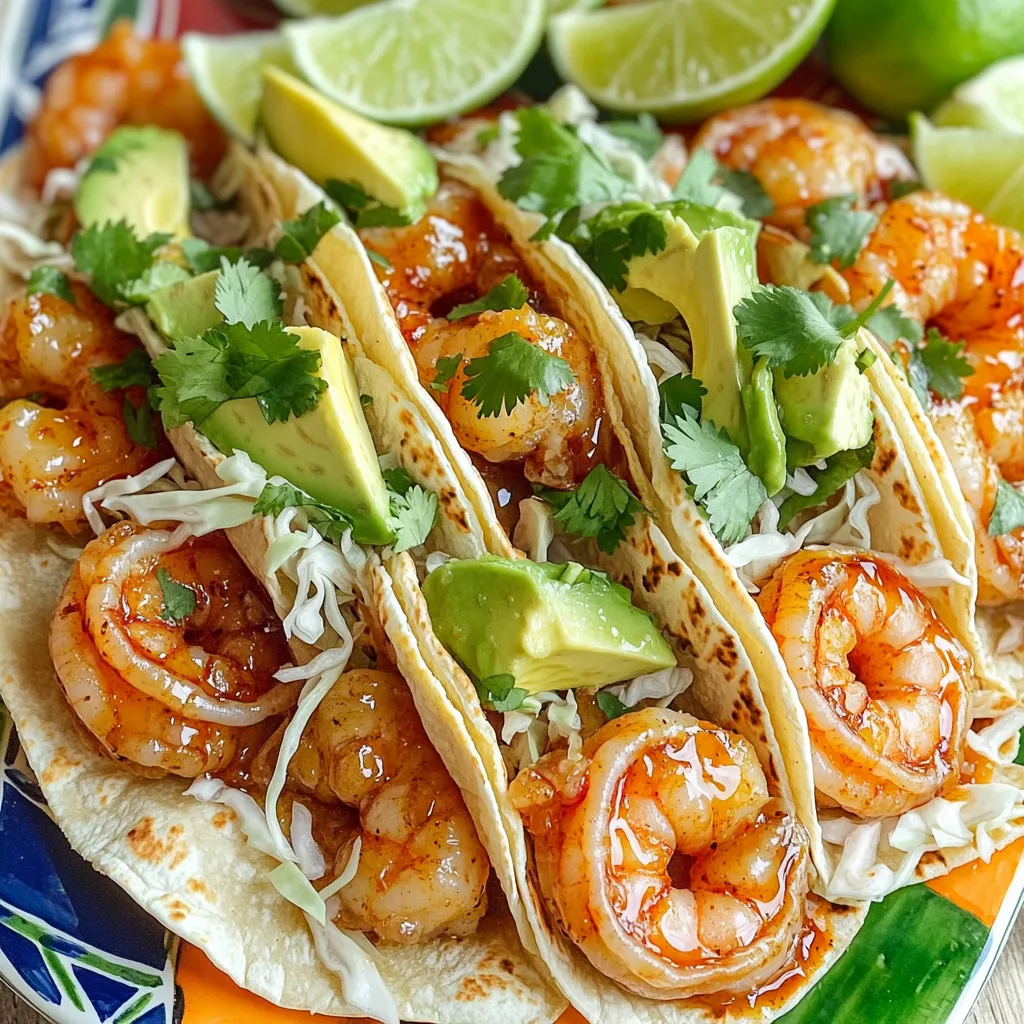
Are you ready for a quick and tasty meal? These Sweet & Spicy Shrimp Tacos can be on your table

To make a crust for the Chocolate Pumpkin Cheesecake Bars, you need three key items: - 1 ½ cups graham cracker crumbs - ½ cup unsweetened cocoa powder - ½ cup unsalted butter, melted These ingredients mix together to form a rich, chocolatey base that holds the filling nicely. The cheesecake filling brings the flavor of fall to your bars. Here’s what you need: - 1 cup cream cheese, softened - 1 cup pumpkin puree (canned or fresh) - ¾ cup powdered sugar - ½ teaspoon vanilla extract - 1 teaspoon ground cinnamon - ½ teaspoon ground nutmeg - ½ teaspoon ground ginger - 1 cup whipped topping (like Cool Whip) This combination makes the filling smooth and creamy with a wonderful pumpkin spice flavor. To make these bars extra special, consider adding a few garnishes: - Dark chocolate shavings for a touch of elegance - A sprinkle of cocoa powder for a rich look - A dollop of extra whipped topping for creaminess These small touches enhance both the look and taste of your dessert. First, grab a medium bowl. In it, mix 1 ½ cups of graham cracker crumbs and ½ cup of unsweetened cocoa powder. Add ½ cup of melted unsalted butter. Stir until the mix looks like wet sand. Next, take a greased 9x9 inch baking pan and press the mixture firmly into the bottom. This forms the crust. Once done, place the pan in the freezer for about 15 minutes. This helps the crust set. Now, we’ll make the cheesecake filling. Take a large mixing bowl and beat 1 cup of softened cream cheese until it’s smooth and creamy. Then, add in 1 cup of pumpkin puree. Next, mix in ¾ cup of powdered sugar and ½ teaspoon of vanilla extract. Don’t forget to add 1 teaspoon of ground cinnamon, ½ teaspoon of ground nutmeg, and ½ teaspoon of ground ginger. Stir everything together until the mixture is smooth and well combined. After the filling is ready, gently fold in 1 cup of whipped topping. This makes the filling light and fluffy. Now, take the crust out of the freezer. Pour the cheesecake filling over the crust and spread it evenly with a spatula. Smooth the top to make it look nice. Cover the pan with plastic wrap and place it in the fridge. Let it chill for at least 4 hours. This allows the filling to firm up. Once set, cut the cheesecake into bars and add dark chocolate shavings on top for a tasty finish. To get a creamy, smooth texture, start with soft cream cheese. This helps mix easily. When adding the pumpkin puree and sugar, mix slowly. Don’t rush it. The key is to fold in the whipped topping gently. This keeps the filling light and airy. If you mix too fast, it can become dense. You can swap ingredients for your taste. Instead of graham cracker crumbs, use crushed cookies for a different flavor. If you want a bit more sweetness, try adding more sugar to the filling. You can also replace the pumpkin puree with sweet potato for a unique twist. If you don't have ground spices, use pumpkin pie spice as an easy option. Presentation matters when serving dessert. Cut the bars into neat squares for a tidy look. Use a sharp knife for clean cuts. To make it special, add dark chocolate shavings on top. You can also sprinkle cocoa powder around the bars on the plate. Serve them on a nice platter. A dollop of extra whipped topping adds a nice touch. For a fun twist, add a few chocolate chips on top! {{image_2}} You can change flavors to keep things fun. Try adding peanut butter for a nutty twist. Mixing in some maple syrup gives a sweet touch. If you love spices, add a hint of cardamom or cloves. These changes create unique taste profiles that can surprise your guests. If you need gluten-free options, swap graham crackers for gluten-free crumbs. You can use coconut oil instead of butter for a dairy-free crust. For a vegan take, use a vegan cream cheese and plant-based whipped topping. These swaps still give you that creamy texture while meeting your dietary needs. Toppings can make a big difference. Consider crushed nuts for crunch or fresh fruit for freshness. You can also drizzle caramel or chocolate sauce on top for extra flair. For the crust, try a chocolate cookie crust for a richer taste. This simple change can elevate your dessert even more. To store leftover cheesecake bars, place them in an airtight container. If you don’t have a container, you can wrap them tightly with plastic wrap. This keeps them fresh and prevents them from absorbing other smells in the fridge. Make sure to refrigerate them as soon as you're done serving. If you want to freeze the bars, cut them into squares first. Then, wrap each piece in plastic wrap. This helps keep them from getting freezer burn. After wrapping, place the bars in a freezer-safe bag or container. These bars can last up to three months in the freezer. When you are ready to eat them, let them thaw in the fridge overnight. These cheesecake bars stay fresh in the fridge for up to five days. Keep them covered to maintain their flavor and texture. If you notice any off smells or changes in texture, it’s best to toss them. For the best taste, enjoy them within a few days. Yes, you can make these cheesecake bars ahead of time. In fact, they taste even better after chilling. I recommend making them a day in advance. Just store them in the fridge, covered, until you are ready to serve. This way, the flavors have time to blend, and the texture firms up nicely. If you want to swap out whipped topping, there are a few great options. You can use heavy cream whipped to soft peaks. This gives a rich flavor. Another option is Greek yogurt for a tangy twist. Just keep in mind that using yogurt will change the taste a bit. Choose what fits your taste best! The cheesecake filling is set when it feels firm to the touch. After chilling for at least 4 hours, gently press the surface with your finger. If it springs back, it’s ready! You can also look for a slight sheen on the top. This shows that it has set well and is ready to cut into bars. You learned how to create delicious cheesecake bars, from crust to filling. The main ingredients make a great base, while tips ensure the best texture. You can customize flavors and toppings to fit your taste. Remember to store leftovers properly to keep them fresh. Enjoy experimenting with variations and impress your friends with your cheesecake skills. With these steps, you're ready to create something tasty. Now, go ahead and make your own cheesecake bars!

Chocolate Pumpkin Cheesecake Bars No-Bake Delight

Dive into a world of flavors with my no-bake Chocolate Pumpkin Cheesecake Bars! This sweet treat combines rich chocolate and

- 1 cup all-purpose flour - 1/2 cup whole wheat flour - 1/2 cup brown sugar, packed - 1 teaspoon baking powder - 1/2 teaspoon baking soda - 1/4 teaspoon salt - 1/2 teaspoon ground cinnamon - 1/2 cup buttermilk - 1/4 cup unsalted butter, melted - 1 large egg - 1 teaspoon maple extract - 1 cup powdered sugar - 2 tablespoons maple syrup - 1-2 tablespoons milk (for consistency) - 1/3 cup chopped pecans Gather these ingredients before you start. Each one plays a key role in making maple pecan donuts that taste amazing. The dry ingredients create the donut's base, while the wet ingredients add moisture and flavor. The glaze? That’s what makes them shine! It’s sweet and rich, enhancing the whole experience. Don't forget the pecans; they add a nice crunch and a nutty flavor. - Preheat your oven to 350°F (175°C). - In a bowl, mix these dry ingredients: - 1 cup all-purpose flour - 1/2 cup whole wheat flour - 1/2 cup brown sugar, packed - 1 teaspoon baking powder - 1/2 teaspoon baking soda - 1/4 teaspoon salt - 1/2 teaspoon ground cinnamon - In a separate bowl, whisk together these wet ingredients: - 1/2 cup buttermilk - 1/4 cup unsalted butter, melted - 1 large egg - 1 teaspoon maple extract - Gently fold the wet ingredients into the dry ingredients. - Mix until just combined; don’t overdo it. - Carefully spoon the batter into the donut pan, filling each cavity about 2/3 full. - Bake the donuts for 10-12 minutes. - Check with a toothpick; it should come out clean. - Let the donuts cool in the pan for a few minutes, then transfer them to a wire rack. - In a small bowl, whisk together these glaze ingredients until smooth: - 1 cup powdered sugar - 2 tablespoons maple syrup - 1-2 tablespoons milk (adjust for consistency) - Add more milk if you want a thinner glaze. - Once the donuts are cool, dip the tops into the glaze. - Set them on a wire rack to let the glaze harden a bit. - Use fresh ingredients. Fresh flour and eggs make a big difference. - Don't overmix the batter. Gently fold until just combined. This keeps donuts light. - Adjust consistency to your preference. Add more milk for a thinner glaze or less for thicker. - Experiment with flavors. Try adding vanilla or chocolate to the glaze for fun twists. - Pair your donuts with coffee or tea. The warmth complements the sweet flavors. - Serve with fresh fruits or whipped cream. This adds a nice contrast to the maple pecan taste. {{image_2}} You can get creative with flavors in your maple pecan donuts. Try making chocolate maple pecan donuts. Just add cocoa powder to the dry mix. This gives a rich, deep flavor. You can also make pumpkin maple pecan donuts. Simply add pureed pumpkin to the wet ingredients. This adds moisture and a warm spice flavor. Mix things up with toppings and add-ins. You can add chocolate chips to the batter for a sweet surprise. They melt during baking and give a gooey texture. Another option is to substitute walnuts for pecans. Walnuts add a slightly different taste and crunch. Both nuts work well with maple's sweetness. If you need a gluten-free option, use a gluten-free flour blend. Just measure it like you would regular flour. You may need to adjust liquid measurements slightly. Gluten-free flours can absorb more moisture. Check the batter's consistency and add a bit more buttermilk if needed. Enjoy these tasty donuts without worry! Store your maple pecan donuts at room temperature in an airtight container. This keeps them fresh and tasty. Enjoy them within 2-3 days for the best flavor and texture. If you want to save some for later, freeze unglazed donuts for up to 2 months. Thaw them at room temperature or in the fridge. Once thawed, dip them in the glaze before serving for a fresh taste. Yes, you can use regular milk. Just add a splash of vinegar or lemon juice. This will give the milk a tangy flavor similar to buttermilk. If your donuts turn out dry, check your ingredient measurements. Make sure you do not overbake them. A toothpick should come out clean, but not dry. To get fluffy donuts, use fresh leavening agents. Make sure to mix the batter gently. Overmixing can cause them to be dense. Yes! If you don’t have a donut pan, use a muffin tin. You can also shape the donuts by hand. Just make sure they are even in size. In this post, we explored how to make delicious maple pecan donuts. We discussed the key dry and wet ingredients, plus the simple steps to prepare, bake, and glaze the donuts. You learned tips for making them light and airy, as well as fun variations and storage options. By following these steps, you can create a delightful treat for any occasion. Enjoy them fresh, share them with friends, or try different flavors to keep things exciting. Happy baking!

Maple Pecan Donuts with Glaze Bakery Style Recipe

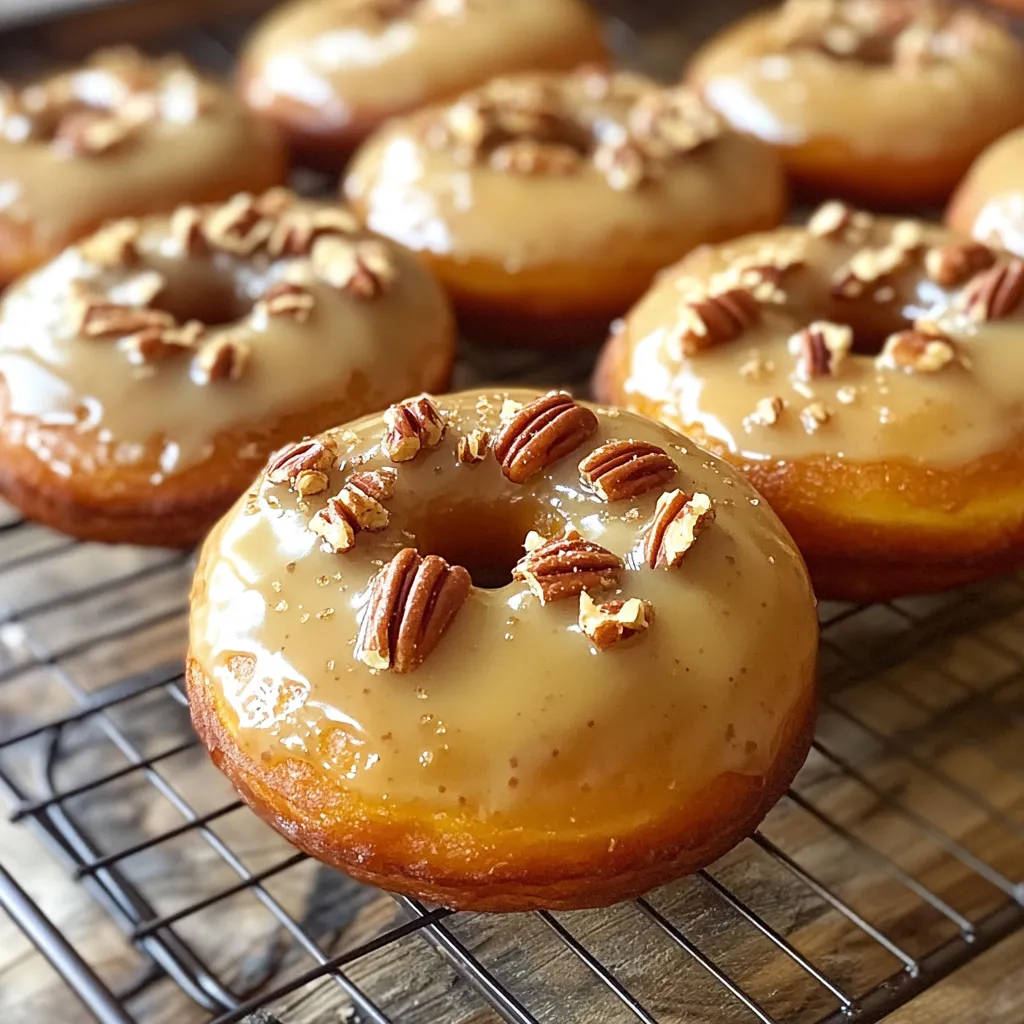
Get ready to indulge in a delightful treat! This Maple Pecan Donuts with Glaze Bakery Style recipe will turn your

- 8 oz pasta (penne or fusilli) - 1 can (15 oz) white beans (cannellini or great northern) - 2 cups kale, chopped - 1 medium onion, diced - 3 cloves garlic, minced - 3 cups vegetable broth - 1 cup coconut milk (or heavy cream) - 1 tablespoon olive oil - Optional: nutritional yeast, red pepper flakes For this dish, I love using penne or fusilli pasta. Both types hold the sauce well. White beans add protein and creaminess. I often choose cannellini beans for their smooth texture. Chopped kale brings color and nutrients. The onion and garlic create a tasty base. Cooking them in olive oil gives a rich flavor. Vegetable broth serves as the main liquid. It infuses the pasta with depth. To create that creamy texture, I use coconut milk. It adds a touch of sweetness without dairy. If you're looking for a cheesy taste, nutritional yeast works wonders. A sprinkle of red pepper flakes can spice things up. Start by heating one tablespoon of olive oil in a large pot over medium heat. Add the diced onion and sauté it for about five minutes. You want the onion to become soft and translucent. Then, add three cloves of minced garlic and, if you like, half a teaspoon of red pepper flakes. Cook this mix for one more minute. The garlic will release a great smell. Next, mix in eight ounces of your pasta choice, three cups of vegetable broth, and one teaspoon of dried oregano. Stir everything well and bring it to a simmer. Cook the pasta according to the package instructions, which usually takes about eight to ten minutes. Stir it occasionally until it reaches the al dente stage. You want it cooked but still firm. Once the pasta is ready, stir in two cups of chopped kale and one can of drained white beans. Mix it well. The kale will wilt into the hot pasta, adding color and nutrition. Now, pour in one cup of coconut milk. This makes the dish creamy and rich. If you want a cheesy flavor, add a quarter cup of nutritional yeast at this stage. Lastly, season with salt and pepper to taste. Let it simmer for two to three more minutes until thickened. Your dish will look and smell amazing! To achieve perfectly cooked pasta, always check the package instructions. Pasta should be al dente, which means it should be firm but not hard. Stir the pasta occasionally to avoid sticking. For a creamier sauce, add coconut milk slowly. Stir it in well while the pasta is still hot. If you want an even richer taste, try using heavy cream instead of coconut milk. Adjust salt and pepper to your liking. You can also add optional spices like red pepper flakes for a little heat. Taste as you cook to find your perfect balance. Using fresh herbs can make a big difference. Chopped parsley or basil sprinkled on top adds color and freshness. They also enhance the flavor of the dish. Serve your creamy pasta in deep bowls. This keeps the sauce from spilling over. For garnish, add chopped fresh herbs and a sprinkle of red pepper flakes. This not only looks nice but adds extra flavor too. Enjoy your meal! {{image_2}} You can easily change the pasta type to fit your taste. Penne and fusilli work well, but any short pasta can do the trick. If you want to swap beans, feel free to use chickpeas or black beans. Both add great texture and flavor. When it comes to coconut milk, you can try heavy cream if you prefer a richer taste. Almond or cashew milk also works for a lighter option. Each choice can change the dish's flavor, giving you room to play. Want to make it heartier? Adding protein is a great idea. Cooked chicken, shrimp, or tofu fit perfectly in this dish. Just add them after the pasta cooks to warm through. You can also mix in extra veggies. Spinach, zucchini, or bell peppers add more color and nutrients. Simply stir them in with the kale for a healthy boost. If you love spice, add more red pepper flakes. Start with a little and taste as you go. This lets you control the heat. You can also switch up the herbs. Fresh basil or thyme can replace oregano for a new flavor. Experimenting with different herbs adds depth to your dish. Don't be afraid to try something new! To keep your creamy white bean kale pasta fresh, store it in an airtight container. This helps retain flavor and moisture. Place the container in the fridge. Your leftovers will stay good for up to three days. If you want to enjoy it later, consider freezing it. To freeze the dish, first let it cool completely. This step prevents ice crystals from forming. Scoop portions into freezer-safe containers, leaving space at the top. Seal them tightly and label with the date. You can freeze creamy white bean kale pasta for up to three months. When ready to eat, thaw overnight in the fridge. Reheat the pasta on the stove over low heat. Stir in a splash of vegetable broth or coconut milk. This helps keep it creamy. Avoid the microwave if you can. It often cooks pasta unevenly. Stir often to prevent overcooking. Aim to heat it just until warm, not boiling. To make this dish vegan, swap the heavy cream for coconut milk. Use a plant-based butter instead of olive oil if desired. Nutritional yeast can add a cheesy flavor without dairy. Always check labels on pasta to ensure no egg is included. Yes, you can make this dish gluten-free. Choose gluten-free pasta like brown rice or chickpea pasta. Adjust the cooking time as needed since gluten-free pasta may cook differently. This dish takes about 10 minutes to prep and 30 minutes to cook. In total, you can enjoy it in about 40 minutes. This makes it a quick and easy meal option on busy days. Pair this pasta with a simple green salad or garlic bread. A light white wine or sparkling water complements the meal well. For a tasty twist, serve with a side of roasted vegetables. This blog post outlines how to make creamy white bean kale pasta. It covers key ingredients and their roles, step-by-step instructions, and helpful tips. You can customize the dish with swaps or additions for flavor. Storing and reheating tips help keep leftovers fresh. Making this meal is easy and fun. Enjoy exploring the recipe variations and enjoy every bite! You’ll have a tasty dish that everyone can love.

Creamy White Bean Kale Pasta One Pot Delight

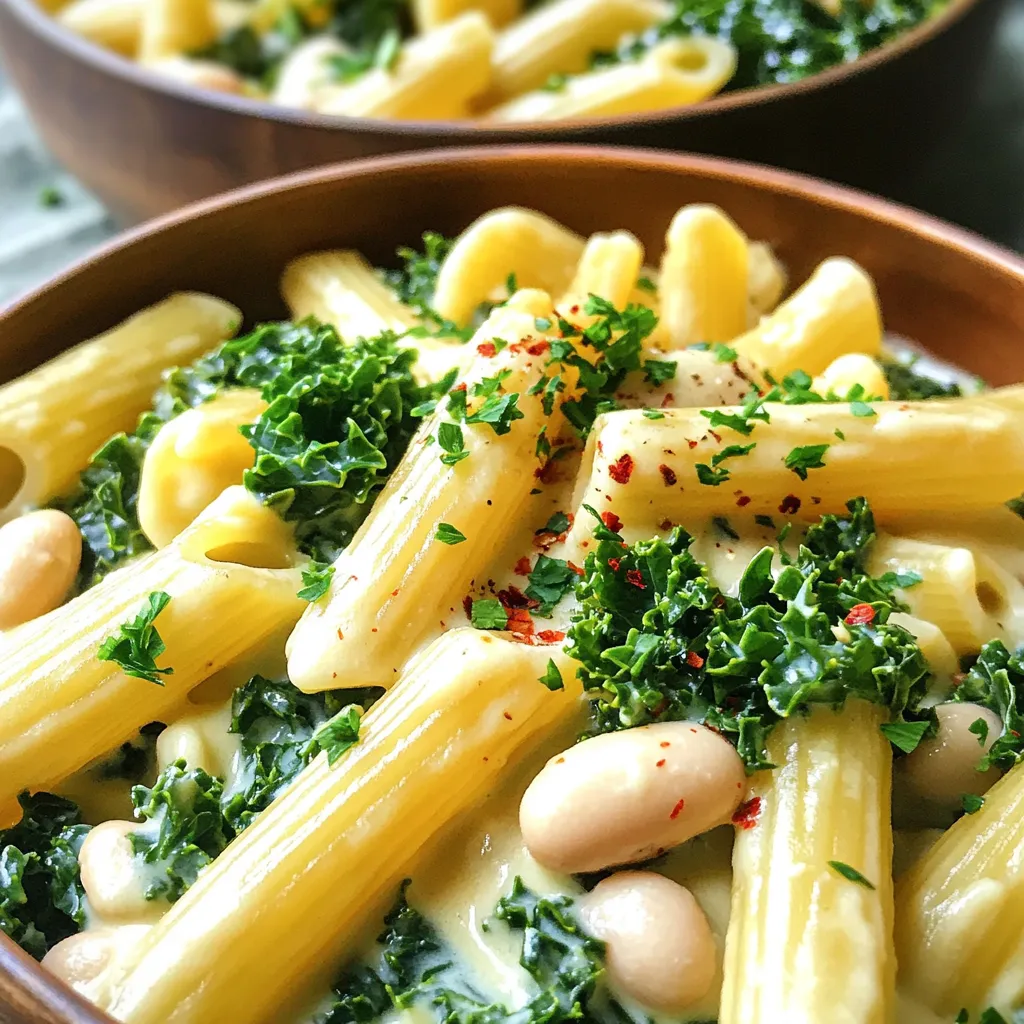
Welcome to my kitchen, where cooking is easy and delicious! Today, I’m excited to share a dish that combines healthy

To make Air Fryer Cinnamon Sugar Apple Chips, you need the following items: - 2 large apples (Fuji or Honeycrisp work well) - 1 tablespoon cinnamon - 2 tablespoons granulated sugar (or coconut sugar) - A pinch of salt - Cooking spray or olive oil spray You can add some fun twists to your apple chips. Try these options: - Nutmeg for extra spice - Vanilla extract for sweetness - Brown sugar for a richer flavor Choosing the right apples makes a big difference. Here are my tips: - Pick firm apples. They hold up well during cooking. - Look for apples with vibrant color. This means they are fresh. - Avoid apples with bruises or soft spots. These can ruin your chips. By following these steps, you will create a tasty and healthy snack that everyone loves! First, wash the apples well. Clean them to remove dirt or wax. Next, slice the apples thinly, about 1/8 inch thick. I like using a mandoline slicer for this task. It makes the slices even. If you don’t have one, a sharp knife works too. Be careful while slicing. Don’t forget to take out any seeds. In a small bowl, mix the cinnamon, sugar, and a pinch of salt. I use two tablespoons of granulated sugar, but you can try coconut sugar for a healthy twist. Stir well until everything blends. This mix adds great flavor to the apple slices. Set your air fryer to 350°F (175°C). Let it preheat for 3 to 5 minutes. This step helps cook the chips evenly. Arrange the apple slices in a single layer in the basket. Avoid overlapping, as this leads to uneven cooking. Depending on your air fryer size, you may need to cook in batches. Air fry the slices for 10 to 15 minutes. Check them every 5 minutes to avoid burning. They should turn a nice golden brown and be crispy. Once done, carefully take them out and let them cool on a wire rack. This cooling step helps them crisp up even more. Enjoy those tasty apple chips! To get that perfect crispiness in your apple chips, slice them thinly. Aim for about 1/8 inch. This thinness helps them cook evenly. A mandoline slicer works best for this. If you use a knife, take your time to keep the slices even. After slicing, pat the apple slices dry with a paper towel. Removing moisture helps them crisp up well. Don’t skip this step! When you coat them with the cinnamon sugar, use just enough spray. Too much can make them soggy. Check them often while air frying. Every air fryer is different. Gently shake the basket every five minutes. This helps them cook evenly and prevents burning. If you want to skip the regular cooking spray, consider using olive oil. It’s a great alternative and adds flavor. You can also use coconut oil spray for a hint of sweetness. Another option is to use a pastry brush. Brush a thin layer of melted coconut oil on the apple slices. This method gives you control over the amount you use. For a healthier choice, try using apple juice. Just a light spritz can add sweetness. However, be careful not to soak them. If you have any leftover apple chips, store them in an airtight container. This keeps them fresh and crispy. You can also use a zip-top bag. Just squeeze out all the air before sealing. To keep them crunchy, add a small packet of silica gel. This helps absorb moisture. If you don’t have that, try placing a piece of bread in the container. It can help control moisture too. Enjoy your apple chips within a week for the best taste. If they start to get soft, you can pop them back in the air fryer for a few minutes to crisp them up again. {{image_2}} You can change your cinnamon sugar mix for fun flavors. Try adding nutmeg for warmth or vanilla for sweetness. You can also use brown sugar instead of white. This will give your apple chips a rich taste. For a spicy kick, add a pinch of cayenne or chili powder. Mix and match to find your favorite blend! Not all apples are the same. Each type brings a unique taste. Fuji apples are sweet and crisp, while Honeycrisp offers a juicy crunch. Granny Smith apples add a nice tartness. You can even mix different types for a fun flavor combo. Choose what you love to create your perfect snack. Air fryer cinnamon sugar apple chips are great alone, but there are more ways to enjoy them! You can serve them with yogurt for a tasty dip. They also pair well with cheese for a sweet and salty snack. Try adding them to salads for a crunchy topping. You can even crumble them over oatmeal for breakfast. The options are endless! Each serving of air fryer cinnamon sugar apple chips has about 150 calories. This includes two large apples, sugar, and cinnamon. If you use coconut sugar, the calories might be lower. Remember, serving size matters. If you eat more, the calories add up fast. Apples offer many health benefits. They are low in calories and high in fiber. One apple has about 4 grams of fiber. This helps with digestion. Apples also contain vitamin C, which boosts your immune system. Eating apples can help lower the risk of heart disease, too. Plus, they are a great snack for kids and adults alike! You can swap out granulated sugar for healthier options. Coconut sugar is a great choice. It has a lower glycemic index. This means it won’t spike your blood sugar as much. You can also use honey or maple syrup. Just remember, these may change the flavor a bit. Adjust the amount based on your taste. This way, you can enjoy your apple chips without the extra calories! Apple chips can last up to one week. Store them in an airtight container. If you keep them in a cool, dry place, they will stay crispy longer. If they lose their crunch, you can re-crisp them in the air fryer for a few minutes. Yes, you can use other sweeteners. Coconut sugar is a great choice for a healthier option. You can also try honey or maple syrup. Just be mindful of the amount, as these are more liquid than granulated sugar. The best air fryer temperature for apple chips is 350°F (175°C). This temperature allows the apples to cook evenly. It also helps them become crispy without burning. Always check your apple chips every five minutes to make sure they don’t overcook. Making apple chips is simple and fun. We covered the ingredients, steps, and tips to create tasty, crispy snacks. Choosing the right apples and perfecting your cinnamon sugar mix are key. Remember, you can add your twist with flavors and variations. These chips not only taste great but are also healthy. Enjoy experimenting with different apples and sweeteners. With the right methods, your homemade apple chips can be a hit. Happy cooking and snacking!

Air Fryer Cinnamon Sugar Apple Chips Tasty Snack

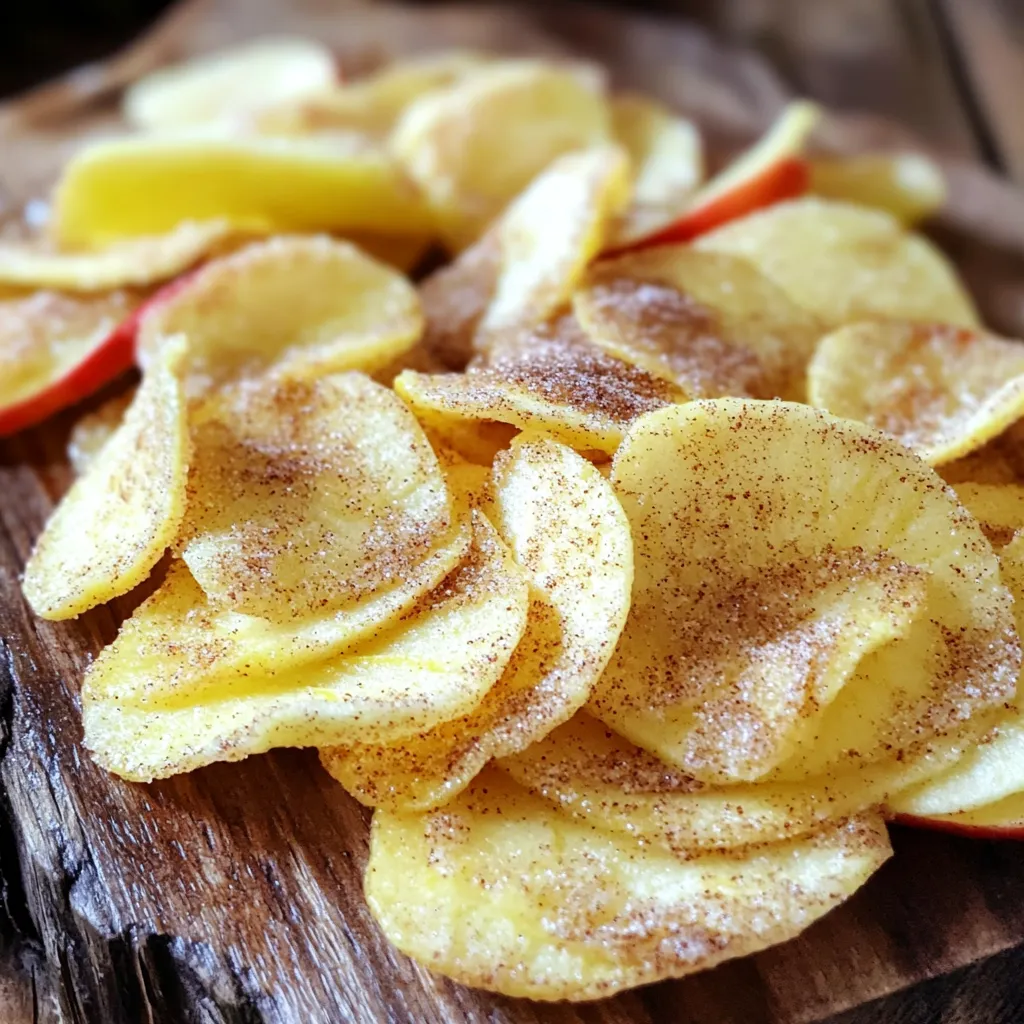
Craving a sweet snack that’s also healthy? You’ll love these Air Fryer Cinnamon Sugar Apple Chips! They’re easy to make

- 12 oz egg noodles - 1 lb assorted mushrooms (cremini, shiitake, button), sliced - 1 medium onion, finely chopped - 3 cloves garlic, minced - 1 cup vegetable broth - 1 cup sour cream - 2 tablespoons soy sauce (or tamari for gluten-free) - 1 teaspoon dried thyme - 1 teaspoon smoked paprika - Salt and pepper to taste - 2 tablespoons olive oil - Fresh parsley, chopped (for garnish) When preparing Mushroom Stroganoff, these ingredients create a rich and creamy dish. The egg noodles serve as a perfect base, soaking up all the savory flavors. The assorted mushrooms add depth, with their unique tastes and textures. I love using cremini, shiitake, and button mushrooms together. The onion and garlic contribute a wonderful aroma and flavor. Sautéing them first brings out their sweetness. The vegetable broth forms the heart of the sauce, giving it a warm base. Sour cream adds creaminess and tang, making the dish richer. Soy sauce or tamari adds umami and depth. The dried thyme and smoked paprika enhance the dish with earthy notes. Salt and pepper round out the flavor, while olive oil helps in cooking. Finally, fresh parsley brightens the dish when sprinkled on top. This dish is simple yet full of flavor. It’s perfect for a cozy dinner. Enjoy the warmth and comfort of this Mushroom Stroganoff with egg noodles! Grease the inside of your slow cooker with olive oil. This helps prevent sticking. You will need a slow cooker, a skillet, and a spatula for this recipe. Start by heating olive oil in a skillet over medium heat. Add the chopped onion and cook until it turns clear, about 3 to 4 minutes. Then, mix in the minced garlic for 1 more minute. This step makes your kitchen smell great and builds flavor. Now, add the sliced mushrooms to the skillet. Cook them for about 5 to 7 minutes. They will release moisture and become soft. Lightly sprinkle salt and pepper over them to enhance their taste. Once cooked, transfer this mix to the slow cooker. Cover the slow cooker. Cook on low for 4 hours or on high for 2 hours. You know it’s ready when the mushrooms are soft and the flavors blend well. Cook the egg noodles about 15 minutes before serving. Follow the package instructions for best results. Drain the noodles and set them aside. When the mushroom mix is done, stir in the sour cream until it's smooth. Adjust the flavor with more salt or pepper if needed. Finally, add the cooked egg noodles to the slow cooker. Toss gently to coat the noodles with the creamy sauce. Let it sit on low heat for 5 more minutes to warm up. To make your Mushroom Stroganoff even tastier, consider adding more spices. You can try: - A pinch of cayenne pepper for heat. - Fresh thyme instead of dried for a stronger flavor. - A splash of Worcestershire sauce for depth. To achieve that rich creaminess, make sure to stir in the sour cream slowly. This helps it blend smoothly. You can also mix in a bit of cream cheese if you like an extra creamy texture. Sautéing your onions and garlic first really boosts the flavor. This step adds sweetness and depth. It only takes a few minutes but makes a big difference. For even cooking, cut your mushrooms into similar sizes. This helps them cook at the same rate. Stir the ingredients well in the slow cooker to mix the flavors. When serving your Mushroom Stroganoff, use shallow bowls. This lets the creamy sauce shine. You can also pair it with a side salad for freshness. For garnishing, sprinkle fresh parsley on top. This adds a nice pop of color and a hint of freshness. You can also add a dash of smoked paprika on top for a decorative touch. {{image_2}} You can make this dish fit your needs. For gluten-free options, swap the egg noodles with gluten-free pasta. Many brands offer great alternatives. You could also use zucchini noodles for a low-carb choice. If you want to switch up the veggies, try adding bell peppers, spinach, or carrots. Each adds its own flavor and texture. Just chop them up and toss them in with the mushrooms. If you’re looking for protein, consider using meat alternatives like tempeh or tofu. These mimic the texture of meat and soak up the sauce well. You could also use cooked chicken or beef if you prefer. Just make sure to add these towards the end of cooking. This keeps them tender and juicy. To make this stroganoff vegan, replace sour cream with cashew cream or coconut yogurt. These options provide creaminess without dairy. For broth, swap vegetable broth for water or a vegan stock. Adjust your seasonings to include nutritional yeast for a cheesy flavor. This keeps the taste rich and satisfying without animal products. Store your Mushroom Stroganoff in an airtight container. This keeps it fresh and tasty. You can put it in the fridge right after it cools down. This dish will last about 3 to 4 days in the fridge. You can freeze this dish if you want to keep it longer. Use a freezer-safe container or a zip-top bag. Make sure to remove as much air as possible before sealing. The stroganoff can last up to 3 months in the freezer. When you’re ready to eat, thaw it in the fridge overnight. To reheat, I suggest using the stovetop for the best results. Just add a bit of water or broth to keep it moist. Heat it on medium-low until warm. If you use the microwave, place it in a safe dish. Cover it loosely and heat in short bursts, stirring in between. This helps it heat evenly. Can I use other types of pasta? Yes, you can use other types of pasta. Bowtie or penne works well too. Just cook them according to the package directions. Keep in mind that cooking times may vary. Can this recipe be made without a slow cooker? Absolutely! You can make this dish on the stovetop. Just sauté the ingredients in a large pot. Then simmer until everything is cooked through. Is it gluten-free? This recipe is not gluten-free as written. To make it gluten-free, use gluten-free egg noodles. You can also substitute soy sauce with tamari, which is gluten-free. Can I make it dairy-free? Yes! Use a dairy-free sour cream alternative. There are many good options made from coconut or cashews that work great. What pairs well with Mushroom Stroganoff? Mushroom Stroganoff pairs well with a fresh salad. Try a simple green salad with a light vinaigrette. You can also serve it with steamed broccoli or garlic bread. Recommended sides or salads to serve Some good sides include roasted vegetables or a hearty bread. A side of sautéed spinach adds more color and nutrients. You can also try a light cucumber salad for some crunch. We explored a tasty mushroom stroganoff recipe. You learned about crucial ingredients like egg noodles and mushrooms. I shared easy steps for preparation and cooking methods. Tips for enhancing flavor and serving ideas were covered. Variations for different diets were discussed, plus how to store leftovers. Enjoy making this dish your own. Whether you follow the recipe or tweak it, it’s sure to be a hit. Happy cooking!

Mushroom Stroganoff Egg Noodles Slow Cooker Delight

Looking for a cozy meal that practically cooks itself? Discover my Mushroom Stroganoff Egg Noodles Slow Cooker Delight! This dish

- 1 cup pitted dates - 1 cup unsweetened shredded coconut - 1/2 cup almond butter - 1/2 cup almond flour - 1/2 cup dark chocolate chips - 1/4 cup chopped almonds - 1 teaspoon vanilla extract - Pinch of salt These ingredients come together to make a tasty and healthy treat. The pitted dates give a natural sweetness. They also add moisture to the bites. Unsweetened shredded coconut brings a chewy texture. It adds that tropical flavor we love in Almond Joy candy bars. Almond butter adds creaminess and healthy fats. Almond flour makes the bites nutty and gives a good base. Dark chocolate chips bring rich flavor and a touch of sweetness. If you prefer, you can use dairy-free chips. Chopped almonds add crunch and extra nutty goodness. A little vanilla extract boosts the overall flavor. The pinch of salt balances the sweetness and rounds out the taste. Together, these ingredients create a mix that is both satisfying and energizing. Each energy bite offers a delightful mix of nutrients. They are rich in healthy fats, fiber, and protein. A single bite has about 100 calories. - Calories: 100 - Fat: 6g - Carbohydrates: 10g - Protein: 2g The health benefits of these ingredients are impressive. Dates provide natural sugars and fiber. Coconut supports heart health and is good for digestion. Almonds are full of vitamin E and magnesium, good for your skin and bones. These bites are vegan and gluten-free. They suit many diets and can fit into various meal plans. Enjoy these energy bites as a quick snack or a boost before a workout. {{ingredient_image_1}} To start, gather all your ingredients. You will need pitted dates, shredded coconut, almond butter, almond flour, dark chocolate chips, chopped almonds, vanilla extract, and a pinch of salt. 1. In your food processor, combine the pitted dates, shredded coconut, almond butter, almond flour, vanilla extract, and a pinch of salt. 2. Pulse the mixture until it becomes sticky and well combined. This should take about 30 seconds. Now, it's time to shape your energy bites: 1. Scoop out tablespoon-sized portions of the mixture with your hands. 2. Roll each portion into a ball, making sure they are firm. 3. Repeat this until you have shaped all the mixture into energy bites. Next, place the energy bites on a baking sheet lined with parchment paper. This will help with easy cleanup. For the best texture, refrigerate the energy bites. 1. Chill them for at least 30 minutes. This helps them firm up and makes them easy to eat. 2. To serve, arrange the energy bites in a decorative bowl. You can sprinkle some shredded coconut on top for an extra touch. Enjoy these tasty bites as a quick snack or a boost of energy during your day! Using fresh ingredients boosts flavor. Fresh dates have a rich sweetness, while new coconut adds texture. I always choose high-quality almond butter too. It makes a big difference in taste. When mixing, ensure even blending in the food processor. This way, all flavors mix well. If you miss a spot, the bites may taste uneven. You can get creative with add-ins. Try seeds like chia or flax for extra nutrients. Dried fruits, such as cranberries or raisins, add a sweet twist, too. Adjusting sweetness is easy. If you want it sweeter, add a bit of honey or maple syrup. For less sweetness, reduce the dates or chocolate. These bites pair well with many snacks. Enjoy them with yogurt or fresh fruit for a balanced snack. For a fun twist, serve them at parties in a decorative bowl. Sprinkle some shredded coconut on top for flair. This simple touch makes them look fancy and inviting. Pro Tips Use Fresh Dates: Fresh pitted dates will provide the best flavor and texture. If they are too dry, soak them in warm water for about 10 minutes to soften before using. Chill for Better Texture: Refrigerating the energy bites for at least 30 minutes will help them firm up, making them easier to handle and enhancing their overall texture. Customize Your Nuts: Feel free to substitute or add different nuts according to your preference, such as walnuts or pecans, to vary the flavor and texture of the energy bites. Store Properly: Keep the energy bites in an airtight container in the refrigerator for up to a week or freeze them for longer storage. This way, you’ll always have a healthy snack on hand! {{image_2}} You can change the nut butter in this recipe. Try cashew or peanut butter. Each nut butter adds a unique taste. You can also switch up the chocolate. Use white chocolate for a sweeter bite. Dark chocolate gives a richer flavor. You can even try milk chocolate if you prefer. For a crunchy texture, add chopped nuts or seeds. Sunflower seeds or pumpkin seeds work well. You can also change the shape. Make bars instead of balls for a different look. Bars are great for on-the-go snacks. Just press the mixture into a pan and cut. If you want a sugar-free version, swap out the dates. Use sugar-free syrup or a banana. For nut allergies, use sunflower seed butter. It gives a similar creaminess. You can also use oat flour instead of almond flour. This keeps the flavor tasty and safe for everyone. To keep your Coconut Almond Joy Energy Bites fresh, store them in an airtight container. Glass jars work best, but plastic containers also work. Make sure to seal the lid tightly. This helps prevent moisture and keeps the bites from drying out. At room temperature, these energy bites last about one week. If you want them to last longer, refrigerate them. They stay fresh for up to two weeks in the fridge. For even more longevity, freeze the energy bites. They can last for up to three months in the freezer. If you have leftover ingredients, use them in other snacks. For example, you can add leftover almond butter to smoothies or oatmeal. You can also make trail mix with chopped nuts and dried fruits. This way, you minimize waste and enjoy more tasty treats! How to make Coconut Almond Joy Energy Bites? To make these bites, you will need a food processor. Start by adding pitted dates, shredded coconut, almond butter, almond flour, vanilla extract, and a pinch of salt. Pulse until it becomes a sticky mix. Then, add dark chocolate chips and chopped almonds. Pulse again to mix them in. Scoop tablespoon-sized portions and roll them into balls. Place them on a lined baking sheet. Chill in the fridge for 30 minutes for a firmer texture. Can I freeze these energy bites? Yes, you can freeze these energy bites! Just place them in an airtight container or a freezer bag. They can last up to three months in the freezer. When ready to eat, let them thaw at room temperature for a few minutes. What can I substitute for almond butter? If you need a substitute for almond butter, try peanut butter or sunflower seed butter. Both options work well and still give a nice flavor. Just ensure that any choice you make has a similar consistency. Are these energy bites healthy? Yes, these energy bites are healthy! They contain natural sugars from dates and healthy fats from nuts. You also get fiber from coconut and almond flour. This snack provides energy without refined sugars. What's the best way to incorporate them into my diet? You can use these energy bites as a quick snack or a pre-workout boost. They make a great addition to breakfast or a midday pick-me-up. Keep them handy in your bag or fridge for easy access. How do I adjust the sweetness of the energy bites? To adjust sweetness, you can add more pitted dates. If you prefer less sweetness, reduce the number of dates. You can also omit the chocolate chips or use a sugar-free version. Can I make these with different nuts or seeds? Absolutely! You can use any nuts or seeds you like. Walnuts, pecans, or pumpkin seeds are great choices. Just ensure to keep the same amounts for the best texture and taste. This blog post covered how to make Coconut Almond Joy Energy Bites. We discussed the ingredients, including dates, coconut, and almond butter, and their health benefits. You learned step-by-step instructions for preparation and forming the bites. I shared tips for customizing your recipe and best storage practices. These energy bites are simple and healthy. They offer a tasty snack for any time. Enjoy experimenting with flavors and textures to make them your own!

Coconut Almond Joy Energy Bites Easy and Tasty Snack

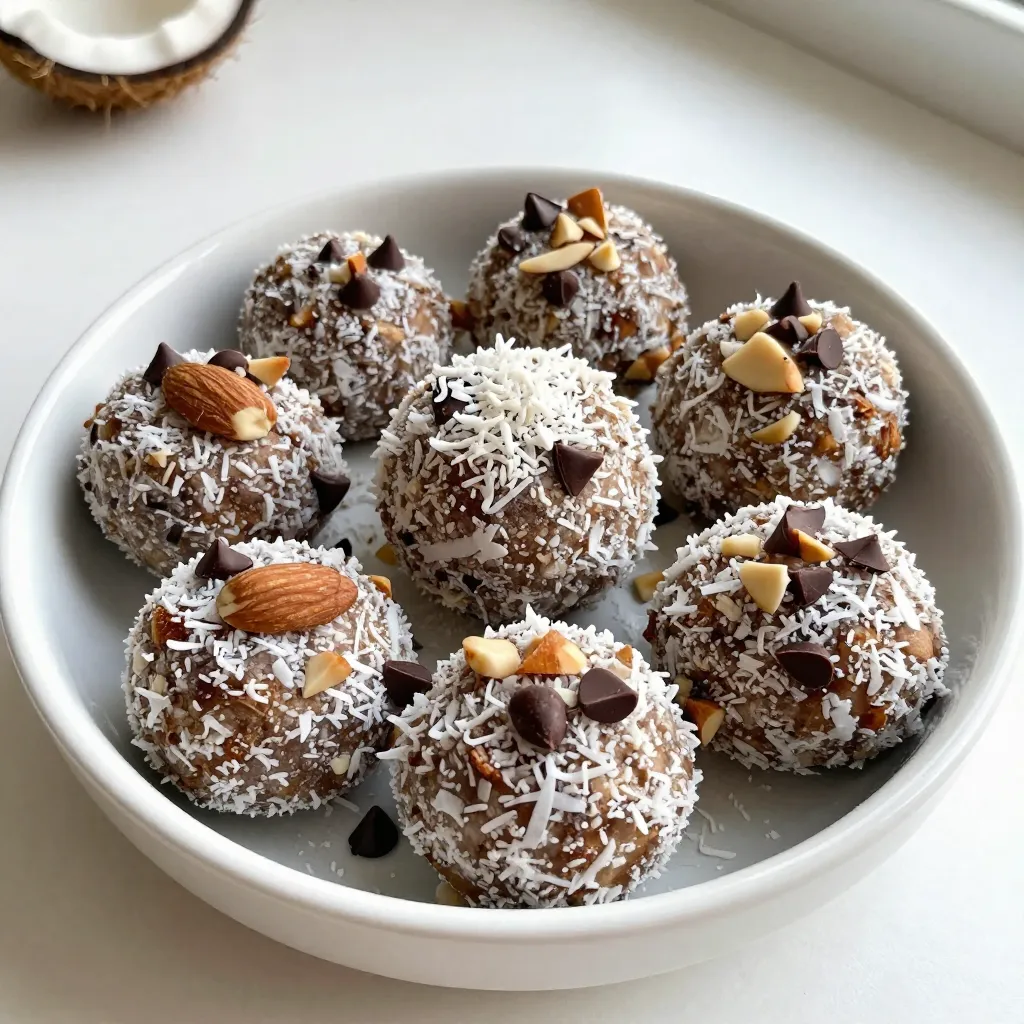
Looking for a quick snack that’s both tasty and good for you? Try my Coconut Almond Joy Energy Bites! These

Older posts
Newer posts
← Previous Page1 … Page15 Page16 Page17 … Page84 Next →

dsad

© 2026 easycookingbite • Built with GeneratePress

Our Policies

  • Copyright Policy
  • Cookie Policy
  • GDPR Policy
  • Privacy Policy
  • Disclaimer
  • Terms Of Use

More Information

  • Home
  • About
  • Contact
  • Appetizers
  • Dessert
  • Dinner
  • Drinks
©2026, easycookingbite About Back To Top