Skip to content
DisclaimerTerms Of UseGDPR PolicyCookie Policy

easycookingbite

  • Home
  • Drinks
  • Appetizers
  • Dinner
  • Dessert
  • About
  • Contact
  • Privacy Policy
DisclaimerTerms Of UseGDPR PolicyCookie Policy

NO-ING-IMG

To make these Pumpkin Spice Energy Muffins, gather the following main ingredients: - 1 cup canned pumpkin puree - 1/2 cup Greek yogurt - 1/4 cup honey or maple syrup - 2 large eggs - 1 teaspoon vanilla extract - 1 1/2 cups whole wheat flour - 1 teaspoon baking soda - 1 teaspoon baking powder - 2 teaspoons pumpkin pie spice - 1/2 teaspoon salt - 1/2 cup rolled oats These ingredients create a moist muffin packed with flavor and energy. The pumpkin puree gives a rich taste, while Greek yogurt adds protein. You can boost your muffins with these tasty add-ins: - 1/2 cup chopped walnuts or pecans - 1/4 cup dark chocolate chips These optional ingredients add crunch and a touch of sweetness. Feel free to mix and match based on your taste. If you need to swap some ingredients, here are great options: - Use applesauce instead of Greek yogurt for a dairy-free version. - Substitute agave syrup for honey if you prefer a vegan option. - For a gluten-free option, replace whole wheat flour with almond or coconut flour. These substitutions keep the muffins delicious while catering to different dietary needs. Adjust as you like! Start by preheating your oven to 350°F (175°C). I like to line a muffin tin with paper liners. You can also grease it with cooking spray if you prefer. In a large bowl, mix together one cup of canned pumpkin puree, half a cup of Greek yogurt, and a quarter cup of honey or maple syrup. Add two large eggs and one teaspoon of vanilla extract. Whisk until the mixture is smooth and combined. In another bowl, sift together one and a half cups of whole wheat flour, one teaspoon of baking soda, one teaspoon of baking powder, two teaspoons of pumpkin pie spice, and half a teaspoon of salt. Gradually add this dry mix to the wet mixture. Use a spatula and stir gently until just combined. Avoid over-mixing, as this keeps the muffins light and fluffy. Now, fold in half a cup of rolled oats. If you like nuts, add half a cup of chopped walnuts or pecans. You can also mix in a quarter cup of dark chocolate chips for a sweet touch. Once your batter is ready, scoop it into the muffin tin, filling each cup about two-thirds full. Bake them in the preheated oven for 18 to 20 minutes. A toothpick should come out clean when inserted into the center. After baking, remove the muffins from the oven. Let them cool in the tin for about five minutes. Then, transfer them to a wire rack to cool completely. For a nice touch, serve the muffins on a rustic wooden board. A light sprinkle of powdered sugar and a few cinnamon sticks can add to the autumn vibe. Enjoy these muffins with a warm cup of coffee or tea for a cozy snack! To get the best texture for your muffins, start with canned pumpkin puree. It gives a moist base. Use whole wheat flour for a hearty bite. Avoid over-mixing your batter; this can make muffins dense. Stir just until the dry and wet ingredients combine. Let the batter sit for a few minutes before baking. This helps the oats soak up moisture, leading to a fluffier muffin. When mixing, use a large bowl for the wet ingredients. Whisk together the pumpkin, Greek yogurt, honey, eggs, and vanilla until smooth. In another bowl, sift the dry ingredients. This ensures your baking powder and soda spread evenly. Gradually add the dry mix to the wet ingredients. Use a spatula to fold in the oats and nuts gently. This keeps the muffins light and airy. Store leftover muffins in an airtight container. They stay fresh at room temperature for about three days. For longer storage, place them in the fridge for up to a week. You can also freeze muffins. Wrap each one in plastic wrap, then place them in a freezer bag. They last for about three months in the freezer. When ready to eat, thaw them in the fridge overnight. {{image_2}} To make gluten-free pumpkin spice energy muffins, swap whole wheat flour for a gluten-free blend. Look for a mix that contains a balance of flours, like almond and brown rice flour. This change keeps the muffins moist and fluffy. Check the package for measurements, as they may differ. Add a bit of xanthan gum if your mix does not contain it. This gum helps bind the ingredients together. To create a vegan version, replace the eggs with flax eggs. Mix one tablespoon of flaxseed meal with two and a half tablespoons of water. Let it sit for five minutes to thicken. Use plant-based yogurt for the Greek yogurt. Maple syrup works well as a sweetener. These small swaps keep the muffins tasty while fitting a vegan diet. You can change the flavor of your muffins easily. Add dried fruits, like cranberries or raisins, for a sweet touch. For a nutty crunch, try almonds or hazelnuts instead of walnuts or pecans. If you love chocolate, use more dark chocolate chips. You could also add a pinch of cayenne pepper for a spicy kick. Each change brings a new twist to these delicious muffins! Each Pumpkin Spice Energy Muffin contains about 150 calories. This number may vary based on optional add-ins. The muffins provide a balanced snack for energy throughout the day. You can enjoy one without guilt. - Pumpkin Puree: Full of fiber and vitamins A and C. It aids digestion and boosts immunity. - Greek Yogurt: Packed with protein and probiotics. It helps with gut health and keeps you full. - Honey or Maple Syrup: Natural sweeteners that provide quick energy. They also contain antioxidants. - Whole Wheat Flour: Offers more fiber than white flour. This can help regulate blood sugar. - Oats: Great for heart health, they lower cholesterol and provide lasting energy. - Nuts: Walnuts or pecans add healthy fats and protein. They support brain health and keep you satisfied. These muffins are perfect for a quick energy boost. The combination of protein, healthy fats, and complex carbs keeps you fueled. Greek yogurt and oats provide steady energy release. Pumpkin adds nutrients that enhance your mood and focus. Enjoy these muffins before a workout or as a mid-morning snack. They make it easy to nourish your body and stay active! Yes, you can freeze these muffins easily. Just let them cool completely. Then, wrap each muffin in plastic wrap. Place them in a freezer bag. They will last up to three months in the freezer. When you want one, simply thaw it overnight in the fridge. You can also warm it in the microwave for a quick snack. To reduce the sweetness, cut back on honey or maple syrup. Use only 2 tablespoons instead of 1/4 cup. You can also add more pumpkin puree to keep the texture. Another option is to replace the sweetener with unsweetened applesauce. This change will keep the muffins moist and tasty. If you don’t have Greek yogurt, you can use regular yogurt. Plain yogurt works well. You can also try using unsweetened applesauce or silken tofu for a dairy-free option. These will keep the muffins moist while changing the flavor slightly. These muffins stay fresh for about 5 days when stored at room temperature. Keep them in an airtight container to maintain freshness. If you want to keep them longer, freeze them as mentioned earlier. This way, you can enjoy them later without losing taste or texture. In this article, we explored how to make delicious Pumpkin Spice Energy Muffins. We covered key ingredients, step-by-step baking instructions, and helpful tips for the best texture. I also shared various muffins' nutritional benefits and common questions. Remember, you can customize these muffins to suit your needs. Whether you want gluten-free or vegan options, the choices are endless. Enjoy your baking adventure and the tasty rewards!

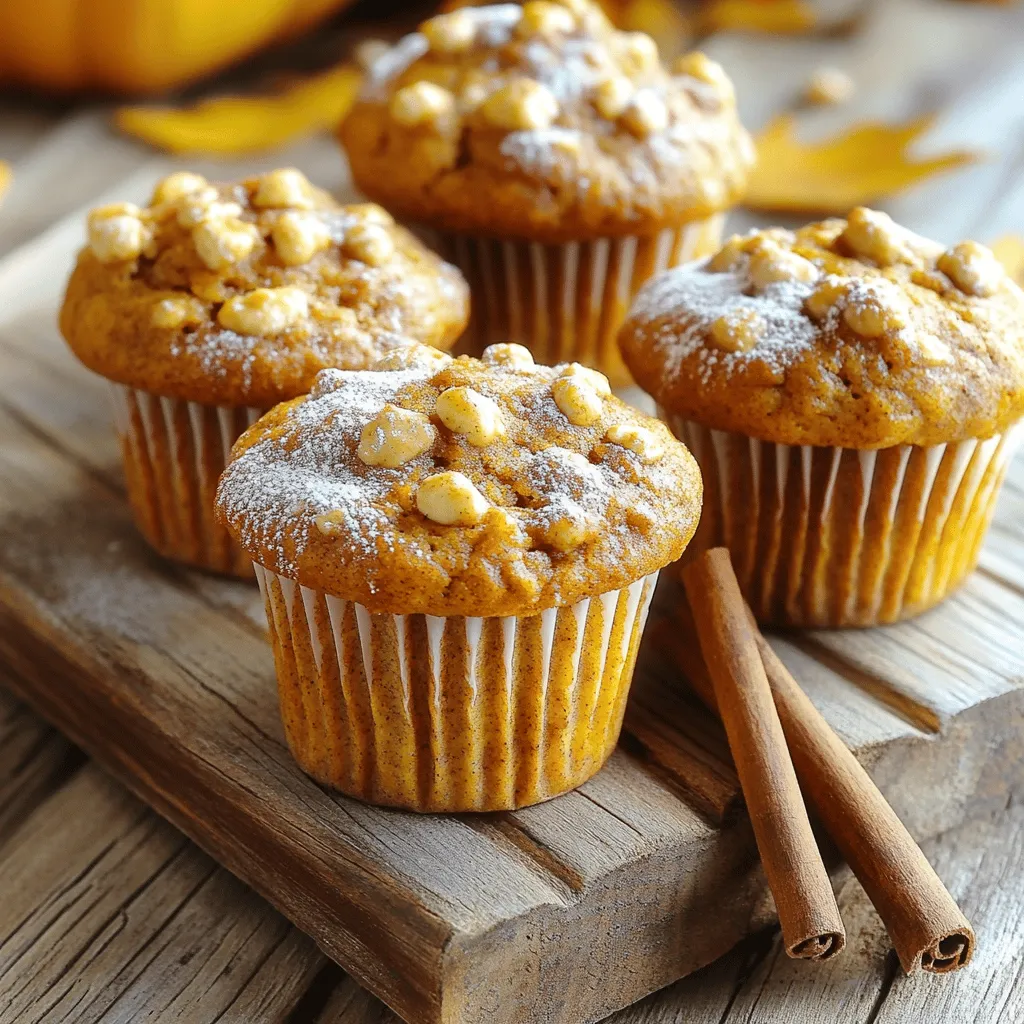
Pumpkin Spice Energy Muffins Nourishing and Tasty Snack

Craving a snack that’s both tasty and healthy? You’re in the right place! These Pumpkin Spice Energy Muffins pack a

You need one sheet of puff pastry. Make sure it is thawed. Puff pastry is the base of this tart. It puffs up and bakes golden. This adds a nice crunch and flakiness. For the apples, I suggest using Granny Smith or Honeycrisp. These apples taste great when baked. Granny Smith apples give a tart flavor. Honeycrisp apples add a sweet touch. You will need three medium apples. Peel, core, and slice them thinly. You will use several sweeteners and spices. Start with 1/4 cup of brown sugar. This gives a rich sweetness. Add 1 teaspoon of ground cinnamon for warmth. A tablespoon of lemon juice brightens the flavors. Finally, include 1 tablespoon of all-purpose flour. This helps thicken the apple mixture. These ingredients create a lovely balance in your tart. First, you need to preheat your oven to 400°F (200°C). This step is key for a nice, crispy tart. Next, take your thawed puff pastry and place it on a floured counter. Roll it out into a rectangle about 1/8 inch thick. Now, grab a parchment-lined baking sheet and transfer the pastry onto it. Using a knife, score a 1-inch border around the edges. Be careful not to cut all the way through. This little trick helps the edges puff up while baking. In a large bowl, combine three medium apples, preferably Granny Smith or Honeycrisp. Make sure to peel, core, and slice them thinly. Add 1/4 cup of brown sugar, 1 teaspoon of ground cinnamon, 1 tablespoon of lemon juice, and 1 tablespoon of all-purpose flour. Toss everything together until the apples are well coated. This mixture will fill your tart with flavor and sweetness. Now, it’s time to assemble your tart. Arrange the apple mixture evenly inside the scored border of the puff pastry. Make it look nice and even! Next, take a beaten egg and brush it on the edges. This helps the pastry turn golden while baking. Put the tart in the preheated oven and bake for 25-30 minutes. You want the pastry to be puffy and golden, while the apples should be nice and tender. Once done, remove it from the oven and let it cool for a bit. If you like, you can dust it with powdered sugar for a sweet touch. Enjoy your delicious Cinnamon Apple Puff Pastry Tart! To get the best puff pastry, start with cold ingredients. Keep your puff pastry in the fridge until you're ready to use it. This helps it puff up nicely in the oven. When rolling it out, use a light touch. Too much pressure can make it dense. Aim for a rectangle that is about 1/8 inch thick. Don't forget to score the edges. This gives a nice raised border when it bakes. Choosing the right apples is key. I like Granny Smith or Honeycrisp. They are tart and sweet, which balances well with the sugar. When slicing apples, keep them thin, about 1/8 inch. This helps them cook evenly. Use a sharp knife for clean cuts. Always peel and core your apples first. This makes them easier to eat and helps the tart bake evenly. An egg wash gives your tart a beautiful golden color. To make it, beat one egg in a small bowl. Use a pastry brush to apply it to the edges of the puff pastry. Be careful not to let it drip onto the baking sheet. This can cause the pastry to stick. Apply the wash just before you bake. It helps create a shiny finish that looks great on the table. {{image_2}} You can easily add nuts or raisins to your tart. Consider walnuts or pecans for crunch. They add a nice texture and flavor. Just chop them up and mix them in with the apple filling. If you prefer raisins, add about 1/4 cup. They bring a sweet touch that pairs well with apples. Feel free to mix in other fruits for a twist! Pears work great alongside apples. You can also try berries like blueberries or raspberries. Slice them thin and toss them with the apples. This will give your tart a unique taste and color. Just keep the total amount of fruit about the same. Switch up the spices for a new flavor. Instead of just cinnamon, try nutmeg or allspice. These spices add warmth and depth to your tart. You can even use pumpkin spice for a seasonal touch. Just replace cinnamon with 1/2 teaspoon of your chosen spice. This small change can make a big difference! To keep your Cinnamon Apple Puff Pastry Tart fresh, place leftovers in an airtight container. This helps to keep the tart from drying out. Store it in the fridge for up to three days. If you want to keep it longer, freezing is a great option. You can freeze the tart for up to three months. First, let it cool completely. Then, wrap it well in plastic wrap. After that, place it in a freezer-safe bag. Be sure to push out as much air as possible. When you are ready to enjoy it, thaw it in the fridge overnight. To reheat your tart, preheat your oven to 350°F (175°C). Place the tart on a baking sheet. Heat for about 10-15 minutes. This warms it up and keeps it crispy. You can also warm individual slices in a microwave for about 30 seconds, but the crust may lose some crunch. Yes, you can use frozen apples in this tart. Just make sure to thaw them first. Drain any excess liquid to avoid a soggy crust. Frozen apples may be softer than fresh ones. They still add great flavor and sweetness. You will know the tart is done when the edges are golden brown. The puff pastry should look puffy and flaky. The apples should be tender but not mushy. You can check the color and texture around the 25-minute mark. This tart pairs well with vanilla ice cream or whipped cream. You can also serve it with a drizzle of caramel sauce. A sprinkle of cinnamon on top adds extra flavor. A cup of hot tea or coffee complements the tart nicely. This blog post covered how to make a delicious Cinnamon Apple Puff Pastry Tart. We explored the right ingredients, including puff pastry, apples, sweeteners, and spices. I shared step-by-step instructions, tips for success, and creative variations to try. Always store leftovers properly, and I answered common questions to help you succeed in the kitchen. Remember, this tart is not just tasty; it’s fun to make! Enjoy the process and the delicious results!

Cinnamon Apple Puff Pastry Tart Flaky and Delicious Treat

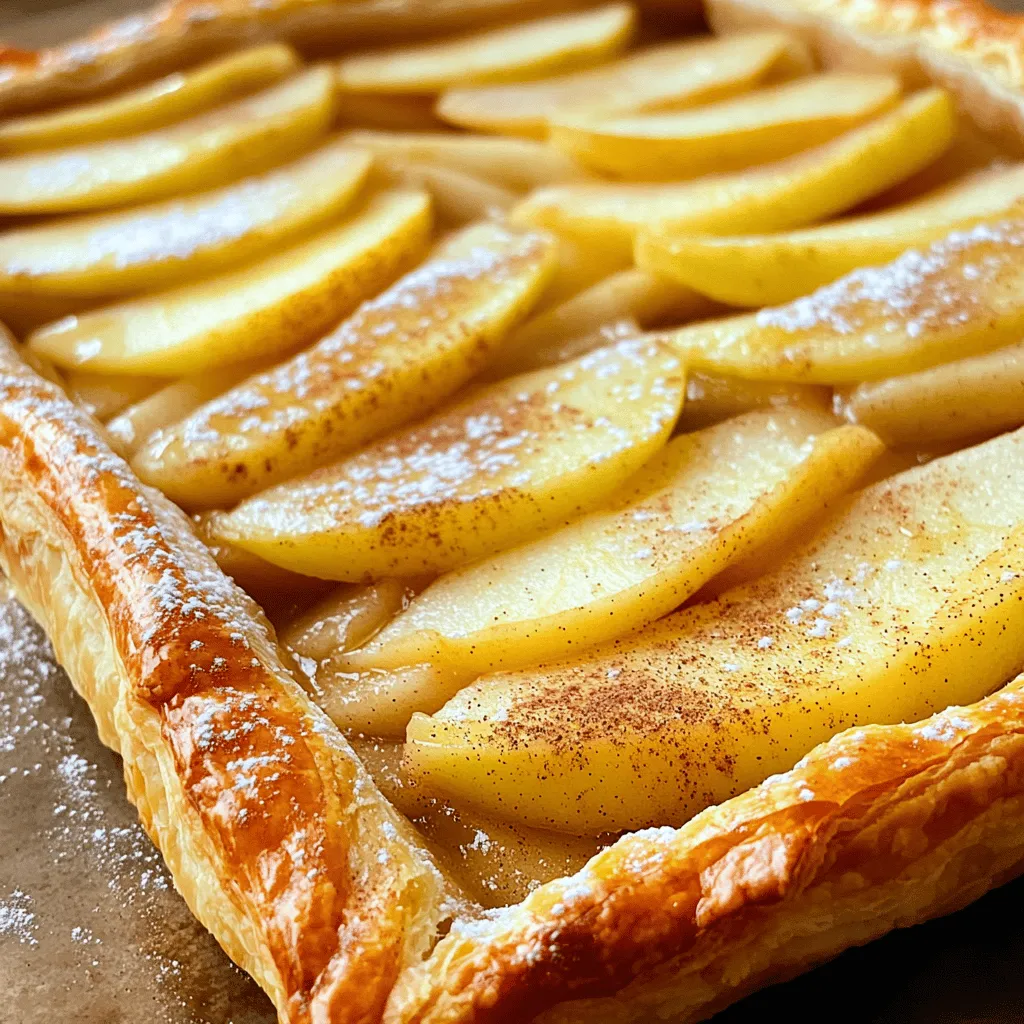
Craving a dessert that’s both flaky and delicious? This Cinnamon Apple Puff Pastry Tart is your answer! I’ll guide you

- 4 large russet potatoes, peeled and cubed - 4 cloves of garlic, minced - 1 cup sour cream - 1 cup shredded sharp cheddar cheese - 1/2 cup cream cheese, softened - 1/2 cup milk - 3 tablespoons butter - 1 teaspoon salt - 1/2 teaspoon black pepper - 1/4 teaspoon paprika - 1/4 cup green onions, chopped (for garnish) In this dish, the russet potatoes shine. They are soft and fluffy. Garlic adds a rich flavor. Sour cream gives it creaminess. Cheddar cheese makes it cheesy and delicious. Cream cheese adds more richness. Milk helps to make the mash smooth. Butter adds a nice taste and texture. Salt and pepper season the dish well. Paprika gives a hint of warmth. Finally, chopped green onions add a fresh touch. When you gather these ingredients, think about how they work together. Each one plays a part in creating a savory delight. This recipe is perfect for any meal. Whether it's a family dinner or a holiday feast, cheesy garlic mashed potato casserole will impress everyone. Keep your ingredients fresh for the best flavor. You can find russet potatoes at any grocery store. Look for firm ones without any spots. The same goes for garlic and the dairy items. Always choose high-quality products for the best results. To start, fill a large pot with salted water. Add the cubed russet potatoes and minced garlic. Bring the pot to a boil. Cook for about 15 to 20 minutes. You want the potatoes to be tender enough to mash. Once cooked, drain the potatoes well. Now, return the drained potatoes to the pot. Add the softened cream cheese, butter, milk, sour cream, salt, black pepper, and paprika. Mash everything together until smooth and creamy. This will create a rich flavor base. Next, stir in the shredded cheddar cheese. Mix well to ensure the cheese is evenly distributed. Spoon the potato mixture into a greased 9x13-inch casserole dish. Spread it out evenly. Now, preheat your oven to 350°F (175°C). Bake the casserole for about 25 to 30 minutes. You want the top to be golden and slightly crispy. Enjoy the wonderful aroma as it bakes! To avoid lumpy potatoes, start with russet potatoes. They are starchy and mash well. Cut the potatoes into equal-sized cubes to cook evenly. Boil them until they are tender, about 15-20 minutes. Drain them well before mashing. The temperature of the cream cheese matters too. Make sure it is softened. Cold cream cheese can lead to lumps. Let it sit out for about 30 minutes before using. This will help it mix in smoothly. Adding herbs or spices can elevate the flavor. Try fresh chives or parsley for a fresh touch. A pinch of garlic powder can boost the garlic taste. You can also change the cheese in this dish. Swap sharp cheddar for mozzarella for a milder flavor. Or use pepper jack for a spicy kick. Mixing different cheeses can create a unique taste. This casserole pairs well with many dishes. Serve it alongside roast chicken or grilled steak. It also goes great with a fresh salad to balance the richness. For presentation, consider garnishing with green onions. They add color and a fresh taste. You can also sprinkle some paprika on top for a nice look. Serve it hot for the best flavor and texture. {{image_2}} You can switch out the cheddar cheese with other cheeses. Try mozzarella for a milder taste or gouda for a smoky flavor. If you want a sharp bite, use pepper jack. For cream cheese, Greek yogurt is a great substitute. It gives a nice tang and cuts some fat too. Instead of russet potatoes, use Yukon Gold for a buttery taste. Red potatoes also work well; they stay creamy when mashed. Sweet potatoes are a fun twist, adding sweetness and color to the dish. To make this casserole gluten-free, check your ingredients. Most cheeses and sour creams are gluten-free, but always read labels. You can also use gluten-free breadcrumbs on top for extra crunch. For a vegetarian option, skip any meat toppings. This dish is already meat-free, so it fits right in. You can also add veggies like spinach or mushrooms for a hearty touch. Use fresh herbs in spring, like chives or parsley. They brighten the casserole and add flavor. In fall, add roasted garlic for a warm taste. You can also mix in seasonal veggies like butternut squash. For the holidays, consider adding crispy bacon or caramelized onions on top. These add a festive touch and make the dish more special. You can also sprinkle some festive spices like nutmeg for a cozy feel. To keep your Cheesy Garlic Mashed Potato Casserole fresh, refrigerate it right away. Place the leftovers in an airtight container. This will help keep them moist and tasty. You can store them in the fridge for up to three days. For long-term storage, freezing works well too. Put the cooled casserole in a freezer-safe container. Make sure to label it with the date. You can freeze it for up to two months. When you’re ready to eat it, just thaw it in the fridge overnight. To reheat your casserole, the oven is your best friend. Preheat it to 350°F (175°C). Place the casserole in a baking dish and cover it with foil. Bake for about 20 minutes until heated through. If you want to avoid a rubbery texture, try these tips. Add a splash of milk before reheating. This keeps the potatoes creamy. Stir gently before serving to blend the flavors again. Enjoy your cheesy delight! Yes, you can make this dish ahead of time. Prepare the casserole up to the point of baking. Then, cover it tightly with foil. You can store it in the fridge for up to 24 hours. When ready to bake, preheat your oven. Remove the foil and bake for about 30-35 minutes. If it’s cold from the fridge, it may need a bit more time. This way, you save time on busy days while enjoying a tasty meal. This casserole pairs well with many dishes. You might serve it with roasted chicken or grilled steak. A fresh salad can also balance the richness of the casserole. For sides, consider steamed broccoli or green beans. These add color and nutrients to your plate. You can also serve bread rolls for a complete meal. Absolutely! You can use low-fat sour cream and cream cheese. These swaps keep the taste good without the extra calories. Use skim milk instead of whole milk for a lighter option. Just make sure to mix everything well. The casserole will still be creamy and satisfying. You now have a complete guide to making Cheesy Garlic Mashed Potato Casserole. We covered all the ingredients, from russet potatoes to green onions. You learned step-by-step how to prepare, mash, and bake your dish. We shared tips for the perfect texture and flavor, plus variations for dietary needs. Storing leftovers and reheating them properly ensures that every bite remains delicious. Enjoy creating this tasty dish, and don’t forget to share your unique twists with friends and family. Happy cooking!

Cheesy Garlic Mashed Potato Casserole Savory Delight

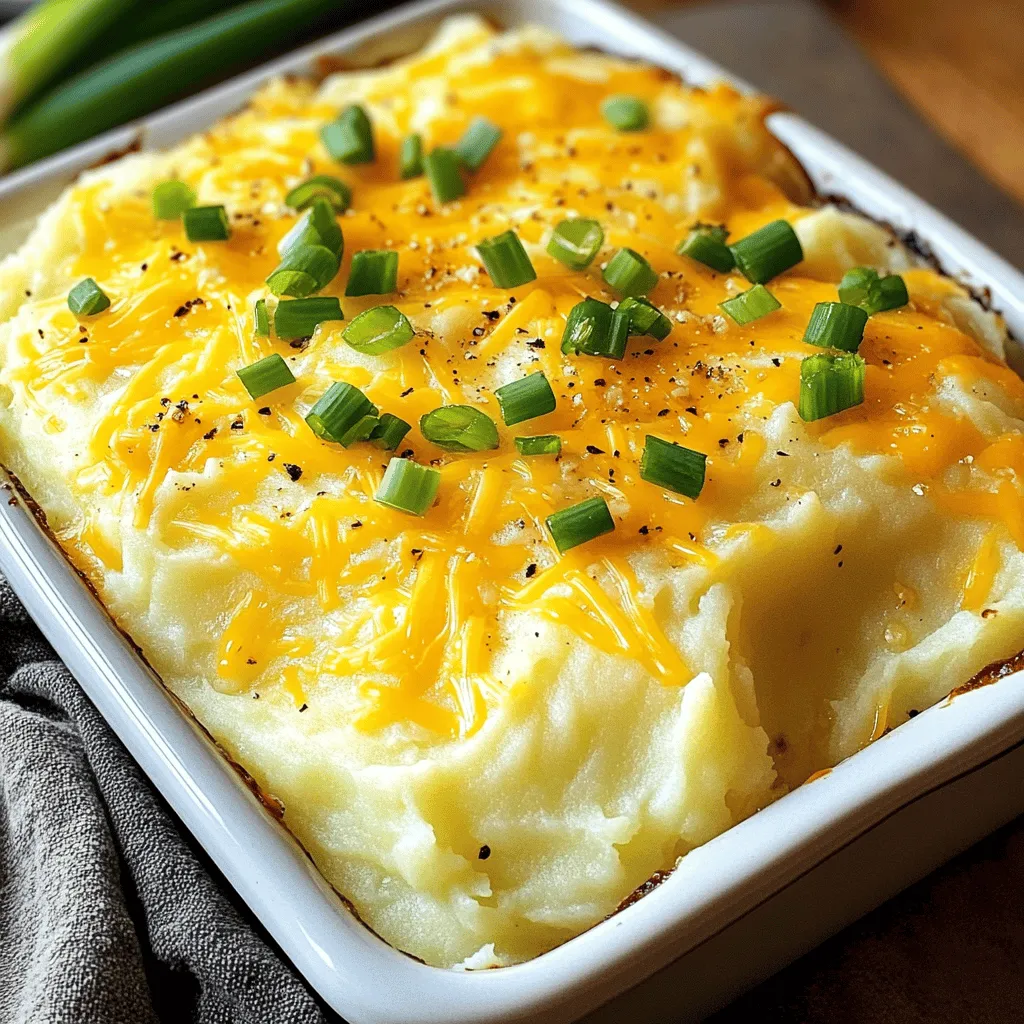
Are you ready to make a dish that steals the show at any meal? My Cheesy Garlic Mashed Potato Casserole

- 1 lb salmon fillet, skin removed - 1/4 cup teriyaki sauce - 1 tablespoon sesame oil - 1 teaspoon fresh ginger, grated - 2 cloves garlic, minced - 1 tablespoon honey - 1 tablespoon sesame seeds - 2 green onions, chopped - Salt and pepper to taste For this recipe, I love using fresh salmon. It has a soft texture and rich flavor. Skinless fillets work best. You can use store-bought teriyaki sauce, or make your own for an extra touch. The sesame oil adds a nice nuttiness to the dish. I always recommend adding fresh ginger and garlic. They give a wonderful kick and aroma. Honey balances the savory teriyaki sauce. For garnishing, sesame seeds add crunch and visual appeal. Chopped green onions brighten the dish. Adjust salt and pepper to your taste. These ingredients come together quickly and easily. You’ll have a tasty treat that impresses everyone! - First, get a bowl. - Add teriyaki sauce, sesame oil, honey, grated ginger, minced garlic, salt, and pepper. - Mix these ingredients well. - Now, take your salmon fillet and cut it into bite-sized cubes. - Toss the salmon cubes in the marinade, making sure they are well coated. - Cover the bowl and refrigerate for at least 30 minutes. - Set your air fryer to 400°F (200°C). - Allow it to preheat for about 5 minutes. - Lightly spray the air fryer basket with cooking oil to prevent sticking. - Place the marinated salmon cubes in a single layer in the basket. - Cook for 8 to 10 minutes. - Halfway through, shake the basket to ensure even cooking. - The salmon should be cooked through and slightly caramelized. When making teriyaki salmon bites, the type of salmon matters. You can choose between fresh and frozen salmon. Fresh salmon often has better flavor and texture. However, frozen salmon is a great option if you can't find fresh. Just make sure it's wild-caught when possible for the best taste. You also have skin-on and skinless options. Skin-on salmon can keep the fish moist. On the other hand, skinless salmon is easier to eat and absorbs the marinade better. I like to use skinless salmon for this recipe since it cooks up nicely. You can customize your teriyaki sauce easily. A simple homemade teriyaki sauce can bring fresh flavor. To make it, mix soy sauce, mirin, sugar, and a splash of rice vinegar. This mix gives a sweet and salty taste. Feel free to adjust the sugar to your liking. To balance sweetness and savory notes, add more honey for sweetness or soy sauce for saltiness. This way, you create a flavor that fits your taste buds perfectly. Shaking the air fryer basket is key. It helps the salmon cook evenly, so don't skip this step. Shake it halfway through cooking to ensure all sides get that crispy texture. Cooking time can vary based on salmon thickness and air fryer models. Check for doneness after 8 minutes. The salmon should be flaky and slightly caramelized. Keep an eye on it, so you don’t overcook. {{image_2}} You can switch up the protein in this recipe. Using chicken or tofu gives you new flavors. For chicken, use boneless, skinless thighs. Cut them into bite-sized pieces. Marinate as you would the salmon. Cook the chicken bites for the same time as the salmon. Tofu is another great choice. Choose firm tofu for the best texture. Press it to remove excess water before cutting. Marinate it just like the salmon. Cook it in the air fryer until crispy. Adjust the marinades for these proteins. Chicken loves a bit more spice. Tofu can soak up any flavor you give it. Feel free to get creative! These teriyaki salmon bites pair well with many sides. Serve them over fluffy rice for a filling meal. Jasmine rice or brown rice works great. You can also serve them with stir-fried veggies. Broccoli, bell peppers, or snap peas add color and crunch. If you want a lighter option, enjoy them as an appetizer. They make great finger food at parties. Just place toothpicks next to them for easy serving. Your guests will love these bites! Want to spice things up? Experiment with additional flavors. Add red pepper flakes for some heat. A sprinkle of five-spice powder gives a nice kick too. You can also mix in other sauces. Sriracha adds a nice, spicy kick. A drizzle of sweet chili sauce can make them sweeter. Don’t be afraid to try new flavors! Each twist can create a unique dish. To store leftovers, let the salmon bites cool down first. Once cooled, transfer them to an airtight container. This helps keep them fresh. Make sure to seal the container tightly. Store the salmon in the refrigerator for up to three days. When reheating salmon bites, I recommend using an air fryer or oven. This method keeps the salmon moist. Avoid using a microwave, as it can dry out the fish. Heat the bites at 350°F (175°C) for about 5-7 minutes. Check regularly to ensure they do not overcook. You can freeze cooked salmon bites for later use. Place the cooled bites in a single layer on a baking sheet. Freeze them for about 1 hour until firm. Then, transfer them to a freezer-safe bag. Make sure to remove as much air as possible. For the best results, thaw the bites overnight in the fridge before reheating. You can make teriyaki sauce at home with just a few ingredients. Here’s what you need: - 1/4 cup soy sauce - 1 tablespoon honey - 1 tablespoon rice vinegar - 1 teaspoon fresh ginger, grated - 1 teaspoon garlic, minced - 1 teaspoon cornstarch (optional, for thickness) - 1 tablespoon water (if using cornstarch) To make the sauce, mix the soy sauce, honey, vinegar, ginger, and garlic in a small pot. Heat over medium flame until it simmers. If you want a thicker sauce, dissolve cornstarch in water and stir it in. Cook for one more minute until thickened. This sauce is sweet, savory, and perfect for your salmon bites. Yes, you can use skin-on salmon for this recipe. Just remember that skin affects cooking time and texture. Skin-on salmon will take a bit longer to cook. It may also become crispier, adding a nice texture. If you choose skin-on, cook it skin-side down in the air fryer for best results. Adjust the cooking time to about 10-12 minutes. Teriyaki salmon bites taste great with many sides. Here are some tasty options: - Steamed rice or jasmine rice - Stir-fried vegetables like broccoli or bell peppers - A fresh salad with sesame dressing - Quinoa for a healthy twist - Cucumber salad for a refreshing crunch These sides complement the sweet and savory flavors of the salmon bites while adding color and nutrition to your meal. This post covered how to make tasty teriyaki salmon bites. We talked about ingredients like salmon, teriyaki sauce, and honey. I shared step-by-step cooking instructions and tips on choosing the best salmon. You can even swap proteins or try different flavors. Now you have the tools to make a quick and delicious meal. Enjoy creating your dish!

Air Fryer Teriyaki Salmon Bites Quick and Tasty Treat

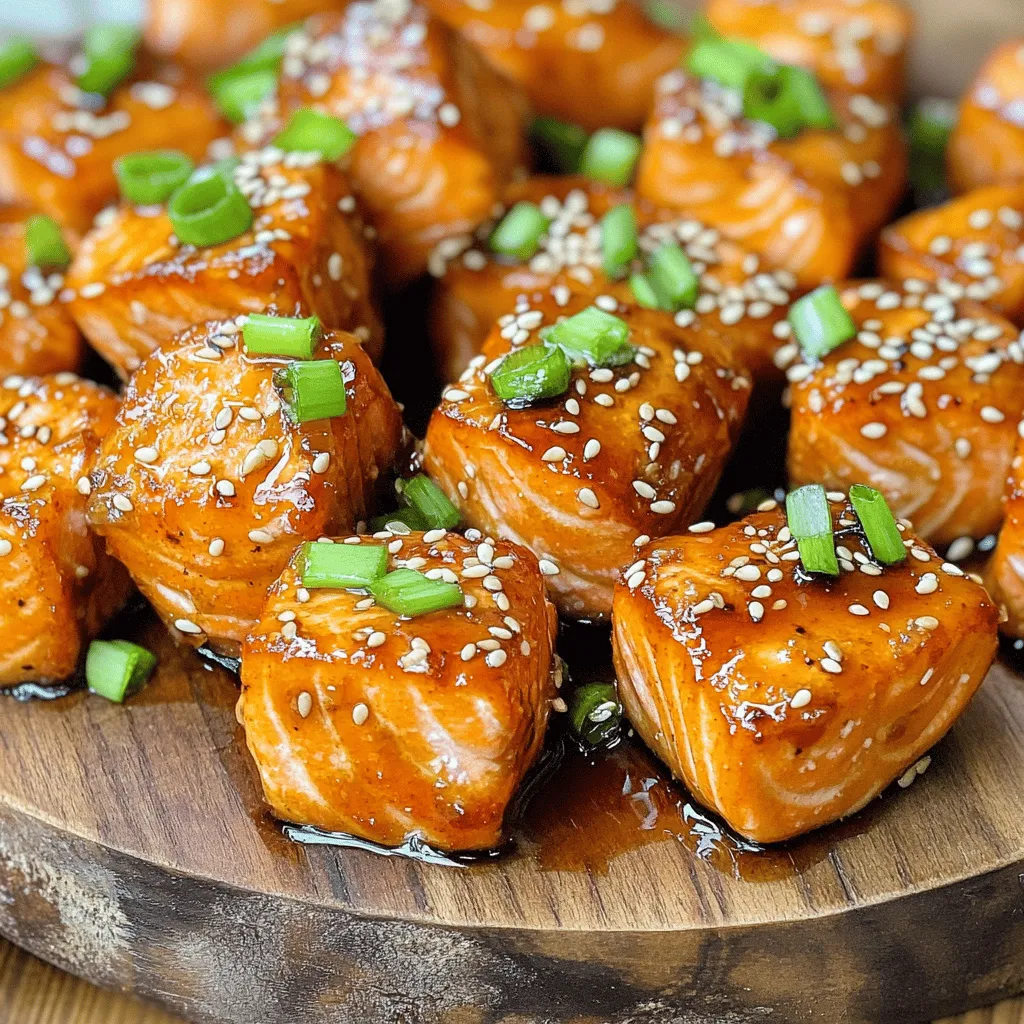
If you’re looking for a quick and tasty treat, Air Fryer Teriyaki Salmon Bites are the answer! These bite-sized delights

- 1 cup rolled oats - 1 cup cottage cheese (or Greek yogurt) - 2 large eggs - 1 medium apple, grated (with skin on) - 1 teaspoon baking powder - 1 teaspoon ground cinnamon - 1 tablespoon honey or maple syrup (optional) - A pinch of salt These ingredients give your pancakes a great taste and boost nutrition. The rolled oats add fiber. Cottage cheese or Greek yogurt offers protein. Eggs bind the mix and add richness. The grated apple gives sweetness and moisture. Baking powder helps them rise. Ground cinnamon adds warmth and flavor. Honey or maple syrup is optional for extra sweetness, while salt enhances all tastes. - Gluten-free substitutes - Dairy-free options If you need gluten-free pancakes, use gluten-free oats. For a dairy-free option, swap cottage cheese for non-dairy yogurt. These changes let everyone enjoy this tasty dish. - Cooking spray or coconut oil - Kitchen tools needed To cook your pancakes, use cooking spray or coconut oil on the skillet. You will need a blender or food processor to mix the batter. A non-stick skillet or griddle is best for cooking. Use a spatula to flip the pancakes easily. These tools make the cooking process smooth and fun. 1. Blending the base ingredients Start by adding 1 cup of rolled oats, 1 cup of cottage cheese, and 2 large eggs into a blender. Blend until smooth and creamy. This mix gives your pancakes a great base that is packed with protein. 2. Incorporating apple and cinnamon Next, add 1 grated medium apple, 1 teaspoon of ground cinnamon, 1 teaspoon of baking powder, and a pinch of salt to the blender. If you like it sweet, add 1 tablespoon of honey or maple syrup. Blend briefly to mix. You want to see bits of apple, not mush. 3. Heating the skillet Heat a non-stick skillet or griddle over medium heat. Lightly coat the surface with cooking spray or a bit of coconut oil. This helps prevent sticking and gives the pancakes a nice golden crust. 1. Pouring and flipping pancakes Pour about 1/4 cup of batter onto the skillet for each pancake. Cook until you see bubbles forming on the surface. This takes about 2-3 minutes. Then, flip the pancake and cook until it turns golden brown on the other side. 2. Adjusting heat for cooking If the pancakes brown too fast, lower the heat. If they take too long, raise the heat slightly. You want even cooking, so keep an eye on them! 1. Stacking and garnishing pancakes Stack the pancakes high on a plate for a great look. Drizzle with honey or maple syrup, and sprinkle with more cinnamon. Adding extra apple slices on top makes it even better. 2. Accompaniments and toppings These pancakes pair well with yogurt, nuts, or fresh fruit. You can also serve them with a side of nut butter for extra flavor and protein. Enjoy your tasty breakfast! - Avoiding burning: To keep your pancakes from burning, use medium heat. If your pan is too hot, the outside cooks faster than the inside. Try a small test pancake first to set your heat. - Making them fluffy: For fluffy pancakes, don’t over-blend your batter. Blend just until mixed. This keeps air in the batter and helps it rise. - Highlighting protein content: These pancakes are high in protein thanks to cottage cheese and eggs. Each pancake packs a punch, helping you feel full and energized. - Health advantages of apple and cinnamon: Apples add fiber and vitamins. Cinnamon helps with blood sugar control and adds a warm flavor. Together, they make these pancakes not just tasty, but healthy too. - Over-blending: Blending too long can turn the batter too smooth. This can make your pancakes dense instead of light and fluffy. - Incorrect heat level: If your heat is too low, pancakes take too long to cook. They can become dry. If it’s too high, they burn quickly. Adjust the heat as needed to find the sweet spot. {{image_2}} You can make these pancakes even better with fun mix-ins. - Adding nuts or seeds: Try adding chopped walnuts or pecans. They add crunch and flavor. You can also mix in chia seeds or flaxseeds for extra nutrition. - Incorporating other fruits: Consider using bananas or pears. They add natural sweetness. You can also mix in dried fruits like raisins or cranberries for added texture. If you follow a special diet, you can still enjoy these pancakes. - Vegan protein pancake version: Swap cottage cheese for a vegan yogurt. Use flax eggs instead of chicken eggs. Just mix one tablespoon of ground flaxseed with three tablespoons of water and let it sit. This creates a great egg substitute. - Low-carb options: Use almond flour instead of oats for a low-carb pancake. This gives you a tasty, protein-rich meal without the carbs. Get creative with how you serve these pancakes. - Breakfast bowls: Stack your pancakes high and add yogurt, fruit, and nuts on top. This makes a colorful breakfast bowl. - Pancake sandwiches: Spread nut butter between two pancakes. This makes a fun and filling breakfast sandwich. You can also add sliced apples or bananas inside for extra flavor. Store any leftover apple cinnamon protein pancakes in the fridge. Place them in an airtight container. They will stay fresh for up to three days. If you want to keep them longer, consider freezing them. To freeze, stack pancakes with parchment paper in between. This helps to prevent sticking. Place the stack in a freezer-safe bag or container. They can last for about a month in the freezer. For the best reheating results, use a microwave or skillet. In the microwave, heat one pancake for about 30 seconds. If it’s cold, add 10 seconds at a time. If using a skillet, warm it on low heat. Add a tiny bit of coconut oil to prevent sticking. Heat each pancake for about 1-2 minutes on each side. This keeps them soft and tasty. You can prep pancakes in advance for busy days. Make the batter the night before and store it in the fridge. Just stir the batter before cooking in the morning. If you want, you can also store cooked pancakes. Place them in a container with parchment paper. This keeps them fresh and easy to grab. To make these pancakes gluten-free, use gluten-free rolled oats. Look for oats that state they are certified gluten-free. This ensures that no gluten is present. You can also substitute oats with almond flour or coconut flour for a different texture. Yes, you can use non-dairy yogurt! Almond, soy, or coconut yogurt work well. Choose unsweetened versions to keep the taste balanced. This option keeps the pancakes creamy while meeting dairy-free needs. If you want to skip honey or maple syrup, try mashed bananas or agave nectar. You can also use stevia or monk fruit for a lower-calorie option. These sweeteners add flavor without added sugars. Store leftover pancakes in an airtight container in the fridge. They will last up to three days. For longer storage, freeze them in a single layer and place in a freezer bag. This way, they stay fresh for up to two months. Protein pancakes provide a great source of energy. The rolled oats give you fiber, which aids digestion. Cottage cheese or yogurt adds protein, helping with muscle repair. Apples offer vitamins and minerals, making these pancakes a smart choice for breakfast. In this post, we covered how to make apple cinnamon protein pancakes. You learned about the main and alternative ingredients, plus cooking essentials. I provided step-by-step instructions and tips for perfect pancakes. We explored variations and discussed storage tips. These pancakes are tasty and healthy, making them great for any meal. With flexible options, you can adapt the recipe to fit your needs. Enjoy creating delicious pancakes while boosting your nutrition!

Apple Cinnamon Protein Pancakes Nutritious Breakfast Option

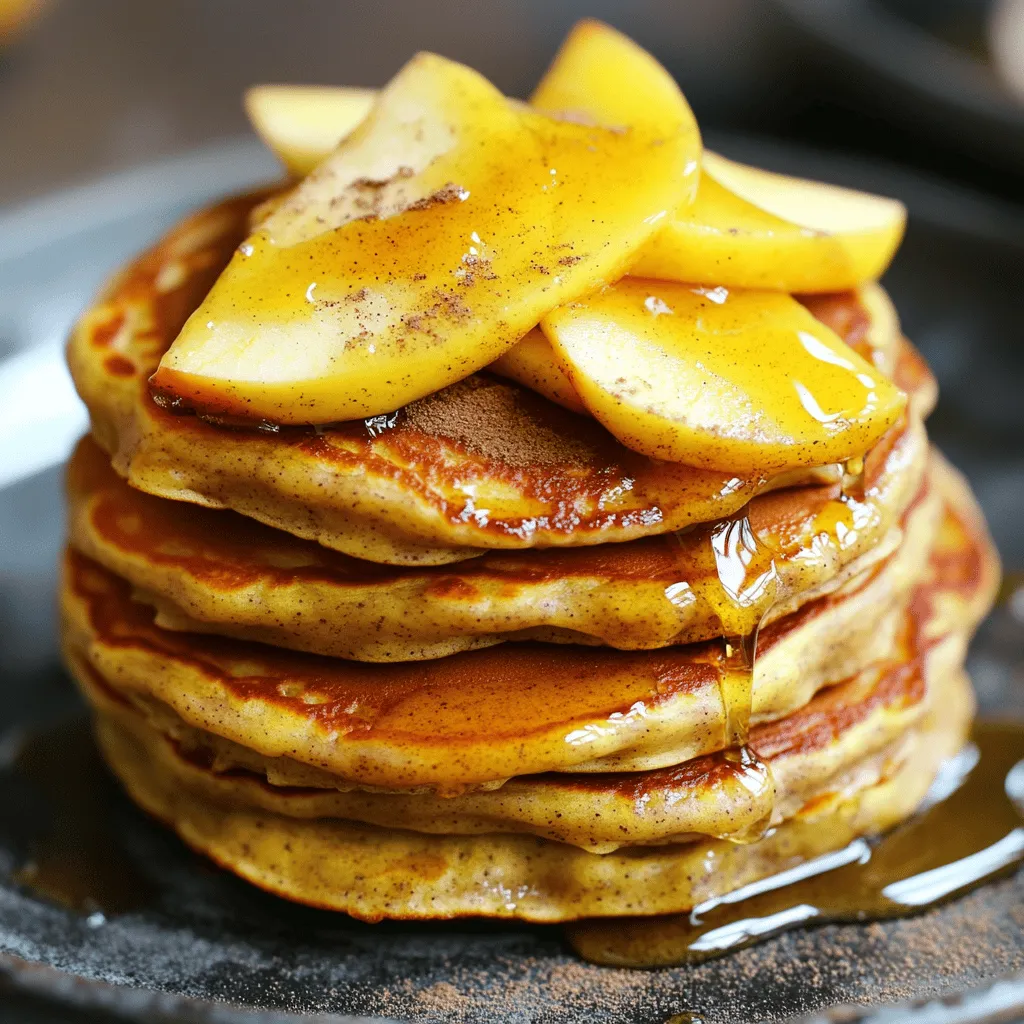
Looking for a healthy breakfast that packs a protein punch? Try my Apple Cinnamon Protein Pancakes! With simple ingredients like

- 2 cups pumpkin puree (homemade or canned) - 1 cup brown sugar (packed) - 1/4 cup maple syrup - 1 teaspoon ground cinnamon - 1/2 teaspoon ground nutmeg - 1/2 teaspoon ground ginger - 1/4 teaspoon ground cloves - 1/4 teaspoon salt - 1 tablespoon lemon juice - 1 teaspoon vanilla extract To make slow cooker pumpkin butter, you need a few key ingredients. First, grab 2 cups of pumpkin puree. You can use homemade puree or the canned version, which is super easy. Next, you will need 1 cup of packed brown sugar. This adds sweetness and a rich flavor. Then, pick up 1/4 cup of maple syrup. It gives a lovely depth to the butter. For the spices, you need 1 teaspoon of ground cinnamon, 1/2 teaspoon of ground nutmeg, and 1/2 teaspoon of ground ginger. These spices bring warmth and comfort. Don't forget 1/4 teaspoon of ground cloves for a little kick. Next, add 1/4 teaspoon of salt. Salt balances out the sweetness. You will also need 1 tablespoon of lemon juice for acidity. Lastly, include 1 teaspoon of vanilla extract, which adds a nice fragrance and flavor. With these ingredients, you can create a tasty spread that brightens up any meal. Preparing pumpkin butter is fun and easy, making it perfect for all cooks. - Measuring ingredients accurately: Start by gathering your ingredients. Use measuring cups for precision. Proper measurements make a big difference in taste and texture. - Preparing slow cooker for use: Make sure your slow cooker is clean. This helps prevent any unwanted flavors. Lightly spray it with cooking oil to help with easy cleanup later. - Tips for blending flavors: When mixing spices, consider their strength. Start with small amounts, then adjust to your taste. Mixing spices well ensures the flavors meld nicely during cooking. - Combining ingredients in the slow cooker: In your slow cooker, add 2 cups of pumpkin puree, 1 cup of brown sugar, and 1/4 cup of maple syrup. Stir these together until well combined. - Setting the slow cooker on low: Cover the slow cooker and set it to low heat. This slow cooking allows flavors to develop fully. Cooking on low takes about 4 to 6 hours. - Timing and stirring for best results: Stir the mixture every hour. This helps prevent sticking and ensures even cooking. You will notice the pumpkin butter thickening and darkening as it cooks. - Determining when the pumpkin butter is done: Your pumpkin butter is ready when it is thick and spreadable. It should have a deep color and a rich aroma. - Transferring to jars and sealing: Carefully pour the warm pumpkin butter into sterilized jars. Leave a little space at the top. Once cooled, seal the jars tightly. Store them in the fridge for up to two weeks. How do you know when your pumpkin butter is thick enough? Look for a deep orange color and a smooth texture. It should spread easily but not run off the spoon. If it seems too thin, let it cook longer. Stir it every hour to help it thicken evenly. If you need to adjust the texture, cook it uncovered for the last hour. This allows more moisture to escape. You can also add a bit more pumpkin puree if it gets too thick. Want to add a twist to your pumpkin butter? Consider adding more spices. A pinch of allspice or cardamom can give it a unique flavor. Try mixing in some vanilla bean for extra depth. For sweetness, adjust the amount of brown sugar or maple syrup. If you like it sweeter, add a little more syrup. If you prefer less sweetness, cut back on the sugar. Taste as you go to find your perfect balance. What pairs best with pumpkin butter? You can spread it on toasted bread, pancakes, or scones. It also tastes great on waffles or with yogurt. For serving, use small ramekins or jars. Arrange them on a rustic wooden board. Add a sprinkle of cinnamon on top for an eye-catching touch. This makes for a lovely presentation at any gathering. {{image_2}} To make spicy pumpkin butter, add cayenne pepper or chili flakes. A pinch of cayenne gives your spread a nice kick. Start with 1/4 teaspoon. Taste, then add more if you want it hotter. This adds warmth that pairs well with sweet pumpkin. It brightens your breakfast toast and makes it fun! For a nutty twist, mix in walnut or pecan pieces. Chopped nuts add crunch and flavor. Use about 1/2 cup of nuts. Toast them lightly to boost their taste. This adds a rich texture to the smooth pumpkin butter. It also makes your spread more filling. You can also try seasonal flavors. Apple cider or cranberries can add a unique twist. Replace some sugar with 1/4 cup of apple cider. For cranberries, add 1/2 cup dried cranberries. Both options bring a fruity note to the pumpkin butter. They make it perfect for fall or winter gatherings. To store your pumpkin butter in the fridge, use a clean glass jar. Make sure the jar has a tight lid. This keeps the butter fresh. You can keep it in the fridge for up to two weeks. If you notice any mold or off smells, throw it away. For long-term storage, canning is the best choice. First, gather your supplies. You need canning jars, lids, a canner, and a jar lifter. Here’s how to can your pumpkin butter: 1. Prepare Jars: Wash and sterilize jars and lids in boiling water. 2. Fill Jars: Spoon hot pumpkin butter into each jar, leaving about 1/4 inch of space at the top. 3. Seal Jars: Wipe the rim of each jar with a clean cloth. Place the lid on top and screw on the band until it’s fingertip-tight. 4. Process in Canner: Place jars in the canner. Process for 10-15 minutes based on your altitude. 5. Cool and Store: Remove jars and let them cool on a towel. Check that the lids seal properly. Store in a cool, dark place. Freezing is another great option for storing pumpkin butter. Use freezer-safe jars or bags. Here’s how to freeze it: 1. Cool Down: Let the pumpkin butter cool completely before freezing. 2. Portioning: Fill jars or bags, leaving some space for expansion. 3. Seal and Label: Seal tightly and label with the date. 4. Freeze: Place in the freezer. It will last for about six months. To use frozen pumpkin butter, thaw it overnight in the fridge. Stir well before serving. Enjoy your tasty treat! Yes, you can use fresh pumpkin. Fresh pumpkin gives a nice, pure flavor. However, it takes more time to prepare. You need to cook, peel, and puree it. Canned pumpkin is easy and saves time. It has a smooth texture and is ready to use. For fresh pumpkin, select a small, sweet variety like sugar pumpkin. Pros of fresh pumpkin: - Fresh taste - Less processed Cons of fresh pumpkin: - Time-consuming prep - Requires cooking Homemade pumpkin butter lasts for about two weeks in the fridge. Store it in a clean, airtight jar. Make sure it cools before sealing. If you want it to last longer, consider canning it. Canned pumpkin butter can last for up to a year when stored in a cool, dark place. Always check for signs of spoilage before use. You can use leftover pumpkin butter in many ways! Spread it on toast, pancakes, or waffles. Stir some into oatmeal or yogurt for added flavor. You can also use it in baking. Add it to muffins or cakes for a unique twist. Try mixing it into smoothies for a seasonal touch. It's versatile and adds a warm spice to many dishes. You’ve learned how to make delicious pumpkin butter with simple steps. From selecting ingredients to adjusting flavors, you now have all the tools you need. Don't forget to explore variations like spicy or nutty options. Remember to store properly, whether in the fridge, canned, or frozen. Enjoy serving your homemade pumpkin butter on bread or desserts. This treat can brighten up any meal! Creating this recipe is easier than you think, so dive in and enjoy the process.

Slow Cooker Pumpkin Butter Rich and Flavorful Spread

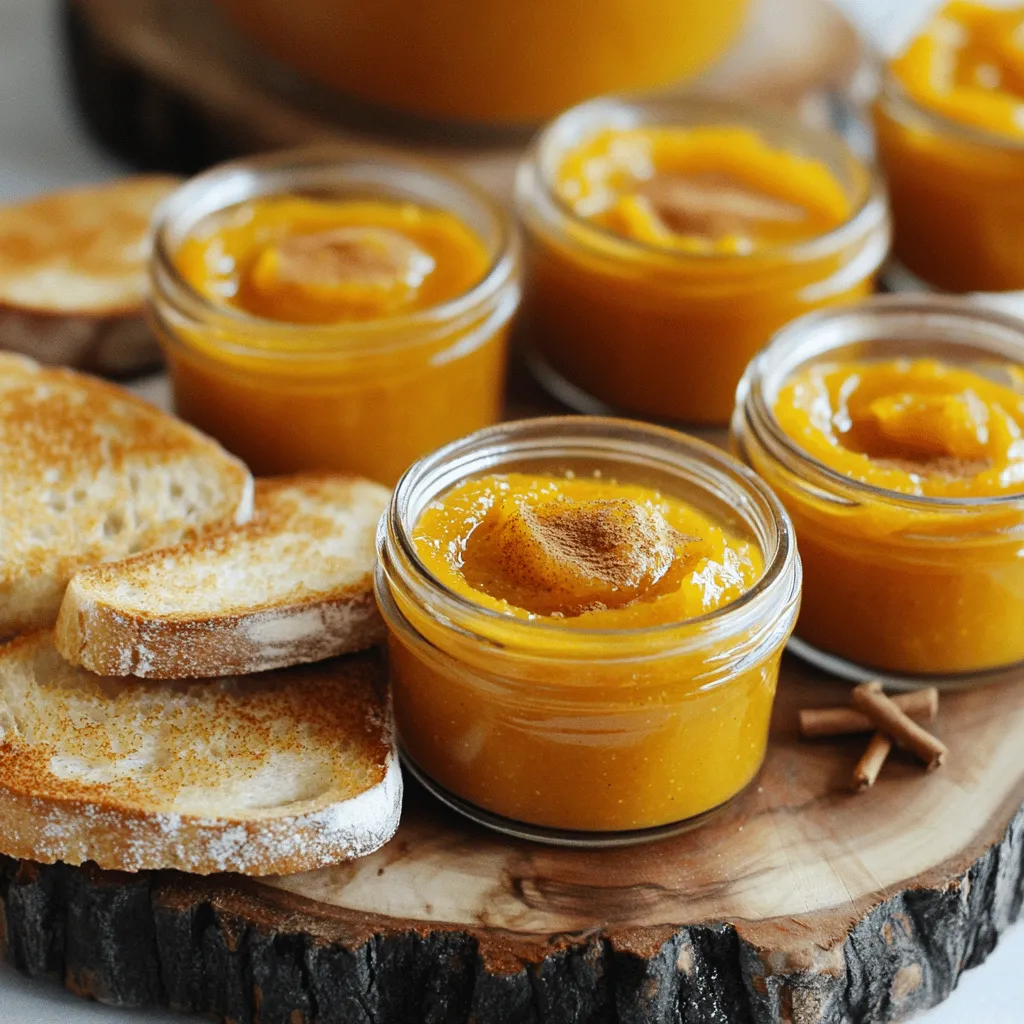
Looking to spice up your fall season? Let’s dive into the world of Slow Cooker Pumpkin Butter! This rich and

- 4 boneless, skinless chicken thighs - 2 medium sweet potatoes, peeled and diced into 1-inch cubes - 1 red bell pepper, sliced - 1 yellow onion, sliced - 1 cup BBQ sauce (your favorite brand or homemade) - 2 tablespoons olive oil - 1 teaspoon smoked paprika - 1 teaspoon garlic powder - Salt and pepper to taste - Fresh parsley for garnish When I make this dish, I love how all the flavors mix together. The chicken thighs are juicy and tender. Sweet potatoes add a nice sweetness and texture. The bell pepper and onion bring a pop of color and crunch. For the sauce, I recommend using your favorite BBQ sauce. This adds a rich, smoky flavor. Olive oil helps the veggies roast nicely. The smoked paprika and garlic powder give an extra kick. Don’t forget salt and pepper for seasoning! Finally, fresh parsley makes everything look nice. It adds a bright touch before serving. This is all you need for a delicious meal that’s easy to prepare. First, preheat your oven to 400°F (200°C). This heat will help cook the chicken and sweet potatoes evenly. Next, grab a large mixing bowl. In this bowl, combine the diced sweet potatoes, sliced red bell pepper, and sliced yellow onion. These veggies will add color and taste to your meal. Now, drizzle two tablespoons of olive oil over the veggies. This oil helps to crisp the sweet potatoes and makes them tasty. Sprinkle one teaspoon of smoked paprika, one teaspoon of garlic powder, salt, and pepper on top. Toss the vegetables well, ensuring they are coated evenly. Next, take the four chicken thighs and place them in the same bowl. Pour half of the cup of BBQ sauce over the chicken. Use your hands or a brush to coat the chicken well. This will make it flavorful and sticky. Spread the vegetable mixture evenly on a large sheet pan. Make sure there’s space between the pieces so they roast well. Then, place the chicken thighs on the sheet pan, nestled among the veggies. Bake in the preheated oven for 20 minutes. After 20 minutes, remove the pan from the oven. Brush the chicken with the remaining BBQ sauce. Return the pan to the oven and bake for an additional 10-15 minutes. The chicken should reach an internal temperature of 165°F (75°C), and the sweet potatoes should be tender and slightly caramelized. Once cooked, take it out and let it rest for a few minutes. Garnish with fresh parsley before serving. Enjoy your easy and tasty meal! To ensure even cooking, cut your sweet potatoes into uniform 1-inch cubes. This helps them cook at the same rate as the chicken. Spread your veggies out on the sheet pan. Avoid crowding them, as this can lead to steaming instead of roasting. To check for doneness, use a meat thermometer. Chicken should reach 165°F. The sweet potatoes should be tender and lightly caramelized. You can test a piece with a fork. If it’s soft, it’s done! To enhance the BBQ flavor, mix in a bit of honey or brown sugar with your sauce. This adds a nice sweetness. You can also try adding a dash of cayenne pepper for heat. If you want to switch things up, consider using smoked salt instead of regular salt. For alternative spices, consider adding chili powder, cumin, or even a pinch of cinnamon. Each spice gives a unique twist. Experiment and find your favorite flavor! Serving directly from the pan can make your meal feel rustic and fun. It also keeps cleanup easy! Use a large spoon to serve the chicken and veggies straight from the pan. If you want a more formal look, plate individual servings. Make sure to include both chicken and a mix of the roasted veggies. A sprinkle of fresh parsley adds a nice pop of green color and freshness. {{image_2}} You can easily switch out the chicken thighs for other proteins. Chicken breasts work well if you want leaner meat. If you prefer a plant-based option, try using tofu. It absorbs flavors nicely and adds a great texture. When it comes to vegetables, feel free to mix and match. Zucchini and carrots are lovely choices. They roast well and add color to your dish. You can also use broccoli or green beans for a different twist. If you want to make your own BBQ sauce, here’s a simple recipe: - 1 cup ketchup - 1/4 cup apple cider vinegar - 2 tablespoons brown sugar - 1 tablespoon Worcestershire sauce - 1 teaspoon smoked paprika - Salt and pepper to taste Mix these ingredients in a bowl and adjust the flavors as needed. If you prefer store-bought sauces, look for brands that use natural ingredients. Some popular options include Annie’s Organic or Sweet Baby Ray's. They both offer great flavor without too many additives. While the sheet pan method is easy, you can also grill the chicken. Grilling adds a smoky flavor that many love. Just marinate the chicken in BBQ sauce and grill until cooked through. For a slow cooker option, place the chicken and veggies in the pot. Pour the BBQ sauce over them and cook on low for 6-8 hours. This method makes the chicken very tender and juicy. Plus, you’ll fill your kitchen with a wonderful aroma. After you finish cooking, let the meal cool down. Cooling helps keep the food safe. I recommend leaving it out for about 30 minutes. Once cool, store it in airtight containers. This keeps the flavors fresh. Make sure to use the containers within 3 to 4 days. When you're ready to eat again, there are good ways to reheat. The oven works best for even heating. Preheat it to 350°F (175°C). Place the chicken and sweet potatoes on a baking sheet. Heat for about 15 to 20 minutes. Check that the chicken is hot all the way through. You can also use a microwave for quick reheating. Just cover the food to keep it moist. If you want to save some for later, freezing is a great option. Let the dish cool completely first. Then, place portions in freezer-safe bags or containers. Press out any air to avoid freezer burn. When you want to enjoy it again, thaw in the fridge overnight. Reheat the portions in the oven or microwave until hot. Cooking sheet pan BBQ chicken takes about 50 minutes total. Here’s how it breaks down: - Prep Time: 15 minutes to get all your ingredients ready. - First Bake: 20 minutes to cook the chicken and veggies. - Second Bake: 10-15 minutes to finish cooking with the BBQ sauce. Yes, you can use bone-in chicken. However, cooking times will differ. Bone-in chicken takes longer to cook than boneless. Make sure to check that the chicken reaches 165°F for safety. Also, bone-in chicken may add more flavor. Here are some great side dishes to enjoy with your BBQ chicken: - Coleslaw: Its crunch complements the chicken well. - Corn on the cob: Sweet corn pairs nicely with BBQ flavors. - Green salad: A fresh salad adds a light touch. - Baked beans: They bring a sweet and savory taste to the meal. Try one or more of these sides for a complete meal! In this post, we explored a delicious sheet pan BBQ chicken recipe. We covered the key ingredients, steps to prepare the dish, and shared helpful tips. I also provided variations to suit your taste and guidance on storing leftovers. Making BBQ chicken at home is easier than you think. With the right tips, you can enjoy a flavorful meal any night. The secret lies in quality ingredients and simple techniques. Use this recipe to create tasty family dinners with ease. Enjoy your cooking journey!

Sheet Pan BBQ Chicken Sweet Potatoes Simple Meal

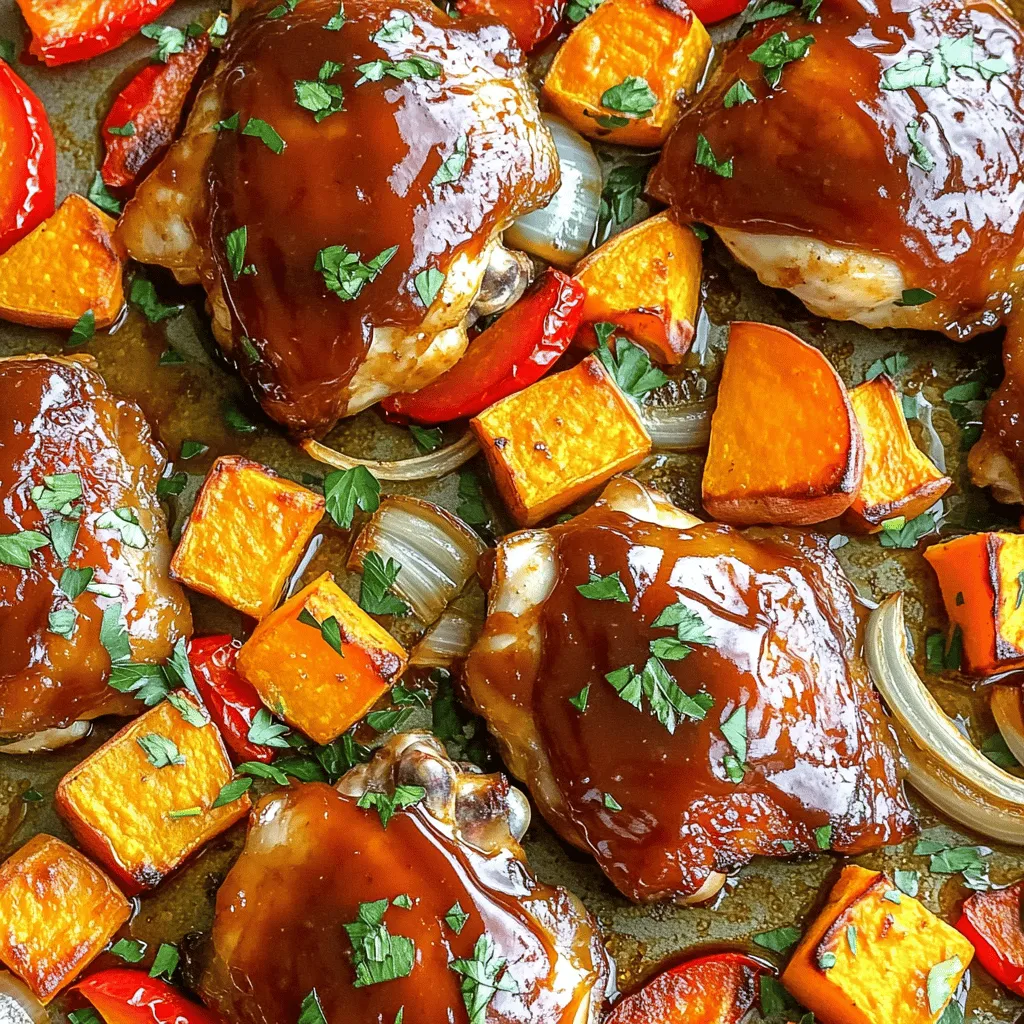
Looking for an easy, tasty meal? You’ve landed in the right spot! This Sheet Pan BBQ Chicken with Sweet Potatoes

- 1 medium butternut squash, peeled and diced - 1 cup Arborio rice - 4 cups vegetable broth - 1 small onion, finely chopped - 2 cloves garlic, minced - 1 tablespoon fresh sage, chopped (or 1 teaspoon dried) - 1 tablespoon olive oil - 1 tablespoon unsalted butter - ½ cup grated Parmesan cheese (or nutritional yeast for a vegan option) - Salt and pepper to taste - Fresh sage leaves for garnish Butternut squash makes this risotto sweet and creamy. Arborio rice gives it that perfect texture. Vegetable broth adds depth. Onion and garlic create a great base flavor. Fresh sage brings a warm, earthy note. Olive oil and butter keep things rich and smooth. Parmesan cheese enhances creaminess, while salt and pepper round out the taste. You can also use nutritional yeast as a vegan option. - Vegan alternatives: Use nutritional yeast instead of Parmesan cheese. Omit the butter or replace it with more olive oil. - Gluten-free options: This recipe is already gluten-free, but always check your broth. - Seasonal variations: Try using pumpkin or sweet potatoes instead of butternut squash in fall. Add peas or spinach in spring for a fresh touch. These substitutions let you adjust the dish to meet your needs and taste preferences. - Preparing the butternut squash: Start by peeling and dicing your butternut squash into small cubes. This helps it cook faster and blend well with the rice. Aim for about 1-inch pieces for even cooking. - Chopping onions and garlic: Next, finely chop one small onion and mince two cloves of garlic. These will add great flavor to your risotto. - Heating the vegetable broth: In a medium saucepan, heat 4 cups of vegetable broth over low heat. Keeping it warm helps the rice cook evenly. - Sautéing onion and garlic: In a large skillet, pour in 1 tablespoon of olive oil and heat it over medium heat. Add the chopped onion and cook for about 5 minutes. Stir until the onion turns translucent. Then, add the minced garlic and cook for another minute until it smells great. - Incorporating butternut squash and sage: Now, stir in the diced butternut squash and 1 tablespoon of fresh chopped sage. Cook this mixture for about 5 to 7 minutes. You want the squash to start softening. - Adding Arborio rice and broth gradually: Add 1 cup of Arborio rice to the skillet. Stir it well to coat the rice with the oil and mix it with the squash. Cook for 2 to 3 minutes. The rice will become slightly translucent. Then, start adding the warm vegetable broth one ladle at a time. Keep stirring until the rice absorbs the liquid. Repeat this until the rice is creamy and just tender, about 18 to 20 minutes. - Mixing in butter and Parmesan: Once the rice is cooked to your liking, take it off the heat. Stir in 1 tablespoon of unsalted butter and ½ cup of grated Parmesan cheese. Mix until everything is melted and creamy. - Seasoning to taste: Taste your risotto and add salt and pepper as needed. This step brings out all the flavors. - Letting risotto rest before serving: Let your risotto sit for a few minutes to thicken up. This resting time helps meld the flavors together and makes it even more delicious. To make the best risotto, you must stir. Stirring helps release the starch from the rice. This starch makes the risotto creamy. If you do not stir, the rice may stick and not cook evenly. Using warm broth is also key. Adding cold broth stops the cooking process. Keep the broth on low heat while you cook. This way, you maintain a steady temperature. It leads to a perfect creamy risotto every time. Cooking time is important too. Risotto takes about 18-20 minutes to cook. You want the rice to be al dente, which means it should have a slight bite. Test the rice near the end of cooking to see if it’s ready. Adding white wine boosts flavor. Use a dry white wine after cooking the onion and garlic. This step adds depth to your risotto. The alcohol cooks off, leaving a rich taste. Incorporating herbs and spices can change the dish. Try thyme or rosemary for a twist. A hint of nutmeg can also add warmth to your risotto. Experiment to find your favorite combination. For a richer taste, mix in some cream or extra butter. You can also use a bit more Parmesan cheese. These ingredients enhance the creaminess and flavor. Enjoy playing around with different flavors! {{image_2}} You can make this risotto vegetarian by using vegetable broth. For a vegan twist, swap the Parmesan cheese for nutritional yeast. Nutritional yeast gives a nice cheesy flavor without any dairy. You can also add more vegetables like spinach or mushrooms. These veggies add color and flavor, making your dish even tastier. If you want to try different grains, consider quinoa or barley. Quinoa cooks faster and has a nice nutty taste. Barley adds a chewy texture to your dish. When cooking these grains, use the same method as for Arborio rice. Just adjust the liquid and cooking time based on the grain you choose. Using seasonal vegetables makes this dish even better. In fall, add some roasted Brussels sprouts or carrots. In spring, you might include peas or asparagus. Adjust the flavors based on the season. For instance, you can use lemon zest in spring for a fresh taste. This keeps your risotto exciting all year round! To store your butternut squash sage risotto, follow these steps for best results: - Let the risotto cool down to room temperature. - Place it in an airtight container. - Refrigerate it for up to three days. This method keeps the risotto fresh and tasty. If you want to keep it longer, freezing is a great option. When it's time to enjoy leftovers, here are my top tips for reheating risotto: - Use a stovetop method for the best texture. - Add a splash of vegetable broth or water to keep it moist. - Heat it over low to medium heat, stirring gently. This helps to revive the creamy texture and rich flavor. You can freeze butternut squash sage risotto for later. Here’s how to do it properly: - Cool the risotto completely first. - Scoop portions into freezer-safe bags or containers. - Label them with the date before placing them in the freezer. To thaw, move the risotto to the fridge overnight. Reheat it using the stovetop method I mentioned earlier. This way, you can enjoy that creamy comfort food even weeks later! The best rice for risotto is Arborio rice. This rice has a high starch content. It gives risotto its creamy texture. Other good options include Carnaroli and Vialone Nano. These types also create a rich and creamy dish. They absorb broth well and cook evenly. Yes, you can make butternut squash risotto ahead of time. Cook it and let it cool. Then, store it in an airtight container. This way, you can keep it in the fridge for up to three days. When ready to eat, reheat it on the stove. Add a splash of broth to bring back its creamy texture. You can make risotto with less stirring by using the oven. Preheat your oven to 375°F (190°C). Cook the onion and garlic on the stove. Then, add the rice and broth to an oven-safe pot. Cover it and transfer it to the oven. Cook for 25 minutes, stirring once halfway through. This method gives you creamy risotto with less effort. In this blog post, we explored how to make a delicious butternut squash risotto. We covered the key ingredients, alternative options, and easy cooking steps. Tips for achieving a creamy texture and flavor enhancements were also shared. You can customize your risotto with seasonal additions and various grains. Remember, storing leftovers correctly ensures they taste great later. I hope you feel ready to try this dish and enjoy every bite! Happy cooking!

Butternut Squash Sage Risotto Creamy Comfort Food

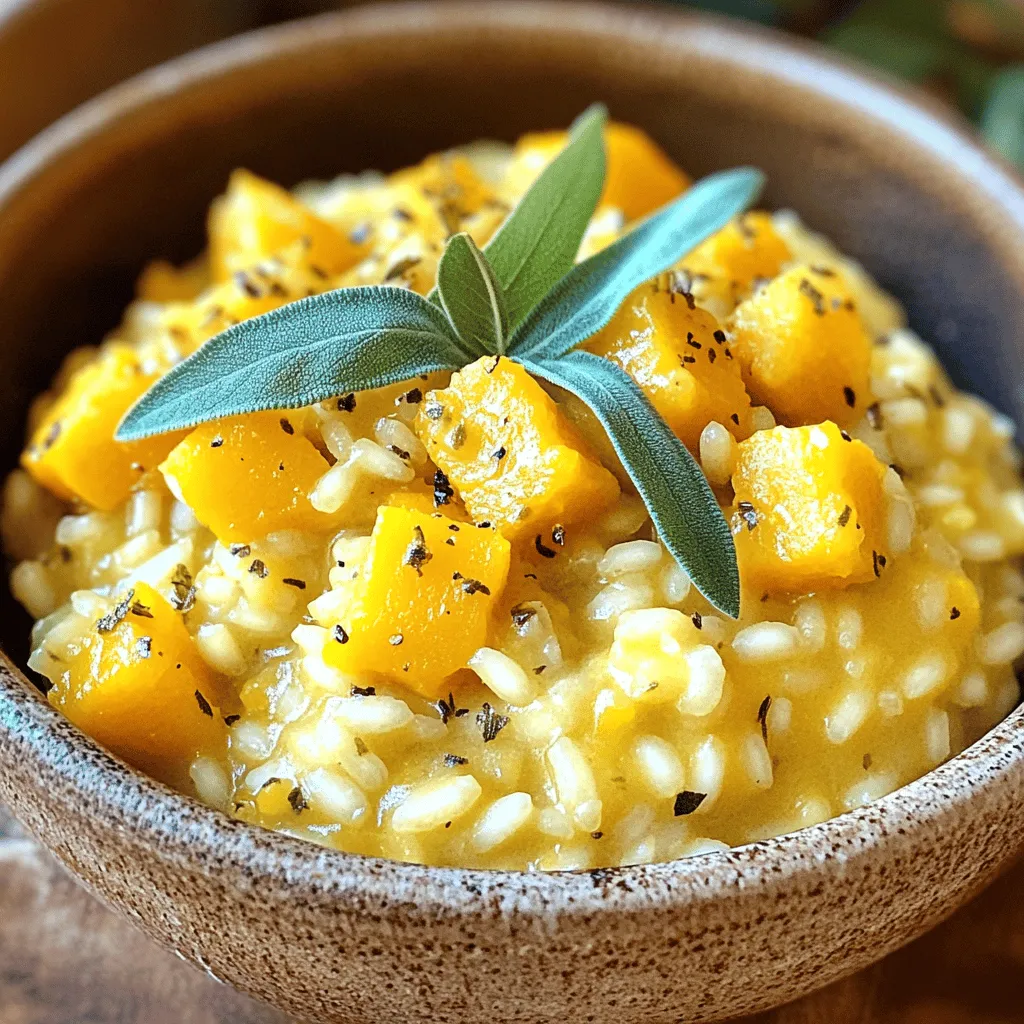
Craving a warm bowl of creamy comfort? Look no further than my Butternut Squash Sage Risotto! This dish blends velvety

When making No Bake Caramel Pecan Pie Bars, you'll need a few simple ingredients. Each one plays a big role in creating that rich and sweet flavor. Here’s a list of what you’ll need: - 1 cup crushed graham crackers - 1/2 cup unsalted butter, melted - 1/4 cup brown sugar, packed - 1 cup pecans, roughly chopped - 1 cup sweetened condensed milk - 1/2 cup caramel sauce (store-bought or homemade) - 1 teaspoon vanilla extract - A pinch of sea salt These ingredients blend together to create a delightful treat. The graham crackers give a crunchy base, while the pecans add a nice texture. Sweetened condensed milk and caramel sauce bring the sweetness, making every bite a joy. Don't forget the vanilla and sea salt; they enhance the flavors. To start, grab a large bowl. Mix 1 cup of crushed graham crackers with 1/2 cup of melted unsalted butter. Next, add 1/4 cup of brown sugar. Make sure to mix well. You want everything combined and smooth. Now, take your graham cracker mix. Press it firmly into the bottom of an 8x8 inch square baking dish. Use the back of a measuring cup to make it even. This step is key for a great base. Chill it in the fridge for about 15 minutes. This helps it set. While the crust chills, prepare the filling. In a medium saucepan over low heat, combine 1 cup of sweetened condensed milk, 1/2 cup of caramel sauce, and 1 teaspoon of vanilla extract. Stir it well until warmed. Avoid boiling it. You want a smooth and creamy mixture. Once your filling is warm, remove it from the heat. Fold in 1 cup of roughly chopped pecans. Add a pinch of sea salt. Stir until the pecans are evenly mixed in. This will add great texture to your bars. Now, it’s time to assemble. Pour the caramel pecan mix over your chilled graham cracker crust. Spread it evenly with a spatula. Press down gently to make sure it sticks well to the crust. Cover your baking dish with plastic wrap. Put it back in the refrigerator. Let it chill for at least 2 to 3 hours. This helps the filling set up nicely. Once set, lift the bars out using the parchment paper. Use a sharp knife to cut them into squares or rectangles. Enjoy the lovely layers! For a special touch, drizzle some extra caramel sauce over the top just before serving. This adds flavor and makes the bars look beautiful. To get the best crust for your no bake caramel pecan pie bars, start with fresh graham crackers. Crush them finely so they blend well with the butter. If you want a richer taste, try using brown sugar instead of white sugar. Mix the crushed crackers, melted butter, and brown sugar thoroughly. Press this mixture firmly in the pan. This step ensures a solid base that holds up well. Adding a touch of vanilla extract gives extra depth to the caramel filling. You can also stir in a bit of sea salt for a sweet and salty balance. If you love chocolate, consider adding mini chocolate chips to the pecan mix. This twist can elevate the flavor profile and add a fun texture. Experimenting with different flavors makes this recipe your own. One common mistake is not chilling the crust long enough. Make sure to chill it for at least 15 minutes. This step helps it set before adding the filling. When mixing the caramel and pecans, don’t overheat the mixture. Stir just until warm and combined; overheating can change the texture. Lastly, let the bars chill for at least 2-3 hours before cutting. This waiting time helps the filling set properly, making it easier to slice. {{image_2}} If you want to make these bars nut-free, it’s easy. Substitute pecans with sunflower seeds or pumpkin seeds. Both options add a nice crunch without the nuts. You can also use chocolate chips for a sweet twist. This way, everyone can enjoy these tasty treats. There are many ways to switch up the flavor of your bars. You can add chocolate or butterscotch for a new taste. For chocolate bars, mix in 1/2 cup of chocolate chips when you fold in the pecans. For butterscotch, use butterscotch chips instead. Each option gives a unique flavor, keeping your dessert fresh and exciting. Experimenting with sweeteners can add a fun twist. For a lighter option, try honey or maple syrup instead of brown sugar. You can also use agave syrup for a different sweetness. Just remember to adjust the amount based on your taste preference. This way, you can enjoy your bars with a personal touch. To keep your no bake caramel pecan pie bars fresh, store them in an airtight container. This helps prevent them from drying out. You can layer the bars with parchment paper to avoid sticking. Always put them in the fridge if you are not serving them right away. These bars stay good in the fridge for about one week. After that, the flavors may fade. It's best to enjoy them while they are fresh. If you see any signs of spoilage, it’s time to toss them out. You can freeze these bars for longer storage. Wrap each bar in plastic wrap and then place them in a freezer bag. They can last up to three months in the freezer. When ready to enjoy, let them thaw in the fridge overnight for the best taste and texture. Yes, you can make these bars a day or two ahead. They taste even better after chilling. Store them in the fridge until you are ready to serve. This way, you save time on the day of your event. You can use coconut cream or a mixture of milk and sugar as a substitute. For a dairy-free option, try almond or oat milk mixed with sugar. Keep the same amount for best results. The bars are set when the filling feels firm to the touch. After chilling for 2-3 hours, they should hold their shape. If you press them lightly, they should not jiggle. Absolutely! You can add chocolate chips, whipped cream, or even extra pecans. Try drizzling melted chocolate or more caramel sauce on top for a fun twist. Yes, it is safe to eat raw pecans. They are tasty and packed with nutrients. Just make sure they are fresh and stored properly to avoid spoilage. You learned how to make delicious pecan bars from scratch. We covered key ingredients, step-by-step instructions, and some helpful tips. Remember to experiment with flavors and variations. Store your bars properly to keep them fresh. Enjoy making these treats, and don’t hesitate to get creative. Sweet treats can be simple and fun!

No Bake Caramel Pecan Pie Bars Delightful Dessert Treat

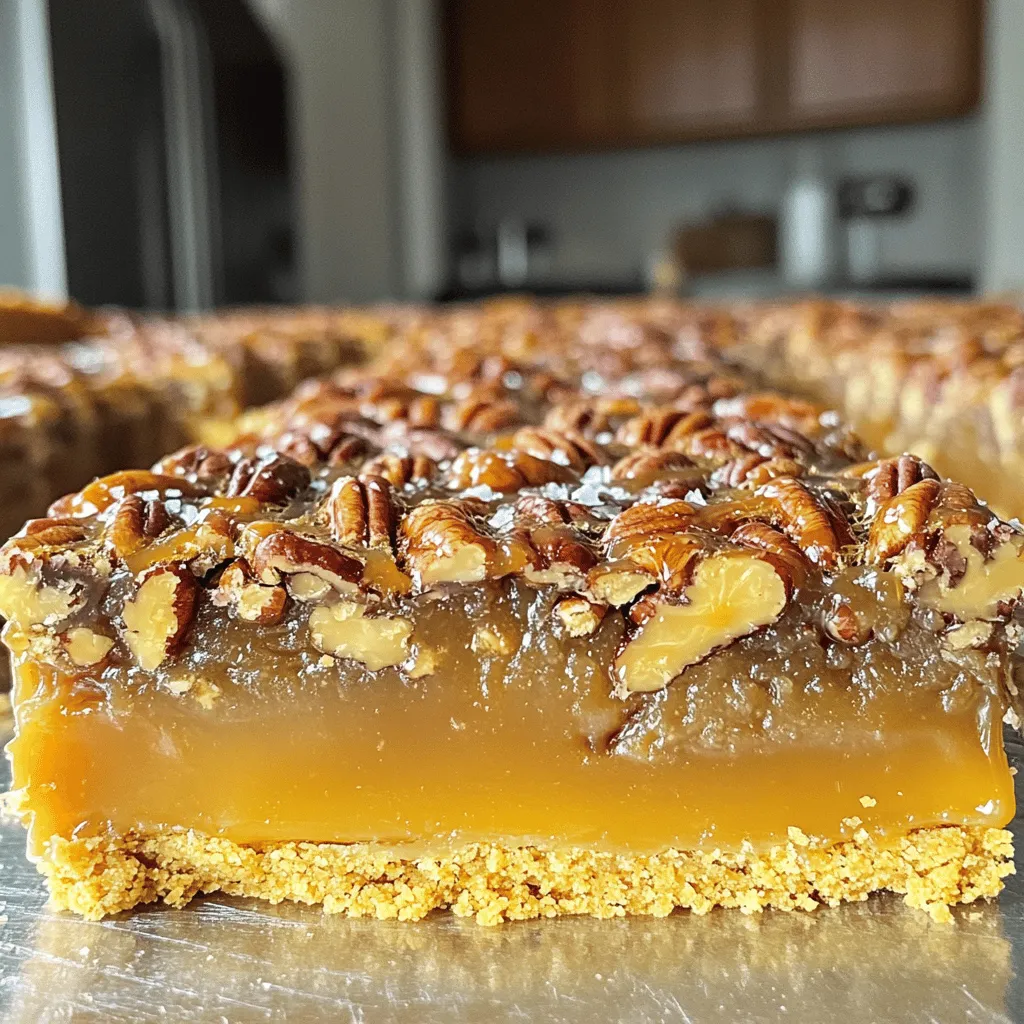
If you crave a simple yet delicious dessert, you’ll love these No Bake Caramel Pecan Pie Bars. Perfect for any

- 1 ½ cups brownie mix - ⅓ cup vegetable oil - 1 large egg - 1 teaspoon vanilla extract - 1 cup cream cheese, softened - ½ cup pumpkin puree - 1 cup powdered sugar - 1 teaspoon cinnamon - 1 teaspoon nutmeg - ½ teaspoon vanilla extract (for cheesecake layer) - ½ cup crushed graham crackers (for crust) - Whipped cream (for topping, optional) - Cinnamon stick (for garnish, optional) I love using these simple ingredients. The brownie mix gives a rich base. The pumpkin cheesecake layer adds a creamy texture and flavor. The spices make it warm and cozy. You can top with whipped cream for extra fun. A cinnamon stick adds a nice touch too. These small details make the dessert shine. First, set your oven to 350°F (175°C). This is the perfect temperature for baking. Next, grab your muffin tin and line it with cupcake liners. These liners help the brownie cups pop out easily. In a medium bowl, mix 1 ½ cups of brownie mix. Add in ⅓ cup of vegetable oil and 1 large egg. Don't forget the 1 teaspoon of vanilla extract! Stir until well combined. The mixture should be thick and smooth. Now, scoop the brownie batter into the lined muffin tins. Fill each cup about halfway full. This allows room for the cheesecake layer. In another bowl, beat together 1 cup of softened cream cheese and ½ cup of pumpkin puree. Add 1 cup of powdered sugar to sweeten it up. Then, sprinkle in 1 teaspoon of cinnamon and 1 teaspoon of nutmeg for warm flavors. Mix in ½ teaspoon of vanilla extract. Keep beating until the mixture is smooth and creamy. This will be the delicious topping for your brownie base. Now it’s time to layer! Spoon the pumpkin cheesecake mixture over the brownie base in each muffin cup. Fill them to the top. This makes for a nice, tall dessert. Make sure to spread it evenly for a great look. Place the muffin tin in the preheated oven. Bake for 20-25 minutes. You want the edges to set while the center has a slight wobble. Once they’re done, take them out and let them cool completely on a wire rack. After cooling, refrigerate for at least 2 hours. This helps the cups set up nicely. When you're ready to serve, top with whipped cream and a sprinkle of crushed graham crackers. A cinnamon stick makes a fun garnish! To get moist brownies, use a good quality brownie mix. Mix the oil, egg, and vanilla well. Avoid overmixing, as it can make brownies tough. When baking, check them around 20 minutes. Take them out when the edges are firm and the center is slightly soft. This helps keep them moist. To prevent cracks in your cheesecake layer, make sure your cream cheese is soft. Beat it well before adding other ingredients. Also, don’t overmix once you add pumpkin and sugar. Bake the cheesecake at a lower temperature if needed. A gentle bake helps keep the top smooth. For decoration, cool your brownie cups first. Then, add whipped cream on top for a tasty look. Sprinkle crushed graham crackers for crunch. You might also use a cinnamon stick as a fun garnish. These touches make your dessert look and taste even better. {{image_2}} You can make these brownie cups gluten-free. Use a gluten-free brownie mix. Check the label to ensure it meets your needs. The rest of the ingredients are usually gluten-free. This way, everyone can enjoy them! Want a lighter version? Swap the cream cheese for Greek yogurt. Use a sugar substitute instead of powdered sugar. You can also replace the vegetable oil with applesauce. These changes keep the taste while cutting calories. You can mix in chocolate chips for an extra treat. Add ½ cup of mini chocolate chips to the brownie mix. For a warm spice, add more nutmeg or even ginger. You can also use pumpkin spice instead of cinnamon. Each tweak offers a new twist on this classic dessert! Store your Pumpkin Cheesecake Brownie Cups in an airtight container. Keep them in the fridge for up to five days. If you want to keep them longer, freezing is a great option. Make sure each cup is well-wrapped to avoid freezer burn. To freeze, let the cups cool completely. Place them in a single layer on a tray. Once frozen, move them into a freezer-safe bag or container. Label the bag with the date. They can last up to three months in the freezer. When you're ready to enjoy, just thaw them overnight in the fridge. To reheat, take a cup out of the fridge. You can warm it in the microwave for about 15-20 seconds. If you prefer, you can also use an oven. Preheat to 350°F (175°C) and place the cup in for about 5-10 minutes. Enjoy them warm, topped with whipped cream for extra delight. Yes, you can use homemade brownie mix. Just make sure it has a similar texture and sweetness. I often use my favorite homemade recipe. It adds a nice personal touch to the cups. Plus, you can adjust the flavors to your liking. If you don't have pumpkin puree, use mashed sweet potatoes or butternut squash. Both options give a similar taste and texture. You can also use applesauce in a pinch, but it will change the flavor a bit. These cups last about 5 days in the fridge. Store them in an airtight container to keep them fresh. I recommend enjoying them within the first few days for the best taste. Absolutely! You can make these cups a day or two ahead. Just keep them in the fridge until you're ready to serve. They taste even better after chilling, as the flavors meld nicely. We explored how to make Pumpkin Cheesecake Brownie Cups from scratch. You gathered the right ingredients and followed easy steps for a great treat. I shared tips for moist brownies and avoiding cracks in the cheesecake. You can even try fun variations for different flavors. Now, with storage tips and answers to your questions, you’re ready to impress. Enjoy these tasty cups at your next gathering or as a sweet snack!

Pumpkin Cheesecake Brownie Cups Irresistible Delight

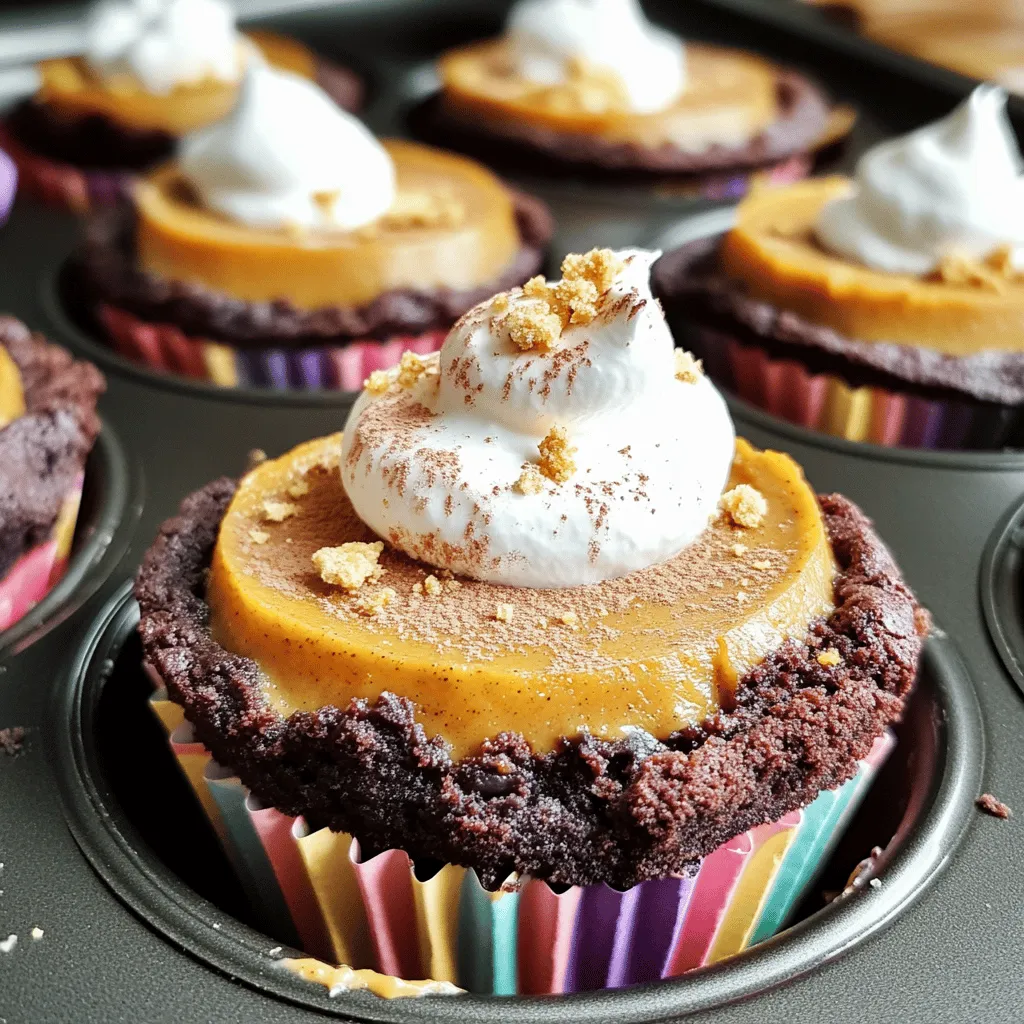
Get ready to fall in love with Pumpkin Cheesecake Brownie Cups! These bite-sized delights blend rich chocolate brownies and creamy

Older posts
Newer posts
← Previous Page1 … Page22 Page23 Page24 … Page84 Next →

dsad

© 2026 easycookingbite • Built with GeneratePress

Our Policies

  • Copyright Policy
  • Cookie Policy
  • GDPR Policy
  • Privacy Policy
  • Disclaimer
  • Terms Of Use

More Information

  • Home
  • About
  • Contact
  • Appetizers
  • Dessert
  • Dinner
  • Drinks
©2026, easycookingbite About Back To Top