Skip to content
DisclaimerTerms Of UseGDPR PolicyCookie Policy

easycookingbite

  • Home
  • Drinks
  • Appetizers
  • Dinner
  • Dessert
  • About
  • Contact
  • Privacy Policy
DisclaimerTerms Of UseGDPR PolicyCookie Policy

NO-ING-IMG

- 2 cups all-purpose flour - 1 cup granulated sugar - 1 tsp baking powder - 1/2 tsp baking soda - 1/4 tsp salt - 3 large eggs - 1 tsp vanilla extract - 1 cup dried cranberries - 1 cup shelled pistachios, roughly chopped - Zest of 1 orange - 1/2 tsp almond extract (optional) To make cranberry pistachio biscotti, gather these ingredients. Each one plays a key role. The all-purpose flour gives structure. The sugar adds sweetness and helps with browning. Baking powder and baking soda give the biscotti lift. Salt enhances all flavors. The eggs bind the dough and add richness. Vanilla extract brings warmth. Dried cranberries add tartness and chew. Pistachios give a nice crunch. The orange zest brightens the flavor. Almond extract is optional but adds a lovely touch. Make sure your ingredients are fresh. This ensures the best taste and texture in your biscotti. Enjoy the process of gathering and preparing these items. They will come together to create an irresistible treat! - Preheat your oven to 350°F (175°C) and line a baking sheet with parchment paper. - In a large bowl, mix together 2 cups of all-purpose flour, 1 cup of granulated sugar, 1 teaspoon of baking powder, 1/2 teaspoon of baking soda, and 1/4 teaspoon of salt. - In another bowl, beat 3 large eggs. Then add 1 teaspoon of vanilla extract and 1/2 teaspoon of almond extract if you like. Mix well. - Gradually add the wet mixture to the dry mixture. Stir until a sticky dough forms. - Gently fold in 1 cup of dried cranberries, 1 cup of chopped pistachios, and the zest of 1 orange. Make sure everything is mixed well. - Divide the dough in half. Shape each half into a log about 12 inches long and 2 inches wide. Place them on the baking sheet with space between. - Bake for 25-30 minutes. The biscotti should turn golden brown. Remove them and let them cool for 15-20 minutes. - Once cooled, slice each log into 1/2 inch thick pieces. Lay them cut-side down back on the baking sheet. - Bake again for 10-15 minutes, turning halfway through. The biscotti should be dry and crisp. - Let the biscotti cool completely on a wire rack. This makes them nice and crunchy. - Serve your biscotti in a pretty jar or on a rustic wooden board. They pair well with coffee or tea. Enjoy every bite! To make the best cranberry pistachio biscotti, focus on the dough. The right consistency is key. Your dough should be sticky but not too wet. If it feels too dry, add a little water. This helps the biscotti rise well. Cooling times matter too. After the first bake, let the logs cool for 15-20 minutes. This makes slicing easier. If you slice them too soon, they may crumble. Patience pays off here! Serving your biscotti can be fun and creative. Use a decorative jar for a beautiful touch. A rustic wooden board looks great too. Pair them with a hot cup of coffee or tea for a cozy feel. Think about pairing options. Biscotti goes well with sweet drinks. Try it with a cappuccino or hot chocolate. You can also serve them with desserts like ice cream. The mix of flavors will wow your guests! {{image_2}} You can swap out nuts and fruits in your biscotti recipe. If you want a different texture, try using walnuts or almonds instead of pistachios. For a fruity twist, you can use dried cherries or apricots instead of cranberries. Each option gives your biscotti a new flavor. You can also change the extracts you use. Instead of vanilla, try using orange or lemon extract. This adds a bright flavor to the biscotti. If you love almond flavor, keep the almond extract in your recipe. Each choice can change the taste in a fun way. If you need gluten-free biscotti, use almond flour or a gluten-free blend in place of all-purpose flour. This keeps the texture nice while making it gluten-free. You might have to adjust the baking time a little, so check for doneness. For vegan biscotti, swap the eggs for flaxseed meal mixed with water. Use 1 tablespoon of flaxseed meal with 2.5 tablespoons of water for each egg. This keeps your biscotti moist and holds it together. You can also use plant-based milk instead of regular milk if needed. These swaps let everyone enjoy a tasty treat! To keep your cranberry pistachio biscotti fresh, store them in an airtight container. This helps lock in flavor and keeps them crisp. I recommend using a glass jar or a plastic container with a tight lid. You can also wrap them in plastic wrap before placing them in the container for extra protection. Your biscotti will stay fresh for about two weeks at room temperature. If you want to enjoy them longer, freezing is a great option. To freeze your biscotti, start by ensuring they are completely cool. Place them in a single layer on a baking sheet. Freeze them for about an hour. Once firm, transfer them into a freezer-safe bag or container. Remove as much air as possible to prevent freezer burn. When you're ready to enjoy a piece, take out the desired amount. Let them thaw at room temperature for about 30 minutes. If you want them warm, pop them in the oven at 350°F for 5-10 minutes. This will bring back that lovely crisp texture. What makes biscotti different from cookies? Biscotti differ from cookies mainly in texture. They are twice-baked, which makes them hard and crunchy. Cookies are often soft and chewy. This unique method gives biscotti their long shelf life and ideal dunking ability in coffee or tea. Can I use fresh fruit instead of dried cranberries? Using fresh fruit is not ideal for biscotti. Fresh fruit has high moisture content. This can make the dough too wet and affect the baking process. Stick with dried fruit for the best results. Why did my biscotti break while slicing? Biscotti can break if they are not cooled enough before slicing. Always let them cool for at least 15 minutes. If not cool, they may crumble or break apart when you cut them. How can I make my biscotti sweeter or less sweet? To adjust sweetness, simply change the sugar amount. Add more sugar for sweeter biscotti. To make them less sweet, cut back on the sugar. Just remember, any change may affect the texture. You now have all the tools to make delicious cranberry pistachio biscotti. We covered the ingredients, prep steps, and baking techniques. I also shared tips for perfecting your biscotti and suggested ways to serve it. Remember, you can customize your biscotti with different nuts, fruits, or dietary needs. Store your biscotti properly, and they will stay fresh for weeks. With these guidelines, you can impress friends and family with your baking skills. Get started and enjoy your tasty treat!

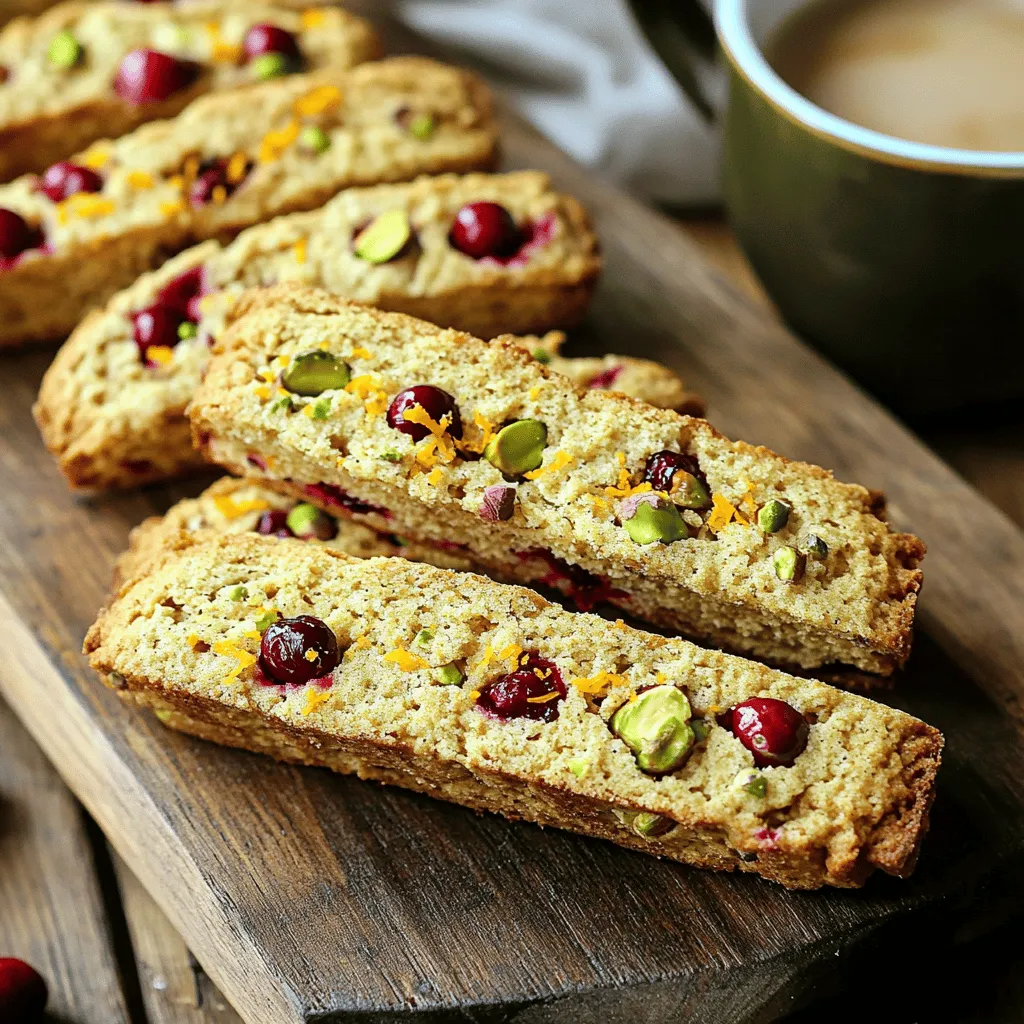
Cranberry Pistachio Biscotti Bakery Irresistible Treat

If you love sweet treats, then you’ll adore these Cranberry Pistachio Biscotti! This delightful recipe blends tart cranberries with crunchy

- 2 boneless, skinless chicken breasts, sliced - 8 oz fettuccine or pasta of choice - 2 cups mushrooms, sliced (preferably cremini or button) - 1 small onion, finely chopped - 2 cloves garlic, minced - 1 cup chicken broth - 1 cup heavy cream - 1 teaspoon dried thyme - 1 teaspoon Italian seasoning - 1 tablespoon olive oil - Salt and pepper to taste - Fresh parsley, chopped (for garnish) - Grated Parmesan cheese (for serving) Preparing and Browning the Chicken First, I heat olive oil in a large pot over medium heat. I add sliced chicken breasts once the oil is hot. I make sure the chicken is seasoned with salt and pepper. I cook it for about 5-6 minutes until it's golden brown and cooked through. Once done, I remove the chicken from the pot and set it aside. Seasoning Tips For the best taste, I use fresh salt and cracked pepper. You can also add garlic powder for extra flavor. If you like spice, try adding a pinch of red pepper flakes. Onions and Garlic Preparation In the same pot, I add chopped onion and minced garlic. I sauté them for 2-3 minutes until the onion turns translucent. This step builds a flavor base for the dish. Cooking the Mushrooms Next, I add sliced mushrooms to the pot. I cook them for about 5 minutes until they are browned and tender. I stir often to keep them from sticking. Adding Chicken and Broth to the Pot Now, I return the cooked chicken to the pot. I pour in the chicken broth, making sure it covers the chicken and veggies well. This is when the dish starts to come together. Bringing to a Simmer I bring the mixture to a gentle simmer. It’s important to let it bubble slightly, so the flavors meld together nicely. Mixing in Fettuccine Next, I stir in the fettuccine. I make sure the pasta is well covered by the broth mixture. This helps the pasta absorb the delicious flavors. Testing for Doneness I cook it for about 8-10 minutes, stirring occasionally. I taste a piece to check if it’s al dente. It should be firm but not hard. Incorporating Heavy Cream Once the pasta is just right, I lower the heat. I stir in heavy cream, which makes the dish rich and creamy. Adjusting Flavors I add dried thyme and Italian seasoning at this point. I give it a taste, then adjust the salt and pepper as needed. Garnishing Tips I serve the pasta hot, garnished with fresh parsley. I also sprinkle grated Parmesan cheese on top. This adds a nice touch and extra flavor. Serving Suggestions For a complete meal, I like to serve it with a crisp salad. A nice glass of white wine pairs well too! - Alternatives for Chicken or Pasta: If you want a twist, use turkey or tofu instead of chicken. For pasta, try whole wheat or spiralized zucchini for a healthy change. Both options can adapt well to this creamy sauce. - Dairy-Free Options: You can swap heavy cream with coconut cream or cashew cream. Both give a rich texture without dairy. Use vegetable broth instead of chicken broth for a fully dairy-free dish. - Ensuring Pasta is Al Dente: To get perfect pasta, follow the package instructions closely. Check the pasta a minute or two before the time is up. It should be firm but not hard. This way, it will soak up more sauce later. - Thickening the Sauce: If your sauce is too thin, let it simmer longer. The heat helps reduce the liquid. You can also add a bit more cream for extra richness. A cornstarch slurry can thicken it quickly, too. - Pairing with Side Dishes: A simple green salad pairs well with this dish. Garlic bread complements the creamy sauce nicely. Roasted vegetables add color and flavor to your meal. - Wine Suggestions: A glass of Chardonnay or Pinot Noir enhances the flavors of the dish. Both wines match well with the richness of the creamy sauce. Enjoying a glass while you eat makes the meal even better. {{image_2}} You can switch up the pasta to keep things fun. Here are some ideas: - Gluten-Free Alternatives: Use gluten-free pasta made from rice or corn. This option works well and is easy to find in stores. - Other Pasta Shapes: Try penne, farfalle, or even spaghetti. Each shape holds sauce differently, adding a unique twist. Enhancing the dish can make it even better. Consider these flavor boosts: - Adding Spinach or Other Vegetables: Toss in fresh spinach or broccoli. They add color and nutrition without altering the taste much. - Incorporating Different Spices: Experiment with paprika or red pepper flakes. These spices can give your dish a nice kick. Changing the sauce can create new tastes. Here are two fun ideas: - Using White Wine Instead of Marsala: Swap Marsala for white wine like Chardonnay. This will give the sauce a lighter flavor. - Creamy Tomato Variation: Mix in some crushed tomatoes with the cream. This gives a rich, tangy flavor that pairs well with chicken. To keep your creamy chicken marsala pasta fresh, follow these best practices for refrigeration: - Let the pasta cool to room temperature. - Place it in an airtight container. - Store it in the fridge for up to three days. For the ideal container types, use glass or BPA-free plastic. These materials help keep the pasta safe and tasty. You can reheat your pasta using several methods: - Microwave: Place the pasta in a bowl and cover it. Heat it in short bursts, stirring in between. - Stovetop: Put the pasta in a pan over low heat. Add a splash of chicken broth or cream to help it warm up. To maintain creaminess, avoid high heat, which can cause the sauce to separate. Stir gently to keep everything smooth. If you want to save your pasta for later, follow these freezing techniques: - Portion the pasta into smaller servings. - Place each portion in a freezer-safe bag or container. For the best practices for thawing, move the pasta to the fridge overnight before reheating. This keeps the texture nice and creamy when you warm it up again. Yes, you can use other wines. White wine works well, too. It adds a nice touch. If you prefer something sweeter, try a sherry. Each wine adds a unique flavor. Remember, the goal is to enhance the dish without overpowering it. You can easily make this dish gluten-free. Use gluten-free pasta instead of regular pasta. Brands like Barilla or Banza offer good options. Just check the package for cooking times. They may take less time to cook than regular pasta. Making this dish ahead is simple. Cook the chicken and veggies first. Then, store them in the fridge. When you are ready to eat, cook the pasta. Combine it all together and add cream just before serving. This keeps the sauce fresh and tasty. This dish pairs well with many sides. A simple green salad adds freshness. Garlic bread is great for soaking up the sauce. Steamed vegetables like broccoli or green beans work nicely, too. Choose sides that balance the rich flavors of the pasta. This recipe for Creamy Chicken Marsala Pasta brings together simple ingredients and clear steps. You learned how to cook the chicken, sauté fresh veggies, and create a rich cream sauce. I shared tips for ingredient swaps and cooking techniques to enhance your dish. Remember to store and reheat leftovers properly for the best taste. Experiment with variations to make this recipe your own. Enjoy the process and savor each bite of your delicious meal!

Creamy Chicken Marsala Pasta One Pot Tasty Delight

If you love rich, creamy dishes, you’ll adore my Creamy Chicken Marsala Pasta! This one-pot meal combines tender chicken, savory

- 1 block (14 oz) firm tofu, pressed and cubed - 1 cup bell pepper, chopped (any color) - 3 green onions, sliced (separate white and green parts) - 1 tablespoon garlic, minced - 1 tablespoon ginger, minced - 1/4 cup low-sodium soy sauce - 2 tablespoons rice vinegar - 1 tablespoon hoisin sauce - 2 tablespoons brown sugar - Sesame seeds - Extra green onions Gather these ingredients for a tasty dish. Firm tofu gives a great base. The bell peppers add color and crunch. Green onions, garlic, and ginger bring flavor. For the sauce, soy sauce, rice vinegar, hoisin, and brown sugar blend well. Optional sesame seeds and green onions make a nice finish. - Pressing and Cubing Start by pressing the tofu. This helps remove extra moisture. Wrap the tofu in a clean kitchen towel. Place something heavy on top, like a skillet, for about 15 minutes. After pressing, cut the tofu into bite-sized cubes. - Tossing with Cornstarch Place the cubed tofu in a mixing bowl. Add 2 tablespoons of cornstarch. Toss the tofu until each piece is coated. This step is key for getting a crispy texture when cooking. - Sautéing until Crispy Heat 2 tablespoons of vegetable oil in a non-stick skillet over medium-high heat. Once the oil is hot, add the tofu cubes. Sauté for 5-7 minutes. Look for a golden color on all sides. This means the tofu is crispy. - Setting Aside When the tofu is ready, remove it from the skillet. Set it aside on a plate. This keeps it warm while you cook the sauce and vegetables. - Stir-frying Aromatics In the same skillet, add 1 tablespoon of vegetable oil and 1 tablespoon of sesame oil. Then, add minced garlic and ginger. Stir constantly for about 30 seconds. This brings out their flavors. - Adding Vegetables and Sauce Next, add the white parts of the green onions and the chopped bell peppers. Stir-fry these for 2-3 minutes. You want the peppers to start softening. In a small bowl, whisk together soy sauce, rice vinegar, brown sugar, hoisin sauce, and red chili flakes. Pour this mixture over the vegetables. - Combining with Tofu Now, return the crispy tofu to the pan. Gently toss everything together for 2-3 minutes. This mixes the sauce with the tofu and veggies until heated through. Enjoy your General Tso's tofu, better than takeout! Cornstarch is key for crispy tofu. It helps create a crunchy outer layer. When you coat the tofu well, it fries beautifully. For the best crispiness, use medium-high heat. If the oil is too cool, the tofu will absorb it and become soggy. A hot skillet makes a big difference. You can adjust spice levels to fit your taste. If you like it hot, add more red chili flakes. For a milder dish, use less. Fresh herbs can brighten the dish. Try adding chopped cilantro or basil for a fresh twist. These herbs add flavor and a pop of color. Serve your General Tso's tofu over jasmine rice or quinoa. It makes a lovely base and soaks up the sauce. Garnish with sesame seeds and sliced green onions. This not only looks great but adds extra flavor and crunch. {{image_2}} Using Tempeh Tempeh makes a great swap for tofu. It has a nutty flavor and firm texture. Just cut it into cubes and follow the same steps. It absorbs flavors well, making it a tasty choice. Other Meat Options (Chicken, Shrimp) If you prefer meat, chicken or shrimp works well. Use bite-sized pieces for even cooking. Cook them until they are just done before adding sauce. This keeps the meat juicy and flavorful. Different Bell Pepper Colors Try different bell pepper colors for a fun look. Red, yellow, and green peppers add sweetness and crunch. Mixing colors adds visual appeal and a range of flavors. Additional Veggies to Include Feel free to add more veggies! Broccoli, snap peas, or carrots brighten the dish. They also add nutrition and a satisfying crunch. Just stir-fry them with the bell peppers. Gluten-Free Options If you need a gluten-free sauce, use tamari instead of soy sauce. It has a similar taste and works in the same way. This swap keeps the dish safe for gluten-sensitive diets. Sweetness Adjustments Adjust the sweetness to your liking! You can add more brown sugar for a sweeter taste. If you prefer less sweetness, cut back on the brown sugar. Always taste as you go! - To store leftovers, place them in an airtight container. - Keep the tofu and sauce together to maintain flavor. - Your General Tso’s tofu will stay fresh for about 3 to 4 days in the fridge. - For freezing, separate the tofu from the sauce. - Place the tofu in a freezer-safe bag. Remove as much air as possible. - The sauce can go into another container. It freezes well for about 2 to 3 months. - To thaw, move the tofu and sauce to the fridge overnight. - Reheat the tofu in a pan until crispy, then add the sauce. - You can prepare the tofu by pressing and cubing it in advance. - Toss the cubed tofu with cornstarch before storing. - Chop the vegetables and store them in the fridge for up to 2 days. - Keep the sauce in a separate container for easy mixing later. - This way, you can have a quick meal ready in no time! You can use different types of tofu. Firm tofu is best for this dish. It holds its shape and gets crispy. Soft or silken tofu won’t work well here. It can break apart easily. For a firmer bite, you can use extra-firm tofu. Just remember to press it well to remove moisture. This helps it stay crisp when cooked. You can adjust the heat level of the sauce with simple changes. To make it spicier, add more red chili flakes. Start with a pinch and taste as you go. For a milder sauce, reduce the chili flakes or leave them out. You can also add a bit of honey or sugar to balance the spice. This helps create a flavor you love. Yes, you can prepare parts of this recipe in advance. You can press and cube the tofu a day before. Store it in the fridge to keep it fresh. You can also chop the vegetables and mix the sauce ahead of time. When you are ready to cook, just sauté the tofu and combine everything. This makes meal prep easy and quick. This blog post covered key ingredients for a tasty tofu dish, from firm tofu and veggies to flavorful sauces. We explored how to prepare and cook, ensuring your tofu crispiness shines. I shared tips for enhancing flavors and presented ideas to mix things up. You can also store leftovers for later. With these simple steps, you can enjoy a delicious meal tonight or prep for days ahead. Experiment and find your favorite variations to keep it fresh and exciting. Enjoy cooking!

General Tso’s Tofu Better Than Takeout Delight

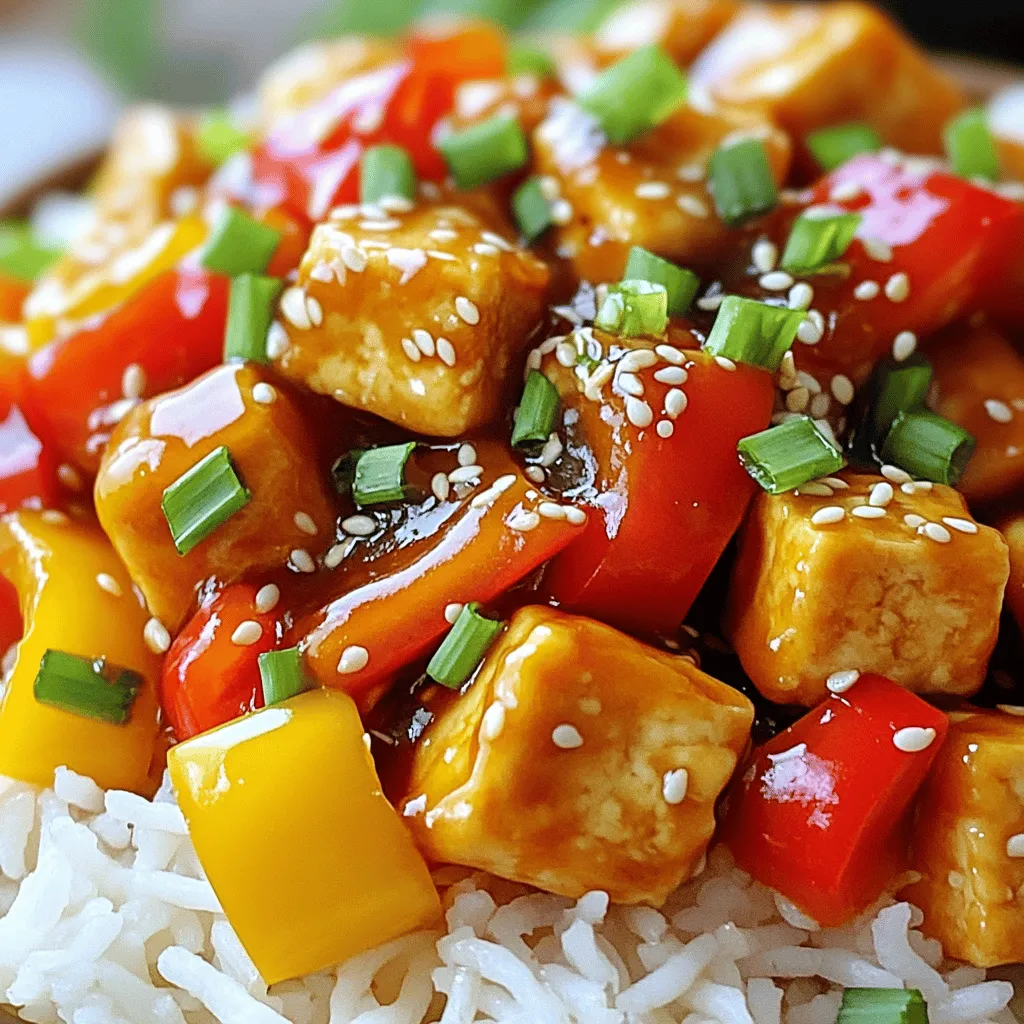
Craving something delicious and satisfying? Let me introduce you to General Tso’s Tofu! This delightful dish brings the vibrant flavors

To make creamy mushroom spinach gnocchi, gather these simple items: - 1 package (16 oz) gnocchi (store-bought) - 2 cups fresh spinach, roughly chopped - 8 oz mushrooms, sliced (cremini or button) - 1 tablespoon olive oil - 2 cloves garlic, minced - 1 cup heavy cream (or use coconut cream for a lighter option) - 1/2 cup grated Parmesan cheese (plus extra for garnish) - Salt and pepper to taste - Pinch of nutmeg (optional) - Fresh parsley, chopped for garnish You can swap items if needed. For example: - Gnocchi: Try homemade gnocchi for a fresh twist. - Spinach: Kale or arugula can work well instead of spinach. - Mushrooms: Use shiitake or portobello for more flavor. - Olive oil: Butter adds a rich taste if you prefer. - Heavy cream: Use half-and-half for a lighter sauce. Coconut cream is great for dairy-free. - Parmesan cheese: Nutritional yeast adds a cheesy flavor for a vegan option. Select fresh ingredients for the best taste. Here’s how: - Gnocchi: Look for firm gnocchi with no bruises or soft spots. - Spinach: Choose bright green leaves with no yellow or brown spots. - Mushrooms: Pick mushrooms that are firm and dry. Avoid slimy ones. - Garlic: Choose garlic that is firm with no sprouts or soft spots. - Cream: Check the expiration date to ensure freshness. Using fresh ingredients makes a big difference in flavor and texture. Enjoy your cooking! To start, fill a large pot with water. Add a good amount of salt to it. Bring the water to a boil. Once boiling, add the gnocchi. Cook them for about 3 to 5 minutes, or until they float. Floating means they are ready. Drain the gnocchi and set them aside. This step is quick and easy. Next, grab a large skillet. Heat olive oil over medium heat. Once hot, add the sliced mushrooms. Stir them often for about 5 minutes. They should turn golden brown and release their moisture. After that, add minced garlic. Cook it for one more minute to get that nice smell. Now, add the chopped spinach and stir. Cook until the spinach wilts down. This adds a fresh taste to our dish. Now it’s time to make the cream sauce. Lower the heat and pour in the heavy cream. Mix it well and let it simmer for 2 to 3 minutes. This helps thicken the sauce. Stir in the grated Parmesan cheese. Keep mixing until it melts. Season with salt, pepper, and a pinch of nutmeg if you want. Finally, add the cooked gnocchi to the skillet. Gently toss everything together. Cook for another minute to heat it all up. Now, your creamy mushroom spinach gnocchi is ready to enjoy! To make a great cream sauce, start with fresh ingredients. Use heavy cream for a rich taste. If you want a lighter option, go for coconut cream. Add it slowly to the pan and stir well. This helps it mix smoothly. A pinch of nutmeg adds warmth and depth. Don't forget to taste it! Adjust the salt and pepper for balance. If you want a lighter meal, try these swaps: - Use half-and-half instead of heavy cream. - Swap Parmesan cheese for nutritional yeast for a vegan option. - Add more vegetables, like zucchini or bell peppers, to bulk it up. These changes keep the dish tasty while cutting down on calories. Presentation matters! Here are some tips to make your dish look great: - Use shallow bowls for serving. It makes the dish pop. - Sprinkle extra Parmesan on top for a nice touch. - Add a sprinkle of fresh parsley. It brings color and freshness. - Serve with crusty bread on the side. It makes a lovely meal! These small steps make your creamy mushroom spinach gnocchi a feast for the eyes. {{image_2}} You can add chicken or shrimp to this dish for extra flavor. For chicken, use boneless pieces. Cook them in the skillet before adding mushrooms. For shrimp, add them right after the garlic. Cook until they turn pink and then mix in the spinach. Both options make the meal heartier and more filling. To make this dish vegan, swap the heavy cream for coconut cream. Use nutritional yeast instead of Parmesan cheese for a cheesy flavor. You can also add tofu or tempeh for protein. This keeps the creamy texture while keeping it plant-based. You won't miss the dairy! Feel free to add seasonal veggies to your gnocchi. In spring, add asparagus or peas for a fresh touch. In summer, try zucchini or cherry tomatoes. In fall, roasted butternut squash adds sweetness. Winter calls for kale or broccoli for extra nutrients. These veggies bring color and flavor to your dish. You can store leftover creamy mushroom spinach gnocchi in an airtight container. Make sure to let it cool down first. Place it in the fridge. It will stay fresh for up to three days. If you want to keep it longer, consider freezing. To reheat gnocchi, use a skillet on medium heat. Add a splash of water or cream to keep it moist. Stir often until it’s warm. You can also use a microwave. Place it in a bowl and cover it. Heat in short bursts, stirring in between. This helps avoid hot spots. If you want to freeze your gnocchi, it’s best to do so before adding cream. Cooked gnocchi can also be frozen. Spread them on a baking sheet to freeze individually. Once frozen, transfer them to a freezer bag. To thaw, place the bag in the fridge overnight. For quick thawing, you can also boil them briefly in water. Yes, you can. I suggest cooking the gnocchi and sauce separately. Store them in airtight containers. When you're ready to eat, just heat them on the stove. Mix them together before serving. This keeps the gnocchi from getting mushy. Most store-bought gnocchi contains wheat flour. However, you can find gluten-free gnocchi made from potato or rice flour. Always check the label for gluten-free options. This allows everyone to enjoy this dish. You can serve a simple side salad with mixed greens. A light vinaigrette pairs well. Garlic bread is another great choice. It soaks up the creamy sauce nicely. For a special touch, add roasted vegetables or grilled chicken for extra flavor. In this post, we explored fresh ingredients, cooking steps, and tips for perfecting your dish. You learned how to make creamy mushroom spinach gnocchi, along with storage and serving ideas. Remember, using fresh ingredients and experimenting with variations can enhance your meal. Always aim for balance in flavors and textures. This dish is versatile, so make it your own. Enjoy the process, and happy cooking!

Creamy Mushroom Spinach Gnocchi 15 Minutes Delight

Are you looking for a quick, delicious meal? My Creamy Mushroom Spinach Gnocchi is here to save your busy evenings!

- 2 chai tea bags - 2 cups milk (dairy or non-dairy) - 1 cup water - 1 medium apple, peeled and diced - 3 tablespoons caramel sauce (plus extra for drizzling) - 1 tablespoon brown sugar (optional) - 1/2 teaspoon ground cinnamon - Whipped cream (optional) - A pinch of nutmeg This recipe for a caramel apple chai tea latte is simple and fun. You need just a few ingredients. First, grab your chai tea bags. They give the drink its warm, spicy base. Next, choose your milk. You can use dairy or non-dairy milk. Almond or oat milk works great here. You also need one medium apple. Make sure to peel and dice it. This adds a nice fruity touch. You will use three tablespoons of caramel sauce. I like to add extra for drizzling on top. If you want more sweetness, add a tablespoon of brown sugar. Ground cinnamon makes the drink cozy and warm. Finally, you can top it all off with whipped cream and a pinch of nutmeg if you like. With these ingredients, you are ready to create a delicious caramel apple chai tea latte! 1. Start by taking a medium apple, peel it, and dice it into small pieces. 2. In a saucepan, combine 1 cup of water and the diced apples. 3. Bring the mixture to a boil over medium heat. 4. Once boiling, reduce the heat and let it simmer for about 5 minutes. 5. The apples will soften and release their sweet flavor into the water. 1. After simmering, remove the saucepan from heat. 2. Add 2 chai tea bags to the apple-infused water. 3. Let the tea bags steep for about 5 minutes. 4. This step is key for extracting rich flavors from the chai and apples. 1. Once steeped, take out the tea bags and return the saucepan to low heat. 2. Add 2 cups of milk, 3 tablespoons of caramel sauce, and 1 tablespoon of brown sugar if you like it sweeter. 3. Sprinkle in 1/2 teaspoon of ground cinnamon and a pinch of nutmeg. 4. Stir the mixture well to combine all the flavors. 5. Heat it gently, stirring often, until hot but do not let it boil. 6. For extra creaminess, use a frother or whisk to froth the latte mixture until foamy. 7. Finally, pour the caramel apple chai tea latte into your favorite mugs. 8. Top it with whipped cream and drizzle with extra caramel sauce if desired. 9. For a finishing touch, sprinkle a little more ground cinnamon on top. Enjoy! To froth milk well, you can use a frother or a whisk. A frother is easy and quick. Just dip it in your milk and turn it on. If you use a whisk, move it up and down quickly. This creates bubbles. Make sure your milk is warm, but not boiling. You can also use a jar with a lid. Pour in the milk, close the lid, and shake it hard. After that, heat the milk gently in a pan. This gives you nice froth, too. Brown sugar adds a deeper flavor than regular sugar. It can enhance the warm spices in your drink. If you prefer a sweeter drink, add more caramel sauce. Start with three tablespoons, then taste it. You can always add more if you like it sweeter. Be careful not to overdo it. Too much caramel can make it sticky. A little goes a long way for flavor. To boost the taste, consider adding more spices. Nutmeg pairs well with chai. You can also try cardamom or ginger for a twist. These spices give your drink a cozy feeling. For a fun finish, top your latte with whipped cream. Drizzle extra caramel sauce on top. You can also sprinkle more cinnamon for added flavor. These touches make the drink look pretty and taste amazing. {{image_2}} You can use various milk types for your caramel apple chai tea latte. Dairy milk is rich and creamy. It adds a nice texture. Non-dairy options like almond or oat milk are great too. They can change the flavor and texture a bit. Almond milk is lighter, while oat milk is creamier. Nutritionally, dairy milk has more protein. Non-dairy milks often have fewer calories. However, many non-dairy options have added vitamins. Look for brands that fortify their milk. This way, you still get important nutrients. Feel free to add your favorite flavored syrups. Vanilla or caramel syrups can make the drink sweeter. You can also try hazelnut or toffee for a new twist. Incorporating different fruits can enhance the flavor. Pears or peaches work well with chai too. You can mix in a few slices for extra sweetness. Toss in some berries for a fun twist. The fruit will complement the spices. As seasons change, so can your drink. For fall, try a pumpkin spice caramel apple chai. Just add pumpkin puree and pumpkin spice. It brings warmth and coziness to your cup. During the holidays, you can add peppermint extract. This gives a festive flair. Top with crushed candy canes for fun. Each sip will remind you of holiday cheer. To store leftover chai latte, let it cool first. Pour it into a clean container. A glass jar or a BPA-free plastic container works well. Seal it tightly to keep out air. Avoid using metal containers, as they can react with the milk. When you're ready to enjoy your chai latte again, use gentle heat. Pour it into a saucepan and warm it on low. Stir it often to keep it smooth. You can also use a microwave. Heat it in short bursts, about 30 seconds each time. Stir between heats to keep the flavor and texture. The average shelf life of the prepared drink is about three days. Keep it in the fridge for best results. Watch for signs of spoilage. If it smells sour or has an odd color, it’s time to toss it. Always trust your senses when it comes to food safety. A caramel apple chai tea latte is a warm drink that blends chai tea, apples, and caramel. It has a sweet and spicy flavor. The main parts are chai tea bags, diced apples, milk, caramel sauce, and spices. This drink is perfect for cozy days. Yes, you can easily make this drink vegan. Use non-dairy milk like almond, soy, or oat milk. For the caramel sauce, look for a vegan version. Brown sugar is already vegan, so no changes are needed there. This way, everyone can enjoy this tasty drink. You can prep this latte in advance. First, make the apple infusion and steep the tea. Then, mix the other ingredients but do not heat them yet. Store the mixture in the fridge. When ready to serve, heat it gently on the stove. This saves time on busy days. This blog post guides you through making a caramel apple chai tea latte. We covered ingredients, preparation steps, tips for frothing, and storage tips. You can customize this drink in many ways to fit your taste. Remember to experiment with different milk types and flavors. Whether you're sipping it in fall or winter, this creamy drink will warm you up. Enjoy your delicious creation and share it with friends!

Caramel Apple Chai Tea Latte Delightful Recipe

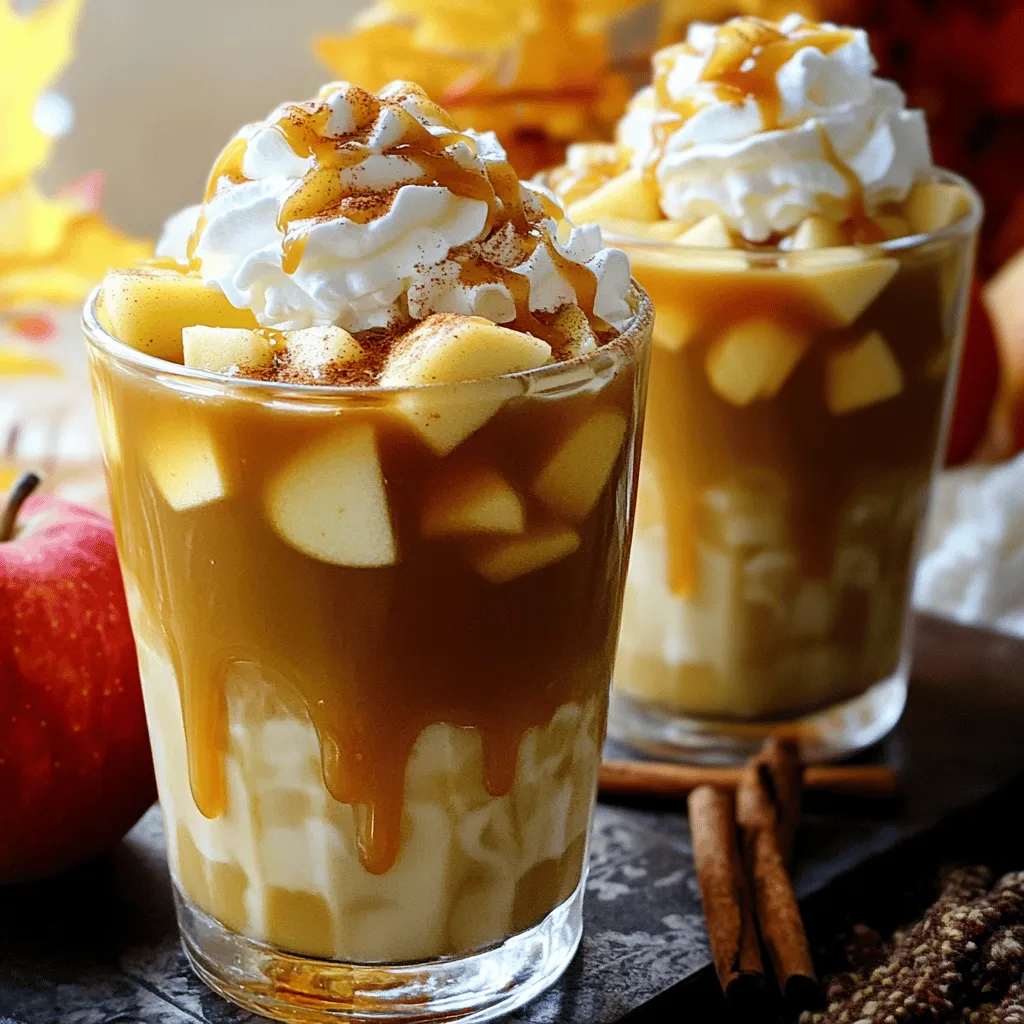
Are you ready to enjoy a cozy drink that warms your soul? The Caramel Apple Chai Tea Latte combines sweet

To make these delicious pumpkin spice oatmeal chocolate chip cookies, gather the following ingredients: - 1 cup rolled oats - 1 cup all-purpose flour - 1/2 teaspoon baking soda - 1/2 teaspoon baking powder - 2 teaspoons pumpkin pie spice - 1/4 teaspoon salt - 1/2 cup unsalted butter, softened - 1 cup brown sugar, packed - 1/4 cup granulated sugar - 1 large egg - 1/2 cup pure pumpkin puree - 1 teaspoon vanilla extract - 1 cup chocolate chips - 1/2 cup walnuts or pecans, chopped (optional) These ingredients blend together to create a warm, tasty cookie. The rolled oats add a nice texture, while the pumpkin brings a rich flavor. The blend of sugars gives the cookies a sweet edge. You can use walnuts or pecans for added crunch if you like. Each component plays a role, so don’t skip any! - Preheat your oven to 350°F (175°C). - Line a baking sheet with parchment paper. Start by preheating your oven. This step helps cookies bake evenly. Also, lining the baking sheet prevents sticking. It makes cleanup easy, too! - Combine oats, flour, baking soda, baking powder, pumpkin pie spice, and salt. In a bowl, mix the oats, flour, baking soda, baking powder, pumpkin pie spice, and salt. This mix adds flavor and helps the cookies rise. Set it aside; you will use it soon. - Cream together the softened butter, brown sugar, and granulated sugar. In a large bowl, cream the softened butter, brown sugar, and granulated sugar. Use a mixer or a spoon. Mix until it’s light and fluffy. This step helps make your cookies soft and sweet. - Beat in the egg, pumpkin puree, and vanilla extract. Now, beat in the egg, pumpkin puree, and vanilla extract. Mix well until it is smooth. The pumpkin adds moisture and flavor. - Gradually add the dry mixture and stir until combined. Next, gradually add the dry mix to the wet mix. Stir gently until just combined. Do not overmix; this keeps the cookies tender. - Fold in chocolate chips and optional nuts. Now, fold in the chocolate chips and nuts if you like. The chocolate adds sweetness, while nuts give crunch. This combination is simply delightful. - Drop tablespoon-sized portions on the baking sheet. - Bake for 10-12 minutes. Drop tablespoon-sized portions of dough onto the prepared baking sheet. Space them about 2 inches apart. Bake for 10-12 minutes. Look for lightly golden edges. - Let cookies cool on the baking sheet before transferring to a wire rack. After baking, let the cookies cool on the baking sheet for about 5 minutes. Then, transfer them to a wire rack. This cooling step helps them firm up and makes them easier to handle. To get soft cookies, watch your baking time. Pull them out when the edges are light brown. If you want chewy cookies, let them cool on the baking sheet longer. This keeps the center soft while setting the edges. Measuring ingredients is key to great cookies. Use a kitchen scale for accuracy. If you use cups, spoon the flour into the cup and level it off. Too much flour makes cookies dry. You can spice things up! Add a pinch of nutmeg for warmth. A dash of cinnamon brings out the pumpkin flavor too. If you love a kick, try adding ground ginger. For the chocolate chips, mix dark and semi-sweet for depth. You can also use white chocolate or butterscotch chips for a different taste. Don’t be afraid to try mini chips for a fun twist! To serve your cookies beautifully, stack them on a festive plate. Add a sprinkle of pumpkin pie spice on top for flair. For storage, use an airtight container to keep them fresh. You can also wrap them in parchment paper for a nice touch. Warm cookies are always a hit, so serve them right out of the oven! {{image_2}} You can make these cookies gluten-free. Just swap the all-purpose flour for a gluten-free blend. Look for a mix that has a good balance of starches and flours. This change helps keep the cookies soft and chewy. Always check the label to ensure it’s truly gluten-free. If you have nut allergies, you can skip the walnuts or pecans. Instead, add more chocolate chips or use seeds like sunflower seeds. They add a nice crunch without the nut risk. Just make sure your chocolate chips are also nut-free. To make these cookies vegan, replace the butter with coconut oil or vegan butter. For the egg, use a flax egg. Mix 1 tablespoon of flaxseed meal with 2.5 tablespoons of water and let it sit until thick. This will help bind the cookies together. These swaps keep the cookies tasty while being plant-based. To keep your cookies fresh, store them in an airtight container. This helps lock in moisture and flavor. Line the container with parchment paper for added protection. If you stack the cookies, place parchment paper between layers. This prevents sticking and keeps them looking nice. Want to save some for later? You can freeze the dough or baked cookies. For dough, scoop it into balls and place them on a baking sheet. Freeze until solid, then transfer to a freezer bag. For baked cookies, let them cool completely. Then, layer them in a freezer-safe container with parchment paper between layers. They can last up to three months in the freezer. When you crave a warm cookie, reheating is easy. For baked cookies, place them on a plate and microwave for about 10-15 seconds. This warms them without drying them out. If you prefer the oven, preheat it to 350°F (175°C) and warm the cookies for about 5 minutes. Enjoy them warm and gooey! Yes, you can use quick oats instead of rolled oats. Quick oats cook faster and can change the cookie's texture. The cookies may turn out softer and less chewy. I recommend sticking with rolled oats for the best results. To make the cookies softer, try these tips: - Use more butter or a little extra pumpkin puree. - Do not overmix the dough; mix just until combined. - Bake for a shorter time, around 10 minutes, for softer cookies. If you don’t have pumpkin puree, use mashed banana or applesauce. Both will add moisture and a hint of flavor. You can also try sweet potato puree for a similar taste. Yes, you can make the dough ahead of time. Just wrap it in plastic wrap and store it in the fridge for up to three days. For longer storage, freeze the dough. When ready to bake, let it thaw in the fridge overnight. The cookies are done when the edges turn lightly golden. The centers should look set but soft. If you press them gently, they should spring back. Remember, they will continue to cook slightly after you take them out. These cookies are a treat you can enjoy any time. We covered sweet ingredients and easy steps to bake them. I shared tips to help you make them just right. Plus, you have ideas for variations to fit your needs. Whether you want gluten-free, nut-free, or vegan options, there’s a way to enjoy these cookies. With the right storage, they'll stay fresh and tasty. Now, gather your ingredients and get baking! You'll have a delicious snack to share or savor alone.

Pumpkin Spice Oatmeal Chocolate Chip Cookies Delight

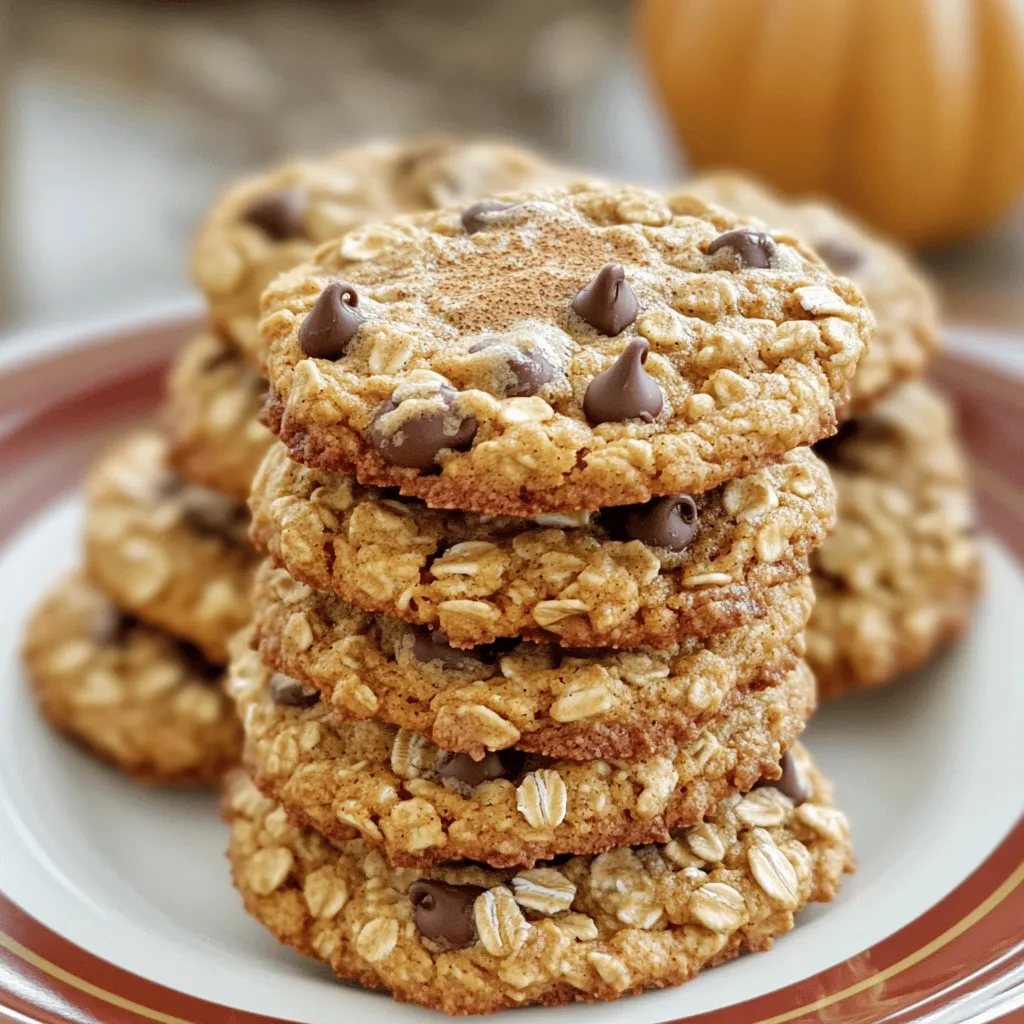
Are you ready to elevate your cookie game? These Pumpkin Spice Oatmeal Chocolate Chip Cookies combine warm fall flavors with

- 12 oz fresh or frozen ravioli (pumpkin or cheese) - 2 tablespoons olive oil - 3 cloves garlic, minced - 1 cup heavy cream - 1 cup vegetable broth - 1 cup baby spinach - 1/2 cup grated Parmesan cheese - 1 teaspoon dried sage - 1/4 teaspoon nutmeg - Salt and pepper to taste - Fresh sage leaves for garnish - Optional: Crushed red pepper flakes for a kick You can swap the heavy cream with half-and-half for a lighter sauce. Use low-sodium vegetable broth if you want to control the salt. For a dairy-free option, try coconut cream and nutritional yeast instead of Parmesan. If you don't have sage, thyme or rosemary also work well. Feel free to use any ravioli you have on hand, like cheese or spinach-filled ones. Each serving offers a balanced meal with around: - Calories: 400 - Protein: 12g - Carbohydrates: 50g - Fat: 18g - Fiber: 3g - Sugar: 3g This dish is rich in flavor and nutrients. It brings warmth and comfort, perfect for any meal. Enjoy this creamy pumpkin sage ravioli skillet, knowing it nourishes both body and soul. Start by gathering all your ingredients. This makes cooking easier and fun. Measure out your olive oil, garlic, heavy cream, vegetable broth, baby spinach, Parmesan cheese, sage, nutmeg, salt, and pepper. If you like heat, grab some red pepper flakes too. If you have fresh sage, set that aside for garnishing. Heat the olive oil in a large skillet over medium heat. Once hot, add the minced garlic and stir it for about one minute. You want it to smell nice but not burn. Now, add the ravioli right from the package. If they are frozen, no need to thaw them. Cook them per the package directions, usually around 4-5 minutes, until they float. Next, pour in the vegetable broth and let it simmer gently. This step adds great flavor. After that, mix in the heavy cream, dried sage, and nutmeg. Stir well and let it cook for another 4-5 minutes until the sauce thickens a bit. Then add the baby spinach and stir until it wilts. Finally, mix in the grated Parmesan cheese. It will melt and make the sauce creamy. Taste it and add salt and pepper as needed. If you want a kick, sprinkle some crushed red pepper flakes on top before serving. Cook ravioli until they float to the top. This means they are done. Avoid overcooking them; they can become mushy. Use a slotted spoon to remove them gently from the skillet. This keeps them intact. If you are unsure, taste one! You want it soft but not falling apart. Enjoy your creamy pumpkin sage ravioli warm for the best flavor. To boost the flavor of your creamy pumpkin sage ravioli, herbs and spices play a big role. Sage is key here. It adds a warm, earthy taste that pairs well with pumpkin. Add a pinch of nutmeg for a sweet note. If you like heat, sprinkle crushed red pepper flakes. Fresh sage leaves on top give a nice touch. Don't be shy with salt and pepper; they really help bring out all the flavors. Cooking ravioli right is important. If you use frozen ravioli, do not thaw them first. Just toss them in the skillet while frozen. This keeps them from getting mushy. Boil them in salted water for about 4-5 minutes if you prefer. Watch for them to float; that means they are done. Always test one for doneness. Perfectly cooked ravioli should be tender but not falling apart. To make your sauce creamy, start with heavy cream. It adds richness and a smooth texture. Mix it in after cooking the ravioli and broth. Stir well to combine. Let it simmer for a few minutes to thicken. The grated Parmesan cheese also helps with creaminess. It melts into the sauce, making it luxurious. Adjust the thickness with more broth if needed. Enjoy that creamy goodness! {{image_2}} You can switch up the ravioli in this dish. Try using cheese ravioli for a classic taste. If you want to explore, look for mushroom or spinach ravioli. Each type adds a new flavor twist. The pumpkin ravioli gives a warm, sweet touch. The cheese has a rich, creamy base that pairs nicely. Always choose fresh or frozen ravioli for best results. Adding protein makes this meal heartier. Chicken is a great option. You can sauté diced chicken breast and mix it in. Shrimp also works well; just cook it briefly in the skillet. For a plant-based choice, consider chickpeas or lentils. These options bring in protein and keep the dish filling. You can also add cooked sausage for more flavor. For a vegetarian version, skip the meat and stick to the creamy sauce. Use vegetable broth and keep the heavy cream or substitute with coconut cream for a vegan option. To make it vegan, you can swap out Parmesan for nutritional yeast. This gives a cheesy flavor without dairy. You can also add more veggies like mushrooms or bell peppers for texture and taste. To store leftovers, let the dish cool first. Then, place it in an airtight container. You can keep it in the fridge for up to three days. Make sure to label the container with the date. This helps you track freshness. When it's time to reheat, I recommend using the stovetop. Place the leftover ravioli in a skillet over low heat. Add a splash of vegetable broth or cream to keep it creamy. Stir gently until heated through. This usually takes about 5 to 7 minutes. You can also microwave it, but stir every minute to heat evenly. If you want to freeze the ravioli, do it before cooking. Arrange the uncooked ravioli on a baking sheet in a single layer. Freeze until solid, then transfer them to a freezer bag. This way, they won’t stick together. Cook from frozen when ready, adding a few extra minutes to the cooking time. Yes, you can use frozen ravioli. Just add them straight from the freezer. Do not thaw them. Cook them according to the package instructions. They usually float when done. This saves time and makes the dish easy. To make this dish gluten-free, choose gluten-free ravioli. Many stores sell them now. You can also make your own using gluten-free flour. Use vegetable broth that is labeled gluten-free. Always check the labels to be sure. You can serve this ravioli with a green salad. A simple side salad adds freshness. Garlic bread also pairs well with the creamy dish. Try a glass of white wine for a nice touch. For a heartier meal, serve with roasted vegetables or grilled chicken. This guide covers everything you need to make tasty ravioli. You learned about the right ingredients, cooking steps, and tips for the best flavor. I also shared fun variations to try and easy storage methods for leftovers. Use this knowledge to impress your friends and family with your ravioli skills. Cooking can be fun and rewarding. Enjoy your meal and share your ravioli journey!

Creamy Pumpkin Sage Ravioli Skillet Flavor Boost

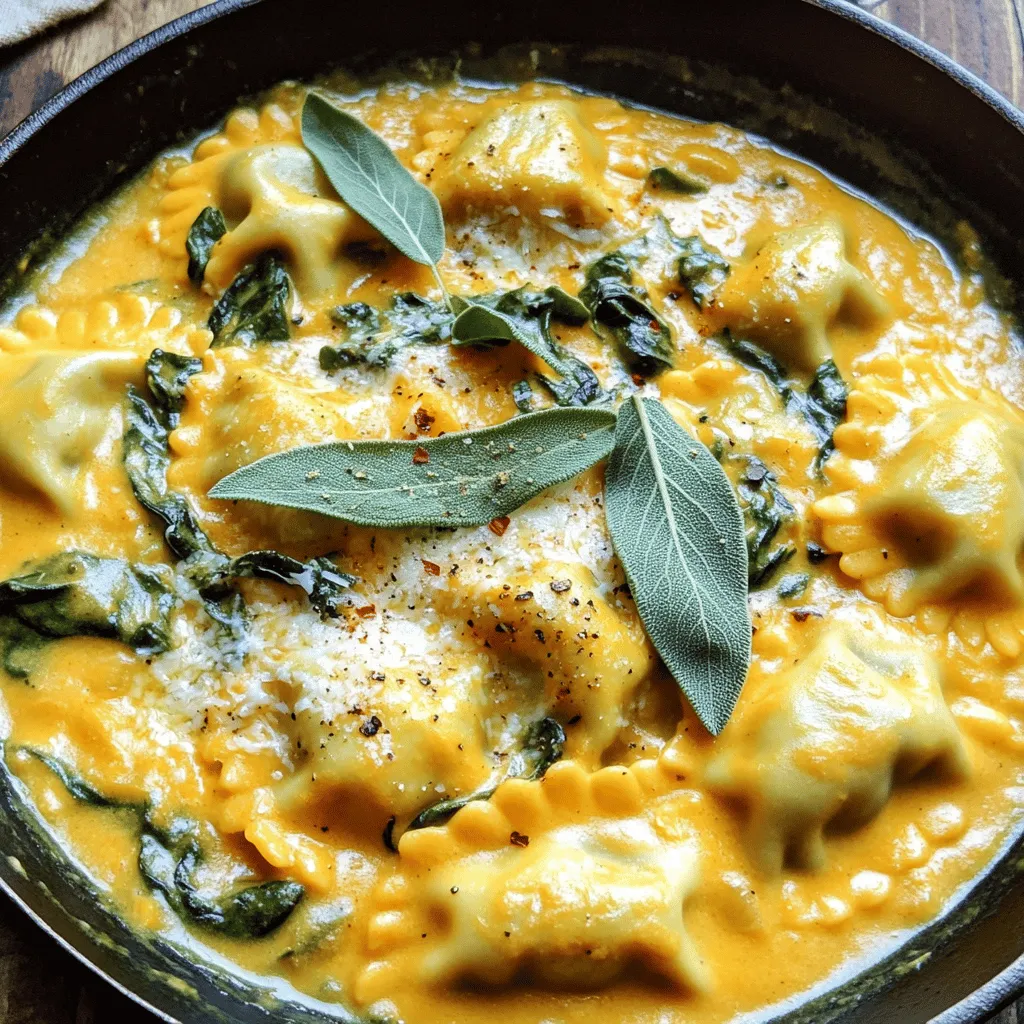
Are you ready to elevate your dinner game? Let me introduce you to my Creamy Pumpkin Sage Ravioli Skillet. This

- 1 pound chicken tenders - 1 cup buttermilk - 1 cup all-purpose flour - 1/2 cup cornstarch - 1 teaspoon garlic powder - 1 teaspoon onion powder - 1 teaspoon paprika - 1/2 teaspoon cayenne pepper (adjust for spice level) - Salt and pepper to taste - 1/3 cup sweet chili sauce - 2 tablespoons honey - 1 tablespoon soy sauce - 1 tablespoon rice vinegar - 1 tablespoon sesame seeds - Fresh cilantro for garnish (optional) Gather these ingredients before you start. The chicken tenders need a good soak in buttermilk. This step makes them juicy and tender. For the dry coating mixture, combine flour and cornstarch. The cornstarch adds extra crispiness. Mix in garlic powder, onion powder, paprika, and cayenne pepper for flavor. Adjust the cayenne to fit your spice level. To make the sweet chili sauce, you need sweet chili sauce, honey, soy sauce, and rice vinegar. These add a delicious sweet and tangy flavor. Finally, sesame seeds add a nice crunch and garnish the dish with fresh cilantro for color. With these ingredients on hand, you are ready to create a tasty delight that everyone will enjoy. To start, place the chicken tenders in a bowl. Pour in one cup of buttermilk. Make sure all the tenders are coated well. This step is key for flavor and tenderness. Cover the bowl and put it in the fridge. Let the chicken marinate for at least 30 minutes or up to 2 hours. This time allows the chicken to soak in that creamy goodness. Next, grab a large bowl. In it, mix together one cup of all-purpose flour and half a cup of cornstarch. Add one teaspoon each of garlic powder, onion powder, and paprika. For some heat, include half a teaspoon of cayenne pepper. Don’t forget to add salt and pepper to taste. This mix gives the chicken a crunchy outer layer. Now, heat about half an inch of vegetable oil in a large skillet. Set the heat to medium-high. You want the oil to reach 350°F (175°C). You can test it by dropping a bit of the flour mix in. If it sizzles, it's ready! Carefully add the coated chicken to the hot oil. Fry for 4 to 5 minutes on each side. Look for a golden brown color. Once done, use a slotted spoon to take them out. Place them on a paper towel-lined plate to drain off extra oil. In a small saucepan, combine one-third cup of sweet chili sauce, two tablespoons of honey, one tablespoon of soy sauce, and one tablespoon of rice vinegar. Heat this over low heat. Stir it well until everything is mixed and warmed. Add in some sesame seeds for a nice crunch. This sauce will add a sweet kick to your tenders. In a large bowl, take your fried chicken tenders. Drizzle the sweet chili sauce over them. Toss gently to coat each tender. Now, plate the tenders. If you like, add fresh cilantro on top for color. Serve with some extra sweet chili sauce on the side for dipping. Enjoy! To get that perfect crispy texture, you need to fry at the right temperature. Heat your oil to 350°F (175°C). This hot oil creates a golden crust. A good test is to drop a bit of the coating mixture into the oil. If it sizzles right away, you are ready to fry! The coating mixture is also key. I use a blend of flour and cornstarch. The cornstarch adds extra crunch. Combine one cup of flour with half a cup of cornstarch for the best result. Marination is crucial for flavor and tenderness. I suggest marinating the chicken for at least 30 minutes. But if you have time, go for two hours. This longer marination makes the chicken juicy and full of flavor. Not everyone enjoys the same spice level. If you want a milder dish, cut back on the cayenne pepper. Use just a pinch or leave it out entirely. For those who love heat, feel free to add more. You can even try adding hot sauce to the sweet chili sauce for extra kick. {{image_2}} You can make crispy sweet chili chicken tenders healthier. One way is to switch the buttermilk for yogurt. Yogurt adds a nice tang and is lower in fat. You can also bake the chicken instead of frying it. Just coat the tenders and place them on a baking sheet. Bake them at 400°F for about 20-25 minutes. This method gives you a tasty meal with less oil. Feel free to get creative with your flavors. You can add spices to the dry coating. Try adding cayenne for more heat or garlic for a robust taste. Want a sweet twist? Mix in a bit of brown sugar. You can also switch the sweet chili sauce for a teriyaki or barbecue sauce. These changes will make your chicken tenders unique. When serving your chicken tenders, think about sides that pair well. Crispy fries are a classic choice. You can also serve them with a fresh salad or steamed veggies. For a fun twist, try them with rice or a grain bowl. Adding a dipping sauce like ranch or blue cheese can make the meal even better. To keep your crispy sweet chili chicken tenders fresh, store them properly. First, let the tenders cool down to room temperature. Then, place them in an airtight container. Make sure to layer a paper towel between the layers of chicken. This helps absorb moisture and keeps them crispy. You can store the tenders in the fridge for up to three days. Reheating chicken tenders can be tricky if you want to keep them crispy. The best way is to use an oven. Preheat your oven to 375°F (190°C). Place the tenders on a baking sheet in a single layer. Heat them for about 10-15 minutes. Check them often so they don’t burn. This method helps keep the outside crispy while warming the inside. If you want to freeze your chicken tenders, start by letting them cool completely. Wrap each tender in plastic wrap or foil. Then, place them in a freezer bag. Squeeze out as much air as possible before sealing. You can freeze them for up to three months. To reheat, take them out and let them thaw in the fridge overnight. Then, follow the oven method to reheat for the best texture. Yes, you can use frozen chicken tenders. However, you need to adjust the cooking time. First, thaw the chicken tenders in the fridge overnight. Then, marinate them in buttermilk as you would with fresh tenders. This helps keep them moist. When frying, add a couple more minutes to ensure they cook through. If you don't have buttermilk, you can use milk with vinegar or lemon juice. Mix 1 cup of milk with 1 tablespoon of vinegar or lemon juice. Let it sit for about 5 minutes. This creates a similar acidity to buttermilk. You can also use plain yogurt mixed with water for a thicker option. To check if chicken tenders are cooked, use a meat thermometer. The internal temperature should reach 165°F (75°C). If you don’t have a thermometer, slice one tender open. The meat should be white with no pink inside. Make sure the juices run clear. This blog post covered how to make delicious chicken tenders with sweet chili sauce. We looked at the ingredients, cooking steps, and key tips to enhance texture and flavor. You can adjust recipes to fit your taste and health goals. Remember, marination adds flavor, and frying gives great crispiness. With these methods, you can impress anyone at your next meal. Enjoy making these easy and tasty chicken tenders!

Crispy Sweet Chili Chicken Tenders Easy Delightful Dish

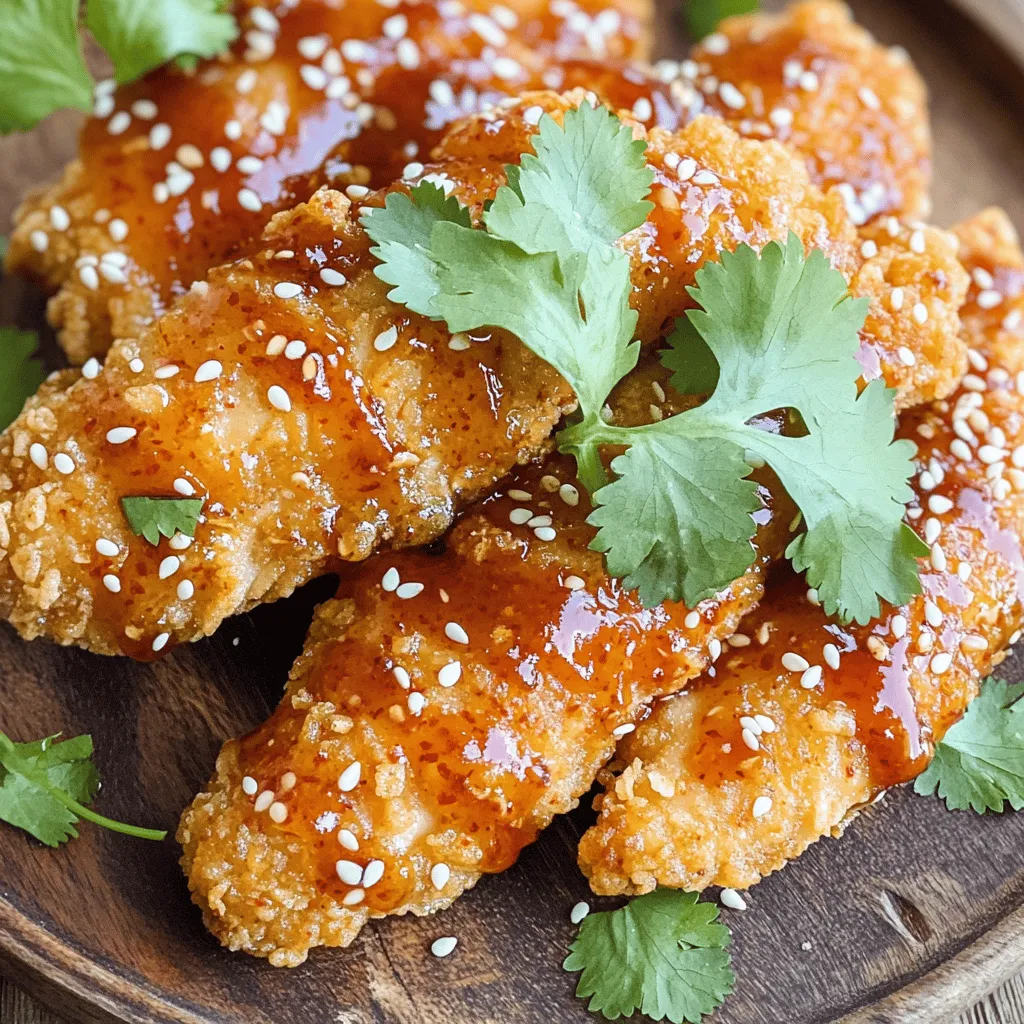
Are you ready to wow your family with a dish that’s both crispy and sweet? My Crispy Sweet Chili Chicken

- 4 salmon fillets - 1 cup teriyaki sauce - 2 cups broccoli florets - 1 bell pepper (red or yellow), sliced - 1 cup snap peas The salmon fillets serve as the star of this dish. They bring a rich flavor and healthy fats. Teriyaki sauce adds the sweet and salty kick we all love. Fresh vegetables like broccoli, bell pepper, and snap peas provide crunch and color. They are also packed with nutrients. - 2 cups cooked jasmine rice - 1 tablespoon sesame oil - 2 green onions, sliced (for garnish) - 1 tablespoon sesame seeds (for garnish) Jasmine rice makes a perfect base. It’s fluffy and absorbs the sauce well. Sesame oil adds a nutty aroma and enhances the dish's flavor. Green onions and sesame seeds are great for garnishing. They give a nice touch to the bowls and a little extra crunch. Marinating the salmon Start by placing your salmon fillets in a bowl. Pour half of the teriyaki sauce over the fish. Make sure each piece gets a nice coat. Let the salmon marinate for about 15 minutes. This step infuses great flavor into the fish. Prepping vegetables and salmon for baking While the salmon marinates, wash and cut your vegetables. Chop the broccoli into small florets. Slice the bell pepper into strips. Rinse the snap peas to keep them crisp. On a large sheet pan, lay out the broccoli, bell pepper, and snap peas. Drizzle them with sesame oil and the rest of the teriyaki sauce. Toss the veggies to coat them evenly. Arranging ingredients on the sheet pan After marinating, create space in the middle of the sheet pan. Place the salmon fillets skin-side down in that space. Ensure the veggies are spread out around the salmon for even cooking. Cooking time and temperature Preheat your oven to 400°F (200°C). Bake the salmon and vegetables for 15-20 minutes. Check for doneness; the salmon should flake easily with a fork. The veggies should be tender but still crisp. Assembling the bowls Once cooked, let everything rest for a minute. Grab a bowl and add a scoop of jasmine rice to the bottom. Place a salmon fillet on top of the rice. Add a generous portion of roasted vegetables beside the salmon. Garnishing for presentation To finish, sprinkle sliced green onions and sesame seeds on top. This not only adds flavor but also makes your dish look great. Enjoy your colorful and tasty teriyaki salmon bowl! How do I know when salmon is cooked? Salmon is ready when it flakes easily with a fork. It should be bright pink inside. If it looks dull, it may be overcooked. A good way to check is to use a meat thermometer. The safe cooking temperature is 145°F (63°C). What are marination tips for flavor enhancement? Marinating salmon in teriyaki sauce adds great taste. I recommend marinating for at least 15 minutes. For deeper flavor, try marinating for up to an hour. You can also add garlic or ginger to the marinade for more zing. How do I choose the right vegetables? Fresh, crisp vegetables make the best dish. Look for bright-colored broccoli and bell peppers. Snap peas should be firm and green. Always wash and trim your veggies well before cooking. What are alternatives for seasonal variations? You can swap in seasonal vegetables. Asparagus or zucchini works well in spring. In fall, try sweet potatoes or Brussels sprouts. Mix and match based on what you find at the market. How can I customize teriyaki sauce? You can tweak the teriyaki sauce to fit your taste. Try adding more soy sauce for saltiness or honey for sweetness. A splash of rice vinegar adds a nice tang, too. What spicy or sweet variations can I try? If you like spice, add sriracha or red pepper flakes to the sauce. For sweeter flavors, mix in pineapple juice or brown sugar. Adjust the sauce until it suits your palate. {{image_2}} You can swap salmon for chicken or tofu. For chicken, use boneless, skinless thighs or breasts. Marinate them just like salmon. Bake them until they reach 165°F. If you prefer tofu, choose firm tofu. Press it to remove extra moisture, then cut it into cubes. Marinate and bake for a tasty, plant-based meal. Change up the rice! Quinoa adds a nutty flavor and is packed with protein. Brown rice gives a chewy texture and extra fiber. Cauliflower rice is a great low-carb option. It cooks quickly and absorbs flavors well. Choose the grain that fits your diet best. Want to mix things up? Try adding different sauces or seasonings. A sprinkle of garlic powder or ginger can boost flavor. You might also like a drizzle of sriracha for heat. Experiment with teriyaki variations, like a honey-soy mix. Each choice can create a new, exciting taste in your bowls. To keep your sheet-pan teriyaki salmon bowls fresh, follow these tips: - Store leftovers in airtight containers. - Keep the salmon and veggies separate from the rice. - Refrigerate within two hours of cooking. - Consume leftovers within three days for best taste. You can reheat your meal in two ways: - Microwaving: Use a microwave-safe dish. Heat for 1-2 minutes. Stir halfway for even heat. - Oven Reheating: Preheat the oven to 350°F (175°C). Place the leftovers in an oven-safe dish. Cover with foil and heat for 10-15 minutes. This keeps your salmon moist. Freezing is a great way to save your meal: - Freeze salmon and veggies in separate bags. This keeps their flavors fresh. - Cooked jasmine rice can also be frozen. Use freezer-safe bags or containers. - Thaw overnight in the fridge before reheating. This gives you a tasty meal anytime! To make teriyaki sauce, combine soy sauce, sugar, garlic, and ginger in a pot. Cook this mix over medium heat until it thickens. You can adjust the sweetness by adding honey or brown sugar. For a bit of spice, add chili flakes. This sauce is simple and adds great flavor to many dishes. Yes, you can prep the ingredients ahead of time! Chop the vegetables and store them in the fridge. You can also marinate the salmon a few hours before cooking. Just keep everything in airtight containers to keep them fresh. This makes cooking quick and easy on busy nights. Many vegetables work well with teriyaki salmon. Broccoli, snap peas, and bell peppers are great choices. You can also add carrots, zucchini, or even asparagus. The key is to use fresh veggies that you enjoy. They add color and nutrients to your meal. This recipe is not gluten-free due to the soy sauce in teriyaki sauce. However, you can use gluten-free soy sauce or tamari as a substitute. This way, you can still enjoy the same delicious flavors without gluten. To make this recipe low-carb, skip the jasmine rice or use cauliflower rice instead. You can also add more non-starchy vegetables, like spinach or mushrooms. This keeps the meal filling while lowering the carbs. Enjoy a tasty dish without the extra carbs! In this blog post, we explored making teriyaki salmon bowls. We covered key ingredients like fresh salmon, vegetables, and jasmine rice. I shared easy steps for marinating and baking. You learned tips for perfecting the salmon and customizing the sauce. We also discussed variations like using chicken or tofu. Finally, I provided guidance on storing leftovers and reheating methods. Teriyaki salmon bowls are versatile, tasty, and satisfying. Enjoy creating your own delicious version tonight!

Sheet-Pan Teriyaki Salmon Bowls Easy and Flavorful Meal

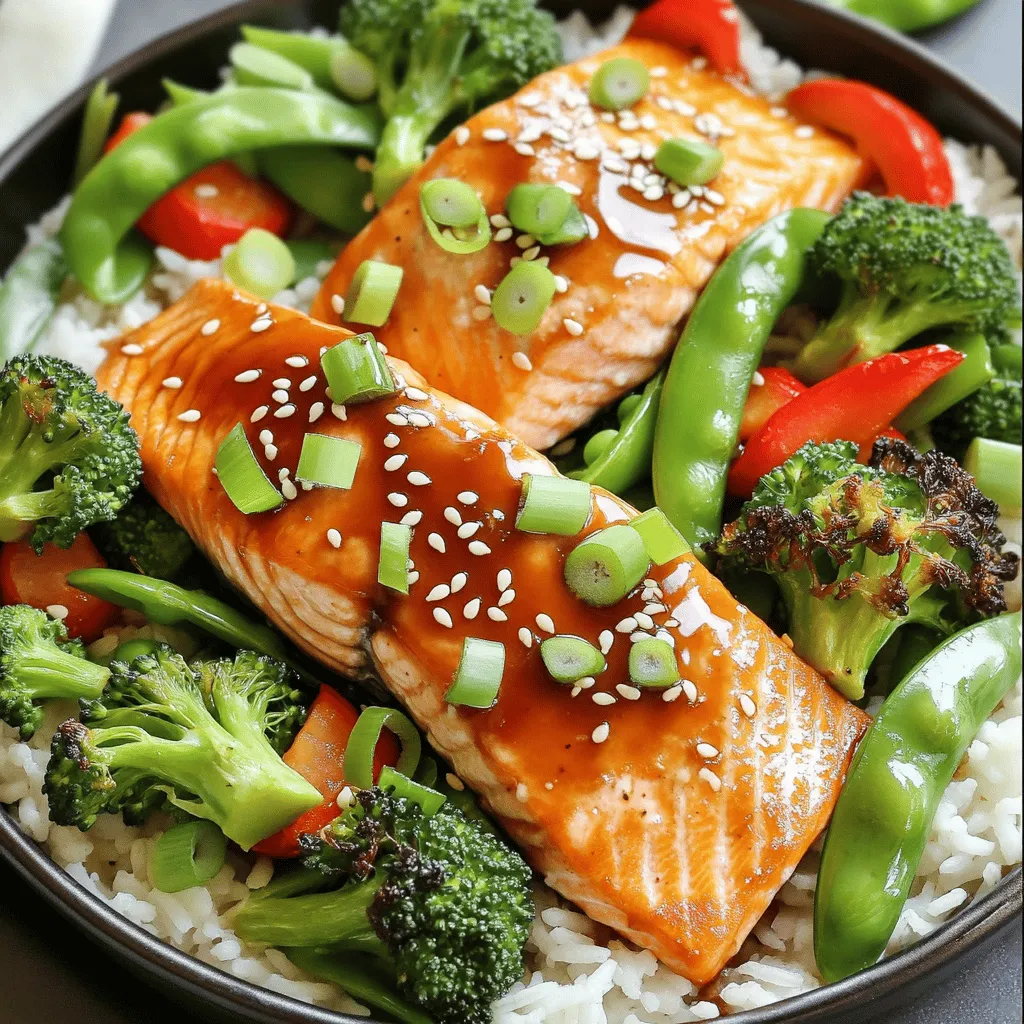
Looking for a quick and tasty meal? Try my Sheet-Pan Teriyaki Salmon Bowls! This recipe is not only easy to

- 200g spaghetti - 4 tablespoons olive oil - 6 cloves garlic, thinly sliced - 1 to 2 teaspoons red chili flakes (adjust to taste) - 1 teaspoon salt - 1/2 teaspoon black pepper - 1 tablespoon fresh parsley, finely chopped (for garnish) - Grated Parmesan cheese (optional) - Large pot for boiling - Skillet for sautéing - Colander for draining spaghetti For this dish, you will need a few simple items. First, get the spaghetti. It will be the star of your meal. Next, grab some olive oil for cooking. Olive oil gives a rich flavor. You will also need garlic, which adds a nice aroma. Red chili flakes will bring heat. Adjust the amount based on your spice preference. Don't forget salt and black pepper. They enhance the taste. Fresh parsley adds color and freshness. If you like cheese, Parmesan is a great option. Make sure you have the right tools. A large pot is needed to boil water. A skillet is for sautéing the garlic and chili. Finally, use a colander to drain the spaghetti. This setup helps you cook the dish easily and quickly. - First, bring a large pot of salted water to a boil. - Add 200g of spaghetti and cook it until al dente, about 8-10 minutes. - Once done, reserve about 1/2 cup of pasta water, then drain the spaghetti. - In a large skillet, heat 4 tablespoons of olive oil over medium heat. - Add 6 thinly sliced cloves of garlic. Sauté until golden, which takes about 2-3 minutes. - Be careful not to burn the garlic; burnt garlic changes the taste. - Stir in 1 to 2 teaspoons of red chili flakes, 1 teaspoon of salt, and 1/2 teaspoon of black pepper. - Let the mixture simmer for about a minute to infuse the oil with flavor. - Add the drained spaghetti directly into the skillet with the garlic chili oil. - Toss well to coat the spaghetti evenly. If needed, add some reserved pasta water to create a light sauce. - For finishing touches, sprinkle fresh parsley on top and toss again. Adjust seasoning with more salt or pepper if desired. - Serve the plated spaghetti with grated Parmesan cheese, if you like, and enjoy! - Adjusting chili flakes to taste: Start with one teaspoon of chili flakes. If you love heat, add more. Everyone has different spice levels. Taste as you go and find your perfect balance. - Importance of not burning garlic: Garlic can turn bitter if it burns. Keep your heat on medium. Stir often and watch for that golden color. Once it’s golden, move fast to add the next ingredients. - Using reserved pasta water for consistency: After draining your spaghetti, save some water. This starchy water helps create a smooth sauce. Add it slowly while tossing the pasta. It makes a big difference in texture. - Tossing techniques for even coating: Use a pair of kitchen tongs to toss your spaghetti. This keeps the strands from breaking and helps coat each piece with the oil. Toss gently but firmly to ensure every bite is flavorful. {{image_2}} You can switch up the pasta to suit your taste. Spaghetti is great, but you can try penne, fettuccine, or even gluten-free options. Each pasta brings its own charm to the dish. If you want a vegan version, skip the cheese. You can still enjoy a rich flavor with the garlic and chili oil. Just add more herbs or a sprinkle of nutritional yeast for a cheesy taste. For a heartier meal, toss in some protein. Chicken or shrimp works well. Cook them separately, then mix them into the garlic chili oil before adding the spaghetti. This adds flavor and makes it more filling. You can also throw in fresh spinach or cherry tomatoes. Spinach wilts nicely in the hot oil. Cherry tomatoes burst with sweetness, adding a nice touch. Just add them to the skillet as you mix in the spaghetti. Enjoy the burst of flavors! To keep your garlic chili oil spaghetti fresh, cool it down first. Use an airtight container. Store the leftovers in the fridge for up to three days. If you want to save it longer, freezing works well too. Place the spaghetti in freezer bags. Squeeze out the air before sealing. It can stay in the freezer for up to three months. When it's time to enjoy your leftovers, the best way to reheat is in a skillet. Add a splash of olive oil to the pan. Heat it over medium heat. Toss the spaghetti in the skillet until it's warm. This keeps it from getting soggy. You can also use the microwave. Just cover the dish to keep moisture in. Heat it in short bursts, stirring in between. This helps avoid a mushy meal. It takes about 15 minutes to make this dish. You spend 5 minutes prepping and 10 minutes cooking. This quick time makes it perfect for a busy day. Yes, you can use fresh chili! Chop it finely and add it to the oil. Fresh chili gives a different taste and a bit more heat. Start with a small amount and adjust to your liking. This spaghetti pairs well with many sides. You can serve it with a simple salad or garlic bread. Grilled vegetables or roasted chicken also make great choices. They add more flavor and balance the meal. Making this dish vegetarian is easy! Just skip the Parmesan cheese or use a vegan option. All other ingredients are already vegetarian-friendly. Enjoy your tasty meal without any meat! This blog post covered how to make Minute Garlic Chili Oil Spaghetti. We explored the key ingredients, like spaghetti, garlic, and chili flakes, and discussed the tools needed. I shared step-by-step instructions to cook the dish perfectly. Remember to adjust spice levels to suit your taste. You can get creative with variations by adding proteins or veggies. Don’t forget about proper storage for leftovers. Enjoy your cooking and make this dish your own. It's quick, simple, and full of flavor. Happy cooking!

Minute Garlic Chili Oil Spaghetti Quick and Easy Meal

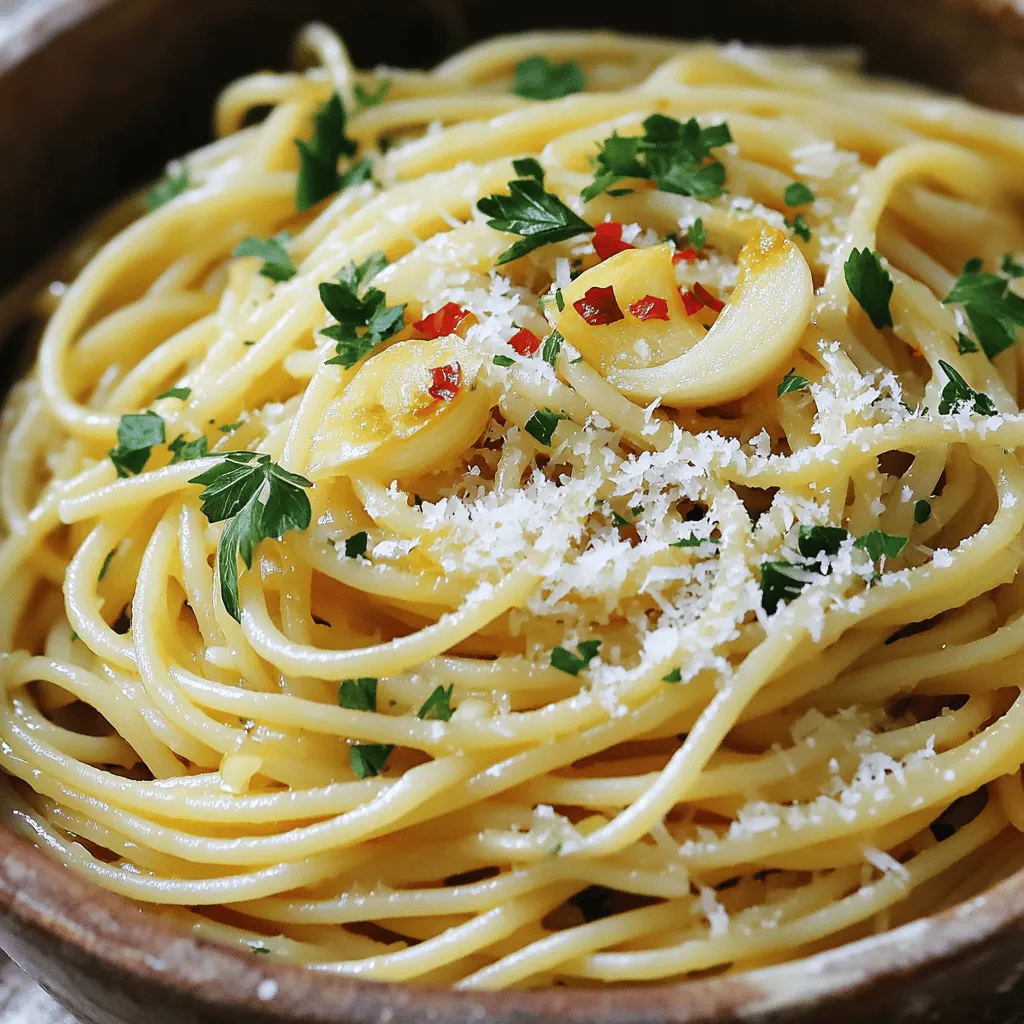
Looking for a quick meal that packs a punch? Minute Garlic Chili Oil Spaghetti is your answer! This dish is

Older posts
Newer posts
← Previous Page1 … Page30 Page31 Page32 … Page84 Next →

dsad

© 2026 easycookingbite • Built with GeneratePress

Our Policies

  • Copyright Policy
  • Cookie Policy
  • GDPR Policy
  • Privacy Policy
  • Disclaimer
  • Terms Of Use

More Information

  • Home
  • About
  • Contact
  • Appetizers
  • Dessert
  • Dinner
  • Drinks
©2026, easycookingbite About Back To Top