Skip to content
DisclaimerTerms Of UseGDPR PolicyCookie Policy

easycookingbite

  • Home
  • Drinks
  • Appetizers
  • Dinner
  • Dessert
  • About
  • Contact
  • Privacy Policy
DisclaimerTerms Of UseGDPR PolicyCookie Policy

NO-ING-IMG

To make Maple Pecan Overnight French Toast, gather these simple ingredients: - 1 loaf of challah or brioche bread, sliced - 4 large eggs - 2 cups whole milk - 1/2 cup pure maple syrup - 1 teaspoon vanilla extract - 1 teaspoon ground cinnamon - 1/4 teaspoon nutmeg - 1 cup pecans, roughly chopped - Pinch of salt These ingredients create a delicious blend of flavors. The challah or brioche bread gives a soft texture and rich taste. Eggs and milk make the base creamy. Maple syrup adds natural sweetness, while vanilla and spices like cinnamon and nutmeg add depth. The pecans offer a nice crunch. This mix results in a warm, comforting breakfast that feels special. Enjoy collecting these items before diving into the recipe! Grease a 9x13 inch baking dish with butter or cooking spray. This step helps prevent the French toast from sticking. Use a generous amount to ensure easy serving later. Arrange the sliced challah or brioche bread in the dish. Overlap the slices slightly for even soaking. Make sure to cover the bottom of the dish completely. In a large bowl, whisk together the eggs, milk, maple syrup, vanilla extract, cinnamon, nutmeg, and salt. Mix until everything is smooth and well combined. This mixture brings all the flavors together. Pour the egg mixture over the bread slices. Use a spatula to gently press the bread down. Make sure every slice absorbs some liquid. This soaking step is key for a rich flavor. Sprinkle the chopped pecans evenly over the top of the bread. The nuts add a nice crunch and flavor. You can adjust the amount based on your preference. Cover the baking dish with plastic wrap or foil. Refrigerate overnight or for at least 4 hours. This allows the bread to soak up all the tasty flavors. The next morning, preheat your oven to 350°F (175°C). Remove the cover and bake for 45-50 minutes. Look for a golden brown, puffy top. This means it's ready to serve! To make sure every slice of bread absorbs the egg mixture, follow these steps: - Use a spatula: After pouring the egg mixture, gently press down on the bread. This will help the slices soak up the liquid quickly. - Overlap slightly: When layering the bread, let the slices overlap a bit. This allows the mixture to flow between the layers. - Check after chilling: If you see some slices not soaked, press them down again before baking. Baking time can vary by oven. Here’s how to adjust: - Know your oven: Some ovens run hot or cold. If you know your oven cooks unevenly, check the French toast a few minutes early. - Use a toothpick: Insert it into the center. If it comes out clean and the top is golden, it’s done. - Consider altitude: At higher altitudes, you may need a longer bake time, so keep an eye on it. For a crispy, caramelized top, broil the French toast: - Broil at the end: After baking, set your oven to broil. - Watch closely: Keep the oven door slightly ajar. This helps you monitor closely to avoid burning. - Broil for just a few minutes: A quick 2-3 minutes is often enough to get that perfect crunch. {{image_2}} You can easily add fruit to your Maple Pecan Overnight French Toast. Berries are a great choice. Blueberries, strawberries, or raspberries add color and flavor. Slice bananas and mix them in for a sweet touch. Just sprinkle the fruit on top before you soak the bread. This adds freshness and makes your dish even more tasty. If you want to switch up the nuts, try walnuts or almonds. Walnuts give a rich taste that pairs well with maple. Almonds add a nice crunch and a different flavor. You can also use hazelnuts for a unique twist. Just chop them roughly, like you would with pecans, and sprinkle on top. You can customize the flavor of your dish too. Try adding a dash of ginger or cardamom for warmth. Almond extract can replace vanilla for a new taste. You can even add a bit of orange zest for a bright note. These changes allow you to make this recipe fit your mood or taste. After you enjoy your Maple Pecan Overnight French Toast, let it cool completely. Cut any leftovers into portions. Place them in an airtight container. Store the container in the fridge. This keeps the toast fresh for up to three days. When you want to reheat, simply microwave or bake it. If microwaving, cover it with a damp paper towel to keep it moist. If baking, preheat your oven to 350°F (175°C) and heat until warmed through, about 10-15 minutes. You can freeze Maple Pecan Overnight French Toast for later enjoyment. First, let the dish cool completely. Then, wrap it tightly in plastic wrap. You can also use aluminum foil for extra protection. Place the wrapped dish in a freezer-safe bag. Remove as much air as possible from the bag. This helps prevent freezer burn. You can freeze it for up to two months. When you're ready to eat, thaw it overnight in the fridge before reheating. In the fridge, Maple Pecan Overnight French Toast lasts about three days. If you freeze it, the taste and texture stay good for up to two months. After that, it might lose flavor and quality. Always check for any signs of spoilage before eating. When stored properly, you can enjoy this tasty dish even after the first serving! Yes, you can make this recipe gluten-free. Use gluten-free bread instead of challah or brioche. Make sure the bread is thick enough to hold the egg mixture well. Brands like Udi's and Canyon Bakehouse have good options. You can soak the mixture overnight. If you are short on time, a minimum of 4 hours works too. The longer it sits, the more flavor it gains. Just make sure to cover it tightly to keep it fresh. Yes, you can use different types of milk. Whole milk gives a rich taste, but you can try skim or low-fat milk for a lighter version. For non-dairy options, almond milk or oat milk work well. Each kind adds a unique flavor, so choose what you like best. You can serve this dish with many toppings. Drizzle more maple syrup on top for extra sweetness. Fresh berries, like strawberries or blueberries, add a nice touch. Whipped cream gives it a fun, indulgent feel. You might also enjoy serving it with yogurt for a creamy contrast. This blog post covered a tasty Maple Pecan Overnight French Toast recipe. We went over the ingredients, step-by-step instructions, and helpful tips. I shared variations to make it your own and storage tips for leftovers. Enjoy creating this dish as a special treat. It’s easy, fun, and opens up many flavor options. Dive in and enjoy a delicious breakfast that brings joy to your table!

Maple Pecan Overnight French Toast Easy and Tasty Recipe

Wake up to the delightful aroma of Maple Pecan Overnight French Toast! This easy recipe gives you warm, sweet goodness

- 1 pound ground turkey - 1 cup fresh spinach, finely chopped - 1/2 cup crumbled feta cheese - 1/4 cup finely chopped red onion - 2 cloves minced garlic - 1 teaspoon dried oregano - 1 teaspoon lemon zest - Salt and pepper to taste - 1/4 cup breadcrumbs (optional) - Whole wheat burger buns - Sliced cucumber and tomato for serving - Tzatziki sauce for topping These ingredients combine to create a Greek-inspired flavor explosion in each bite. The ground turkey serves as a lean base. Fresh spinach adds nutrients and color. Crumbled feta brings a salty creaminess that pairs well with the turkey. Finely chopped red onion gives a nice crunch and sweetness. Minced garlic adds a strong aroma and flavor. Dried oregano brings that classic Mediterranean taste. Lemon zest brightens the dish with a fresh zing. Salt and pepper enhance all the flavors. Breadcrumbs help bind the patties, but you can skip them if you prefer. Whole wheat burger buns provide a healthy touch. Sliced cucumber and tomato add freshness when serving. Finally, a dollop of tzatziki sauce completes the burger with its cool and tangy flavor. This mix of flavors makes each bite a delightful experience. You can easily find these ingredients at your local grocery store. Don't worry if you're not a pro in the kitchen; these ingredients are simple and fun to work with. Enjoy the process, and get ready for a flavorful delight! In a large bowl, combine the ground turkey, chopped spinach, crumbled feta, red onion, minced garlic, dried oregano, lemon zest, salt, and pepper. Mix well, but don’t overdo it; you want a nice blend without toughening the meat. If the mixture feels too wet, adding breadcrumbs can help bind it. This step ensures your burgers hold their shape and remain juicy. Now it's time to shape the mixture into patties. I like to make them about 4 to 6 ounces each. Keep them even in size for even cooking. Make sure they are not too thick; around ¾ inch works great. This thickness ensures they cook through without drying out. You can cook these burgers on a grill or in a skillet. Preheat your grill or skillet over medium heat, and add a little oil or cooking spray. Cook the turkey burgers for about 5 to 6 minutes on each side. You want them to reach an internal temperature of 165°F (74°C). This ensures they are safe and delicious. While the burgers are cooking, toast the whole wheat buns lightly on the grill or in a toaster. When assembling, place the cooked turkey patty on the bun. Top it with sliced cucumber and tomato. Add a generous dollop of tzatziki sauce for that authentic Greek flavor. Serve the burgers right away with a side of mixed greens or a Greek salad. To make great Greek spinach feta turkey burgers, focus on your mixing technique. Avoid overmixing the meat. This keeps your burgers tender and juicy. When you blend the ingredients, just mix until they come together. For burger thickness, aim for patties about 1 inch thick. This size cooks evenly without drying out. If you want thinner burgers, just adjust the cooking time. Thinner patties will need less time on the grill or skillet. When cooking, use medium heat. This is key for grilling or pan-frying. A hot surface gives a nice sear while keeping the inside moist. Aim for an internal temperature of 165°F (74°C). Use a meat thermometer to check this. To ensure even cooking, flip the burgers only once. This helps them cook through without falling apart. If you’re grilling, leave space between each patty. This allows heat to circulate around them. To complement your burgers, serve them with a side of mixed greens or a Greek salad. These fresh sides add crunch and flavor. You can also pair your burgers with sweet potato fries for a tasty twist. For leftovers, try making a burger bowl. Chop the patties and mix them with greens, cucumber, and tzatziki. This way, you enjoy a new meal without much effort. {{image_2}} For a leaner meat option, consider using ground chicken or even lean beef. These meats can still hold the same flavors and textures. If you want a vegetarian version, try using chickpeas or black beans as your base. Mash them up and mix them with the spinach and feta for a hearty patty. You can add more herbs and spices to boost flavor. Fresh dill or parsley can make a great addition. If you love a bit of heat, try adding a pinch of red pepper flakes. You can also swap out feta for goat cheese or even a sharp cheddar. Each cheese will add its unique taste to the burger. You can serve these burgers on various types of bread. Pita pockets or flatbreads work well if you want something different. For toppings, think beyond tzatziki. Try adding a spicy harissa sauce or a simple yogurt sauce. Sliced olives and roasted red peppers also make great additions. To keep your Greek spinach feta turkey burgers fresh, place them in an airtight container. Store them in the fridge for up to three days. If you want to keep them longer, consider freezing. Wrap each burger in plastic wrap, then place them in a freezer bag. They can last in the freezer for about three months. Always label the bag with the date for easy tracking. To reheat your burgers, you have a couple of options. The oven works best to keep them juicy. Preheat your oven to 350°F (175°C). Place the burgers on a baking sheet and cover them with foil. Heat for about 10-15 minutes or until warm. If you're in a hurry, the microwave is an option too. Use a microwave-safe plate, cover the burgers with a damp paper towel, and heat for about 1-2 minutes. Always check that they reach an internal temperature of 165°F (74°C) to ensure they are safe to eat. This way, your burgers stay flavorful and moist. Yes, you can use ground chicken. The taste will change slightly. Chicken cooks faster than turkey. You should check the burgers after 4-5 minutes on each side. Aim for an internal temperature of 165°F (74°C) for safety. If you don’t have feta, you can use goat cheese or ricotta. For a vegan option, try tofu or a cashew cheese. These options give different flavors, but they work well in this recipe. Check the burgers with a meat thermometer. They should reach 165°F (74°C) inside. You can also look for a nice golden brown color on the outside. The juices should run clear when you cut into them. Absolutely! You can shape the patties and store them in the fridge. They will stay fresh for up to two days. You can also freeze them for about three months. Just cook them straight from the freezer, adding a few extra minutes to the cooking time. These turkey burgers are easy to make and packed with flavor. You learned how to mix the right ingredients, shape perfect patties, and cook them well. I also shared tips for serving and storing your burgers. Remember, you can swap in different meats or toppings to change up the flavor. By following these steps, you will enjoy juicy burgers every time. Get ready to impress your family and friends with your cooking skills!

Greek Spinach Feta Turkey Burgers Flavorful Delight

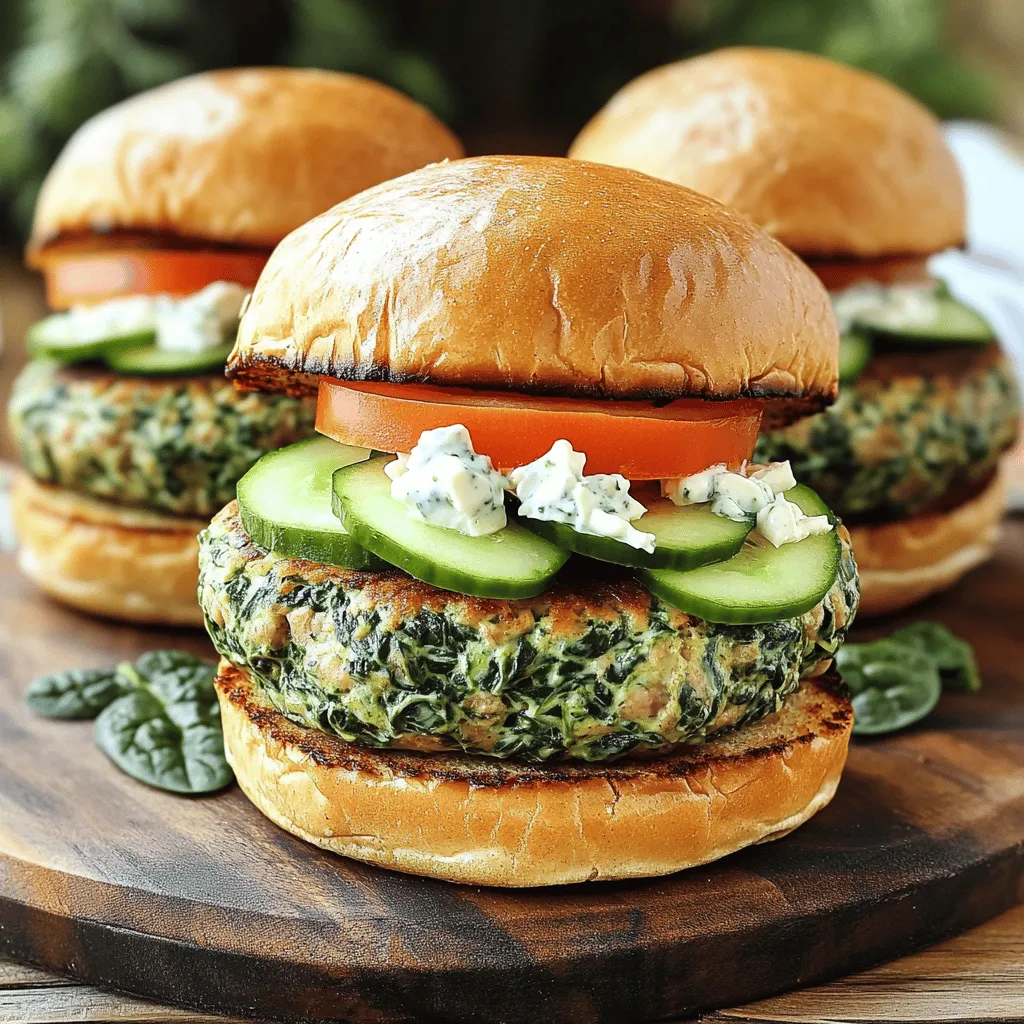
Are you ready to take your burger game to the next level? These Greek Spinach Feta Turkey Burgers are packed

- Chicken: 4 bone-in, skin-on chicken thighs - Vegetables: 1 pound baby potatoes, halved, 2 cups mixed bell peppers, zucchini, and carrots - Herbs: 2 tablespoons fresh rosemary, chopped, 2 tablespoons fresh thyme, chopped - Seasonings: 3 tablespoons olive oil, 1 head garlic (cloves separated and peeled), 1 teaspoon paprika, salt, and pepper The main star of this dish is the chicken. I love using bone-in, skin-on thighs. They stay juicy and add great flavor. The skin gets crispy in the oven, which everyone loves. Now, let’s talk about the veggies. I use baby potatoes, bell peppers, zucchini, and carrots. They roast beautifully and add color to your plate. The mix of colors makes the dish pop. Fresh herbs like rosemary and thyme bring the flavor to life. They are key to this dish. You can smell them as they cook, and it's fantastic. The sauce is simple. Olive oil, garlic, paprika, salt, and pepper mix together for a lovely marinade. This blend keeps the chicken moist and gives it a nice kick. - Lemon wedges for serving - Additional herbs for garnish Lemon wedges add a bright touch when served. Squeezing lemon juice over the chicken and veggies gives a fresh taste. You can also use more fresh herbs as a garnish. They add color and make the dish look fancy. With these ingredients, you create a meal that is tasty and easy to make. Everything cooks on one pan, so clean-up is quick. 1. Preheat oven and prepare baking sheet Start by preheating your oven to 400°F (200°C). This helps cook the chicken evenly. Line a large baking sheet with parchment paper. This makes cleanup a breeze. 2. Create marinade with olive oil, herbs, and spices In a large mixing bowl, mix together 3 tablespoons of olive oil, 2 tablespoons of chopped rosemary, 2 tablespoons of chopped thyme, 1 teaspoon of paprika, salt, and pepper. This blend will give your chicken a wonderful flavor. 1. Marinate chicken and prepare vegetables Add 4 bone-in, skin-on chicken thighs to the bowl. Make sure each piece is coated well in the marinade. Let it sit for at least 15 minutes. While the chicken marinates, take 1 pound of halved baby potatoes and 2 cups of mixed vegetables. Toss them in another bowl with a drizzle of olive oil, salt, and pepper. 2. Arrange chicken and vegetables on the baking sheet Place the marinated chicken thighs skin-side up on one side of the baking sheet. On the other side, spread out the potatoes and mixed vegetables. Make sure everything is in a single layer for even cooking. 3. Roast the dish and monitor cooking time Scatter the peeled garlic cloves from one head of garlic across the baking sheet. This will roast and add a rich flavor. Bake for 35-40 minutes. Check that the chicken's skin is crispy and golden brown and that it reaches an internal temperature of 165°F (75°C). The veggies should be tender with a slight char. For the best taste, marinate the chicken for at least 15 minutes. This time allows the chicken to soak up all the good flavors. If you have more time, try marinating for an hour or even overnight in the fridge. This extra time will make the chicken even tastier. To boost flavor, use fresh herbs. Fresh rosemary and thyme add a bright taste. You can also try adding lemon zest or a splash of lemon juice into the marinade. This will give the chicken a nice zing. The ideal internal temperature for chicken is 165°F (75°C). This makes sure the chicken is safe to eat. Use a meat thermometer to check the thickest part of the thigh. Avoid touching the bone, as it can give a false reading. For the vegetables, look for a golden brown color and tenderness. Baby potatoes should be fork-tender, and the bell peppers, zucchini, and carrots should look slightly charred. This means they are cooked just right and full of flavor. {{image_2}} You can switch up the chicken type for your sheet pan dinner. Try chicken breasts, thighs, or drumsticks. Each cut brings a different flavor and texture. You can also use different vegetables. Choose what is fresh or what you like best. Seasonal veggies like asparagus or Brussels sprouts work great. Carrots, zucchini, and bell peppers are always a good choice. To boost flavor, add different herbs or spices. Basil or oregano can give a new twist. Experiment with smoked paprika for a deeper taste. You can also add citrus flavors beyond lemon. Try lime for a zesty kick or orange for sweetness. These flavors brighten up the dish and make it more exciting. After you enjoy your Garlic Herb Chicken Sheet Pan Dinner, store any leftovers properly. First, let the dish cool to room temperature. Then, place it in an airtight container. This helps keep it fresh and tasty. You can store the chicken and veggies in the fridge for up to four days. If you want to keep it longer, freeze the leftovers. They can last for three months in the freezer. When you're ready to eat the leftovers, reheating is easy. The best way is to use your oven. Preheat it to 350°F (175°C). Place the chicken and veggies on a baking sheet. Heat them for about 15 to 20 minutes. This method keeps the chicken juicy and the veggies crisp. You can also use a microwave. Just place the food in a microwave-safe dish. Cover it with a lid to keep steam in. Heat on medium power in short bursts, checking often. This helps avoid drying out the chicken. For both methods, adding a splash of water or olive oil can help keep the dish moist. Enjoy your delicious leftovers! Yes, you can use boneless chicken thighs. They cook faster than bone-in thighs. When using boneless thighs, reduce the baking time by about 10 minutes. Check for an internal temperature of 165°F (75°C) to ensure they are safely cooked. This change makes the dish easier to serve and can help reduce prep time. If you don’t have fresh herbs, dried herbs work well too. Use one-third the amount of dried herbs. For example, if the recipe calls for 2 tablespoons of fresh rosemary, use about 2 teaspoons of dried rosemary. Dried herbs have a stronger flavor, so adjust to taste. Add them to the marinade along with the olive oil for best results. To make this dish low-carb, swap the baby potatoes for low-carb veggies. Consider using cauliflower florets or zucchini noodles. These options keep the meal light but still tasty. You can also add more mixed vegetables, like broccoli or asparagus, to fill your plate. This way, you enjoy a hearty meal while cutting down on carbs. This article covered a simple and tasty chicken dish. We talked about main ingredients, step-by-step instructions, and various tips. You learned how to marinate chicken for better flavor and check for doneness. Feel free to swap ingredients or add your favorite herbs. Save leftovers properly, and reheating is easy. With this guide, you can create a delicious meal that fits your tastes and kitchen skills. Enjoy cooking!

Garlic Herb Chicken Sheet Pan Dinner Packed with Flavor

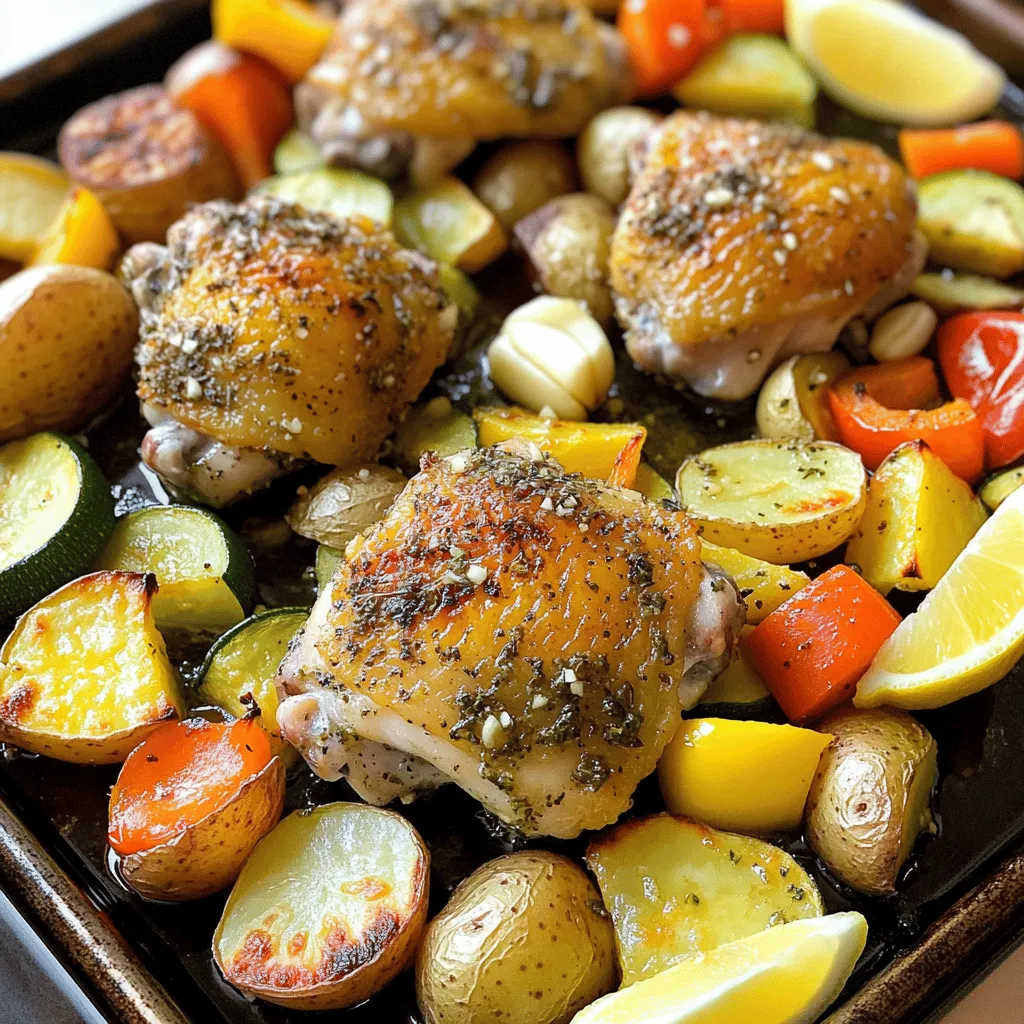
Looking for a simple yet delicious dinner idea? This Garlic Herb Chicken Sheet Pan Dinner is packed with flavor and

- 1 cup all-purpose flour - 1/2 cup granulated sugar - 1 tablespoon baking powder - 1/2 teaspoon salt - 1 teaspoon ground cinnamon - 1/2 cup buttermilk - 1 large egg - 2 tablespoons unsalted butter, melted - 1 teaspoon vanilla extract - 1/4 cup granulated sugar (for coating) - Cooking spray - Additional cinnamon for coating - Frosting or whipped cream Gather these ingredients to make your cinnamon sugar air fryer donuts. They are simple and quick to prepare. You can find these items at any grocery store. Using fresh ingredients makes a big difference in taste. I like to keep my pantry stocked with these essentials. This way, I can whip up these donuts anytime I crave something sweet. You can also customize the toppings. Add more cinnamon if you love the flavor. Or, try adding frosting for a special treat! Preheat your air fryer to 350°F (175°C) for about 5 minutes. This step makes sure the donuts cook evenly. If you skip this, the donuts may not rise well. In a bowl, combine the following: - 1 cup all-purpose flour - 1/2 cup granulated sugar - 1 tablespoon baking powder - 1/2 teaspoon salt - 1 teaspoon ground cinnamon Mix well until there are no lumps. This ensures every donut has great flavor. In another bowl, whisk together: - 1/2 cup buttermilk - 1 large egg - 2 tablespoons unsalted butter, melted - 1 teaspoon vanilla extract Mix until smooth. This adds moisture and flavor to your donuts. Pour the wet mixture into the dry mixture. Stir gently until just combined. Be careful not to over-mix; the batter should be a bit lumpy. This keeps the donuts light and fluffy. Lightly grease your donut pan with cooking spray. Fill each cavity about 2/3 full with the batter. This gives them room to rise without overflowing. Carefully place the filled donut pan in the air fryer basket. Cook for 5-7 minutes. The donuts should be golden brown and firm. A toothpick inserted in the center should come out clean. While the donuts cook, prepare your cinnamon sugar coating. In a shallow bowl, mix: - 1/4 cup granulated sugar - Extra ground cinnamon Once the donuts cool for a minute, roll each one in the cinnamon sugar mixture until fully coated. This step adds a sweet crunch to each bite. To get your donuts just right, avoid over-mixing the batter. This keeps them light and fluffy. Stir until the dry and wet ingredients are just combined. The batter should be a bit lumpy, not smooth. Next, monitor the cooking time closely. Every air fryer is different. Start checking your donuts at 5 minutes. They should be golden brown and cooked through. A toothpick should come out clean when you test them. Want to boost the flavor? Add more cinnamon to the batter. You can also try different extracts like almond or maple for fun twists. Mixing in flavored sugars can add a nice touch too. Consider using brown sugar for a deeper flavor. To cook your donuts evenly, rotate the donut pan halfway through cooking. This ensures all sides brown nicely. If you notice some parts are cooking faster, this step helps fix that. With a little care, you’ll have perfect air fryer donuts every time! {{image_2}} To make a simple glaze, mix 1 cup of powdered sugar with 2 tablespoons of milk. Stir until smooth. You can add a splash of vanilla or almond extract for extra flavor. For a twist, try lemon juice or maple syrup instead of milk. Adding chocolate makes these donuts even better. Melt your favorite chocolate, like dark or milk chocolate, in a bowl. Dip the tops of the cooled donuts into the melted chocolate. For fun, sprinkle crushed nuts or sprinkles on top. Use chocolate chips or bars for melting. You can swap some ingredients for healthier choices. Use whole wheat flour instead of all-purpose flour. Try almond milk or coconut milk in place of buttermilk. For a vegan option, replace the egg with a flax egg. Mix 1 tablespoon of ground flaxseed with 2.5 tablespoons of water. Let it sit for 5 minutes before using. To keep your leftover donuts fresh, place them in an airtight container. This keeps air out and moisture in. You can store them at room temperature for up to two days. If you want them to last longer, refrigerate them. Just remember, donuts may dry out faster in the fridge. If you want to freeze your donuts, first let them cool completely. Then, place them in a single layer on a baking sheet. Freeze for about an hour, then put them in a freezer bag. This method helps prevent them from sticking together. Donuts can freeze well for up to three months. To thaw, simply leave them at room temperature for about 30 minutes before enjoying. You can also heat them in the microwave for a few seconds. To reheat your donuts, the best method is using the air fryer. It keeps them warm and crispy. Set your air fryer to 300°F (150°C) and heat for about 2-3 minutes. You can also use a microwave, but be careful. Heat them in short bursts of 10 seconds to avoid making them tough. Enjoy your warm, tasty donuts! Yes, you can use a regular oven. The cooking time will change. Preheat the oven to 350°F. Bake for about 10-12 minutes. Check for doneness with a toothpick. Air fryers cook faster and use less oil. You can make your own buttermilk easily. Mix 1/2 cup of milk with 1/2 tablespoon of vinegar or lemon juice. Let it sit for 5 minutes. This will give you a similar taste and texture. Look for a golden brown color. The donuts should rise nicely. Insert a toothpick into the center. If it comes out clean, your donuts are ready. They should not be doughy inside. Yes, you can try other flours. Almond flour is a good gluten-free option. Whole wheat flour will add a nutty flavor. Just know that the texture may change a bit. You might need to adjust the liquid. No, you don’t need a special pan. You can use a muffin tin instead. Just fill each cup about halfway. Shape your donuts by using a small round cutter in the center. This will give them a lovely shape. You learned how to make delicious air fryer donuts using simple ingredients and steps. Remember to mix your wet and dry ingredients carefully to keep the texture right. You can add tasty toppings or try different flavors to make them special. Storing and reheating your donuts correctly will keep them fresh longer. With these tips, making donuts at home is easy and fun! Enjoy your fresh, tasty treats with friends and family.

Cinnamon Sugar Air Fryer Donuts Simple and Quick Recipe

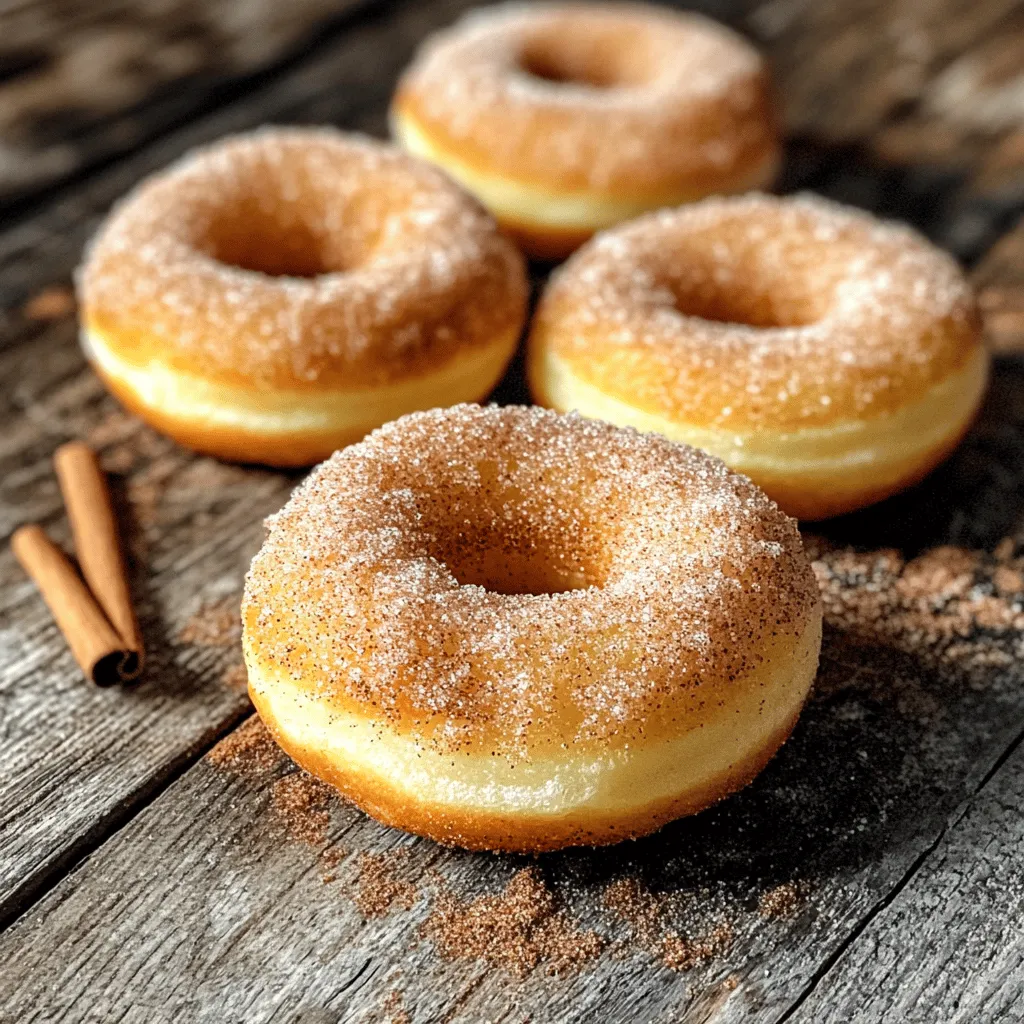
Who doesn’t love warm, fluffy donuts with a sweet cinnamon twist? In just a few simple steps, you can make

- 1 cup sticky rice (glutinous rice) - 1 can (13.5 oz) coconut milk - 2 tablespoons sugar - 1/4 teaspoon salt - 1 ripe mango, peeled and sliced - 1 tablespoon sesame seeds (optional, for garnish) - Fresh mint leaves (optional, for garnish) Use 1 cup of sticky rice. If you can't find sticky rice, you can use jasmine rice. However, the texture will change. For coconut milk, you can swap it with almond milk. This will make a different flavor, but still tasty. The sugar helps sweeten the dish. You may use honey or agave syrup as a substitute. If you want less sweetness, reduce the sugar to 1 tablespoon. Quality matters in this recipe. Sticky rice gives you that unique chewy texture. Always choose glutinous rice for the best results. Coconut milk should be full-fat for rich flavor. Low-fat versions can taste watery. Fresh mango adds sweetness and brightness. Look for ripe, juicy mangoes. They will make your dish shine. Fresh mint leaves and sesame seeds add color and a little crunch. Quality ingredients make all the difference in taste. They help you create a dish that you will want to share. First, rinse 1 cup of sticky rice under cold water. You want the water to run clear. This step removes extra starch. Next, soak the rice in water for about 30 minutes. After soaking, drain the rice well. This helps the rice cook evenly and become sticky. Pour 1 cup of water into the Instant Pot. Place the steamer basket inside. Add the drained sticky rice to the basket, spreading it out evenly. Close the Instant Pot lid and set the valve to sealing. Select the 'Steam' function and set the timer for 20 minutes. When the timer goes off, carefully release the pressure. Remove the rice and transfer it to a large bowl. While the rice cooks, prepare the coconut sauce. In a small saucepan, combine 1 can of coconut milk, 2 tablespoons of sugar, and 1/4 teaspoon of salt. Use low heat and stir until the sugar dissolves. Do not let it boil; you want it warm, not hot. Once the rice is ready, pour half of the coconut sauce over it. Gently fold to combine. Let it sit for 5-10 minutes to soak up the flavor. When serving, scoop some sticky rice onto a plate. Drizzle more coconut sauce on top. Add fresh mango slices on the side. For a special touch, sprinkle sesame seeds and garnish with mint leaves. Enjoy your delicious dish! To get the best texture, rinsing the sticky rice is key. I rinse it under cold water until the water is clear. This step helps wash away excess starch. After rinsing, soak the rice for about 30 minutes. This allows the grains to absorb water and cook evenly. When you steam the rice in the Instant Pot, make sure it is spread out evenly in the basket. This ensures that all parts cook well and become tender. One common mistake is not soaking the rice long enough. If you skip soaking, the rice might end up hard and dry. Another mistake is overcooking. Set the timer for 20 minutes and avoid opening the pot too soon. Allow the pressure to release naturally for best results. Lastly, be careful with the coconut sauce. Do not let it boil, as this can change the flavor. Instead, stir it gently over low heat until the sugar dissolves. You can add extra flavor with simple ingredients. Try mixing in vanilla extract or a pinch of cinnamon into the coconut sauce for a twist. Fresh mango slices add sweetness and brightness, but you can also use other fruits. Consider bananas or berries for different tastes. For a nice touch, sprinkle sesame seeds on top for crunch. Mint leaves add color and a fresh aroma. These optional ingredients can elevate your dish and make it more exciting. {{image_2}} You can change the flavor of your sticky rice in many ways. Try adding pandan leaves for a sweet, floral taste. Just tie a few leaves in a knot and place them in the pot while cooking. You can also mix in some vanilla extract for a warm aroma. If you like spicy food, add a pinch of chili powder to the coconut sauce. This gives a nice kick to your dish. Mango is a classic choice, but other fruits work well too. Pineapple brings a tangy, juicy twist. Simply cut it into small pieces and mix it in. Dragon fruit adds a pop of color and a mild flavor that is refreshing. You can also use ripe bananas for a creamy texture. Just slice them and add on top of the rice when serving. You can make sticky rice sweet or savory by mixing flavors. Try adding roasted peanuts for a crunchy, nutty taste. You can also drizzle some soy sauce on top for a unique twist. For a sweet touch, consider drizzling honey or maple syrup over the rice before serving. This mix of sweet and salty will surprise your taste buds. After you enjoy your Instant Pot sticky rice, store any leftovers properly. First, let the rice cool down to room temperature. This step helps avoid moisture build-up. Then, transfer the sticky rice to an airtight container. Make sure to seal it tight. You can store the rice in the fridge for up to four days. This keeps it fresh and tasty! When you're ready to eat the leftover sticky rice, you have a few easy options. You can microwave it for a quick reheat. Add a splash of water to keep it moist. Cover it with a damp paper towel to trap steam. Heat it in short bursts, around 30 seconds each, until warm. Another way is to steam it. Place the rice in a steamer basket over boiling water. Cover it and steam for about 5 minutes. This method helps regain its soft texture. If you want to save sticky rice for later, freezing is a great option. Portion the rice into small servings. Use freezer-safe bags or containers to keep it fresh. Remove as much air as possible before sealing. You can freeze it for up to three months. When you’re ready to enjoy it, thaw the rice overnight in the fridge or use the microwave. Reheat it the same way as mentioned above. Enjoy that sweet, coconut flavor anytime! Sticky rice, or glutinous rice, is a special type of rice. It is known for its sticky texture when cooked. This rice is often used in Asian dishes. It is perfect for desserts and snacks. The sticky texture makes it easy to mold and eat with chopsticks. You can find it in Asian grocery stores. It is great for making dishes like sushi and rice cakes. Yes, you can make sticky rice without an Instant Pot. You can use a stovetop method instead. First, rinse the sticky rice to remove excess starch. Soak it in water for at least 4 hours or overnight. After soaking, place the rice in a steamer basket. Fill a pot with water and bring it to a boil. Steam the rice for about 30-40 minutes. Check to see if it's tender and sticky. This method takes longer but yields great results. You can easily adjust this recipe for dietary needs. If you want a dairy-free option, use coconut milk. The recipe already uses coconut milk, which is vegan. If you need a sugar-free option, you can use a sugar substitute. Just make sure it can dissolve in liquid. For gluten-free needs, this recipe is safe since sticky rice is naturally gluten-free. Always check the labels of any products you use. This way, you ensure they meet your dietary needs. This blog post covered how to make sticky rice and its coconut sauce. You learned what ingredients to use and their measurements. Quality matters for the best taste. I shared step-by-step instructions for cooking in the Instant Pot. You also got tips to avoid common mistakes and enhance flavor. Finally, I discussed variations, storage tips, and answered common questions. Now, you can create this dish with confidence. Enjoy delicious sticky rice any time!

Instant Pot Sticky Rice Quick and Easy Recipe

Are you ready to whip up some delicious sticky rice in your Instant Pot? This quick and easy recipe will

- 2 cups frozen edamame in pods - 2 tablespoons sesame oil - 4 cloves garlic, minced - 2 tablespoons sweet chili sauce - 1 tablespoon soy sauce - 1 teaspoon sriracha (optional for extra heat) - 1 tablespoon sesame seeds - 1 green onion, finely chopped - Salt, to taste - Edamame: These young soybeans are high in protein. They help build muscles and keep you full. - Sesame oil: This oil has healthy fats. It can help lower bad cholesterol. - Garlic: Garlic boosts your immune system. It helps fight off colds and infections. - Sweet chili sauce: This sauce adds flavor and sweetness. It can improve your mood with its taste. - Soy sauce: It adds umami and some sodium. Use it in moderation for flavor. - Sriracha: This spicy sauce can speed up your metabolism. It also adds a kick to dishes. - Sesame seeds: These tiny seeds are rich in calcium. They help keep your bones strong. - Green onion: This herb adds freshness. It is also rich in vitamins A and C. - Salt: Use salt to enhance flavor. Be careful not to use too much. - Frozen edamame: You can use fresh edamame if available. It will taste even better. - Sesame oil: Olive oil can replace sesame oil in a pinch. - Garlic: Garlic powder can be used instead of fresh garlic. Use less to match the flavor. - Sweet chili sauce: Try using honey mixed with vinegar for a homemade version. - Soy sauce: Tamari is a good gluten-free option. - Sriracha: Any hot sauce can work if you want heat. - Sesame seeds: Chopped nuts can add crunch and flavor. - Green onion: Chives or shallots can be used as a substitute. - Salt: You can use low-sodium salt if preferred. To start, gather your ingredients. You need 2 cups of frozen edamame in pods, sesame oil, minced garlic, sweet chili sauce, soy sauce, sriracha (if you want heat), sesame seeds, a green onion, and salt. Next, bring a pot of water to a boil. This will take a few minutes. Once it boils, add your frozen edamame. Cook them for 3 to 5 minutes. They should be tender but still bright green. After cooking, drain the edamame and set them aside. In a large skillet, heat 2 tablespoons of sesame oil over medium heat. Once hot, add 4 cloves of minced garlic. Sauté the garlic for about 30 seconds. You want it fragrant, not burnt. Now, stir in 2 tablespoons of sweet chili sauce and 1 tablespoon of soy sauce. If you like spice, add 1 teaspoon of sriracha here. Mix everything together well. Add the drained edamame to the skillet next. Toss them in the sauce. Cook for another 2 to 3 minutes until heated through. Finally, remove the skillet from heat. Sprinkle sesame seeds and salt to taste. Garnish with chopped green onion before serving. Sweet chili garlic edamame makes a fun snack or appetizer. Serve it warm in a bowl. You can also use small cups for individual servings. This dish pairs well with rice or noodles for a full meal. If you want to impress guests, add some lime wedges. The extra citrus taste adds a nice touch! Enjoy your flavorful snack! To boost your edamame's flavor, use fresh garlic. Fresh garlic gives a punchy taste. Also, try adding more sweet chili sauce. This sauce brings a nice sweetness. For extra heat, include sriracha. Just a teaspoon will do. The sesame oil adds a rich, nutty flavor. It pairs well with the garlic and sauces. One mistake is overcooking the edamame. Cook it just until tender. If you boil it too long, it loses its bright color. Another mistake is not draining the edamame well. Excess water can dilute the flavors. Make sure to toss the edamame in the sauce well. This ensures every pod gets coated. Lastly, don’t skip the salt. A pinch enhances all the flavors. Serve your sweet chili garlic edamame in a large bowl. This makes it easy for guests to grab some. Sprinkle sesame seeds on top. This adds a nice crunch. Use chopped green onions for a pop of color. You can also serve it with toothpicks. This makes it fun and easy to eat. Pair it with drinks for a perfect snack! {{image_2}} If you crave heat, add more sriracha. It gives a nice kick. You can also mix in some crushed red pepper flakes. Adjust the spice to your taste. This spicy twist makes it more exciting. The heat balances well with the sweet chili sauce. You will love this zesty variation! This dish can easily be vegan and gluten-free. Simply ensure your soy sauce is gluten-free. You can use tamari as a great substitute. It tastes similar to soy sauce but is gluten-free. This way, everyone can enjoy this snack without worries. Try adding citrus for a fresh twist. A squeeze of lime or lemon can brighten the flavors. You can also mix in other sauces. Consider teriyaki or hoisin for a different taste. These combinations will surprise your taste buds. Experiment to find your favorite mix! To store leftover sweet chili garlic edamame, place it in an airtight container. Be sure to let it cool completely first. Store it in the fridge for up to three days. When you want a quick snack, just grab it from the fridge and enjoy. If you want to keep edamame for longer, freezing is a great option. First, let the cooked edamame cool down. Then, transfer it to a freezer-safe bag. Squeeze out as much air as possible before sealing. You can freeze it for up to three months. Label the bag with the date for easy tracking. Reheating sweet chili garlic edamame is simple. You can microwave it for about one minute. Stir halfway through to ensure even heating. If you prefer, you can also reheat it on the stovetop. Just add a splash of water to a skillet and heat until warm. This keeps it moist and tasty. Enjoy your flavorful snack any time! Cooking frozen edamame takes about 3 to 5 minutes. First, boil a pot of water. Then, add the edamame pods. You want them tender but still bright green. After that, drain them and set aside. This quick cooking time keeps the beans fresh and tasty. Yes, you can use fresh edamame. Fresh edamame cooks a bit faster than frozen. Boil them for about 2 to 3 minutes. Check for tenderness as they cook. Fresh edamame adds a nice texture and flavor to your dish. Sweet chili garlic edamame is a healthy snack. Edamame is high in protein and fiber. It also has vitamins and minerals that are good for you. Using sesame oil and garlic adds flavor but also healthy fats. Just watch the amount of sweet chili sauce, as it has sugar. In this post, we explored how to prepare edamame. We looked at key ingredients and their health perks. We also covered cooking steps, serving ideas, and common mistakes to avoid. You can enjoy many tasty variations, like Spicy Sweet Chili Garlic. Proper storage keeps leftovers fresh for later. Remember, making edamame can be simple and fun with the right tips. Try different flavors and find your favorite. Enjoy this healthy snack anytime!

Sweet Chili Garlic Edamame Flavorful Snack Idea

Are you ready to elevate your snacking game? Sweet Chili Garlic Edamame is a delicious, healthy treat that’s easy to

- 2 cups cooked chicken, shredded - 1 cup plain Greek yogurt - 1/4 cup mayonnaise - 1/2 cup celery, finely chopped - 1/2 cup red grapes, halved - 1/4 cup chopped toasted walnuts (or pecans) - 1/4 cup red onion, finely chopped - 1 tablespoon Dijon mustard - 1 tablespoon apple cider vinegar - Salt and pepper to taste - Fresh dill, for garnish I love using cooked chicken. It gives the salad a hearty base. You can use leftover chicken or grab a rotisserie chicken for ease. Greek yogurt adds a creamy texture and tangy taste. The mayonnaise gives extra moisture. Celery adds crunch, while red grapes bring a sweet touch. The walnuts (or pecans) offer a nice nutty flavor. Chopped red onion adds a bit of bite. Dijon mustard gives a slight tang that wakes up the dish. Apple cider vinegar adds brightness, balancing the creaminess. Finally, season with salt and pepper to round out the flavors. Fresh dill is the perfect garnish, adding a pop of green and aroma. - Substitute rotisserie chicken for leftover chicken - Alternative nuts: pecans or almonds - Add-ins: dried cranberries or apples Feel free to mix it up! If you want a different crunch, use pecans or almonds. Dried cranberries or chopped apples can add sweetness. These changes make the salad your own while keeping it fresh and flavorful. In a large bowl, combine 1 cup of plain Greek yogurt and 1/4 cup of mayonnaise. This mix gives the salad a creamy texture. Next, stir in 1 tablespoon of Dijon mustard and 1 tablespoon of apple cider vinegar. This adds a nice tangy flavor. Mix well until everything is smooth. Now, add 2 cups of shredded chicken into the bowl. You can use rotisserie chicken or any cooked chicken. Toss the chicken in the yogurt mixture until it's fully coated. Then, fold in 1/2 cup of finely chopped celery, 1/2 cup of halved red grapes, 1/4 cup of chopped toasted walnuts, and 1/4 cup of finely chopped red onion. Gently mix to keep some texture in the salad. Season the salad with salt and pepper to your taste. Chill it in the refrigerator for at least 30 minutes. This helps the flavors blend together. Before serving, garnish with fresh dill for a pop of color and aroma. Enjoy your fresh and flavorful Greek yogurt chicken salad! To perfect the flavors in your Greek yogurt chicken salad, start by adjusting the seasonings. I like to add salt and pepper gradually. Taste after each addition. You want a balance that suits your palate. If it feels flat, a splash more apple cider vinegar can brighten the taste. For the right consistency, ensure your Greek yogurt is creamy but not too thick. If it feels too dense, mix in a little more mayonnaise. This keeps the salad smooth and easy to scoop. When it comes to presentation, serve your chicken salad on a bed of mixed greens. This adds color and freshness. You can also use cucumber boats. Just hollow out the cucumbers and fill them with the salad. Drizzle a bit of olive oil on top for extra flavor. Pair this dish with crunchy crackers or whole-grain bread. You can also add a light soup. A fresh tomato basil soup works well. If you want to prepare your salad in advance, it’s simple. You can make it a day before serving. Just store it in an airtight container in the fridge. This allows the flavors to blend well. For overnight storage, keep the salad chilled. Use glass or plastic containers with tight lids. This keeps it fresh and tasty. Just remember to give it a good stir before serving! {{image_2}} You can make this chicken salad lighter. Here are a couple of ideas: - Use low-fat yogurt: Swap regular Greek yogurt for low-fat. - Try vegan alternatives: Use coconut yogurt or cashew cream. - Cut down on mayo: You can skip it and use only Greek yogurt. Want to add a twist to your chicken salad? Consider these ideas: - Fresh herbs: Add basil or tarragon for a fragrant touch. - Spicy kick: Mix in jalapeños or a splash of sriracha for heat. Sometimes you run out of ingredients. Here are some easy swaps: - Celery substitutes: Use cucumber or bell peppers for crunch. - Alternate fruits: Swap red grapes for apples or pears for sweetness. Each of these variations keeps the dish fresh and exciting. You can tailor it to fit your taste! This chicken salad stays fresh in the fridge for up to three days. Store it in an airtight container to keep it tasty. Glass or plastic containers work well. They help prevent spills and keep your salad safe. This salad is not freezer-friendly. Freezing can change the texture of the chicken and yogurt. If you must freeze it, try to eat it fresh. If you do freeze it, thaw it in the fridge overnight. Then, stir in a bit of fresh yogurt to refresh its flavor. Check for signs of spoilage before eating. If it smells off or has a strange color, it’s best to toss it. I recommend using this salad within three days for the best taste and texture. Yes, you can use canned chicken. It saves time and is convenient. However, the taste and texture may differ from fresh chicken. Canned chicken often has a softer texture. It also may contain added sodium. If you choose canned chicken, drain it well. Rinse it to reduce salt if needed. Fresh or rotisserie chicken usually gives a better flavor. Greek yogurt is typically healthier than mayonnaise. It has fewer calories and less fat. Greek yogurt also offers more protein. One cup of Greek yogurt has about 20 grams of protein. Mayonnaise, on the other hand, contains mostly fat with little protein. Greek yogurt helps add creaminess without the extra calories. Plus, it has probiotics that are good for your gut. Yes, you can make this salad vegan. Substitute the chicken with chickpeas or tofu. Use a vegan yogurt instead of Greek yogurt. You can also skip the mayonnaise. For added flavor, mix in some avocado or vegan mayo. Fresh herbs and spices will also enhance the taste. This way, you keep it tasty and plant-based. This blog covered a delicious chicken salad recipe. It included main and optional ingredients, step-by-step instructions, and helpful tips. I shared ways to make it healthier and variations to keep it exciting. Proper storage and serving ideas were also provided to enhance your experience. Remember, cooking should be fun and creative. Use this recipe as a base and let your tastes shine. Enjoy making this salad your own, and serve it with pride!

Greek Yogurt Chicken Salad Fresh and Flavorful Recipe

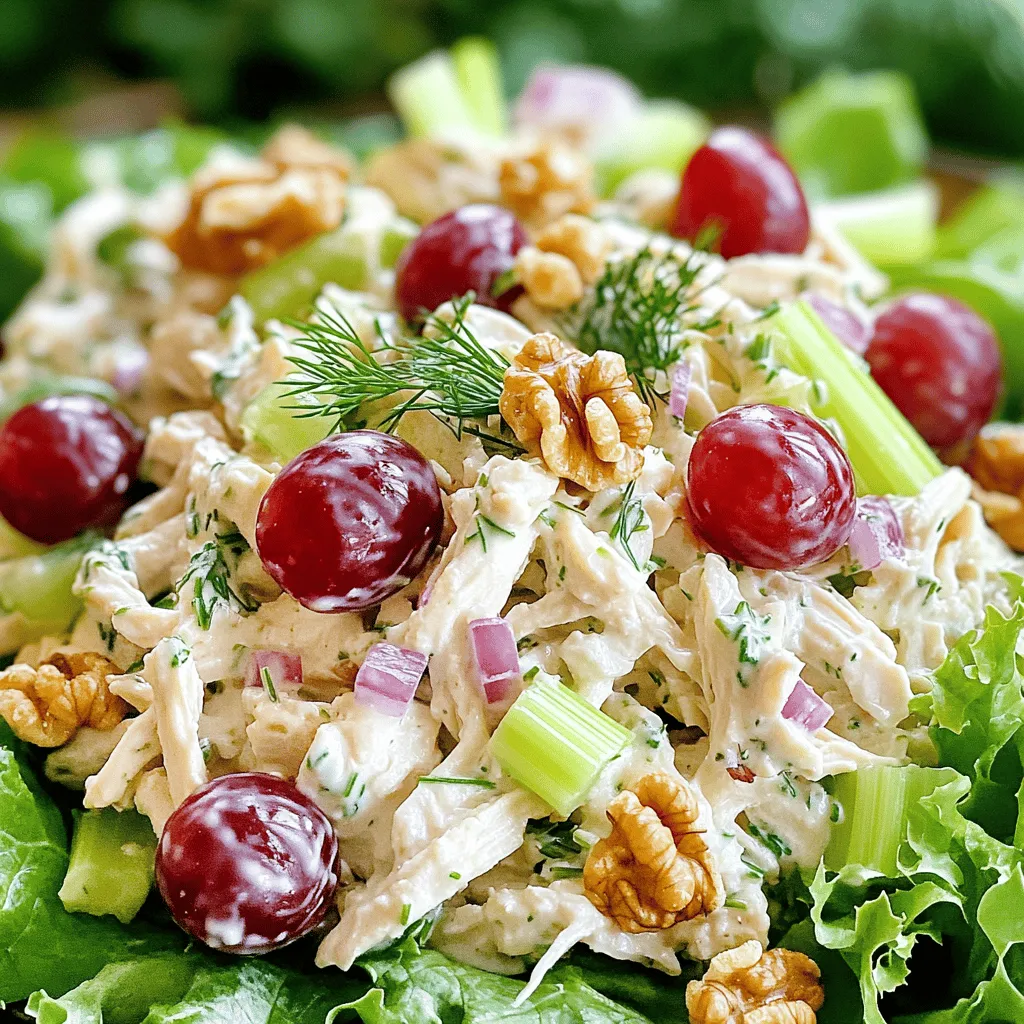
Looking for a fresh twist on a classic chicken salad? My Greek Yogurt Chicken Salad recipe is here to save

For these tasty muffins, you need a few key items. Here’s what to gather: - 1 medium zucchini, grated - 1 cup all-purpose flour - 1/2 cup cocoa powder - 1 teaspoon baking powder - 1/2 teaspoon baking soda - 1/4 teaspoon salt - 1/2 cup granulated sugar - 1/2 cup brown sugar, packed - 1/2 cup unsweetened applesauce - 1/4 cup vegetable oil - 2 large eggs - 1 teaspoon vanilla extract - 1 cup dark chocolate chips (or semi-sweet) These items come together to create a rich muffin that hides healthy zucchini inside. While the base recipe is great, you can make it your own. Consider these fun add-ins: - 1/2 cup chopped walnuts or pecans - 1/2 teaspoon cinnamon for warmth - A dash of espresso powder for depth These additions can give your muffins a unique twist and enhance the chocolate flavor. To make the best muffins, pay attention to a few details: - Zucchini Preparation: Grate the zucchini finely. Squeeze out extra moisture with a paper towel. This helps keep muffins from being too wet. - Cocoa Quality: Use high-quality cocoa powder. It makes a big difference in taste. Look for unsweetened cocoa for the best results. These tips will elevate your baking game and ensure delicious muffins every time. Start by preheating your oven to 350°F (175°C). This helps the muffins bake evenly. While the oven warms up, grab your muffin tin. You can use paper liners or spray it with non-stick cooking spray. This step keeps the muffins from sticking. Next, take one medium zucchini and grate it finely. You want about one cup of grated zucchini. This adds moisture and makes the muffins soft. Set the grated zucchini aside for later. In a large bowl, combine the grated zucchini, 1/2 cup granulated sugar, 1/2 cup packed brown sugar, 1/2 cup unsweetened applesauce, 1/4 cup vegetable oil, and 2 large eggs. Add 1 teaspoon vanilla extract too. Mix everything well until it blends together. This mixture is your wet ingredients. In another bowl, whisk together 1 cup all-purpose flour, 1/2 cup cocoa powder, 1 teaspoon baking powder, 1/2 teaspoon baking soda, and 1/4 teaspoon salt. Make sure these dry ingredients are mixed well. Then, slowly add the dry mix to the wet ingredients. Gently fold them together. You want to mix just until combined. It’s okay if some lumps remain. Lastly, fold in 1 cup dark chocolate chips and any nuts if you choose to add them. Now, divide the batter evenly among the muffin cups. Fill each cup about 3/4 full to allow for rising. Place the muffin tin in your preheated oven. Bake for 18 to 22 minutes. You’ll know the muffins are done when a toothpick poked in the center comes out clean or with a few moist crumbs. After baking, let the muffins cool in the pan for about 5 minutes. This helps them firm up a bit. Then, transfer them to a wire rack to cool completely. Enjoy the rich chocolate aroma filling your kitchen! To keep your Double Chocolate Zucchini Muffins moist, focus on two key things: zucchini and applesauce. First, make sure to grate the zucchini finely. This helps it blend well and release moisture during baking. Second, using unsweetened applesauce adds moisture without extra fat. Mixing these wet ingredients well helps create a smooth batter. Avoid these mistakes to ensure great muffins. Do not overmix; this can lead to tough muffins. Mix until just combined. Another mistake is not measuring the flour correctly. Too much flour can dry out your muffins. Use a spoon to scoop the flour into the measuring cup, then level it off. Lastly, keep an eye on the baking time; every oven is different. Check your muffins a few minutes early. You can easily adjust this recipe for different diets. For a gluten-free option, use a 1:1 gluten-free flour blend instead of all-purpose flour. If you want to cut sugar, try using a sugar substitute like stevia or monk fruit. For a vegan version, replace the eggs with flax eggs, made by mixing flaxseed meal with water. These swaps keep your muffins tasty and cater to various dietary needs. {{image_2}} You can make these muffins healthier with some easy swaps. Use whole wheat flour instead of all-purpose flour. This adds more fiber and nutrients. You can also replace granulated sugar with a sugar substitute like stevia or monk fruit. This keeps the sweetness but lowers calories. Applesauce is a great option too. It keeps muffins moist and adds flavor without extra fat. Want to boost the flavor? Try adding some spices. A pinch of cinnamon or nutmeg can add warmth. You can also mix in extracts like almond or orange for a fun twist. For a richer taste, consider using a splash of espresso or coffee. It enhances the chocolate flavor and gives your muffins a unique kick. If you need nut-free muffins, simply skip the nuts. The muffins will still be tasty. For a dairy-free option, use dairy-free chocolate chips. You can also replace eggs with flaxseed meal mixed with water. This keeps the texture and flavor while making it suitable for everyone. These easy swaps make the muffins friendly for different diets. To keep your muffins fresh, store them in an airtight container. This step helps lock in moisture. Place a paper towel at the bottom of the container. This towel absorbs excess moisture. Store the muffins at room temperature for up to three days. If you want to keep them longer, consider freezing. Freezing is a great way to extend the life of your muffins. Let the muffins cool completely before freezing. Wrap each muffin in plastic wrap or foil. Place wrapped muffins in a freezer-safe bag. Squeeze out as much air as possible. You can freeze them for up to three months. When ready to eat, thaw them in the fridge overnight. To enjoy your muffins warm, you can reheat them easily. Preheat your oven to 350°F (175°C). Place the muffins on a baking sheet. Heat for about 10 minutes. You can also use the microwave. Heat for about 15-20 seconds. Enjoy them warm with a cup of coffee or tea! Yes, you can use frozen zucchini. Just make sure to thaw it first. Squeeze out excess water with a paper towel. This helps keep your muffins from getting too wet. You can check the muffins after 18 minutes. Insert a toothpick into the center. If it comes out clean or with a few moist crumbs, your muffins are done. Remember, they will continue to cook a bit after you take them out. You can use a few options instead of eggs. Try 1/4 cup of unsweetened applesauce per egg. You can also use 1/2 ripe banana or 1 tablespoon of flaxseed mixed with 3 tablespoons of water. Let it sit for a few minutes to thicken. These muffins last for about 3 to 5 days at room temperature. Store them in an airtight container. You can also freeze them for up to 3 months. Just make sure to wrap them well! In this blog post, we explored making double chocolate zucchini muffins. We covered essential ingredients and options for add-ins. I shared tips for baking and avoiding common mistakes. You learned how to store and reheat muffins for maximum freshness. Double chocolate zucchini muffins are tasty and easy to customize. Whether you follow my tips or make your own twist, you’ll enjoy every bite. Happy baking!

Double Chocolate Zucchini Muffins Easy and Tasty Recipe

Looking for a sweet treat that’s also healthy? Double Chocolate Zucchini Muffins are your answer! These muffins blend the rich

- 1.5 lbs boneless, skinless chicken breasts - 2 cans (15 oz each) white beans (cannellini or great northern), drained and rinsed - 1 can (4 oz) diced green chilies - 1 medium onion, finely chopped - 3 cloves garlic, minced - 1 cup corn kernels (fresh or frozen) - 4 cups chicken broth The main ingredients make this chili hearty. The chicken gives it protein and flavor. White beans add creaminess and texture. The corn brings a sweet crunch. Onions and garlic add depth to the taste. - 1 teaspoon ground cumin - 1 teaspoon chili powder - ½ teaspoon paprika - ½ teaspoon salt (to taste) - ¼ teaspoon black pepper Spices are key to flavor. Cumin has a warm, earthy taste. Chili powder adds heat and depth. Paprika gives a hint of smokiness. Adjust salt and pepper to your liking. - Fresh cilantro, chopped (for garnish) - Sliced jalapeños (optional, for garnish) Garnishes make your dish pop. Fresh cilantro adds brightness. Jalapeños can give an extra kick if you want more heat. Add these right before serving for the best flavor. - Chopping and rinsing Start by chopping the onion and mincing the garlic. Rinse the white beans under cold water. This step helps remove any extra salt. - Layering in the slow cooker Place the chicken breasts at the bottom of the slow cooker. Next, add the rinsed white beans. Then, toss in the diced green chilies, chopped onion, minced garlic, and corn. - Setting the slow cooker Pour the chicken broth over the layered ingredients. Sprinkle in the ground cumin, chili powder, paprika, salt, and pepper. Stir gently, but do not disturb the chicken too much. - Cooking times and temperature Cover the slow cooker with the lid. Cook on low for 6-8 hours or on high for 3-4 hours. The chicken should be fully cooked and tender when done. - Shredding chicken Once cooked, remove the chicken breasts from the slow cooker. Use two forks to shred the chicken into bite-sized pieces. - Mixing in cream and lime juice Return the shredded chicken to the slow cooker. Stir in the heavy cream and the juice of two limes. Mix well until everything is combined. Taste and adjust seasoning if needed. Cover and cook for an extra 30 minutes on low to heat through. Cooking on low gives a richer flavor. It allows the chicken to absorb more spices. I recommend cooking it low for 6-8 hours. If you are in a hurry, high works too, but only for 3-4 hours. Always check the chicken for tenderness. Adjusting seasoning can enhance your chili. Taste it before serving. If it needs more flavor, add salt or spices. A touch of lime juice can brighten the dish too. To make the chili creamier, add more heavy cream. You can also blend some of the beans. This gives a smooth texture and thickens the chili. Adding more vegetables can create a heartier dish. Try bell peppers, zucchini, or even spinach. They add nutrients and color to your meal. For sides, cornbread pairs well with the chili. A fresh salad can balance the meal nicely. You can also serve it with tortilla chips for crunch. Toppings can make your chili special. Use fresh cilantro for a fresh touch. Sliced jalapeños add spice for those who like heat. Sour cream can cool it down too. {{image_2}} You can change the protein in your chili. Try turkey for a leaner option. Ground beef works too but adds more fat. For beans, you can use black beans or pinto beans instead of white beans. This adds a different taste and color to your dish. Add more spices for extra flavor. Try cayenne pepper for heat. You might also like smoked paprika for a rich taste. Experiment with different chilies, like poblano or serrano. Each type brings a unique kick. To make this dish lower in carbs, swap heavy cream with plain Greek yogurt. This keeps it creamy but cuts calories. You can also add more vegetables like zucchini or bell peppers. They boost nutrition and add great texture. Once you make this chili, it can last in the fridge for 3-4 days. Store it in an airtight container to keep it fresh. Glass or plastic containers with tight lids work best. This helps to keep out air and moisture. You can freeze the chili too! Let it cool down first. Then, pour it into freezer-safe bags or containers. Remove as much air as you can from bags before sealing. This helps prevent freezer burn. To reheat, thaw overnight in the fridge. Then, warm it on the stove or in the microwave until hot. If you want to prepare it in advance, chop the veggies and measure the spices ahead of time. You can store these in the fridge for a couple of days. For quick reheating, portion the chili into smaller containers. This makes it easy to grab and heat when you are ready to eat. Yes, you can! Using frozen chicken in your slow cooker is safe. Just make sure to add extra time. If you cook on low, aim for 8-10 hours. On high, go for 4-6 hours. Always check the chicken's internal temperature. It should reach 165°F. This method works well and keeps the chicken juicy. If you want a lighter option, use half-and-half or whole milk. Coconut milk is another great choice. It adds creaminess and a hint of sweetness. Silken tofu blended smooth can also work. This will keep your chili rich without heavy cream. To heat things up, add more spices! Try a teaspoon of cayenne pepper. If you like heat, toss in sliced jalapeños. You can also add a dash of hot sauce. For a smoky flavor, chipotle peppers in adobo sauce are perfect. Adjust to your taste for the right kick. Absolutely! To cook on the stovetop, follow the steps but use a large pot. Sauté the onion and garlic first for more flavor. Then add the rest of the ingredients. Simmer for about 30-40 minutes. Stir occasionally until the chicken is cooked through. Shred and mix in the cream and lime juice before serving. This blog post covered all the steps to make delicious chili. We looked at key ingredients, spices, and garnishes. I shared tips for cooking and adjusting flavors. You can also explore fun variations and storage methods. Chili is simple to make and offers endless options. Enjoy the process and adapt the recipe to your taste. Happy cooking!

Slow Cooker White Chicken Chili Easy and Flavorful Recipe

Looking for a warm, comforting meal that’s easy to make? My Slow Cooker White Chicken Chili is just what you

- 4 medium zucchinis - 1 lb ground turkey (or beef) - 1 packet taco seasoning - 1 cup canned black beans, rinsed and drained - 1 cup corn kernels (fresh or frozen) - 1 cup diced tomatoes (canned or fresh) - 1 cup shredded cheese (cheddar or Mexican blend) - 1/4 cup chopped fresh cilantro - Optional: sour cream and avocado for serving When you start making taco stuffed zucchini boats, fresh ingredients make a big difference. I choose medium zucchinis because they hold the filling well. Ground turkey is my go-to, but beef works too. Taco seasoning adds flavor fast. I love adding canned black beans for protein and fiber. Sweet corn brings a nice crunch. Fresh or canned diced tomatoes add moisture. For toppings, shredded cheese is a must. I like cheddar or a Mexican blend for that melty goodness. Fresh cilantro gives a bright taste. If you want, serve with sour cream and avocado for extra creaminess. These ingredients come together to create a satisfying meal. They are colorful, tasty, and easy to prepare. Enjoy the process of creating these tasty boats! - Preheat the oven to 400°F (200°C). - Slice zucchinis in half and scoop out seeds. - Brush with olive oil and season with salt and pepper. First, I set the oven to 400°F (200°C). This step ensures your zucchini boats roast perfectly. Next, I slice the zucchinis in half lengthwise. I use a spoon to scoop out the seeds, making room for the filling. This creates the “boats” that will hold all that tasty taco mix. After scooping, I brush each half with olive oil. A sprinkle of salt and pepper gives them flavor before baking. I place the zucchini halves cut side up on a baking sheet. - Brown the ground meat in a skillet. - Add taco seasoning and water, simmer. - Stir in black beans, corn, and diced tomatoes. I heat a skillet over medium heat. Then, I add the ground turkey or beef. I cook it until it turns brown, breaking it apart with a spatula. If there’s extra fat, I drain it. Next, I add taco seasoning and half a cup of water. I stir this mixture well and let it simmer for about five minutes. This helps the flavors blend. After that, I stir in black beans, corn, and diced tomatoes. I cook it for a few more minutes until everything is hot. - Fill zucchini boats with the taco mixture. - Top with shredded cheese. - Bake until zucchini is tender and cheese is golden. Now, I fill each zucchini boat with the taco mixture. I make sure to pack it in well. After that, I sprinkle shredded cheese on top of each one. Finally, I bake the zucchini boats in the oven for about 20 to 25 minutes. I know they are ready when the zucchini is tender and the cheese is golden. This step brings all the flavors together and makes a delicious meal. To hollow out zucchini, you have a couple of great tools. A spoon is simple and effective, but a melon baller works well too. For best results, use a small spoon to scoop out the seeds. When you hollow out the zucchini, be careful not to break the sides. Start by cutting the zucchini in half. Then, gently remove the seeds while leaving enough flesh for support. This keeps your boats sturdy for filling. You can adjust the spice level to fit your taste. If you like it hot, add more taco seasoning or some chili powder. If you prefer milder flavors, use less seasoning. For meat options, you can swap ground turkey for beef or chicken. For vegetarians, try lentils or quinoa. Both offer great texture and flavor, making the dish hearty without meat. To complement taco zucchini boats, serve them with a fresh salad or rice. A side of tortilla chips adds a fun crunch. For garnishes, fresh cilantro brightens the dish. A dollop of sour cream or slices of avocado enhance the flavors. They also make the presentation more appealing. {{image_2}} You can easily make taco stuffed zucchini boats vegetarian. Just swap the meat for lentils or quinoa. Both options add great texture and protein. Lentils cook fast and bring a nice earthy flavor. Quinoa adds a nutty taste and is rich in nutrients. For a cheesy touch, use vegan cheese alternatives. They melt well and enhance the dish's creaminess. Explore various toppings to change the flavor. For a Southwest twist, try adding jalapeños for heat. Their spicy kick pairs well with the zucchini. You can also create a Mediterranean version. Top with feta cheese and sliced olives. This brings a salty, tangy flavor that makes the dish unique and bright. Customizing your seasoning can take your zucchini boats to the next level. Use homemade taco seasoning for a fresh taste. This way, you control the spice and flavors. Consider adding unique spices like cumin or smoked paprika. Cumin gives warmth, while smoked paprika adds a delightful depth. Experimenting with spices makes the dish even more exciting. To store leftover taco stuffed zucchini boats, place them in an airtight container. Make sure they cool first. You can eat them cold or warm them up. For reheating, use the oven at 350°F for about 10-15 minutes. This keeps the zucchini tender and the cheese melty. If you want to freeze the boats before baking, prepare them as usual but skip the oven. Place the filled zucchini in a freezer-safe dish. Cover well with plastic wrap or foil. You can bake them later. For frozen leftovers, let them thaw in the fridge overnight. Then, bake as usual, adding a few extra minutes if needed. In the fridge, expect taco stuffed zucchini boats to last around 3-4 days. Look for signs of spoilage, like a bad smell or mushy texture. If the zucchini looks slimy or discolored, it’s best to toss it. Always trust your senses for food safety. Yes, you can use many other veggies. Bell peppers make great boats. Eggplant can also hold the filling well. You might try acorn squash for a sweet twist. Each option brings a unique taste and texture. Just make sure the veggie you pick can hold the stuffing. If you want other meats, ground beef works well. You can also use chicken for a lighter option. For a plant-based choice, try lentils or mushrooms. They add great flavor and texture to your dish. Quinoa is another good choice for a healthy twist. You’ll know the zucchini boats are done when they are tender. The cheese should be golden and bubbly. Use a fork to check the zucchini; it should be easy to pierce. This means the boats are ready to serve and enjoy. We've explored the tasty world of taco stuffed zucchini boats. You learned about the main and additional ingredients, along with simple steps to create this dish. I shared tips for hollowing and perfecting the filling. You can also try fun variations or store leftovers easily. In the end, taco zucchini boats are a fun, healthy meal option. They adapt well to your taste and pantry. Enjoy cooking and get creative!

Taco Stuffed Zucchini Boats Flavorful and Simple Dish

Looking for a fun, flavorful dish that packs a punch? Taco Stuffed Zucchini Boats are the answer! This easy recipe

Older posts
Newer posts
← Previous Page1 … Page33 Page34 Page35 … Page84 Next →

dsad

© 2026 easycookingbite • Built with GeneratePress

Our Policies

  • Copyright Policy
  • Cookie Policy
  • GDPR Policy
  • Privacy Policy
  • Disclaimer
  • Terms Of Use

More Information

  • Home
  • About
  • Contact
  • Appetizers
  • Dessert
  • Dinner
  • Drinks
©2026, easycookingbite About Back To Top