Skip to content
DisclaimerTerms Of UseGDPR PolicyCookie Policy

easycookingbite

  • Home
  • Drinks
  • Appetizers
  • Dinner
  • Dessert
  • About
  • Contact
  • Privacy Policy
DisclaimerTerms Of UseGDPR PolicyCookie Policy

NO-ING-IMG

- 2 cups cooked quinoa - 1 lb boneless, skinless chicken thighs - 1 cup cherry tomatoes, halved - Olive oil - 2 teaspoons dried oregano - 1 teaspoon garlic powder - 1 teaspoon onion powder - 1 teaspoon smoked paprika - Salt and pepper to taste - 1/2 cup Greek yogurt - 2 tablespoons lemon juice - 1 cucumber, diced - 1 red onion, thinly sliced - 1 cup feta cheese, crumbled - Fresh parsley for garnish To make Greek Chicken Gyro Bowls, you need simple yet fresh ingredients. Start with cooked quinoa as your base. It’s nutritious and filling. You will love how it pairs with chicken. The chicken thighs are tender and juicy. They soak up the flavors from the marinade. Use olive oil, dried oregano, garlic powder, onion powder, and smoked paprika to spice things up. These seasonings give the chicken a lovely taste. Don’t forget salt and pepper for balance. For the dressing, Greek yogurt mixed with lemon juice adds creaminess. It also brightens up the dish. Fresh additions are key to these bowls. Diced cucumber adds crunch. Thinly sliced red onion brings a sharp bite. The cherry tomatoes burst with sweetness. Feta cheese adds saltiness and creaminess. Finish with fresh parsley for color. This mix of fresh and cooked ingredients makes every bite exciting. You will enjoy the blend of flavors and textures in each bowl. To marinate the chicken, start by mixing olive oil, dried oregano, garlic powder, onion powder, smoked paprika, salt, and pepper in a bowl. This mix is key for great flavor. Then, add 1 pound of boneless, skinless chicken thighs to the marinade. Make sure each piece is covered well. You should let the chicken marinate for at least 30 minutes. If you have more time, marinate it for up to 2 hours in the fridge. This extra time helps the flavors soak in, making your chicken juicy and tasty. Next, you need to cook the chicken. You can either grill it or use a skillet. If you choose a grill pan, preheat it over medium-high heat. Remove the chicken from the marinade. Cook it for about 6-7 minutes on each side. The chicken is done when it reaches an internal temperature of 165°F (74°C). After cooking, let the chicken rest for 5 minutes before slicing it into strips. This helps keep it moist. Now, it’s time to build your bowl! Start with 2 cups of cooked quinoa as the base. Spread it evenly in your bowl. Then, layer the sliced chicken on top. Add halved cherry tomatoes, diced cucumber, and thinly sliced red onion for crunch and color. For the finishing touch, drizzle Greek yogurt mixed with lemon juice over your bowl. Sprinkle crumbled feta cheese on top, and garnish with fresh parsley. Your Greek Chicken Gyro Bowl is now ready to enjoy! Marinate the chicken thighs for at least 30 minutes. For better taste, marinate them up to 2 hours. The longer marination helps the flavors sink in well. When cooking, aim for juicy chicken by using medium-high heat. Grill or skillet-cook the chicken for about 6-7 minutes on each side. Always check for an internal temperature of 165°F to ensure it’s safe to eat. Let the chicken rest for 5 minutes after cooking. This step keeps it juicy and tender. You can make your bowls unique by adding extra toppings. Try sliced avocado, olives, or roasted red peppers. You can also switch up the veggies. Bell peppers or arugula add nice flavors. For a creamier touch, add more Greek yogurt. Serve your bowls with a sprinkle of lemon juice. This brightens the flavors and adds freshness. Make your dish visually appealing by layering the ingredients. Start with quinoa, then the chicken, and finish with veggies. Drizzle the yogurt dressing on top for a beautiful look. Garnish with fresh parsley for a pop of color. Pair your gyro bowls with a side of pita bread or a light salad. For drinks, a sparkling water with lemon works great. These ideas elevate your meal and make it a feast for the eyes! {{image_2}} You can easily change this dish to a vegetarian delight. Instead of chicken, use chickpeas or falafel. Chickpeas add protein and a nice texture. You can roast them with olive oil and spices for extra flavor. Falafel works well too. It brings a crispy bite that everyone loves. While quinoa is great, you have other choices. You can use brown rice, couscous, or even lettuce. Brown rice gives a nutty taste. Couscous cooks quickly and has a soft texture. Lettuce offers a fresh crunch and is perfect for a light meal. Try these bases to keep things interesting. Add fun spices or dressings to make your gyro bowls unique. Try adding cumin for warmth or chili powder for heat. You can also switch up the dressing. Use tahini or a spicy yogurt sauce for a new twist. These small changes can make a big difference in taste and excitement. To keep your Greek chicken gyro bowls fresh, store them in the fridge. Use airtight containers. This helps to lock in moisture and flavor. Always refrigerate any leftovers within two hours of cooking. They will stay good for about three to four days. When reheating, avoid high heat. This can dry out the chicken and make the quinoa mushy. Instead, use the microwave on low power. Heat for one to two minutes, stirring halfway through. You can also heat them gently in a skillet over medium-low heat. Add a splash of water to keep the bowl moist. Yes, you can freeze Greek chicken gyro bowls! This is a great option for meal prep. To freeze, separate the chicken from the fresh veggies and yogurt. Place them in freezer-safe bags. Squeeze out as much air as possible to prevent freezer burn. To thaw, move the bowls to the fridge a day before you eat. This keeps them safe and tasty. Reheat them as described above once thawed. You can use several other proteins instead of chicken. Here are some great options: - Pork: Use pork tenderloin or pork chops. Marinate just like chicken. - Beef: Try flank steak or ground beef. Season similarly to chicken. - Lamb: Lamb is tasty and pairs well with Greek flavors. Use ground lamb or lamb chops. - Tofu: Firm tofu is a great plant-based choice. Press it to remove extra water and marinate. - Chickpeas: For a vegetarian option, use canned chickpeas. Season them with the same spices. Each of these proteins brings a unique flavor. Adjust the cooking time based on your chosen protein to ensure it cooks through. Making Greek Chicken Gyro Bowls gluten-free is easy. Here are some ingredient swaps: - Quinoa: This grain is naturally gluten-free. It makes a great base. - Feta Cheese: Most feta is gluten-free. Check the label to be sure. - Greek Yogurt: Plain Greek yogurt is gluten-free. Use it for the dressing. - Vegetables: All veggies like cucumbers and tomatoes are gluten-free. Double-check all sauces and seasonings you use. Some may contain gluten. Always read labels to ensure safety. Yes, you can prepare Greek Chicken Gyro Bowls in advance. Here’s how to do it: - Meal Prep: Cook and marinate the chicken a day before. Store it in the fridge. - Quinoa: Cook quinoa in advance too. It keeps well in the fridge for up to 4 days. - Veggies: Chop your veggies ahead of time. Keep them in airtight containers. - Assembly: Assemble the bowls right before serving. This keeps everything fresh. Store the bowls in the fridge. They taste great cold or warm. Just reheat the chicken gently on low heat. Enjoy a quick meal anytime! This article shared how to create delicious Greek Chicken Gyro Bowls. We covered the key ingredients, like quinoa and chicken, and went over the marinating and cooking steps. You learned tips for perfecting chicken and how to customize your bowls. We even explored fun variations and storage tips. Enjoy experimenting with flavors and personal touches. These bowls are easy to make and tasty! You can create a meal that fits your taste. Dive into this recipe and make it your own. Happy cooking!

Greek Chicken Gyro Bowls Flavorful and Easy Recipe

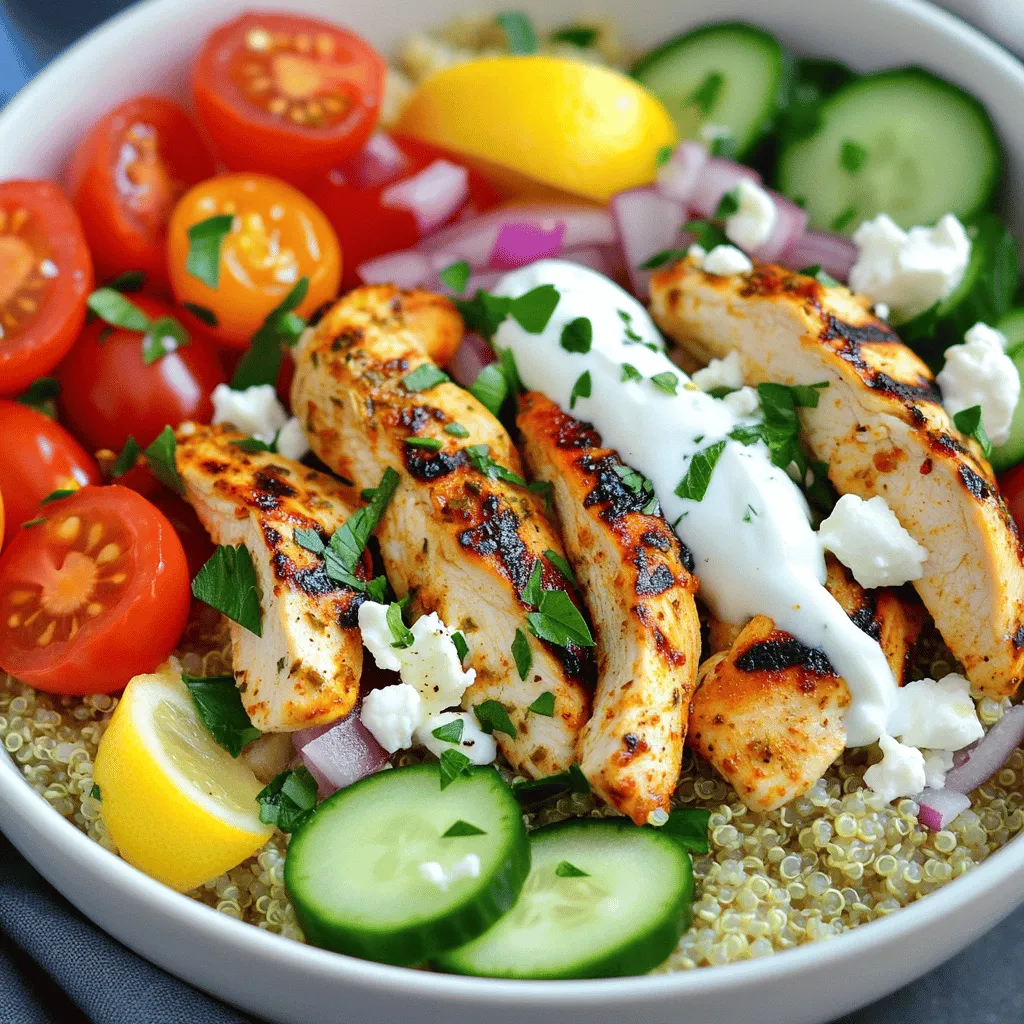
Looking for a fresh and tasty meal idea? You’ll love Greek Chicken Gyro Bowls! This simple recipe combines juicy chicken

- 1 cup all-purpose flour - 1/4 cup granulated sugar - 1/2 teaspoon baking powder - 1/4 teaspoon baking soda - 1/4 teaspoon salt - 1/2 teaspoon ground cinnamon - 1/4 teaspoon nutmeg - 1/2 cup buttermilk - 1 large egg - 2 tablespoons unsalted butter, melted - 1 teaspoon vanilla extract - 1/4 cup powdered sugar (for coating) - 1/4 cup granulated sugar (for coating) - 1/2 teaspoon cinnamon (for coating) Gather these simple ingredients. All-purpose flour forms the base of our donut holes. Granulated sugar gives them sweetness. Baking powder and baking soda help them rise and become fluffy. Spices like ground cinnamon and nutmeg add warmth and depth. Buttermilk adds moisture and tang. The egg binds everything together. Melted butter brings richness, while vanilla extract adds a lovely aroma. For coating, we mix powdered sugar and granulated sugar with cinnamon. This gives our donut holes a sweet, crunchy finish. Having these ingredients ready makes the cooking process easy and fun. You will love how these items come together to create a delightful treat! - Combining dry ingredients: Start by taking a large mixing bowl. In it, whisk together 1 cup of all-purpose flour, 1/4 cup of granulated sugar, 1/2 teaspoon of baking powder, 1/4 teaspoon of baking soda, 1/4 teaspoon of salt, 1/2 teaspoon of ground cinnamon, and 1/4 teaspoon of nutmeg. Mix well until all the dry ingredients blend together nicely. - Mixing wet ingredients: In another bowl, mix 1/2 cup of buttermilk, 1 large egg, 2 tablespoons of melted unsalted butter, and 1 teaspoon of vanilla extract. Make sure to stir until the wet ingredients are smooth and fully combined. - Scooping and rolling into balls: Pour the wet mixture into the dry mixture. Gently stir until just combined; you want it thick but slightly lumpy. Next, scoop out about 1 tablespoon of batter and roll it into a ball. Place each ball on a tray lined with parchment paper. - Preparing the air fryer: Preheat your air fryer to 350°F (175°C). This step is important to ensure even cooking. Once it's hot, arrange the donut holes in a single layer in the basket. Make sure they have some space and do not touch each other. - Air frying temperature and time: Cook the donut holes in the air fryer for 5-6 minutes. Keep an eye on them, as they should turn golden brown. - Checking for doneness: To check if they are done, insert a toothpick into one of the holes. If it comes out clean, they are ready! If not, give them a minute more and check again. Enjoy the wonderful aroma as they cook! To get the best donut holes, avoid overmixing the batter. Mixing too much makes them tough. You want a thick batter that is slightly lumpy. This will keep your holes soft and fluffy. When you arrange the donut holes in the air fryer, place them in a single layer. Leave space between each hole. If they touch, they may not cook evenly. You may need to cook them in batches. For the perfect sugar-cinnamon mix, combine granulated sugar and cinnamon in a small bowl. Use equal parts of sugar and cinnamon for a balanced flavor. Coat the donut holes while they are still warm. This helps the mixture stick better. Roll each hole to fully cover it. This way, you get a sweet and flavorful coating that makes them irresistible. {{image_2}} You can easily make chocolate donut holes. Just add cocoa powder to the dry mix. Start with 1/4 cup of cocoa powder. This gives a rich, chocolatey taste. For a sweeter treat, drizzle with a chocolate glaze. Melt some chocolate and mix it with a bit of cream. Dip each hole for a shiny finish. Add nuts for a delicious twist. Chopped walnuts or almonds work great. You can also use nut butter. Mix in 1/4 cup of peanut butter or almond butter. This adds creaminess and flavor. Pair these with chocolate or caramel for a tasty combo. Try adding crushed nuts on top for crunch! Seasonal flavors make these holes fun. For fall, try pumpkin spice donut holes. Add 1/2 cup of pumpkin puree and a teaspoon of pumpkin spice to the batter. This gives a cozy taste. For winter, mix in peppermint extract. Top with crushed candy canes for a festive touch. These ideas keep your donut holes exciting all year round! To keep your leftover donut holes fresh, place them in an airtight container. You can use a plastic or glass container with a tight lid. This method helps prevent them from getting stale. Make sure the donut holes are fully cooled before you store them. If they are warm, they may create moisture inside the container. When it's time to enjoy your donut holes again, reheating is key. The best way to reheat them is in the air fryer. Set the air fryer to 300°F (150°C) and heat for about 3-4 minutes. This method helps restore their crispy texture. You can also use the microwave, but this may make them soft. Heat them for about 10-15 seconds. After reheating, roll them again in the sugar-cinnamon mix for extra flavor. Serve them warm with a cup of coffee or tea for a delightful treat! Yes, you can use different flours. For a gluten-free option, try almond flour or a gluten-free blend. These can change the texture but still taste great. If you choose almond flour, keep in mind the donut holes may be denser. Homemade donut holes can last for about three days. Store them in an airtight container at room temperature. If you keep them in the fridge, they may dry out faster. Yes, you can freeze these donut holes. Place them in a single layer on a baking sheet. Freeze until solid, then transfer to a freezer bag. They can last up to three months. When you’re ready to eat, thaw in the fridge overnight and warm them up in the air fryer for a few minutes. In this post, we covered how to make tasty air fryer donut holes. You learned about key ingredients, step-by-step mixing, and cooking tips. We explored fun flavor variations and proper storage methods. Remember, easy adjustments can make these treats your own. Donut holes are not just tasty; they also bring joy and warmth to any gathering. Enjoy crafting these treats and sharing them with others. They are sure to be a hit!

Air Fryer Donut Holes Tasty and Easy Recipe

Craving a sweet treat that’s simple and delicious? These Air Fryer Donut Holes are your answer! Made with common pantry

- 8 oz (225g) linguine or spaghetti - 1 cup creamy hummus - 1/4 cup fresh lemon juice - 3 cloves garlic - 1/4 cup extra-virgin olive oil To create a tasty Creamy Lemon Garlic Hummus Pasta, you need a few simple items. Start with 8 ounces of linguine or spaghetti. This pasta forms the base of the dish. Next, grab 1 cup of creamy hummus. You can use store-bought hummus or make your own for a fresher taste. Squeeze in 1/4 cup of fresh lemon juice, about two lemons. This adds a bright and zesty flavor. Don’t forget 3 cloves of minced garlic to give the dish a savory kick. Finally, drizzle in 1/4 cup of extra-virgin olive oil to bring all the flavors together. - 1/4 teaspoon red pepper flakes - 1 cup cherry tomatoes - 1/2 cup fresh spinach - Fresh parsley and lemon zest for garnish To customize your pasta, consider adding optional ingredients. A pinch of 1/4 teaspoon of red pepper flakes can add some heat. You may want to toss in 1 cup of halved cherry tomatoes for a pop of color and sweetness. Adding 1/2 cup of roughly chopped fresh spinach provides a nice green touch. For the finishing touch, garnish your dish with fresh parsley and lemon zest. These add flavor and make your dish look lovely on the plate. To start, boil a large pot of salted water. Add the linguine or spaghetti. Cook it until it is al dente, about 8 to 10 minutes. Al dente means the pasta is cooked but still firm. This gives it a nice bite. Before you drain the pasta, reserve about 1/2 cup of the pasta water. This water will help later with the sauce. In a large mixing bowl, combine the creamy hummus, fresh lemon juice, minced garlic, and extra-virgin olive oil. Mix these together until the sauce is smooth and creamy. If it seems too thick, add some of the reserved pasta water. This will help you get the right consistency for the sauce. Now it’s time to bring it all together. Add the drained pasta to the bowl with the hummus sauce. Toss the pasta well so it gets fully coated in the sauce. If the sauce is still too thick, you can add more reserved water. Next, gently fold in the cherry tomatoes and chopped spinach. If you like a bit of heat, add red pepper flakes. Cook this mixture for 2 to 3 minutes on low heat. This will slightly wilt the spinach and warm the dish. Season with salt and pepper to taste. When choosing hummus, you can go for store-bought or make your own. Store-bought hummus is quick and easy. Look for smooth, creamy options with fresh ingredients. If you want to make it from scratch, blend chickpeas, tahini, lemon juice, and garlic. You can also play with flavors. Try adding roasted red peppers, sun-dried tomatoes, or herbs to your hummus for a unique taste. This can change the whole vibe of your pasta dish. Cooking pasta al dente is key. This means the pasta should be firm but not hard. To achieve this, follow the package instructions but check the pasta a minute early. It should have a slight bite. Don’t forget to save some pasta water! This starchy water helps bind the sauce to the pasta. It can also help adjust the sauce's thickness if it’s too thick. Just add a little at a time until it’s perfect. Garnishing adds fun and flavor. Fresh herbs like parsley or basil work well on this dish. They brighten up the plate and add a fresh taste. Spices can also enhance your dish. Add a sprinkle of red pepper flakes for heat. You can also use lemon zest to boost that citrus flavor. Serve the pasta warm and enjoy its creamy goodness! {{image_2}} You can boost your creamy lemon garlic hummus pasta with protein. Grilled chicken or shrimp makes a tasty addition. Just add the cooked protein to the pasta after mixing in the sauce. For a plant-based choice, try chickpeas or tofu. Cook them well and mix them in for a hearty meal. If you need gluten-free options, use gluten-free pasta. It works well with this recipe. You can also make vegan adjustments. Make sure your hummus is vegan. This dish is already dairy-free, so it fits perfectly. Get creative with flavor! You can add different veggies like bell peppers or zucchini. Spices like cumin or paprika can give new depth. You can also experiment with types of hummus. Try roasted red pepper or basil hummus for a twist. Each change gives a fresh taste to your dish. To keep your leftover creamy lemon garlic hummus pasta fresh, store it in an airtight container. This helps prevent moisture loss and keeps flavors strong. You can refrigerate it for up to three days. After that, the pasta may lose its texture and taste. To reheat, place the pasta in a pan over low heat. Add a splash of water or olive oil to keep it moist. Stir gently until warmed through. This method helps maintain the creamy texture. Avoid using a microwave, as it can dry out the pasta. You can freeze the creamy lemon garlic hummus pasta if you want to save it for later. Place it in a freezer-safe container, leaving space for expansion. It will stay fresh for about one month. To thaw, move it to the fridge overnight. Reheat gently on the stove, adding a bit of water to restore creaminess. To make homemade hummus, you need these basic ingredients: - 1 can of chickpeas, drained and rinsed - 1/4 cup tahini - 2 tablespoons lemon juice - 1 clove garlic - 2 tablespoons olive oil - Salt to taste 1. Blend the chickpeas, tahini, lemon juice, and garlic in a food processor. 2. Slowly add olive oil as you blend until smooth. 3. Season with salt to your liking. 4. For a creamier texture, add a little water. This hummus is perfect for the pasta and adds great flavor. Yes, you can use various pasta shapes. Some great options include: - Penne - Fusilli - Farfalle These shapes will still hold the creamy sauce well. Just make sure to adjust the cooking time as needed. Yes, this dish is great for meal prep. Here are some tips: - Cook the pasta and toss it with the sauce. - Store in airtight containers. - Add fresh veggies just before serving. This way, your pasta stays fresh and tasty all week long. This dish combines creamy hummus and al dente pasta for a tasty meal. You learned about the key ingredients, step-by-step cooking methods, and tips to enhance flavor. There are many ways to customize this recipe, from adding protein to using different spices. Plus, you can store leftovers easily or prepare ahead for future meals. Try it out and enjoy a quick yet satisfying dish that keeps hunger at bay. Your taste buds will thank you!

Creamy Lemon Garlic Hummus Pasta Delightful Dish

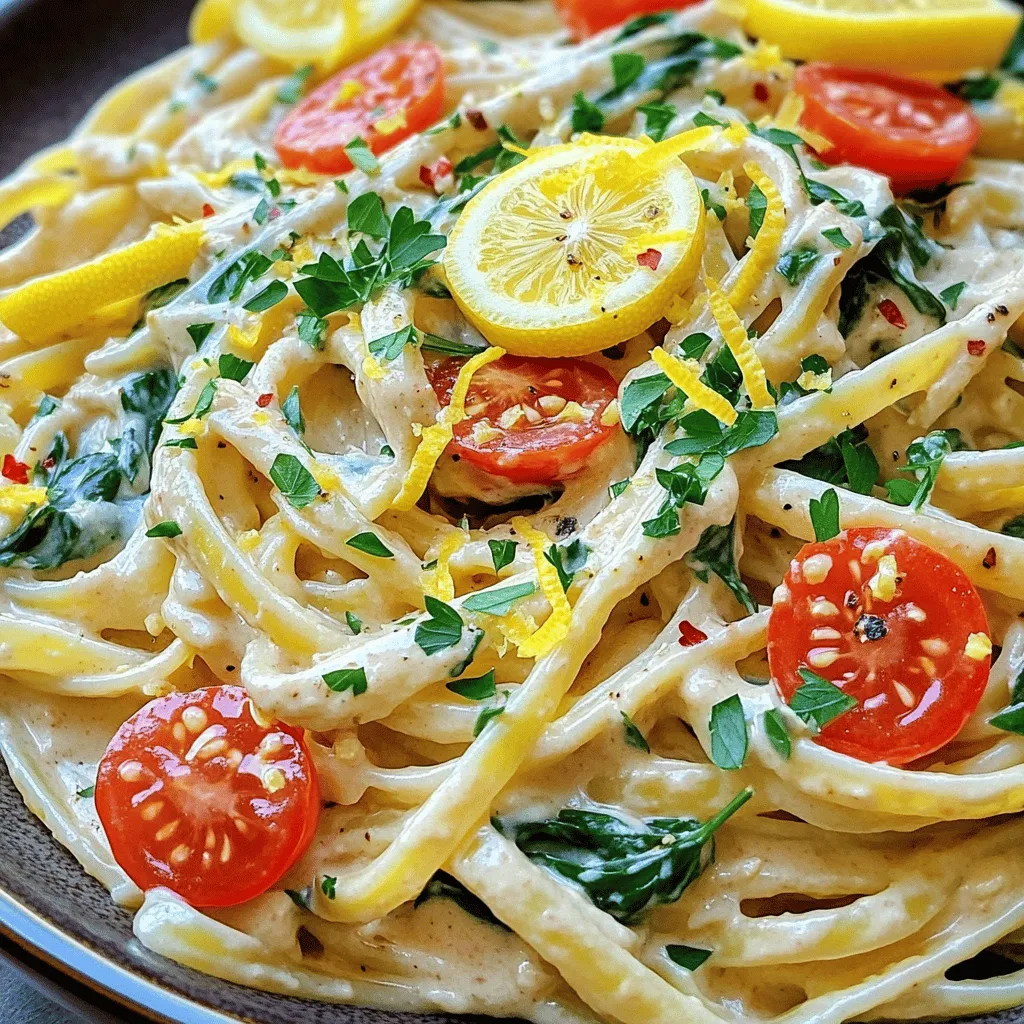
If you’re craving a simple yet flavorful dish, try my Creamy Lemon Garlic Hummus Pasta. This delightful recipe combines creamy

- 1 cup strawberries, hulled and halved - 1 cup blueberries, fresh or frozen - 1 cup raspberries, fresh or frozen Using fresh berries is key for flavor. Strawberries add sweetness, while blueberries are juicy. Raspberries provide a slight tartness that balances all the flavors. Feel free to mix in frozen berries too. They work just as well. - 1/4 cup granulated sugar - 1/2 cup brown sugar, packed - 1 tablespoon lemon juice - 1/2 teaspoon ground cinnamon Granulated sugar sweetens the berries. Brown sugar brings a rich flavor. Lemon juice brightens everything up. It adds a nice zing. Ground cinnamon gives warmth to the dish. These flavors blend well and create a lovely taste. - 1 cup rolled oats - 1/2 cup all-purpose flour - 1/4 cup cold unsalted butter, cubed - Pinch of salt Rolled oats add a chewy texture. All-purpose flour helps bind everything together. Cold unsalted butter creates a crumbly topping. The pinch of salt enhances the sweetness. This topping is the perfect finish to your berry mixture. First, gather your berries. You will need: - 1 cup strawberries, hulled and halved - 1 cup blueberries, fresh or frozen - 1 cup raspberries, fresh or frozen - 1/4 cup granulated sugar - 1 tablespoon cornstarch - 1 tablespoon lemon juice In a mixing bowl, combine the strawberries, blueberries, raspberries, granulated sugar, cornstarch, and lemon juice. This mixture will create a sweet and juicy blend. Stir gently to coat the berries evenly. Let this sit for about 10 minutes. This resting time helps the berries release their juices and mix well with the sugar. Next, prepare the crumble topping. You will need: - 1 cup rolled oats - 1/2 cup all-purpose flour - 1/2 cup brown sugar, packed - 1/2 teaspoon ground cinnamon - 1/4 cup cold unsalted butter, cubed - Pinch of salt In another bowl, mix the rolled oats, all-purpose flour, brown sugar, cinnamon, and a pinch of salt. This blend creates a nice base for your topping. Then, add the cold cubed butter into the dry mixture. Using your fingertips or a pastry cutter, mix until the mixture resembles coarse crumbs. This texture will give your crumble a great crunch. Now, it's time to bake! Preheat your oven to 350°F (175°C). Spread the berry mixture evenly in a baking dish, about 8x8 inches. Then, sprinkle the crumble topping over the berry mixture, covering it completely. This ensures every bite has that delicious crunch. Bake in the preheated oven for 30-35 minutes. Look for a golden brown topping and bubbling berries. Once done, let it cool slightly before serving. This cooling time helps the filling thicken. Enjoy your homemade triple berry crumble! To make the best crumble, focus on the texture. Your crumble should be like coarse crumbs. Mix the dry ingredients well before adding butter. This step helps create a nice, even crumble. Cold butter is key. It keeps the topping crisp and flaky. When the butter is cold, it stays in small bits. These bits create a lovely texture when baked. For added flavor, try a splash of vanilla extract. This simple addition makes the crumble even more tasty. You might also want to add nuts, like walnuts or pecans. They add crunch and richness. Different spices can also enhance the flavor. A pinch of nutmeg or ginger can bring a new twist. Experiment and find what you like best! Serve your Triple Berry Crumble warm. A scoop of vanilla ice cream on top is heavenly. Whipped cream is also a great choice. It adds a light, creamy touch. For a beautiful presentation, sprinkle fresh berries around the plate. This adds color and makes the dish pop. You can also use a pretty baking dish to impress your guests! {{image_2}} You can change the berries in this recipe. Try blackberries, cherries, or peaches. Each fruit will bring a new taste. Mix and match depending on what you have. In summer, use fresh berries. In winter, frozen berries work well too. They are just as tasty and save time. If you need a gluten-free crumble, switch out the flour. Use almond flour or coconut flour instead. Both add great flavor and texture. You can also use gluten-free oats. They will keep the crumble crunchy. Just check the label to ensure they are certified gluten-free. For a vegan version, use dairy-free butter. Coconut oil or vegan butter works well. You can also try applesauce as a substitute. For sweeteners, use maple syrup or agave. They add a nice flavor and keep it plant-based. Make sure to adjust the amount to taste. To keep your Triple Berry Crumble fresh, store it in the fridge. Place it in an airtight container. This method keeps the crumble moist and prevents it from drying out. The leftovers last about three to four days in the fridge. If you want to keep it longer, freeze the crumble. First, let it cool completely. Then, wrap it tightly in plastic wrap and foil. You can also use a freezer-safe container. It stays good for up to three months in the freezer. When you're ready to enjoy it, just thaw it in the fridge overnight. To reheat your crumble, the oven is the best choice. Preheat the oven to 350°F (175°C). Place the crumble in a baking dish and cover it with foil. Heat it for about 15 to 20 minutes. This method warms it evenly and keeps the topping crisp. You can use the microwave too, but it may soften the topping. If you choose this method, heat it for about 30 seconds at a time. Check it often to avoid overheating. Enjoy your warm Triple Berry Crumble! Your Triple Berry Crumble is ready when the topping turns golden brown. Look for bubbling around the edges. This bubbling shows the berries are cooking well. If you see those signs, take it out of the oven. Let it cool a bit before serving. This helps the filling thicken up. Yes, you can prepare it in advance! Mix the berries and sugar, then chill them in the fridge. You can also make the crumble topping ahead. Store it in a separate container. When you’re ready to bake, just combine them in the dish. Bake as directed, and you’ll have a fresh dessert! If you need a substitute for cornstarch, try using flour. All-purpose flour works well, but use more of it. About 1.5 tablespoons should do. You can also use arrowroot powder or tapioca starch. Both are great for thickening. Just remember, each option may change the texture a little. Triple Berry Crumble can be a healthy dessert option. Berries are full of vitamins and fiber. They help keep your body strong. Using less sugar makes it even better. You can use whole oats in the topping. They add nutrients too. Enjoy this dessert without too much guilt! This blog post covered how to make a delicious Triple Berry Crumble. You learned about fresh berries, sweeteners, and topping components. We explored step-by-step instructions for prepping the berries and baking the crumble. I shared tips on getting the crumble just right and ways to customize your dish. Lastly, we discussed storage and reheating tips. Now you can enjoy a warm, fruity dessert any time. The options for making it your own are endless. Happy baking!

Triple Berry Crumble Delightful Berry Dessert Recipe

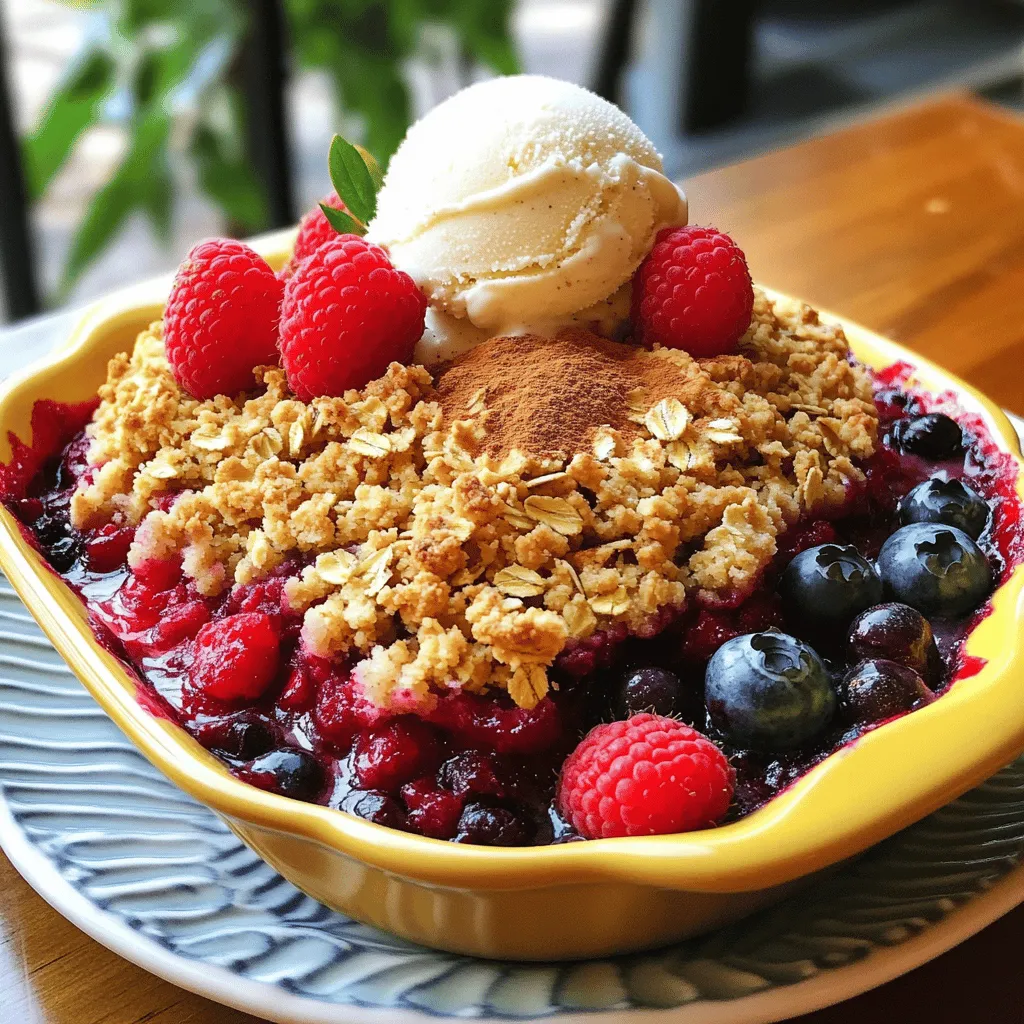
Are you ready to indulge in a delicious dessert? This Triple Berry Crumble is easy to make and packed with

- 1 cup canned chickpeas, rinsed and drained - 1 large roasted red bell pepper (jarred or homemade) - 1/4 cup tahini - 2 tablespoons olive oil - 2 tablespoons lemon juice - 1 garlic clove, minced - 1/2 teaspoon cumin - Salt and pepper to taste - Water, as needed for consistency - Paprika and fresh parsley for garnish - Chickpeas: Packed with protein and fiber, they help keep you full longer. - Roasted Red Bell Pepper: Rich in vitamins A and C, good for skin health. - Tahini: Made from sesame seeds, it adds healthy fats and calcium. - Olive Oil: Contains heart-healthy fats and antioxidants. - Lemon Juice: Provides vitamin C and adds a fresh taste. - Garlic: Known for its immune-boosting properties and flavor. - Cumin: Adds flavor and may aid digestion. - Paprika: Offers antioxidants and enhances color. - Fresh Parsley: Full of vitamins and adds a fresh touch. - Chickpeas: Use white beans or lentils if you prefer. - Tahini: Sunflower seed butter works well for nut-free diets. - Olive Oil: Any light oil, like avocado oil, can be used. - Lemon Juice: Lime juice provides a nice twist. - Garlic: Garlic powder is a quick swap if fresh isn't handy. - Cumin: Try coriander for a different flavor. - Paprika: Use chili powder for more heat if desired. To make roasted red pepper hummus, start by gathering your ingredients. You will need: - 1 cup canned chickpeas, rinsed and drained - 1 large roasted red bell pepper (jarred or homemade) - 1/4 cup tahini - 2 tablespoons olive oil - 2 tablespoons lemon juice - 1 garlic clove, minced - 1/2 teaspoon cumin - Salt and pepper to taste - Water, as needed for consistency - Paprika and fresh parsley for garnish First, rinse your chickpeas well. This helps remove any extra salt or liquid. If using jarred peppers, drain them too. If you prefer homemade, roast your bell pepper until charred. Let it cool, then peel off the skin. Now, take a food processor. Add the rinsed chickpeas, roasted red pepper, tahini, olive oil, lemon juice, minced garlic, and cumin. Blend on high speed. Make sure to stop and scrape down the sides. This ensures all ingredients mix well. Blend until the mixture is smooth. You want a creamy texture, not chunky. If your hummus is too thick, add water. Do this one tablespoon at a time. Blend again after each addition. Keep adding until you reach your desired smoothness. Taste the hummus and add salt and pepper as needed. Blend once more to combine. Once done, transfer the hummus to a serving bowl. Drizzle with olive oil and sprinkle paprika and fresh parsley on top. Enjoy your delicious hummus with pita or veggies! Roasting red peppers is easy and adds great flavor. You can roast them in the oven or over a flame. If you use an oven, set it to 450°F. Place the peppers on a baking sheet. Roast them for about 20 minutes, turning once. Look for blackened skin. After roasting, place the peppers in a bowl and cover it. This helps loosen the skin when they cool. Once cool, peel off the skin and remove the seeds. You can also buy jarred roasted peppers for convenience. You can make hummus even better with spices and herbs. Try adding fresh basil or cilantro for a fresh taste. A pinch of paprika adds warmth and color. For heat, use a dash of cayenne pepper. You can also mix in lemon zest for a bright flavor. Experiment with these additions to find your favorite blend. If you have extra hummus, store it in an airtight container. Keep it in the fridge for up to a week. To keep it fresh, drizzle a little olive oil on top before sealing. You can also freeze hummus for up to three months. Just thaw it in the fridge when you’re ready to eat. To make it smooth again, blend it briefly after thawing. {{image_2}} To make your hummus spicy, add jalapeños or cayenne pepper. Start with a small amount. Blend it in with the other ingredients. Taste and adjust until it reaches your heat level. This adds a nice kick to the flavor. You can give your hummus a Mediterranean twist. Try mixing in olives or sun-dried tomatoes. They add a rich taste and a pop of color. You could also add fresh herbs like basil or oregano. These additions make your dish more vibrant and aromatic. If you want a nut-free hummus, skip the tahini. You can use sunflower seed butter instead. This still keeps the creamy texture. Another option is to blend in extra chickpeas for thickness. You won’t lose flavor, and it remains delicious and safe for nut allergies. Roasted red pepper hummus is versatile and pairs well with many foods. Here are some great options: - Warm pita bread - Fresh cucumber slices - Carrot sticks - Celery sticks - Bell pepper strips - Cherry tomatoes These pairings add crunch and flavor. They make great snacks or sides. You can use hummus in many fun and tasty ways. Here are some ideas: - Spread it on sandwiches for extra flavor. - Use it as a dip for crackers. - Top a salad with a scoop for added creaminess. - Mix it into pasta for a unique twist. - Add it to wraps with veggies and proteins. Hummus makes meals more exciting and healthy. When serving hummus to guests, a nice presentation makes a big difference. Here are some tips: - Use a shallow bowl for serving. - Drizzle olive oil on top in a fun pattern. - Sprinkle paprika and chopped parsley for color. - Arrange fresh veggies around the bowl. - Serve with a side of warm pita. These ideas impress guests and make the meal more inviting. Roasted red pepper hummus lasts about 4 to 7 days in the fridge. Store it in an airtight container. The flavors may deepen as it sits. If you notice any off smells or mold, it's best to toss it. Yes, you can freeze homemade hummus! Place it in a freezer-safe container. Leave space at the top for expansion. It can last up to four months. To eat, defrost it in the fridge overnight. Homemade hummus tastes fresher and has better flavor. You control the ingredients. Store-bought hummus may have preservatives and less flavor. Homemade hummus can be customized to your liking. You can add more garlic or spices as desired. To make hummus creamier, use a bit more tahini. Adding a splash of cold water helps too. Blend the hummus longer for a smoother texture. You can also try using ice cubes while blending. This creates a lighter, fluffier dip. This blog covered the best ways to make hummus, focusing on ingredients, preparation, and serving. We learned how to choose and benefit from the right ingredients. I shared tips for blending, roasting, and storing to improve your hummus experience. Don't forget to try fun variations and creative presentations. With this guide, you can whip up delicious hummus that impresses everyone. Enjoy making your tasty spread and sharing it with friends and family!

Roasted Red Pepper Hummus Simple and Tasty Recipe

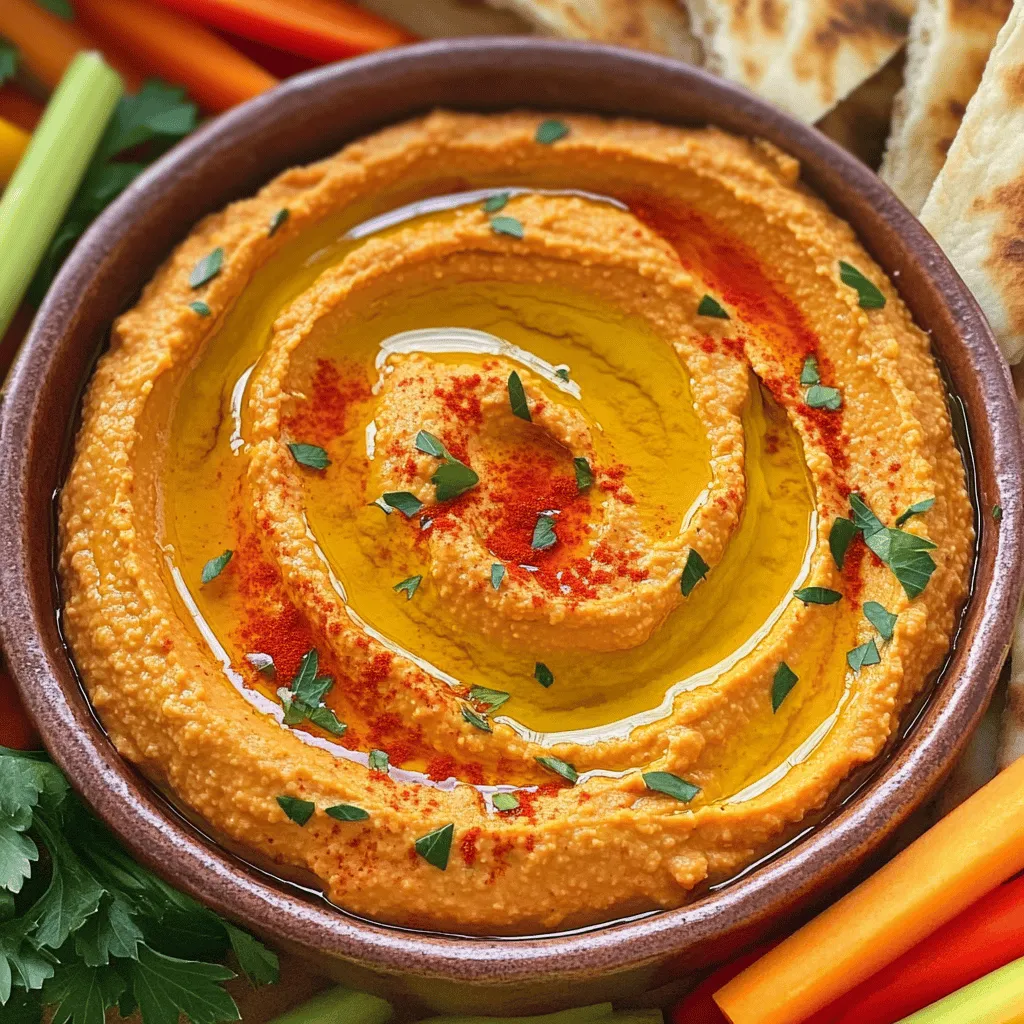
Looking for a simple, tasty dip that packs a punch? This Roasted Red Pepper Hummus is perfect for any snack

To make salted caramel pretzel bark, gather these simple ingredients: - 2 cups mini pretzels - 1 cup semi-sweet chocolate chips - 1 cup caramel bits - 1 tablespoon heavy cream - Sea salt for sprinkling - Optional: ½ cup crushed nuts (like pecans or almonds) These ingredients create a perfect mix of sweet and salty. The mini pretzels give crunch, while the chocolate and caramel add rich flavor. Adding nuts is optional, but it can enhance both taste and texture. This bark is easy to make and great for sharing! 1. First, preheat your oven to 350°F (175°C). This helps the caramel melt well. 2. Next, line a baking sheet with parchment paper. This makes cleanup easy. 3. Spread 2 cups of mini pretzels evenly on the prepared baking sheet. Cover the whole surface. 4. In a small saucepan, mix 1 cup of caramel bits with 1 tablespoon of heavy cream. Heat over low. Stir until smooth, about 5 minutes. 5. Pour the melted caramel over the pretzels. Use a spatula to coat each pretzel well. 6. Bake the pretzels in the oven for 10 minutes. Look for the caramel to bubble up. 1. While the pretzels bake, melt 1 cup of semi-sweet chocolate chips. Use a microwave-safe bowl. 2. Heat the chocolate in 30-second intervals. Stir each time until fully melted. 1. Once the pretzels bake, drizzle the melted chocolate over them right away. Spread it evenly with a spatula if you want. 2. Before the chocolate sets, sprinkle sea salt on top. If you like nuts, add ½ cup of crushed nuts now. 3. Let the bark cool at room temperature for about 30 minutes. Then, refrigerate it for another 30 minutes to set. 4. After it hardens, break the bark into pieces and enjoy! To make the best salted caramel pretzel bark, focus on melting the caramel and chocolate right. - Melting Caramel: Use low heat to melt the caramel bits and heavy cream together. Stir often. This takes about 5 minutes. A smooth mix is key to a great bark. - Melting Chocolate: For chocolate, use short bursts in the microwave. Heat for 30 seconds, then stir. Repeat until melted. This keeps the chocolate from burning. - Even Distribution: Pour the melted caramel over the pretzels slowly. Use a spatula to spread it. This ensures every pretzel gets coated. When adding chocolate, drizzle it in a zig-zag. It helps cover more area. Storing your bark right keeps it fresh and tasty. - Storing: Once cool, break the bark into pieces. Keep it in an airtight container. Store at room temperature or in the fridge. This helps it last up to two weeks. - Serving Ideas: Serve the bark as a sweet snack or dessert. Pair it with coffee or tea for a treat. You can also add it to gift boxes for friends. The contrast of salty and sweet always impresses! {{image_2}} You can change the taste of your salted caramel pretzel bark by using different chocolates. Dark chocolate adds a rich taste, while white chocolate gives a sweet twist. Each type of chocolate brings its own flavor and charm to the bark. You might also try flavored caramel. Think about adding sea salt caramel or even a hint of vanilla. This adds depth and a unique touch to your treat. If you want to swap out the pretzels, there are great options. Try using potato chips for a salty crunch. Rice cakes also work well for a lighter snack. You can also change the nuts or toppings. Instead of pecans or almonds, use walnuts or even hazelnuts. You can leave them out if you are nut-free. Mixing and matching helps you create a bark that suits your taste! If you want a tasty treat without the hassle, pre-made salted caramel pretzel bark is a great choice. Several brands make this sweet delight. Some recommended brands include Tate's Bake Shop and Brittle Brothers. These companies offer high-quality options that taste great. You can find them online or in stores. For online shopping, check websites like Amazon or Walmart. They often have a wide selection and convenient delivery options. If you prefer to shop in-store, look at local grocery chains or specialty shops. Stores like Target and Whole Foods carry these brands too. Always check the snack aisle for the best finds! Making your own salted caramel pretzel bark has many perks. First, you can control the flavors and ingredients. This means you can use high-quality chocolate and fresh pretzels. Plus, it can be a fun kitchen project for you and your family. Cost is another vital factor. Pre-made options can be pricey. When you make your own, you save money. The total cost for homemade salted caramel pretzel bark is about $10. This recipe serves around 16 pieces. In contrast, a store-bought version can cost up to $15 for fewer portions. In the end, whether you buy or make it, both options are delicious. It just depends on your time and budget! The best nuts for salted caramel pretzel bark are pecans and almonds. They add a nice crunch and flavor. You can use other nuts too, like walnuts or peanuts. Just make sure they are crushed well to mix into the bark. Yes, you can make this recipe gluten-free. Just use gluten-free pretzels. Many brands offer gluten-free options that taste great. Always check the label to ensure they are safe to eat. Salted caramel pretzel bark can last for about two weeks. Store it in an airtight container at room temperature. It may last longer in the fridge, but the texture can change. Yes, you can freeze salted caramel pretzel bark. Wrap it tightly in plastic wrap or foil. Then, place it in an airtight container. It can last for up to three months in the freezer. If your caramel hardens, you can gently reheat it. Place it in a saucepan on low heat. Add a splash of cream to help it melt again. Stir until smooth before pouring it over the pretzels. You learned how to make salted caramel pretzel bark using simple steps. We discussed the ingredients, preparation, and tips for that perfect texture. You can also try fun flavor twists to suit your taste. Whether you buy it or make it, this treat is a crowd-pleaser. Enjoy making your own delicious bark and share it with friends or family. It's easy and fun!

Salted Caramel Pretzel Bark Irresistible Sweet Treat

Are you ready to indulge in a treat that combines sweet, salty, and crunchy? My Salted Caramel Pretzel Bark is

For Balsamic Glazed Caprese Chicken, you need: - 4 boneless, skinless chicken breasts - 1 teaspoon salt - 1/2 teaspoon black pepper - 2 tablespoons olive oil - 1 cup cherry tomatoes, halved - 1 cup fresh mozzarella balls, halved - 1/2 cup fresh basil leaves - 1/2 cup balsamic glaze - 2 tablespoons honey - 1 teaspoon garlic powder These ingredients come together to create a tasty dish that looks great too. The salt and black pepper add flavor to the chicken. Garlic powder gives an extra kick. Olive oil is vital for searing the chicken. It helps to lock in moisture and keeps the chicken tender. The balsamic glaze and honey provide a sweet and tangy shine that makes this dish special. I love to finish the dish with fresh basil leaves. They add a pop of color and fresh flavor. You can also drizzle extra balsamic glaze on top for more taste. Serving it on a pretty platter makes it look even better. Mixing it with greens on the side makes a complete meal that impresses everyone at the table. First, preheat your oven to 400°F (200°C). This helps the chicken cook evenly. Next, take your chicken breasts and season them well. Use one teaspoon of salt, half a teaspoon of black pepper, and one teaspoon of garlic powder. Rub the seasonings on both sides. This adds flavor to every bite. Now, grab a large oven-safe skillet. Heat two tablespoons of olive oil over medium-high heat. Once hot, add the seasoned chicken breasts. Sear each side for about 5-7 minutes. Look for a nice golden-brown color. This step locks in juices and adds texture. After searing, remove the skillet from heat. Layer one cup of halved cherry tomatoes and one cup of halved fresh mozzarella balls on top of the chicken. Drizzle half a cup of balsamic glaze and two tablespoons of honey over everything. Make sure it covers the chicken well. Now, transfer the skillet to your preheated oven. Bake for 20-25 minutes. Check that the chicken reaches an internal temperature of 165°F (75°C). Once done, take it out and sprinkle half a cup of fresh basil leaves on top. Let it cool for a few minutes before serving. This allows the flavors to blend beautifully. To get the best glaze, use high-quality balsamic glaze. It should be thick and sweet. Make sure to drizzle it over the chicken after searing. This helps it stick well. Bake at the right temperature to let the glaze thicken. Keep an eye on the chicken to avoid burning the glaze. A good tip is to let the chicken rest before serving. This way, the glaze will look shiny and appealing. Serve your Balsamic Glazed Caprese Chicken on a large platter. This makes it look festive and inviting. Drizzle extra balsamic glaze on top for added flavor. Fresh basil leaves scattered on top add a nice touch. Pair the chicken with mixed greens or a light salad. Roasted vegetables also make a great side. For a heartier meal, serve it with garlic bread or pasta. To boost flavor, add spices like oregano or thyme when seasoning the chicken. A squeeze of lemon juice over the dish can brighten the taste. If you like a kick, add red pepper flakes for heat. Consider marinating the chicken in balsamic vinegar before cooking. This extra step adds depth to the flavor. A sprinkle of Parmesan cheese on top can also enhance the dish. These simple changes can make your meal even more delightful. {{image_2}} You can change the main protein in this dish. Try chicken thighs for a juicier bite. Pork tenderloin also works well, giving a nice twist. If you want seafood, shrimp is a quick and tasty option. Just adjust the cooking time based on the protein you choose. Fish cooks faster, so keep an eye on it to avoid overcooking. While fresh mozzarella is classic, you can explore other cheese types. Try burrata for a creamier texture. Feta cheese adds a salty kick, perfect for a different flavor. Goat cheese brings tanginess, making the dish unique. Use any cheese you enjoy, but adjust the amount to keep balance in taste. For a vegetarian version, replace the chicken with eggplant or portobello mushrooms. These options add great texture. You can use vegan mozzarella to keep it dairy-free. For a full vegan dish, swap honey with maple syrup or agave nectar. These changes keep the dish tasty while meeting dietary needs. To store your Balsamic Glazed Caprese Chicken, let it cool first. Place the chicken in an airtight container. You can keep it in the fridge for up to three days. Make sure to separate the chicken from any sides to keep them fresh. When you're ready to eat, preheat your oven to 350°F (175°C). Place the chicken in an oven-safe dish. Cover it with foil to keep it moist. Heat for about 15-20 minutes until warm. You can also use a microwave. Just heat on medium for about 2-3 minutes, checking often. If you want to freeze the chicken, wrap it well in plastic wrap, then foil. Label it with the date. It can last for up to three months in the freezer. To thaw, place it in the fridge overnight. Always reheat until it’s hot all the way through. Balsamic glaze is a thick, sweet sauce made from balsamic vinegar. It cooks down until it becomes syrupy. This glaze adds a rich flavor to many dishes. You can find it in stores or make it at home. To make it, simmer balsamic vinegar with honey or sugar. This thickens it and enhances its taste. Yes, you can use chicken thighs instead of breasts. Chicken thighs are more tender and juicy. They have a richer flavor, which can make your dish even better. Just make sure to adjust the cooking time. Thighs may take a bit longer to cook through. To spice up this dish, add red pepper flakes or cayenne pepper. You can also use spicy Italian sausage or add jalapeños. These ingredients will bring heat and excitement to the meal. Adjust the amount based on your spice tolerance. Taste as you go to find the right level of heat. Many sides work well with Balsamic Glazed Caprese Chicken. Here are some great options: - Mixed green salad with vinaigrette - Garlic bread or crusty baguette - Roasted vegetables like zucchini or asparagus - Quinoa or rice pilaf - Mashed potatoes for a comforting touch These sides will complement the chicken and enhance your meal. This article covered the key ingredients, step-by-step cooking instructions, and useful tips for making Balsamic Glazed Caprese Chicken. We explored variations using different proteins and cheeses, plus storage tips for leftovers. This dish is easy to make and versatile. Try the tips for a delicious result. Enjoy experimenting with flavors! This meal is perfect for any dinner and will impress your guests. Keep these ideas in mind and get cooking!

Balsamic Glazed Caprese Chicken for a Flavorful Meal

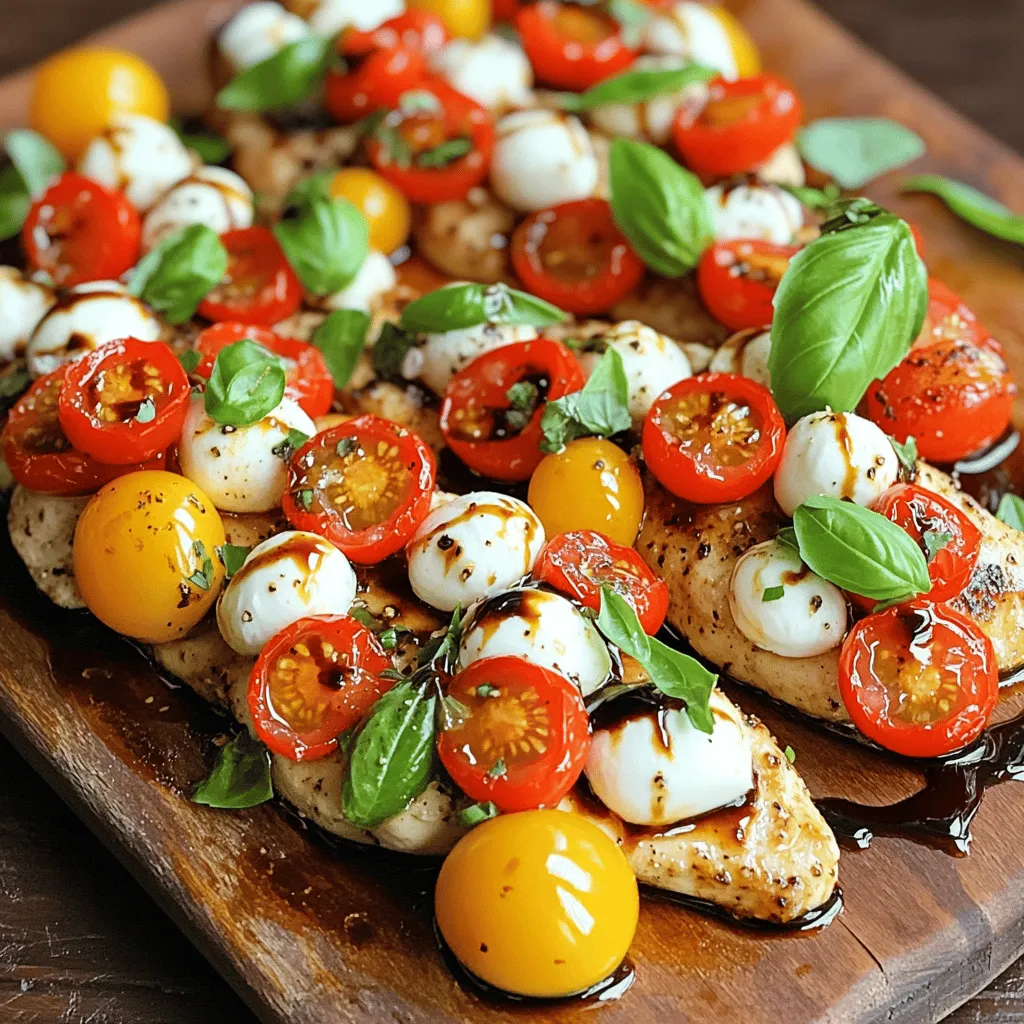
Looking for a tasty way to spice up dinner? Balsamic Glazed Caprese Chicken is your answer! This dish brings together

- 1 lb large shrimp, peeled and deveined - 1 cup shredded coconut (sweetened or unsweetened) - 1/2 cup panko breadcrumbs - 1/2 cup all-purpose flour - 2 large eggs - 1 teaspoon garlic powder - 1 teaspoon paprika - Salt and pepper to taste - Cooking spray To make tasty air fryer coconut shrimp, you need fresh ingredients. Start with large shrimp. They should be peeled and deveined for best texture. Use sweetened coconut for a hint of sweetness. Panko breadcrumbs give a nice crunch. All-purpose flour helps the coating stick. Eggs bind the coating together. Garlic powder and paprika add flavor. Don't forget salt and pepper for taste. Lastly, cooking spray prevents sticking in the fryer. Each ingredient plays a role in making this dish crispy and flavorful. The combination creates a perfect blend of textures and tastes. You can mix and match ingredients for your twist. Enjoy cooking! Start by preheating your air fryer to 400°F (200°C). This step is crucial. It ensures that the shrimp cook evenly and become crispy. Preheating takes about 5 minutes. Next, set up your breading station. You need three shallow bowls: - One with 1/2 cup all-purpose flour. - One with 2 large beaten eggs. - One with a mix of 1 cup shredded coconut, 1/2 cup panko breadcrumbs, 1 teaspoon garlic powder, 1 teaspoon paprika, salt, and pepper. Mix the coconut-panko mixture well. This will be the tasty coating for your shrimp. Now, it’s time to coat the shrimp. Take each shrimp and dip it into the flour. Shake off any extra flour. Then, dip it into the beaten eggs. Make sure it’s fully coated. Finally, roll the shrimp in the coconut-panko mixture. Press gently to help it stick well. This coating gives the shrimp its crunchy texture. Lightly spray the air fryer basket with cooking spray. This helps prevent sticking. Place the coated shrimp in the basket. Make sure to leave space between each piece. This allows hot air to circulate and cook the shrimp evenly. Air fry the shrimp for 8 to 10 minutes. Flip them halfway through the cooking time. Keep an eye on them to avoid over-browning. Once they are golden and crispy, they are ready to enjoy! To make your coconut shrimp crispy, you need to follow a few key steps. First, ensure the shrimp are dry before breading. Pat them down with a paper towel. This helps the coating stick better and avoids a soggy texture. When you coat the shrimp, use even layers. Dip the shrimp in flour, then eggs, and finally in the coconut-panko mix. Make sure to press gently so the coating sticks well. In the air fryer, avoid overcrowding. Place the shrimp in a single layer. This allows hot air to circulate freely, giving you that desired crispiness. Adding spices can elevate your coconut shrimp. You can mix in extra spices like cayenne pepper for heat or lemon zest for brightness. If you want, marinate the shrimp in lime juice for a tangy kick before breading. You can also use flavored breadcrumbs, such as garlic or Italian herbs. These small tweaks add depth and fun to the dish. Serving your coconut shrimp is a chance to get creative. A sweet chili sauce pairs perfectly for dipping. You can also try mango salsa for a fruity twist. For garnishing, sprinkle fresh cilantro on top for color and freshness. Serve the shrimp on a platter with lime wedges for a zesty touch. This makes your dish not only tasty but also visually appealing. {{image_2}} You can make coconut shrimp without eggs. Instead of eggs, use milk or a non-dairy option like almond milk. You can also use a mixture of cornstarch and water. This creates a sticky coating for the shrimp. Dip the shrimp in your chosen liquid. Then roll them in the coconut-panko mix. This option is great for those with egg allergies. Want some heat? Add chili powder, cayenne, or hot sauce to the breading mix. You can mix one teaspoon of chili powder into the coconut-panko mixture. If you like it spicier, try adding more. For extra flavor, consider using jalapeños or sriracha sauce in your dipping sauce. This will give your shrimp a zesty kick. You can play around with different coatings. Oats can replace panko for a heartier texture. Simply pulse rolled oats in a blender for a finer texture. Cornmeal is another fun option. It gives a crunchy bite to the shrimp. Mix and match these coatings to find your favorite! To keep your air fryer coconut shrimp fresh, store them in an airtight container. Place the shrimp in the fridge if you plan to eat them soon. For longer storage, freeze them. Make sure to separate layers with parchment paper to avoid sticking. This method helps keep the shrimp crispy. To reheat the shrimp and keep them crispy, use your air fryer. Set it to 350°F (175°C). Place the shrimp in a single layer. Heat for around 5 minutes. This keeps the coating crunchy and warms the shrimp all the way through. When stored properly, coconut shrimp last about 3 days in the fridge. If frozen, they can last up to 2 months. Just remember that the longer they sit, the more the texture changes. Enjoy them while they are fresh for the best taste! Yes, you can use frozen shrimp. Just remember to thaw them first. To thaw, place the shrimp in cold water for about 15-20 minutes. Pat them dry with a paper towel before breading. Fresh shrimp can taste better, but frozen shrimp works well, too. The key is to ensure they are dry, so the coating sticks nicely. Coconut shrimp tastes great with several sauces. Here are some popular choices: - Sweet chili sauce adds a nice kick. - Mango salsa gives a sweet and fresh touch. - A tangy lime aioli can enhance the flavor. Feel free to mix and match these options to find your favorite! You can tell when shrimp is done by looking for a few signs: - The shrimp should turn pink and opaque. - The coating should be golden brown and crispy. - If you cut one open, the meat should be firm and not translucent. Cook time is about 8-10 minutes, so keep an eye on them to avoid overcooking! In this post, we explored how to make delicious coconut shrimp using an air fryer. We covered the key ingredients, step-by-step instructions, and tips for perfect results. You learned how to achieve crispiness and enhance flavors with fun variations. Also, I shared storage tips to enjoy leftovers later. Now, you have all the tools to create this tasty dish. You can impress friends and family with your cooking skills! Enjoy your coconut shrimp and have fun experimenting with flavors.

Air Fryer Coconut Shrimp Crispy and Flavorful Treat

Looking for a tasty dish that’s quick and easy? You’re in the right place! This Air Fryer Coconut Shrimp recipe

To make BBQ chicken flatbread pizza, gather these ingredients: - 2 large flatbreads or naan bread - 1 cup cooked chicken, shredded - 1/2 cup BBQ sauce (your favorite brand) - 1 cup shredded mozzarella cheese - 1/2 red onion, thinly sliced - 1/2 cup corn kernels (fresh or frozen) - 1/4 cup fresh cilantro, chopped - Salt and pepper to taste - Olive oil for drizzling These ingredients create a tasty and simple pizza. The flatbreads serve as a perfect base. You can add more flavors to your pizza with these options: - Jalapeños for heat - Pineapple for sweetness - Bell peppers for crunch - Goat cheese for creaminess Feel free to mix and match these extras. They can make your pizza unique and fun. Choosing the right BBQ sauce can make a big difference. Here are some brands I recommend: - Sweet Baby Ray's for a sweet taste - Stubbs for a more smoky flavor - Kraft for classic BBQ flavor Each brand adds its own twist to the pizza. Try different ones to find your favorite! To make BBQ chicken flatbread pizza, start by gathering all your ingredients. You need two large flatbreads, shredded cooked chicken, BBQ sauce, mozzarella cheese, red onion, corn, cilantro, salt, pepper, and olive oil. First, preheat your oven to 425°F (220°C). This step ensures your pizza cooks evenly. Mix the shredded chicken with BBQ sauce in a bowl. Make sure the chicken is well coated. Next, place your flatbreads on a baking sheet lined with parchment paper. Drizzle a bit of olive oil on top. This helps keep the flatbread crispy. Spread the BBQ chicken mix evenly over each flatbread. Leave a small border around the edges for crust. Now, sprinkle the shredded mozzarella on top. Follow with the sliced red onion and corn. Season with salt and pepper to taste. Bake your pizzas in the preheated oven for about 10-12 minutes. Keep an eye on them. You want the cheese to melt and bubble, and the edges to turn golden brown. Once done, take them out and let them cool for a minute. Before slicing your pizza, sprinkle fresh cilantro over the top. This adds a nice touch of flavor and color. Cut the flatbread into pieces and serve warm. Enjoy your tasty BBQ chicken flatbread pizza! To make great BBQ chicken, use cooked chicken. Shredded rotisserie chicken works well. It saves time and adds flavor. Always mix the chicken with BBQ sauce. This helps the chicken stay moist. Make sure every piece is coated well. If you have time, marinate the chicken in BBQ sauce for a deeper taste. For crispy flatbread, start with a light drizzle of olive oil. This helps the edges crisp up nicely. Preheat your oven to 425°F (220°C) before baking. The heat is key. Bake the flatbreads for about 10-12 minutes. Keep an eye on them. You want the cheese melted and the edges golden brown. If you like extra crunch, you can toast the flatbreads lightly before adding toppings. BBQ chicken flatbread pizza pairs well with many sides. A fresh salad adds a nice crunch. Try a simple green salad with a light vinaigrette. You could also serve it with coleslaw for a classic BBQ touch. For drinks, iced tea or lemonade works great. These options balance the rich flavors of the pizza. Enjoy your meal with friends or family! {{image_2}} You can make a tasty vegetarian BBQ flatbread pizza. Replace the chicken with more veggies. Use bell peppers, mushrooms, or zucchini. Add black beans for protein. Mix these with your BBQ sauce. This makes a colorful and yummy pizza. Feel free to get creative with toppings. You can add sliced jalapeños for heat. Pineapple brings a sweet touch. Try feta cheese for a salty kick. Spinach adds a fresh taste. Mix and match until you find your favorite combo. While BBQ sauce shines in this recipe, you can switch it up. Use ranch dressing for a creamy base. A spicy buffalo sauce adds a kick. Pesto gives a fresh herb flavor. Each sauce changes the whole pizza experience. Try different ones to find your perfect flavor. To keep your leftover BBQ chicken flatbread pizza fresh, wrap it tightly in plastic wrap. You can also use aluminum foil or place it in an airtight container. Store it in the fridge for up to three days. This way, you can enjoy it later without losing flavor. For the best taste, reheat your pizza in the oven. Preheat the oven to 350°F (175°C). Place the pizza on a baking sheet and heat for about 10 minutes. This method keeps the flatbread crispy. You can also use a skillet. Heat it on medium for 5 minutes. Cover it to melt the cheese evenly. Avoid using the microwave, as it can make the flatbread soggy. If you want to save pizza for later, freezing works great. First, let the pizza cool completely. Wrap each piece in plastic wrap, then in aluminum foil. This will prevent freezer burn. Store it in the freezer for up to three months. When ready to eat, thaw it in the fridge overnight. Then, reheat it in the oven as mentioned above for the best taste. Yes, you can use store-bought BBQ sauce. It saves time and is tasty. Look for a sauce that you enjoy. You can find many flavors, like sweet or spicy. Choose one that fits your taste. Making your own BBQ sauce is simple and fun. Here’s a quick recipe: - 1 cup ketchup - 1/4 cup apple cider vinegar - 1/4 cup brown sugar - 1 tablespoon Worcestershire sauce - 1 teaspoon smoked paprika - Salt and pepper to taste Mix everything in a bowl. Adjust the flavors as needed. This sauce adds a personal touch to your pizza. You can use many proteins for this flatbread pizza. Some great options are: - Cooked beef - Grilled shrimp - Shredded pork - Tofu for a vegetarian choice Each protein gives a different flavor. Choose what you like best! This blog post covered everything you need for BBQ chicken flatbread pizza. You learned about ingredients, preparation steps, and cooking tips. We explored exciting variations and how to store leftovers properly. In my opinion, this dish is fun and versatile. Try new flavors and toppings to make it your own. Use these tips to impress your friends and family. Enjoy your tasty creation!

BBQ Chicken Flatbread Pizza Flavorful and Easy Recipe

Are you ready to spice up your meal routine? Let me show you how to make a delicious BBQ Chicken

- 200g ramen noodles - 1 cup broccoli florets - 1 red bell pepper, julienned - 1 carrot, julienned - 2 tablespoons sesame oil - 1 tablespoon fresh ginger, grated - 2 garlic cloves, minced - 2 tablespoons soy sauce - 1 tablespoon rice vinegar - 1 tablespoon honey (or maple syrup) - 1 tablespoon sesame seeds - 3 green onions, chopped - Fresh cilantro, for garnish These ingredients give the dish its tasty and rich flavor. The ramen noodles form the base. They soak up all the sauce and seasoning. The veggies add crunch and color. Broccoli, red bell pepper, and carrot are great choices. They cook fast and stay crisp. The sauces bring everything together. Sesame oil adds a nutty taste. Ginger and garlic give a nice kick. Soy sauce and rice vinegar balance the flavors. Honey or maple syrup adds a hint of sweetness. Don’t forget the garnishes! Sesame seeds add a nice crunch. Green onions and cilantro give a fresh touch. Mix and match these elements to make the dish yours. Enjoy cooking! Begin by boiling a large pot of salted water. Once the water boils, add 200g of ramen noodles. Cook them until they are al dente, usually about 3-4 minutes. When done, drain the noodles and set them aside. Next, heat 2 tablespoons of sesame oil in a large skillet or wok over medium heat. Add 1 tablespoon of grated fresh ginger and 2 minced garlic cloves. Sauté these for 1-2 minutes until you can smell their great aroma. This step adds a lovely depth to your dish. Now it’s time to add some color and crunch! Toss in 1 cup of broccoli florets, 1 julienned red bell pepper, and 1 julienned carrot into the skillet. Stir-fry these vegetables for about 5-7 minutes until they are tender-crisp. They should be vibrant and still have a bit of bite. In a small bowl, whisk together 2 tablespoons of soy sauce, 1 tablespoon of rice vinegar, and 1 tablespoon of honey (or maple syrup for a vegan option). Pour this sauce over the sautéed veggies in the skillet. Then, add the drained ramen noodles. Toss everything together so the noodles are well-coated with the sauce. Let everything cook for another 2-3 minutes until the noodles are warmed through. Remove from heat and serve in bowls. For the finishing touch, garnish each bowl with 3 chopped green onions, 1 tablespoon of sesame seeds, and a handful of fresh cilantro. Enjoy your delicious sesame ginger ramen noodles! To cook the ramen noodles just right, follow the package instructions. This usually takes about 3 to 5 minutes. You want them to be al dente, which means they should have a slight bite. Drain them quickly to avoid overcooking. If you rinse them under cold water, it will stop the cooking process. This keeps your noodles firm and tasty. To make your sesame ginger ramen even better, think about adding spices or other ingredients. Here are some ideas: - Red pepper flakes for heat - A splash of lime juice for brightness - Peanuts or cashews for crunch - A sprinkle of sesame oil before serving for extra richness Feel free to experiment! Each addition brings a unique twist to the dish. Preparing ahead makes cooking easier. Chop your vegetables, like broccoli, bell pepper, and carrot, in advance. Store them in the fridge until you’re ready to cook. You can also make the sauce ahead of time. Mix soy sauce, rice vinegar, and honey, then keep it in a jar. This way, you save time and make your meal quick and easy on busy days. {{image_2}} You can add protein to your sesame ginger ramen noodles. This can make the dish heartier. Options include: - Chicken: Use grilled or shredded chicken for a classic taste. - Shrimp: Cook shrimp until pink, then toss them in the noodles. - Tofu: For a vegetarian option, use firm tofu. Cut it into cubes and pan-fry it until golden. Each protein adds its own flavor, making your meal unique. If you want a vegan-friendly dish, it's easy to adjust. Here are some simple swaps: - Honey: Replace honey with maple syrup for sweetness. - Tofu: Use tofu as your protein source. - Vegetable Broth: Instead of chicken broth, use vegetable broth for a richer taste. These changes keep your meal delicious while sticking to vegan guidelines. Feel free to mix in different vegetables. This adds color and nutrients to your dish. Some tasty options include: - Snap Peas: Crisp and sweet, they give a nice crunch. - Mushrooms: Sautéed mushrooms add umami flavor. - Spinach: Toss in fresh spinach for a pop of green. Experiment with veggies to find your favorite combinations. This makes every bowl of ramen special. To keep your leftover Sesame Ginger Ramen Noodles fresh, store them in an airtight container. Make sure to let them cool before sealing. Place the container in the fridge. This helps to keep flavors locked in and prevents sogginess. Leftovers can last about 3 to 4 days in the fridge. When you’re ready to eat, just reheat them on the stove or in the microwave. If you want to keep your noodles longer, freezing is a great option. First, let the noodles cool completely. Then, place them in a freezer-safe bag or container. Remove as much air as possible. This helps prevent freezer burn. When you’re ready to eat, you can thaw them overnight in the fridge or add them frozen to a hot skillet with a splash of water. Heat until warmed through. These Sesame Ginger Ramen Noodles have a good shelf life when stored properly. In the fridge, they last for 3 to 4 days. If you freeze them, they can last up to 2 months. Just remember, the sooner you eat them, the better the taste! This way, you can enjoy the fresh flavors of the dish. Yes, you can use other types of noodles. Soba noodles, udon, or even rice noodles work well. These options give you a different taste and texture. Soba has a nutty flavor, while udon is thick and chewy. Rice noodles are lighter and gluten-free. Feel free to experiment with what you have at home. To make this recipe gluten-free, choose gluten-free ramen or rice noodles. Check the labels to ensure they are certified gluten-free. Use tamari sauce instead of soy sauce, as tamari is made without wheat. This way, you can enjoy all the flavors without gluten. The Sesame Ginger Ramen Noodles are delicious and nutritious. Each serving contains about 450 calories. You get protein from the noodles and veggies. The dish has healthy fats from sesame oil. Broccoli and bell peppers add vitamins and minerals. This meal is balanced and satisfying, making it a great choice for lunch or dinner. We covered how to make delicious Sesame Ginger Ramen Noodles. You learned about the key ingredients like ramen noodles and fresh vegetables. I provided step-by-step instructions to guide you through the cooking process. We also explored tips for flavor and meal prep. Don’t forget the variations, including proteins and vegan options for everyone. Lastly, proper storage ensures your leftovers stay fresh. Enjoy your cooking adventure!

Savory Sesame Ginger Ramen Noodles Quick and Easy Meal

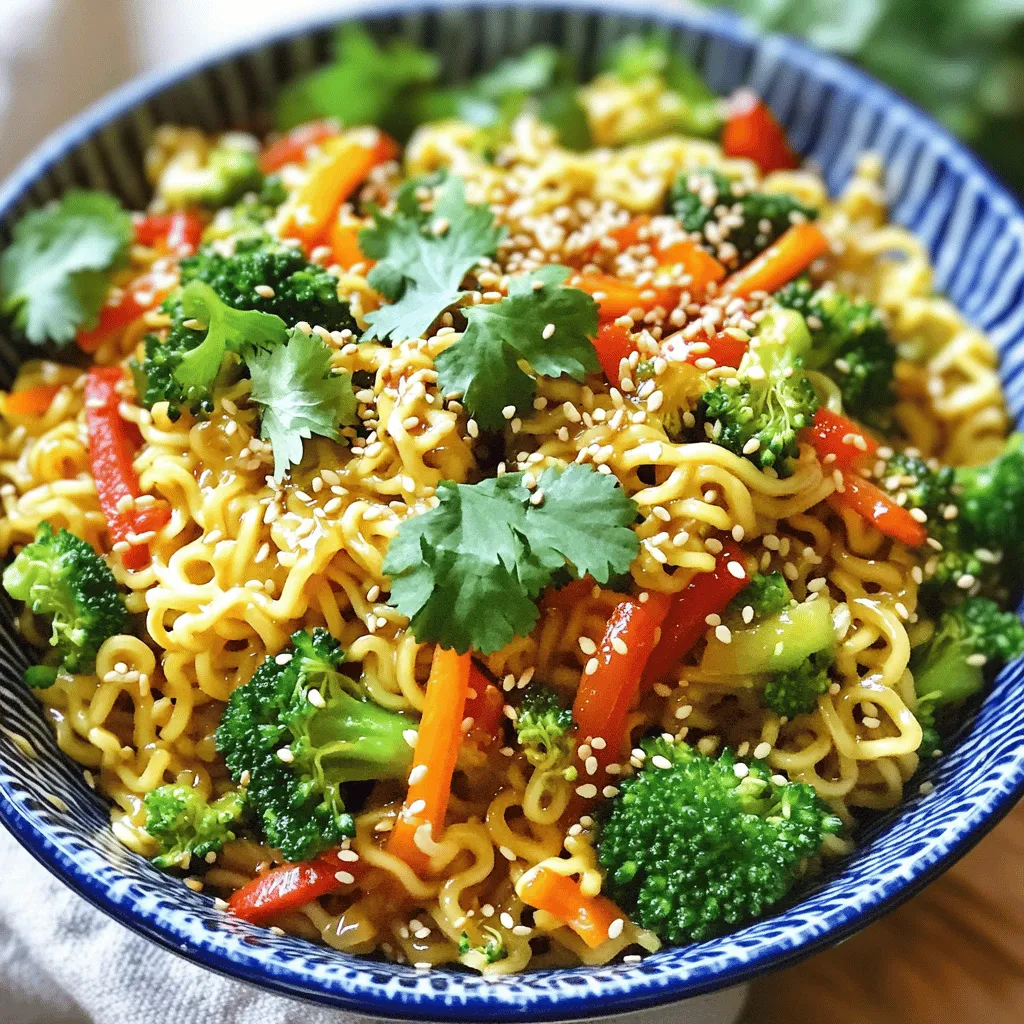
Craving a quick and tasty meal? These Savory Sesame Ginger Ramen Noodles are perfect for you! With fresh veggies, bold

Older posts
Newer posts
← Previous Page1 … Page35 Page36 Page37 … Page84 Next →

dsad

© 2026 easycookingbite • Built with GeneratePress

Our Policies

  • Copyright Policy
  • Cookie Policy
  • GDPR Policy
  • Privacy Policy
  • Disclaimer
  • Terms Of Use

More Information

  • Home
  • About
  • Contact
  • Appetizers
  • Dessert
  • Dinner
  • Drinks
©2026, easycookingbite About Back To Top