Skip to content
DisclaimerTerms Of UseGDPR PolicyCookie Policy

easycookingbite

  • Home
  • Drinks
  • Appetizers
  • Dinner
  • Dessert
  • About
  • Contact
  • Privacy Policy
DisclaimerTerms Of UseGDPR PolicyCookie Policy

NO-ING-IMG

You need two fresh ahi tuna steaks, about 6 ounces each. They bring rich flavor and protein to the salad. Look for bright color and firm texture when choosing your tuna. The sesame seeds add crunch and flavor. Use 1/4 cup of white sesame seeds and 1/4 cup of black sesame seeds. The mix creates a lovely look and taste on the tuna. For the salad, gather 4 cups of mixed greens. I like arugula, spinach, and romaine for a fresh base. Add 1 cup of halved cherry tomatoes for sweetness. Slice 1/2 cucumber thinly for a crisp bite. Include 1/4 red onion, also thinly sliced, for a bit of sharpness. Finally, add 1 avocado, sliced, for creaminess. The dressing ties everything together. You’ll need 2 tablespoons of soy sauce for saltiness. Add 1 tablespoon of rice vinegar for tang. Use 1 tablespoon of sesame oil for depth. Mix in 1 teaspoon of honey for sweetness. Lastly, include 1 teaspoon of grated ginger for a nice kick. To start, I dry the ahi tuna steaks with paper towels. This step helps the sesame seeds stick better. Next, I season both sides of the tuna with salt and pepper. This adds flavor to each bite. In a shallow dish, I mix the white and black sesame seeds. I press each tuna steak into the sesame mixture. I make sure both sides are fully coated. This creates a tasty crust that adds crunch. I heat olive oil in a non-stick skillet over medium-high heat. Once the oil is hot, I add the sesame-crusted tuna steaks. I sear them for about 1-2 minutes on each side for rare. The goal is to have a warm center. After searing, I remove the tuna and let it rest for a few minutes. I take a large bowl and combine the mixed salad greens. I add the cherry tomatoes, cucumber, red onion, and avocado. I toss everything gently. This mix brings freshness and color to the salad. In a small bowl, I whisk together the soy sauce, rice vinegar, sesame oil, honey, and grated ginger. I keep whisking until the ingredients blend well. This dressing adds a sweet and tangy kick to the salad. I slice the seared tuna into thin strips. I arrange the salad mixture on individual plates or a large serving platter. I top it with the sliced tuna. This makes the dish look inviting and vibrant. Finally, I drizzle the dressing over the salad just before serving. This keeps the greens crisp and fresh. To get that perfect sear on your tuna, start with dry steaks. Pat them with paper towels. This helps the sesame seeds stick better. Season both sides with salt and pepper. Heat olive oil in a non-stick skillet. Make sure the oil is hot before adding the tuna. Sear each side for just 1-2 minutes. This keeps the inside rare and tender. If you want it more cooked, leave it on longer. Remember, a quick sear seals in the flavor. Mixing your salad greens can be fun. In a large bowl, add the mixed greens first. Then, toss in the cherry tomatoes, cucumber, red onion, and avocado. Use your hands or salad tongs to mix gently. This ensures every bite is filled with flavor. Avoid squishing the avocado. It should stay in nice slices for texture. If you want, you can add some nuts or seeds for crunch. Presentation makes your salad pop. Serve it on a large platter for a family-style meal. Slice the seared tuna into thin strips. Arrange the slices on top of the salad. Sprinkle extra sesame seeds for a nice finish. Add a lime wedge for a splash of color. This not only looks great but adds a zesty kick when served. A beautiful salad makes everyone excited to eat! {{image_2}} You can switch out ahi tuna for other proteins. Salmon works great and adds a rich flavor. Grilled chicken is another good choice, offering a milder taste. If you want a plant-based option, try marinated tofu. Just remember to press the tofu to remove excess water before cooking. Feel free to change the salad greens. Baby kale adds a nice crunch and flavor. You can also use a mix of spinach and arugula for a peppery kick. If you want something lighter, try using shredded cabbage. Each mix brings its own taste and texture. You can play with the dressing to suit your taste. Add a splash of lime juice for a zesty twist. If you love heat, stir in some chili flakes or sriracha. For a creamier dressing, mix in a little Greek yogurt. Each change will make the salad feel fresh and new. To keep your sesame crusted ahi tuna salad fresh, store it properly. Place leftover salad in an airtight container. This helps prevent wilting and keeps flavors intact. It's best to eat the salad within one day. If you leave it longer, the greens may get soggy. Store the dressing separately to keep it fresh. You can freeze the tuna steaks if you have extra. Wrap each steak tightly in plastic wrap or foil. Then, place wrapped steaks in a freezer-safe bag. This keeps air out and prevents freezer burn. Use frozen tuna within three months for the best taste. When ready to use, thaw in the fridge overnight. For the salad components, store each in separate containers. Keep greens in a damp paper towel inside a bag. This keeps them crisp. Store sliced veggies like cucumber and onion in airtight containers. They stay fresh for two to three days. If you slice the avocado, cover it tightly with lime juice to prevent browning. Yes, you can use frozen tuna, but it is best to thaw it first. Frozen tuna may not have the same taste as fresh. Always check for quality when thawing. To thaw, place it in the fridge overnight. You can also place it in cold water for quicker results. Ahi tuna is low in calories and high in protein. It contains omega-3 fatty acids that are good for your heart. This fish is also rich in vitamins and minerals like B vitamins and selenium. Eating ahi tuna can help support brain function and reduce inflammation. To make this salad gluten-free, use gluten-free soy sauce. Check the labels on other ingredients too. Avoid any dressings that may contain wheat. Most fresh vegetables and the tuna are already gluten-free, making this salad easy to adapt. This salad goes great with simple sides. Consider steamed rice or quinoa for a filling option. Grilled vegetables add color and flavor. A light soup, like miso, can also work well. These sides complement the flavors of the salad nicely. You can store the dressing in the fridge for up to a week. Keep it in a sealed container to maintain freshness. Before using, give it a good shake to mix the ingredients again. If it separates, this is normal; just mix it up before serving. This article explored how to create a tasty sesame-crusted ahi tuna salad. You learned about the key ingredients, including fresh tuna, salad components, and flavorful dressings. I provided clear steps for preparing and cooking the tuna, assembling the salad, and dressing it. Tips and variations helped you customize this dish to your liking. Finally, we covered storage best practices and answered common questions. With these insights, you can enjoy a delightful meal. Now, go ahead and try making this salad yourself!

Sesame Crusted Ahi Tuna Salad Flavorful and Fresh Meal

If you crave a fresh meal packed with flavor, try my Sesame Crusted Ahi Tuna Salad. This dish is not

- 1 cup ricotta cheese - 1 cup fresh blueberries - Zest of 1 lemon - 2 tablespoons lemon juice Ricotta cheese makes these pancakes super fluffy. It adds creaminess and keeps them moist. Fresh blueberries burst with flavor, giving a sweet and tangy taste. The lemon zest and juice brighten the dish, adding a refreshing kick. - 1 cup all-purpose flour - 2 tablespoons sugar - 1 tablespoon baking powder - ½ teaspoon salt All-purpose flour creates a nice base for the pancakes. Sugar adds sweetness, while baking powder helps them rise. A pinch of salt brings out all the flavors in each bite. - 2 large eggs - ¾ cup milk - Butter or oil for cooking Eggs bind everything together. Milk adds creaminess and helps create a smooth batter. Use butter or oil to cook the pancakes. This prevents sticking and gives a lovely golden color. To start, I mix the ricotta cheese, eggs, milk, lemon zest, and lemon juice in a bowl. I whisk these ingredients together until they are smooth and well combined. This mix brings a creamy texture and a fresh flavor. Next, I take a separate bowl to combine the dry ingredients. I whisk together the all-purpose flour, sugar, baking powder, and salt. This step is key to ensure the pancakes rise well and taste great. Now, I gradually add the dry mix into the ricotta mixture. I stir gently until just combined. I make sure not to over-mix; a few lumps are okay. Finally, I fold in the fresh blueberries carefully, so they stay whole and juicy. I preheat a non-stick skillet or griddle over medium heat. I add a small amount of butter or oil to coat the surface. This helps the pancakes cook evenly and not stick. When the skillet is hot, I pour about ¼ cup of batter for each pancake. I wait until bubbles form on the surface and the edges look set. This usually takes about 2-3 minutes. Then, I flip the pancakes and cook them for another 2-3 minutes until they turn golden brown. Once cooked, I remove the pancakes from the skillet. I keep them warm on a plate while I repeat with the remaining batter. To keep the pancakes warm, I cover them with a clean kitchen towel. This keeps them soft and fluffy until serving. For a beautiful presentation, I stack the pancakes high on a plate. I dust them with powdered sugar and top them with extra blueberries. A drizzle of honey or maple syrup adds a sweet finish. To make your pancakes fluffy, do not over-mix the batter. Over-mixing makes the pancakes dense. Stir just until the ingredients blend. A few lumps are fine; they help keep the texture light. Use a whisk to combine the wet and dry ingredients. This tool helps add air to the batter, which is key for fluffiness. Remember, less mixing means more air and better pancakes! Boost the taste of your pancakes with fun toppings. Try adding fresh whipped cream, maple syrup, or a sprinkle of powdered sugar. You can also top them with more blueberries or sliced bananas for extra fruitiness. If you want to change things up, swap ricotta with cottage cheese. This will create a different texture, but still taste great. You can also use other fruits like strawberries or raspberries for a unique twist. If your pancakes are too thick, add a splash of milk. This helps loosen the batter so it spreads better. The right thickness is key for even cooking. If your pancakes are not browning well, check your skillet's heat. If it's too low, they will cook slowly and not get golden. A medium heat is best for even browning and cooking. Always use enough butter or oil to keep them from sticking. {{image_2}} You can swap blueberries for other fruits. Raspberries and strawberries work great. These fruits add a new taste and color. You can also mix fruits for a fun twist. Fresh fruit is best, but frozen works too. If you use frozen fruit, let it thaw first. This way, your pancakes won’t get too watery. For gluten-free pancakes, try using almond or coconut flour. These flours give a different taste but still taste great. You can also use a gluten-free all-purpose mix. For dairy-free options, look for ricotta made from almonds or cashews. These will still keep your pancakes fluffy and tasty. Want to make your pancakes even more fun? Try adding chocolate chips to the batter. They melt and create little pockets of sweetness. You can also add spices like cinnamon or nutmeg. These spices add warmth and depth to your pancakes. Just a pinch can take your dish to a new level! To keep your pancakes fresh, first let them cool completely. Place them in an airtight container. You can store them in the fridge for up to three days. If you want to keep them longer, freezing is a great option. To freeze pancakes, stack them with parchment paper in between. This prevents them from sticking. Place the stacked pancakes in a freezer bag. Seal it tight and label it with the date. They will stay fresh for up to two months. When it comes to reheating, you have two options: the oven or the microwave. For the oven, preheat it to 350°F (175°C). Place the pancakes on a baking sheet and cover them with foil. Heat for about 10 minutes. If you use the microwave, place pancakes on a plate. Cover them with a damp paper towel to keep them moist. Heat in 30-second bursts until warm. To keep pancakes fluffy, avoid reheating too long. They can become tough if overcooked. In the fridge, your pancakes will stay fresh for about three days. If they smell sour or have a strange color, it’s best to toss them. If you freeze them, they can last for two months. Check for freezer burn if they stay in too long. Always trust your senses; if it looks or smells off, don’t eat it! Yes, you can prepare these pancakes ahead. To store them, let the pancakes cool completely. Then, stack them with parchment paper between each one. Place the stack in an airtight container. You can keep them in the fridge for up to three days. For longer storage, freeze them. Just wrap each pancake in plastic wrap and place them in a freezer bag. They will last for up to two months. When you're ready to eat, reheat them. You can use the oven or microwave. For the oven, preheat it to 350°F (175°C). Place pancakes on a baking sheet and cover with foil. Heat for about 10 minutes. If using a microwave, place a few pancakes on a plate, cover with a damp paper towel, and heat for 30 seconds to 1 minute. This keeps them soft and fluffy. If you don't have ricotta, you can use cottage cheese. Blend it until smooth for a similar texture. Cream cheese is another option, but it will give a richer taste. Greek yogurt can work as well; it adds a tangy flavor and makes pancakes moist. Each substitute will change the taste slightly, but they will still be delicious. To prevent sticking, use a non-stick skillet or griddle. Preheat it on medium heat before adding butter or oil. Make sure to coat the surface evenly. If you find that your pancakes still stick, try using a silicone spatula for flipping. It can slide under the pancake more easily than metal. Always let the pancakes cook until bubbles form on top before flipping. This helps them set and stay intact. These blueberry lemon ricotta pancakes combine simple yet tasty ingredients. We explored the perfect balance of wet and dry ingredients to create fluffy batter. I shared tips for cooking, storing, and reheating pancakes, so they always taste fresh. Don't forget the fun variations for dietary needs and flavor twists! Keep experimenting to find your favorite mix. Enjoying food should be easy and fun. Happy cooking!

Blueberry Lemon Ricotta Pancakes Fluffy and Delicious

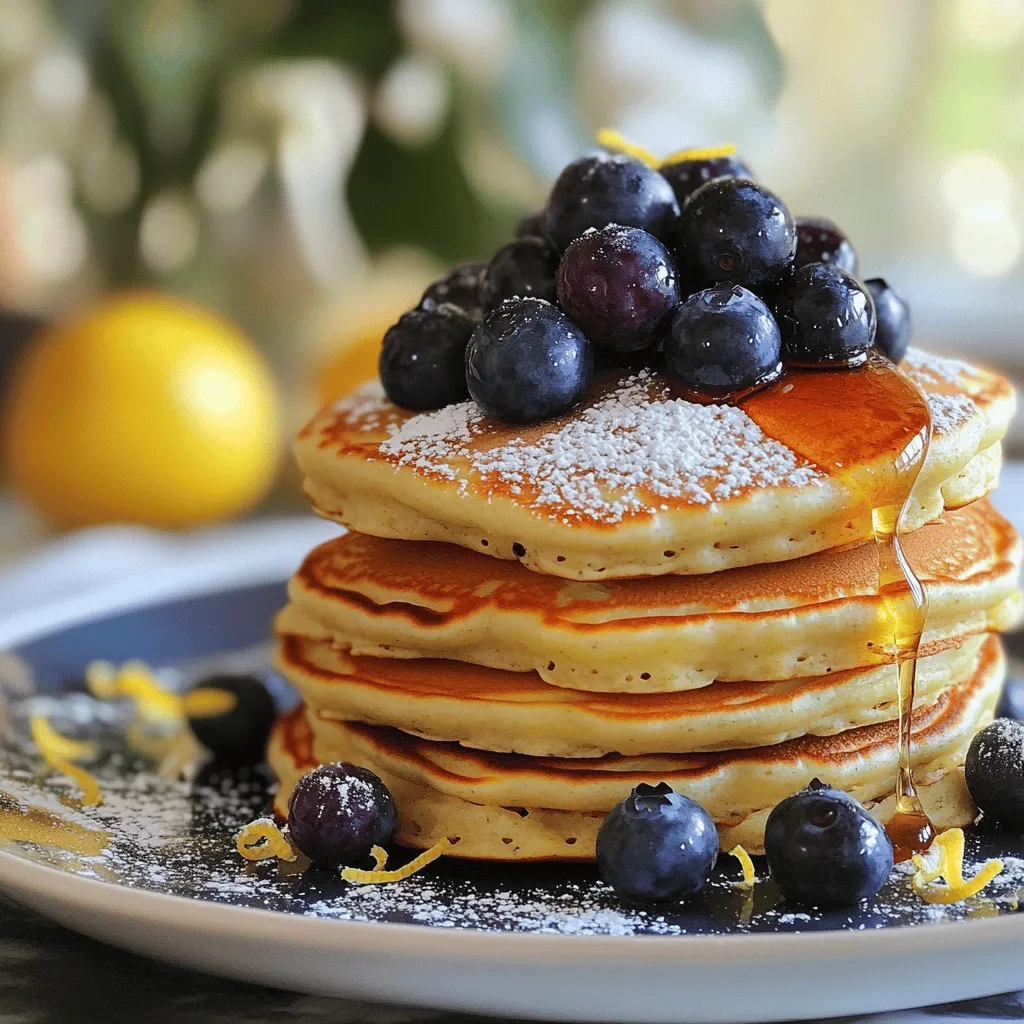
Start your mornings with a burst of flavor! These Blueberry Lemon Ricotta Pancakes are fluffy, delicious, and packed with zest.

To make this tasty blackberry cobbler crumble, you will need: - 4 cups fresh blackberries - 1 cup granulated sugar, divided - 1 tablespoon lemon juice - 1 teaspoon vanilla extract - 1 cup all-purpose flour - 1 cup rolled oats - 1/2 cup brown sugar - 1/2 teaspoon baking powder - 1/2 teaspoon cinnamon - 1/2 cup unsalted butter, melted - 1/4 teaspoon salt You can make some swaps if you lack an ingredient. For example: - Use frozen blackberries if fresh ones are not available. - Swap granulated sugar for coconut sugar for a lower glycemic index. - If you need a gluten-free option, replace all-purpose flour with almond flour or gluten-free flour. - Instead of butter, use coconut oil for a dairy-free version. - Maple syrup can replace granulated sugar for a different taste. Each serving of this blackberry cobbler crumble contains: - Calories: Approximately 280 - Total Fat: 12g - Saturated Fat: 7g - Cholesterol: 30mg - Sodium: 150mg - Total Carbohydrates: 43g - Dietary Fiber: 4g - Sugars: 20g - Protein: 3g This delicious dessert gives you a sweet treat while bringing in some fiber from the blackberries and oats. Enjoy this delightful dish, knowing it has a bit of nourishment! First, wash 4 cups of fresh blackberries. This step is key for great flavor. Next, in a large bowl, mix the blackberries with 1/2 cup of granulated sugar, 1 tablespoon of lemon juice, and 1 teaspoon of vanilla extract. Toss gently to coat the berries. Be careful not to crush them. Then, pour this mixture into a greased 9x13 inch baking dish. Spread the blackberries evenly across the dish. This will be the base of your cobbler. In another bowl, combine the dry ingredients. Use 1 cup of all-purpose flour, 1 cup of rolled oats, 1/2 cup of brown sugar, 1/2 teaspoon of baking powder, 1/2 teaspoon of cinnamon, and 1/4 teaspoon of salt. Mix these well. Next, add 1/2 cup of melted unsalted butter to the dry mixture. Stir until it looks like coarse crumbs. This crumble will give your cobbler a lovely texture. Now, sprinkle the crumble mixture evenly over the blackberries. It's important to cover all the berries well. Preheat your oven to 350°F (175°C). Bake the cobbler for 35 to 40 minutes. Look for a golden brown top and bubbling blackberries. Once it's ready, take it out and let it cool slightly. This step helps the flavors meld together. Enjoy your warm blackberry cobbler crumble, perhaps with ice cream or whipped cream on top! To get a golden crumble, start with the right oven temperature. Set it to 350°F (175°C). This heat allows the top to brown nicely while the blackberries bubble below. Make sure to mix the dry ingredients well. This helps the butter spread evenly. When you pour in the melted butter, don’t skimp! Use a full 1/2 cup. The butter helps create that crunchy texture. Stir until the mixture looks like coarse crumbs. This is key for the perfect crunch! For a beautiful serve, use individual bowls. Scoop the warm blackberry crumble into each bowl. Add a scoop of vanilla ice cream or a dollop of whipped cream on top. This not only tastes great but looks stunning too. For an extra touch, sprinkle a bit of cinnamon on top. It adds flavor and makes it look fancy. You can also serve it with fresh blackberries on the side for color. One common mistake is overmixing the crumble. If you mix it too much, it becomes dense, not crumbly. Just stir until everything is combined. Another mistake is not greasing the baking dish. This can cause your crumble to stick. Make sure to grease it well before adding the blackberries. Lastly, do not skip the cooling time. Let it cool for a few minutes before serving. This helps the flavors meld and makes it easier to scoop. {{image_2}} You can make a gluten-free version of this dish. Use gluten-free flour instead of all-purpose flour. It works just as well. Make sure to check your oats too. They should be labeled gluten-free. This way, you can enjoy the treat without worry! Mix it up with other fruits! You can use peaches, blueberries, or apples. Each fruit gives a new taste. For a berry mix, combine blackberries with raspberries or strawberries. Experiment and find your favorite combo. You might just create a new family classic! Want a vegan crumble? Swap the butter for coconut oil or vegan butter. Use maple syrup or agave instead of granulated sugar. This keeps it plant-based but still tasty. Enjoy the same great flavors while sticking to vegan choices! To store leftover blackberry cobbler crumble, first let it cool. Once cool, cover it tightly with plastic wrap or aluminum foil. You can also put it in an airtight container. This way, it stays fresh and tasty for up to three days in the fridge. To reheat your cobbler crumble, preheat your oven to 350°F (175°C). Place the crumble in an oven-safe dish. Heat it for about 15 to 20 minutes. This warms it up nicely. You can also use the microwave. Heat it for 30 seconds to one minute. Check it often to avoid overheating. You can freeze blackberry cobbler crumble if you want to save some for later. First, let it cool completely. Then, wrap it well in plastic wrap and aluminum foil. You can use a freezer-safe container too. It will last for up to three months in the freezer. When ready to eat, thaw it in the fridge overnight and reheat it as needed. You can prepare this dessert a day in advance. Start by mixing the blackberries, sugar, lemon juice, and vanilla. Place this mixture in the baking dish and cover it with plastic wrap. For the crumble topping, mix the dry ingredients and melted butter in a separate bowl. Store the crumble topping in the fridge. When you are ready to bake, just sprinkle the topping over the blackberries and pop it in the oven. Yes, you can use frozen blackberries. They work well in this recipe. Just keep in mind that frozen blackberries may release more juice. This can make your cobbler a bit wetter. To fix this, you can add an extra tablespoon of flour to the blackberry mixture. This helps absorb some of the extra liquid. I love serving blackberry cobbler crumble warm. It tastes great on its own, but you can add a scoop of vanilla ice cream or some whipped cream. This adds a nice creaminess. You can also sprinkle some extra cinnamon on top for a touch of flavor and style. Serve in individual bowls for a lovely presentation. Blackberry cobbler crumble is easy to make and fun to enjoy. We covered ingredients, step-by-step instructions, and tips for a perfect dish. You can even try different fruits or make it vegan. Store any leftovers properly and reheat when needed. With this guide, you can create a delicious treat that your friends and family will love. Get ready to impress them with your baking skills!

Blackberry Cobbler Crumble Delightful and Simple Recipe

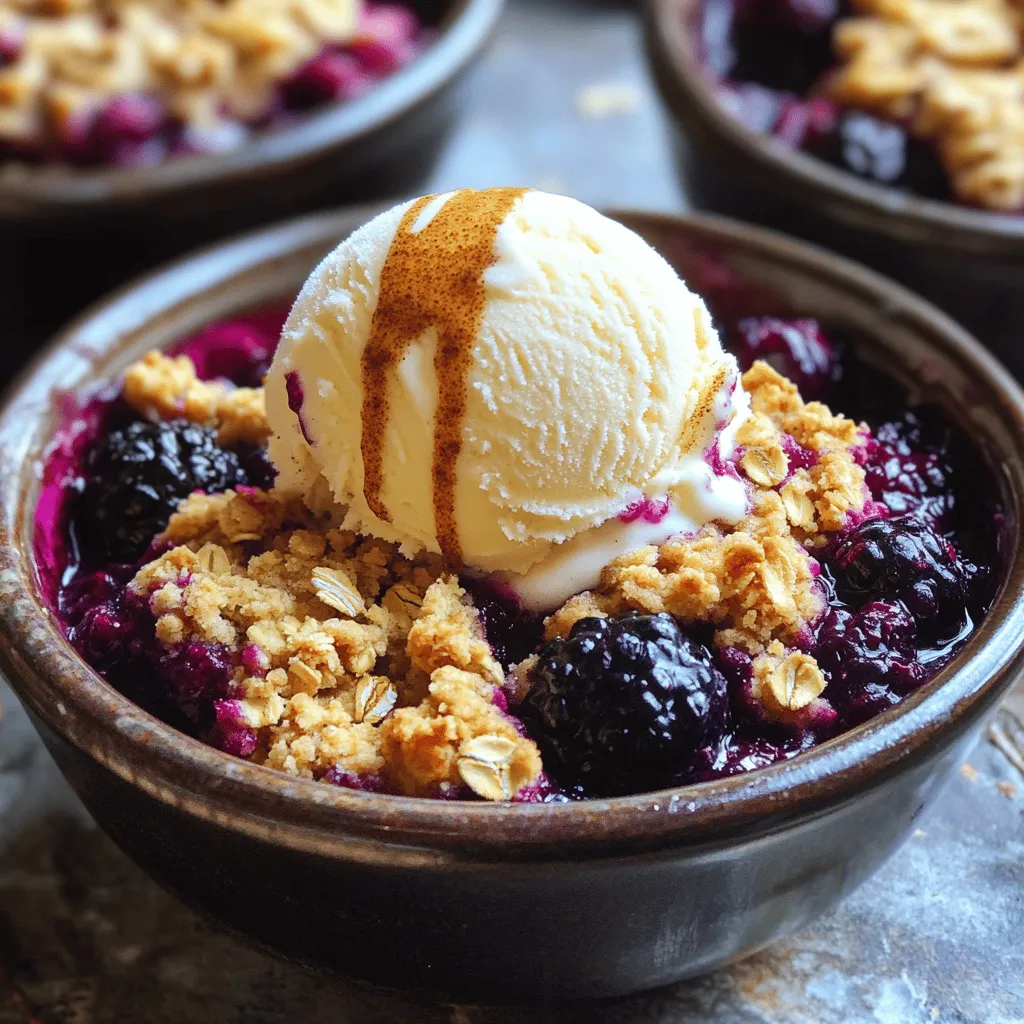
Are you ready to indulge in a warm, sweet treat? This Blackberry Cobbler Crumble is easy to make and perfect

- 1 package of refrigerated pizza dough - 1/2 cup basil pesto - 1 cup fresh mozzarella cheese, diced - 1/4 cup grated Parmesan cheese - 1 clove garlic, minced - 1 tablespoon olive oil - 1 teaspoon Italian seasoning - Salt and pepper to taste - 1 egg, beaten (for egg wash) - Optional: fresh basil leaves for garnish Choosing fresh mozzarella is key. Look for cheese that is soft, creamy, and stored in water. This will give your twists a great flavor and texture. You can also use low-moisture mozzarella if fresh is not available. You can switch up the pesto too! Try sun-dried tomato pesto or spinach pesto for a twist. Different cheeses like goat cheese or cheddar can change the flavor profile. If you have dietary restrictions, consider using gluten-free dough. For a vegan option, try a dairy-free cheese substitute. Always check labels to ensure they fit your needs. - Preheat your oven to 400°F (200°C) and line a baking sheet with parchment paper. - Roll out the pizza dough on a lightly floured surface into a rectangle, about 1/4 inch thick. - Spread the basil pesto evenly over the surface of the dough, leaving a small border around the edges. - In a bowl, combine the diced mozzarella, grated Parmesan, minced garlic, Italian seasoning, salt, and pepper. Mix well. - Sprinkle the cheese mixture evenly over the pesto. This mix adds great flavor and creaminess. - Using a sharp knife or pizza cutter, cut the dough into strips about 2 inches wide. - Twist each strip gently to form a spiral shape, then place them on the prepared baking sheet, leaving space between each twist. - Brush the tops of the twists with the beaten egg. This gives them a golden finish. - Bake in the preheated oven for 15-20 minutes, or until the bread twists are golden brown and the cheese is melted. - To check for doneness, look for a deep golden color and a bubbly cheese layer. Remove from the oven and let cool slightly before serving. The dough thickness is key to great twists. I recommend rolling it to about 1/4 inch thick. If it's too thick, the twists may not cook evenly. If it's too thin, they might break apart. A perfect twist is all about the technique. When you twist the strips, do it gently. This keeps the filling inside and helps maintain the shape. To boost flavor, add fresh herbs and spices. Try mixing in a bit of red pepper flakes for a kick. You can also use fresh thyme or oregano. For serving, pair these twists with dipping sauces. A bowl of extra pesto or a tangy marinara sauce works wonders. It adds a fun element to each bite. When serving, think about your platter. A rustic wooden board gives a warm, inviting feel. You can also stack the twists high for a fun display. Garnish with fresh basil leaves for color and freshness. This not only looks nice but enhances the aroma, too. Serve warm for the best experience. {{image_2}} You can be creative with different cheeses. Goat cheese adds a creamy tang. Cheddar gives a sharp kick and melts well. Both options enhance the flavor. If you're vegan, try nut-based cheeses. They mimic texture and taste. Look for products made from cashews or almonds. They melt nicely and pair well with pesto. Add more flavors to your twists. Roasted tomatoes bring sweetness and depth. Toss in fresh spinach for a pop of color and nutrition. You can also try flavored pestos. Sun-dried tomato or spinach pesto can change the whole dish. Each option opens new taste possibilities. Mix and match to find your favorite combo. Switching up the dough can change your bread twists. Gluten-free dough works well for those with dietary needs. Many stores sell good gluten-free options now. If you're feeling adventurous, make your own dough from scratch. Homemade dough can be fun and allows for custom flavors. Use herbs or spices to give it your personal touch. Store leftovers in an airtight container. Keep them in the fridge. They stay fresh for up to three days. If you wrap them well, they won’t dry out. To freeze, place the cooled twists in a freezer-safe bag. Remove as much air as possible. They can last for up to three months. When you want to eat them, thaw in the fridge overnight. To refresh the bread twists, reheat them in the oven. Set the oven to 350°F (175°C) and heat for about 10 minutes. This helps keep them crisp. You can also use a toaster oven for this. Enjoy them warm for the best taste! Pesto Mozzarella Stuffed Bread Twists stay fresh for about 2-3 days in the fridge. To store them, place the twists in an airtight container. You want to keep them from drying out. If you see any signs of mold or an off smell, it is best to toss them out. Yes, you can prepare these twists ahead of time. You can roll and shape them, then place them on the baking sheet. Cover them tightly with plastic wrap. You can then store them in the fridge for up to 24 hours. When ready, just bake them straight from the fridge. Add a few extra minutes to the baking time. These twists pair well with many sides. Try serving them with a fresh salad or a bowl of warm marinara sauce for dipping. You can also enjoy them with a side of roasted veggies or a hearty soup. The flavors blend well, adding to your meal. Absolutely! Adding meat can enhance the flavor. You can mix in cooked chicken or sausage with the cheese filling. Chopped pepperoni or prosciutto also works great. Just make sure to keep the total filling balanced so the dough can hold its shape. These Pesto Mozzarella Stuffed Bread Twists are easy and fun to make. With simple ingredients like pizza dough, pesto, and cheese, you'll create a tasty treat. Remember to experiment with cheeses and fillings for unique flavors. Proper storage extends their shelf life, so use the tips given. These twists pair well with dips and can be enjoyed fresh or reheated. Get ready to impress your friends and family with this delicious recipe!

Pesto Mozzarella Stuffed Bread Twists Savory Delight

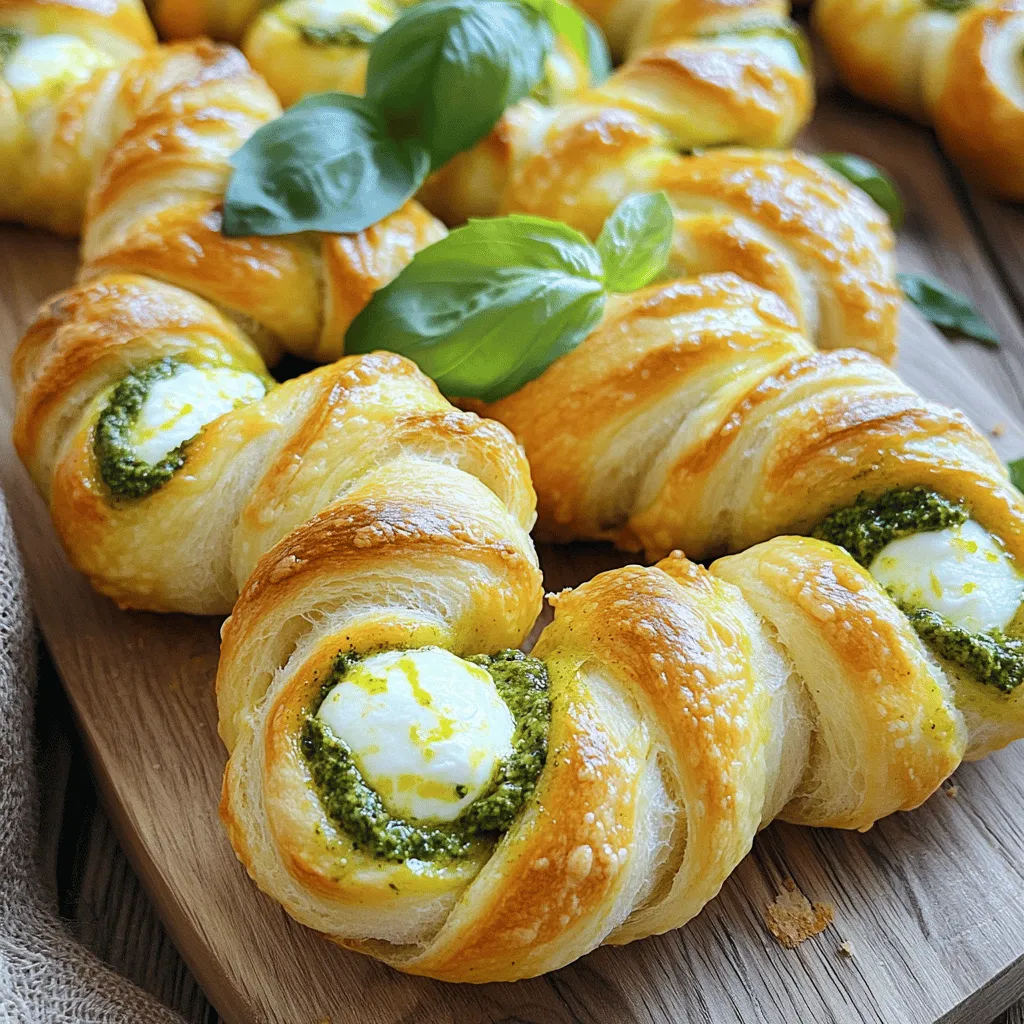
Looking for a tasty snack that’s quick and easy? Try my Pesto Mozzarella Stuffed Bread Twists! These delightful twists combine

- 1 cup plain yogurt (Greek or regular) - 1/2 cup granulated sugar - 1/4 cup vegetable oil - 2 large eggs - Zest of 1 lemon - 1 tablespoon lemon juice - 1 teaspoon vanilla extract - 1 1/2 cups all-purpose flour - 1 teaspoon baking powder - 1/2 teaspoon baking soda - 1/4 teaspoon salt - 1 cup fresh or frozen blueberries - 1 tablespoon flour (for tossing blueberries) When you pick your ingredients, aim for the best quality. Use fresh blueberries for the best taste and texture. If you can't find fresh ones, frozen blueberries work well too. Just remember to toss them in flour before adding to the batter. This helps keep them from sinking. For yogurt, both Greek and regular work great. Greek yogurt gives a thicker texture, while regular is lighter. If you want a lower-fat option, use non-fat yogurt. If you have allergies, there are easy swaps. For a gluten-free loaf, use a gluten-free flour blend. You might need to adjust the liquid slightly for the right consistency. These tips will help you create a delightful blueberry lemon yogurt loaf that is moist and full of flavor! 1. Preheat your oven to 350°F (175°C). 2. Grease and flour a 9x5 inch loaf pan. You can also use parchment paper for easy removal. 3. In a large bowl, mix 1 cup of yogurt, 1/2 cup sugar, and 1/4 cup vegetable oil. Whisk until smooth. 4. Add 2 large eggs, the zest of 1 lemon, 1 tablespoon lemon juice, and 1 teaspoon vanilla extract. Keep mixing until well blended. 5. In another bowl, mix 1 1/2 cups flour, 1 teaspoon baking powder, 1/2 teaspoon baking soda, and 1/4 teaspoon salt. 6. Slowly add the dry mix to the wet mix. Stir gently until just combined. Be careful not to overmix! 7. In a small bowl, toss 1 cup of blueberries with 1 tablespoon of flour. This helps them not sink in the batter. 8. Gently fold the blueberries into the batter. 9. Pour the batter into the loaf pan. Smooth the top with a spatula. 1. Place the loaf pan in the preheated oven. 2. Bake for 55-65 minutes. 3. To check if it's done, insert a toothpick into the center. If it comes out clean, the loaf is ready. 1. Once baked, remove the loaf from the oven. Let it cool in the pan for about 10 minutes. 2. Carefully transfer it to a wire rack to cool completely. 3. To serve, slice the loaf evenly. Place it on a wooden board for a nice look. 4. You can add a sprig of mint and a few blueberries on the side for a pop of color. If you like, drizzle a simple lemon glaze over the top for extra sweetness. To make your loaf great, mix carefully. Overmixing can make it tough. Stir the dry and wet ingredients until they just blend together. This keeps the loaf light and fluffy. Using yogurt adds moisture. It helps keep the loaf soft and tender. Greek yogurt is a great choice because it’s thick and creamy. To boost flavor, think about adding spices. A pinch of cinnamon or nutmeg can add warmth. Vanilla extract gives a lovely depth, too. You can also toss in lemon zest for a brighter taste. For added crunch, consider walnuts or almonds. They pair well with blueberries. Slice the loaf and serve it on a nice board. A wooden board adds charm. Garnish each slice with mint and a few blueberries for color. You can drizzle a simple lemon glaze on top for extra sweetness. This makes it look fancy and taste even better! {{image_2}} You can change the blueberries for other fruits. Raspberries work great and add a tart flavor. Cranberries give a nice pop of sweetness. You can even mix fruits! Try adding strawberries or blackberries for a colorful loaf. Just keep the total fruit amount the same to keep the texture right. To make this recipe vegan, swap the eggs with flaxseed meal. Mix 1 tablespoon of flaxseed with 3 tablespoons of water. Let it sit for five minutes to thicken. For yogurt, use coconut or almond yogurt. Use plant-based oil like canola or coconut oil. These simple swaps keep the loaf moist and tasty. For a gluten-free loaf, use a gluten-free flour blend. Look for blends that include rice flour and almond flour. You may need to add a bit more liquid to the batter. Check the texture; it should be thick but pourable. This will ensure your loaf stays soft and fluffy. To keep your blueberry lemon yogurt loaf fresh, let it cool first. Once cooled, wrap it in plastic wrap or aluminum foil. Store it in a cool, dry place for short-term storage. For long-term storage, place it in an airtight container. This helps keep moisture in and air out. You can also slice the loaf before storing for easy access. To freeze the loaf, wrap it tightly in plastic wrap. Then, place it in a freezer-safe bag. Make sure to remove as much air as possible. This keeps the loaf tasting fresh. When you're ready to enjoy it, remove the loaf from the freezer. Let it thaw in the fridge overnight or on the counter for a few hours. Avoid using a microwave, as it can change the loaf's texture. At room temperature, the loaf lasts about 2-3 days. In the fridge, it can stay fresh for up to a week. If you freeze it, expect it to last for about 2-3 months. Always check for any signs of spoilage before eating. A quick smell test can help! How can I tell if my loaf is done baking? You can check if your loaf is done by using a toothpick. Insert it into the center of the loaf. If it comes out clean, your loaf is ready. If there is batter on the toothpick, bake it a bit longer. Can I use frozen blueberries? Yes, frozen blueberries work well in this recipe. Just toss them in flour before adding them to the batter. This helps them stay suspended and not sink to the bottom. Can I double the recipe for a larger batch? Absolutely! Doubling the recipe is easy. Just make sure to use a larger loaf pan and increase the baking time. Keep an eye on it, as it may need a few extra minutes. Each serving of this loaf has about 180 calories. It includes 6 grams of fat and 3 grams of protein. You can make it healthier by using low-fat yogurt or reducing the sugar. You can also add nuts for extra nutrients. What to do if the loaf is too dense? If your loaf is too dense, try mixing the batter less. Overmixing can make it tough. Also, make sure your baking powder is fresh, as old leavening agents can affect texture. Fixing common baking mistakes (e.g., sinking blueberries) To prevent blueberries from sinking, coat them in flour before adding them to the batter. This helps them stay suspended during baking. If they still sink, your batter might be too thin. This blog post offers a clear path to baking a delicious blueberry loaf. We covered ingredients, step-by-step instructions, and helpful tips. You learned about variations, storage methods, and common questions. Baking can be fun and rewarding. Remember to enjoy the process and try new ideas. With these simple guidelines, you'll create a tasty treat every time. So gather your ingredients and start baking today!

Blueberry Lemon Yogurt Loaf Delightfully Moist Recipe

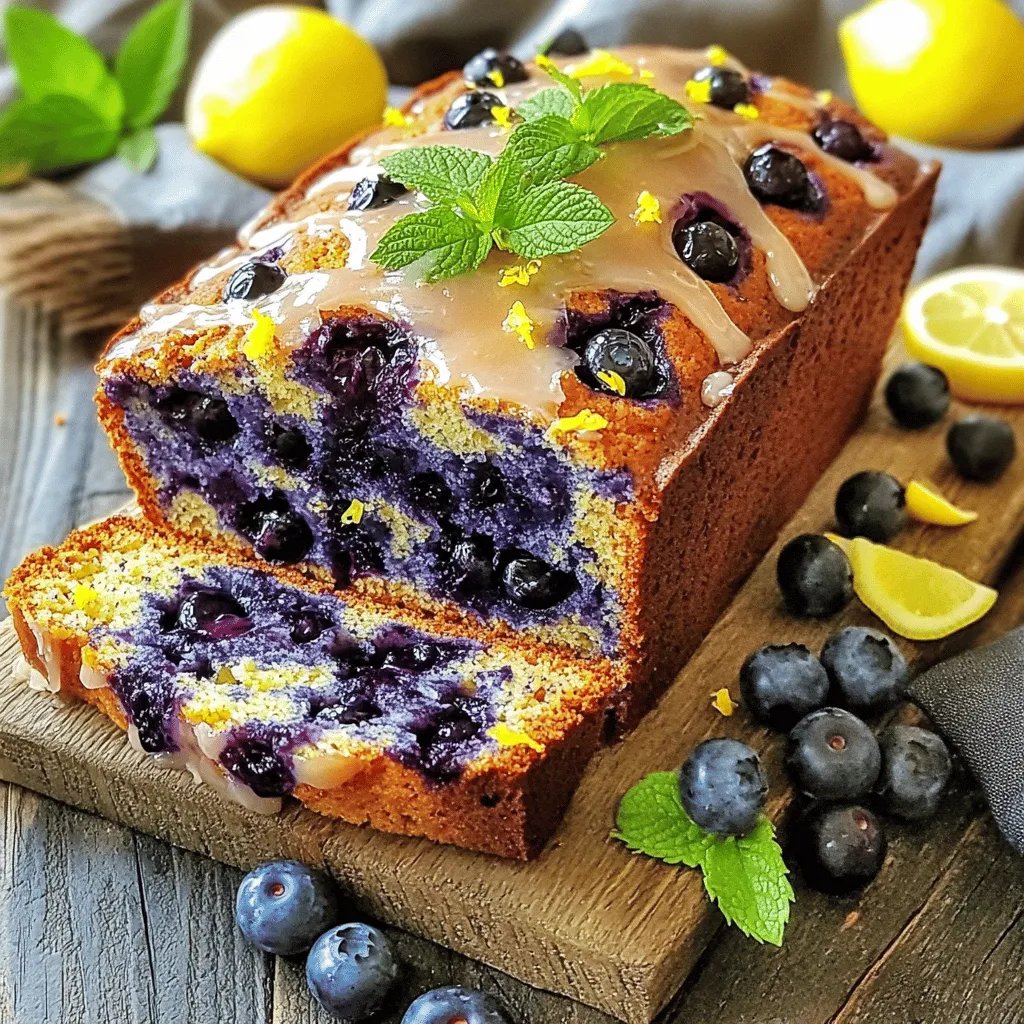
Are you ready to bake a delightfully moist Blueberry Lemon Yogurt Loaf? This recipe brings together the sweetness of fresh

To make Lemon Garlic Roasted Chickpeas, you will need: - 1 can (15 oz) chickpeas, drained and rinsed - 2 tablespoons olive oil - 1 teaspoon garlic powder - ½ teaspoon smoked paprika - ½ teaspoon ground cumin - Zest of 1 lemon - 2 tablespoons fresh lemon juice - Salt and pepper to taste - Fresh parsley, chopped (for garnish) You can add more flavors to your chickpeas. Consider using: - Cayenne pepper for heat - Onion powder for depth - Nutritional yeast for a cheesy taste - Thyme or rosemary for herbal notes Each serving of Lemon Garlic Roasted Chickpeas has: - Calories: 140 - Protein: 7g - Carbohydrates: 22g - Fiber: 6g - Fat: 4g - Sodium: 150mg These numbers may vary based on your specific ingredients. Always check your labels for accurate info. Start by gathering all your ingredients. You will need a can of chickpeas, olive oil, garlic powder, smoked paprika, ground cumin, lemon zest, lemon juice, salt, and pepper. Make sure to have fresh parsley for garnish. This recipe takes about 10 minutes to prep and 30 minutes to cook. 1. Preheat your oven: Set it to 400°F (200°C) and line a baking sheet with parchment paper. This helps with easy cleanup. 2. Prepare the chickpeas: Drain and rinse the chickpeas thoroughly. Spread them on a clean kitchen towel and pat them dry. This step is key to getting them crispy. 3. Mix the ingredients: In a large bowl, add the chickpeas, olive oil, garlic powder, smoked paprika, ground cumin, lemon zest, lemon juice, salt, and pepper. Toss everything together until the chickpeas are well-coated with the seasoning. 4. Spread on the baking sheet: Transfer the chickpea mixture to your prepared baking sheet. Spread them out in a single layer. This helps them roast evenly. 5. Roast in the oven: Place the baking sheet in the preheated oven. Roast the chickpeas for 25-30 minutes. Remember to shake the pan halfway through to ensure even cooking. 6. Cool and garnish: Once they are golden brown and crispy, take the pan out of the oven. Let the chickpeas cool for about 5 minutes. If you want, taste them and adjust the seasoning. Finally, sprinkle with fresh parsley before serving. - Prep Time: 10 minutes - Total Cooking Time: 30 minutes - Oven Temperature: 400°F (200°C) - Roasting Time: 25-30 minutes This will give you a crispy, tasty snack that you can enjoy at any time! To make your roasted chickpeas extra crispy, start by drying them well. After draining and rinsing, spread the chickpeas on a towel. Pat them dry for best results. This step removes moisture, which keeps them crunchy. Use a single layer on your baking sheet. This helps them roast evenly. Shake the pan halfway through to keep them from sticking. You can change the flavor of your chickpeas easily. Try using different spices like chili powder for heat or Italian herbs for a fresh taste. You can also add some cheese for a savory twist. Experiment with your favorite flavors. Lemon and garlic pair well, but don’t be afraid to explore. Mixing in some nutritional yeast adds a cheesy flavor without dairy. One common mistake is not drying the chickpeas enough. Moisture leads to soggy chickpeas instead of crispy ones. Another mistake is overcrowding the baking sheet. This prevents even cooking, and they won’t brown properly. Always check the spices amount too. Too little seasoning makes them bland, while too much can overpower the dish. {{image_2}} You can change the taste of your chickpeas with different spices and herbs. Try adding cayenne pepper for heat, or Italian herbs for a fresh twist. Curry powder will give a warm, earthy flavor. Even a bit of cheese powder can make them cheesy and savory. Experiment with rosemary or thyme for a fragrant touch. Each choice can make your snack unique. If you want a quicker option, use an air fryer. Set it to 400°F (200°C) and cook for 15-20 minutes. Shake the basket halfway through for even cooking. You can also make these on the stovetop. Use a skillet over medium heat. Cook for about 10-15 minutes, stirring often. This method will give you crispy chickpeas, but they may not be as crunchy as oven-roasted ones. Use these chickpeas in many ways. They make a great snack on their own. Toss them into salads for extra crunch and protein. You can also sprinkle them on soups or grain bowls. They add texture and flavor. For a tasty dip, blend them with yogurt and herbs to create a spread. The options are endless, so get creative! To keep your roasted chickpeas fresh, store them in an airtight container. Place them at room temperature. They will stay crispy for about two days. If they lose some crunch, don't worry. You can easily restore their texture when you reheat them. Avoid storing them in the fridge, as moisture can make them soggy. Reheating is key to keeping that crunch. Preheat your oven to 350°F (175°C). Spread the chickpeas on a baking sheet. Heat them for about 10 minutes. This method revives their crispiness. You can also use an air fryer. Set it to 350°F (175°C) for a quick 5-minute crisp-up. If you want to keep chickpeas for a longer time, freezing is a great option. After cooking, let them cool completely. Spread them in a single layer on a baking sheet. Freeze them for about an hour, then transfer to a freezer bag. This way, you can enjoy them later. They can stay fresh for up to three months. When ready to eat, thaw in the fridge, then reheat as needed. You can easily make Lemon Garlic Roasted Chickpeas vegan by using the basic ingredients. The recipe already uses chickpeas and olive oil, which are vegan. Just be sure to check your spices for any non-vegan additives. This recipe is simple and already fits a vegan diet. Yes, you can use dried chickpeas! First, soak them overnight. After soaking, cook them until soft. Then, follow the same steps in the recipe. Just remember to dry them well before adding the spices. This will help them stay crispy. These roasted chickpeas are great as a snack! You can also serve them on salads or as a topping for soups. They add a nice crunch and flavor. For a fun twist, try them in wraps or as a side with dips. Roasted chickpeas stay crispy for about 2 days if stored properly. Keep them in an airtight container. If they lose some crispiness, you can re-roast them for a few minutes. This will bring back their crunch. Yes, feel free to add other veggies! Bell peppers, zucchini, and carrots roast well. Just cut them into small pieces. Toss them with the chickpeas and spices. This will give you a colorful and tasty mix. This blog post covered everything you need to know about roasting chickpeas. We went through the ingredients, cooking steps, and tips for the best results. You learned how to achieve crispiness and avoid common mistakes. Plus, you discovered flavor variations, storage tips, and answers to frequently asked questions. Roasted chickpeas are versatile and perfect for snacking or as meal toppings. Now, you can enjoy delicious, healthy chickpeas any time!

Lemon Garlic Roasted Chickpeas Crisp and Tasty Snack

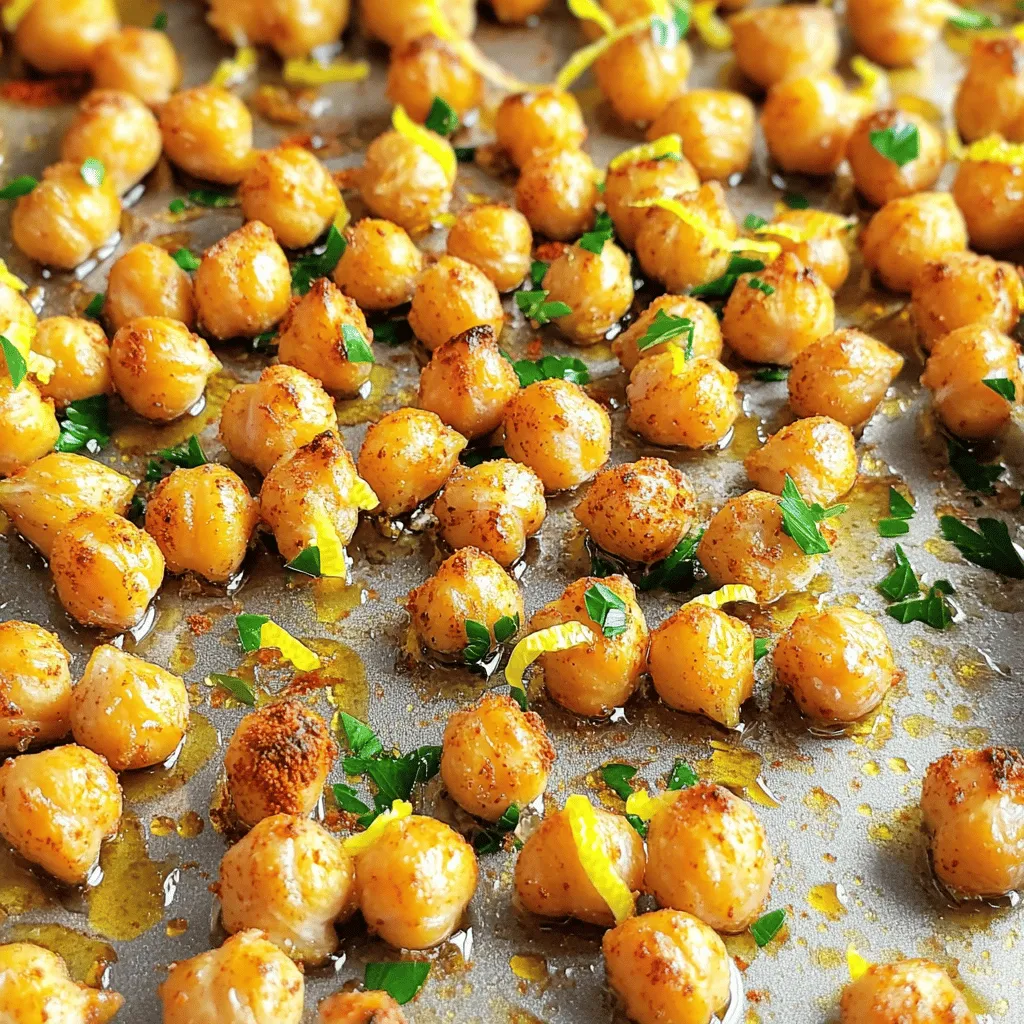
Looking for a delicious and healthy snack? Let me introduce you to Lemon Garlic Roasted Chickpeas! These snacks are crisp,

- 4 large russet potatoes, cut into fries - 1 tablespoon olive oil - 1 teaspoon garlic powder - 1 teaspoon smoked paprika - Salt and pepper to taste To make these fries, start with russet potatoes. They become crispy when baked. You need four large ones. Cut them into fry shapes, so they are even. Next, add olive oil and a mix of spices. Garlic powder gives a rich taste. Smoked paprika adds a nice depth. Use salt and pepper to enhance the flavor. - 1 cup black beans, drained and rinsed - 1 cup corn (fresh, frozen, or canned) - 1 cup cherry tomatoes, halved - 1 avocado, diced - 1/2 cup dairy-free cheese shreds (optional) - 1/4 cup fresh cilantro, chopped - 1/4 cup vegan sour cream (optional) Now, let’s talk toppings. Black beans and corn bring great texture. They also add protein and fiber. Halved cherry tomatoes add sweetness and color. Diced avocado gives a creamy touch. If you like cheese, sprinkle some dairy-free shreds on top. Fresh cilantro adds a burst of flavor. Lastly, vegan sour cream can be drizzled on top for creaminess. - 2 tablespoons jalapeños, sliced (optional for heat) - Other vegetables or proteins to customize Want a spicy kick? Add sliced jalapeños. They brighten each bite. You can also mix in other veggies or proteins. Think bell peppers or lentils. These options let you make this dish your own. First, preheat your oven to 425°F (220°C). This helps the fries cook evenly. Next, take four large russet potatoes and cut them into fries. Place them in a large bowl. Drizzle one tablespoon of olive oil over the fries. Then, add one teaspoon of garlic powder, one teaspoon of smoked paprika, and a pinch of salt and pepper. Toss everything together until the fries are well coated with oil and spices. Spread the coated fries evenly on a baking sheet lined with parchment paper. Bake them for about 25 to 30 minutes. Halfway through, flip the fries to ensure they crisp up nicely. You want them to be golden and crunchy. Keep an eye on them, so they don’t burn. While the fries bake, prepare your toppings. In a separate bowl, mix one cup of black beans, one cup of corn, and one cup of halved cherry tomatoes. If you like some heat, add two tablespoons of sliced jalapeños. After the fries are done, take them out of the oven. If you choose, sprinkle half a cup of dairy-free cheese shreds on top. Put the fries back in the oven for five more minutes to melt the cheese. Once the cheese is melted, layer the black bean and corn mixture on top of the fries. Finish with diced avocado, fresh cilantro, and dollops of vegan sour cream if you like. Enjoy your vibrant, loaded nacho fries! To get crispy fries, start with the right potatoes. I love using russet potatoes. They have the perfect starch content. Cut them into even-sized pieces. This helps them cook evenly. Toss the fries with olive oil and spices in a bowl. Make sure every fry is coated. This is key for crispiness. Place the fries on a baking sheet lined with parchment paper. Spread them out, so they don’t touch. This helps them crisp up. Bake them at 425°F (220°C) for 25-30 minutes. Flip them halfway through. This ensures all sides get golden brown. Want to kick up the flavor? Try adding more spices. Cumin or chili powder can add depth. You can also mix in some smoked salt for a unique twist. For toppings, the sky is the limit! Black beans and corn are great, but think beyond that. Try adding diced bell peppers or olives for more color and taste. You can even use roasted garlic for an extra punch. Want some heat? Add fresh or pickled jalapeños. When it comes to serving, presentation matters. Serve your nacho fries in a large bowl. This makes it easy to share. Top them with fresh cilantro and extra jalapeños for color. A small bowl of vegan sour cream on the side is perfect. It adds creaminess and tang. You can also serve it with some lime wedges. A squeeze of lime brightens every bite. Enjoy your loaded nacho fries with friends or family! {{image_2}} To make your nacho fries spicy, try different jalapeño types. You can use fresh, pickled, or smoked jalapeños. Each variety brings a unique heat level and flavor. I love using fresh jalapeños for a crisp bite. If you want more heat, add more slices. For a smoky taste, try using chipotle peppers in adobo. They pack a punch and add depth to the dish. A great way to customize your nacho fries is with cheese. Many dairy-free cheese options exist today! You can find shreds, slices, or even creamy spreads. My go-to is a blend of mozzarella and cheddar shreds. They melt well and taste amazing. If you want a cheesy dip, try cashew cheese or nutritional yeast mixed with almond milk. This adds a rich, cheesy flavor without dairy. Boost your nacho fries with plant-based proteins. Lentils and tofu work great here. Cooked lentils add texture and fiber. They blend well with the beans and corn. For tofu lovers, try marinating and baking it first. Then crumble it over the fries for added flavor. You can also use chickpeas or tempeh for a hearty bite. This way, your nacho fries become a filling meal. To keep your nacho fries fresh, use airtight containers. This stops air from making them soggy. You can also place a paper towel inside the container. This absorbs moisture and keeps fries crisp. Store them in the fridge for up to three days. If you need more time, consider freezing them. When reheating, aim to restore that crispy texture. I suggest using the oven or an air fryer. Preheat the oven to 400°F (200°C). Spread the fries on a baking sheet. Heat them for about 10 minutes. If using an air fryer, set it to 375°F (190°C) and cook for 5-7 minutes. Avoid the microwave, as it makes fries soft. To freeze, cool the nacho fries completely first. Place them in a single layer on a baking sheet. Freeze them for about two hours. Once frozen, transfer them to a freezer-safe container. They can last for up to three months. To defrost, place them in the fridge overnight before reheating. Yes, you can! If you want a change from russet potatoes, try using sweet potatoes. They add a nice sweetness and color. Yukon gold potatoes also work well. They have a buttery taste and a golden hue. Just cut them into fries and follow the same steps in the recipe. This recipe is naturally gluten-free! All the ingredients are safe for those avoiding gluten. Just check the labels on any packaged items, like the vegan sour cream and dairy-free cheese. Some brands may have gluten. If you are unsure, look for certified gluten-free options to be safe. You can prep the fries in advance! Cut the potatoes and coat them with olive oil and spices. Store them in the fridge for up to 24 hours. When you're ready to bake, just spread them on a baking sheet and follow the cooking steps. For toppings, you can also prepare the black bean mixture ahead. Just mix them up and store them in the fridge. This way, you can enjoy your nacho fries quickly! These vegan loaded nacho fries combine simplicity and taste. You start with crispy baked fries, seasoned just right. Then, you layer on vibrant toppings like black beans, corn, and avocado. For the adventurous, add jalapeños or more cheese. Remember, perfecting your fries takes practice, but the results are worth it. Store leftovers properly, and they can delight you again! With these tips and ideas, you can enjoy a tasty, customizable snack anytime. So grab your ingredients and start creating your own delicious version of nacho fries!

Vegan Loaded Nacho Fries Flavorful and Satisfying Treat

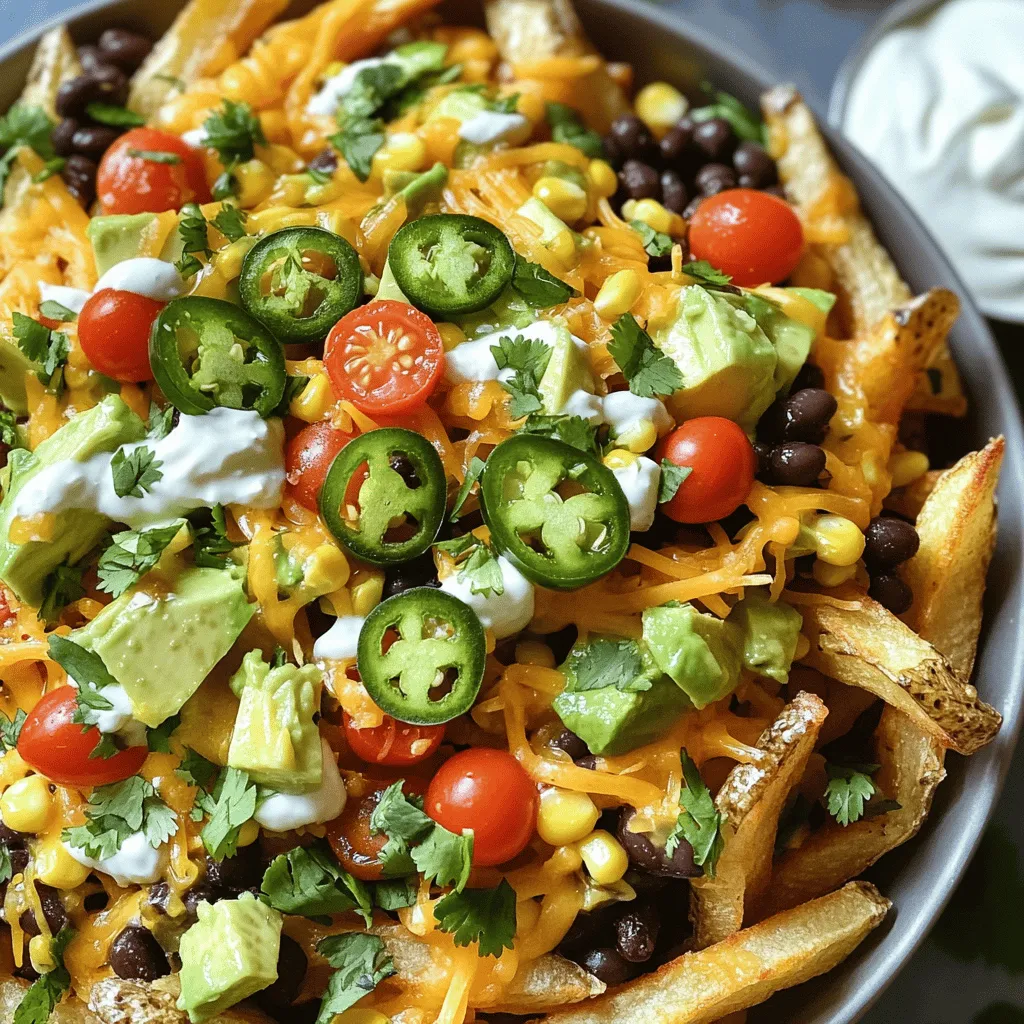
Are you craving something bold, savory, and vegan? Look no further than these Vegan Loaded Nacho Fries. They pack a

For a delicious Caprese pasta salad, gather these simple ingredients: - 8 oz. pasta (fusilli or penne works well) - 1 cup cherry tomatoes, halved - 1 cup mozzarella balls (bocconcini), halved - 1 cup fresh basil leaves, roughly chopped - 3 tablespoons extra virgin olive oil - 2 tablespoons balsamic glaze - Salt and pepper to taste - Optional: 1 avocado, diced If you need swaps, try these ideas: - Use any short pasta like rotini or farfalle instead of fusilli or penne. - Swap cherry tomatoes for grape tomatoes or diced regular tomatoes. - Replace mozzarella balls with cubed feta cheese for a different flavor. - Use a mix of dried herbs if fresh basil is not available. - For a creamy touch, add a dollop of ricotta cheese instead of avocado. To make this salad, you’ll need a few helpful items: - A large pot for boiling the pasta - A colander for draining the pasta - A large mixing bowl to combine all ingredients - A sharp knife for chopping vegetables - A measuring cup and spoons for precise amounts - A spatula or spoon for mixing everything together These tools make the process easy and fun! Start by boiling water in a large pot. Add a pinch of salt to the water. Once it boils, add 8 ounces of pasta. Fusilli or penne works best. Cook the pasta until it's al dente, about 8 to 10 minutes. When it’s done, drain the pasta in a colander. Rinse it under cold water to stop the cooking. This step cools the pasta and keeps it firm. In a large mixing bowl, combine the cooled pasta, 1 cup of halved cherry tomatoes, and 1 cup of halved mozzarella balls. Next, add 1 cup of roughly chopped fresh basil leaves. The basil brings a bright flavor. Drizzle 3 tablespoons of extra virgin olive oil and 2 tablespoons of balsamic glaze over the top. Now, season your salad with salt and pepper to taste. If you choose to add avocado, dice it and fold it in gently. Be careful not to mash it. Toss all the ingredients until they are well mixed and coated with the dressing. Let the salad chill in the fridge for at least 15 minutes. This helps the flavors mix well. Serve the salad chilled or at room temperature. Enjoy this fresh and flavorful dish! When picking tomatoes, look for bright colors and firm skins. Choose cherry tomatoes that feel heavy for their size. Avoid any that have soft spots or wrinkles. These signs show freshness and flavor. Ripe tomatoes add sweetness to your salad. You can also try heirloom tomatoes for more flavor. They come in unique shapes and colors. Their taste can enhance your dish. Fresh basil is a key part of this salad. It adds a bright taste that makes the dish pop. When using basil, smell the leaves first. They should smell sweet and fragrant. Look for vibrant green leaves without brown spots. If you can, chop the basil just before mixing. This keeps its flavor fresh and strong. Dried basil just won't give you the same taste. While the basic dressing is tasty, you can get creative. Try adding lemon juice for a zesty kick. You can also mix in some minced garlic for extra flavor. If you want a creamier dressing, add a bit of Greek yogurt. For a spicy touch, try a dash of red pepper flakes. Experiment until you find your favorite blend. This adds a personal touch to your Caprese pasta salad. {{image_2}} You can make this Caprese pasta salad heartier by adding protein. Chicken and shrimp are great options. For chicken, use grilled or rotisserie chicken. Just chop it into bite-sized pieces and mix it in. For shrimp, cook them in a pan until they turn pink and opaque. Then, toss them with the salad. Both proteins add flavor and keep you full. This salad is already vegetarian-friendly, but you can make it even more robust. Try adding chickpeas or white beans for extra protein. They give a nice texture and boost the nutrition. You could also use tofu for a plant-based option. Just press and cube the tofu before adding it to the mix. It will soak up the dressing well. Seasonal ingredients can elevate your Caprese pasta salad. In spring, add asparagus or peas for a fresh crunch. In summer, use ripe peaches or nectarines for a sweet touch. In fall, roasted butternut squash adds warmth and color. You can also mix in seasonal herbs like mint or dill to change the flavor profile. Each season brings new tastes to enjoy! After you enjoy your Caprese pasta salad, store leftovers in an airtight container. This keeps the flavors fresh and prevents drying out. Make sure to refrigerate it right away. The salad stays good for about three days in the fridge. To keep your salad fresh, avoid mixing in dressing until you’re ready to eat. This helps the pasta and veggies stay crisp. If you add avocado, use it right away to prevent browning. If you have to store it with avocado, squeeze some lemon juice on it for extra protection. Though I recommend eating this salad fresh, you can freeze it if needed. However, pasta can get mushy when thawed. If you choose to freeze it, store the pasta and salad components separately. Thaw in the fridge before enjoying. Yes, you can make this salad ahead of time. I often prepare it a few hours before serving. This lets the flavors mix well. Just store it in the fridge until you're ready to eat. The pasta stays fresh and tasty. I suggest using fusilli or penne. These shapes hold the dressing and mix well with the other ingredients. They also make it easy to grab a bite. You can use any pasta you like, but these two work best for this salad. While you can use dried herbs, fresh basil gives the best flavor. Fresh basil adds a bright taste that dried herbs can't match. If you must use dried, use less since it is stronger. A little goes a long way. This blog post explored the key ingredients and tools for making a pasta salad. We discussed cooking pasta, mixing fresh ingredients, and serving tips. I shared tips for choosing tomatoes and using fresh basil. You can customize your salad with protein or vegetarian options. Proper storage and freezing methods help keep leftovers fresh. Remember, you can prepare the salad ahead of time. Enjoy your delicious pasta salad that fits your taste and needs!

Simple Caprese Pasta Salad Fresh and Flavorful Dish

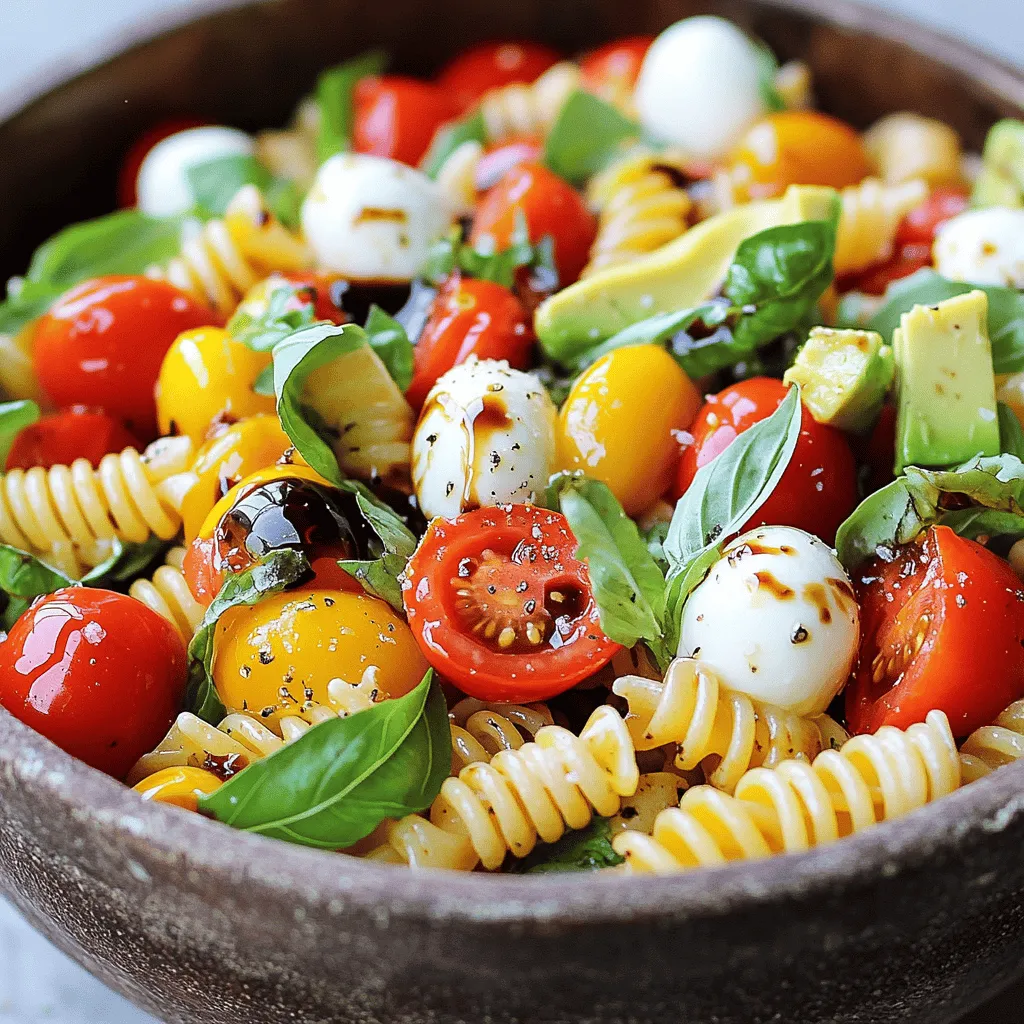
Craving a fresh and tasty dish that’s easy to make? Let me introduce you to the Simple Caprese Pasta Salad.

- 1 cup plain Greek yogurt - 1/4 cup mayonnaise - 1 tablespoon dried dill weed - 1 teaspoon garlic powder - 1 teaspoon onion powder - 1 teaspoon dried parsley - 1 teaspoon lemon juice - Salt and pepper to taste - Fresh vegetables (carrots, celery, cucumber, bell peppers) for serving Greek yogurt is thick and creamy. It has more protein than regular yogurt. This protein helps you feel full. It also has probiotics, which are good for your gut. These friendly bacteria can aid digestion. Greek yogurt is lower in sugar than many dips. It makes a healthy base for our ranch dip. If you can't find Greek yogurt, try regular yogurt. You can use sour cream for a tangy taste. For a lighter option, choose low-fat yogurt. If you want a vegan dip, use cashew cream or silken tofu. These options still keep the dip creamy and delicious. - Combining the Base Ingredients Start by taking a medium bowl. Add 1 cup of plain Greek yogurt and 1/4 cup of mayonnaise. Mix these together until they are smooth and creamy. This blend gives the dip its rich texture. - Adding Herbs and Spices Next, it's time to bring in the flavor. Add 1 tablespoon of dried dill weed, 1 teaspoon of garlic powder, 1 teaspoon of onion powder, and 1 teaspoon of dried parsley. Stir well to mix all the herbs and spices evenly. This step is key for a tasty dip. - Chilling the Dip After mixing everything, squeeze in 1 teaspoon of lemon juice. Then, add salt and pepper to taste. Mix again until everything is blended. Cover the bowl with plastic wrap and put it in the fridge. Let it chill for at least 30 minutes. Chilling allows the flavors to meld together beautifully. - Best Vegetables for Dipping When it's time to serve, choose fresh veggies. Carrots, celery, cucumber, and bell peppers are great options. They add crunch and color to your dip spread. - Pairing with Chips or Crackers This dip also works well with chips or crackers. They provide a crunchy contrast to the creamy dip. You can set out a mix of both for your guests. For a lovely presentation, serve the dip in a nice bowl. You can arrange the vegetables around the bowl. This not only looks appealing but also makes it easy for guests to grab their favorites. Adding a sprinkle of fresh herbs on top can also enhance the visual appeal. To get that smooth and creamy dip, start with thick Greek yogurt. Use full-fat yogurt for the best texture. Mix it with a bit of mayonnaise. This adds richness and helps with creaminess. Stir well until the mixture is uniform. If the dip feels too thick, add a splash of milk for extra smoothness. You can boost the flavor of your dip in many ways. Fresh herbs add a bright taste. You can use chives, basil, or even fresh dill. Try adding a dash of hot sauce for some heat. If you like a tangy kick, squeeze in more lemon juice. Taste your dip as you go. Adjust the salt and pepper to fit your taste. When making this dip, measuring is key. Use a measuring cup for yogurt and mayonnaise. This step ensures the right balance. For spices, use measuring spoons. Dried herbs can vary in strength. It's best to stick to the amounts provided. If you want to experiment, add small amounts. Mix, taste, and adjust as needed. This way, you can create a dip that’s just right for you! {{image_2}} To make a spicy Greek yogurt ranch dip, add some heat. You can mix in 1-2 teaspoons of hot sauce. You can also use cayenne pepper or chili powder. This adds a nice kick without changing the base flavor. Spicy dips pair well with fresh veggies or even chips. If you love heat, try adding diced jalapeños for a crunchy twist. For a more herbal taste, you can try different herbs. Fresh herbs work great in this dip. Add chopped chives, basil, or cilantro to enhance the flavor. You can also mix in some tarragon or thyme for a unique touch. This makes the dip fresh and bright. Use any herb you love to make it your own! If you want a dairy-free option, don't worry! You can swap Greek yogurt with coconut yogurt. This gives you the same creamy texture. You can also use cashew cream for a rich flavor. Just blend soaked cashews with a bit of water until smooth. This way, everyone can enjoy the dip, no matter their diet. To store Greek yogurt ranch dip, place it in an airtight container. This keeps the dip fresh and prevents it from absorbing other fridge smells. Make sure to seal the lid tightly. If you have leftover veggies, store them in another container. Greek yogurt ranch dip lasts about 3 to 5 days in the fridge. Always check for any changes in smell or color before using. If you notice any off smells, it’s best to toss it. You do not need to heat this dip, as it is served cold. If you want to reuse it, just give it a good stir before serving again. This helps mix the flavors back together. If the dip seems thick after sitting, add a little yogurt or mayo to loosen it. Enjoy it with fresh veggies or chips! Yes, you can easily make this dip ahead of time. It tastes better when it sits. Prepare it up to two days before your event. Just keep it in the fridge. Cover it tightly with plastic wrap. This helps the flavors blend well. Greek yogurt ranch dip is a healthy choice. It has less fat than regular ranch dip. Greek yogurt gives you protein and probiotics. These are good for your gut health. The fresh herbs and spices add flavor without extra calories. You can enjoy this dip guilt-free! You can serve many things with this dip. Fresh vegetables are the best. Try carrots, celery, cucumber, and bell peppers. They add crunch and color. You can also pair it with chips or crackers. This dip is great for parties or snack time! In this article, we explored the ingredients and steps for making Greek yogurt ranch dip. We discussed its benefits, common substitutes, and ways to enhance its flavor. I shared tips for achieving creaminess and presented fun variations. Remember, this dip is easy to make and perfect for any snack. Enjoy experimenting with flavors and serving ideas. Keep it fresh and simple for your next gathering!

Greek Yogurt Ranch Dip Simple and Flavorful Recipe

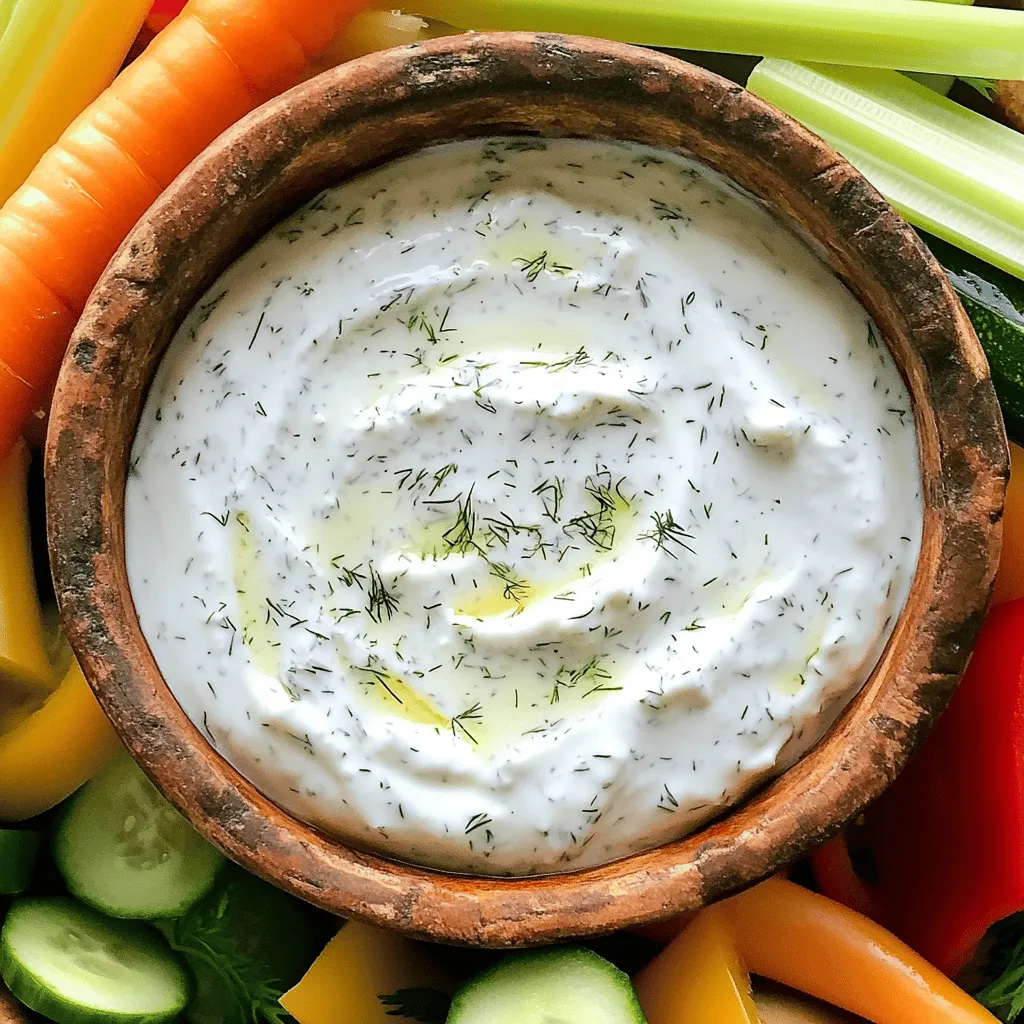
Looking for a tasty dip that’s simple to make? Greek Yogurt Ranch Dip is your answer! Packed with flavor and

- 8 oz elbow macaroni - 1 cup shredded sharp cheddar cheese - 1 cup shredded pepper jack cheese - 1/2 cup cream cheese - 2-3 fresh jalapeños, finely chopped (seeds removed for less heat) - 2 tablespoons butter - 2 tablespoons all-purpose flour - 2 cups milk (whole or 2%) - 1/2 teaspoon garlic powder - 1/2 teaspoon onion powder - Salt and pepper to taste The main ingredients create a rich and creamy dish. The elbow macaroni acts as the base. Sharp cheddar gives a classic taste. Pepper jack adds a nice kick, while cream cheese makes everything smooth. Fresh jalapeños bring the heat, but you can adjust them to suit your taste. - 1/4 cup panko breadcrumbs (optional, for topping) - Fresh cilantro or parsley for garnish (optional) Panko breadcrumbs add texture and crunch. They create a nice contrast to the creamy macaroni. Cilantro or parsley brightens the dish. They also make it look great when served. - Gluten-free pasta - Dairy-free cheese options If you need a gluten-free option, swap the elbow macaroni for gluten-free pasta. For dairy-free needs, choose dairy-free cheese. This way, everyone can enjoy this delightful dish. Cooking the elbow macaroni Start with a large pot. Fill it with water and add salt. Bring the water to a boil. Once boiling, add 8 oz of elbow macaroni. Cook it according to the package instructions. You want it to be tender but still firm. This is known as al dente. Drain the pasta and set it aside for later. Importance of al dente texture Cooking the pasta to al dente is key. This texture holds up well in the cheesy sauce. It also prevents the pasta from becoming mushy after mixing. Keeping some bite in the pasta makes each bite satisfying. Creating a roux with butter and flour In the same pot, melt 2 tablespoons of butter over medium heat. Once melted, add 2 tablespoons of all-purpose flour. Whisk the mixture for about 1 to 2 minutes. This forms a roux, which thickens your sauce. Gradually adding milk for consistent texture Now, slowly pour in 2 cups of milk while whisking. Keep whisking to avoid lumps in your sauce. Cook this mixture for about 4 to 5 minutes. It should thicken nicely and become smooth. Incorporating cheeses and jalapeños Once your sauce is thick, lower the heat. Add in 1 cup of shredded sharp cheddar cheese, 1 cup of shredded pepper jack cheese, and 1/2 cup of cream cheese. Stir until all the cheese melts into a smooth sauce. Then, mix in 2 to 3 finely chopped jalapeños, along with 1/2 teaspoon of garlic powder and 1/2 teaspoon of onion powder. Season with salt and pepper to taste. Combining the pasta and cheese sauce Now it's time to add the pasta. Pour the cooked elbow macaroni into the cheese sauce. Mix well until every piece of pasta is coated in that creamy goodness. Optional broiling for a crispy topping If you want a crunchy top, transfer the mac and cheese to a greased baking dish. Sprinkle 1/4 cup of panko breadcrumbs on top. Broil it for 2-3 minutes. Keep a close eye on it to avoid burning. Enjoy your creamy jalapeño mac and cheese right away! For a creamy mac and cheese, the milk's temperature matters. Use warm milk, not cold. This helps the cheese melt smoothly. Stir it well as you cook. Keep whisking to avoid lumps. Using the right cheese blends also boosts creaminess. I suggest sharp cheddar for a rich taste and pepper jack for a kick. Cream cheese adds silkiness. Mixing these cheeses gives you depth and flavor. Want less heat? Remove the seeds from the jalapeños. You can also use fewer jalapeños. This change helps control the spice. If you like more flavor, try adding smoked paprika or cayenne pepper. These spices add depth without too much heat. Pair your mac and cheese with simple sides. A fresh garden salad works well. Also, consider garlic bread for a tasty contrast. For drinks, a light beer or iced tea complements the dish nicely. To make your plate pop, garnish with fresh cilantro or parsley. You can also sprinkle some panko breadcrumbs on top for a crunchy finish. It makes the dish look fancy and inviting! {{image_2}} You can make this dish meat-free and still tasty. Use plant-based cheeses instead of dairy. They melt well and add flavor. You can also mix in more vegetables like spinach or bell peppers. This boosts nutrition and adds color. Want to change the taste? Try using smoked cheese. It gives a nice, rich flavor. You can also add spices like paprika or cayenne. If you want a heartier dish, mix in cooked chicken or crispy bacon. Both add great flavor and texture. Not a fan of elbow macaroni? You can use other pasta shapes, like shells or penne. Each shape brings a different texture to the dish. Just remember, cooking times may vary. Check the package for the right boiling time. After you enjoy your creamy jalapeño mac and cheese, store any leftovers right. Place them in an airtight container. This keeps the dish fresh and tasty. Refrigerate it within two hours of cooking. Aim to eat leftovers within three to four days for best flavor. To reheat your mac and cheese, use gentle heat. I recommend using the stove for even warming. Place the mac and cheese in a pot. Add a splash of milk to keep it creamy. Stir often over low heat until hot. You can also use the microwave. Heat in short bursts, stirring in between to avoid dryness. If you want to freeze mac and cheese, do it right. First, let it cool completely. Then, transfer it to a freezer-safe container. Seal it tightly to prevent freezer burn. You can freeze it for up to three months. When you're ready to eat, thaw it overnight in the fridge. Reheat it slowly, adding milk to revive its creaminess. To make your mac and cheese less spicy, remove the seeds and ribs from the jalapeños. This part holds most of the heat. You can also use fewer jalapeños or replace them with a milder pepper, like a bell pepper. Another option is to add a pinch of sugar to balance the heat. You can also mix in some extra cream cheese or sour cream to cool down the spice. Yes, you can make this recipe ahead of time. Cook the pasta and prepare the cheese sauce. Mix them together and let it cool. You can store it in the fridge for up to three days. When ready to bake, add a bit of milk to keep it creamy. You can reheat it in the oven or microwave. For cream cheese, you can use Greek yogurt or sour cream. Both add creaminess but with a tangy flavor. You can also use mascarpone cheese for a richer taste. Just remember, these swaps can change the flavor slightly, but they will still give you a creamy texture. In this article, we covered how to make creamy mac and cheese with a spicy kick. You learned about key ingredients like cheeses and jalapeños, along with tips for perfecting the texture. We also explored flavor variations and how to store leftovers safely. Remember, feel free to adjust spices and try new pasta shapes. With these tips, you can create a delicious dish that suits your tastes and needs. Enjoy your cooking adventure!

Creamy Jalapeño Mac and Cheese Easy Comfort Dish

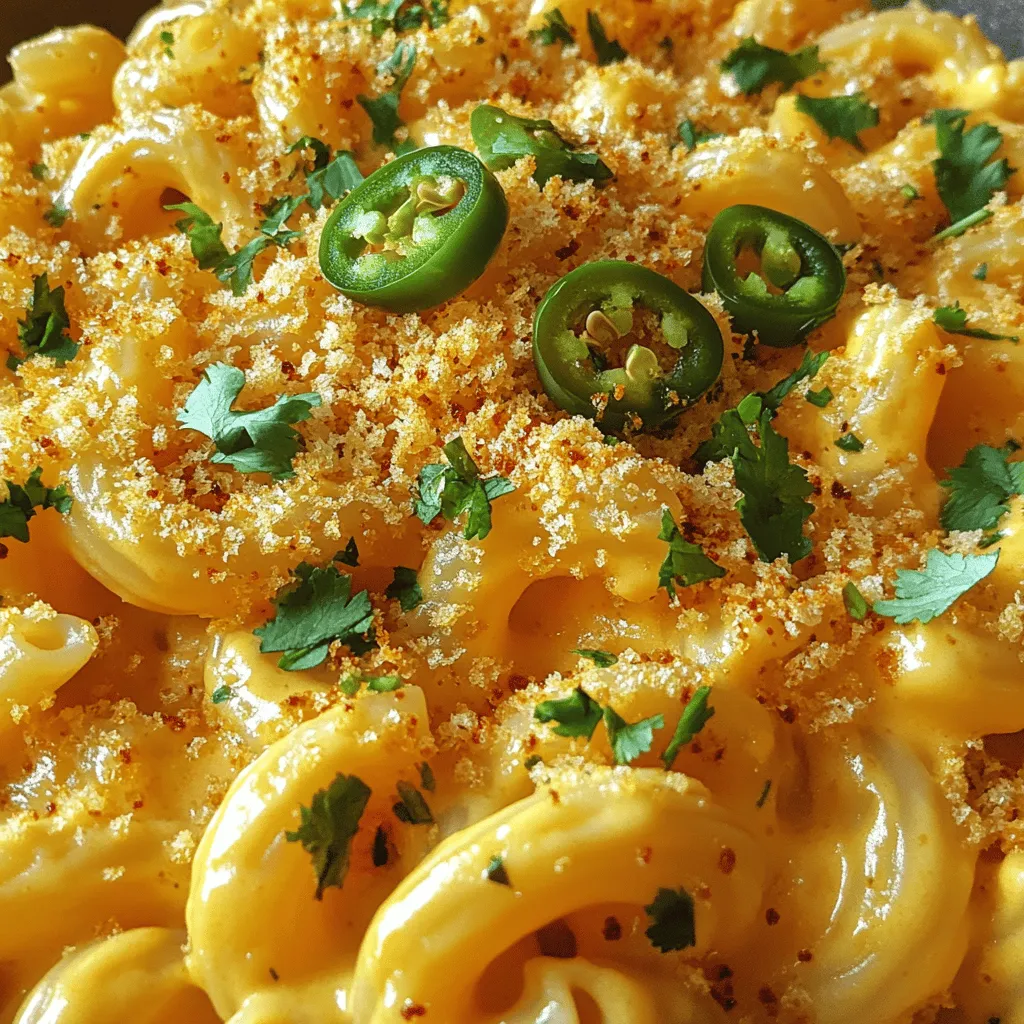
If you crave comfort food, let me share my favorite dish: Creamy Jalapeño Mac and Cheese. This dish combines rich,

Older posts
Newer posts
← Previous Page1 … Page37 Page38 Page39 … Page84 Next →

dsad

© 2026 easycookingbite • Built with GeneratePress

Our Policies

  • Copyright Policy
  • Cookie Policy
  • GDPR Policy
  • Privacy Policy
  • Disclaimer
  • Terms Of Use

More Information

  • Home
  • About
  • Contact
  • Appetizers
  • Dessert
  • Dinner
  • Drinks
©2026, easycookingbite About Back To Top