Skip to content
DisclaimerTerms Of UseGDPR PolicyCookie Policy

easycookingbite

  • Home
  • Drinks
  • Appetizers
  • Dinner
  • Dessert
  • About
  • Contact
  • Privacy Policy
DisclaimerTerms Of UseGDPR PolicyCookie Policy

NO-ING-IMG

You need 2 cups of fresh blueberries. These tiny fruits burst with flavor. They add a sweet and tangy touch to the dish. Next, use 2 cups of fresh peaches. Peel and slice them for the best taste. Together, these fruits create a colorful and tasty mix. For extra sweetness, add 1 tablespoon of honey or maple syrup. This step is optional, but it can enhance the flavor. Honey brings a floral note, while maple syrup adds a warm taste. You can choose either based on your preference. The crisp topping needs 1 cup of rolled oats. These oats give the dish a chewy texture. Then, mix in 1/2 cup of all-purpose flour. This flour helps bind the topping together. For sweetness, add 1/2 cup of packed brown sugar. Sprinkle in 1/2 teaspoon of cinnamon for warmth and flavor. Lastly, add 1/4 teaspoon of salt to balance the taste. This mixture creates a crumbly topping that will bake to a golden brown. Start by preheating your oven to 350°F (175°C). In a mixing bowl, add 2 cups of fresh blueberries and 2 cups of sliced peaches. These fruits are sweet and juicy. Drizzle 1 tablespoon of lemon juice over them. This adds brightness and balance. If you want more sweetness, add 1 tablespoon of honey or maple syrup. Toss gently to coat the fruit. You want the flavors to mix well. Once combined, transfer the fruit mixture into a greased 9x9 inch baking dish. Spread the fruit out evenly. This ensures every bite is tasty. In another bowl, mix together 1 cup of rolled oats, 1/2 cup of all-purpose flour, 1/2 cup of packed brown sugar, 1/2 teaspoon of ground cinnamon, and 1/4 teaspoon of salt. These ingredients create a great texture for your topping. If you like a crunch, add 1/4 cup of chopped nuts, like pecans or almonds. Stir everything until combined. Then, pour in 1/2 cup of melted unsalted butter. Mix until the topping looks crumbly and well blended. Now, sprinkle the oat mixture evenly over the fruit in the baking dish. Make sure to cover the fruit well. This will create a nice crust when baked. Place the dish in the preheated oven and bake for about 30-35 minutes. You’ll know it’s ready when the topping is golden brown and the fruit is bubbling. When it’s done, remove it from the oven. Let it cool slightly before serving. This crisp is best enjoyed warm. To get the best texture for your crisp, focus on the topping. Use rolled oats for a chewy bite. Mix the oats with flour and brown sugar to create a crumbly feel. When you melt the butter, make sure it coats all the dry mix. This helps bind everything together. Don’t skip the nuts; they add a nice crunch. You can use pecans or almonds, depending on your taste. Spices can really boost the taste of your crisp. Ground cinnamon is a must, as it pairs well with both blueberries and peaches. Try adding a pinch of nutmeg for warmth, too. If you like a bit of heat, a dash of ginger works great. These spices bring out the fruit's natural sweetness and make each bite more exciting. Serving your Blueberry Peach Crisp is fun! I love it warm right out of the oven. A scoop of vanilla ice cream on top melts beautifully into the crisp. If you want a lighter option, whipped cream is a great choice. For a touch of color, add a sprig of mint on top. This not only looks pretty but also adds a fresh taste. Enjoy it with friends or family for a sweet treat! {{image_2}} You can easily make a gluten-free version. Just swap the all-purpose flour for a gluten-free flour blend. This blend usually contains rice flour, potato starch, and tapioca flour. Most brands work well in baking. Check labels to ensure they are certified gluten-free. This way, you can enjoy the crisp without worry! To make this crisp vegan, replace the butter with coconut oil or a vegan butter substitute. Instead of honey, use maple syrup or agave nectar for sweetness. This keeps it plant-based and just as tasty. If you have nut allergies, skip the nuts in the topping. You can replace them with more oats or sunflower seeds for added crunch. This keeps the texture nice without any nuts. Enjoy your Blueberry Peach Crisp safe and sound! To store leftover blueberry peach crisp, let it cool completely. Cover it with plastic wrap or foil. You can keep it in the fridge for up to four days. Make sure to place it in an airtight container for best results. When you're ready to enjoy the crisp again, preheat your oven to 350°F (175°C). Place the crisp in the oven for about 10 to 15 minutes. This will warm it up and make the topping crisp again. You can also use a microwave, but the oven gives better results. If you want to freeze blueberry peach crisp, let it cool first. Wrap it tightly in plastic wrap and then in foil. You can freeze it for up to three months. When you're ready to eat it, thaw it in the fridge overnight. Reheat it in the oven for the best taste. Yes, you can use frozen fruit. Just thaw it first and drain excess liquid. Frozen fruit may release more juice during baking. This can make your crisp a bit juicier but still tasty. If you prefer a thicker filling, add a little extra flour to help absorb the juices. Blueberry Peach Crisp lasts about 3 to 5 days in the fridge. Store it in an airtight container to keep it fresh. You can also freeze it for up to 3 months. Just make sure to wrap it well to prevent freezer burn. If you want a dairy-free option, use coconut oil or vegan butter. You can also try applesauce for a lighter option. Just remember that the texture may change slightly. Adjust the amount based on your preference for moisture and richness. You now know how to make a delicious Blueberry Peach Crisp. We covered key ingredients and the step-by-step process. I shared tips on texture and flavor, plus fun variations. Storing leftovers and reheating them correctly ensures more tasty treats. Remember, feel free to adapt the recipe to your needs. Whether using fresh or frozen fruit, this dessert is sure to please. Enjoy your time in the kitchen, and happy baking!

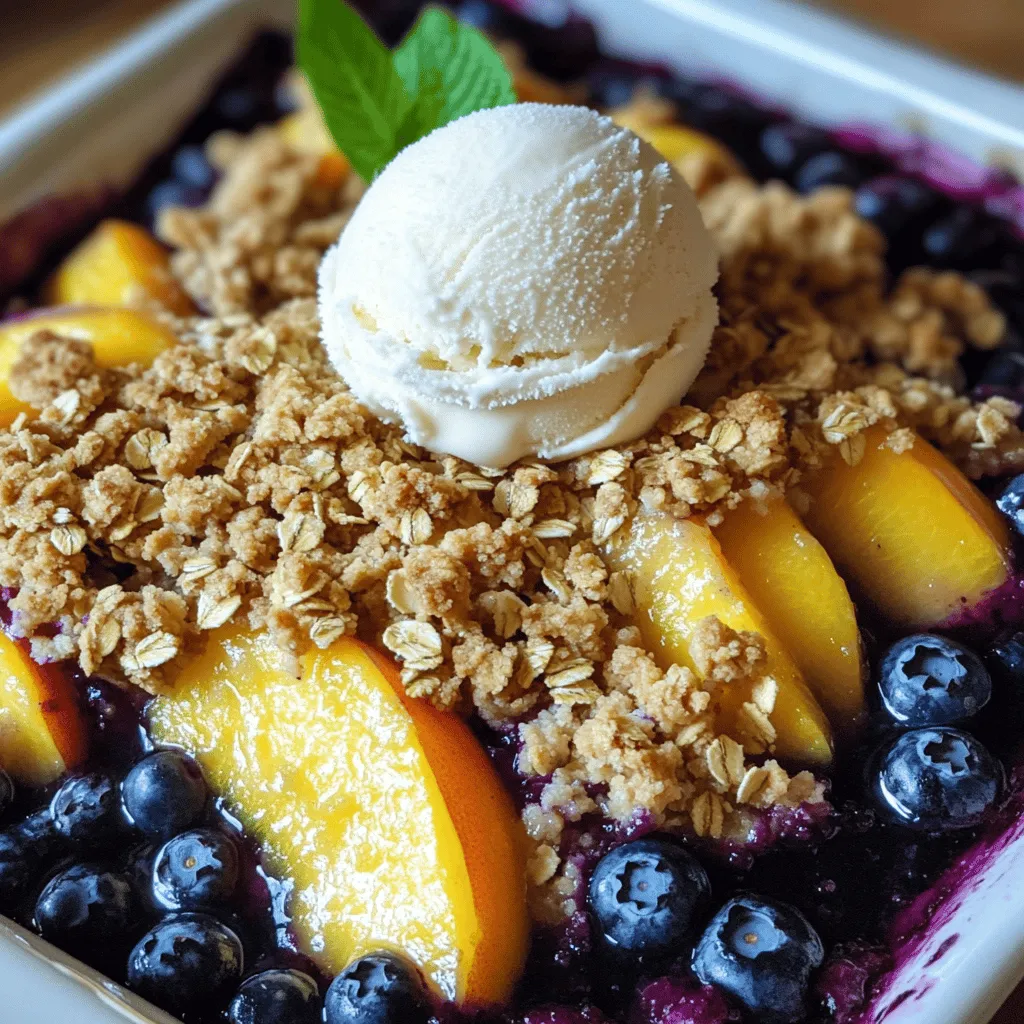
Blueberry Peach Crisp Delightful and Easy to Make

Ready to treat your taste buds? This Blueberry Peach Crisp is both delightful and easy to make! With fresh blueberries

- 1 cup sushi rice - 8 ounces sushi-grade tuna, diced - 2 tablespoons mayonnaise (preferably Kewpie) - 1 tablespoon sriracha (plus more for drizzling) - 1 avocado, sliced - 1 cucumber, thinly sliced - 1 small carrot, shredded Sushi rice is the base of this dish. It’s sticky and holds together well. Sushi-grade tuna gives the dish its fresh, rich flavor. You can find it at fish markets or specialty stores. Mayonnaise and sriracha create a creamy and spicy sauce for the tuna. Fresh avocado, cucumber, and carrot add nice textures. - 1 tablespoon rice vinegar - 1 teaspoon sugar - ½ teaspoon salt - 1 teaspoon sesame oil - 1 tablespoon sesame seeds (for garnish) Rice vinegar balances the flavors in the sushi rice. Sugar and salt enhance the taste. Sesame oil adds a nutty flavor. Sesame seeds give a nice crunch and extra flavor. - Seaweed sheets, cut into strips - 2 green onions, chopped Seaweed sheets can add a fun touch. They bring a slight saltiness. Chopped green onions add a fresh bite. You can use them for extra flavor and color. First, rinse the sushi rice until the water runs clear. This step is key to removing extra starch, which helps the rice stay fluffy. Next, cook the rice. In a medium saucepan, combine the rinsed rice and 1 ¼ cups of water. Bring it to a boil over high heat. After it boils, reduce the heat to low, cover, and let it simmer for 20 minutes. Once done, remove it from heat and let it sit, covered, for 10 minutes. This resting time helps the rice finish cooking. Now, we need to season the rice. In a small bowl, mix 1 tablespoon of rice vinegar, 1 teaspoon of sugar, and ½ teaspoon of salt until it dissolves. Once the rice is ready, transfer it to a large bowl. Gently fold in the vinegar mixture using a spatula. Let the rice cool to room temperature before using it. For the spicy tuna mixture, start by combining 8 ounces of sushi-grade tuna, 2 tablespoons of mayonnaise, 1 tablespoon of sriracha, and 1 teaspoon of sesame oil in a bowl. Mix it until the tuna is well-coated. This mixture is the star of your sushi bowl. You can adjust the spiciness to your taste. If you like it hotter, add more sriracha. To assemble the bowls, divide the cooled sushi rice among two bowls. Top each bowl with the spicy tuna mixture. Next, add slices of avocado, thin cucumber slices, and shredded carrot for a fresh crunch. For the finishing touch, garnish with chopped green onions and sesame seeds. If you want extra heat, drizzle more sriracha on top. You can also add strips of seaweed on the side or on top for a fun touch. Enjoy your vibrant and tasty spicy tuna sushi bowls! Rinsing sushi rice is key. It removes extra starch and helps the rice cook better. Wash it under cold water until the water runs clear. This makes the texture light and fluffy. For cooking, use a medium saucepan. Combine rinsed rice and water. Bring it to a boil on high heat. Then, lower the heat and cover it. Let it simmer for 20 minutes. After that, let it sit for 10 minutes with the lid on. This step lets the rice finish cooking in its steam. Sushi-grade tuna is safe to eat raw. It comes from fish that are handled with care. Look for bright color and a fresh smell. Avoid fish with a dull or brownish hue. When selecting fresh tuna, buy from a trusted source. Ask your fishmonger if it is sushi-grade. If possible, buy it the same day you plan to use it. Fresh fish tastes best and ensures safety. You can use different sauces and seasonings to add flair. Try spicy mayo or a drizzle of ponzu. These options can give your bowl a new twist. To adjust the spiciness, add more sriracha to the tuna mix. If you prefer less heat, reduce the sriracha. You can also mix in a bit of cream for a smoother texture. This adds a nice balance to the dish. {{image_2}} You can switch up the protein in your spicy tuna sushi bowls. If you prefer salmon, use sushi-grade salmon instead of tuna. Cooked shrimp is another tasty choice. It gives a sweet flavor that pairs well with all the toppings. For a vegetarian option, tofu works great. Just cube it and marinate it in the same sauces. This keeps the dish fresh and fun. The veggies you add can make your bowl special. Besides avocado, cucumber, and carrot, consider using radishes for a crunch. You can also try thinly sliced bell peppers or edamame for color and taste. Seasonal vegetables like peas or asparagus can brighten your dish. Think about mixing in your favorites to keep it exciting. Want to mix things up? Add fruits like mango or pineapple for a sweet twist. These fruits blend well with the spicy mayo. You can also try different sauces. A drizzle of teriyaki or ponzu sauce adds a zesty kick. Get creative and explore new flavors. Just remember to balance them with your spicy tuna. To store your spicy tuna sushi bowls, cover them tightly with plastic wrap or place them in airtight containers. This helps keep them fresh. It's best to store the rice and toppings separately. The rice can dry out if mixed with moist toppings. - For rice: Keep it in a sealed container at room temperature for up to 4 hours. After that, refrigerate for up to 2 days. - For toppings: Place the spicy tuna mixture, avocado, cucumber, and carrot in separate containers. They can stay fresh in the fridge for about 1 day. When reheating sushi rice, do it slowly. Use a microwave or stovetop. If using a microwave, add a splash of water to the rice. Cover it with a damp paper towel. This keeps the rice moist. - Safe reheating for sushi rice: Warm it in 30-second bursts. Stir between each to heat evenly. - Tips for maintaining texture: Avoid overheating. Overcooked rice can become hard and dry. You can freeze sushi rice, but it won’t have the same texture after thawing. It is best to use fresh rice for the best results. - Can you freeze sushi rice?: Yes, let it cool completely. Place it in a freezer bag and remove air before sealing. Use within 1 month. - Freezing fish safely: If you want to freeze tuna, wrap it tightly in plastic wrap. Use a freezer-safe bag. It can last for about 2 months. Always thaw tuna in the fridge before using. Sushi rice lasts about 3 to 5 days when stored in the fridge. Keep it in an airtight container. If you notice any off smell or texture, it’s best to discard it. Fresh is always best for flavor and safety. Yes, you can prepare some parts in advance. You can cook the sushi rice and store it in the fridge. You can also mix the spicy tuna a few hours before serving. However, assemble the bowls just before eating. This keeps the rice and toppings fresh. You can find pre-made spicy tuna sushi bowls at local sushi shops or grocery stores with sushi counters. Many online grocery services also offer them. Look for quality brands that use fresh ingredients. Check places like Whole Foods or local Asian markets. If you can’t find sushi-grade tuna, you have options. Cooked shrimp or salmon works well. For a vegetarian twist, try marinated tofu. You can also use canned tuna, but choose high-quality brands for better flavor. Spicy Tuna Sushi Bowls are simple yet tasty. We covered key ingredients like sushi rice and fresh tuna. You learned how to prepare the rice, mix the tuna, and assemble the bowls. Remember those helpful tips for perfecting sushi rice and choosing quality tuna. Feel free to customize with different proteins and veggies. Enjoy making this meal your own. With practice, you will impress your friends and family with delicious sushi bowls. Dive in and have fun experimenting!

Spicy Tuna Sushi Bowls Flavorful Fresh Dish Delight

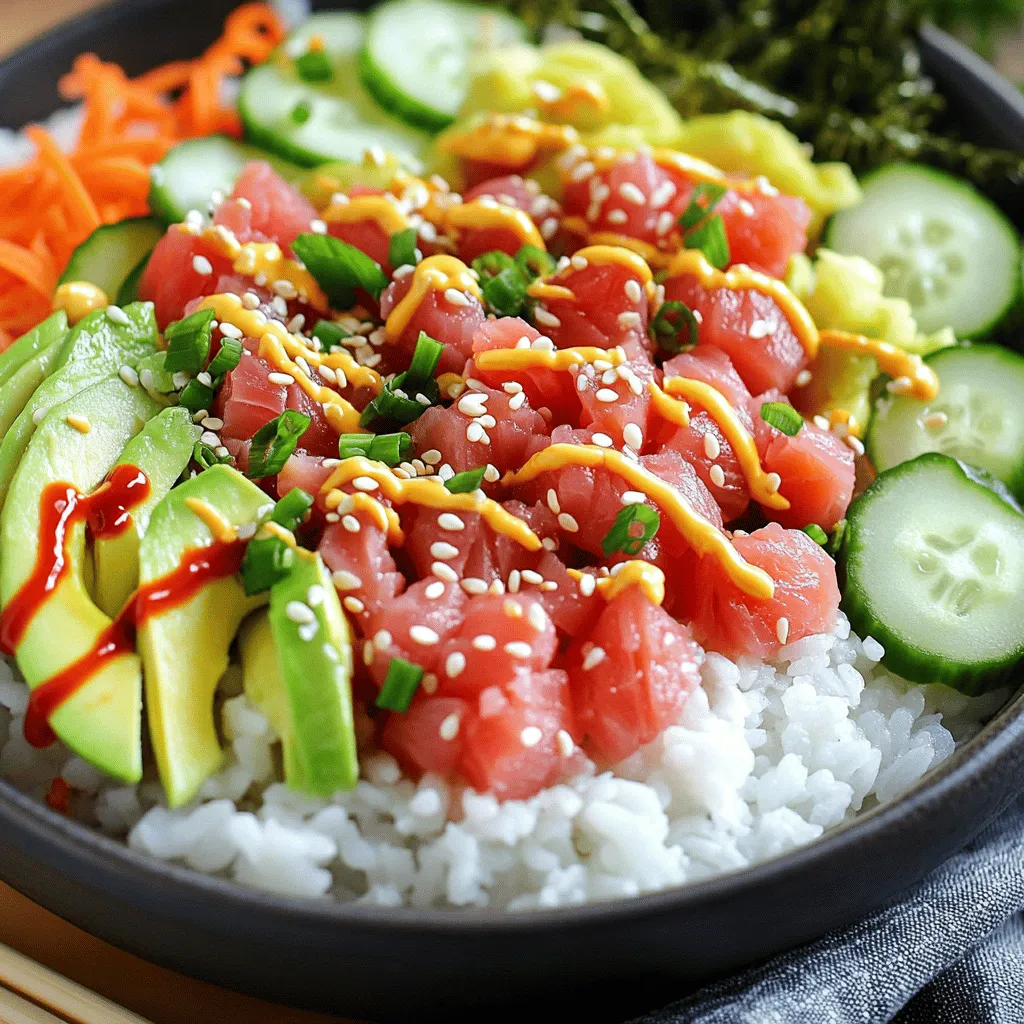
If you adore fresh flavors and want a fun twist on sushi, you’ll love Spicy Tuna Sushi Bowls! This delightful

- 1 cup sushi rice - 1 1/4 cups water - 4 sheets nori (seaweed) - 1 medium cucumber, julienned - 1 medium carrot, julienned - 1/2 red bell pepper, sliced into thin strips - 1/2 yellow bell pepper, sliced into thin strips - 1 medium avocado, thinly sliced - 1/4 cup pickled ginger (for serving) - Soy sauce (for dipping) - Sesame seeds (for garnish) - Wasabi (optional, for serving) Gathering fresh ingredients is key for great sushi. Start with sushi rice. This rice is sticky and holds together well. You'll need water to cook it. Next, choose colorful vegetables. I love using cucumber, carrot, and bell peppers. These add crunch and flavor. Don’t forget the creamy avocado; it makes your rolls rich and tasty. You'll need nori sheets, which are thin sheets of seaweed. They hold everything together. For flavor, use rice vinegar, salt, and a bit of sugar. These seasonings make your rice shine. Lastly, think about garnishes. Sesame seeds add a nice touch. Pickled ginger cleans your palate. Soy sauce and wasabi are perfect for dipping. They enhance the sushi's taste. Make sure to have everything ready before you start to roll! {{ingredient_image_1}} 1. Rinsing the rice: Start by rinsing 1 cup of sushi rice under cold water. Rinse until the water runs clear. This step removes excess starch and helps the rice cook evenly. 2. Cooking method and timing: Combine the rinsed rice and 1 1/4 cups of water in a pot. Bring it to a boil over high heat. Once boiling, reduce the heat to low. Cover and let it simmer for 20 minutes or until the water is absorbed. 3. Cooling the rice: After cooking, remove the pot from heat and let it sit, covered, for another 10 minutes. Transfer the rice to a bowl. Add a splash of rice vinegar, a pinch of salt, and a dash of sugar for flavor. Mix gently and let it cool to room temperature. 1. Julienne and slice vegetables for filling: While the rice cools, prepare your veggies. Julienne 1 medium cucumber and 1 medium carrot. Slice 1/2 of a red bell pepper and 1/2 of a yellow bell pepper into thin strips. Thinly slice 1 medium avocado. 2. Arranging fillings for assembly: Place each prepared vegetable in separate bowls. This makes it easy to grab what you need when assembling your rolls. 1. Placement of nori and sushi rice: Lay a bamboo sushi mat on a clean surface. Place 1 sheet of nori, shiny side down, on the mat. Wet your hands to keep the rice from sticking. Grab a handful of sushi rice and spread it evenly over the nori, leaving about 1 inch at the top edge. 2. Layering the colorful fillings: Start layering your colorful fillings—cucumber, carrots, bell peppers, and avocado—in the center of the rice. Be careful not to overfill; this helps with rolling. 3. Rolling technique and sealing the roll: Lift the edge of the sushi mat closest to you. Start rolling it away from you, tucking in the filling as you go. Keep rolling while pulling gently on the mat to form a tight roll. Wet the top edge of the nori with water to seal it. 1. Using the right knife technique: Use a sharp knife to slice the roll into bite-sized pieces. Wipe the blade with a damp cloth after each cut. This helps keep the edges clean and neat. 2. Plating presentation ideas: Arrange the sushi rolls on a beautiful platter. The colorful veggies should show on the cut sides, making them look inviting. 3. Suggestions for garnishing: Sprinkle sesame seeds over the top for crunch. Serve with pickled ginger, soy sauce, and wasabi on the side for added flavor. Enjoy this colorful and tasty treat! When making rainbow veggie sushi rolls, keep your hands wet. This helps the rice from sticking to your fingers. Wet hands make the process smoother and cleaner. Use the right amount of rice. A handful is usually enough. Spread it evenly over the nori, leaving space at the top. The rice should cover most of the nori but not be too thick. Avoid overfilling your sushi rolls. Too many ingredients can cause the nori to tear. Only add a few strips of each veggie to keep it manageable. Make sure to seal the roll properly. After rolling, wet the edge of the nori to help it stick. A tight seal keeps everything together when you slice it. Rice vinegar is the best for sushi rice. It adds a nice tang and complements the veggies well. You can also try flavored rice vinegars for a twist. To vary the flavors, think about adding different veggies or sauces. You can include spicy mayo or a drizzle of sesame oil. Experiment with your favorite tastes! Pro Tips Use Fresh Ingredients: The quality of vegetables directly affects the flavor of your sushi. Always choose fresh, ripe produce for the best results. Moisten Your Hands: Wet your hands before handling sushi rice to prevent it from sticking. This makes the rolling process easier and cleaner. Experiment with Fillings: Feel free to mix and match different vegetables or even proteins like cooked shrimp or tofu for a unique twist on your sushi rolls. Sharp Knife for Slicing: Use a very sharp knife to slice your rolls. This ensures clean cuts and helps maintain the shape of your sushi without squishing it. {{image_2}} To make these sushi rolls fit your needs, try some easy swaps. For those who need gluten-free options, use tamari instead of regular soy sauce. Tamari gives a rich flavor without the gluten. If you want a vegan-friendly addition, consider adding tofu or tempeh. Both options add protein and texture. You can marinate them in some soy sauce or teriyaki sauce for extra taste. You can play with the veggies in your sushi rolls. Try adding thinly sliced radishes for a peppery kick or some spinach for a fresh touch. You can also use sweet potatoes or beets for a colorful twist. When it comes to dips, think outside the box. Instead of soy sauce, try a spicy mayo or a tangy peanut sauce. These unique sauces can change your sushi experience. Take advantage of the seasons to keep your rolls fresh. In spring, use tender asparagus or snap peas for a crisp bite. Summer is perfect for colorful cherry tomatoes or zucchini. In fall, try roasted bell peppers or even pumpkin. You can also mix colors to fit festive occasions. Use red, green, and gold vegetables for a holiday theme. This way, your sushi rolls will not just taste good; they will look amazing too! To keep your sushi rolls fresh, refrigeration is key. Place the rolls in an airtight container. This helps avoid drying out. If you have some, add a damp paper towel. This keeps the sushi moist. Wrap each roll in plastic wrap before placing them in a container. This extra layer helps shield them from air. Make sure to store them in the fridge right after you finish your meal. Sushi is best enjoyed fresh, but if you have leftovers, you can reheat them carefully. Use a microwave on a low setting. Heat for just a few seconds to warm the rice. Avoid cooking it too long, as this can make it tough. If the sushi contains raw fish, it's best to discard it after a day. Cooked fish sushi can last a bit longer but still should be eaten quickly. Sushi rolls stay fresh for about 24 hours in the fridge. After that, the quality declines. Make sure to check for signs of spoilage. If the rice turns hard or the vegetables look wilted, it’s time to toss them. Trust your nose too; if it smells off, it’s best not to eat it. To make sushi rice, start with high-quality sushi rice. Rinse the rice under cold water until the water runs clear. This removes excess starch. Next, combine one cup of rice with 1 1/4 cups of water in a pot. Bring it to a boil, then reduce the heat. Cover and let it simmer for 20 minutes. After that, remove it from heat and let it sit, covered, for 10 more minutes. This resting time is crucial. Once it’s done, mix in rice vinegar, a pinch of salt, and a dash of sugar. Let it cool to room temperature. You can use regular rice, but the texture will change. Sushi rice is short-grain and sticky when cooked. It holds together well, which is important for sushi rolls. Other rice types, like long-grain or brown rice, will not stick as nicely. This means your rolls may fall apart. If you do not have sushi rice, use a medium-grain rice for better results. If you lack nori, try using lettuce leaves or rice paper. Lettuce provides a fresh, crunchy texture. Rice paper is flexible and easy to roll. Both options create a fun twist on traditional sushi rolls. You can also use thinly sliced cucumber for a low-carb version. Each alternative gives a different flavor and texture. Yes, Rainbow Veggie Sushi Rolls are healthy! They contain fresh vegetables like cucumber, carrots, and bell peppers. These veggies are full of vitamins and minerals. Avocado adds healthy fats, which are good for heart health. Sushi rice provides carbohydrates for energy. Overall, these rolls are colorful, tasty, and nutritious. Enjoy them as a light meal or snack! You can now create delicious sushi at home using simple ingredients and steps. We covered key items you need, like sushi rice and fresh veggies. You learned how to prepare, assemble, and serve your rolls beautifully. Don’t forget the tips to avoid common mistakes! Finally, explore different flavors and options to make your sushi unique. Enjoy the process, get creative, and share your homemade sushi with friends!

Rainbow Veggie Sushi Rolls Colorful and Tasty Treat

Looking for a fun and healthy meal? Try making Rainbow Veggie Sushi Rolls! These colorful treats are not just eye-catching;

To make Honey Mustard Brussels Sprouts, gather these items: - 1 pound Brussels sprouts, halved - 3 tablespoons olive oil - 2 tablespoons honey - 2 tablespoons Dijon mustard - Salt and pepper to taste - 1 tablespoon apple cider vinegar - 1/4 cup toasted walnuts, chopped - 1 tablespoon fresh parsley, chopped (for garnish) You will need some tools to prepare this dish: - Baking sheet - Parchment paper - Large bowl - Small bowl - Whisk or fork - Knife and cutting board Each serving of Honey Mustard Brussels Sprouts offers a healthy balance. This dish is low in calories and high in nutrients. It provides: - Fiber from Brussels sprouts - Healthy fats from olive oil and walnuts - Antioxidants from honey and mustard This recipe serves four people. Enjoy a tasty and healthy side dish! Start by preheating your oven to 400°F (200°C). This helps the sprouts roast well. Next, take 1 pound of Brussels sprouts and cut them in half. Place them in a large bowl. Add 3 tablespoons of olive oil, salt, and pepper to taste. Toss everything together. Make sure the sprouts are well coated in oil. This step is key for flavor and texture. While the sprouts roast, you can make the honey mustard dressing. In a small bowl, mix 2 tablespoons of honey, 2 tablespoons of Dijon mustard, and 1 tablespoon of apple cider vinegar. Add a pinch of salt and pepper. Whisk everything together until it is smooth. This dressing adds a sweet and tangy kick to the dish. Spread the Brussels sprouts out on a baking sheet, cut side down. Roast them in the oven for 20-25 minutes. You want them golden brown and tender. After roasting, take them out and drizzle the honey mustard dressing over the sprouts. Toss to coat evenly. Return them to the oven for an extra 5 minutes. This helps the dressing caramelize. Once done, mix in 1/4 cup of chopped toasted walnuts. Finally, sprinkle with fresh parsley for a nice touch. Enjoy your tasty dish! Roasting Brussels sprouts gives them a nice crunch. First, always cut them in half. This helps them cook evenly. Use a good amount of olive oil. It helps the sprouts get golden brown. Make sure to spread them out on the baking sheet. Crowding them makes them steam instead of roast. To get the best flavor, season well. Use salt and pepper to taste. The honey mustard dressing adds a sweet and tangy kick. Whisk the honey, Dijon mustard, and apple cider vinegar together. Drizzle this over the roasted sprouts for full flavor. Adding toasted walnuts at the end gives a nice crunch. Aim for a crispy outside and tender inside. Roast the sprouts for about 20-25 minutes first. This gives them time to soften and brown. After adding the dressing, roast for five more minutes. This allows the dressing to caramelize and enhance the flavor. Enjoy the mix of textures in every bite! {{image_2}} You can make Honey Mustard Brussels Sprouts even better by adding more ingredients. Here are some ideas: - Bacon: Add crispy bacon bits for a smoky flavor. - Cheese: Sprinkle some feta or goat cheese for creaminess. - Garlic: Toss in minced garlic for a savory kick. - Cranberries: Dried cranberries add a sweet contrast. - Apples: Add diced apples for a sweet crunch. This dish is easy to adapt for different diets. To make it vegan: - Replace honey: Use maple syrup instead of honey. - Check mustard: Ensure the Dijon mustard is vegan. For gluten-free options, use gluten-free mustard. Always check labels to be sure. You can enhance the flavor of your Honey Mustard Brussels Sprouts in fun ways. Here are some tips: - Spices: Add smoked paprika or chili flakes for heat. - Citrus: A squeeze of lemon juice brightens the dish. - Herbs: Use thyme or rosemary for an earthy taste. - Nuts: Experiment with different nuts like pecans or almonds. These variations will keep your Brussels sprouts exciting and delicious! To keep your Honey Mustard Brussels Sprouts fresh, place them in an airtight container. Store them in the fridge. They will last about three to four days. Make sure they cool down before sealing the container. This helps prevent moisture buildup. When you're ready to enjoy your leftovers, reheat them in the oven for the best results. Preheat your oven to 350°F (175°C). Place the sprouts on a baking sheet and heat for about 10-15 minutes. This keeps them crispy. You can also use the microwave, but they may become soft. Heat in 30-second intervals, stirring in between. If you want to freeze these sprouts, first let them cool completely. Then, spread them out on a baking sheet and freeze for about an hour. This prevents clumping. After they are frozen, transfer them to a freezer bag. They can last up to three months. When ready to eat, thaw them in the fridge overnight before reheating. Yes, you can use frozen Brussels sprouts. They are convenient and save time. However, fresh sprouts give better flavor and texture. If you use frozen, thaw them first. Then, follow the same roasting steps. Honey mustard Brussels sprouts pair well with many dishes. Here are some great options: - Grilled chicken or turkey - Pork chops or roast pork - Quinoa or rice dishes - A fresh green salad These sides enhance the sweet and tangy flavors of the sprouts. You can easily adjust the dressing to fit your taste. To make it sweeter, add more honey. If you like it tangy, add more Dijon mustard or apple cider vinegar. Mix well after each addition, and taste until it is just right for you. You learned how to make honey mustard Brussels sprouts by exploring key ingredients, equipment, and nutrition. I shared step-by-step cooking instructions, plus tips for the best roasting results. Various adaptations catered to different diets, while clear storage guidelines kept your leftovers fresh. In closing, these simple steps help you create a tasty dish everyone will love. Enjoy the unique flavors and share them with friends!

Honey Mustard Brussels Sprouts Flavorful Healthy Dish

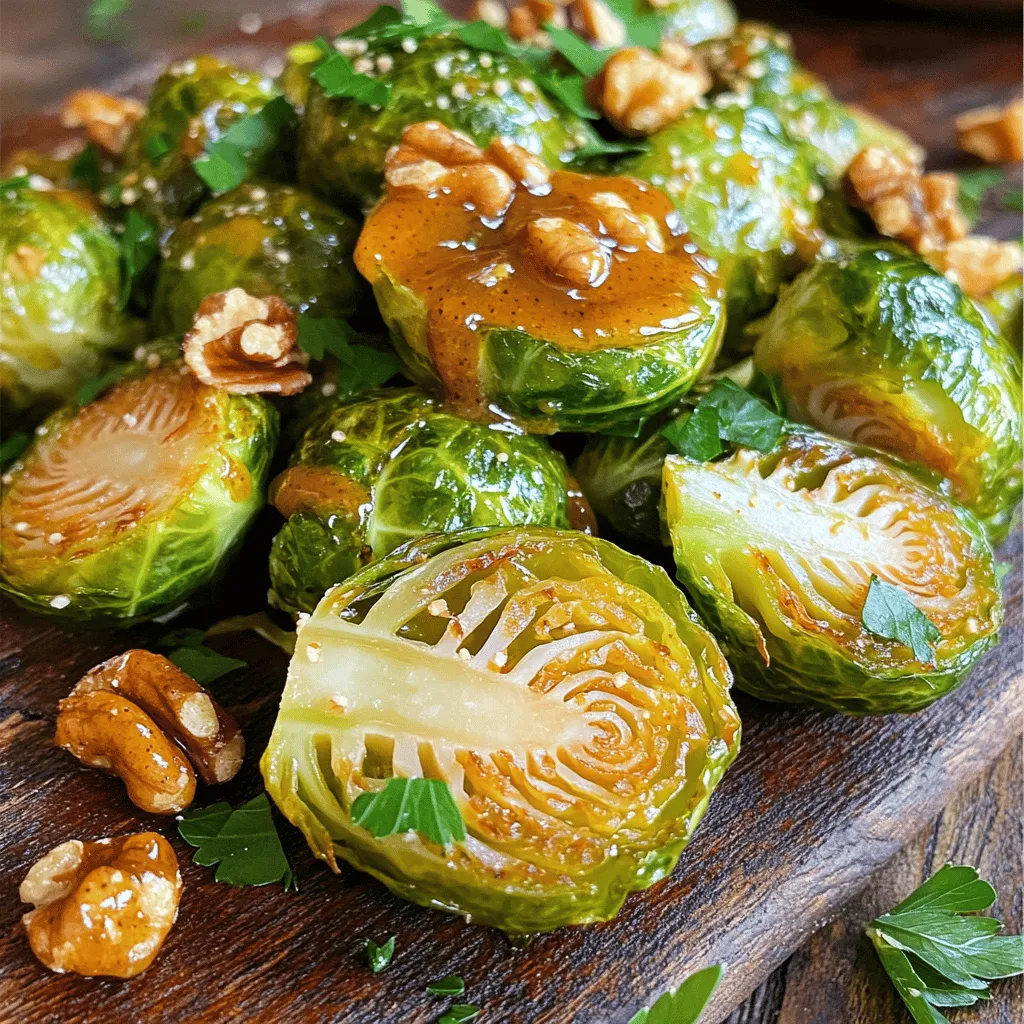
Looking to spice up your veggie game? Honey Mustard Brussels Sprouts are the answer! This dish is not only packed

To create the most delightful Raspberry Lemonade Popsicles, gather these fresh ingredients: - 2 cups fresh raspberries - 1 cup freshly squeezed lemon juice (about 4-6 lemons) - 1 cup water - 1/2 cup honey or agave syrup (adjust to taste) - 1/2 cup lemon-lime soda (for a fizzy twist, optional) These ingredients blend together to form a tasty and refreshing treat. Fresh raspberries provide a sweet and tart flavor. The lemon juice adds a vibrant zing. Honey or agave syrup sweetens the mix, making it perfect for hot days. While the base recipe is fantastic, you can take it up a notch with garnishes and add-ins: - Lemon slices - Whole raspberries Adding these to your popsicle molds not only enhances flavor but also makes your popsicles look pretty. They bring a burst of color and a fun surprise when you bite into them. Plus, they add extra natural sweetness. You can switch up the sweeteners based on your taste or dietary needs. Here are some options: - Maple syrup - Coconut sugar - Stevia Each sweetener brings a unique flavor. You may want to adjust the amount, so taste as you go. If you love a fizzy popsicle, try adding the lemon-lime soda after blending. This adds a fun, bubbly twist to your treat. To start, gather all your ingredients. You will need 2 cups of fresh raspberries, 1 cup of freshly squeezed lemon juice, 1 cup of water, and 1/2 cup of honey or agave syrup. You can also add 1/2 cup of lemon-lime soda for a fizzy twist if you’d like. 1. Place the raspberries, lemon juice, water, and honey in a blender. 2. Blend the mixture until it is smooth. While blending, pause to taste the mixture. If it’s too tart, add more honey or syrup. This way, you can adjust the sweetness to your liking. If you decide to add lemon-lime soda, do it gently after blending. This keeps the fizz intact and makes your popsicles light and bubbly. Once you have your smooth mixture, it’s time to pour it into popsicle molds. Leave a little space at the top for the mixture to expand as it freezes. If you want to make your popsicles look nice, drop in a few lemon slices and whole raspberries in each mold. Insert the popsicle sticks and place the molds in the freezer. Let them freeze for at least 4 to 6 hours. To remove the popsicles, run warm water over the outside of the molds for a few seconds. This will help loosen the popsicles for easy removal. Enjoy your homemade raspberry lemonade popsicles! To make the best raspberry lemonade popsicles, follow these key tips: - Use fresh raspberries for the best flavor. - Squeeze lemons yourself for fresh juice. - Adjust honey or agave syrup to your taste. - Pour the mixture into molds, leaving room for expansion. - Add lemon slices or whole raspberries for a fun look. Here are some common mistakes to steer clear of: - Not blending the mixture enough. It should be smooth. - Overfilling the molds. Leave space at the top. - Forgetting to taste the mixture. Adjust sweetness as needed. - Using too much soda if you want a fizzy twist. A little goes a long way. You can easily change the flavor of your popsicles. Here are some ideas: - Swap raspberries for strawberries or blueberries. - Mix in other fruits like peaches or mango. - Try adding herbs like mint for a fresh taste. - Use sparkling water instead of soda for a lighter version. - Experiment with flavored syrups or juices for unique twists. {{image_2}} You can mix things up with different fruits. Try strawberry lemonade popsicles. Just swap the raspberries for fresh strawberries. You can also use mixed berries. Combine raspberries, blueberries, and blackberries for a colorful treat. Each fruit brings its own flavor, making them fun to taste! For a dairy-free or vegan popsicle, use agave syrup instead of honey. This sweetener works great and keeps it plant-based. Also, check if your soda is vegan-friendly. This way, everyone can enjoy these refreshing popsicles on a hot day! Herbs can add a nice twist. Try adding mint or basil to your mix. Just blend a few leaves with the fruit. Mint gives a cool taste, while basil adds a sweet, spicy note. You can also add a splash of vanilla for a different flavor. These small changes make the popsicles unique and exciting! To keep your Raspberry Lemonade Popsicles fresh, store them in an airtight container. Use a sealable plastic bag or a popsicle mold with a lid. This helps prevent freezer burn, which can ruin the taste. Make sure to remove as much air as possible before sealing. It’s best to put them in the coldest part of your freezer. Raspberry Lemonade Popsicles can last up to two months in the freezer. To maintain quality, label the container with the date. Avoid leaving them out at room temperature for too long, as this can cause them to melt and refreeze, affecting texture and flavor. Always freeze them until solid, which takes about 4-6 hours. When you are ready to enjoy a popsicle, thaw it slightly for easier removal. Run warm water over the outside of the mold for a few seconds. This helps loosen the popsicle without melting it too much. For a fun serving idea, place them on a plate with mint leaves or in a tall glass. Garnish with extra raspberries and lemon slices for a lovely look. Enjoy your refreshing treat! You don’t need an ice cream maker for these popsicles. Just blend the ingredients in a blender. You can mix fresh raspberries, lemon juice, water, and honey or agave syrup. Blend until it is smooth. Then, pour the mixture into popsicle molds. Freeze them for at least 4-6 hours until they are solid. It’s that easy! Yes, you can use frozen raspberries! They work well for this recipe. Just let them thaw a bit before blending. This will help the raspberries blend easily. If you use frozen berries, your popsicles may be a bit slushier. However, they will still taste great and be refreshing! To remove popsicles, run warm water over the outside of the molds for a few seconds. This will help loosen the popsicles. Be careful not to get water on the popsicles themselves. If they still stick, let them sit for a minute and try again. Enjoy your popsicles once they are out! You learned how to make delicious raspberry lemonade popsicles. We covered essential ingredients, step-by-step instructions, and tips for success. You can customize flavors and avoid common mistakes. Plus, we discussed storage tips to keep your popsicles fresh. Making these treats is simple and fun. Enjoy experimenting with different fruits and flavors. Use this guide to make your popsicle game stronger. Your taste buds will thank you!

Raspberry Lemonade Popsicles Refreshing Summer Treat

Looking for a fun way to cool down this summer? You’re in the right place! Let’s dive into these delicious

To make creamy pesto gnocchi, you need a few key ingredients. Here’s what you'll need: - 1 pound potato gnocchi - 1 cup fresh basil pesto (store-bought or homemade) - 1 cup heavy cream - 1 cup cherry tomatoes, halved - 1 cup spinach leaves - 1/2 cup grated Parmesan cheese - 2 tablespoons olive oil - 2 cloves garlic, minced - Salt and pepper to taste - Pine nuts, toasted (for garnish) Each ingredient plays a role. The gnocchi brings that wonderful chewy texture. The pesto offers fresh, bold flavors. Cream makes the dish rich and smooth. You can add garnishes to enhance the dish. Here are some options: - Toasted pine nuts - Extra grated Parmesan cheese - Fresh basil leaves These garnishes not only add flavor but also make the dish look beautiful. You can use either homemade or store-bought pesto. Both have their perks: - Homemade Pesto: Making your own pesto lets you control the flavors. You can adjust the garlic or cheese to fit your taste. Plus, it's fresh and vibrant. - Store-Bought Pesto: This option saves time. Many brands offer good quality, and you can find it in most grocery stores. Just check for fresh ingredients. Choose what works best for you. Both options will result in a delicious meal. To start, fill a large pot with water and add salt. Bring it to a boil. Once the water bubbles, add 1 pound of potato gnocchi. Cook them until they float to the top, which takes about 2-3 minutes. This means they are ready! Drain the gnocchi and set them aside. In a large skillet, heat 2 tablespoons of olive oil over medium heat. Add 2 cloves of minced garlic and sauté for 1 minute until it smells good. Next, toss in 1 cup of halved cherry tomatoes. Cook them for 3-4 minutes until they start to blister. Then, add 1 cup of fresh spinach leaves and stir until they wilt, about 1-2 minutes. Now, pour in 1 cup of heavy cream and 1 cup of fresh basil pesto. Stir well and let the sauce simmer for 2 minutes. Once your sauce is ready, add the cooked gnocchi to the skillet. Toss them gently to coat with the creamy pesto sauce. Let it cook for another 2-3 minutes. This helps the gnocchi soak up the yummy flavors. Stir in 1/2 cup of grated Parmesan cheese and season with salt and pepper to your taste. Remove from heat and let it sit for a minute to thicken up. Serve hot, garnished with toasted pine nuts for that extra crunch! To cook gnocchi well, start with a large pot of water. Add salt to boost flavor. Bring the water to a boil before adding the gnocchi. Watch for them to float. This means they are ready. Cooking usually takes about 2 to 3 minutes. Drain them gently to avoid breaking. You can boost flavor with extra ingredients. Try adding cooked chicken or shrimp for protein. For a spicy kick, add red pepper flakes. Fresh herbs like parsley or oregano also work well. You can swap spinach for kale or arugula for a different taste. Use sun-dried tomatoes for a rich twist. To get a creamy sauce, use heavy cream. Combine it with pesto in the skillet. Stir well to blend. Let it simmer for a couple of minutes. This helps the flavors mix. If the sauce is too thick, add a splash of pasta water. This will help loosen it up while keeping the creaminess. {{image_2}} If you want to make this dish gluten-free, look for potato gnocchi made with gluten-free flour. Many brands offer this option. You can also make gnocchi at home using just potatoes and gluten-free flour. Both choices will work well in this creamy pesto dish. To make this meal heartier, add protein. Grilled chicken adds a nice flavor that pairs well with pesto. Cooked shrimp works great, too, giving a sweet touch to the dish. For a plant-based option, try tofu. Just sauté it until golden brown before adding it to the sauce. You can also boost flavor with seasonal veggies. In spring, add peas or asparagus. Summer is perfect for zucchini or bell peppers. In fall, try butternut squash or mushrooms. Each vegetable will add a unique taste, making the dish even more exciting. Mix and match for your favorite combination! To store leftover creamy pesto gnocchi, let it cool first. Then, place it in an airtight container. Make sure to cover it well to keep it fresh. Store it in the fridge for up to three days. The gnocchi may soak up some sauce, but it will still taste great. You can freeze creamy pesto gnocchi for later. First, let it cool completely. Next, transfer it to a freezer-safe container. Use freezer bags if you want to save space. Label the bags with the date. It can last up to three months in the freezer. When ready to eat, reheat the gnocchi for the best taste. You can microwave it in a bowl. Add a splash of water or cream to keep it moist. Stir often to heat evenly. You can also reheat it on the stove. Just warm it up over low heat, stirring gently. Enjoy your tasty meal! If you need a substitute for heavy cream, use half-and-half or whole milk. You can also blend silken tofu with a bit of water for a dairy-free option. These swaps may change the texture a little, but they will still taste good. Leftover pesto is great for many dishes. You can mix it into pasta, spread it on sandwiches, or drizzle it on grilled vegetables. You can also use it as a dip for bread or crackers. It adds bold flavor to any meal. Yes, you can make creamy pesto gnocchi ahead of time. Cook the gnocchi and sauce, then store them in the fridge. When ready to eat, just reheat it on low heat. Add a splash of cream to keep it creamy. Enjoy your meal without stress! You learned about creamy pesto gnocchi, from key ingredients to tasty variations. Enjoy cooking your gnocchi and making a creamy sauce. Remember, this dish welcomes changes with proteins or seasonal veggies. Store leftovers well for another meal. Use this guide to craft a dish that impresses. I hope you feel ready to create your own creamy pesto gnocchi masterpiece!

Creamy Pesto Gnocchi Flavorful and Easy Meal

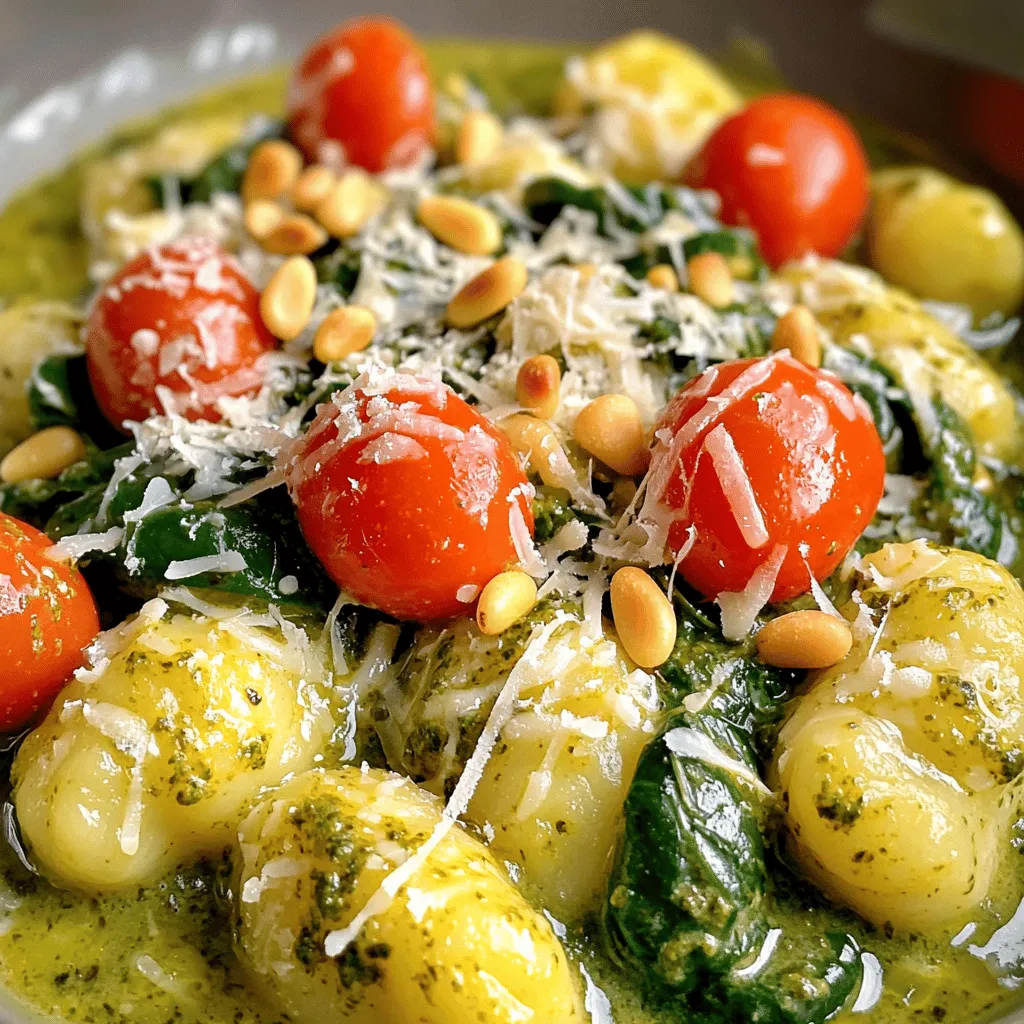
Looking for a quick and delicious meal? My Creamy Pesto Gnocchi recipe is here to help! This dish combines soft

To make spicy garlic edamame, you need a few simple ingredients. Here’s what you’ll need: - 2 cups edamame in pods (fresh or frozen) - 3 tablespoons olive oil - 4 cloves garlic, minced - 1 teaspoon red pepper flakes (adjust to taste) - 1 tablespoon soy sauce - 1 teaspoon sesame oil - Salt, to taste - Fresh cilantro or green onions, for garnish (optional) These ingredients create a bold flavor. The edamame provides protein and crunch. Garlic adds a wonderful aroma, while red pepper flakes bring the heat. Feel free to get creative with your edamame. You can add a squeeze of lime juice for a fresh twist. Or try a sprinkle of sesame seeds for extra crunch. If you don't have sesame oil, you can use more olive oil. For a different flavor, you can swap soy sauce for tamari to make it gluten-free. Spicy garlic edamame is not just tasty; it's healthy too! Each serving has about: - Calories: 150 - Protein: 12g - Carbohydrates: 10g - Fat: 8g - Fiber: 4g This snack is low in calories but high in protein and fiber. It’s a great choice for a quick bite that keeps you full! To start, gather your edamame pods. You can use fresh or frozen ones. If you pick frozen, follow the package instructions to cook them. Usually, boiling or steaming works best. Cook them until they feel tender, then drain them. Set the pods aside while you prepare the garlic and oil. Next, we will make the spicy garlic mix. This part is quick and easy. You will sauté garlic in olive oil. This gives the edamame a nice flavor. Then, we toss in the cooked edamame, soy sauce, and sesame oil. Finally, we season it to taste. 1. Heat the Oil: In a large skillet, add 3 tablespoons of olive oil. Heat it over medium heat until it shimmers. 2. Sauté the Garlic: Add 4 cloves of minced garlic. Cook for 1-2 minutes. You want it fragrant but not burnt. 3. Add Red Pepper Flakes: Stir in 1 teaspoon of red pepper flakes. Let them mix for about 30 seconds. This step adds heat. 4. Combine Edamame: Now, add your cooked edamame to the skillet. Toss them well to coat with the garlic oil. 5. Add Soy and Sesame: Drizzle in 1 tablespoon of soy sauce and 1 teaspoon of sesame oil. Toss everything for 2-3 minutes. Heat through until everything is warm. 6. Season and Garnish: Remove from heat. Sprinkle salt to taste. If you like, add chopped cilantro or green onions on top for color and flavor. This method ensures your edamame bursts with flavor. Enjoy your spicy garlic snack! To sauté garlic just right, use medium heat. Start with fresh, minced garlic. Add it to hot oil and stir often. This keeps garlic from burning. Cook it until it smells great, about 1-2 minutes. If it turns brown, you cooked it too long. Brown garlic tastes bitter, and that is not what you want. Spice is a personal choice. If you like it hot, add more red pepper flakes. Start with one teaspoon, then taste as you cook. You can always add more, but it’s hard to take it out. For less heat, use less pepper or skip it. You can also add a pinch of sugar to balance the spice. Garnish your edamame with fresh cilantro or green onions. This adds color and flavor. You can serve it with a squeeze of lime juice for a zesty kick. Try pairing it with soy sauce or a spicy dipping sauce. These extras make your snack even more fun and tasty. {{image_2}} You can easily make this dish vegan. The base ingredients are already plant-based. Use soy sauce for flavor. If you want a richer taste, try a vegan Worcestershire sauce. This will enhance the umami without adding any animal products. Feel free to get creative with spices. Want more heat? Add cayenne pepper. Prefer a touch of sweetness? A dash of brown sugar works well. Fresh herbs can also change the taste. Try basil or mint for a fresh twist. They add a lovely aroma and depth. Spicy garlic edamame is great alone, but dips can make it even better. Pair it with a spicy mayo or a tangy sesame sauce. For a fun twist, serve with sriracha or soy sauce for dipping. This adds layers of flavor and makes it more interactive. To store your leftover spicy garlic edamame, let it cool first. Place it in an airtight container. It will keep well in the fridge for up to three days. If you want to keep it longer, freezing is a good option. When you're ready to enjoy your leftover edamame, simply take it out of the fridge. You can reheat it in the microwave for about one to two minutes. Stir halfway for even heating. For a crispier texture, warm it in a skillet over medium heat for about five minutes. If you decide to freeze your edamame, make sure it is fully cooled. Transfer it to a freezer bag, squeezing out as much air as possible. It can stay fresh in the freezer for up to three months. When you're ready to eat it, thaw in the fridge overnight, then reheat as directed. Yes, you can use frozen edamame for this recipe. In fact, it's a great option. Just cook it according to the package instructions. Usually, this means boiling or steaming until tender. Once done, drain and set aside. This makes the recipe quick and easy. Spicy Garlic Edamame pairs well with many dishes. Try it with sushi, rice bowls, or grilled chicken. It also goes great with Asian-style salads. The flavors mix well with fresh veggies and tangy dressings. You can also enjoy it as a snack with drinks. To make this recipe gluten-free, use gluten-free soy sauce. You can find this at most stores now. Just check the label. Tamari is another good option. It adds the same great taste without gluten. Enjoy your spicy garlic edamame worry-free! Spicy garlic edamame is easy to make and delicious. We explored the key ingredients, preparation steps, and tips for flavor. I shared ways to adjust spice levels and delightful serving suggestions. You can even store leftovers or freeze them for later. Embrace the variations to suit your tastes. Enjoy this vibrant dish, whether as a snack or part of a meal. Keep experimenting and making it your own!

Spicy Garlic Edamame Flavorful and Easy Snack Recipe

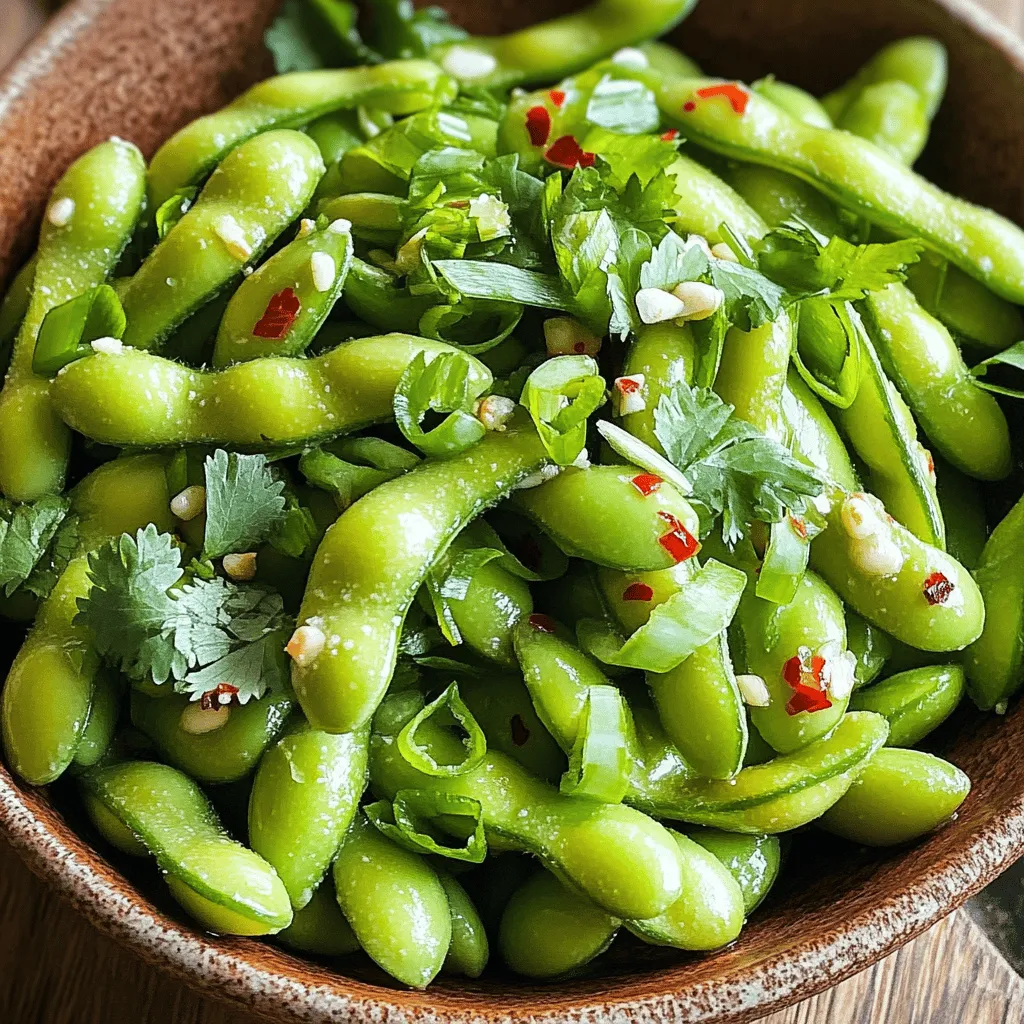
Craving a quick snack that packs a punch? Look no further! My Spicy Garlic Edamame recipe is simple, tasty, and

- 1 cup apple cider - 2 cups all-purpose flour - 1 teaspoon baking powder - 1 teaspoon baking soda - 1 teaspoon ground cinnamon - 1/2 teaspoon nutmeg - 1/4 teaspoon salt - 1/2 cup granulated sugar - 1/4 cup brown sugar, packed - 1/2 cup unsalted butter, melted - 2 large eggs - 1 teaspoon vanilla extract - 1/2 cup apples, peeled and chopped - Muffin tin - Mixing bowls - Whisk - Spatula - Measuring cups and spoons Gather all these items before you start. Each ingredient plays a key role in making these muffins taste great. The apple cider gives the muffins a sweet and tangy flavor. The spices like cinnamon and nutmeg add warmth and comfort. The sugars create a lovely sweetness. The butter keeps the muffins moist and rich. Eggs help bind the mix, while apples add texture and freshness. Using the right tools is just as important. A muffin tin is essential for shaping the muffins. Mixing bowls help you combine the ingredients easily. A whisk mixes the dry ingredients well. A spatula helps fold everything together without overmixing. When you have all these ingredients and tools ready, you set yourself up for success. Enjoy the process, and soon, you will savor these delightful muffins! - Preheat your oven to 350°F (175°C). - Line a muffin tin with paper liners or grease muffin cups. - Bring the apple cider to a boil and reduce it to about 1/2 cup. - Allow it to cool slightly after reducing. - Whisk together dry ingredients in one bowl. - Combine wet ingredients in another bowl before mixing. - Fold wet and dry mixtures together carefully. - Fill muffin cups and bake for 18-20 minutes. - Check for doneness with a toothpick. Now let's dive a little deeper into these steps. First, when you preheat the oven, it helps the muffins rise better. The heat creates a nice dome shape. Lining the muffin tin makes cleanup easy and keeps muffins from sticking. Next, reducing the apple cider concentrates the flavor. Boiling it down brings out that sweet and tangy taste. Let it cool a bit so it won’t cook the eggs in the next step. For mixing, use a whisk to blend the dry ingredients well. This helps combine the flour, baking powder, and spices. In another bowl, mix the wet ingredients. This way, the sugar dissolves better. When you fold the mixtures, do it gently. Overmixing can make the muffins tough. Finally, fill each muffin cup to about 2/3 full. This gives them room to rise without spilling over. Bake until a toothpick comes out clean. This means they are ready to eat! Use room temperature ingredients for better mixing. This helps create a smooth batter. It also ensures even cooking. Avoid overmixing; this keeps your muffins light and fluffy. Overmixing can lead to dense muffins, which we want to avoid. Want to elevate the taste? Experiment with spices like cloves or ginger. These spices add warmth and depth. You could also try adding a streusel topping for added crunch. This gives your muffins a nice texture contrast. Dust the muffins with powdered sugar before serving. This adds a touch of sweetness and looks great. For the best taste, serve them warm. Warming brings out all the lovely flavors and makes each bite cozy and delightful. {{image_2}} You can make these muffins gluten-free. Simply swap the all-purpose flour for a gluten-free flour blend. This change keeps the texture light and tasty while catering to gluten sensitivities. For a vegan twist, use plant-based butter instead of regular butter. Replace eggs with flax eggs, which you can make by mixing ground flaxseeds with water. Use almond milk instead of regular milk. These swaps ensure everyone can enjoy this treat. To add more texture, mix in nuts or raisins. They give a nice crunch and extra flavor. You can also try different types of apples. Fuji or Gala apples can add sweetness, while tart apples give a zesty bite. Experiment with what you like best! Store your Apple Cider Donut Muffins in an airtight container. Keep them at room temperature for up to 3 days. This way, they stay fresh and tasty. If you want to keep them longer, freeze the muffins. They last for up to 3 months in the freezer. Just make sure they are in a good freezer bag or container. This helps prevent freezer burn. When you're ready to enjoy your muffins, you can reheat them. Use a microwave for a few seconds to warm them up. Or, place them in the oven for a few minutes. This makes them soft and cozy again. Insert a toothpick into the center. If it comes out clean, they’re done. This quick test helps you avoid underbaking. Perfectly baked muffins are soft and moist, not gooey. Yes, but it may alter the flavor slightly. Apple juice is sweeter, while cider adds a deep, rich taste. If you prefer a milder flavor, apple juice works. Just remember that the unique cider notes might be lost. Dust with powdered sugar or roll in cinnamon sugar for extra flavor. This simple touch makes them look fancy and taste even better. Serve warm for a cozy treat that everyone will love. Yes, they can be made a day ahead and stored properly. Keep them in an airtight container at room temperature. This way, you can enjoy fresh muffins on busy mornings without stress. Honeycrisp or Granny Smith apples add great flavor and texture. Honeycrisp gives a sweet crunch, while Granny Smith offers tartness. Mixing different kinds can enhance the taste and make your muffins even more special. These apple cider donut muffins are simple, fun, and delicious. We explored the key ingredients, tools, and steps to bake them perfectly. I shared tips to enhance flavor and texture and suggested convenient storage methods. Remember, you can also make gluten-free or vegan options. Enjoy these warm, dusted with powdered sugar or cinnamon sugar. They’ll be a hit no matter the occasion. Happy baking!

Savory Apple Cider Donut Muffins Delightful Treat

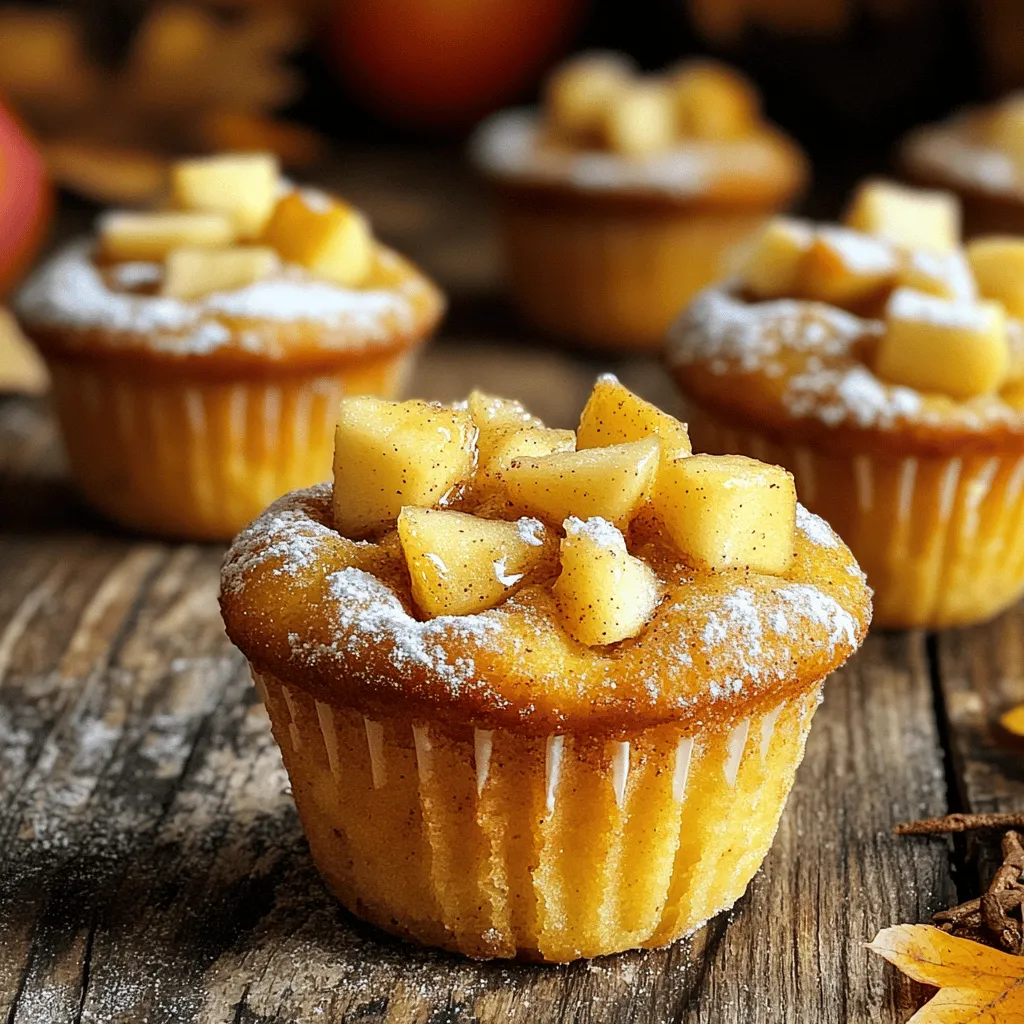
Do you love warm, sweet muffins on a chilly morning? You’re in for a treat! These Apple Cider Donut Muffins

- 1 lb ground turkey - 1/2 cup breadcrumbs - 1/4 cup grated Parmesan cheese - 1/4 cup finely chopped green onions - 1 egg - 2 cloves garlic, minced - 1 tablespoon fresh ginger, grated - 1/4 teaspoon red pepper flakes (optional) - Salt and pepper to taste To make these turkey meatballs, ground turkey is the star. It is lean and easy to find. Breadcrumbs help bind the meatballs together. Grated Parmesan cheese adds a nice, salty touch. Green onions give a fresh taste. Garlic and ginger bring warmth and flavor. The egg helps hold everything together. You can add red pepper flakes for a little heat. - 1/2 cup fresh orange juice - Zest of 1 orange - 1/4 cup honey - 1 tablespoon soy sauce - 1 teaspoon cornstarch mixed with 1 tablespoon water (slurry for thickening) The orange glaze is what makes these meatballs special. Fresh orange juice gives a bright flavor. Orange zest adds even more citrus notes. Honey sweetens the glaze, while soy sauce brings umami. The cornstarch slurry thickens the glaze, giving it a nice texture. - Red pepper flakes - Fresh ginger You can tweak the flavors by adding red pepper flakes for spice. Fresh ginger can also boost the flavor. These additions let you make the dish your own. Feel free to play with these options based on your taste. Set your oven to 400°F (200°C). This temperature helps cook the meatballs evenly. While the oven heats, line a baking sheet with parchment paper. This step keeps your meatballs from sticking. In a large bowl, mix the ground turkey, breadcrumbs, grated Parmesan cheese, and chopped green onions. Add the egg, minced garlic, and grated ginger to the bowl. If you like some heat, sprinkle in red pepper flakes. Season with salt and pepper. Mix everything well, but don’t overdo it. Overmixing can make the meatballs tough. Now, it's time to form the meatballs. Use your hands to shape the mixture into 1-inch balls. Place them on your baking sheet. Bake the meatballs for 20 to 25 minutes. They should turn golden brown and be fully cooked. While they bake, prepare the orange glaze. In a saucepan, whisk together fresh orange juice, orange zest, honey, and soy sauce. Let it simmer for about 5 minutes. Then, add the cornstarch mixed with water. Cook for 1 to 2 more minutes to thicken. When the meatballs are ready, take them out of the oven. Place them in a large bowl and pour the orange glaze over them. Gently toss to coat each meatball evenly. Enjoy your delicious orange glazed turkey meatballs! To achieve golden brown meatballs, preheat your oven to 400°F (200°C). This high heat helps create a nice crust. Line your baking sheet with parchment paper. It prevents sticking and makes cleanup easy. Form 1-inch meatballs and place them on the sheet, leaving space in between. Bake them for 20 to 25 minutes. Check that they are cooked through. You want them golden and firm. You can customize the flavors easily. If you like spice, add more red pepper flakes. For a sweeter taste, increase the honey in the glaze. Want a zing? Add more orange zest. Feel free to play with herbs too. Fresh herbs like parsley or cilantro can add freshness. Always taste the mix before you bake. Adjust salt and pepper to your liking. To keep the meatballs juicy, do not overmix the meatball mixture. Mix until just combined. Adding breadcrumbs and egg helps hold moisture. If your turkey is lean, consider adding a little olive oil. Bake the meatballs until they are just cooked through. Overcooked meatballs can become dry. You can also cover them with the orange glaze right after baking to lock in moisture. {{image_2}} You can easily switch the ground turkey for chicken or beef. Chicken offers a light flavor that pairs well with the orange glaze. Beef will add a rich taste and a hearty texture. When using chicken, choose ground chicken. For beef, go for ground sirloin or chuck. Adjust cooking times slightly, as beef may need more time to cook through. While the orange glaze is fantastic, you can explore other flavors. Lemon or lime juice can give your meatballs a zesty twist. Honey-mustard is another option for a sweet and tangy taste. For a spicy kick, try a sweet chili sauce. Mix and match these glazes to suit your taste. Each will add a unique flair to your meatballs. Pairing sides with your orange glazed meatballs can enhance the meal. Rice or quinoa works well to soak up the glaze. Steamed broccoli or green beans add color and crunch. A simple salad can balance the sweetness of the meatballs. Serve with crusty bread to mop up extra glaze. Each side complements the dish nicely. To keep your orange glazed turkey meatballs fresh, place them in an airtight container. Make sure the meatballs cool down before sealing. Store them in the refrigerator for up to four days. You can also cover them with plastic wrap if you don't have a container. This way, they stay moist and tasty. If you want to save some for later, you can freeze the meatballs. Place them in a single layer on a baking sheet and freeze for about two hours. Once they are firm, transfer them to a freezer bag. Remove as much air as you can. They will keep well for up to three months. When you’re ready to eat them, thaw in the fridge overnight. Reheat in the oven or microwave until hot. Fresh orange glazed turkey meatballs last about four days in the fridge. If frozen, they maintain their best quality for three months. After that, they are still safe to eat, but the taste may fade. Always check for signs of spoilage before enjoying any leftovers. Yes, you can use frozen ground turkey. Just make sure to thaw it first. You can place it in the fridge overnight or use the microwave's defrost setting. After thawing, follow the recipe as usual. This will give you juicy meatballs with great flavor. To thicken the glaze, use a cornstarch slurry. Mix one teaspoon of cornstarch with one tablespoon of water. Stir this mixture into the glaze while it simmers. Cook for one to two more minutes. This will give you a nice, thick glaze that sticks to the meatballs. Pair these meatballs with steamed rice or quinoa. They also go well with a fresh salad or roasted vegetables. For something cozy, serve with mashed potatoes. Each option adds flavor and balance to your meal. In this blog post, we explored orange glazed turkey meatballs. You learned about the key ingredients, like ground turkey and fresh orange juice. I shared how to bake them perfectly and keep them juicy. Plus, you discovered variations with different meats and glazes. For the best flavors, adjust the spices to your taste. Enjoy these meatballs with your favorite sides, and remember to store leftovers properly. With these tips, you are ready to impress at your next meal. Happy cooking!

Delicious Orange Glazed Turkey Meatballs Recipe

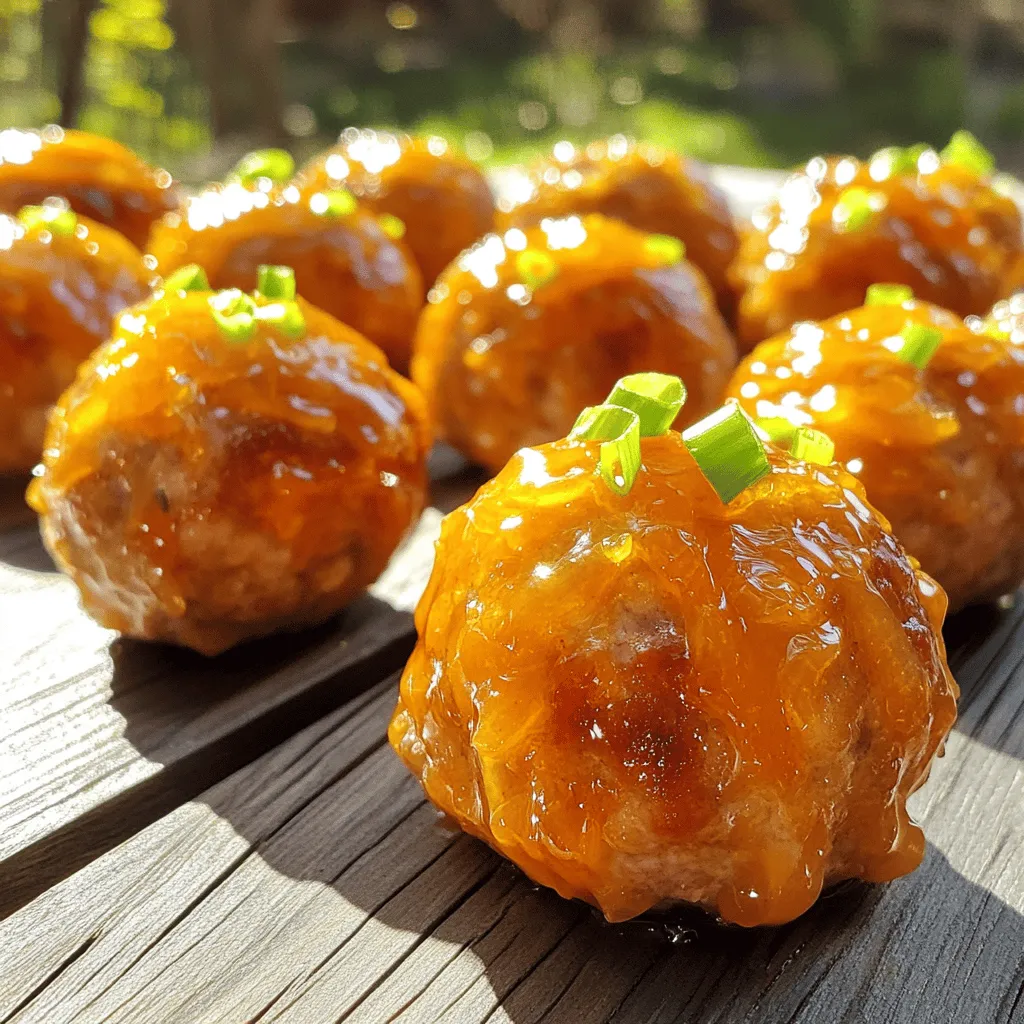
Looking for a fun and tasty dinner idea? You’re in the right spot! These orange glazed turkey meatballs are full

- 4 large eggs - 1/4 cup milk (or dairy-free alternative) - 1 cup spinach, chopped - 1/2 bell pepper (any color), diced - 1/4 cup red onion, diced - 1/2 cup cherry tomatoes, halved - 1/4 cup feta cheese, crumbled (optional) - 1 tablespoon olive oil - Salt and pepper to taste - Fresh herbs (like parsley or chives) for garnish This dish is packed with nutrients. Each serving has about 250 calories. It provides 18 grams of protein and 15 grams of fat. The vegetables add fiber and vitamins. Overall, this meal is good for your health. - Freshness of vegetables: Look for bright colors and firm textures. Fresh vegetables taste better and add more nutrients. - Choosing the best eggs: Select eggs that are free-range or organic. They often have richer flavor and better nutrition. - In a medium bowl, whisk together: - 4 large eggs - 1/4 cup milk (or dairy-free alternative) - Add salt and pepper to taste. - Set the bowl aside. - For the veggies: - Chop 1 cup of spinach. - Dice 1/2 bell pepper (any color). - Dice 1/4 cup of red onion. - Halve 1/2 cup of cherry tomatoes. - Heat 1 tablespoon of olive oil in a non-stick skillet over medium heat. - Add the diced red onion and bell pepper. - Sauté for about 3 minutes until softened. - Stir in the chopped spinach and cherry tomatoes. - Cook for another 2-3 minutes until the spinach is wilted. - Pour the egg mixture into the skillet. - Gently stir to mix with the vegetables. - Cook for 5-7 minutes, stirring occasionally. - The eggs should be fully cooked and slightly fluffy. - If you want, sprinkle 1/4 cup crumbled feta cheese on top. - Let it melt slightly before serving. - Best sides to pair with the scramble include toast or fresh fruit. - For garnish, use fresh herbs like parsley or chives for color. To make your veggie loaded egg scramble shine, use fresh herbs and spices. Fresh parsley or chives add a bright touch. You can also try adding dill or basil for a unique twist. A dash of paprika or chili powder can add warmth. For a little zing, a sprinkle of black pepper works well. Taste as you go to find your perfect mix. To achieve fluffy and creamy eggs, whisk the eggs well. Combine them with milk for added richness. Use a non-stick skillet to prevent sticking. Cook on medium heat, not high. Stir gently and frequently for even cooking. Remove the skillet from heat just before the eggs fully set. They will continue to cook off the heat. Timing is key to avoid overcooking your eggs. Start by sautéing the veggies for about 5 minutes. Once you add the eggs, cook for only 5 to 7 minutes. Stir gently and check for doneness. The eggs should look soft and slightly wet. This ensures a creamy texture and great taste. {{image_2}} You can boost your veggie loaded egg scramble with protein. Try adding cooked sausage or crispy bacon for a savory touch. If you want a plant-based option, tofu works great. Just crumble it and mix it in. Each of these choices adds flavor and keeps you full longer. Feel free to swap out vegetables based on what you have. Zucchini, mushrooms, or kale can add exciting flavors. You could also use broccoli or asparagus for a crunchy bite. The key is to use fresh veggies that you enjoy. This dish is versatile and can adapt to your taste. To make this dish dairy-free, use a dairy-free milk alternative. Almond milk or oat milk works well. If you like cheese, try nutritional yeast instead of feta. It adds a cheesy flavor without dairy. This way, everyone can enjoy the scramble, no matter their diet. To store leftover egg scramble, let it cool first. Place it in an airtight container. This keeps it fresh in the fridge for up to three days. Make sure to label the container with the date. The best way to reheat your scramble is on the stove. Heat a non-stick skillet over low heat. Add a splash of milk or water to keep it moist. Stir gently until heated through. You can also use a microwave. Place the scramble in a bowl and cover it. Heat for 30 seconds and stir. Repeat until warm. If you want to freeze your egg scramble, wait until it cools. Portion it into freezer-safe bags or containers. Remove as much air as possible to prevent freezer burn. It can stay frozen for up to three months. To reheat, thaw it in the fridge overnight. Then, use the stovetop or microwave methods mentioned above. This way, you keep the taste fresh and enjoyable! You can add many vegetables to your egg scramble. Some great choices include: - Zucchini - Mushrooms - Broccoli - Kale - Carrots - Asparagus These vegetables boost flavor and nutrition. Mix and match to find what you like best. Yes, you can prepare parts of this dish ahead of time. Chop your veggies and store them in the fridge. You can also whisk the eggs and milk in advance. When you're ready to eat, just cook it all together. This saves time on busy mornings. You know the eggs are done when they look set and slightly fluffy. Stir occasionally while cooking. If the eggs are still shiny or runny, keep cooking. Once they are firm, it’s time to serve. Enjoy your delicious egg scramble! This egg scramble dish is simple, healthy, and full of flavor. We explored key ingredients like fresh veggies and eggs, along with tips for selecting the best ones. I shared steps to prepare and cook the dish, plus ideas for customizing flavors. Remember, you can add your favorite proteins and veggies. Store leftovers properly for later enjoyment. This dish is perfect for any meal. Enjoy experimenting with new variations to make it your own!

Veggie Loaded Egg Scramble Flavorful and Nutritious Dish

Are you ready for a delicious and nutritious start to your day? This Veggie Loaded Egg Scramble packs in flavor

Older posts
Newer posts
← Previous Page1 … Page38 Page39 Page40 … Page84 Next →

dsad

© 2026 easycookingbite • Built with GeneratePress

Our Policies

  • Copyright Policy
  • Cookie Policy
  • GDPR Policy
  • Privacy Policy
  • Disclaimer
  • Terms Of Use

More Information

  • Home
  • About
  • Contact
  • Appetizers
  • Dessert
  • Dinner
  • Drinks
©2026, easycookingbite About Back To Top