Skip to content
DisclaimerTerms Of UseGDPR PolicyCookie Policy

easycookingbite

  • Home
  • Drinks
  • Appetizers
  • Dinner
  • Dessert
  • About
  • Contact
  • Privacy Policy
DisclaimerTerms Of UseGDPR PolicyCookie Policy

NO-ING-IMG

- 8 oz rice noodles - 1 cup shredded carrots - 1 cup bell peppers (red and yellow), thinly sliced - 1 cup cucumber, julienned - 1/4 cup green onions, chopped - 1/4 cup fresh cilantro, chopped For Thai Peanut Noodles, rice noodles are the star. They are soft and chewy, perfect for soaking up all the flavors. Fresh vegetables add crunch and color. Carrots give a sweet bite, while bell peppers bring a slight tang. Cucumber adds a refreshing touch. Green onions and cilantro round out the dish with extra flavor. - 1/4 cup peanut butter (creamy or chunky) - 2 tablespoons soy sauce (or tamari for gluten-free) - 2 tablespoons lime juice - 1 tablespoon maple syrup or honey - 1 tablespoon sesame oil - 1 teaspoon ginger, grated - 1 garlic clove, minced - 1/4 teaspoon red pepper flakes (optional, for spice) - Water (to adjust the sauce consistency) A good peanut sauce makes this dish shine. Peanut butter is rich and creamy. Soy sauce adds salt and umami. Lime juice gives a bright, tangy taste. Maple syrup or honey adds a hint of sweetness. Sesame oil brings a nutty flavor. Ginger and garlic boost the sauce's warmth. Red pepper flakes add a kick, but you can skip them if you prefer. Mix these together for a delicious sauce that coats the noodles perfectly. You can find the full recipe in the main article. First, boil water in a large pot. Once boiling, add the rice noodles. Cook them as per the package instructions, usually about 8-10 minutes. You want them soft but not mushy. After they are done, drain the noodles in a colander. Rinse them with cold water. This stops the cooking and keeps them from sticking. Set the noodles aside while you prepare the sauce and veggies. In a medium bowl, mix all the ingredients for the peanut sauce. You will need peanut butter, soy sauce, lime juice, maple syrup, sesame oil, ginger, garlic, and red pepper flakes if you want some heat. Whisk everything together until it is smooth. If the sauce seems too thick, add a little water. Stir until you reach your desired consistency. The sauce should be creamy but pourable. In a large mixing bowl, combine the cooked noodles with the fresh veggies. Use shredded carrots, thinly sliced bell peppers, julienned cucumber, and chopped green onions. Pour the peanut sauce over the noodle and veggie mix. Toss everything gently. Make sure each noodle is well-coated with the sauce. Serve the Thai peanut noodles on plates or a large platter. Garnish with fresh cilantro for extra flavor. Enjoy this tasty dish! For more details, check the Full Recipe. To get the best consistency for your peanut sauce, start with creamy peanut butter. It blends easily. If you use chunky, just stir well. Whisk all the sauce ingredients together: peanut butter, soy sauce, lime juice, maple syrup, sesame oil, ginger, garlic, and red pepper flakes. If the sauce is too thick, add water slowly. Mix until you reach a smooth texture. If you have allergies, you can swap out some ingredients. For peanut allergies, try sun butter or almond butter. Tamari works well instead of soy sauce for gluten-free diets. Maple syrup can be replaced with agave syrup for vegan options. These swaps keep the flavor strong. Presentation matters! Serve your Thai peanut noodles on a large platter. This looks great for family meals or parties. Drizzle extra peanut sauce on top for a glossy finish. Add sliced lime wedges around the dish for a fresh look. For garnishes, sprinkle fresh cilantro over the noodles. You can also add crushed peanuts for crunch. Red pepper flakes give a nice pop of color. Arrange everything neatly to make it appealing. These small touches make your meal special and fun! {{image_2}} You can add protein to your Thai Peanut Noodles to make them heartier. Common choices include chicken, shrimp, or tofu. To add chicken, cook sliced pieces in a pan until they are no longer pink. For shrimp, sauté them until they turn pink and opaque. If you prefer tofu, press it to remove moisture, then cut it into cubes and fry until golden. After cooking your protein, mix it in with the noodles and vegetables. This adds great flavor and makes the meal more filling. You can use any protein you like. Just make sure to adjust cooking times based on what you choose. Feel free to get creative with your veggie choices! Seasonal ingredients can make your dish fresh and exciting. Swap out bell peppers for snap peas or add in some broccoli florets. You can also use zucchini or asparagus for a different taste. Adding more vegetables not only boosts nutrition but also adds color and crunch. You can mix in leafy greens like spinach or kale. Just sauté them briefly before adding to the noodles. The more veggies, the better! They enhance the flavor and make the dish more enjoyable. To store leftover Thai Peanut Noodles, first, let them cool. Place them in an airtight container. This keeps them fresh and safe to eat later. You can store them in the fridge for up to three days. For the peanut sauce, keep it separate from the noodles. Store the sauce in a small jar or container. It can last about a week in the fridge. If you see any signs of spoilage, throw it out. When you're ready to eat the leftovers, use a pan or microwave to reheat. Heat the noodles gently on medium. Add a splash of water if they seem dry. This helps bring back moisture. To avoid soggy noodles, do not overheat them. Just warm them enough to enjoy. Mixing in fresh veggies can also help maintain texture. Enjoy your Thai Peanut Noodles again! What kind of noodles can I use? You can use rice noodles for this dish. They cook quickly and soak up flavors well. If you prefer, you can also try soba noodles or whole wheat pasta. Each type will give the dish a different texture. Just make sure to cook them according to the package directions. Can I make this recipe ahead of time? Yes, you can make this dish ahead of time. Prepare the peanut sauce and chop the veggies. Store them separately. When ready to eat, cook the noodles, mix everything, and enjoy! This makes for a quick meal when you're busy. Is this recipe gluten-free or vegan? Yes, this recipe can be gluten-free. Just use tamari instead of soy sauce. It’s also vegan since it has no animal products. The peanut sauce is rich and creamy without dairy. How to modify for nut allergies? If you have nut allergies, try using sunflower seed butter. It has a similar texture and flavor. You can also skip the nut butter altogether and use tahini for a different taste. Best side dishes to serve with Thai Peanut Noodles Serve with a light salad or spring rolls. These add fresh flavors that balance the rich peanut sauce. Cucumber salad with lime dressing is also a great option. Beverage pairings for a complete meal Pair these noodles with iced tea or light beer. A fresh coconut drink will also enhance the meal. For something warm, a cup of herbal tea is soothing and complements the flavors. Thai Peanut Noodles are a tasty dish with many ingredients and easy steps. We talked about the main ingredients like rice noodles, fresh veggies, and a rich peanut sauce. You learned how to cook the noodles, make the sauce, and mix everything well. Don't forget tips to make it better, like adding protein or garnishes. This dish stores well and reheats nicely too. Now, you can enjoy a simple yet delicious meal anytime! Give it a try and make it your own.

Thai Peanut Noodles Flavor-Packed and Easy Recipe

Are you craving a quick and tasty dish? Look no further than Thai Peanut Noodles! This easy recipe is packed

- 1 cup fresh pineapple chunks - 1 ripe banana - 1/2 cup coconut milk (full-fat for creaminess) For this smoothie, fresh ingredients shine. The pineapple adds a sweet, tangy kick. Pineapple chunks bring a burst of flavor. The ripe banana adds natural sweetness and creaminess. Coconut milk makes it rich and smooth. I suggest using full-fat coconut milk for a creamy texture. - 1/2 cup Greek yogurt (plain or coconut-flavored) - 1 tablespoon honey (optional) Greek yogurt gives the smoothie a nice thickness. It also adds protein, which is great for energy. If you want a sweeter taste, add honey. This is optional, as the banana and pineapple are already sweet. - A handful of ice cubes - 1 tablespoon shredded coconut (for garnish) - Fresh mint leaves (for garnish) Add ice cubes to chill the smoothie. It makes each sip refreshing. Sprinkle shredded coconut on top for texture and flavor. Fresh mint leaves add a pop of color and freshness. These little touches make the drink look and taste even better. You can find the full recipe for this tasty drink above. Enjoy making your Pineapple Coconut Smoothie! First, grab your blender. Add these fresh ingredients: - 1 cup fresh pineapple chunks - 1 ripe banana - 1/2 cup coconut milk - 1/2 cup Greek yogurt - 1 tablespoon honey (optional) Next, add a handful of ice cubes. This will make your smoothie cool and refreshing. Now, blend on high speed. Keep blending until the mixture is smooth and creamy. This takes about 30 seconds. After blending, taste your smoothie. If you want it sweeter, add more honey. Blend again for a few seconds. Pour the smoothie into tall glasses. Fill each glass about three-quarters full. To make it pretty, sprinkle shredded coconut on top. You can also add fresh mint leaves for a pop of color. Serve your smoothie right away for the best taste. Enjoy your tropical bliss! For making smoothies, a high-speed blender works best. These blenders can mix fruits and yogurt into a creamy drink. Look for one with sharp blades. This makes blending fast and easy. If you have a less powerful blender, cut the fruit into smaller pieces. This helps it blend better. To achieve the perfect consistency, start with the liquids first. Add coconut milk and yogurt before the solid ingredients. This creates a smooth base. Blend on high speed until the mixture is creamy. If it gets too thick, add a little more coconut milk. You can customize the sweetness of your smoothie. If you like it sweeter, add a tablespoon of honey or maple syrup. You can also use agave nectar for a different flavor. If you want a lower-calorie option, try stevia or monk fruit sweetener. Both are great alternatives. Always taste your smoothie before serving. Adjust the sweetness to match your preference. This way, you get a drink that is just right for you. Enjoy your pineapple coconut smoothie at any time of day. It makes a great breakfast or snack. The fresh flavors can boost your mood and energy. Pair this smoothie with a light meal or snack. It goes well with granola bars or fresh fruit. You can even serve it with a slice of toast for a balanced treat. Enjoying it on a warm day makes it even more refreshing. {{image_2}} You can change up the fruit in your smoothie. For a tropical twist, try adding mango or papaya. These fruits add new flavors and make your drink even more exciting. You can also use berries like strawberries or blueberries for a pop of color and taste. Seasonal fruits work well too. In summer, peaches or watermelon can brighten up your smoothie. Each fruit brings its own taste and nutrients. If you want a dairy-free option, there are many choices. Plant-based yogurt is a great swap. Almond, coconut, or soy yogurt can keep your smoothie creamy. You can also try almond milk, oat milk, or cashew milk instead of coconut milk. Each of these options adds its unique flavor and texture. Experiment to find your favorite mix! Want to make your smoothie even healthier? Adding greens is a simple way. Spinach or kale blends well and adds nutrition without changing the taste much. You can also add protein powder. This will give you more energy and help you feel full longer. Choose a flavor that matches your smoothie, like vanilla or chocolate. These boosts make your drink not just tasty but also packed with benefits. You can store leftover pineapple coconut smoothie in the fridge for up to 24 hours. It’s best to seal the smoothie in an airtight container. This helps keep it fresh and tasty. If you let it sit, it may separate. Just give it a good shake before drinking. Freezing your smoothie is a great option if you want it to last longer. Pour the smoothie into ice cube trays or freezer-safe bags. If using bags, flatten them for easy storage. When you want to enjoy it, let the smoothie thaw in the fridge overnight. You can also blend the frozen cubes with a bit of milk for a quick treat. Don’t throw away extra pineapple or coconut! You can use leftover pineapple in fruit salads or on top of yogurt. Add shredded coconut to oatmeal or baked goods. You can even make a tasty pineapple salsa. Just mix it with tomatoes, onion, and lime juice for a fresh dip. These ideas help cut waste and boost flavor in your meals. To make your smoothie thicker, use less liquid. Try adding more solid fruits like bananas or avocados. You can also add Greek yogurt or nut butter for creaminess. Frozen fruits are great too, as they boost texture without adding extra liquid. - Use less coconut milk or yogurt. - Add a frozen banana for creaminess. - Try blending in oats or chia seeds. These tips will give your smoothie a rich, thick texture that feels great in your mouth. Yes, you can use frozen pineapple! It offers a nice chill to your drink. Frozen fruits are often picked at peak ripeness, so they taste great. However, they can make your smoothie thinner if you add too much. - Frozen fruits save prep time and reduce waste. - Use less liquid if using frozen pineapple. - Blend well to avoid chunks. Just remember to adjust other ingredients to keep the balance right. This smoothie can be good for weight loss if you watch your portions. Pineapple is low in calories and high in vitamin C. Coconut milk adds healthy fats, but the calories can add up. - Use plain Greek yogurt for protein and lower sugar. - Skip the honey if you want fewer calories. - Add greens like spinach for more volume without many calories. By making small changes, you can enjoy a tasty smoothie while staying on track with your weight goals. For the full recipe, check out the Tropical Bliss Pineapple Coconut Smoothie. This blog post shared a delicious smoothie recipe and helpful tips. We explored fresh ingredients like pineapple and coconut milk, and garnishes that add flair. I gave you steps to blend a creamy, tasty drink and shared various ways to customize it. Remember, creativity is key when making smoothies. Use seasonal fruits, dairy alternatives, or even superfood boosts. Whether for breakfast or a snack, enjoy your smoothie in a way that fits your taste. Happy blending!

Pineapple Coconut Smoothie Creamy and Refreshing Drink

Are you craving a drink that’s both creamy and refreshing? Look no further than my Pineapple Coconut Smoothie! This easy-to-make

To make Cheesy Garlic Pull Apart Bread, gather these items. Each one enhances the taste and texture of the bread. - Fresh bread options (sourdough or pull-apart loaf) - Cheese selections (mozzarella and cheddar) - Seasoning essentials (garlic, Italian herbs, and red pepper flakes) - Optional garnishes (parsley and extra butter) Using fresh bread is key. Sourdough adds a tangy flavor. A pull-apart loaf is soft and easy to pull apart. For cheese, mozzarella gives that gooey texture. Cheddar adds a sharp taste. You can mix and match cheese types for even more flavor. Garlic is a must for this recipe. It brings out the best in the bread. Italian herbs add depth. Red pepper flakes give a kick, but they are optional. Finally, parsley brightens the dish. Extra butter can serve as a dip. You can find the Full Recipe above for the full list and cooking steps. Gather these ingredients, and you are ready to make a treat that everyone will love! First, preheat your oven to 375°F (190°C). This is key for getting that nice, golden crust. While the oven heats, let’s make our garlic butter blend. In a small bowl, mix 4 tablespoons of melted butter with 4 minced garlic cloves, 1 teaspoon of dried Italian herbs, a pinch of red pepper flakes, and a bit of salt. Stir well to combine. Next, prepare the cheese mixture. Grab 1 cup of shredded mozzarella and ½ cup of shredded cheddar cheese. This combo adds great flavor and gooeyness. Now, it’s time to cut the bread. Use a serrated knife to make diagonal cuts across the loaf. Cut in both directions to create diamond shapes. Be careful not to slice all the way through. You want the loaf to stay intact. Once you’ve made the cuts, gently pull them apart. This creates room for all that cheesy goodness! Now for the fun part! Take your garlic butter mix and drizzle it into the cuts in the bread. Use a spoon or brush to get the mixture deep inside. Next, stuff the shredded mozzarella and cheddar into the cuts. Make sure it’s evenly distributed. After that, wrap the bread in aluminum foil, leaving the top exposed. Place it on a baking sheet and pop it in the oven. Bake for 15 to 20 minutes. Once the time is up, remove the foil and bake for another 10 minutes. This helps the cheese get bubbly and the bread crusty. When done, remove it from the oven and sprinkle some chopped fresh parsley on top for a tasty finish. Enjoy this cheesy garlic pull apart bread right away! For the full recipe, check the recipe section above. To get that golden crust, start with fresh bread. I love using sourdough or a pull-apart loaf. These types hold up well and give a great bite. Brush the top with the garlic butter mixture before baking. This helps the crust brown nicely. To avoid soggy bread, make sure to cut the loaf without going all the way through. This keeps the bottom intact and helps the bread hold its shape. Also, do not skip the step of wrapping the bread in foil. It helps steam the bread, keeping it soft. Unwrap it for the last part of baking to let the crust crisp up. Bake your cheesy garlic pull apart bread at 375°F (190°C). Start by covering it with foil for the first 15-20 minutes. This cooks the inside well. After that, remove the foil and bake for about 10 more minutes. You want the cheese bubbly and the bread golden. Covering the bread during the first part of baking is key. It helps the cheese melt evenly. You want that gooey center, but a nice crust on the outside too. For the best presentation, serve the bread on a large wooden board. This adds warmth to your table. Place a small bowl of extra garlic butter on the side for dipping. It makes for a fun, interactive way to enjoy this dish. Pair your cheesy garlic pull apart bread with a fresh salad or a warm bowl of soup. The contrast in textures and flavors will elevate your meal. You can also enjoy it with a glass of wine for a cozy evening. For the full recipe, check out the detailed steps to make this delightful dish. {{image_2}} You can switch up the cheese in your pull apart bread. While mozzarella and cheddar work great, try other options. Gouda gives a smoky flavor. Parmesan adds a salty zing. For a fun twist, use pepper jack. It brings heat that many love. If you want a unique taste, try adding feta or blue cheese. Adding flavored cheese can also elevate the dish. Think garlic and herb cream cheese or sun-dried tomato cheese. These choices create new and exciting flavors. Experimenting with cheese makes the bread even more fun. You can add veggies to your pull apart bread for extra taste and nutrients. Spinach is a great choice. It adds color and a mild flavor. Roasted peppers also work well. They bring sweetness and a pop of color. Chopped olives can add a briny touch. Herbs and spices can make a big difference too. Fresh basil or rosemary can enhance the aroma. A sprinkle of crushed red pepper can bring some heat. Don't be afraid to mix and match. Your taste buds will thank you! If you want a lighter option, consider using whole wheat bread. This choice adds fiber and nutrients. Gluten-free bread is a great alternative for those with dietary needs. You can also reduce the amount of cheese. Less cheese still gives great flavor. Use a mix of cheese and some Greek yogurt for creaminess. This keeps it tasty while cutting calories. With these swaps, you can enjoy cheesy garlic pull apart bread without the guilt. For the full recipe, check out the link above. To keep your cheesy garlic pull apart bread fresh, store it properly. First, let it cool completely. Next, wrap it in plastic wrap or aluminum foil. This keeps the bread soft and prevents it from drying out. You can also place it in an airtight container. For refrigeration, your leftovers will last about 3 to 4 days. If you want to keep them longer, freezing is the best choice. Wrap the bread well, then place it in a freezer bag. It can stay frozen for up to 3 months. Just remember to label it with the date! When reheating, you want to avoid drying out the bread. The best way is to wrap it in foil and place it in a preheated oven at 350°F (175°C). Heat for about 10 to 15 minutes. This method warms the bread evenly and keeps it soft. If you have leftover bread that you stored in the fridge, it’s best to eat it within 3 to 4 days. If frozen, try to use it within 3 months for the best taste. Always check for any signs of freezer burn before cooking! How to make cheesy garlic pull apart bread ahead of time? You can prepare the bread a few hours before baking. Follow the recipe up to the point of wrapping it in foil. Store it in the fridge. When you're ready, bake it straight from the fridge. This keeps the flavors fresh and tasty. Can I use pre-made bread instead of fresh? Yes, using pre-made bread is fine. Just make sure it is still soft. Store-bought pull-apart bread or baguettes work well. This saves time and still gives you great results. What to do if the cheese spills out during baking? If cheese spills out, don’t worry! It happens. Just scoop up the cheese and place it back on the bread. Next time, stuff the cheese a little less to prevent this from happening. How to ensure even baking and cheese melting? To bake evenly, make sure the oven is fully preheated. Place the bread in the center of the oven. Rotate the baking sheet halfway through baking. This helps the heat reach all sides. What can I substitute for garlic? If you don't have garlic, try using garlic powder. Use about one teaspoon for each clove. You can also try onion powder for a different flavor. Can I use dried herbs instead of fresh? Yes, dried herbs work great! Use one-third of the amount if using dried. For example, if the recipe calls for one teaspoon fresh, use about one-third teaspoon dried. This blog post covered how to make cheesy garlic pull-apart bread. We started with the essential ingredients and the steps to prepare and bake. I gave you tips for perfect texture and serving ideas. You also learned about variations and how to store leftovers. In the end, this dish is fun to make and share. Enjoying cheesy bread brings joy to any meal.

Cheesy Garlic Pull Apart Bread Irresistible Delight

If you’re craving a warm, cheesy treat, look no further than cheesy garlic pull apart bread! This irresistible delight combines

- 1 cup rolled oats - 1/2 cup creamy peanut butter - 1/4 cup honey or maple syrup - 1/4 cup ground flaxseed - 1/4 cup mini dark chocolate chips - 1/4 cup shredded coconut - 1/4 teaspoon salt - 1/2 teaspoon vanilla extract - Seeds (chia, sunflower) - Other nut butters - Dried fruits (raisins, cranberries) The main ingredients in Peanut Butter Energy Bites create a tasty base. Rolled oats give them a nice chew. Creamy peanut butter adds richness and protein. Honey or maple syrup sweetens the bites naturally. The additional ingredients enhance flavor and texture. Ground flaxseed boosts nutrition with healthy fats. Mini dark chocolate chips add a sweet touch. Shredded coconut offers a tropical vibe, while salt balances the flavors. Vanilla extract rounds it all out. You can also customize these bites with optional add-ins. Adding seeds gives crunch and extra nutrition. Other nut butters can change the taste. Dried fruits like raisins or cranberries add sweetness and chewiness. For the full recipe, check out Nutty Bliss Peanut Butter Energy Bites. To start, we need to combine the dry ingredients. In a large mixing bowl, add: - 1 cup rolled oats - 1/4 cup ground flaxseed - 1/4 cup shredded coconut - 1/4 teaspoon salt Stir these until they mix well. This step gives you a good base for your energy bites. Next, we mix the wet ingredients. In a separate bowl, add: - 1/2 cup creamy peanut butter - 1/4 cup honey or maple syrup - 1/2 teaspoon vanilla extract Stir this mixture until it is smooth and creamy. This adds sweetness and flavor to your bites. Now, we integrate the dry and wet mixtures together. Pour the peanut butter mix into the dry ingredients bowl. Stir well to combine everything. You want to ensure there are no dry spots left. Then, it’s time to add the chocolate chips. Toss in: - 1/4 cup mini dark chocolate chips Mix gently until the chocolate chips are evenly spread throughout the mixture. This gives each bite a sweet surprise. Now, we shape the energy bites. Use your hands to scoop about one tablespoon of the mixture. Roll it into a ball shape. Repeat this process until you have formed all the mixture into bites. Lastly, we need to chill the energy bites. Place them on a parchment-lined tray. Refrigerate for at least 30 minutes. This helps them firm up and makes them easier to eat. Enjoy your Nutty Bliss Peanut Butter Energy Bites! For the full recipe, visit the link. You can swap out sweeteners in this recipe. Try agave or stevia for honey. They add sweetness without extra calories. If you need gluten-free options, use quinoa oats instead of regular oats. They taste great and keep the texture right. To make these bites vegan, replace honey with maple syrup. This keeps the flavor rich and sweet. You can also use other plant-based binders like almond butter or sunflower seed butter. Just make sure to keep the same amount as the peanut butter. Store your energy bites in an airtight container. They last up to a week in the fridge. For longer storage, freeze them for up to three months. When serving, put them on a fun plate. Add a sprinkle of coconut on top for flair. You can enjoy these bites with fresh fruit or yogurt for a tasty and balanced snack. {{image_2}} Peanut Butter Energy Bites are fun to change up. You can mix in different flavors. Here are two tasty ideas: - Peanut Butter and Chocolate Chip: This classic combo is a hit! Just add mini dark chocolate chips to the mix. They bring sweetness and a nice texture. Each bite is like a little treat! - Coconut Almond Bliss: For a tropical twist, add shredded coconut and almond butter. This mix gives a creamy and rich flavor. It’s like a vacation in your mouth! Need some extra protein? You can easily boost these bites. Here’s how: - Adding protein powder: Just stir in a scoop of your favorite protein powder. This makes your bites more filling and great for post-workout snacks. - Incorporating nut butters: Swap in almond or cashew butter for a change. Each nut butter brings its own flavor and nutrition. You can even mix different nut butters for more fun! Energy bites can fit the season too! Try these ideas to celebrate: - Pumpkin Spice Energy Bites: Add pumpkin puree and pumpkin spice. This gives a warm, cozy flavor, perfect for fall. - Chocolate Mint Energy Bites: Mix in some mint extract and dark cocoa powder. These bites taste like a peppermint patty, great for the holidays! These variations keep your snacks exciting and full of flavor. Don’t forget to check the Full Recipe for the basic mix! You can keep your peanut butter energy bites in the fridge for up to one week. Store them in an airtight container to keep them fresh. I like to use glass jars or plastic containers with tight lids. This way, they stay cool and tasty for days. Make sure not to overcrowd the container. This helps prevent the bites from sticking together. You can freeze these energy bites for longer storage. To freeze, place them in a single layer on a plate. Once they are frozen solid, transfer them to a freezer-safe bag or container. This method helps keep their shape. When you want to eat one, just take it out and let it thaw for about 10 minutes. You can also pop them in the fridge overnight. Check your energy bites for any signs of spoilage. If they smell off or look discolored, it’s best to toss them. A good rule is to eat them within a week if stored in the fridge, or within three months if frozen. Keeping an eye on their texture helps too. If they feel too dry or hard, they may not taste good anymore. Enjoy your snacks while they are fresh! Peanut Butter Energy Bites last about one week in the fridge. They stay fresh if you keep them in an airtight container. If you want them to last longer, you can freeze them. They can last up to three months in the freezer. Just thaw them in the fridge when you want to eat them. Yes, you can customize this recipe! You can change the nut butter if you want. Try almond butter or cashew butter for a new taste. You can also add seeds, dried fruit, or even different types of chocolate chips. The options are endless. Mix and match to find your favorite flavor! Peanut Butter Energy Bites are quite healthy! They are full of protein and healthy fats from the peanut butter. The oats and flaxseed give you fiber, which is good for digestion. They can give you energy without a sugar crash later. Just watch how many you eat, as they can be calorie-dense. The best way to pack these bites is in a small container or a snack bag. You can also use silicone molds to keep them together. If you're taking them on the go, make sure they are in a cooler bag. This keeps them firm and tasty. Absolutely! Making Peanut Butter Energy Bites is fun for kids. They can mix the ingredients and roll them into balls. Just supervise them while using any kitchen tools. This is a great way to teach them about cooking and healthy snacks! In this blog post, I shared a simple recipe for delicious Peanut Butter Energy Bites. We detailed the key ingredients, like rolled oats and peanut butter, and added fun variations. You also learned helpful tips for customizing and storing these snacks. These energy bites are quick to make and offer numerous health benefits. With easy substitutions and variations, you can enjoy them anytime. Make them your own, and have fun creating tasty snacks!

Peanut Butter Energy Bites Simple and Tasty Snack

Looking for a quick and tasty snack that fuels your day? Peanut Butter Energy Bites are here to save you!

To make a Mediterranean Orzo Pasta Salad, you need fresh and vibrant ingredients. Here’s what you’ll need: - 1 cup orzo pasta - 1 cup cherry tomatoes, halved - 1 cucumber, diced - 1/2 red onion, finely chopped - 1/2 cup Kalamata olives, pitted and sliced - 1/2 cup Feta cheese, crumbled - 1/4 cup fresh parsley, chopped - 2 tablespoons olive oil - 1 tablespoon lemon juice - 1 teaspoon dried oregano - Salt and pepper to taste Each ingredient plays a role in making this dish tasty and colorful. The orzo pasta forms the base, giving it a nice texture. Cherry tomatoes add sweetness and crunch. The cucumber brings a refreshing bite, while red onion offers a mild sharpness. Kalamata olives introduce a briny flavor that pairs well with the creamy Feta cheese. Fresh parsley adds brightness and color to the salad. The dressing ties everything together. Olive oil provides richness, while lemon juice adds a zesty note. Dried oregano gives it that classic Mediterranean flair. Lastly, salt and pepper enhance the flavors, making each bite delightful. I recommend using high-quality ingredients for the best taste. You can find the full recipe for making this Mediterranean Orzo Pasta Salad [here](#). Enjoy creating a dish that is both flavorful and fresh! To start, bring a large pot of salted water to a boil. Add 1 cup of orzo pasta to the pot. Cook the orzo for about 8-10 minutes until it is al dente. Once cooked, drain the orzo and rinse it under cold water. This stops the cooking and keeps the pasta firm. In a large mixing bowl, combine the vegetables. Use 1 cup of halved cherry tomatoes, 1 diced cucumber, 1/2 finely chopped red onion, 1/2 cup of sliced Kalamata olives, 1/2 cup of crumbled Feta cheese, and 1/4 cup of chopped fresh parsley. Mix them well to combine all the flavors. In a small bowl, whisk together the dressing. Combine 2 tablespoons of olive oil, 1 tablespoon of lemon juice, 1 teaspoon of dried oregano, and a pinch of salt and pepper. This dressing adds a fresh taste to the salad. Now it's time to mix everything together. Add the cooled orzo to the vegetable mixture. Drizzle the dressing over the top. Toss everything gently until all the ingredients are well coated. This step ensures each bite is full of flavor. Taste the salad and adjust the seasoning if needed. You may want to add more salt, pepper, or lemon juice. Cover the salad and refrigerate it for at least 30 minutes before serving. This allows the flavors to meld beautifully. For the full recipe, check out the details above. To cook perfect orzo, watch the time. I usually cook it for 8 to 10 minutes. Start with a large pot of salted water. When it boils, add the orzo. Stir it a bit to prevent sticking. Once it's tender but firm, drain it and rinse with cold water. This stops the cooking and keeps it al dente. You can switch up the dressing for new flavors. Try using balsamic vinegar or red wine vinegar instead of lemon juice. For oils, consider avocado oil or even nut oils like walnut oil. Each will give your salad a unique taste that can surprise your guests. Pair your orzo salad with proteins for a full meal. Grilled chicken or shrimp works well with the fresh flavors. You can also serve it with roasted vegetables or crusty bread. This adds nice texture and makes for a satisfying dish. {{image_2}} You can make your Mediterranean Orzo Pasta Salad even better with some tasty add-ins. Grilled chicken or shrimp adds great protein. Just chop them up and mix them in. You can also use chickpeas for a nice plant-based option. Other favorites include roasted red peppers or artichoke hearts. These flavors blend well with the salad. Using seasonal vegetables makes your salad fresh and fun. In spring, try adding asparagus or snap peas. For summer, zucchini or bell peppers work great. In fall, roasted butternut squash can add a sweet touch. In winter, use hearty greens like kale or spinach. Mixing in seasonal veggies gives your dish new life every time. If you want a vegan or gluten-free version, swap the orzo. Use quinoa or rice instead. For the Feta, try using tofu or a vegan cheese. This way, you keep all the great flavors while making it fit your diet. You won’t miss out on anything! Feel free to explore these variations to make your Mediterranean Orzo Pasta Salad truly your own! For the full recipe, check out the main article. To store your Mediterranean Orzo Pasta Salad, place it in an airtight container. This helps keep the salad fresh and tasty. You can refrigerate it for up to three days. If you notice the salad getting dry, add a bit more olive oil or lemon juice before serving. This will revive the flavors and moisture. Freezing this salad is a bit tricky. The orzo and veggies may not hold up well. If you want to freeze it, only freeze the orzo. Cook the orzo, then let it cool completely. After that, place it in a freezer-safe bag. You can freeze it for up to three months. When ready to eat, thaw it in the fridge overnight. Then mix it with fresh veggies and dressing. The best time to enjoy your Mediterranean Orzo Pasta Salad is within the first two days. This is when the flavors are bright and fresh. The salad tastes great cold, making it perfect for picnics and parties. If you let it sit in the fridge for at least 30 minutes before serving, the flavors will meld nicely. For the full recipe, check out the details provided earlier. You can make this salad ahead of time with ease. First, cook the orzo as directed. Cool it completely before mixing with the veggies. You can chop the vegetables a day before. Store each ingredient separately to keep them fresh. Combine everything just before serving. This method keeps the salad crunchy and tasty. Yes, whole grain orzo is a great choice. It adds more fiber and nutrients to your dish. The taste is slightly nuttier, making it more filling. Just remember, cooking time may vary, so check the package for details. To boost protein, add grilled chicken, chickpeas, or black beans. You can also toss in some diced turkey or shrimp. These options not only enhance nutrition but also add great flavor. This salad can last up to three days in the fridge. Make sure to store it in an airtight container. If you see any moisture, it’s best to eat it sooner. Yes, this salad is perfect for meal prep! It holds up well and tastes great cold. Making a batch can save time during busy weeks. Just pack it in individual containers for easy lunches or snacks. In this blog post, we explored how to make a delicious Mediterranean Orzo Pasta Salad. We covered the key ingredients and walked through each step, from cooking the orzo to preparing the dressing. I shared tips for perfecting your salad and suggested fun variations. Remember, you can easily adapt this dish to fit your taste. Whether for a meal prep or a special gathering, this salad fits right in. Enjoy fresh flavors and a bright dish that everyone will love.

Mediterranean Orzo Pasta Salad Flavorful and Fresh Dish

Are you ready to brighten your meal lineup? This Mediterranean Orzo Pasta Salad packs a punch of fresh flavors and

- 1 medium head of cauliflower, cut into bite-sized florets - 1 cup all-purpose flour - 1 cup water - 1 teaspoon garlic powder - 1 teaspoon onion powder - 1 teaspoon paprika - 1/2 teaspoon salt - 1/2 teaspoon black pepper - 1 cup buffalo sauce (store-bought or homemade) - 2 tablespoons olive oil - Fresh parsley, chopped (for garnish) These ingredients create a tasty and healthy snack. Cauliflower is the star here. It has many health benefits. It is low in calories and high in fiber. This makes it a great choice for a snack. The flour, water, and spices mix to form a batter. This batter coats the cauliflower, giving it a crunchy texture. The buffalo sauce adds a spicy kick that many love. You can also add olive oil for richness. Fresh parsley on top makes it look nice and adds flavor. Check out the Full Recipe to see how to bring these ingredients together. - Preheat the oven to 450°F (230°C). - Prepare the baking sheet with parchment paper. To create the batter, mix these items in a large bowl: - 1 cup all-purpose flour - 1 cup water - 1 teaspoon garlic powder - 1 teaspoon onion powder - 1 teaspoon paprika - 1/2 teaspoon salt - 1/2 teaspoon black pepper Whisk them together until the batter is smooth. Next, add the cauliflower florets and toss them. Make sure every piece is well coated. Now, lay the battered cauliflower on the baking sheet. Bake them for 20 minutes, or until they turn golden brown. While they bake, mix up the buffalo sauce. In a small bowl, combine: - 1 cup buffalo sauce (store-bought or homemade) - 2 tablespoons olive oil Stir well to mix. After 20 minutes, take the cauliflower out and toss it in the buffalo sauce. Coat each piece well in the sauce. Return the sauced cauliflower to the baking sheet. Bake for an extra 10 to 15 minutes. You want them crispy and slightly charred. Once done, let them cool for a few minutes. Garnish with fresh parsley before serving. For a complete guide, check the Full Recipe. To make your buffalo cauliflower bites crispy, follow a few key steps. First, bake them at a high temperature. Preheat your oven to 450°F (230°C) for the best results. Use parchment paper on your baking sheet. This helps prevent sticking and gives a nice crisp. Make sure to space out the cauliflower florets. They need room for hot air to circulate. The secret to the perfect batter lies in the consistency. Your batter should not be too thick or too thin. Aim for a smooth texture that coats the florets well. Mixing equal parts flour and water with spices creates a great base. For an extra kick, use homemade buffalo sauce. Making your own sauce allows you to adjust the spice level. You can mix butter, hot sauce, and a dash of garlic powder for a great flavor. Adding spices enhances the taste even more. Consider using cayenne pepper or smoked paprika. These spices add depth and a subtle smokiness. Feel free to experiment with different herbs and spices to find your favorite combination. Buffalo cauliflower bites pair well with several dips. Blue cheese dressing is a classic choice. It balances the heat with creamy goodness. Ranch dressing also works great for those who like a milder flavor. For side dishes, think about serving them with fresh veggies or a green salad. This adds crunch and freshness to your meal. You can also serve them as a fun appetizer at parties. They are sure to impress your guests! {{image_2}} To make vegan Buffalo cauliflower bites, you can change the batter. Instead of all-purpose flour, try using chickpea flour. Mix it with water to create a smooth batter. This gives a nice flavor and keeps it plant-based. You can also use almond milk or oat milk instead of water. This adds a creamy texture while keeping it vegan-friendly. If you love heat, add cayenne pepper to the batter. Just a pinch can make a big difference. You can also mix in your favorite hot sauce with the buffalo sauce. This will give your bites an extra kick. If you want even more spice, try adding a dash of crushed red pepper flakes. Experimenting with different hot sauces can create fun new flavors. You can cook Buffalo cauliflower bites in different ways. An air fryer is a great option. Preheat it to 400°F (200°C). Place the battered cauliflower in a single layer. Cook for about 15 minutes, flipping halfway through. This method makes them crispy with less oil. Grilling is another fun way to cook these bites. Preheat your grill to medium heat. Place the battered cauliflower on skewers or a grill basket. Grill for about 10-12 minutes, turning often. This adds a nice smoky flavor to your bites. For the full recipe, check out the instructions provided earlier. Enjoy experimenting with these variations! To keep your Buffalo Cauliflower Bites fresh, store them in an airtight container. Place a paper towel in the container to absorb extra moisture. This helps maintain crispiness. Store them in the fridge for up to three days. If you want to enjoy them longer, consider freezing. When it’s time to enjoy your leftovers, the oven is the best choice. Preheat it to 400°F (200°C). Spread the bites on a baking sheet for even heating. Bake for about 10 minutes until they’re hot and crispy. If you’re short on time, you can use a microwave. Heat them in short bursts, about 30 seconds at a time. Keep in mind that the microwave may make them softer. Freezing Buffalo Cauliflower Bites is simple. First, let them cool completely after cooking. Then, place them in a single layer on a baking sheet and freeze for about an hour. Once frozen, transfer them to a freezer-safe bag or container. They can last up to two months in the freezer. To reheat, bake directly from frozen. Increase the oven time to about 15-20 minutes. This way, you can enjoy crispy, tasty bites whenever you want. For the full experience, check out the Full Recipe. Buffalo Cauliflower Bites are a tasty snack made from cauliflower. These bites have a crispy coating and are tossed in spicy buffalo sauce. They serve as a great vegan alternative to chicken wings. You can enjoy them as a snack or party food. They pack a punch of flavor and are easy to share. Yes, you can make Buffalo Cauliflower Bites gluten-free. Use gluten-free flour instead of all-purpose flour. You can try almond flour or chickpea flour as good options. Make sure your buffalo sauce is also gluten-free. Many brands offer gluten-free sauces. To make Buffalo Cauliflower Bites less spicy, dilute the buffalo sauce. You can mix it with a little olive oil or butter. This will tone down the heat. Another option is to use BBQ sauce instead of buffalo sauce. BBQ sauce adds sweetness and flavor without the heat. In this article, we explored how to make delicious buffalo cauliflower bites. We covered the ingredients, cooking steps, and tips to achieve crispy results. You learned about storage and variations, including vegan options and different cooking methods. Making these bites is easy and fun. Whether you're a new cook or an expert, enjoy sharing these tasty snacks with friends. Keep experimenting with flavors to make them your own!

Buffalo Cauliflower Bites Tasty and Crispy Snack

Looking for a tasty, crispy snack that’s easy to make? Buffalo Cauliflower Bites are the answer! Packed with flavor and

- 1 pound fresh or frozen edamame in pods - 4 tablespoons olive oil - 4 cloves garlic, minced - 1 tablespoon red pepper flakes (adjust to taste) - 1 tablespoon soy sauce - 1 teaspoon sesame oil - 1 teaspoon lime juice - Salt, to taste - Sesame seeds, for garnish - Chopped green onions, for garnish You can easily swap ingredients if you need to. Here are some options: - Use avocado oil instead of olive oil for a different taste. - Try garlic powder if you don't have fresh garlic. - Instead of red pepper flakes, use sriracha or hot sauce. - Coconut aminos work well in place of soy sauce for a soy-free version. - Lime juice can be replaced with lemon juice for a similar flavor. Edamame is not just tasty; it offers great health perks! Here are some benefits: - High in protein: Edamame is a complete protein, making it great for vegetarians. - Rich in fiber: It helps keep your digestive system healthy. - Packed with vitamins: Edamame contains vitamins A, C, and K. - Good fats: It has healthy fats that support heart health. - Antioxidants: Edamame is full of antioxidants, which help fight free radicals in the body. By making this spicy garlic edamame, you not only enjoy a quick snack but also boost your health! For the complete cooking experience, check the Full Recipe for step-by-step instructions. To start, you need to prepare your edamame. If you're using frozen edamame, boil them in a large pot of salted water. Cook them for about 3 to 5 minutes until they feel tender. After that, drain them and set them aside. This step makes sure your edamame is soft and ready to soak up the flavors. Next, you will make the garlic sauce. In a large skillet, heat up the olive oil over medium heat. Once hot, add the minced garlic. Sauté it for about 1 to 2 minutes until it smells great. Be careful not to burn the garlic, as it can turn bitter. After that, stir in the red pepper flakes, soy sauce, and sesame oil. Let this cook for one more minute. This step brings out all the bold flavors of the sauce. Now, it’s time to bring everything together. Add the cooked edamame to the skillet. Toss the edamame well to coat them in the spicy garlic sauce. Cook for another 2 to 3 minutes so they heat through. After that, drizzle the lime juice over the mix and sprinkle with salt. Stir everything to combine well. Remove the skillet from the heat, and transfer the edamame to a serving bowl. Garnish with sesame seeds and chopped green onions. This adds a nice touch and makes your dish look great. For the full recipe, check out the details above! To get the best edamame, choose fresh or frozen pods. If using frozen, boil them for 3-5 minutes in salted water. This step keeps them tender and tasty. Drain them well after boiling. When you sauté garlic, be careful not to burn it. Cook it just until fragrant for a sweet flavor. For more flavor, add a dash of lime juice at the end. This brightens the dish and adds a nice zing. You can also play with the red pepper flakes. If you like it spicier, add more. You can even try adding a splash of rice vinegar for a tangy twist. Serve your spicy garlic edamame in a lovely bowl. Top it with sesame seeds and chopped green onions for a pop of color. Pair it with extra lime wedges for those who want more zing. You can enjoy it as a snack or a side dish. This recipe is great for sharing with friends. For the full recipe, check out the details above. {{image_2}} You can change the heat of your spicy garlic edamame. Want it mild? Use less red pepper flakes. For a medium kick, stick to the recipe. If you crave more spice, add extra flakes or some fresh chili peppers. You can also mix in a splash of hot sauce for an added punch. Taste as you go, and adjust the heat to fit your mood. Feel free to get creative with this dish. You can add cooked shrimp or chicken for extra protein. If you want a nutty flavor, toss in some toasted peanuts or cashews. You can swap soy sauce for tamari to keep it gluten-free. If you don’t like sesame oil, try using peanut oil instead. These simple changes can make this dish your own. This recipe is already vegan and can be gluten-free. Just use tamari instead of soy sauce. It’s easy to make this dish fit your diet. Edamame is packed with protein and fiber, making it a great snack for everyone. Enjoy this simple recipe, and feel free to explore all the possible variations. Check out the Full Recipe for more tips on how to customize your spicy garlic edamame! After enjoying your spicy garlic edamame, store any leftovers in a sealed container. Make sure to let them cool first. Place the container in the fridge. They will stay fresh for about three days. To reheat, you can use a skillet. Just add a bit of olive oil and heat the edamame over medium heat. Stir them often until they are hot. You can also use a microwave. Place them in a bowl and cover with a damp paper towel. Heat for about 1-2 minutes until warm. If you want to keep them longer, you can freeze the edamame. Place the cooled leftovers in a freezer-safe bag. Remove as much air as you can and seal it. When you’re ready to eat them, take the bag out of the freezer. Let them thaw in the fridge overnight. You can also boil them directly from frozen. Just add a few extra minutes to the cooking time. For the full recipe, refer back to the original instructions. Spicy garlic edamame is a tasty snack made from young soybeans. You cook the edamame in pods and toss them in a sauce made of garlic, olive oil, and spices. This dish is both healthy and full of flavor. It’s perfect as an appetizer or a side dish. The combination of garlic and red pepper flakes gives it a kick. You can find the full recipe above to try at home. Yes, you can make spicy garlic edamame ahead of time. Cook the edamame and sauce separately. Store them in the fridge. When you are ready to eat, just heat them together in a skillet. This way, the flavors stay fresh and vibrant. Making it ahead can save you time when hosting guests or preparing meals for the week. Cooked edamame lasts about 3 to 5 days in the fridge. Make sure to keep it in an airtight container. If you notice any changes in color or smell, it’s best to toss it out. Reheating is easy. Just warm it in a skillet or microwave before serving. Enjoy your leftovers while they are still tasty! This post covered all aspects of making Spicy Garlic Edamame. We looked at the key ingredients and tasty substitutions. I shared health benefits and cooking tips for perfect edamame. You can enhance flavor and explore different spice levels. Plus, I gave storage tips to keep your leftovers fresh. Trying this dish can lead to a new favorite snack. Enjoy your delicious edamame and share it with friends!

Spicy Garlic Edamame Flavorful and Simple Snack Recipe

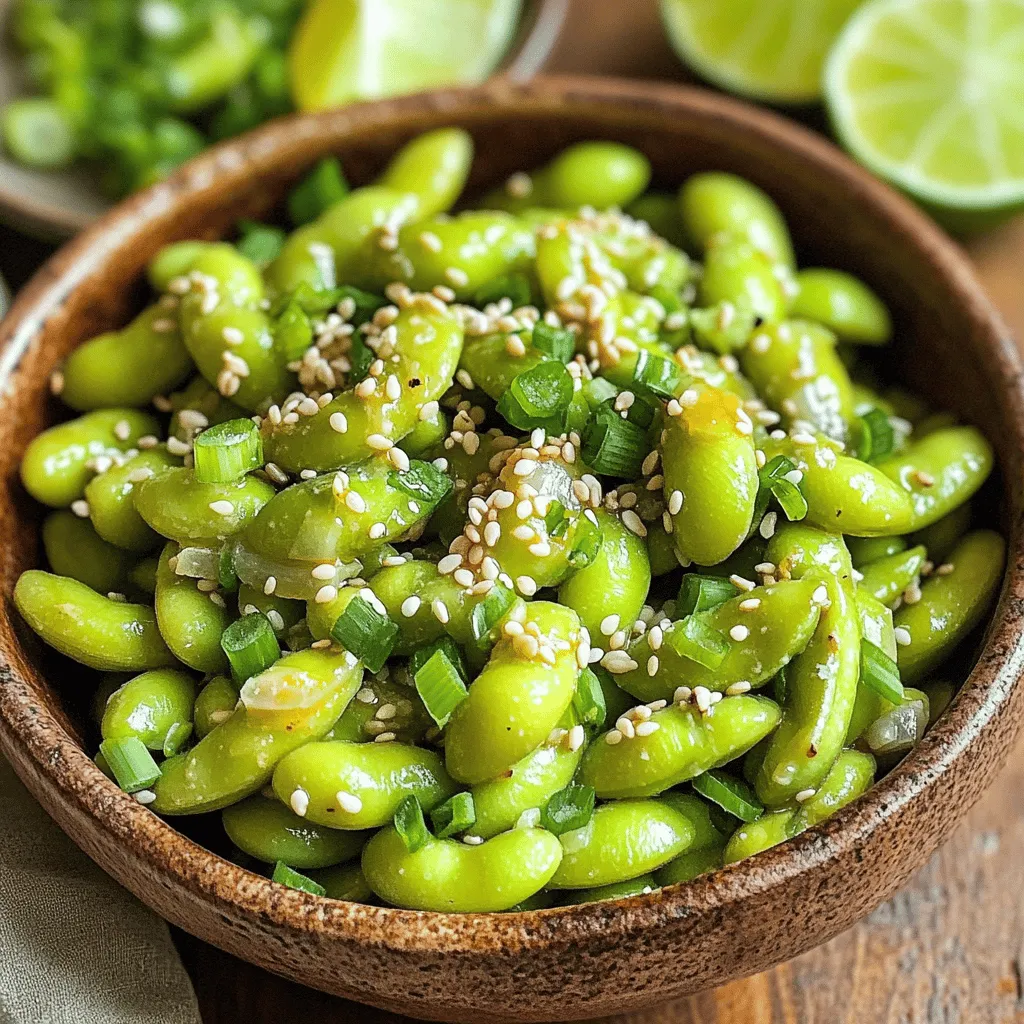
If you’re craving a simple, tasty snack, look no further! My Spicy Garlic Edamame recipe is quick to make and

- 2 pounds baby potatoes - 1 cup Greek yogurt - 2 tablespoons Dijon mustard I love starting with baby potatoes. They are small, tender, and perfect for this salad. Boiling them brings out their natural sweetness. Greek yogurt adds creaminess, and Dijon mustard gives that tangy kick. - 2 tablespoons apple cider vinegar - 1 tablespoon fresh dill, chopped - Spices: garlic powder and onion powder Apple cider vinegar adds brightness. Fresh dill gives a fresh, herbal note. Garlic and onion powders enhance the flavor without overpowering the dish. - 1/2 cup celery, finely diced - 1/2 cup red bell pepper, finely diced - 2 green onions, sliced Adding celery and red bell pepper brings crunch. The green onions add a mild onion flavor, which rounds out the salad nicely. Each bite will have a mix of textures. {{ingredient_image_1}} Start by boiling the halved baby potatoes in a large pot. Use salted water for added flavor. Cook them for about 15 to 20 minutes. You want them tender but not mushy. To check, poke a potato with a fork; it should slide in easily. Once they’re done, drain the potatoes and let them cool for a few minutes. Cooling helps keep the salad fresh. In a separate bowl, mix together Greek yogurt, Dijon mustard, apple cider vinegar, and fresh dill. Add garlic powder and onion powder for extra flavor. Whisk all these ingredients together until you have a smooth and creamy dressing. A good dressing should coat the potatoes well without being too thick. Once the potatoes have cooled slightly, add them to the bowl with the dressing. Toss gently to coat all the potatoes evenly. Make sure every piece gets some of that tasty dressing. Next, fold in the crunchy veggies: diced celery, diced red bell pepper, and sliced green onions. Mixing these adds a nice texture and flavor. Finally, season your salad with salt and pepper to taste. Adjust it to your liking. Cover the bowl and refrigerate for at least 30 minutes. This wait helps the flavors blend beautifully. To get your potato salad just right, cooking time is key. Boil the halved baby potatoes for 15-20 minutes. You want them tender, but not mushy. Once they are done, drain them and let them cool. This step is very important. Cooling the potatoes helps them hold their shape. Mixing warm potatoes with the dressing can make the salad too soggy. You can adjust the taste of your potato salad easily. If you want more zing, add a bit more apple cider vinegar. If it's too sour, a dash of salt can help balance it out. When it comes to dill, I always prefer fresh. Fresh dill brings a bright taste. However, dried dill can work in a pinch. Just remember, dried herbs are stronger, so use less. Serving your potato salad in a bright bowl can make it pop. You can also add sliced boiled eggs on top for a nice touch. Garnish with extra dill sprigs for color and flair. This simple step can elevate the dish and make it look more inviting. For a fun twist, try serving it in small cups for individual servings. Pro Tips Choose the Right Potatoes: For the best texture, opt for waxy baby potatoes which hold their shape well after boiling. Chill Before Serving: Allow the potato salad to chill for at least 30 minutes before serving to enhance the flavors. Customize Your Veggies: Feel free to add other vegetables like diced cucumbers or peas for extra crunch and flavor. Make It Ahead: This salad can be made a day in advance; it often tastes even better the next day as the flavors meld. {{image_2}} To cut calories in your tangy dill potato salad, you can swap out the Greek yogurt. Use lighter options like sour cream or low-fat yogurt. These swaps keep the creamy texture but reduce calories. For a tangy twist, try dressings made with lemon juice or vinegar, which add flavor without extra calories. Want to make your salad more colorful and nutritious? You can add other veggies. Try diced cucumbers, shredded carrots, or even peas. Each adds a nice crunch and different flavors. You can also include protein for a heartier dish. Chopped chicken or hard-boiled eggs work well and boost the protein content. Get creative with herbs and spices! Instead of just dill, add fresh basil or parsley for a new taste. You can also use flavored vinegars, like balsamic or red wine vinegar, to change the salad's profile. Mustards come in many flavors, so pick one that excites your palate! Experimenting keeps the dish fresh and fun. To store your Tangy Dill Potato Salad, place it in an airtight container. This keeps it fresh and safe. Use glass or plastic containers that seal well. I like to use glass because it’s easy to clean and doesn’t stain. Make sure to cover the salad tightly with a lid. In the fridge, potato salad stays good for about three to five days. Always check for any signs of spoilage before serving. If you want to save it for longer, you can freeze it. However, freezing may change the texture. If you decide to freeze, place it in a freezer-safe container. It can last up to two months in the freezer. For the best taste, serve the salad cold. The flavors mix well when it’s chilled. If you prefer it warmer, let it sit at room temperature for about 15 minutes before serving. If you need to reheat it, do so gently in the microwave. Heat it in short bursts and stir often. This way, you can enjoy that creamy, tangy taste! To reduce the tanginess, cut back on the vinegar and mustard. You can use just one tablespoon of apple cider vinegar instead of two. For the mustard, try one tablespoon of Dijon instead of two. This will make the salad milder. You can also add a bit more Greek yogurt to balance the flavors. Taste as you go to find the right mix for you. Yes, you can make this potato salad ahead of time. It tastes great after chilling in the fridge. Prepare the salad, cover it, and store it in the fridge for up to two days. Just keep it in an airtight container. The flavors blend together nicely when chilled. If you need a different option, try sour cream or a dairy-free yogurt. Plain yogurt works, too. For a lighter version, use low-fat sour cream. If you prefer a vegan option, choose a plant-based yogurt. Each of these will give you a creamy base, but the taste may vary slightly. This potato salad combines baby potatoes, Greek yogurt, and vibrant veggies for great flavor. You learned how to prepare the dressing and achieve the perfect texture. Plus, you discovered tips for enhancing flavor and creative presentation ideas. Remember, you can easily adjust the recipe to fit your needs. Whether you’re cutting calories or trying new ingredients, this salad is versatile and satisfying. Enjoy making this dish for your next gathering, and explore the variations to keep it fresh and exciting!

Tangy Dill Potato Salad Refreshing Summer Side Dish

Looking for a refreshing side dish that’s perfect for summer BBQs? My Tangy Dill Potato Salad is just what you

- 2 lbs chicken wings - 2 tablespoons olive oil - 1 teaspoon garlic powder - 1 teaspoon onion powder - 1 teaspoon smoked paprika - 1 teaspoon dried oregano - Salt and pepper to taste The main stars of this recipe are the chicken wings. They give you that perfect bite. Olive oil helps the spices stick and makes them crispy. The garlic powder brings a nice kick. Onion powder adds extra depth. Smoked paprika gives a hint of smokiness. Oregano adds a fresh note. Don’t forget the salt and pepper for balance. - 1/2 cup freshly grated Parmesan cheese - 2 tablespoons chopped fresh parsley (for garnish) - Optional: Hot sauce for serving After cooking, we top the wings with grated Parmesan cheese. This adds a rich, cheesy flavor. The fresh parsley gives a pop of color and freshness. If you like heat, add hot sauce for a spicy kick. You can find the full recipe above to see how to combine these ingredients for the best wings ever! To start, you need to pat the chicken wings dry. Use paper towels to soak up any moisture. This step is key for crispy wings. If they are wet, they won’t crisp up well in the air fryer. Next, let’s create the seasoning mix. In a large bowl, add olive oil, garlic powder, onion powder, smoked paprika, dried oregano, salt, and pepper. Stir the mix until it is well combined. This blend gives your wings that amazing garlic and Parmesan flavor. Now it’s time to air fry the wings. Preheat your air fryer to 400°F (200°C). Lay the chicken wings in a single layer in the basket. You may need to cook them in batches if your fryer is small. Cook for 25 to 30 minutes. Shake the basket halfway through. This helps cook the wings evenly and makes them nice and crispy. To check for doneness, look for a golden-brown color. You can also use a meat thermometer. The internal temperature should reach 165°F (74°C). After the wings are cooked, move them to a large mixing bowl. It’s time to add the cheese! Sprinkle the grated Parmesan cheese over the hot wings. Toss them well to coat all the wings with the cheese. For the final crisping step, put the wings back in the air fryer for an extra 2 to 3 minutes at 400°F. This melts the cheese a bit and helps it stick to the wings. Now, they are ready to serve! To get crispy wings, start by drying them well. Water on the wings leads to sogginess. Use paper towels to pat them dry. This helps create a nice crust when air frying. Next, arrange the wings in the air fryer. Lay them in a single layer. Do not overcrowd the basket. If needed, cook in batches. This allows hot air to circulate around each wing. It ensures even cooking and crispiness. Adjusting seasoning is key to great flavor. Taste as you go. Add more garlic powder or paprika if you want a bolder flavor. You can also play with salt and pepper levels. Consider brining or marinating the wings for extra flavor. A simple brine of salt and water can help. Let them soak for a few hours. This adds moisture and taste to the wings. You can also marinate them in olive oil and herbs overnight. This will deepen the flavor even more. For the full recipe, check the recipe section. {{image_2}} You can change the flavor of your wings to keep things exciting. If you love heat, try a buffalo wing adaptation. Just add some cayenne pepper or your favorite hot sauce to the seasoning mix. This will give your wings a nice kick that many enjoy. For a fresh twist, try herb-infused options. Mix in dried basil, thyme, or rosemary. These herbs will add depth and a lovely aroma to your wings. You can even use fresh herbs if you have them on hand. Just chop them finely and add them to your seasoning mix. If you want to explore cooking methods beyond the air fryer, consider traditional oven baking. Preheat your oven to 425°F (220°C). Spread the seasoned wings on a baking sheet lined with parchment paper. Bake for about 30-35 minutes, flipping halfway through. This method still yields crispy wings, but it takes a bit longer. Grilling is another great option. Preheat your grill and set it to medium-high heat. Place the wings on the grill grates. Cook for 20-25 minutes, turning often. The grill adds a nice smoky flavor that pairs well with garlic and Parmesan. For the full recipe, check out the delicious details provided. After enjoying your crispy air fryer garlic Parmesan wings, let them cool. Place the cooled wings in an airtight container. This helps keep them fresh. If you do not have an airtight container, a resealable plastic bag works too. Make sure to remove as much air as possible from the bag. You can store the wings in the fridge for about 3 to 4 days. When you're ready to eat the leftovers, you want them to be crispy again. The best way to reheat wings is in the air fryer. Preheat your air fryer to 375°F (190°C). Place the wings in a single layer in the basket. Heat them for about 5 to 7 minutes. This method keeps them crunchy. If you don’t have an air fryer, you can use the oven. Preheat your oven to 400°F (200°C). Spread the wings on a baking sheet and heat for about 10-15 minutes. Once reheated, serve with your favorite dipping sauce or extra Parmesan cheese. Enjoy your wings like they're fresh from the fryer again! If you want the full recipe, check it out for more tips. To add heat to your wings, you can mix in spices like cayenne pepper or chili powder. Start with a small amount, about 1/4 teaspoon, and taste as you go. Another option is to toss the wings in your favorite hot sauce after air frying. You can also use a spicy seasoning blend. If you love bold flavors, try adding a splash of hot sauce to the seasoning mix. Yes, you can cook frozen chicken wings in the air fryer. Just adjust the cooking time. I recommend adding about 5-10 extra minutes to the cooking time. Make sure to check that the wings reach an internal temperature of 165°F (75°C). For even cooking, shake the basket halfway through. This method ensures you still get crispy wings without thawing them first. A few great dipping sauces go well with garlic parmesan wings. Classic choices are ranch dressing and blue cheese dip. You can also try a spicy buffalo sauce for an extra kick. For something different, a honey mustard dip adds a nice sweet touch. Feel free to mix your favorite sauces to find the perfect match. You’ve learned how to make tasty Air Fryer Garlic Parmesan Wings. We covered the ingredients, cooking steps, and tips for getting them crispy. You also saw how to store and reheat leftovers properly. Feel free to mix in new flavors or try different cooking methods. With a few simple changes, you can make these wings your own. Enjoy this easy and fun recipe next time you want a delicious snack.

Air Fryer Garlic Parmesan Wings Crispy and Flavorful

Craving wings that are both crispy and packed with flavor? Look no further! My Air Fryer Garlic Parmesan Wings will

- 1 pound potato gnocchi - 1 cup heavy cream - 1/2 cup sun-dried tomatoes in oil, chopped - 3 cloves garlic, minced - 1/2 cup grated Parmesan cheese - 1 cup fresh spinach - 1/4 teaspoon red pepper flakes (optional) - 2 tablespoons olive oil - Fresh basil leaves, for garnish - Salt and pepper to taste When I think about the ingredients for my creamy sun-dried tomato gnocchi, I feel excited. Each item brings something special to the dish. The potato gnocchi serves as the perfect base. They are soft and hold the creamy sauce well. Next, the heavy cream adds richness. It makes the dish feel indulgent. The sun-dried tomatoes bring a burst of flavor. They are sweet and tangy, making every bite delightful. Garlic is a must for this recipe. I use fresh garlic for the best taste. It adds depth to the sauce. Parmesan cheese melts into the cream, giving it a wonderful umami kick. Fresh spinach not only adds color but also nutrients. It wilts beautifully in the hot sauce. If you like a bit of spice, red pepper flakes can add warmth. Olive oil is key for sautéing the garlic and tomatoes. It helps release their flavors. Finally, fresh basil leaves make the dish look stunning. They add a nice touch of freshness. These ingredients blend together to create a delicious meal. You can find the full recipe to make this tasty dish. First, fill a large pot with water and add a pinch of salt. Bring the water to a boil. Once it bubbles, add 1 pound of potato gnocchi. Cook the gnocchi for about 2-3 minutes, or until they float to the top. This shows they are ready. Carefully drain the gnocchi and set them aside. Next, grab a large skillet and heat 2 tablespoons of olive oil over medium heat. Add 3 cloves of minced garlic to the skillet. Sauté it for about 1 minute until it smells great. Then, toss in 1/2 cup of chopped sun-dried tomatoes. Stir these for another 2 minutes, allowing the flavors to mix. Pour in 1 cup of heavy cream and bring it to a gentle simmer. Stir the mixture often to keep it smooth. Gradually add in 1/2 cup of grated Parmesan cheese. Keep stirring until the cheese melts and the sauce is creamy. Now it's time to bring everything together. Gently fold the cooked gnocchi into the sauce until they are well-coated. Add 1 cup of fresh spinach to the skillet. Cook for about 2-3 minutes, or until the spinach wilts. If you like a bit of heat, sprinkle in 1/4 teaspoon of red pepper flakes. Season with salt and pepper to taste, and give it one final stir. Enjoy this flavorful dish right away! For a full recipe, check out the details above. To make the sauce creamy, use heavy cream. It adds richness and texture. Stir the cream often as it simmers to avoid burning. For flavor balance, add salt and pepper. Taste as you go. You can also add more sun-dried tomatoes for extra flavor. When cooking gnocchi, boil water first. Add salt to the water for taste. Cook the gnocchi for just 2-3 minutes. They are ready when they float. Drain them quickly to stop cooking. This helps keep them firm and not mushy. Garnish your dish with fresh basil leaves. They add color and a nice aroma. Also, sprinkle extra Parmesan cheese on top for a tasty finish. Serve in a white bowl to make the colors pop. Enjoy your beautiful and tasty meal! For the full recipe, check out the details above. {{image_2}} To make this dish vegan, swap out the heavy cream and cheese. Use coconut cream or cashew cream for a rich base. Nutritional yeast can add a cheesy flavor without dairy. For proteins, consider chickpeas or lentils. These options keep it plant-based and tasty. You can add proteins like chicken or shrimp for extra flavor. If using chicken, cook it first in the skillet. For shrimp, add them right after the garlic. Cook until they turn pink. This adds depth and makes the dish heartier. Want to amp up the flavor? Try adding fresh herbs like thyme or oregano. A squeeze of lemon juice brightens the dish. You can also toss in olives or capers for an extra kick. These small changes create a more complex taste without much effort. To keep your creamy sun-dried tomato gnocchi fresh, use an airtight container. Glass or plastic containers work well. Before sealing, let the dish cool down to room temperature. This helps avoid condensation inside the container. Store it in the fridge for up to three days. To reheat, use a skillet over low heat. Add a splash of cream or broth to keep it moist. Stir often to prevent sticking. You can also use a microwave; just cover it to avoid drying out. If you want to refresh the dish, toss in more spinach or a sprinkle of cheese. This adds flavor and keeps it vibrant. To freeze, place the cooled gnocchi in a freezer-safe bag. Remove as much air as you can before sealing. It can last up to three months in the freezer. When you want to enjoy it, thaw it overnight in the fridge. Reheat in a skillet, adding a little cream or milk for creaminess. Yes, you can use frozen gnocchi. Cooking frozen gnocchi is simple. Just boil it directly in salted water. Follow these tips: - Do not thaw the gnocchi before cooking. - Cook for about 3-4 minutes or until they float. - Drain and add to your sauce right away. To add heat, increase the red pepper flakes. Here are some ideas: - Add more flakes for a stronger kick. - Try a pinch of cayenne pepper for extra spice. - Incorporate sliced jalapeños for a fresh touch. If you need a cheese swap, try these options: - Pecorino Romano for a sharper taste. - Nutritional yeast for a vegan option. - Cream cheese for a creamy texture. These swaps give your dish a new flavor twist. For the full recipe, check out the Creamy Sun-Dried Tomato Gnocchi. This blog post covered a delicious gnocchi recipe. We discussed main and additional ingredients, plus step-by-step cooking tips. You learned how to make a creamy sauce and combine it with gnocchi. Don’t forget to explore variations to suit your taste. You can store leftovers and reheat them to enjoy later. Try customizing your dish with different proteins or spices. Now, get cooking and enjoy this tasty meal!

Creamy Sun-Dried Tomato Gnocchi Flavorful Dinner Delight

Are you ready for a delicious dinner? This Creamy Sun-Dried Tomato Gnocchi recipe is your new go-to! With just a

Older posts
Newer posts
← Previous Page1 … Page45 Page46 Page47 … Page84 Next →

dsad

© 2026 easycookingbite • Built with GeneratePress

Our Policies

  • Copyright Policy
  • Cookie Policy
  • GDPR Policy
  • Privacy Policy
  • Disclaimer
  • Terms Of Use

More Information

  • Home
  • About
  • Contact
  • Appetizers
  • Dessert
  • Dinner
  • Drinks
©2026, easycookingbite About Back To Top