Skip to content
DisclaimerTerms Of UseGDPR PolicyCookie Policy

easycookingbite

  • Home
  • Drinks
  • Appetizers
  • Dinner
  • Dessert
  • About
  • Contact
  • Privacy Policy
DisclaimerTerms Of UseGDPR PolicyCookie Policy

NO-ING-IMG

To make a hearty and tasty veggie-packed minestrone soup, gather these ingredients: - 2 tablespoons olive oil - 1 medium onion, chopped - 2 cloves garlic, minced - 2 medium carrots, diced - 2 celery stalks, diced - 1 zucchini, diced - 1 bell pepper (any color), chopped - 1 cup green beans, chopped - 1 cup kale or spinach, roughly chopped - 1 can (14 oz) diced tomatoes - 4 cups vegetable broth - 1 cup cannellini beans, drained and rinsed - 1 teaspoon dried oregano - 1 teaspoon dried basil - Salt and pepper to taste These fresh veggies and beans create a mix of flavors and textures. Fresh herbs make your soup bright and fresh. Here are my top picks: - Fresh parsley, chopped - Fresh basil leaves, torn - A squeeze of lemon juice These herbs add a burst of flavor and color. Garnishes can elevate your soup to a new level. Consider these options: - Grated Parmesan cheese (optional, for serving) - Crusty bread, for dipping - A drizzle of olive oil on top These add richness and texture. For the full recipe, check the complete instructions above. Enjoy cooking! Start by gathering your ingredients. You will need: - 2 tablespoons olive oil - 1 medium onion, chopped - 2 cloves garlic, minced - 2 medium carrots, diced - 2 celery stalks, diced - 1 zucchini, diced - 1 bell pepper, chopped - 1 cup green beans, chopped - 1 cup kale or spinach, roughly chopped - 1 can (14 oz) diced tomatoes - 4 cups vegetable broth - 1 cup cannellini beans, drained and rinsed - 1 teaspoon dried oregano - 1 teaspoon dried basil - Salt and pepper to taste - Fresh parsley, chopped (for garnish) - Grated Parmesan cheese (optional, for serving) Chop and measure all your veggies first. This will save time later. 1. Heat the olive oil in a large pot over medium heat. Add the chopped onion and garlic. Cook until the onion turns soft and clear, about 5 minutes. 2. Add the diced carrots and celery. Stir and cook for another 5 minutes. They should start to soften but not brown. 3. Next, toss in the zucchini, bell pepper, and green beans. Sauté them for 4 to 5 minutes. Stir often to keep them from sticking. 4. Pour in the can of diced tomatoes and the vegetable broth. Bring the mixture to a gentle boil. This will help blend the flavors. 5. Add the drained cannellini beans, chopped kale or spinach, dried oregano, and dried basil. Season with salt and pepper. Stir well to combine. 6. Lower the heat and cover the pot. Let the soup simmer for 20 to 30 minutes. This allows the flavors to meld beautifully. Before serving, taste the soup. Adjust the seasonings if needed. Once perfect, ladle the soup into bowls. Garnish with fresh parsley and a sprinkle of Parmesan cheese if you like. Serve it warm and enjoy this veggie-packed delight. For the complete recipe, refer to the Full Recipe section. To boost the health of your veggie packed minestrone soup, try these tips. Use low-sodium vegetable broth to cut down on salt. Add more leafy greens like spinach or Swiss chard for extra vitamins. You can also toss in some quinoa or barley for added fiber and protein. If you want a lower-carb option, skip the pasta and use spiralized veggies instead. These small changes can make your soup even more nutritious. When making minestrone soup, avoid these common mistakes. Don’t rush the sautéing step; it builds flavor. If you skip the fresh herbs, your soup may taste flat. Be careful not to overcook the vegetables; they should be tender but still have a bit of crunch. Lastly, remember to taste as you go. Adjusting the flavors early can save your soup from being bland. To make your soup shine, serve it hot with a dash of olive oil on top. Adding a sprinkle of fresh parsley brings a bright touch. Consider a squeeze of lemon juice for a zesty kick. Serve it with crusty bread for dipping, or pair it with a fresh salad. For extra richness, top each bowl with grated Parmesan cheese. These tips will take your minestrone to the next level. If you want to try making this soup, check the Full Recipe for all the details. {{image_2}} You can swap any vegetable in minestrone soup. For instance, try sweet potatoes instead of carrots. You might use peas in place of green beans. You can also add corn for a sweet crunch. The key is to pick veggies you enjoy. This soup allows you to be creative. Feel free to mix and match based on what you have at home. To make this soup gluten-free, you can skip any pasta. A good choice is using rice or quinoa instead. For a vegan option, simply leave out the Parmesan cheese. Use vegetable broth as your base, which is already vegan. You can also add extra beans for protein. This way, your soup remains hearty and filling. Change the soup's flavor by adding different spices. For a kick, try red pepper flakes or cumin. If you prefer a fresh taste, add lemon zest or a splash of vinegar. These small changes can make a big difference. Taste as you go, and adjust the spices to your liking. You can also try fresh herbs like thyme or rosemary to enhance the flavor. For the complete instructions on making this delicious soup, you can check out the Full Recipe. To store leftovers, let the soup cool down first. Then, pour it into airtight containers. Make sure to leave some space at the top for expansion. Label the containers with the date. This way, you know when you made it! If you want to freeze the soup, use freezer-safe bags or containers. Pour the cooled soup into the bags. Squeeze out the air before sealing. You can freeze it for up to three months. Just remember to label it with the date too! When you’re ready to eat it again, thaw the soup in the fridge overnight. To reheat, pour it into a pot over medium heat. Stir often until it’s hot. If it seems thick, add a splash of broth or water. This will keep the flavors fresh and bright. Enjoy your veggie-packed minestrone soup! Check out the Full Recipe for more details. Veggie-packed minestrone soup lasts about 4 to 5 days in the fridge when stored properly. To keep it fresh, place it in an airtight container. Make sure to let it cool before sealing. This helps prevent moisture from building up inside the container. If you want to enjoy it longer, consider freezing it. Yes, you can make this soup in a slow cooker. Just follow these simple steps. Start by sautéing the onion and garlic in a pan. This extra step adds great flavor. Then, add all the remaining ingredients to your slow cooker. Set it to low for 6 to 8 hours or high for 3 to 4 hours. Stir it occasionally if you can. Enjoy the wonderful smells as it cooks! You can add many other vegetables to your minestrone soup. Great options include: - Potatoes for extra heartiness - Peas for a touch of sweetness - Corn for a pop of color - Spinach or Swiss chard for added greens Get creative! The best part of this soup is that it’s flexible. Use what you have at home or what’s in season. This way, you can make a unique version each time. For a full list of ingredients and steps, check the Full Recipe. In this blog post, we explored the essential ingredients for a hearty minestrone soup, from fresh herbs to optional garnishes. We walked through easy steps for preparation, cooking, and final touches. You learned tips for a healthier dish, common mistakes to avoid, and how to enhance flavors when serving. We also discussed variations like gluten-free and vegan options, along with storage tips for leftovers. Now you have all the knowledge you need to create a delicious soup. Enjoy crafting your own version!

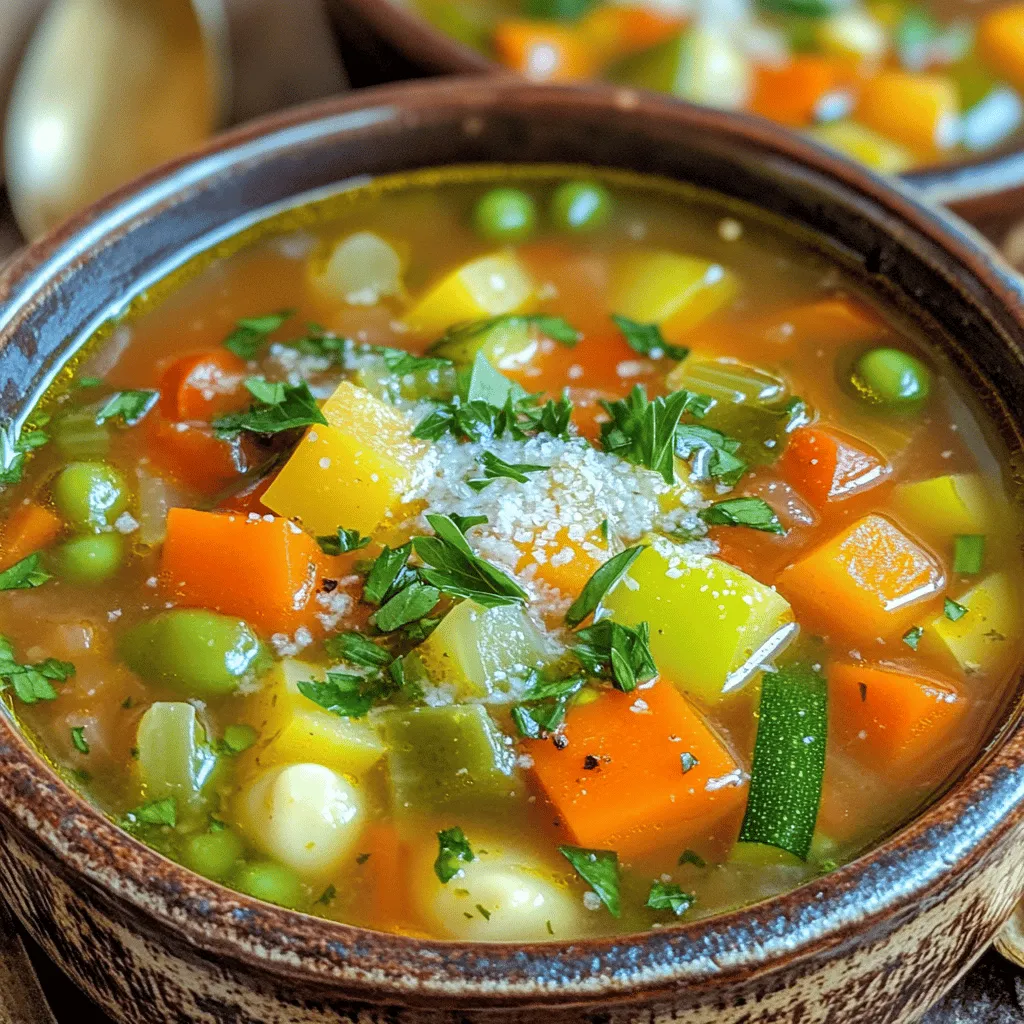
Veggie Packed Minestrone Soup Flavorful and Healthy Dish

Looking for a healthy, tasty dish that warms your soul? This Veggie Packed Minestrone Soup is just what you need!

- 2 tablespoons matcha green tea powder - 1 cup milk (dairy or non-dairy) - 1 cup coconut milk - 2-3 tablespoons honey or maple syrup - 1 teaspoon vanilla extract - A pinch of sea salt - Optional ingredients: chia seeds or chopped nuts To make the best Iced Matcha Latte Popsicles, gather your ingredients first. I love starting with the matcha powder. Choose a high-quality matcha for a vibrant color and rich flavor. The milk can be dairy or non-dairy, like almond or oat milk, based on your taste. Next, combine coconut milk for a creamy base that adds a tropical twist. Sweeten your mixture with honey or maple syrup. Adjust the sweetness according to your taste. A touch of vanilla extract boosts the flavor, while the sea salt helps balance the sweetness. If you want a fun texture, consider adding chia seeds or chopped nuts. These extras give your popsicles a nice crunch. Ensure you have everything ready before moving to the next steps. Each ingredient plays a vital role in creating a refreshing treat that’s both delicious and visually appealing. Enjoy the process, and have fun experimenting! 1. Sift matcha powder to remove clumps. This helps make your popsicles smooth. If you skip this step, you might have lumps in your mix. 2. Combine all liquid ingredients in a bowl. This includes milk, coconut milk, honey or maple syrup, vanilla extract, and sea salt. Mixing them well ensures great flavor. 3. Whisk until smooth and lump-free. Use a whisk for best results. It takes only a minute or two. 1. Stir in optional texture ingredients. You can add chia seeds or chopped nuts here. These give your popsicles a nice crunch. 2. Pour the mixture into molds. Fill them up but leave a little room at the top. The liquid will expand as it freezes. 3. Insert popsicle sticks and freeze. Make sure the sticks are centered. Freeze for at least 4-6 hours or until solid. 1. Tips for easy unmolding. When ready, run warm water over the outside of the molds. This helps release the popsicles without breaking them. 2. Recommended freezing time. For best results, freeze your popsicles for at least 6 hours. The longer, the better! These steps will guide you to make refreshing Iced Matcha Latte Popsicles. For the Full Recipe, check the ingredients and instructions above. To make the best iced matcha latte popsicles, start with high-quality matcha powder. Look for a vibrant green color, which means it is fresh. Ceremonial grade matcha is great for this recipe. It has a smooth taste that works well in popsicles. Next, adjust the sweetness to fit your taste. You can use honey or maple syrup. Start with less and add more if needed. This way, your popsicles will not be too sweet. Remember, the flavor of matcha should shine through! Adding texture can make these popsicles even better. Consider stirring in chia seeds or chopped nuts. Chia seeds add a fun crunch, while nuts give a lovely bite. They help make every lick interesting. Think about how texture affects enjoyment. A smooth popsicle can be nice, but adding bits makes it exciting. It breaks up the creaminess and gives you a tasty surprise. When it's time to serve, make your popsicles look great! Try placing them on a rustic wooden board or a bright plate. You can sprinkle some matcha powder on top or add fresh mint leaves. Both add a nice touch. Pair these popsicles with other desserts or drinks. They go well with fruity sorbets or a cold brew coffee. Enjoying them together makes for a fun treat! For the full recipe, check out the section above. {{image_2}} If you want to skip dairy, many options exist. Almond milk is a great choice. It has a light flavor that pairs well with matcha. Oat milk is thicker and creamier. It enhances the popsicle's texture. Coconut milk is another fantastic option. It adds a rich, tropical taste. Plus, it helps keep the popsicles creamy. Coconut milk is rich in healthy fats. These fats help your body absorb vitamins. They also provide a nice, smooth mouthfeel. Using coconut milk can make your popsicles more filling. It’s a perfect way to enjoy a treat without dairy. Want to spice up your popsicles? Adding fruit puree is a fun way to do it! You can use berries, mango, or even pineapple. Just blend your fruit and mix it into the matcha base. This gives your popsicles a fruity twist. It’s refreshing on hot days! You can also try different sweeteners. Honey and maple syrup are common, but there are more. Agave syrup is a great choice for a light sweetness. Coconut sugar adds a unique flavor. Experiment with what you like best. This way, you can create a popsicle that suits your taste. Popsicles reflect trends and seasons. You might see seasonal flavors like pumpkin spice in fall. Or how about a peppermint matcha during winter? These seasonal twists keep things exciting! Matcha itself has global roots. It comes from Japan, where it is a key part of tea ceremonies. Pop culture now embraces matcha in many treats. From lattes to cakes, matcha is everywhere! By blending global flavors, you can create unique popsicles. Try adding spices like ginger or cardamom for a twist. The possibilities are endless! For the full recipe to create these delightful treats, be sure to check out the [Full Recipe]. To keep your Iced Matcha Latte Popsicles fresh, always store them in the freezer. Wrap each popsicle in plastic wrap. This helps prevent freezer burn. You can also place them in an airtight container. This adds an extra layer of protection. If you have many popsicles, use a freezer-safe bag. Make sure to remove as much air as possible before sealing. The best temperature for freezing popsicles is 0°F (-18°C) or lower. This helps them freeze faster and stay solid. To avoid ice crystals, freeze your popsicles quickly. Pour the mixture into molds and freeze as soon as possible. Avoid opening the freezer door too often. Each time you open it, warm air enters and can affect the freezing process. These popsicles can last about 2 to 3 months in the freezer. However, for the best taste, enjoy them within a month. Signs of spoilage include off smells, discoloration, or ice crystals on the surface. If you notice any of these, it's best to toss them. Enjoy your popsicles while they're fresh for the best flavor and texture. The best matcha powder for popsicles is ceremonial grade. This type is bright green and smooth. It offers a rich flavor and vibrant color. Look for brands that are organic and finely ground. Higher quality matcha gives your popsicles a nice taste. Yes, you can make these popsicles vegan. Just use non-dairy milk instead of regular milk. Coconut milk works great and adds creaminess. For sweetener, use maple syrup or agave nectar. Both are vegan-friendly and tasty. You need to freeze the popsicles for at least 4-6 hours. This ensures they freeze solid. If they are not fully frozen, they will be hard to unmold. For best results, leave them overnight. Yes, you can use other sweeteners. Agave nectar and coconut sugar are good options. You can also use stevia for a low-calorie choice. Adjust the amount based on your taste. Each sweetener may change the flavor slightly. Check the Full Recipe for more details. This blog post has walked you through making delicious matcha popsicles. We covered ingredients, preparation steps, and tips for the best flavor and texture. You can customize them with fun add-ins and flavors. Remember to store them properly to keep them fresh for longer. Enjoy making these treats at home! With simple steps, you'll impress friends and family. Dive in and explore these tasty popsicle variations whenever you crave something cool and refreshing.

Iced Matcha Latte Popsicles Refreshing Cool Treat

Looking for a cool treat that is both refreshing and healthy? Iced Matcha Latte Popsicles are the answer! With just

To make Honey Teriyaki Glazed Salmon, gather these ingredients: - 4 salmon fillets (about 6 ounces each) - 1/4 cup soy sauce (low sodium preferred) - 1/4 cup honey - 2 tablespoons rice vinegar - 1 tablespoon freshly grated ginger - 2 garlic cloves, minced - 1 tablespoon sesame oil - 2 green onions, finely sliced (for garnish) - Sesame seeds for garnish (optional) - Salt and pepper to taste Using high-quality ingredients makes a big difference. I suggest using fresh salmon. Look for bright, firm fillets. Low-sodium soy sauce adds flavor without too much salt. Pure honey gives the glaze a rich sweetness. Fresh ginger and garlic will make your dish pop. Always choose fresh herbs for the best taste. You can easily swap some ingredients if needed. If you don’t have low-sodium soy sauce, regular soy sauce works too, but cut back on salt. Maple syrup can replace honey for a different sweetness. Rice vinegar can be swapped with apple cider vinegar if that’s what you have. No fresh ginger? Ground ginger can work in a pinch, but use less. Get creative with what you have in your pantry! For more details, check the Full Recipe. Making the teriyaki glaze is simple. First, gather your ingredients: - 1/4 cup soy sauce - 1/4 cup honey - 2 tablespoons rice vinegar - 1 tablespoon freshly grated ginger - 2 garlic cloves, minced - 1 tablespoon sesame oil In a medium bowl, whisk together the soy sauce, honey, rice vinegar, ginger, garlic, and sesame oil. Mix well until everything is smooth and combined. This glaze will give your salmon a sweet and savory flavor. Save half of the glaze for later. Now it's time to marinate the salmon. Take your four salmon fillets, about 6 ounces each. Place them in a shallow dish. Pour half of the teriyaki glaze over the salmon, ensuring it covers all sides. This step infuses the salmon with flavor. Cover the dish and let it sit in the fridge for at least 30 minutes. For even better taste, let it marinate for up to 2 hours. You can cook the salmon in two ways: baking or grilling. Both methods work well, but they give slightly different results. Baking: Preheat your oven to 400°F (200°C). Line a baking sheet with parchment paper or foil. Remove the salmon from the marinade and sprinkle a pinch of salt and pepper on top. Place the salmon on the baking sheet and bake for about 12-15 minutes. The fish is done when it flakes easily with a fork. Grilling: If you prefer grilling, preheat your grill. Oil the grates to avoid sticking. Remove the salmon from the marinade and season with salt and pepper. Grill each fillet for about 4-5 minutes per side. Brush with the reserved glaze halfway through cooking. This gives the salmon a nice char and enhances the flavor. Both methods create a delicious Honey Teriyaki Glazed Salmon that you will love. For the full recipe, check the earlier section. To get the best glaze, you need the right balance. Mix equal parts soy sauce and honey. This mix should be thick but not too sticky. If it’s too runny, add more honey. If it’s too thick, add a drop of water. Stir well until you see a smooth blend. This glaze will cling to the salmon nicely. Salmon comes in many cuts. The thicker the fillet, the longer it needs to cook. For standard fillets, cook for 12-15 minutes in the oven. If you have thinner pieces, check them after 8-10 minutes. For grilling, thinner fillets take about 3-4 minutes per side. Always check for flakiness to know if it’s done. Serve your salmon with rice or quinoa. These sides soak up the extra glaze well. You can also add steamed vegetables like broccoli or snap peas. A fresh salad with a light dressing complements the meal. For a fun twist, try it in a taco with fresh slaw. You can find the full recipe to explore more ideas! {{image_2}} You can change up the marinade for your Honey Teriyaki Glazed Salmon. Try adding orange juice for a citrus twist. You can also use maple syrup instead of honey for a deeper flavor. If you like a bit of heat, add red pepper flakes. This will give your salmon a spicy kick. If you want to switch proteins, chicken works well with this glaze. Tofu is another great choice for a vegetarian option. For vegetables, try bell peppers, zucchini, or asparagus. These veggies grill up nicely and soak in the flavor. You can also roast them in the oven alongside your salmon. To make your dish even better, add sesame seeds or chopped nuts for crunch. Fresh herbs like cilantro or basil can brighten the flavor. You might also consider a splash of lime juice just before serving. This adds a fresh zing that balances the sweetness of the glaze. Don’t forget to check the Full Recipe for all the details on how to prepare this delicious meal! To store leftover honey teriyaki glazed salmon, let it cool first. Then, place it in an airtight container. This keeps the salmon fresh. Make sure to add any leftover glaze too. Store it in the fridge for up to three days. When you are ready to eat it again, you want to ensure it tastes just as good. When reheating your salmon, keep it moist. The best way is to use the oven. Preheat your oven to 275°F (135°C). Place the salmon on a baking dish. Add a splash of water or broth to keep it juicy. Cover it with foil to trap steam. Heat for about 15 minutes or until warm. You can also use a microwave. Just heat for 30 seconds, then check. Repeat until warm, but be careful not to overcook it. If you want to freeze your salmon, do it right after cooking. First, let it cool completely. Then, wrap each fillet tightly in plastic wrap. Place the wrapped fillets in a freezer-safe bag. Remove as much air as possible. You can freeze it for up to three months. When you’re ready to eat, thaw it in the fridge overnight. Then, reheat using the tips above. Enjoy your delicious salmon whenever you wish! For the full recipe, check out the section above. The best way to check if salmon is done is by using a fork. Gently flake the salmon at the thickest part. If it flakes easily, it’s ready. You can also use a meat thermometer. The internal temperature should reach 145°F (63°C). If you don't have a thermometer, look for a bright pink color. It should not be translucent. Yes, you can prepare Honey Teriyaki Glazed Salmon in advance. Marinate the salmon fillets in the teriyaki glaze for up to 2 hours. After marinating, you can cook it right away or store it in the fridge. You can also cook it ahead and reheat it later. Just keep the cooked salmon in an airtight container. You can store leftover Honey Teriyaki Glazed Salmon in the fridge for up to 3 days. Make sure it’s in an airtight container to keep it fresh. If you want to keep it longer, freeze the salmon. It can last up to 2 months in the freezer. When ready to eat, thaw it in the fridge overnight before reheating. For the full recipe, refer to the earlier section. Honey teriyaki glazed salmon is a tasty dish everyone can enjoy. We covered ingredients, preparation, and cooking methods. You learned how to create a perfect glaze and adjust cooking times. We also shared tips for serving and storing leftovers. Try different marinades or even other proteins for variety. This dish is easy and fun to make. Enjoy your cooking adventure!

Honey Teriyaki Glazed Salmon Flavorful and Easy Recipe

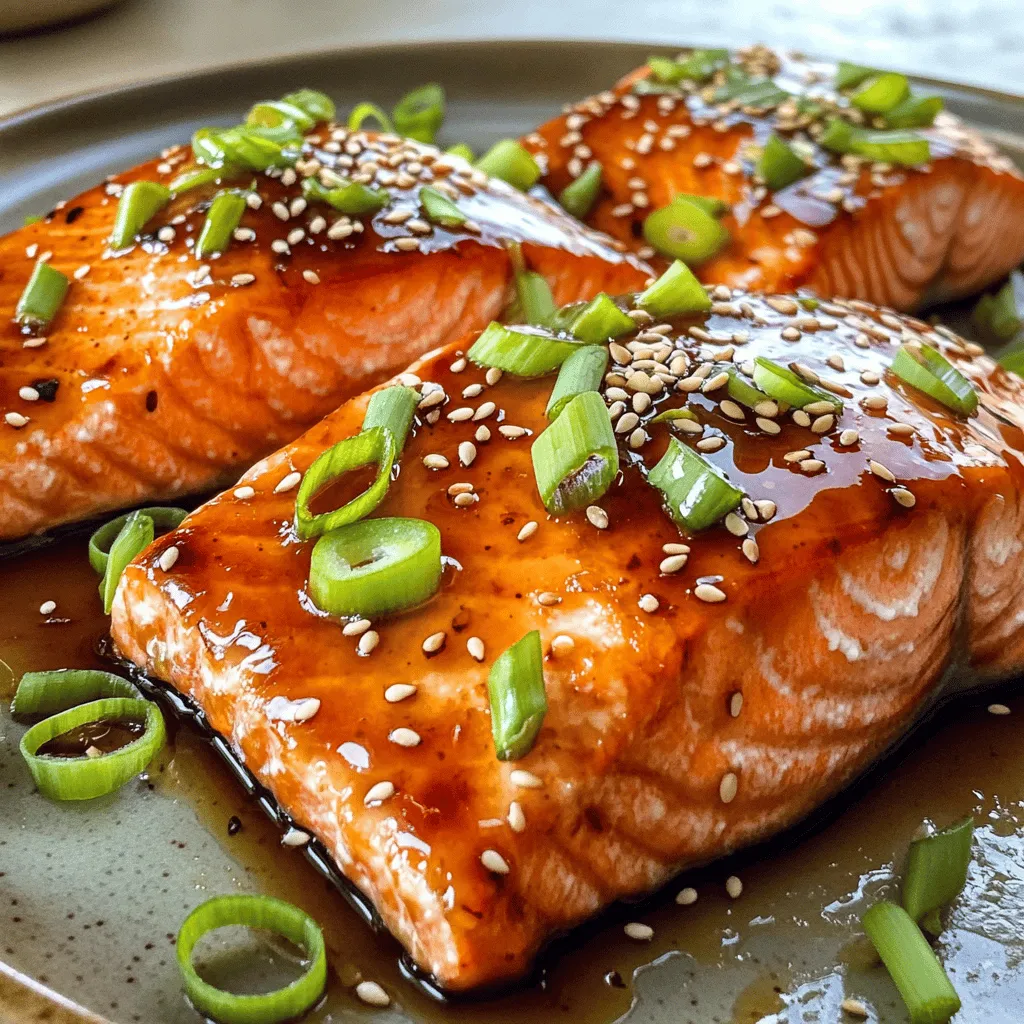
Are you ready to impress your taste buds with a dish that’s both easy and delicious? My Honey Teriyaki Glazed

- 2 cups cooked chicken, shredded - 1 cup frozen mixed vegetables (peas, carrots, corn) - 1 cup cream of chicken soup - 1 cup chicken broth - 1 teaspoon garlic powder - 1 teaspoon onion powder - 1 teaspoon dried thyme - 1 cup cheddar cheese, shredded - 1 package refrigerated pie crusts (2 crusts) - Salt and pepper to taste - 2 tablespoons fresh parsley, chopped (for garnish) To make chicken pot pie casserole, you begin with your main star: chicken. I love using cooked chicken because it saves time. You can shred it easily. Next, add frozen mixed vegetables. They bring color and texture. I often use peas, carrots, and corn for a nice blend. For creaminess, we need cream of chicken soup and chicken broth. These ingredients create a rich sauce. Don't forget the seasonings! Garlic powder, onion powder, and dried thyme add great flavor. Lastly, we have cheddar cheese. It melts beautifully and gives a nice, cheesy taste. The pie crusts are essential for that classic pot pie feel. They form the base and top, creating a perfect, flaky crust. - Cream of chicken soup alternatives: Use homemade white sauce or dairy-free options like coconut cream. - Cheddar cheese alternatives: Try mozzarella for a mild taste or pepper jack for some heat. These substitutions keep your casserole tasty while catering to your diet. You can mix and match based on what you have at home. - Casserole dish - Mixing bowl - Oven For tools, you'll need a casserole dish. A 9x13 inch dish works great. It holds all the filling and crust well. A mixing bowl is also key for combining all your ingredients. Finally, the oven does the magic. Preheating it ensures that your casserole bakes evenly. Gather these items, and you're ready to create a delicious chicken pot pie casserole. For the full recipe, check out the details above. First, preheat your oven to 375°F (190°C). This step is key to getting a crispy crust. Next, gather your chicken and vegetables. If you have cooked chicken, shred it into bite-sized pieces. For the veggies, I like to use a mix of peas, carrots, and corn from the freezer. They save time and add great color. In a large mixing bowl, combine the shredded chicken and frozen vegetables. Add the cream of chicken soup and chicken broth. Sprinkle in garlic powder, onion powder, and thyme. Mix everything well until all the ingredients coat each other evenly. Don't forget to season with salt and pepper to taste. For an extra cheesy touch, fold in half of the shredded cheddar cheese. Take one pie crust from your package and roll it out. Place it in a 9x13 inch casserole dish. Gently press it into the bottom and sides. Now, pour the chicken mixture over the crust, spreading it evenly. Roll out the second pie crust and cover the filling. Seal the edges by crimping them with a fork or your fingers. Cut a few slits in the top crust for steam to escape. Finally, sprinkle the remaining cheddar cheese on top for that golden finish. Place your casserole in the preheated oven. Bake for 30-35 minutes, or until the crust turns golden brown and the filling bubbles. Once it’s done, take it out of the oven and let it sit for about 10 minutes. This resting time helps the filling set. Before serving, garnish with fresh parsley for a pop of color. Enjoy your Chicken Pot Pie Casserole! For the complete recipe, see the Full Recipe section. To get that golden crust, start by using a good-quality pie crust. Roll it out evenly. Before baking, brush the top with an egg wash. This gives a nice shine. For flavor enhancements, add a pinch of smoked paprika or cayenne pepper. This adds warmth without overpowering the dish. Fresh herbs like thyme or rosemary can also boost flavor. Overfilling the crust can lead to mess. Make sure to leave some space at the top for the filling to expand. Not sealing the edges properly can cause leaks. Crimp or pinch the edges well. This keeps the filling inside and makes it look nice. Pair your casserole with a fresh green salad. The crunch balances the creamy filling. You can also serve it with warm bread for a hearty meal. For plate presentation, cut the casserole into squares before serving. Garnish with chopped parsley for color. This makes it look inviting and delicious. For the full recipe, check out the details provided above. Enjoy your cooking! {{image_2}} You can easily swap chicken for turkey or beef. Turkey gives a nice, rich taste. It works well for holiday meals or when you have leftovers. Beef can add a hearty touch, making the dish more filling. Just cook it until brown before adding to the casserole. For a vegetarian option, use hearty vegetables or beans. Chickpeas, lentils, or even mushrooms work great. They add protein and flavor while keeping the dish meat-free. Change up the seasonings to suit your taste. Instead of thyme, try rosemary or sage. These herbs add a different twist to the flavor. You can also mix in some dried herbs like basil or oregano for a fresh touch. Adding spices can elevate your casserole too. A pinch of paprika or cayenne pepper gives a nice kick. If you like it spicy, add some crushed red pepper. For a sweeter note, try a hint of nutmeg. You can cook this casserole in different ways. If you prefer a slow cooker, set it on low for about 6 hours. Just mix all ingredients and let it cook. This method makes the chicken super tender. For a quick meal, use an Instant Pot. Cook on high pressure for about 10 minutes. Then, use a quick release to save time. Both methods retain the flavor and make dinner easy. For more details, check the Full Recipe for a tasty chicken pot pie casserole. To keep your chicken pot pie casserole fresh, store it properly. First, let it cool to room temperature. Then, place it in an airtight container. You can refrigerate it for up to three days. If you want to keep it longer, freeze it. Wrap the casserole tightly in plastic wrap and then in foil. This can last for up to three months in the freezer. When you’re ready to enjoy leftovers, reheat them correctly. The best way is to use the oven. Preheat your oven to 350°F (175°C). Place the casserole in a baking dish and cover it with foil. Heat for about 25-30 minutes or until warmed through. You can also use a microwave, but the oven keeps the crust crispy. In the fridge, your chicken pot pie casserole lasts for about three days. After that, it may spoil. Check for signs like a sour smell or mold. If you see any of these, it’s best to toss it out. Always trust your nose and eyes when checking food! You can make your own soup at home. Combine chicken broth, milk, and flour. Stir until smooth and cook until thick. This gives you a fresh, tasty alternative. If you prefer store-bought options, you can use cream of mushroom soup. It adds a unique flavor and works well in this recipe. Yes, you can! Puff pastry is a great choice. It adds a flaky and light texture. Just roll it out and place it over the filling. Biscuit dough is another option. It gives a nice, soft topping. Just flatten it and lay it over the filling before baking. Look for a golden crust on top. This is a good sign that it’s ready. You should also see bubbling around the edges. To check the filling temperature, use a food thermometer. The center should read at least 165°F (74°C) to ensure it’s safe to eat. Absolutely! You can prepare the filling a day before. Store it in the fridge until you're ready to bake. To assemble before baking, roll out the pie crusts and layer them in your dish. Then, add the filling. Cover it with plastic wrap and refrigerate until needed. Just remember to take it out to warm up a bit before baking. For the full recipe, check the earlier section! This blog post covered everything you need to make a great casserole. We discussed essential ingredients, optional substitutes, and the tools you need. I shared step-by-step instructions to help you cook successfully. We explored tips for perfecting your dish and common mistakes to avoid. Lastly, I offered storage info and answered FAQs. Remember, you can always customize your casserole with different proteins and flavors. Enjoy the cooking process, and have fun creating your perfect casserole!

Chicken Pot Pie Casserole Flavorful and Simple Recipe

Are you craving comfort food that’s both delicious and easy to make? Look no further! My Chicken Pot Pie Casserole

- 1 cup unsalted butter, softened - 4 cloves garlic, minced - 2 tablespoons fresh parsley, finely chopped - 1 tablespoon fresh chives, finely chopped - 1 tablespoon fresh thyme leaves - 1 teaspoon lemon zest - 1 teaspoon sea salt - 1/2 teaspoon black pepper When making garlic herb butter, the key is to use fresh ingredients. Start with unsalted butter. This lets you control the saltiness. Next, garlic adds a rich flavor. You can use more or less based on your taste. Fresh herbs like parsley, chives, and thyme give the butter a vibrant taste. They also add color. Lemon zest brightens the mix, making it lively and fresh. Sea salt and black pepper round out the flavor. - Assorted bread options (baguette, sourdough, etc.) - Fresh vegetable sticks (carrots, cucumbers, bell peppers) For serving, choose a variety of breads. Crusty baguette or soft sourdough works well. You can also add fresh vegetable sticks. Carrots, cucumbers, and bell peppers add crunch and freshness. They are perfect for dipping into the garlic herb butter. This makes for a fun and interactive meal that everyone can enjoy. You can find the Full Recipe for more details on making this tasty dish! Start by gathering your ingredients. In a medium bowl, combine 1 cup of softened unsalted butter, 4 cloves of minced garlic, 2 tablespoons of finely chopped fresh parsley, 1 tablespoon of finely chopped chives, 1 tablespoon of fresh thyme leaves, 1 teaspoon of lemon zest, 1 teaspoon of sea salt, and 1/2 teaspoon of black pepper. Using a fork or spatula, mix all the ingredients together until they blend well. You want to see the garlic and herbs spread evenly throughout the butter. This step is key to making your garlic herb butter tasty. Once your butter mixture is ready, it’s time to shape it. Transfer the mixture onto a wooden serving board or a clean platter. You can shape it into a rustic block or simply spread it out nicely. To add a fun touch, use the back of a spoon to create swirls and peaks in the butter. This gives it a lovely texture that looks inviting. Remember, you eat with your eyes first! For a little extra flair, you can drizzle some olive oil over the top of the butter. This adds flavor and makes it shine. You might also sprinkle some extra herbs for garnish. These small details can make a big difference. Serve your garlic herb butter alongside slices of assorted bread and fresh vegetable sticks. Trust me, the combination will make everyone smile. To make the best garlic herb butter, start with room temperature butter. This helps the butter blend smoothly with the herbs. You can use a mix of fresh and dried herbs. Fresh herbs give a bright taste, while dried herbs add depth. When serving, arrange herbs and whole garlic cloves around the butter. This makes your dish look colorful and inviting. Use attractive serving dishes too. A beautiful platter can make your butter board shine. Serve the garlic herb butter at room temperature. This makes it easy to spread on bread. Pair it with wine for a classy touch. A nice white wine or light red goes well with the flavors. {{image_2}} You can make your garlic herb butter even more exciting. Try adding different herbs like basil or dill. These herbs give new flavors and scents. You can also mix in spices such as smoked paprika or cayenne pepper. This adds warmth and a kick to your butter. Experimenting with these options keeps your butter fresh and fun. Garlic herb butter is not just for bread. You can use it as a spread for grilled meats or vegetables. This adds a burst of flavor to your dishes. You can also mix it into pasta for a rich and creamy sauce. The butter melts into the pasta, creating a tasty experience. If you prefer a plant-based option, swap unsalted butter for vegan butter alternatives. They work well and taste great, too! You can also adjust the salt content if you want lower sodium options. This makes your garlic herb butter fit your dietary needs while still being delicious. For the full recipe, check out the Garlic Herb Butter Board! You can store leftover garlic herb butter easily. Place it in an airtight container. Keep it in the fridge for up to two weeks. This helps maintain its fresh taste. If you want to store it longer, freeze it. Use small portions, like in ice cube trays. This makes it simple to use later. What should you do with extra chopped herbs or garlic? You can add them to sauces for extra flavor. They work well in dressings too. Mix them into pasta sauces or drizzle them over salads. This way, nothing goes to waste, and you add more taste to your meals. To make Garlic Herb Butter, start with soft butter. You need one cup of unsalted butter. Then, add four cloves of minced garlic. Next, mix in two tablespoons of finely chopped parsley. Add one tablespoon each of chopped chives and thyme. Don't forget one teaspoon of lemon zest, one teaspoon of sea salt, and half a teaspoon of black pepper. Use a fork to blend everything well. You want the garlic and herbs spread evenly. Garlic Herb Butter pairs great with many foods. Serve it with assorted breads like baguette or sourdough. You can also use fresh vegetable sticks such as carrots, cucumbers, and bell peppers. These make a nice, crunchy contrast to the rich butter. Absolutely! You can change the herbs or add spices. If you like a kick, try smoked paprika or cayenne pepper. For a different taste, mix in basil or dill. Feel free to adjust the salt to your liking too. Garlic Herb Butter can last up to two weeks in the fridge. Store it in an airtight container. You can also freeze it for longer use. Just cut it into portions before freezing. This way, you can enjoy it anytime! For the full recipe, check out the complete list of ingredients and instructions. Garlic Herb Butter adds flavor to many dishes with simple ingredients. You learned to mix butter, garlic, and fresh herbs for a tasty spread. You can serve it with bread and veggies for a snack. Remember, you can try different herbs and adjust the recipe to your taste. Storing leftovers is easy and keeps it fresh for weeks. Enjoy creating your own unique versions of this delicious butter to impress your family and friends!

Garlic Herb Butter Board Delicious and Easy Recipe

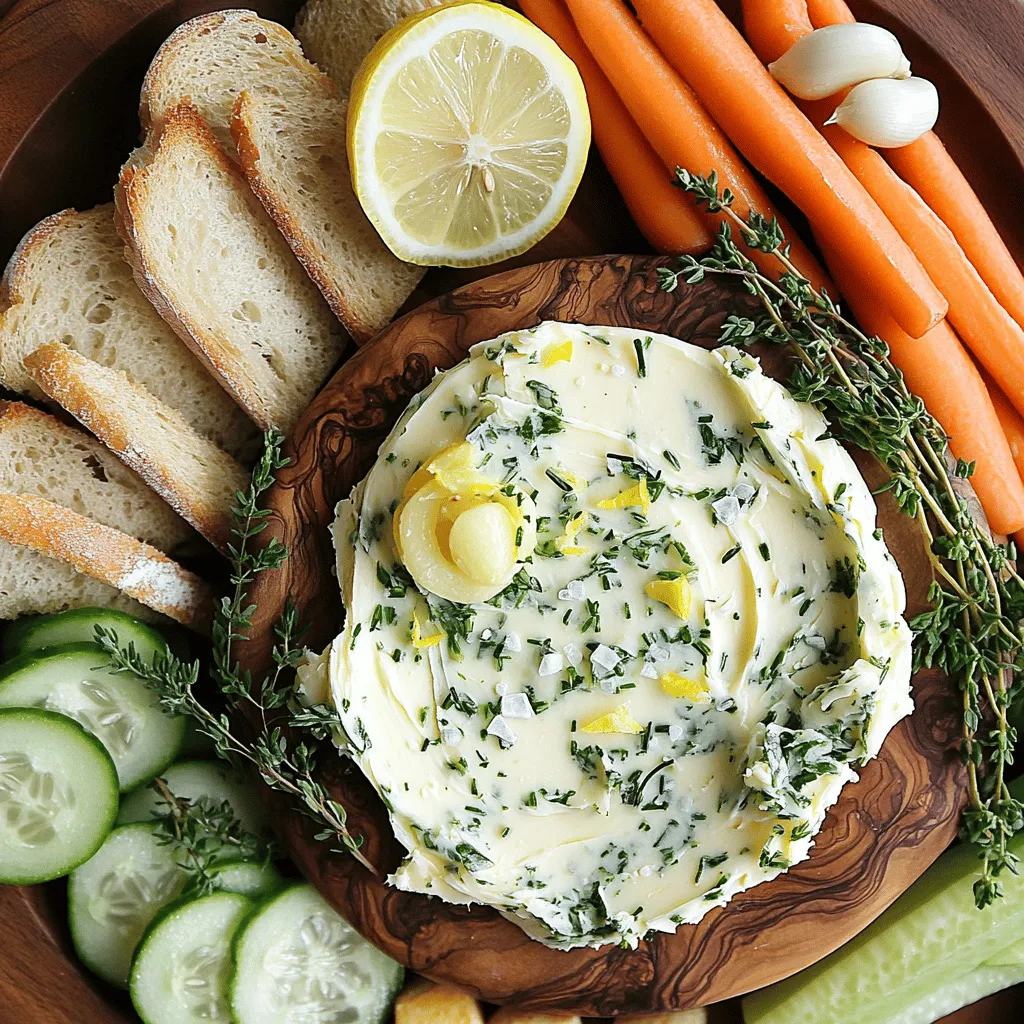
Are you ready to elevate your appetizer game? This Garlic Herb Butter Board is a delicious and easy recipe that

- 1 can (15 oz) black beans, rinsed and drained - 1 can (15 oz) corn, drained - 1 red bell pepper, diced - 1 green bell pepper, diced Black beans bring protein and fiber, making this salad filling. Corn adds a sweet crunch. Using both red and green bell peppers adds color and taste. Each bite bursts with flavor. - 1 small red onion, finely chopped - 1 cup cherry tomatoes, halved - 1 avocado, diced Red onion gives a sharp taste that balances the salad. Cherry tomatoes add juicy sweetness. Avocado contributes creaminess and healthy fats. Together, these ingredients create a vibrant mix. - 2 tablespoons lime juice - 1 tablespoon olive oil - 1 teaspoon ground cumin - 1 teaspoon chili powder - Salt and pepper to taste The dressing ties everything together. Lime juice brings brightness, while olive oil adds richness. Cumin and chili powder add a warm spice. Season with salt and pepper for the perfect blend. For the full recipe, click [Full Recipe]. First, grab a large mixing bowl. In this bowl, combine the rinsed black beans and drained corn. These two ingredients start our salad with great flavor and texture. Next, add the diced red bell pepper and green bell pepper. They bring a nice crunch and bright color. Then, toss in the finely chopped red onion and halved cherry tomatoes. These veggies add sweetness and depth to the dish. Finally, gently fold in the diced avocado and chopped cilantro. Be careful not to mash the avocado; you want nice chunks for a creamy bite. Now, let’s make the dressing. In a small bowl, whisk together the lime juice and olive oil. This adds zest and richness. Next, add ground cumin and chili powder. These spices give our salad that Southwest kick. Whisk until the mixture is smooth and well combined. Taste it and adjust if needed. You may want a little more lime juice or salt. This dressing is key to bringing all the flavors together. Pour the dressing over the salad mixture. Use a large spoon to toss everything gently. You want all the ingredients coated but not broken apart. After mixing, taste the salad. Adjust the seasoning with more salt, pepper, or lime juice as desired. For the best flavor, chill the salad in the refrigerator for at least 30 minutes. This allows the tastes to meld together. Serve it in a colorful bowl for a beautiful presentation. Enjoy your fresh and flavorful Southwest Black Bean Salad! For the full recipe, check out the [Full Recipe]. To make your Southwest Black Bean Salad shine, think bright colors. Serve it in a large bowl. A colorful bowl adds to the fun. You can also layer it in a glass dish for a neat look. Garnishing makes a big difference. Add fresh cilantro leaves on top. You might squeeze some lime wedges around the bowl, too. This adds a fresh touch and a pop of color. For extra flavor, consider spices. Ground cumin and chili powder are great choices. They add warmth and depth. You can also try smoked paprika for a smoky twist. Fresh herbs can lift the dish. Cilantro is a must, but don’t forget about fresh parsley or green onions. They add brightness and flavor. Be careful not to over-mix the salad. Gentle folding keeps the avocado intact. It makes the salad look pretty, too. Also, don't skip chilling it. Letting the salad sit for 30 minutes helps the flavors blend. It makes every bite tasty. Enjoy your Southwest Black Bean Salad with these tips in mind! {{image_2}} You can add protein to your Southwest black bean salad in several ways. Grilled chicken or shrimp makes a great addition. Just cook the meat, let it cool, and chop it up. Toss it in with the salad for a hearty meal. If you prefer vegetarian options, try adding diced tofu or roasted chickpeas. They will give you the protein boost you need without meat. Don't be afraid to swap ingredients in this salad. You can use different beans if you want. Navy beans or pinto beans work well too! They add their own flavor and texture. Try using a different dressing to change the taste. A tangy vinaigrette or a creamy avocado dressing can make it special. Experiment with what you have and find your favorites! This salad shines with Southwestern flavors, but you can give it a global twist. Add some fresh mango for a tropical vibe or sprinkle in feta cheese for a Mediterranean touch. You could even mix in some Asian flavors by adding sesame oil and chopped peanuts. The possibilities are endless! Your salad can tell a story through its ingredients. For the full recipe, check out the link above! To keep your Southwest Black Bean Salad fresh, store it in an airtight container. This method helps keep moisture in and air out. It stays good for about 3 to 5 days in the fridge. Always check for any signs of spoilage before eating. Yes, you can freeze this salad! However, I recommend freezing only the beans and corn mix. The fresh veggies may lose their crunch. To freeze, place the mix in a freezer-safe bag. For reheating, let it thaw overnight in the fridge. Heat in the microwave for a minute or two before serving. You can easily repurpose leftovers. Use them as a filling for tacos or burritos. Toss them with cooked quinoa for a hearty bowl meal. You can also make meal prep a breeze by packing portions in containers. This way, you have a quick lunch or snack ready to go! A Southwest Black Bean Salad is a fresh dish packed with flavor. It often includes black beans, corn, and bell peppers. You can also find red onion, cherry tomatoes, and avocado in it. Each ingredient adds a tasty touch. This salad is colorful and nutritious. It's perfect as a side or a light meal. You can make it even better by adding lime juice and spices. Check out the Full Recipe for all the details. If you love heat, there are many ways to spice up your salad. You can add diced jalapeños or serrano peppers for a kick. Another option is to sprinkle in some cayenne pepper or hot sauce. You might also try using chipotle powder for a smoky flavor. Remember to start small. You can always add more heat if needed. Taste as you go to find the right balance that suits you. Yes, you can easily make this salad ahead of time. It holds up well in the fridge. Just keep in mind a few tips for best results. Prepare the salad and let it chill for about 30 minutes. This helps the flavors blend. If you want to make it a day early, store the dressing separately. Mix it in right before serving. This way, the veggies stay fresh and crisp. Enjoy your meal prep! This blog post explored how to make a delicious Southwest Black Bean Salad. You learned about the key ingredients like black beans, corn, and fresh vegetables. We covered simple steps for preparation, mixing, and assembling. You also discovered helpful tips for serving, enhancing flavors, and avoiding common mistakes. Lastly, we discussed storage options and variations for a unique twist. Try this salad to enjoy fresh flavors, and feel free to experiment with new ingredients. Happy cooking!

Southwest Black Bean Salad Fresh and Flavorful Dish

Are you ready to brighten your meal with a burst of fresh flavors? This Southwest Black Bean Salad is your

- 1 cup all-purpose flour - 1/2 cup granulated sugar - 1/2 teaspoon baking powder - 1/4 teaspoon baking soda - 1/4 teaspoon salt - 1/2 teaspoon ground cinnamon - 1/4 cup unsweetened applesauce - 1/4 cup milk - 1 large egg - 2 tablespoons melted butter - 1/2 teaspoon vanilla extract - 1/4 cup granulated sugar (for coating) - 1 tablespoon ground cinnamon (for coating) Baked cinnamon sugar donut holes are a treat that you can make with simple ingredients. You start with all-purpose flour, which gives the donut holes their light and fluffy texture. The granulated sugar adds sweetness, while the baking powder and baking soda help them rise. A pinch of salt balances the flavors, and cinnamon gives that warm, cozy taste. In the wet ingredients, we use unsweetened applesauce. This not only adds moisture but also keeps the donuts soft. Milk, a large egg, melted butter, and vanilla extract round out the mixture, giving it a rich flavor. For the coating, we combine granulated sugar and ground cinnamon. This mix creates a sweet and spicy crust that makes each bite irresistible. If you want the full recipe, check out the complete guide to making these treats. - Preheat your oven to 350°F (175°C). - Grease a mini muffin tin with non-stick spray. - In a medium bowl, mix together the following dry ingredients: - 1 cup all-purpose flour - 1/2 cup granulated sugar - 1/2 teaspoon baking powder - 1/4 teaspoon baking soda - 1/4 teaspoon salt - 1/2 teaspoon ground cinnamon - In another bowl, whisk together: - 1/4 cup unsweetened applesauce - 1/4 cup milk - 1 large egg - 2 tablespoons melted butter - 1/2 teaspoon vanilla extract - Mix until smooth and well combined. - Gradually add the wet mixture to the dry mix. Stir gently until just combined. - Spoon the batter into the prepared muffin tin. Fill each cup about 3/4 full. - Bake for 10-12 minutes. Check if they are done by inserting a toothpick into the center. It should come out clean. - While the donut holes bake, prepare the coating. Mix together: - 1/4 cup granulated sugar - 1 tablespoon ground cinnamon - Once the donut holes are done, let them cool for 5 minutes in the pan. Then, transfer them to a wire rack. - While they are still warm, toss each donut hole in the cinnamon sugar mixture. Coat them well for that perfect sweet touch. For the full recipe, check out the detailed instructions above! To get fluffy donut holes, avoid overmixing the batter. Mix just until the wet and dry ingredients come together. Overmixing can lead to dense donut holes. Use a mini muffin tin for even baking. This helps them cook uniformly and rise nicely. Fill each cup about 3/4 full to allow room for them to puff up. You can present donut holes in fun ways. Try arranging them in a cute basket lined with parchment paper. Dust them with extra cinnamon sugar for a lovely touch. You can also serve them with warm chocolate or vanilla dipping sauce. This adds a new flavor that kids and adults will love. To keep leftover donut holes fresh, store them in an airtight container. Place a piece of paper towel inside. This absorbs moisture and keeps them soft. For reheating, pop them in the microwave for a few seconds. This will bring back the warm, soft texture. Enjoy your delicious Baked Cinnamon Sugar Donut Holes with these tips, and check the Full Recipe for more details! {{image_2}} You can change the flavor of your donut holes easily. Try substituting the applesauce with mashed banana or pumpkin puree. Both options add moisture and a unique taste. You can also experiment with spices. Instead of just cinnamon, try adding nutmeg, cardamom, or ginger. Each spice gives a new twist to your donut holes. For those who need gluten-free options, use a gluten-free flour blend. This will keep the texture light and fluffy. If you want to make the recipe vegan, swap the egg for a flax egg. Just mix one tablespoon of ground flaxseed with three tablespoons of water. Let it sit for a few minutes until it thickens. You can also use plant-based milk in place of regular milk. Baked cinnamon sugar donut holes are great for any season. In fall, you might add pumpkin puree or spices like nutmeg. During the winter, try incorporating peppermint extract for a festive flair. You can even fold in seasonal fruits, like diced apples in autumn or fresh cranberries in winter. These variations make your snack fun and exciting throughout the year. For the complete recipe, check out the Full Recipe section to create your perfect donut holes! Each donut hole has about 70 calories. The main nutrients include: - Carbohydrates: 10 grams - Fat: 3 grams - Protein: 1 gram This recipe makes 24 donut holes, perfect for sharing or enjoying over a few days. Using applesauce is a great way to cut back on sugar. It adds moisture and sweetness without the calories of white sugar. Applesauce also has vitamins and minerals that support good health. The fiber in applesauce helps with digestion, making these donut holes a smarter choice than fried ones. To enjoy these treats without overindulging, stick to 1-2 donut holes per serving. This keeps your calorie intake balanced and lets you savor the flavor. You can always save some for later! If you don't have a mini muffin pan, use a regular muffin pan. Fill each cup halfway. This works well, but your donut holes will be larger. You can also use silicone molds. They release easily and shape the donuts perfectly. Yes, you can freeze these tasty treats! Allow them to cool completely. Place them in an airtight container or zip-top bag. They will last for about three months in the freezer. When you want to eat them, thaw at room temperature or warm them in the oven at 350°F for a few minutes. For a vegan option, use flaxseed meal or chia seeds. Mix one tablespoon of either with three tablespoons of water. Let it sit for five minutes until it thickens. This substitute keeps the donut holes moist, though they may be a bit denser. These donut holes stay fresh for about three days at room temperature. Store them in an airtight container to keep them soft. You can also refrigerate them to extend their shelf life, but they may lose some fluffiness. This blog post covered everything you need to make tasty baked cinnamon sugar donut holes. We discussed the key ingredients, step-by-step instructions, and helpful tips for great results. You learned about flavor variations and how to store the leftovers. Remember, using applesauce is a smart way to cut sugar and add moisture. Try different spices and ingredients to make your own version. With these easy steps, you can enjoy fresh, warm treats anytime!

Baked Cinnamon Sugar Donut Holes Irresistible Snack

Craving a sweet treat that’s easy to make and packed with flavor? Look no further! These baked cinnamon sugar donut

- 4 medium sweet potatoes - 1 lb ground turkey or beef - 1 can black beans, drained and rinsed - 1 cup corn, frozen or fresh - 1 packet taco seasoning - 1 cup diced tomatoes - 1/2 cup chopped red onion - 1 cup shredded cheese (cheddar or a Mexican blend) - 1 avocado, diced - Fresh cilantro, for garnish - Sour cream or Greek yogurt, for topping (optional) - Salt and pepper, to taste I love using sweet potatoes as the base for this dish. They are sweet and filling. They pair well with the spicy taco filling. You only need a few main ingredients to make this meal shine. Ground turkey or beef works great here. I always add black beans for protein and fiber. Frozen or fresh corn adds a nice crunch. Taco seasoning brings all the flavors together. Diced tomatoes add moisture and freshness. For toppings, I suggest chopped red onion for a zing. Shredded cheese adds creaminess, while diced avocado gives a rich texture. Fresh cilantro adds a lovely herbal note. If you want, a dollop of sour cream or Greek yogurt can cool the heat. With these ingredients, you can create a hearty meal. For the full recipe, check out the detailed instructions and cooking tips. - Preheat the oven to 400°F (200°C). - Wash the sweet potatoes thoroughly. Pierce each potato several times with a fork. Place them on a baking sheet. Bake for 45 to 60 minutes, until they are soft. - Heat a large skillet over medium heat. Add the ground turkey or beef. Brown the meat, breaking it into small bits. - Once the meat is cooked, drain any fat from the pan. Add the taco seasoning, black beans, corn, and diced tomatoes. Stir well and cook for 5 to 7 minutes. Make sure everything is hot and mixed well. Season with salt and pepper to taste. - When the sweet potatoes are done, take them out of the oven. Let them cool a bit. Slice each sweet potato in half lengthwise. Scoop out some flesh to create a small well. - Fill each sweet potato half with the taco mixture. Top them with shredded cheese. - Put the stuffed sweet potatoes back in the oven. Bake for 10 more minutes, or until the cheese is melted and bubbly. This recipe makes a tasty and satisfying meal that everyone will love. For the full recipe, check the detailed instructions above. To know when sweet potatoes are done, check for softness. Poke them with a fork. If it goes in easily, they are ready. The skins should look a bit wrinkled and shiny. This shows they are cooked fully. For a creamy texture, try baking them whole. This method keeps moisture inside. After baking, let them cool slightly. Then scoop out the flesh and mix it with some butter or olive oil. This adds richness to your dish. To add more flavor, use spices like cumin or paprika. You can also add garlic powder for a nice kick. Fresh herbs like oregano can enhance the taste too. For toppings, think outside the box. You can use salsa, jalapeños, or even pickled onions. Each adds a unique twist. If you want more crunch, try crushed tortilla chips on top. These stuffed sweet potatoes pair well with a simple salad. A side of black bean corn salsa also complements the flavors. If you want a heartier meal, serve them with rice or quinoa. For meal prep, make extra filling. Store it in the fridge for quick meals later. Leftover sweet potatoes can be reheated in the oven or microwave. They still taste great the next day! For the full recipe, check out the detailed instructions provided above. {{image_2}} You can change the protein in Taco Stuffed Sweet Potatoes to fit your taste. If you want a vegetarian dish, try using lentils or tempeh. Both options are high in protein and add a nice texture. You can cook the lentils with taco seasoning for a flavor boost. If you prefer meat, consider using chicken or turkey. Ground chicken is lean and tasty. If you want to swap the sweet potatoes, use other vegetables. Zucchini or bell peppers work well. They add color and flavor. You can also make this meal gluten-free. Just check the taco seasoning label to ensure it fits your needs. For a dairy-free option, skip the cheese. Use avocado or a vegan yogurt instead. Adding different cheeses or spices can elevate your dish. Try pepper jack cheese for a spicy kick. You can also mix in seasonal veggies like spinach or bell peppers. These will add freshness and crunch. Experiment with spices too. Adding cumin or smoked paprika can enhance the taco flavor. For the full recipe, check out the detailed instructions above. To keep your taco stuffed sweet potatoes fresh, store them in the fridge. Place them in an airtight container. This limits air exposure and keeps the flavors intact. Always allow the potatoes to cool before sealing them. They can last for about 3 to 4 days in the fridge. To reheat without losing texture, use the oven. Preheat your oven to 350°F (175°C). Place the stuffed sweet potatoes on a baking sheet. Heat for about 15 to 20 minutes, or until warm. You can also use the microwave for quicker reheating. Just be careful, as the texture may change a bit. To keep them tasting fresh, add a sprinkle of cheese before reheating. Yes, you can freeze taco stuffed sweet potatoes! To freeze, wrap each potato tightly in plastic wrap. Then, place them in a freezer-safe bag. They can stay fresh for up to 3 months. When you're ready to eat, thaw them in the fridge overnight. After thawing, follow the reheating instructions to warm them up. This method keeps the flavors and textures close to fresh. You can serve many tasty sides with Taco Stuffed Sweet Potatoes. Here are some ideas: - A fresh green salad with lime dressing. - Mexican rice or quinoa for extra carbs. - Homemade guacamole or salsa for dipping. - Corn on the cob for a sweet crunch. These sides add flavor and balance to your meal. Yes, you can make Taco Stuffed Sweet Potatoes ahead of time. Cook the sweet potatoes and filling as normal. Then, store them separately in the fridge. When you're ready to eat, just fill the potatoes and bake them. This makes meal prep easy and can save time on busy days. Taco Stuffed Sweet Potatoes are healthy and filling. Here's a quick look at the nutritional info per serving: - Calories: About 400-500 - Protein: 25-30 grams - Carbohydrates: 50-60 grams - Fiber: 10-15 grams - Fat: 15-20 grams (depending on cheese and toppings) These potatoes offer plenty of nutrients without sacrificing taste. Making Taco Stuffed Sweet Potatoes dairy-free is simple. Just skip the cheese on top. Instead, use avocado or a dairy-free yogurt as a topping. You can also add more veggies or beans for creaminess. This way, you still enjoy a delicious meal without dairy. The best cheese for Taco Stuffed Sweet Potatoes is shredded cheddar or a Mexican blend. These cheeses melt well and add great flavor. If you want a stronger taste, try pepper jack cheese. Remember, you can also use dairy-free cheese if needed. For the full recipe, check out the complete guide. Taco stuffed sweet potatoes are a fantastic meal choice. We covered tasty ingredients, cooking steps, and helpful tips. You can customize them with your favorite proteins and toppings. This dish is not only delicious but also healthy and great for meal prep. Enjoy making this simple recipe that satisfies everyone at the table. With these ideas, you can create your own perfect taco stuffed sweet potatoes. Happy cooking!

Taco Stuffed Sweet Potatoes Flavorful and Filling Dish

Looking for a delicious twist on classic tacos? Taco Stuffed Sweet Potatoes combine hearty flavors with healthy ingredients. This dish

- 1 lb asparagus, trimmed - 3 tablespoons olive oil - 4 cloves garlic, minced - 1 teaspoon lemon zest - 2 tablespoons lemon juice - Sea salt and black pepper - 1/4 teaspoon red pepper flakes (optional) - Fresh parsley for garnish Lemon Garlic Roasted Asparagus is a simple and fresh dish. The main stars are the asparagus, olive oil, and garlic. These ingredients come together to create a bright flavor. Each ingredient plays a key role. The asparagus should be fresh and crisp. When you trim it, cut off the tough ends. This makes the dish more enjoyable. The olive oil adds richness, while the garlic gives a strong taste. I love using minced garlic for its bold flavor. Lemon adds that zesty kick. The zest and juice work together to brighten the dish. Sea salt and black pepper enhance all the flavors. You can adjust these to suit your taste. If you like a bit of heat, add red pepper flakes. They are optional but delicious. Fresh parsley is perfect for a colorful finish. It adds a nice touch to the plate. For the full recipe, check the details above. This dish is easy to make and a great addition to any meal. Enjoy the simple goodness! - Preheat the oven to 425°F (220°C). - Rinse the asparagus under cold water. - Trim the tough ends of the asparagus, about 1-2 inches. - Gather your other ingredients: olive oil, garlic, lemon zest, lemon juice, and spices. - In a large mixing bowl, combine 3 tablespoons of olive oil and 4 minced garlic cloves. - Add 1 teaspoon of lemon zest and 2 tablespoons of lemon juice. - Season the mixture with 1 teaspoon of sea salt, 1/2 teaspoon of black pepper, and 1/4 teaspoon of red pepper flakes, if you like some heat. - Stir everything well until it forms a smooth sauce. - Toss the trimmed asparagus in the lemon garlic sauce. - Make sure each piece is evenly coated. - Line a baking sheet with parchment paper. - Spread the asparagus in a single layer on the sheet. - Roast in the preheated oven for 12-15 minutes. - The asparagus should be tender and a bit crispy at the tips. This simple dish is bright, fresh, and full of flavor. If you want to see the complete recipe with measurements, check out the [Full Recipe]. How to choose fresh asparagus When picking asparagus, look for bright green spears. The tips should be tight and firm. Avoid any that look wilted or have a strong odor. Fresh asparagus should snap when you bend it. This ensures you get the best flavor and texture. Tips for roasting for the perfect texture Roasting asparagus at 425°F gives it a nice crispness. Spread the spears in a single layer on the baking sheet. This allows them to cook evenly. Overcrowding can cause steaming, making them soggy. Roast for 12-15 minutes, until they're tender at the base and slightly crispy at the tips. Adding cheese or nuts for extra richness For a creamy touch, sprinkle some grated Parmesan cheese on top before roasting. If you prefer crunch, toss in some chopped nuts like almonds or walnuts. These additions add great texture and depth to your dish. Using fresh vs. dried herbs Fresh herbs like parsley or thyme brighten the flavors of the asparagus. Dried herbs work well, too. If using dried herbs, use less since they are more potent. Fresh herbs give a nice pop and aroma that dried can’t match. Pairing with main dishes Lemon garlic roasted asparagus pairs well with many main dishes. Try it with grilled chicken, fish, or even a hearty steak. It adds a fresh element to any meal, balancing rich flavors. Creating a balanced meal Consider adding a grain like quinoa or rice to your plate. This adds fiber and makes the meal more filling. A simple salad on the side can also round out your meal nicely. For the full recipe, check the main article section. {{image_2}} You can change the flavor of this dish easily. Try swapping lemon for lime or orange. This small change brings a new taste that brightens the dish. You can also play with different herbs. Basil, thyme, or oregano works well with asparagus. Each herb adds its own touch, making it fun to try new options. Grilling asparagus offers a smoky flavor. Just heat your grill and cook the asparagus for a few minutes. This method gives you a nice char and a different taste. You can also steam the asparagus if you want a softer texture. Steaming keeps the bright green color and makes it tender. Making this dish vegan is simple. Just ensure your olive oil is pure, and skip any added cheese. You can also make it gluten-free, as all the ingredients are naturally gluten-free. For those watching sodium, use low-sodium salt or simply skip it. This way, you can enjoy the dish without worry. For the Full Recipe, check out the ingredients and steps to create this tasty dish. After you enjoy your Lemon Garlic Roasted Asparagus, store any leftovers in the refrigerator. Place them in an airtight container. This keeps them fresh and tasty for up to three days. If you want to keep the dish bright, cover the top with plastic wrap before sealing the lid. To reheat your asparagus, use the oven or a skillet. The oven helps keep it crisp. Preheat it to 350°F (175°C). Place the asparagus on a baking sheet and warm for about 10 minutes. If using a skillet, add a little olive oil, then heat over medium heat. Stir gently for a few minutes. This method helps maintain the flavor. Can you freeze roasted asparagus? Yes, you can freeze it! To do this, let the asparagus cool completely. Then, place it in a single layer on a baking sheet. Freeze for about an hour. Once frozen, transfer the asparagus to a freezer-safe bag. Remove as much air as possible. When you're ready to eat, just thaw it in the fridge overnight. You can also reheat it from frozen. Just add a few extra minutes to your cooking time. Enjoy your Lemon Garlic Roasted Asparagus later with all its great taste! For the full recipe, check out the details in the earlier sections. To make Lemon Garlic Roasted Asparagus perfectly, follow these steps: 1. Preheat your oven to 425°F (220°C). 2. Trim the asparagus ends to remove any tough parts. 3. Mix olive oil, minced garlic, lemon zest, lemon juice, sea salt, black pepper, and red pepper flakes in a bowl. 4. Coat the asparagus well with this mixture. 5. Spread the asparagus on a baking sheet in a single layer. 6. Roast for 12-15 minutes until tender and slightly crispy. This method ensures even cooking and great flavor. Trimming asparagus is simple. Hold the asparagus spear in both hands. Bend it gently until it snaps. This natural break point removes the tough part. You can also line up the spears and cut off about 1-2 inches from the bottom. Yes, you can use frozen asparagus. However, frozen asparagus has more water. This may change the texture after cooking. To use it, thaw and drain the asparagus first. Then, follow the same recipe. You may need to adjust cooking time. Lemon Garlic Roasted Asparagus pairs well with many dishes. Here are some ideas: - Grilled chicken or fish - Quinoa or rice - Pasta with a light sauce - A fresh salad These options balance the flavors and add variety to your meal. To adjust the spice level, you can: - Add more or less red pepper flakes. - Omit the red pepper flakes for no spice. - Use a pinch of cayenne pepper for more heat. These changes let you customize the dish to your taste. For the full recipe, check the earlier section. Lemon garlic roasted asparagus is simple and tasty. You learned about key ingredients and steps. Prepping asparagus, mixing the sauce, and roasting it brings out great flavors. Tips can help you enhance taste and texture. You can also try different herbs or cooking methods based on your needs. Remember to store and reheat leftovers properly to enjoy later. With these ideas, you can make a delicious dish every time. Enjoy your cooking adventure with lemon garlic roasted asparagus!

Lemon Garlic Roasted Asparagus Tasty and Simple Dish

Are you craving a simple, tasty dish that elevates your meals? Look no further than Lemon Garlic Roasted Asparagus! This

- Fresh strawberries and maceration process You need 2 cups of fresh strawberries. Make sure to hull and slice them. Mix them with 1/4 cup of granulated sugar and 1 teaspoon of lemon juice. This step helps bring out their sweet flavor. Let the strawberries sit for 15 minutes. This is called maceration. - Other ingredients needed for the trifle You will also need 1 cup of heavy whipping cream. Add 1/4 cup of powdered sugar and 1 teaspoon of vanilla extract to it. You will need a store-bought angel food cake, cut into cubes. Lastly, grab 1/2 cup of Greek yogurt to add creaminess. - Optional garnishes for presentation For a nice touch, consider using mint leaves or extra strawberry slices. These make your trifle look pretty and fresh. The garnishes add color and a pop of flavor. For the full recipe, check out the detailed instructions to create this delightful treat! 1. Preparing strawberries and the maceration time Start by hulling and slicing the fresh strawberries. Place them in a medium bowl. Add the granulated sugar and lemon juice. Toss gently to combine. Let this sit for about 15 minutes. This time allows the strawberries to macerate. They will release their sweet juices, making them extra tasty. 2. Whipping the cream and folding in yogurt In a large bowl, pour in the heavy whipping cream. Use an electric mixer to whip the cream until soft peaks form. Gradually add the powdered sugar and vanilla extract. Keep whipping until you see stiff peaks. Next, fold in the Greek yogurt. This makes the cream light and fluffy. 3. Layering the trifle components Grab a trifle dish or individual glasses. Start with a layer of angel food cake cubes. Then, add a layer of the sweetened strawberries. Follow this with a generous layer of whipped cream. Repeat these layers. Finish with whipped cream on top. Chill the trifle in the fridge for at least 2 hours. This helps the flavors blend perfectly. For the full recipe, check out the detailed steps above. Enjoy making this delightful treat! Whipping cream can be fun! To get stiff peaks, start with cold cream. Chill your bowl and beaters too. Cold tools help the cream whip better. Use an electric mixer for speed. Whip on high until soft peaks form. Then, add powdered sugar slowly. Add vanilla extract for great flavor. Keep whipping until stiff peaks form. This means the cream holds its shape. You can add other flavors to your whipped cream. A little cocoa powder gives a chocolate twist. Or try almond extract for a nutty flavor. You can even mix in a bit of coffee for a mocha taste. Layering is key in a trifle dish. Start with cake cubes at the bottom. Add a layer of strawberries next, then top with whipped cream. Repeat the layers until you fill the dish. For a great look, use clear glasses. This way, you can see the layers. Garnish the top with mint leaves and extra strawberry slices. This makes your trifle look fancy and inviting. Check out the Full Recipe for more details on making this dessert! {{image_2}} You can change the taste of your strawberry shortcake trifle by using other fruits. Blueberries, peaches, or even raspberries work great. Each fruit brings its own zest. For example, peaches add a sweet and juicy bite. You can mix and match to create your own flavor blend. You can also swap out the cake type. While angel food cake is light and fluffy, you can try pound cake or sponge cake. Pound cake gives a denser texture. It will hold up well against the cream and fruit. Sponge cake adds a soft texture that soaks up flavors. If you need a gluten-free version, you can use gluten-free cake mixes. Many brands offer great options that taste just as good. Check the label to make sure it fits your needs. For a dairy-free alternative, use coconut cream instead of heavy cream. It whips up nicely and adds a tropical flavor. You can also use almond milk yogurt instead of Greek yogurt. These swaps keep your trifle creamy and delicious without dairy. Feel free to explore these variations to make the trifle your own. For the full recipe, check it out in the main article! To keep your leftover trifle fresh, store it in the fridge. Use an airtight container. This helps keep the layers intact and prevents them from drying out. If you have a trifle dish, you can cover it with plastic wrap. Just make sure it’s tight. This keeps the flavor and texture nice. For best results, layer the trifle in smaller containers. Individual cups work well for easy serving. You can grab one and go! In the fridge, your trifle can last about 2 to 3 days. After that, the cake may become soggy. If it looks or smells off, it’s best to toss it. Freezing the trifle is not recommended. The whipped cream and fresh strawberries do not freeze well. They lose their texture and flavor. If you want to prep ahead, make the layers separately. Then, assemble it fresh before serving. This gives you the best taste and texture. For the full recipe, visit the recipe section of this article. Can I make the trifle ahead of time? Yes, you can make the trifle a day before. This helps the flavors mix well. Just cover it tightly and store it in the fridge. What can I substitute for heavy cream? You can use coconut cream or whipped coconut milk. These options work well for a lighter touch. They also add a nice flavor twist. How can I adjust sweetness for different tastes? You can add more or less sugar based on your taste. You can also use honey or maple syrup for a different sweetness. What is the best type of strawberries to use? The best strawberries are fresh, ripe, and sweet. Look for bright red berries with no bruises. They will give your trifle the best flavor. Can I use frozen strawberries in a pinch? Yes, you can use frozen strawberries. Just thaw them first and drain excess liquid. They may not taste as fresh, but they still work well. For the full recipe, check out the Strawberry Shortcake Trifle Delight section. This blog post covered everything you need to make a delicious strawberry shortcake trifle. We explored the key ingredients, from fresh strawberries to optional garnishes. You learned step-by-step instructions for preparing each layer and tips to whip perfect cream. We also discussed various flavor and dietary modifications to suit your needs. Finally, I shared proper storage techniques to keep your trifle fresh. Enjoy creating this tasty treat, and remember, the best part is sharing it with friends and family.

Strawberry Shortcake Trifle Delightful and Fresh Treat

Looking for a fresh and delightful dessert? You’re in for a treat with my Strawberry Shortcake Trifle! This layered dessert

Older posts
Newer posts
← Previous Page1 … Page46 Page47 Page48 … Page84 Next →

dsad

© 2026 easycookingbite • Built with GeneratePress

Our Policies

  • Copyright Policy
  • Cookie Policy
  • GDPR Policy
  • Privacy Policy
  • Disclaimer
  • Terms Of Use

More Information

  • Home
  • About
  • Contact
  • Appetizers
  • Dessert
  • Dinner
  • Drinks
©2026, easycookingbite About Back To Top