![To make a tasty Loaded Veggie Frittata, you need fresh and vibrant ingredients. Here are the main items: - 6 large eggs - 1 cup milk (or plant-based milk) - 1 cup diced bell peppers (red, yellow, green) - 1 cup spinach, chopped - 1 small zucchini, diced - 1/2 cup cherry tomatoes, halved - 1/2 onion, finely chopped - 1 cup shredded cheese (cheddar or mozzarella) - 1 teaspoon olive oil - Salt and pepper to taste - Fresh herbs (basil or parsley) for garnish These ingredients create a colorful frittata that is full of flavor and nutrition. The eggs provide protein, while the veggies add vitamins and minerals. For an extra kick, consider adding some additional flavors. You can use: - Garlic (minced or powder) - Red pepper flakes for spice - Fresh herbs like thyme or oregano - A splash of hot sauce These ingredients enhance the taste of your frittata. They make every bite exciting and full of life. You can easily swap ingredients based on what you have at home. Here are some ideas: - Instead of spinach, try kale or arugula. - Use different cheeses like feta or goat cheese. - If you want more protein, add cooked ham, bacon, or tofu. - Use any seasonal veggies you like, such as asparagus or broccoli. These swaps keep your frittata fresh and fun. Experiment with flavors to find your perfect mix. For the full recipe, check out the Loaded Veggie Frittata details. To start, gather all your veggies. I love using bell peppers, zucchini, spinach, and cherry tomatoes. Wash them well. Dice the bell peppers and zucchini into small pieces. Chop the spinach into smaller bits. Halve the cherry tomatoes for a nice touch. Next, finely chop the onion. This gives the frittata great flavor. In a large bowl, crack the six eggs. Add one cup of milk. You can use plant-based milk if you prefer. Whisk them together. Make sure to mix in salt and pepper to taste. This adds a nice flavor. Set the egg mixture aside for now. Heat one teaspoon of olive oil in an oven-safe skillet over medium heat. Once hot, add the chopped onion. Sauté for two to three minutes until it becomes clear. Then, add the diced bell peppers and zucchini. Cook these for three to four minutes. Stir well until they soften. Finally, toss in the chopped spinach and halved cherry tomatoes. Cook until the spinach wilts. Pour the egg mixture over the cooked veggies in the skillet. Gently shake the pan to spread the eggs evenly. Now, sprinkle one cup of shredded cheese on top. Cook on the stovetop for three to four minutes until the edges set. Then, transfer the skillet to your preheated oven at 375°F (190°C). Bake for 15 to 20 minutes until the eggs are set and the top is golden. Allow it to cool slightly before slicing. Garnish with fresh herbs for a bright finish. Enjoy this Loaded Veggie Frittata as a delightful meal! For the complete process, check the full recipe. Start with a good non-stick skillet. This helps the frittata slide out easily. Use medium heat when cooking the veggies. This cooks them well without burning. When the edges of your frittata begin to set, gently shake the pan. This helps the eggs mix well with the veggies. Remember to bake the frittata until it is golden on top. This gives it a nice look and taste. Add spices to your egg mix for more flavor. A pinch of paprika or chili powder works well. Fresh herbs, like basil or parsley, can brighten the dish. Stir them into the egg mixture or sprinkle them on top before serving. You may also try different cheeses. Goat cheese or feta can add a tangy twist. Lastly, consider adding a splash of hot sauce for a kick. Slice the frittata into wedges for easy serving. A colorful platter makes it look great on any table. For a nice touch, garnish each slice with herbs. This adds color and freshness. You can also serve it with a side salad. This adds crunch and balances the meal. Enjoy warm or at room temperature to savor the flavors. For the full recipe, see the section above. {{image_2}} You can add protein to your Loaded Veggie Frittata in many ways. Ham or bacon gives a savory flavor. Both work well with the veggies. If you prefer plant-based options, tofu is a great choice. Crumble firm tofu and cook it with the veggies. This adds protein without meat. You can also use smoked tofu for a richer taste. Just remember to adjust the seasoning to keep it tasty. The beauty of a frittata is its versatility with vegetables. You can mix and match based on what you have. Try mushrooms for a hearty bite. Broccoli adds a nice crunch and color. Carrots can give a sweet touch. You can also use kale instead of spinach for a stronger flavor. The key is to chop the veggies small so they cook evenly. Feel free to experiment with what’s in season! Cheese adds creaminess to your frittata, but you can switch it up. If you don’t like cheddar or mozzarella, try goat cheese. It brings a tangy flavor that pairs well with veggies. Feta is another great option; it crumbles nicely and adds a salty kick. For a dairy-free choice, use vegan cheese. Just make sure it melts well. Whatever cheese you choose, it will add richness to your dish. For the full recipe, check out the Loaded Veggie Frittata section. Enjoy your cooking adventure! After making the Loaded Veggie Frittata, let it cool completely. Wrap individual slices tightly in plastic wrap. You can also place the slices in an airtight container. Store the frittata in the fridge for up to 4 days. Keeping it well-sealed helps maintain its flavor and texture. To freeze, slice the frittata into wedges. Wrap each piece in plastic wrap and then in aluminum foil. This extra layer prevents freezer burn. Place the wrapped slices in a freezer bag. You can freeze the frittata for up to 2 months. Label the bag with the date for easy tracking. Reheating your frittata is easy. For the best texture, use the oven. Preheat the oven to 350°F (175°C). Place the frittata slice on a baking sheet. Heat for about 10-15 minutes until warm. You can also use the microwave. Place the slice on a microwave-safe plate and cover it with a damp paper towel. Heat for about 1-2 minutes. Enjoy your frittata warm or at room temperature! For the full recipe, check out Loaded Veggie Frittata. A veggie frittata can last up to five days in the fridge. To keep it fresh, store it in an airtight container. This helps lock in flavor and moisture. If you notice any change in smell or texture, it’s best to toss it. Yes, you can make a Loaded Veggie Frittata ahead of time. It holds well in the fridge. This makes it perfect for meal prep. Just follow the [Full Recipe] and cool it before storing. You can slice it into portions for easy servings. The best way to reheat a frittata is in the oven. Preheat your oven to 350°F (175°C). Place the frittata on a baking sheet and cover it with foil. Heat for about 10-15 minutes. This keeps the frittata moist and prevents it from drying out. To make the frittata gluten-free, simply use certified gluten-free ingredients. For a dairy-free option, swap regular milk with plant-based milk like almond or oat milk. You can also use dairy-free cheese. These swaps keep the frittata tasty and healthy for everyone. In this blog post, we explored how to make a Loaded Veggie Frittata. We covered key ingredients, from veggies to flavor boosters and possible swaps. You learned step-by-step instructions for prepping, cooking, and baking to get the best texture. We shared tips for perfecting your technique and enhancing flavor, plus how to present your dish nicely. With these ideas, you can enjoy a delicious, healthy meal. Get creative with variations and enjoy this dish any way you like!](https://easycookingbite.com/wp-content/uploads/2025/07/4602b032-462a-44a8-8398-2369a71a4aa5.webp)
Loaded Veggie Frittata Flavorful and Nutritious Dish
If you’re looking for a tasty way to pack in your veggies, you’ve found it! This Loaded Veggie Frittata is
If you’re looking for a tasty way to pack in your veggies, you’ve found it! This Loaded Veggie Frittata is
![Chilled Cucumber Avocado Soup is a bright and tasty dish. It’s perfect for hot days. You can whip it up in just 15 minutes. This soup is creamy and cool. It combines fresh veggies and yogurt. You’ll love every spoonful! - 2 large cucumbers, peeled and diced - 1 ripe avocado, pitted and diced - 1 cup plain Greek yogurt - 1 cup vegetable broth (chilled) - 1 tablespoon fresh lime juice - 1 garlic clove, minced - 1 tablespoon fresh dill or mint, chopped (plus more for garnish) - Salt and pepper to taste - 1 tablespoon olive oil (optional for drizzling) Gather these simple ingredients before you start. Each one adds flavor and creaminess to the soup. The cucumbers keep it light and fresh. The avocado gives it a rich texture. Greek yogurt adds tanginess and protein. Using chilled vegetable broth makes it refreshing. Don't forget the lime juice for a zing! Fresh herbs like dill or mint give a lovely aroma. You can adjust salt and pepper to suit your taste. For a finishing touch, drizzle olive oil on top. It adds a nice shine and flavor. Enjoy experimenting with these fresh ingredients! Start by prepping your ingredients. Grab two large cucumbers and peel them. Dice them into small pieces. Next, take one ripe avocado. Cut it in half and remove the pit. Scoop the flesh out and dice it. You will also need one cup of plain Greek yogurt. Measure out one cup of chilled vegetable broth. Squeeze one tablespoon of fresh lime juice, and mince one garlic clove. Lastly, chop one tablespoon of fresh dill or mint for flavor. In a blender or food processor, add the diced cucumbers, diced avocado, Greek yogurt, chilled vegetable broth, lime juice, and minced garlic. Blend all these ingredients on high until the mixture is smooth and creamy. If you want a thinner soup, you can add more vegetable broth. After blending, add the chopped dill or mint, along with salt and pepper to taste. Pulse the blender a few times to mix everything well. Once your soup is blended, transfer it to a bowl. Cover it and place it in the fridge for at least 30 minutes. This chilling time allows the flavors to meld together. When you’re ready to serve, stir the soup well. Taste it again to check the seasoning. Ladle the soup into chilled bowls. For a nice touch, drizzle some olive oil on top and sprinkle more dill or mint as a garnish. For the full recipe, check the section above. Enjoy this refreshing summer treat! To make this soup shine, focus on your herbs. Fresh dill or mint adds a bright taste. You can mix both for a unique twist. Consider using lime zest along with lime juice. This adds a punch of citrus that wakes up the flavors. If you like a bit of heat, add a pinch of cayenne or jalapeño. Just a little can make a big difference. Serve this soup in chilled bowls for the best experience. Garnish with a drizzle of olive oil for richness. You can also top it with cucumber slices and avocado cubes for color. Pair it with crusty bread or a fresh salad. This makes a full meal that is light and refreshing. If you like a creamier soup, use more Greek yogurt. Blend longer for a smoother finish. If you want it thinner, add more chilled vegetable broth. Always taste and adjust the seasoning as you blend. This ensures every bite is perfect. Enjoy your delicious creation from the [Full Recipe]! {{image_2}} You can add protein to your chilled cucumber avocado soup for more nutrition. A few great options are cooked shrimp, crab meat, or shredded chicken. Simply mix in your choice after blending. For a vegetarian option, try using chickpeas or white beans. They add creaminess and protein without changing the taste too much. Changing herbs and spices can give this soup a new twist. You might try basil, cilantro, or even chives. Each herb adds its own flavor. For a spicy kick, add a pinch of cayenne pepper or a dash of hot sauce. These small changes can turn your dish into something special. If you want a dairy-free version, swap the Greek yogurt for coconut yogurt or silken tofu. Both options create a creamy base and keep the soup smooth. You can also use almond milk or cashew cream for a lighter texture. These swaps maintain the soup's flavor while catering to your dietary needs. To keep your chilled cucumber avocado soup fresh, store it in an airtight container. Make sure to seal it well. This method keeps the soup from absorbing other smells in the fridge. The soup stays good for about three days. If you notice any changes in color or smell, it’s best to toss it. You can freeze this soup, but it’s not my first choice. Frozen avocado can change texture when thawed. If you decide to freeze it, place the soup in a freezer-safe container. Leave some space for expansion. It can last up to two months. When ready to use, thaw it in the fridge overnight. Chilled soup is meant to be served cold, so reheating isn’t ideal. If you prefer it warm, gently heat it on the stove over low heat. Stir often and avoid boiling. You want to keep the creamy texture. Adjust salt and pepper if needed after heating. Enjoy this refreshing summer treat in whichever way you like! Yes, you can make this soup ahead of time. I often prepare it a day in advance. Chilling it overnight helps the flavors blend nicely. Just remember to store it in an airtight container. This keeps it fresh and tasty. You can store the soup for up to three days in the fridge. After that, the cucumbers may lose their crunch. If you want to keep it longer, consider freezing it. However, freezing may change the texture slightly. Absolutely! Feel free to swap out cucumbers or add other veggies. Zucchini or bell peppers can work well. You could even try adding spinach for a nutrient boost. Just keep in mind, this may change the color and taste. For the best results, stick to veggies that blend smoothly. For the full recipe and more ideas, check the [Full Recipe]. This blog post guides you through making a fresh chilled cucumber and avocado soup. We explored the simple ingredients like cucumbers, avocado, and Greek yogurt, and shared step-by-step steps to prepare it. I provided tips to enhance flavor, serving ideas, and ways to customize the soup. In the end, this recipe is easy and fun. It’s a cool treat perfect for warm days. Enjoy your time making this dish and feel free to experiment with your own twists!](https://easycookingbite.com/wp-content/uploads/2025/07/956b7e04-98c8-4458-b0fd-903a77b1998f.webp)
Looking for a cool dish to beat the summer heat? I’ve got you! Chilled cucumber avocado soup is not just
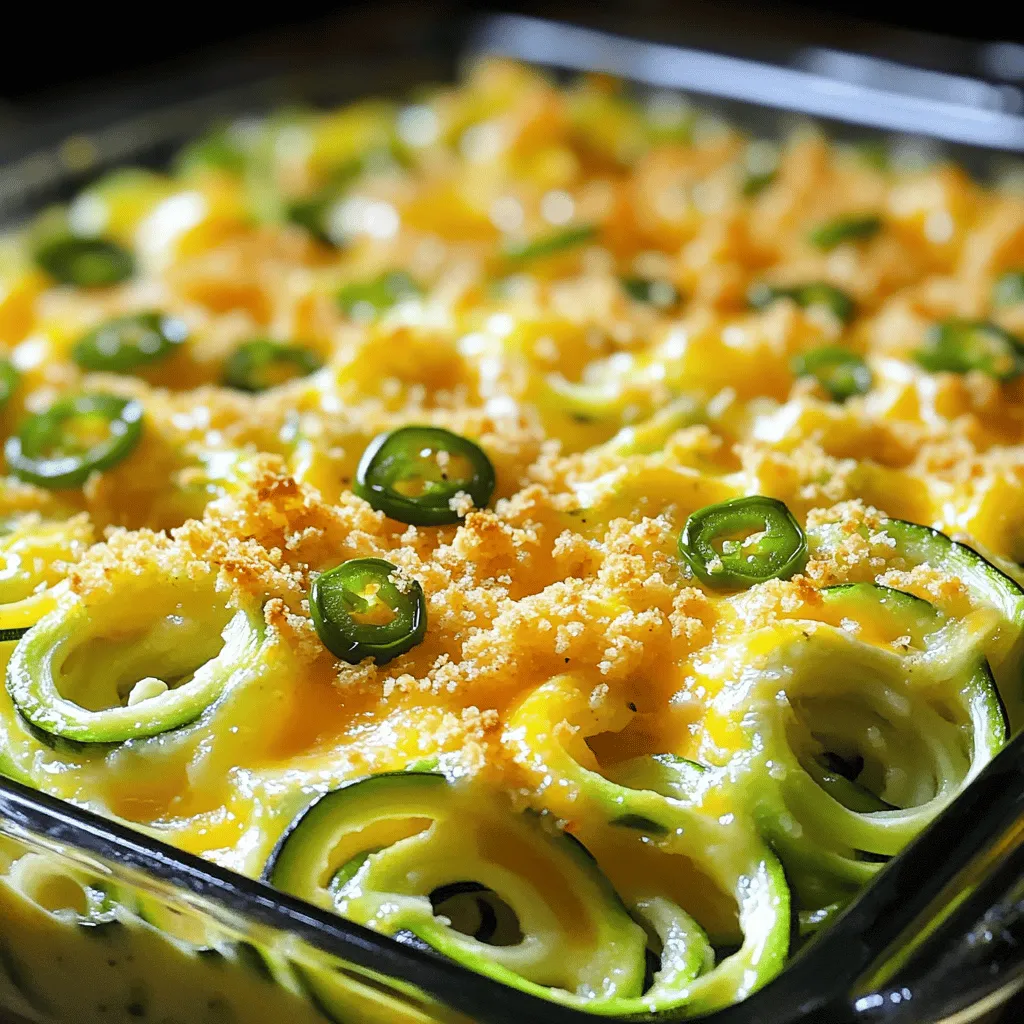
Are you ready to spice up your dinner routine? This Cheesy Jalapeno Zucchini Bake combines fresh zucchini and creamy cheeses

Are you ready to elevate your snack game? Spicy roasted chickpeas are your new go-to treat! These crunchy bites pack

If you love bright, citrusy treats, then this Easy Lemon Loaf Cake is for you! It’s simple to make and
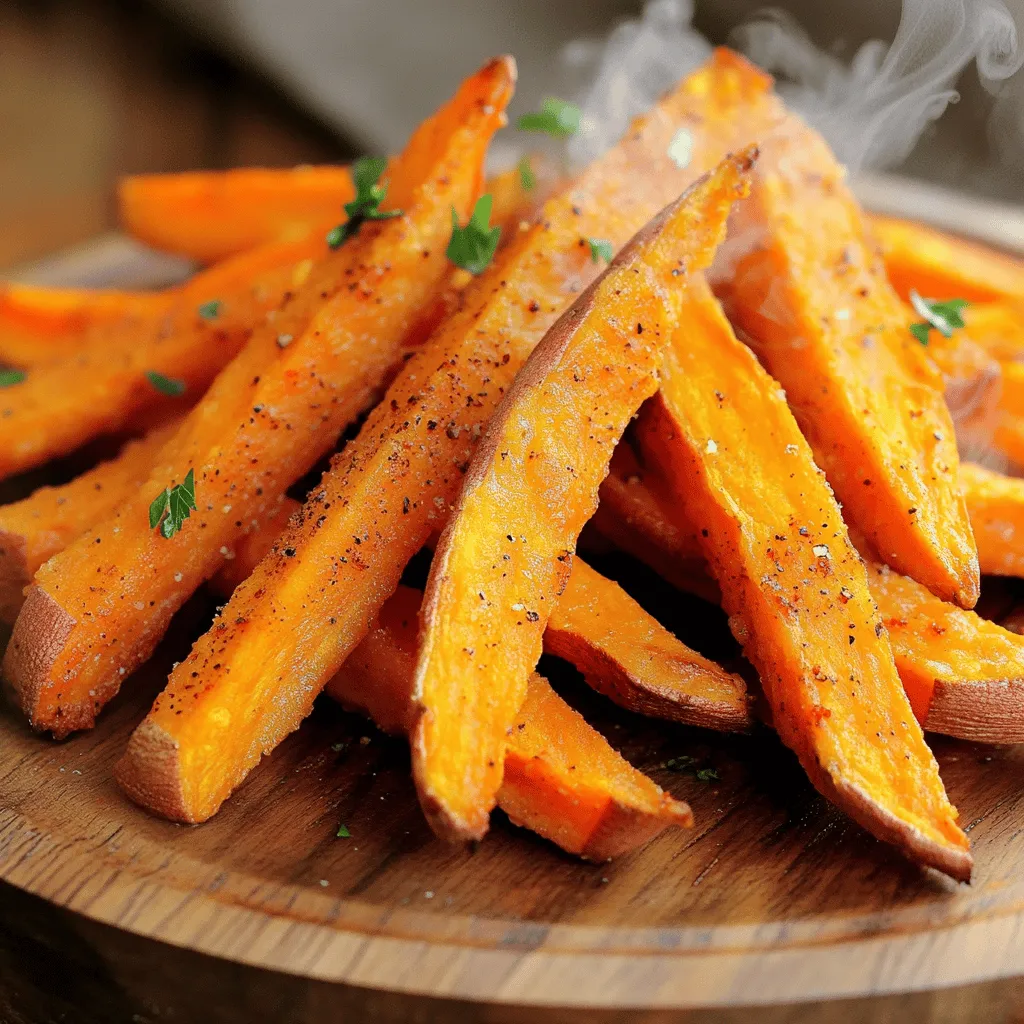
Are you ready for a crispy, flavorful treat? My Air Fryer Sweet Potato Fries are the perfect snack or side
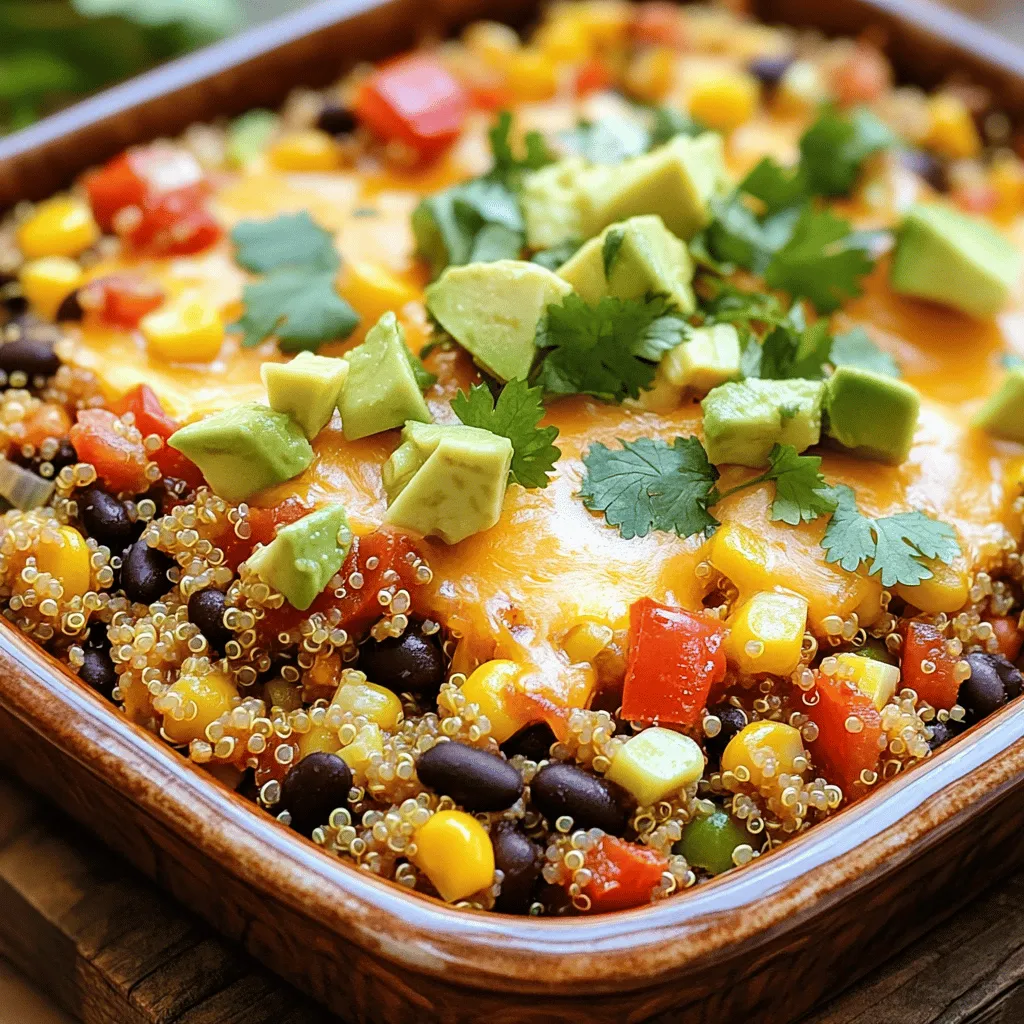
Are you looking for a dish that’s both delicious and healthy? Look no further! My Southwest Quinoa Casserole is packed
![For these sweet and savory chicken bites, you need a few key items. Here’s what you will need: - 1 pound chicken breast, cut into bite-sized pieces - 1/3 cup honey - 3 tablespoons soy sauce - 3 cloves garlic, minced - 1 tablespoon fresh ginger, grated - 2 tablespoons cornstarch - 1 tablespoon vegetable oil - Salt and pepper to taste These ingredients come together to create a delicious sauce that sticks to the chicken. The honey adds sweetness, while the soy sauce gives depth. Garlic and ginger bring a lovely aroma and flavor. Garnishes make your dish look great and taste even better. I recommend these: - 2 green onions, chopped (for garnish) - Sesame seeds (for garnish) Green onions add a fresh crunch, while sesame seeds give a nice nutty flavor. Sprinkle them on top before serving for that perfect finish. Want to kick up the flavor? Here are some optional ingredients: - A pinch of red pepper flakes for heat - A splash of rice vinegar for tang These extras can change the dish in fun ways. If you like spice, the red pepper flakes will add a nice kick. The rice vinegar can balance the sweetness with some tartness. Experiment with these to find your perfect taste! For the full recipe, check out the section above. To start, gather your ingredients. You need chicken, honey, soy sauce, garlic, ginger, and cornstarch. Cut 1 pound of chicken breast into bite-sized pieces. Next, in a bowl, mix 1/3 cup honey, 3 tablespoons soy sauce, 3 minced garlic cloves, and 1 tablespoon of grated ginger. Stir it well and set it aside. In another bowl, coat the chicken pieces with 2 tablespoons of cornstarch. This step is key for a crispy finish. For cooking, I recommend using a skillet. Heat 1 tablespoon of vegetable oil in the skillet over medium-high heat. Once hot, add the chicken. Make sure to place the chicken in a single layer. This helps it cook evenly. Season with salt and pepper. Cook for about 5-7 minutes. You want the chicken to turn golden brown and be cooked through. If you prefer, you can also bake the chicken in an oven. Preheat the oven to 400°F and bake for 15-20 minutes. To make the chicken crispy, the cornstarch is vital. It creates a nice crust when cooked. Don’t overcrowd the skillet. If necessary, cook in batches. Also, keep the heat medium-high. This keeps the oil hot enough for crispiness. Once the chicken is golden, pour the honey garlic mixture over it. Let it bubble for 2-3 minutes. This thickens the sauce and gives you that sticky texture. For a full recipe, check the original recipe. Enjoy your tasty honey garlic chicken bites! To make the best honey garlic chicken bites, follow these simple tips: - Use fresh ingredients. Fresh garlic and ginger bring out the best flavors. - Coat the chicken well with cornstarch. This ensures a crispy texture. - Don’t overcrowd the skillet. Cook in batches if needed for even cooking. - Stir the sauce often while it cooks. This helps it thicken evenly. Avoid these common mistakes to ensure great results: - Skipping the cornstarch coating can lead to soggy chicken bites. - Cooking at too high a heat can burn the sauce before the chicken cooks. - Not letting the sauce bubble long enough can keep it thin. - Forgetting to season the chicken can make it bland. Pair these bites with flavors that enhance their taste: - Serve with steamed rice or quinoa. This balances the sweet and savory. - Add a side of crisp vegetables for crunch. Broccoli or snap peas work well. - Use a tangy dipping sauce on the side. A mix of soy sauce and vinegar is tasty. - Consider adding chili flakes for a spicy kick if you like heat. For the full recipe, check out [Full Recipe]. Enjoy cooking these delightful bites! {{image_2}} You can add veggies for a colorful twist. Bell peppers, broccoli, and snap peas work well. Cut them into bite-sized pieces. Toss them in with the chicken during cooking. This adds crunch and flavor. Plus, it makes the dish more filling! Want some heat? Add chili flakes or sriracha to the sauce. Mix them in when you combine honey, soy sauce, garlic, and ginger. You can adjust the heat level to your taste. This variation gives the bites a spicy kick that balances the sweetness. You can make this dish lighter. Substitute honey with maple syrup for a lower glycemic index. Use low-sodium soy sauce to cut back on salt. For a gluten-free option, try coconut aminos instead of soy sauce. These swaps keep the flavors while being healthier. For the full recipe, check out the detailed instructions above. To store leftover honey garlic chicken bites, first let them cool. Place them in an airtight container. This keeps the moisture in and prevents drying out. You can store them in the fridge for up to three days. If you want to keep them longer, freezing is a great option. To reheat, I suggest using a skillet. Heat it over medium heat and add a splash of water. This helps steam the chicken and keeps it moist. Add the chicken bites and cover. Cook for about five minutes or until warmed through. You can also use a microwave. Heat in 30-second bursts, stirring in between, to avoid overcooking. For freezing, place the cooled chicken bites in a single layer on a baking sheet. Freeze them for one hour. Once frozen, transfer them to a freezer-safe bag. Remove as much air as possible to prevent freezer burn. They can last up to three months in the freezer. When ready to eat, thaw overnight in the fridge before reheating. This method gives you tasty honey garlic chicken bites whenever you want! For the full recipe, check out the main article. You can serve Honey Garlic Chicken Bites with rice or noodles. They also pair well with fresh salad. For a fun twist, try them with steamed broccoli or snap peas. These sides balance the sweet and savory flavors of the chicken. Yes, you can easily make this recipe gluten-free. Just swap regular soy sauce for gluten-free soy sauce or tamari. Most brands offer a gluten-free option that tastes great. This way, you can enjoy the same flavors without the gluten. Honey Garlic Chicken Bites can last up to three days in the fridge. Store them in an airtight container to keep them fresh. Just make sure to cool them down before placing them in the fridge. If you want to skip soy sauce, try coconut aminos. It has a similar flavor but is soy-free. You can also use liquid aminos or a homemade broth for a unique taste. Each option will add different flavors to your dish. Yes, you can prepare the chicken bites ahead of time. Just cook them and store them in the fridge once cooled. When you are ready to serve, reheat them and add the honey garlic sauce. This makes for a quick meal on busy days. Honey garlic chicken bites are simple to make and full of flavor. We covered the must-have ingredients, steps, and tips for success. You learned how to make them crispy and flavorful. Plus, we looked at tasty variations and storage tips. By following this guide, you can impress anyone with this dish. Enjoy your cooking journey and the delicious results. Your meals will shine, and your guests will be happy!](https://easycookingbite.com/wp-content/uploads/2025/07/fb149d5d-ee74-4aab-909c-6729add78e8c.webp)
If you want a quick and easy meal that dazzles your taste buds, you’ve come to the right place! These
![- 4 large bell peppers (any color) - 1 cup cooked quinoa - 1 cup black beans, rinsed and drained - 1 cup corn (fresh or frozen) - 1 cup diced tomatoes (canned or fresh) - 1 small red onion, finely chopped - 2 cloves garlic, minced - 1 teaspoon cumin - 1 teaspoon chili powder - Salt and pepper to taste - 1 cup shredded cheese (cheddar or a dairy-free alternative) - Fresh cilantro or parsley, for garnish To make veggie stuffed bell peppers, you need fresh and healthy ingredients. Bell peppers provide a sweet base. Quinoa adds protein and fiber. Black beans bring a hearty texture. Corn gives sweetness and crunch, while tomatoes add moisture. Red onion and garlic pack in flavor. Cumin and chili powder bring warmth and spice. Salt and pepper balance the dish. Cheese melts on top for a creamy finish. Lastly, fresh herbs like cilantro or parsley brighten the meal. Using the right ingredients makes your dish taste great. Each component adds something special. You can find this full recipe in the article. - Preheat the oven to 375°F (190°C). - Cut the tops off the bell peppers and remove seeds and membranes. To start, you need to preheat your oven. This step is important. A hot oven cooks food evenly. While that heats up, grab your bell peppers. I love using bright colors for fun meals. Cut off the tops carefully, then scoop out the seeds and membranes. This makes space for your tasty filling. - Combine cooked quinoa, black beans, corn, diced tomatoes, onion, garlic, spices, salt, and pepper. - Spoon the mixture into each bell pepper. Next, let’s mix the filling. In a big bowl, add cooked quinoa, black beans, corn, and diced tomatoes. Then, toss in the chopped onion and minced garlic. Don’t forget the spices—cumin and chili powder add great flavor. Add salt and pepper to taste. Mix everything until combined. Now, it’s time to fill those bell peppers! Spoon the mixture in tightly, making sure each pepper is packed full of goodness. - Top each pepper with shredded cheese and add water to the baking dish. - Cover with foil and bake, then remove foil to finish cooking. Now for baking! Sprinkle shredded cheese on top of each stuffed pepper. This gives a nice cheesy finish. Pour a little water into the baking dish. This helps steam the peppers, keeping them moist. Cover the dish with foil and bake for 25-30 minutes. After that time, take off the foil. Bake for another 10-15 minutes. This will melt the cheese and get the peppers tender. You’ll love the smell wafting through your kitchen! For the complete recipe, check out the [Full Recipe]. Choosing the right colors of bell peppers can make your dish pop. I like to mix red, yellow, and green peppers. This adds visual appeal and different flavors. Each color has its unique taste. Red peppers are sweeter, while green ones are more earthy. This variety enhances your meal. To avoid soggy peppers, try this simple trick. Before baking, add a splash of water to the bottom of your baking dish. Cover the dish with foil for the first part of cooking. This helps steam the peppers while keeping them firm. Remove the foil later to let the tops brown. Adding moisture to your stuffing is key for great flavor. I recommend using cooked quinoa or black beans, as they hold moisture well. Incorporate diced tomatoes into your filling. This not only adds flavor but also keeps the stuffing moist as it cooks. To ensure even cooking, pack the stuffing tightly into each pepper. This helps the filling cook uniformly. Use a spoon to press down gently, making sure the mixture is snug inside. This technique helps everything cook at the same rate. Pair your stuffed peppers with a fresh side salad. A light salad with lemon vinaigrette complements the dish well. You might also serve them with some crusty bread. This adds a nice texture contrast to the meal. For garnishing, fresh herbs like cilantro or parsley brighten the plate. Chop them finely and sprinkle on top just before serving. This adds a burst of color and freshness. You can also use a dollop of sour cream or yogurt to add creaminess. For the complete dish, check out the Full Recipe. {{image_2}} You can change grains for your stuffed peppers. Try rice, farro, or even couscous. Each grain adds a unique taste and texture. You can also switch out beans. Use kidney beans, chickpeas, or lentils instead of black beans. If you want protein, add ground turkey or tofu. These swaps will keep meals fresh and interesting. To boost flavor, add spices. Try paprika, oregano, or a dash of hot sauce. These spices give your dish a great kick. You can also mix in sauces like salsa or barbecue sauce. For a cheesy twist, use different cheese types. Feta, goat cheese, or pepper jack can change the taste. Each option makes your stuffed peppers special. If you want a vegan option, leave out cheese and use plant-based protein. You can also use nutritional yeast for a cheesy flavor. For gluten-free adjustments, check the grains and beans. Most of the ingredients are gluten-free, but always check labels. These changes help you enjoy stuffed peppers no matter your diet. For the full recipe, check the Veggie Stuffed Bell Peppers 🥗 section. To store leftovers of veggie stuffed bell peppers, let them cool first. Place them in an airtight container. You can keep them in the fridge for up to four days. If you want to save them for longer, freezing is a great option. To freeze stuffed peppers, wrap each one tightly in plastic wrap. Then, place them in a freezer bag. They can last for three months in the freezer. When you are ready to eat, just thaw them overnight in the fridge. To reheat your stuffed peppers, the oven works best. Preheat it to 350°F (175°C). Place the peppers in a baking dish. Cover with foil to keep them moist. Heat for about 20 minutes, or until warm. You can also use the microwave for faster reheating. Place a pepper on a microwave-safe plate. Heat for 2-3 minutes. Check if it's warm all the way through. Be careful, as the texture may change a bit. These methods help keep your stuffed peppers tasty and enjoyable! For the full recipe, check out the details above. How long to cook frozen stuffed peppers? Cook frozen stuffed peppers for about 45-50 minutes at 375°F (190°C). If they are not warm in the center, cook them longer. Can I make stuffed peppers ahead of time? Yes, you can make stuffed peppers a day before. Just prepare them, cover, and store in the fridge. Bake them when you are ready to eat. What to do if my peppers are too tough to eat? If your peppers are tough, try cooking them longer. You can also cut them in half, scoop the filling out, and cook them more. Are stuffed peppers healthy? Yes, stuffed peppers are healthy! They are full of nutrients from veggies, beans, and quinoa. They are low in fat and high in fiber. Can I reduce calories in this recipe? Absolutely! Use less cheese or a low-fat cheese. You can also cut down on oil or use less quinoa for fewer calories. How do I know when the peppers are done? Peppers are done when they are tender and the cheese is melted. You can poke them with a fork to check. Can I use mini peppers for this recipe? Yes, you can use mini peppers! They make great bite-sized snacks. Just adjust the cooking time to about 20-25 minutes. For the full recipe, check out the Veggie Stuffed Bell Peppers. In this guide, you learned how to make tasty stuffed peppers. We covered the ingredients, step-by-step preparation, and smart tips for success. You can mix and match fillings or adjust for diets. Proper storage and reheating will keep them fresh and delicious. Stuffed peppers are fun to make and share. Enjoy cooking, and let your creativity shine!](https://easycookingbite.com/wp-content/uploads/2025/07/4c553bee-6c2b-4634-b2b3-7311afcfcf43.webp)
Looking for a healthy, tasty meal that’s easy to make? Veggie stuffed bell peppers are your answer! These colorful peppers
![- 4 large eggs, hard-boiled - 1 ripe avocado - 2 tablespoons Greek yogurt - 1 tablespoon Dijon mustard - 1 tablespoon lemon juice - 1 small red onion, finely chopped - 1 celery stalk, finely diced - Salt and pepper to taste - Fresh dill or chives for garnish The base of this dish is simple yet packed with flavor. The hard-boiled eggs provide protein and richness. The ripe avocado adds creaminess while being a great source of healthy fats. Greek yogurt offers a tangy kick and helps make the salad lighter. Lemon juice brightens the taste and keeps the avocado fresh. Red onion and celery add crunch and a bit of bite, making each bite exciting. Don’t forget to season with salt and pepper to enhance the flavors. Finally, fresh herbs like dill or chives give a lovely touch and color. This avocado egg salad is both tasty and nutritious. Each serving has about 250 calories, 12 grams of protein, 18 grams of fat, and 15 grams of carbs. The eggs give you plenty of protein, while the avocado provides heart-healthy fats. Eating this salad can help support heart health and offer vitamins E and C. Plus, the fiber from the avocado and celery aids digestion. You can enjoy this salad as a light lunch or a snack. For the full recipe, check out the detailed steps in the recipe section above. To start, you need to hard-boil the eggs. Place four large eggs in a pot. Cover them with water and bring it to a rolling boil. After it boils, remove the pot from heat and cover it. Let the eggs sit for 12 minutes. This step can be tricky, but it’s key for a great salad. Once the time is up, transfer the eggs to a bowl of ice water. This cools them down fast. Let them sit in the ice water for at least five minutes. After they cool, peel the eggs and chop them roughly. Keep the pieces a bit chunky for better texture. Now it’s time to mix the salad. Grab a ripe avocado and cut it in half. Use a fork to mash the avocado in a large bowl. Aim for a smooth base, but leave some chunks for texture. Next, add two tablespoons of Greek yogurt, one tablespoon of Dijon mustard, and one tablespoon of lemon juice to the mashed avocado. Stir the mixture well until all the ingredients are combined. Now, gently fold in the chopped eggs, finely chopped red onion, and diced celery. Mix slowly to keep the egg pieces intact. This adds nice bites to your salad. It’s time for the final touches. Season your egg salad with salt and pepper to taste. Start with a pinch of each, then adjust to your liking. For serving, you have options! Enjoy the avocado egg salad on whole grain toast, in crisp lettuce leaves, or with crunchy crackers. Each option brings its own fun! Finish by garnishing with fresh dill or chopped chives for a pop of color and taste. This adds a lovely touch to your dish. Check out the Full Recipe for more details! To get the best texture in your avocado egg salad, mash the avocado just right. You want it smooth but still a bit chunky. This gives the salad a nice, creamy feel. Choosing ripe avocados is key. A ripe avocado feels slightly soft when you press it. If it’s hard, leave it on the counter for a few days. You can also speed this up by placing it in a paper bag with a banana. The gas from the banana helps it ripen faster. Best practices for storage include placing the salad in an airtight container. This keeps it fresh for up to three days in the fridge. You can also cover the surface of the salad with plastic wrap to limit air contact. How to revive leftovers? If the salad seems dry, add a splash more lemon juice or Greek yogurt to bring it back to life. Mix gently to keep the chunks intact. For pairing with various sides, I love to serve this salad on whole grain toast. It goes great with crunchy veggies like carrot sticks or cucumber slices. You can also pair it with a light salad for a complete meal. Creative serving vessels make it fun. Try serving it in lettuce cups, hollowed-out tomatoes, or even in small jars for a picnic. Your guests will love the look and taste! For the full recipe, check out the [Full Recipe]. {{image_2}} You can easily swap Greek yogurt for mayo. This change gives a creamier texture. Some people prefer the taste of mayo, and that's okay. You can also add spices or herbs. Try paprika for a smoky twist or fresh basil for a light touch. These small changes can make your dish exciting. If you want a vegan version, use mashed chickpeas instead of eggs. Blend ripe avocados with lemon juice and mustard for a creamy feel. For low-carb options, skip the toast and serve it in lettuce wraps. This keeps it light and fresh while still being tasty. Want to kick up the flavor? Add chopped pickles or diced jalapeños for a zesty kick. You can also include seasonal ingredients like diced tomatoes in summer or roasted peppers in fall. These tweaks keep your avocado egg salad vibrant and fun to eat. For those looking for the complete method, check out the Full Recipe to get started on making this delicious dish! For a tasty meal, pair your avocado egg salad with fresh sides. A simple green salad with mixed greens works well. You can add cucumbers and cherry tomatoes for extra crunch. Another great side is a bowl of fruit. Think berries, melon, or slices of citrus. These add sweetness and freshness. When it comes to drinks, iced tea or sparkling water fits perfectly. You can even add a slice of lemon for a refreshing twist. If you prefer something warm, a light soup like tomato or vegetable can be comforting. Make your avocado egg salad shine by presenting it well. Serve it in a bowl with fresh herbs on top. This adds color and makes it look fancy. For gatherings, consider using small cups or jars. This way, each guest has their own portion. If you want a fun appetizer, use small lettuce leaves. Spoon the salad into the leaves for easy bites. This makes for a light and healthy snack. You can make avocado egg salad ahead of time. It stays fresh in the fridge for a few days. Just store it in an airtight container. This makes lunchtime quick and easy. For snacks, portion the salad into small containers. This way, you have grab-and-go options ready. It’s perfect for busy days or picnics. Enjoy the ease of having a healthy snack at your fingertips. Check out the Full Recipe for all the details! You can store avocado egg salad in the fridge for up to three days. Keep it in a sealed container to keep it fresh. After three days, the avocado may brown and the eggs can lose texture. Yes! To make this avocado egg salad vegan, use tofu instead of eggs. You can also replace Greek yogurt with a plant-based yogurt. This keeps the creaminess while being vegan-friendly. If you don’t have Greek yogurt, you can use plain yogurt or mayo. Both options add creaminess. You can also try using mashed silken tofu for a dairy-free choice. I do not recommend freezing avocado egg salad. The texture of the avocado and eggs changes when frozen. It can become watery and mushy when thawed. To spice up your avocado egg salad, add hot sauce to taste. You can also mix in diced jalapeños or sprinkle on cayenne pepper. These additions will bring heat and flavor to your dish. For more detailed instructions, check the Full Recipe. To make avocado egg salad, you first hard-boil the eggs. After boiling, cool them in ice water. Then, peel and chop the eggs. Next, mash the ripe avocado in a bowl. Add Greek yogurt, Dijon mustard, and lemon juice to the avocado and mix. Fold in the chopped eggs, red onion, and celery. Finally, season with salt and pepper. Garnish with dill or chives before serving. This dish takes 15 minutes to prep and 30 minutes total. It serves four people. Enjoy this tasty lunch idea with friends or family. This egg salad with avocado is easy and healthy. We covered the key ingredients and their benefits. You learned how to prepare, mix, and serve it. Tips on storage and variations help you get creative. In the end, it’s a versatile dish that fits any meal. Try different ingredients to make it your own. Experimenting keeps it fun and tasty. Enjoy the process and share with loved ones!](https://easycookingbite.com/wp-content/uploads/2025/07/343679a3-5687-4e73-8d85-7f79e370be48.webp)
Welcome to a tasty twist on a classic lunch! This Avocado Egg Salad is easy to make and packed with
