Skip to content
DisclaimerTerms Of UseGDPR PolicyCookie Policy

easycookingbite

  • Home
  • Drinks
  • Appetizers
  • Dinner
  • Dessert
  • About
  • Contact
  • Privacy Policy
DisclaimerTerms Of UseGDPR PolicyCookie Policy

NO-ING-IMG

- 1 medium head cauliflower, riced - 2 tablespoons vegetable oil - 2 large eggs, lightly beaten - 1 cup mixed vegetables (peas, carrots, bell peppers) - 3 green onions, chopped - 2 cloves garlic, minced - 2 tablespoons soy sauce (or tamari for gluten-free) - 1 tablespoon sesame oil - Salt and pepper to taste - Optional: chopped cilantro and sesame seeds for garnish Gather these ingredients for your cauliflower fried rice. You will need a medium head of cauliflower. The first step is to rice the cauliflower. Cut it into small florets. Then, pulse it in a food processor. You want it to look like grains of rice. Next, you need vegetable oil for frying. Use a good quality oil for a nice flavor. You will also need two large eggs. Lightly beat them in a bowl. The eggs will add protein and richness to your dish. Mixed vegetables are key too. Peas, carrots, and bell peppers add color and nutrition. Don't forget the green onions. They give a fresh taste and crunch. Garlic is another must. It adds a lovely aroma and flavor. Soy sauce or tamari will bring umami to the dish. I prefer tamari for a gluten-free option. One tablespoon of sesame oil will add a nutty flavor, making the dish more delicious. Finally, season with salt and pepper. You can also garnish with chopped cilantro and sesame seeds if you like. This recipe is all about balance and flavor. For the full recipe, check out the details above. How to rice cauliflower To rice cauliflower, start by cutting a medium head into florets. Place the florets in a food processor. Pulse until it looks like rice. Make sure not to over-process it. Set the riced cauliflower aside for later. Cooking the eggs In a large skillet or wok, heat two tablespoons of vegetable oil over medium-high heat. Add two cloves of minced garlic and sauté for about thirty seconds until fragrant. Push the garlic to one side. Pour in two large eggs, lightly beaten, into the other side. Scramble the eggs until cooked, then mix them with the garlic. Stir-frying vegetables Next, add one cup of mixed vegetables to the skillet. You can use peas, carrots, and bell peppers. Stir-fry for three to four minutes until the veggies are tender. This step adds color and flavor to your dish. Adding riced cauliflower to the mix Now, add the riced cauliflower to the skillet. Stir it in well with the cooked eggs and veggies. You will see the bright colors blend beautifully together. Incorporating seasonings Pour in two tablespoons of soy sauce and one tablespoon of sesame oil. These will enhance the flavor of your fried rice. Mix everything together for a minute, ensuring the cauliflower soaks up those tasty seasonings. Cooking time for perfect texture Cook the mixture for five to seven minutes, stirring frequently. You want the cauliflower to be tender but not mushy. This keeps the texture just right! Garnishing for presentation Turn off the heat and mix in three chopped green onions. Season with salt and pepper to taste. For a finishing touch, garnish with chopped cilantro and sesame seeds if you like. This adds a nice look and extra flavor to your dish! For a detailed recipe, check out the Full Recipe. - Best oil choices for frying I like using vegetable oil for frying. It has a high smoke point. You can also try peanut oil for a nice flavor. These oils help cook the dish well without burning. - How to avoid soggy cauliflower To keep your cauliflower fried rice from getting soggy, dry the riced cauliflower. You can pat it with a towel. Also, cook it on high heat. This helps remove moisture fast. - Additional ingredients for extra taste You can add more flavor by including chopped bell peppers, mushrooms, or corn. These add texture and color. You can also mix in some cooked chicken or shrimp for protein. - Spice options for a kick Want some heat? Add red pepper flakes or a splash of hot sauce. You can also try fresh ginger for a zesty twist. These spices make your dish exciting and full of flavor. - Prepping ingredients ahead of time Cut and rice your cauliflower the day before. Store it in the fridge. You can also chop your veggies in advance. This saves time and makes cooking easier on busy nights. - Storing leftovers Keep any leftover cauliflower fried rice in an airtight container. It lasts in the fridge for about three days. You can reheat it in the microwave or on the stovetop to enjoy later. For the complete recipe, check out the [Full Recipe]. {{image_2}} You can easily make a vegan version of cauliflower fried rice. Simply skip the eggs. Use tofu for protein instead. Firm tofu works best. Just cube it and add it when you add the garlic. This keeps it flavorful and filling. For those wanting low-carb substitutions, cauliflower is an excellent choice. It has fewer carbs than rice. You can also add nuts or seeds for crunch. Chopped almonds or sunflower seeds can add great texture. To add different proteins, try chicken, shrimp, or beef. Cook the protein first, then set it aside. Add it back when you mix in the cauliflower. This keeps the dish hearty and satisfying. You can also change up the vegetables. Broccoli, snap peas, or zucchini work well. Just remember to cut them small. This helps them cook evenly. Mix and match based on what you like or have on hand. For a Mexican-style cauliflower fried rice, add black beans and corn. Season with cumin and chili powder. Top with avocado and cilantro for freshness. This gives a fun twist to the original dish. For a Thai-inspired cauliflower fried rice, use lime juice and peanuts. Add some bell peppers and green beans for crunch. Finish with a sprinkle of fresh basil. This brings bright flavors that wake up your taste buds. You can find the full recipe to create your own delicious version. To store leftover cauliflower fried rice, first let it cool to room temperature. Then, place it in an airtight container. This keeps it fresh and prevents strong odors from mixing. Leftovers stay good in the fridge for about 3 to 4 days. Make sure to eat it within this time for the best taste and safety. You can freeze cauliflower fried rice if you want to save it for later. First, let it cool completely. Then, scoop it into freezer-safe bags or containers. Squeeze out any air to prevent freezer burn. It can stay fresh in the freezer for up to 3 months. When you’re ready to eat it, thaw the rice in the fridge overnight. To reheat, use a skillet or microwave. To heat up your fried rice, you have a couple of great options. The stovetop method works well. Just add a splash of oil to a skillet and heat it over medium heat. Stir the rice frequently for even warming. This keeps the flavor and texture nice. You can also use the microwave. Place the rice in a bowl and cover it with a damp paper towel. This helps add moisture and warmth. Heat it in short bursts, stirring in between until it's hot. Both methods restore the taste you love in cauliflower fried rice! Can I use frozen cauliflower rice? Yes, you can use frozen cauliflower rice. It is quick and easy. Just heat it in the skillet until it's warm. This saves you time if you're in a rush. Is cauliflower fried rice healthier than regular fried rice? Yes, cauliflower fried rice is healthier. It has fewer carbs and calories. Cauliflower is high in fiber and vitamins. This makes it a great choice for many diets. How can I make this recipe in advance? You can prepare the riced cauliflower ahead of time. Store it in the fridge for up to 3 days. You can also cook the dish fully and refrigerate it. Just reheat it when you're ready to eat. Calories and macros per serving One serving of cauliflower fried rice has about 120 calories. It has 6 grams of protein and 9 grams of carbs. This makes it a light and filling meal. Health benefits of using cauliflower Cauliflower is rich in vitamins C and K. It also has antioxidants that help your body. Eating cauliflower can support digestion and weight loss. What to do if the cauliflower is too crunchy If the cauliflower is too crunchy, cook it longer. Stir it often and add a splash of water. This helps steam it and soften the texture. How to prevent sticking during cooking To prevent sticking, use a non-stick skillet or add extra oil. Keep the heat at medium-high. Stir the ingredients often to keep them moving. This blog post guides you through making delicious cauliflower fried rice. We covered ingredients, steps, and tips for the best taste. The variations let you customize it to your diet or flavor preferences. Proper storage ensures your leftovers stay fresh. Incorporate these ideas into your cooking for a quick, healthy meal. You can enjoy this dish any time and share it with friends. Explore the fun of creating your version today!

Cauliflower Fried Rice Delicious and Easy Recipe

Looking for a tasty, low-carb meal that’s quick to whip up? Cauliflower Fried Rice is your answer! This dish not

- 1 pound shrimp, peeled and deveined - 8 small corn tortillas - 1 cup red cabbage, finely shredded - 1/2 cup carrots, grated - 1/4 cup fresh cilantro, chopped - 2 tablespoons olive oil - 2 teaspoons chili powder - 1 teaspoon cumin - 1/2 teaspoon smoked paprika - 1/4 teaspoon cayenne pepper - Salt and pepper to taste - 1 avocado, sliced - 1/2 cup sour cream or Greek yogurt - 2 tablespoons lime juice In this recipe, we focus on fresh ingredients that shine. The shrimp brings a lovely sweetness. It pairs well with the crunch of the cabbage and carrots. I love using red cabbage for its color and nutrients. The cilantro adds a fresh pop, too! For the seasonings, I choose chili powder and cumin for warmth and depth. Smoked paprika gives it a nice smoky flavor. Adjust the cayenne pepper based on your spice preference. Don't forget to season with salt and pepper for balance. The toppings make these tacos extra special. Sliced avocado adds creaminess. I use sour cream or Greek yogurt for tanginess. A splash of lime juice brightens the overall flavor. This combination of ingredients makes a flavorful and fresh delight. For the full recipe, check the "Full Recipe" section. First, you need to prepare the shrimp. In a bowl, combine the shrimp with olive oil, chili powder, cumin, smoked paprika, cayenne pepper, salt, and pepper. Make sure the shrimp gets a nice coating from the spices. Let it marinate for at least 15 minutes. This step is key to infusing flavor into the shrimp. Next, let's make the slaw. In a separate bowl, mix together the finely shredded cabbage, grated carrots, chopped cilantro, and lime juice. This mix adds crunch and freshness to the tacos. Season it with a pinch of salt and pepper. Toss everything well and set it aside. This slaw balances the spicy shrimp perfectly. Now it's time to cook the shrimp. Heat a large skillet over medium-high heat. Once hot, add the marinated shrimp in a single layer. Cook for about 2-3 minutes on each side until the shrimp are opaque and cooked through. Be careful not to overcook them, as they can become tough. Remove from heat and set aside. Next, we need to warm the tortillas. In a dry skillet over medium heat, warm the corn tortillas for about 30 seconds on each side. This step makes them soft and pliable. Warm tortillas hold the fillings better and add to the overall taste. Now comes the fun part—assembling the tacos! Take a warm tortilla and layer a few shrimp. Add a generous spoonful of the slaw, a couple of avocado slices, and drizzle with sour cream or Greek yogurt. Each bite should be a mix of flavors and textures. Serve your tacos with lime wedges on the side. A squeeze of lime adds zest and brightens the dish. Enjoy your homemade spicy shrimp tacos! For the complete list of steps, refer to the Full Recipe. To get the best shrimp, avoid overcooking. Cook shrimp for just 2-3 minutes on each side. Perfect shrimp should look opaque and firm. If you love heat, adjust the spice levels. You can add more cayenne pepper for a kick or reduce it for a milder flavor. Add other vegetables for extra crunch. Bell peppers or radishes work well. Try different colors for a vibrant look. Let the slaw sit for about 10-15 minutes. This allows the flavors to blend and deepen, making each bite more exciting. Corn tortillas are classic and tasty. For a different texture, try flour tortillas. They are soft and chewy, perfect for wrapping. If you want a low-carb option, use lettuce wraps instead. They add a fresh crunch and keep it light. {{image_2}} You can switch shrimp for chicken or tofu. Chicken works great with the same spices. Just cook it until it’s fully done. Tofu absorbs flavors well. Press it first to remove water. Then, marinate it like the shrimp. You can also use white fish fillets for fresh fish tacos. Fish cooks quickly, so keep an eye on it. Want more heat? Add jalapeños or hot sauce to the tacos. These will give your meal a nice kick. If you want a sweet touch, try mango or pineapple. These fruits balance the spice and add freshness. You can chop them up and add them to the slaw or top the tacos. If you need gluten-free options, use corn tortillas. They are tasty and keep the tacos intact. For a vegan version, swap sour cream for vegan alternatives. You can use plant-based yogurt or cashew cream. These options keep your tacos rich and creamy without dairy. Store shrimp and slaw in separate airtight containers. This keeps them fresh longer. Wrap tortillas tightly to stop them from drying out. You want them soft and ready for your next taco feast. Eat leftovers within 2-3 days for the best taste. Shrimp loses its nice texture if kept too long. When reheating, do it gently. This keeps the shrimp tender and tasty. You can freeze marinated shrimp for up to 2 months. Just make sure they are in a good freezer bag. Slaw is best fresh and should not be frozen. Freezing changes its crunch and flavor. Yes, but assemble just before serving for best texture. If you prep the shrimp and slaw in advance, it saves time. Just keep them in the fridge until you're ready to eat. This way, your tacos stay fresh and crunchy. Chicken, tofu, or fish are great alternatives. If you want a different flavor, try using cod or tilapia. These proteins work well with the same spices and slaw. You can easily make a delicious taco with what you have. Adjust cayenne pepper and chili powder to your taste. If you like it mild, use less cayenne. For more heat, add extra chili powder or even fresh jalapeños. Always taste as you go and find your perfect balance. Packed with protein and veggies, they can be a healthy meal choice. Shrimp is low in calories and high in protein. The slaw adds fiber and nutrients. This meal fits well into many diets. Consider serving with rice, beans, or a fresh salad. A side of black beans adds protein and flavor. Rice can soak up any extra sauce. A salad offers a refreshing crunch and balances the meal. Check the "Full Recipe" section for complete details. You will find all the steps and ingredients needed to make these tasty tacos. You learned how to make spicy shrimp tacos from scratch. We covered ingredients, cooking steps, and tips to enhance flavor. These tacos are easy and fun to customize. Use different proteins or add your favorite toppings. Store leftovers properly for the best taste. Enjoy these tacos with friends or family for a great meal. With a bit of creativity, your tacos can be a hit at any gathering. Happy cooking!

Spicy Shrimp Tacos with Slaw Flavorful and Fresh Delight

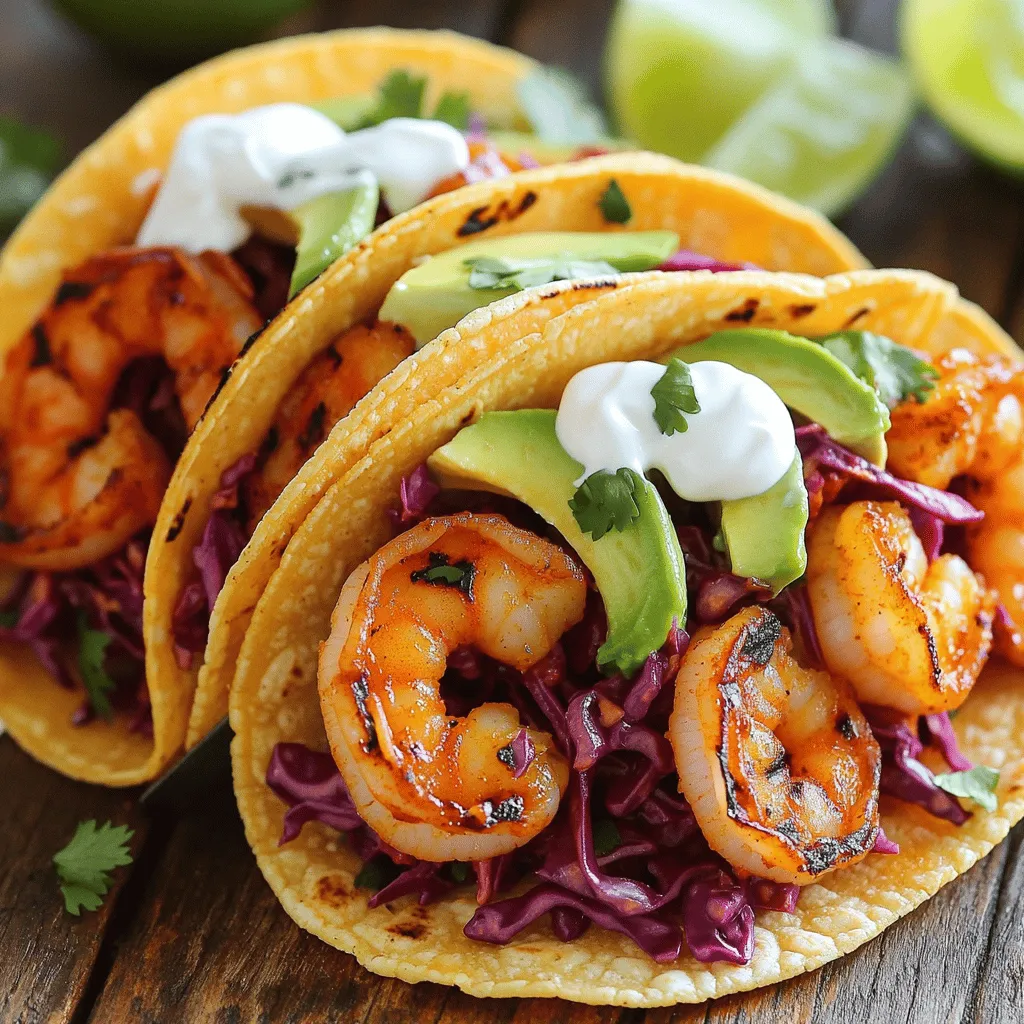
Get ready to spice up your dinner with my delicious Spicy Shrimp Tacos with Slaw! This fresh and flavorful dish

To make Cherry Pineapple Dump Cake, you need a few simple ingredients. Here is the full list: - 1 can (20 oz) crushed pineapple, undrained: This gives moisture and sweetness. The juice from the pineapple helps the cake stay soft. - 1 can (21 oz) cherry pie filling: This adds a rich cherry flavor. It creates a nice layer on top of the pineapple. - 1 box (15.25 oz) yellow cake mix: This is the main base of the cake. It helps create a fluffy texture. - 1 cup unsalted butter, melted: This adds richness and helps the cake bake evenly. It also creates a nice golden top. - 1/2 cup chopped pecans or walnuts (optional): These nuts give a nice crunch. They add extra flavor if you like. - Whipped cream or vanilla ice cream for serving: This makes the dessert even better. A scoop of ice cream or a dollop of cream adds creaminess. These ingredients come together to make a delicious and easy dessert. Each part plays a role in creating a delightful treat. {{ingredient_image_1}} First, preheat your oven to 350°F (175°C). This step is key for a good bake. While the oven heats up, grab a 9x13-inch baking dish. Next, pour the can of undrained crushed pineapple into the dish. Spread it evenly across the bottom. This fruity layer adds moisture and flavor to your cake. Now, take the cherry pie filling and carefully spoon it over the pineapple. Make sure it covers the pineapple completely. This creates a sweet and tangy layer that will shine through after baking. After layering the fruits, it's time to add the cake mix. Open the box of yellow cake mix and sprinkle it evenly over the cherry filling. Do not mix; just let it sit there. This will form the cake top. Next, melt the butter in a microwave or on the stove. Drizzle the melted butter over the cake mix. Try to cover as much as you can. This helps the top get golden and crispy when it bakes. Place your assembled cake in the preheated oven. Bake it for about 40-45 minutes. Look for a golden brown top that is bubbly. Once your cake is done, take it out of the oven and let it cool for about 10 minutes. This cooling time helps the flavors set and makes it easier to serve. Enjoy your delicious creation! To bring out the best in your Cherry Pineapple Dump Cake, focus on the butter. Melted butter adds rich flavor. You want to drizzle it evenly over the cake mix. This way, each bite gets that buttery goodness. For added crunch, consider nuts. Chopped pecans or walnuts work great. They add a nice texture and flavor contrast. If you like, you can mix in some nuts with the cake mix. This gives a more even nut flavor throughout the cake. Serving your cake well makes it even more special. A dollop of whipped cream on top can really elevate it. You might also try a scoop of vanilla ice cream. Both options taste great and look nice. Garnishing can add a fun touch. Fresh cherries or pineapple slices on top make for a pretty presentation. You can also sprinkle a little extra chopped nuts around the edges. This adds color and a bit of extra flair. Pro Tips Layer Wisely: Make sure to spread the crushed pineapple evenly to create a moist base for the cake, which will help keep it from becoming too dry. Butter Coverage: Drizzle the melted butter slowly and evenly over the cake mix to ensure all areas are moistened for a perfect bake. Nutty Crunch: If you choose to add nuts, lightly toast them beforehand to enhance their flavor and add extra crunch to your dump cake. Serve Warm: For the best experience, serve the dump cake warm with whipped cream or vanilla ice cream to complement the fruity flavors. {{image_2}} You can switch up the fruit in this dump cake. Try using a different pie filling. Blueberry or peach fillings add a nice twist. You can also mix fruits. Combine cherry filling with fresh blueberries for a fun flavor. Incorporating seasonal fruits works well, too. In the summer, use fresh cherries and peaches. In the fall, diced apples or pears can create a cozy taste. The key is to keep the fruit juicy. This helps the cake stay moist. You can make this dump cake fit your diet. For gluten-free, choose a gluten-free cake mix. Many brands offer great options. Just check the label to be sure. If you need a dairy-free cake, use vegan butter. Coconut oil is another great alternative. Both keep the cake tasty and moist. This way, everyone can enjoy a slice without worry. To keep your Cherry Pineapple Dump Cake fresh, store it in an airtight container. You can also cover it tightly with plastic wrap. This helps keep moisture in and prevents it from drying out. You should aim to eat the leftovers within three to four days. If you want to keep it longer, you can freeze it. Just make sure to wrap it well in foil or freezer-safe bags to avoid freezer burn. It can last up to three months in the freezer. When it’s time to enjoy your leftovers, reheating is easy. Preheat your oven to 350°F (175°C). Place the dump cake in an oven-safe dish. Cover it with foil to keep it from getting too brown. Heat for about 15 to 20 minutes, or until it’s warm throughout. You can also use a microwave for quicker reheating. Just heat in short bursts of 30 seconds. Keep an eye on it to avoid overheating. Enjoy your warm dessert with whipped cream or ice cream for the best taste! Yes, you can make Cherry Pineapple Dump Cake ahead of time. Prepare it and store it in the fridge for up to two days before baking. This lets the flavors blend well. Just remember to bake it right before you serve it. It tastes best warm and fresh from the oven. If you don’t have yellow cake mix, you can use a white cake mix. You can also try a gluten-free cake mix for a gluten-free option. If you want something different, a chocolate cake mix gives a fun twist. Just keep the same amount, and follow the rest of the recipe as usual. Yes, you can use fresh fruit instead of canned. For pineapple, chop fresh pieces and use them in place of crushed pineapple. For cherries, use fresh ones or even frozen cherries. Just be sure to adjust the juice if needed. Fresh fruit can add a bright taste and texture to your cake. In this article, we covered how to make a delicious Cherry Pineapple Dump Cake. We discussed the key ingredients, like crushed pineapple and cherry pie filling. I shared easy steps for baking and cooling the cake. We explored tips for flavor and presentation, plus fun variations. Remember, you can customize it to fit your needs. You can store leftovers properly to enjoy later. Baking can be fun and rewarding. Dive into this tasty treat and impress your friends and family!

Cherry Pineapple Dump Cake Easy and Delicious Recipe

Are you ready to delight your taste buds with a tasty dessert? This Cherry Pineapple Dump Cake is simple to

- 1 pound baby carrots, peeled and trimmed - 4 cloves garlic, minced - 2 tablespoons olive oil - 1 teaspoon dried thyme - 1 teaspoon dried rosemary - Salt and pepper to taste - 1 tablespoon fresh parsley, chopped (for garnish) - Zest of 1 lemon - Baking sheet - Parchment paper - Mixing bowl - Chef's knife When making Garlic Herb Roasted Carrots, start by gathering your ingredients. Baby carrots work best for their sweetness and easy prep. You will need fresh garlic for a bold flavor and olive oil to help the herbs stick. Dried thyme and rosemary add depth to each bite. A splash of lemon zest brightens the dish. Fresh parsley offers a nice touch of color and flavor. You can find all these ingredients at your local grocery store or farm market. Next, grab your tools. A baking sheet lined with parchment makes clean-up easy. A mixing bowl helps combine everything. A chef's knife will help you chop the garlic and parsley. With these ingredients and tools ready, you are set for a delicious side dish that is both simple and tasty. For the full recipe, check the earlier section. - Preheat the oven to 425°F (220°C). - Line a baking sheet with parchment paper. To start, preheating the oven is key. It helps the carrots roast evenly and get that nice caramelized flavor. Lining the baking sheet with parchment paper makes cleanup easy. Plus, it prevents the carrots from sticking. - Combine carrots, garlic, olive oil, and herbs. - Season with salt and pepper. Next, grab a large bowl. Add the baby carrots, minced garlic, olive oil, dried thyme, and dried rosemary. Toss everything together until the carrots are well coated. This lets all the flavors blend perfectly. Don’t forget to sprinkle in salt and pepper to taste. This step is crucial for bringing out the natural sweetness of the carrots. - Spread carrots on the baking sheet. - Roast for 20-25 minutes, stirring halfway through. Now, spread the coated carrots in a single layer on your prepared baking sheet. The even layer ensures they roast properly. Pop them in the oven for about 20-25 minutes. Halfway through, give them a stir. This helps them cook evenly and get that lovely golden color. Once they’re tender and caramelized, they’re ready to shine on your table. For the full recipe, check out the original source. To check for tenderness, pierce a carrot with a fork. If it slides in easily, the carrots are done. This simple test helps you avoid overcooking. Even spacing on the baking sheet is key. If the carrots touch, they may steam instead of roast. Spread them out to get that nice caramelization. You can add other herbs or spices for more flavor. Try basil or oregano for a twist. A pinch of chili flakes gives a nice kick. For toppings, consider crumbled feta or toasted nuts. These add texture and flavor to the dish. Serve the carrots in a fan shape on a platter. This makes them look more inviting. You can also drizzle olive oil on top for shine. Use fresh parsley as a garnish to add color. A sprinkle of lemon zest makes the dish pop visually and adds freshness. {{image_2}} You can switch regular carrots for baby carrots. Baby carrots are sweet and tender. Regular carrots have a stronger flavor. Both work well, depending on your taste. You can also try different herbs. If you don’t have thyme or rosemary, use oregano or basil. Each herb gives a new twist. Experiment and find your favorite mix! These carrots pair well with many proteins. Try them with grilled chicken or roasted fish. They add color and flavor to your plate. You can also serve them as part of a larger meal. Try them with a salad or grain dish. They fit well into a cozy dinner or a big feast. To make this dish vegan-friendly, skip the butter and use olive oil. It keeps the flavors and is plant-based. For a gluten-free option, this recipe is already safe! All the ingredients are gluten-free, so enjoy without worry. You can share this dish with anyone! For the full recipe, visit the [Full Recipe]. To keep your garlic herb roasted carrots fresh, store them in an airtight container. This helps seal in their flavor. Place them in the fridge within two hours of cooking. They can last for about 3 to 5 days in the refrigerator. The best way to reheat roasted carrots is in the oven. Preheat your oven to 350°F (175°C) and place the carrots on a baking sheet. Heat for about 10 minutes, or until they are warm. This method keeps the carrots flavorful and avoids sogginess. You can also use a microwave, but be sure to cover them with a damp paper towel to keep them moist. To freeze your roasted carrots, first let them cool completely. Then, spread them in a single layer on a baking sheet. Freeze them for about 1 hour, or until solid. Transfer the frozen carrots to a freezer-safe bag or container. They can last up to 3 months in the freezer. To thaw, simply place them in the fridge overnight. For reheating, use the oven or microwave as mentioned above. This keeps them tasty and enjoyable even after freezing. For the full recipe, check back for the detailed steps! Can I make Garlic Herb Roasted Carrots ahead of time? Yes, you can prepare these carrots ahead. Cook them fully and cool them down. Store them in the fridge for up to three days. Reheat them in the oven when you are ready to serve. This method keeps them tasty and fresh! What other vegetables can I use for roasting? Roasting is great for many veggies. Consider using potatoes, broccoli, or bell peppers. Root vegetables like parsnips or beets work well, too. Just cut them into even pieces for best results. Caloric breakdown and health benefits One serving of Garlic Herb Roasted Carrots has around 100 calories. Carrots are rich in vitamins A and K. They support eye health and boost your immune system. The olive oil adds healthy fats, while garlic provides antioxidants. Are garlic and herbs good for health? Yes, garlic is known for its health benefits. It may help reduce blood pressure and cholesterol. Herbs like thyme and rosemary have anti-inflammatory properties. They also add flavor without extra salt or calories. How to avoid burnt garlic To prevent burnt garlic, add it later in the cooking process. Toss the minced garlic with the carrots halfway through roasting. This keeps it flavorful and prevents bitterness. How to adjust cooking time for larger carrots If you use larger carrots, cut them into smaller pieces. Aim for uniform sizes to cook evenly. Larger pieces may need 5-10 extra minutes. Always check for tenderness with a fork to ensure they are done. This article covered Garlic Herb Roasted Carrots, focusing on ingredients, tools, and cooking steps. You learned how to prep, mix, and roast to perfect tenderness. I shared tips for enhancing flavor and presentation. Storage methods and variations broaden your options. Always feel free to experiment with herbs and vegetables. This dish is healthy, tasty, and easy to make. Enjoy your cooking adventure!

Garlic Herb Roasted Carrots Flavorful Side Dish Recipe

Looking for a delicious side dish to elevate your meals? Garlic Herb Roasted Carrots are the perfect choice! This simple

- 1 can (15 oz) chickpeas, drained and rinsed - 1 cup cherry tomatoes, halved - 1 cucumber, diced - 1/2 red onion, finely chopped - 1 bell pepper (red or yellow), diced - 1/2 cup Kalamata olives, pitted and halved - 1/2 cup feta cheese, crumbled - 2 tablespoons fresh parsley, chopped Chickpeas are the star here. They give protein and fiber. I love using canned chickpeas for ease. Rinse them well to remove salt. Next, I add vibrant vegetables. Cherry tomatoes bring sweetness. Cucumbers add crunch. Red onion gives a nice bite. Bell peppers add color and texture. Kalamata olives pack a briny punch. Feta cheese adds creaminess. Fresh parsley brightens the dish. - 3 tablespoons olive oil - 2 tablespoons lemon juice - 1 teaspoon dried oregano - Salt and pepper to taste For the dressing, I combine olive oil and lemon juice. This adds a nice tang. Dried oregano gives a classic Greek flavor. I always season with salt and pepper. Adjust to your taste. A well-made dressing makes the salad shine. Chopped Greek Chickpea Salad is healthy and filling. One serving has about 300 calories. You get a mix of protein, carbs, and fats. Chickpeas and feta cheese provide protein. Fresh veggies add vitamins and minerals. This salad is great for digestion too. The fiber helps keep you full. Eating this salad boosts your energy and mood. Looking for the full recipe? You can find it above! First, you need to rinse and drain the chickpeas. This step makes them fresher. Use a colander to remove excess liquid. Next, chop your vegetables and herbs. Dice the cucumber, halve the cherry tomatoes, and finely chop the red onion. Don’t forget to chop the bell pepper and parsley, too. This mix of colors adds beauty to your salad. Now, let’s mix everything together. In a large bowl, combine the drained chickpeas, halved cherry tomatoes, diced cucumber, chopped red onion, and diced bell pepper. Add in the Kalamata olives and crumbled feta cheese. Finally, sprinkle in the chopped parsley for a fresh touch. Next, prepare the dressing. In a small bowl, whisk together olive oil, lemon juice, dried oregano, salt, and pepper. This mix adds zing to your salad. Pour the dressing over the salad ingredients. Toss gently until everything is well coated. Let the salad sit for about 10 minutes. This helps the flavors blend nicely. When it's time to serve, think about presentation. Use a large, shallow bowl for a beautiful display. You can also serve it in individual bowls for a nice touch. This salad pairs well with grilled meats or pita bread for a complete meal. Enjoy the fresh flavors and healthy ingredients! For the full recipe, check the section above. For easy meal prep, wash your veggies first. You can chop the cucumber, tomatoes, and onion a day ahead. Store them in airtight containers. This keeps them fresh and crisp. You can prep the chickpeas too. Just drain and rinse them, then store them separately. This way, you save time when you make the salad. For extra flavor, try adding spices. A pinch of smoked paprika or a dash of cumin can elevate the taste. If you like heat, add a bit of cayenne pepper. Always taste your dressing. If it needs more zing, add more lemon juice or salt. Adjust the seasoning based on your preference to make it perfect for you. Chopped Greek chickpea salad is best served chilled. This keeps the flavors bright and fresh. You can chill it in the fridge for 30 minutes before serving. However, it’s also tasty at room temperature. This makes it great for picnics or potlucks. Enjoy it however you like! For the full recipe, check the earlier section. {{image_2}} You can change the dressing to fit your taste. I love making homemade dressings. A Greek yogurt-based dressing adds creaminess and tang. Just mix yogurt, lemon juice, and herbs. For a lighter option, try a vinegar-based dressing. Combine olive oil, vinegar, and seasonings for a fresh taste. If you’re in a hurry, store-bought dressings work too. Look for ones labeled "Mediterranean" or "Greek" for a quick fix. This salad is flexible. You can add protein like grilled chicken or tuna for a heartier meal. If you want a vegetarian option, simply remove the feta or swap it for vegan cheese. This keeps the salad tasty and satisfying for everyone. You can also add nuts like walnuts for extra crunch and nutrition. Use seasonal ingredients to keep your salad exciting. In spring, add fresh peas or asparagus. Summer is perfect for ripe tomatoes and sweet corn. In the fall, try diced apples or roasted squash. Winter brings hearty greens like kale or spinach. Each season offers new flavors to explore in your Chopped Greek Chickpea Salad. Don't forget to check the [Full Recipe] to get started! You can keep Chopped Greek Chickpea Salad in the fridge for about 3 to 5 days. Store it in an airtight container to keep it fresh. Glass containers work well because they seal tightly and do not stain. If you use plastic containers, make sure they are BPA-free. No, I do not recommend freezing this salad. The veggies and feta cheese do not freeze well. When thawed, they can become mushy and lose their taste. If you have leftover salad, it is best to eat it fresh. You do not need to reheat this salad. Serve it cold or at room temperature. If you want to add some freshness, toss in a little more olive oil and lemon juice before serving. This helps the flavors pop! Enjoy it on its own or with pita bread for a complete meal. For the full recipe, check out the details above. Chopped Greek Chickpea Salad lasts about 3 to 5 days in the fridge. After that, it may spoil. Signs of spoilage include a sour smell or a change in color. Always check for these signs before eating. Yes, you can make this salad a day in advance. To keep it fresh, store it in an airtight container. Mix the salad and dressing separately. Combine them just before serving to preserve the crunchiness of the veggies. If you need options, you can swap chickpeas for black beans or lentils. For cheese, consider using goat cheese or nutritional yeast for a vegan twist. These changes keep the salad tasty and interesting. Yes, this salad is gluten-free! All the ingredients, like chickpeas, vegetables, and olives, do not contain gluten. This makes it a great choice for those with gluten sensitivities or celiac disease. Enjoy your fresh and healthy meal without worry! You can find the Full Recipe for Chopped Greek Chickpea Salad to make this delicious dish. This blog post covered a delicious Chopped Greek Chickpea Salad. We explored the key ingredients, like chickpeas and fresh veggies, and discussed the perfect dressing. I shared how to prepare, combine, and serve it for best results. You learned about storage tips and flavor variations. Overall, this salad is healthy, easy, and adaptable. Whether you meal prep or serve it fresh, it’s a great dish for any time. Enjoy your cooking journey, and make this salad your own!

Chopped Greek Chickpea Salad Fresh and Flavorful Dish

Looking for a fresh and healthy dish that bursts with flavor? You’ve found it! This Chopped Greek Chickpea Salad combines

To make Buffalo Chicken Stuffed Sweet Potatoes, you need: - 4 medium sweet potatoes - 2 cups shredded cooked chicken - ½ cup buffalo sauce (adjust to taste) - 1 cup shredded cheddar cheese - ½ cup Greek yogurt (or sour cream) - 2 green onions, sliced - 1 tablespoon olive oil - Salt and pepper to taste - Optional: celery sticks and additional blue cheese for garnish These ingredients work together to create a tasty and hearty meal. The sweet potatoes give a nice balance to the spicy buffalo chicken. If you want to boost the taste, consider adding: - Crumbled blue cheese for a tangy kick - Fresh herbs like cilantro or parsley for freshness - Diced celery for crunch - A squeeze of lime or lemon juice for brightness These optional ingredients let you customize your dish to fit your taste. Not every ingredient may be on hand. Here are some easy swaps: - Use leftover rotisserie chicken instead of cooking your own. - Swap buffalo sauce for BBQ sauce if you prefer a milder taste. - Use mozzarella or pepper jack cheese instead of cheddar for a different flavor. - Greek yogurt can be replaced with sour cream, or even avocado for a creamy touch. These substitutions allow you to adapt the recipe based on what you have. You can enjoy a great meal without any stress! For the full recipe, check out the complete cooking instructions. To start, preheat your oven to 400°F (200°C). Next, wash the sweet potatoes under running water and dry them with a towel. Use a fork to poke a few holes in each potato. This helps the steam escape while they cook. Now, place the sweet potatoes on a baking sheet. Drizzle them with olive oil and sprinkle with salt and pepper. Bake them for about 45 to 60 minutes. They are done when they feel soft when you poke them with a fork. While the sweet potatoes bake, let’s make the buffalo chicken mixture. In a mixing bowl, add 2 cups of shredded cooked chicken. Pour in ½ cup of buffalo sauce. Mix the chicken and sauce well until the chicken is fully coated. You can adjust the buffalo sauce to your taste. If you like it spicy, add more sauce! Once your sweet potatoes are ready, take them out of the oven and let them cool for a few minutes. Cut each potato down the middle. Use a fork to gently mash the insides for a creamy texture. Now, fill each sweet potato with the buffalo chicken mixture. Pack it in generously to make it tasty. Top each stuffed potato with shredded cheddar cheese. Return the baking sheet to the oven and bake for another 10 minutes. You want the cheese to be melted and bubbly. After that, let them cool briefly. Drizzle Greek yogurt on top and sprinkle with sliced green onions. If you want, add celery sticks and blue cheese for a nice touch. Enjoy your Buffalo Chicken Stuffed Sweet Potatoes! For the full recipe, check out the section above. To cook sweet potatoes just right, start by choosing medium-sized ones. Wash them well under running water. Use a fork to poke holes in each potato. This helps steam escape as they cook. Place them on a baking sheet, drizzle with olive oil, and season with salt and pepper. Bake at 400°F for 45 to 60 minutes. Check for doneness by piercing with a fork; they should feel soft inside. This method gives you a fluffy texture every time. For more flavor, mix in spices with your buffalo sauce. Add some garlic powder, onion powder, or smoked paprika. You can also toss in chopped celery for crunch. If you like it spicy, try adding a dash of cayenne pepper. Using high-quality buffalo sauce makes a big difference. Choose one with bold flavor. The cheese on top should be sharp cheddar for a great melt and taste. Serve your stuffed sweet potatoes on a rustic platter for a nice touch. You can place small bowls of extra buffalo sauce and Greek yogurt on the side. This lets everyone add more sauce as they like. Garnish with sliced green onions and, if you want, a few celery sticks. For a fun twist, consider serving with a side salad or fresh veggies. This adds color and freshness to your meal. You can find the full recipe for Buffalo Chicken Stuffed Sweet Potatoes to guide you through every step! {{image_2}} You can make this dish meatless. Replace chicken with cooked quinoa or chickpeas. Both options add protein and texture. Use a robust buffalo sauce to keep the flavors bold. You can also add sautéed veggies like bell peppers or mushrooms. They bring great taste and nutrients to the meal. Buffalo sauce is classic, but you have options. Try barbecue sauce for a sweet twist. A spicy ranch dressing can also add a creamy kick. If you like bold flavors, use a spicy Sriracha sauce. Each sauce will change the dish's flavor profile, so experiment to find your favorite. Toppings can elevate your sweet potatoes. Add crumbled blue cheese or feta for richness. Chopped cilantro or parsley adds a fresh touch. You can even sprinkle crushed tortilla chips for crunch. Don't forget a drizzle of extra buffalo sauce for those who love heat. These small touches make a big difference in taste and presentation. For detailed instructions, check the Full Recipe. After enjoying Buffalo Chicken Stuffed Sweet Potatoes, let leftovers cool. Place them in an airtight container. Store in the fridge for up to four days. Make sure they are sealed well to keep them fresh. To reheat, you can use the oven or microwave. For the oven, preheat it to 350°F (175°C). Place the stuffed sweet potatoes on a baking sheet. Heat for about 15-20 minutes, or until they are warm throughout. If using a microwave, place the potatoes on a microwave-safe plate. Heat for about 2-3 minutes, checking to avoid overheating. You can freeze these stuffed sweet potatoes for later. Wrap each one tightly in plastic wrap or foil. Place them in a freezer-safe bag or container. They will keep well for up to three months. When ready to eat, thaw them overnight in the fridge before reheating. Yes, you can prepare these sweet potatoes in advance. Cook the sweet potatoes and the buffalo chicken mixture separately. Store them in airtight containers in the fridge for up to two days. When you're ready to eat, just reheat and stuff the sweet potatoes. This makes meal prep easy and quick. You can serve many things with these stuffed sweet potatoes. Try a fresh salad with crisp greens. Carrot and celery sticks with ranch dip work well too. You might like some corn on the side for extra color and crunch. Buffalo chicken dip is also a fun addition for more flavor. To adjust the spice level, change the amount of buffalo sauce you use. Start with less sauce and add more if you want more heat. You can also add diced jalapeños or hot sauce to the chicken mixture. For a milder option, use a less spicy sauce or mix in some honey. This lets you control the spice to fit your taste. Buffalo Chicken Stuffed Sweet Potatoes are tasty and easy to make. We covered the essential ingredients, preparation steps, and tips to help you succeed. I shared variations for different diets and how to store leftovers. Remember, you can customize this dish to fit your taste. Use your favorite sauces and toppings for extra flavor. This recipe is perfect for meal prep or a quick weeknight dinner. Dive in and enjoy making this meal that is both fun and healthy!

Buffalo Chicken Stuffed Sweet Potatoes Tasty Recipe

Looking for a simple, tasty meal? Buffalo Chicken Stuffed Sweet Potatoes will hit the spot! Packed with flavor and easy

To make this creamy avocado pasta, gather these fresh and simple ingredients: - 2 ripe avocados - 2 cloves garlic, minced - 2 tablespoons fresh lemon juice - 1/4 cup fresh basil leaves, packed - 1/4 cup olive oil - Salt and pepper to taste - 12 ounces spaghetti or your favorite pasta - 1/4 cup grated Parmesan cheese (optional for garnish) - Cherry tomatoes, halved (for garnish) You can add your own twist to this dish! Here are some fun ideas: - Red pepper flakes for heat - Cooked chicken or shrimp for protein - Spinach or kale for extra greens - Nuts like pine nuts or walnuts for crunch This creamy avocado pasta is not just tasty; it's good for you too! Here’s a quick look at its nutritional benefits: - Avocados provide healthy fats and fiber. - Garlic may help boost your immune system. - Fresh basil adds vitamins A and K. - Using whole grain pasta can increase fiber content. Enjoy this dish that’s both a feast for the senses and a boost for your health. For the full recipe, check out the details above! Start by boiling water in a large pot. Add salt to the water; this adds flavor. Once the water boils, add 12 ounces of spaghetti. Cook it according to the package directions until it is al dente. This usually takes about 8 to 10 minutes. Before you drain the pasta, save 1 cup of that pasta water. This water helps to make the sauce creamy later on. Drain the pasta and set it aside. Next, grab a food processor. Add 2 ripe avocados, 2 cloves of minced garlic, and 2 tablespoons of fresh lemon juice. Toss in 1/4 cup of fresh basil leaves as well. Blend this mix until it becomes smooth and creamy. As you blend, slowly pour in 1/4 cup of olive oil. If the sauce is too thick, you can add some of the reserved pasta water. This helps adjust the creaminess to your liking. Season the mixture with salt and pepper to taste. Now, take the pot you used for the pasta. Return the drained spaghetti to the pot. Pour the creamy avocado sauce over the pasta. Toss everything together until the spaghetti is well coated. If the sauce is still thick, add a bit more of the reserved pasta water. This will help the sauce cling to the pasta better. Once mixed, serve the pasta on plates. You can garnish with grated Parmesan cheese and halved cherry tomatoes for an extra touch. Enjoy your creamy avocado pasta! For the complete recipe, check the Full Recipe. When picking avocados, look for ones that feel slightly soft. Gently press the skin; it should yield a bit. If it feels hard, it’s not ripe. If it feels mushy, it’s overripe. You want that perfect balance. Color can help, too. A dark green or black skin often means it’s ripe. Avoid any with large dark spots or cracks. To boost flavor, try adding more herbs. Fresh parsley or cilantro can add zest. A pinch of red pepper flakes gives a nice kick. You might also mix in some diced sun-dried tomatoes for sweetness. Consider adding nuts, like pine nuts, for crunch. These small changes can make your creamy avocado pasta shine even brighter. Don’t skip reserving pasta water. It helps thin the sauce and adds flavor. Also, avoid over-blending the avocado sauce; it should remain creamy, not runny. Make sure to season well with salt and pepper. A bland sauce can ruin the dish. Finally, don’t forget to taste as you go; this ensures your pasta is just right. For the complete directions, check the Full Recipe. {{image_2}} You can easily make creamy avocado pasta gluten-free. Just swap regular pasta for gluten-free options. Look for rice, quinoa, or chickpea pasta. These alternatives taste great and work well with the creamy sauce. Make sure to check the cooking time, as it may differ from regular pasta. If you're vegan, you can make this dish without any dairy. Skip the Parmesan cheese, and use nutritional yeast instead. It adds a cheesy flavor without using animal products. You can also add more garlic or lemon juice for an extra zing. Want to boost the flavor? Try adding some fresh herbs. Chopped parsley or cilantro can add a new twist. You might also toss in some veggies, like spinach or zucchini. For a bit of heat, add red pepper flakes. These options keep the dish fresh and exciting. Check out the Full Recipe for the complete guide! Store any leftover creamy avocado pasta in an airtight container. This keeps it fresh. Make sure to chill it in the fridge right away. The pasta will stay good for up to three days. If you know you won’t eat it all, consider storing the pasta and sauce separately. This helps keep the flavor and texture better. To reheat the pasta, use a microwave or a pan on the stove. If using a microwave, heat it in short bursts. Stir between heating to ensure even warmth. If using a pan, add a splash of water or olive oil. This keeps the pasta moist. Heat it on low until warm. Avoid high heat, which can dry it out. You can freeze the creamy avocado sauce for later use. Put it in a freezer-safe container. Be sure to leave some space for expansion. The sauce will freeze well for up to two months. When ready to use, thaw it in the fridge overnight. After thawing, blend it again for a smooth texture. This helps restore its creamy goodness before mixing with pasta. For the full recipe, check out the Creamy Avocado Pasta section above. Yes, you can prepare the avocado sauce ahead of time. Store it in a bowl. Cover it tightly with plastic wrap. Press the wrap directly on the sauce to limit air contact. This keeps it fresh and green. Cook your pasta fresh when you are ready to serve. Mix the sauce with the pasta just before eating for the best taste. If you want a dairy-free option, try nutritional yeast. It adds a cheesy flavor without dairy. You can also use vegan cheese shreds. For a nutty taste, sprinkle some ground almonds or cashews on top. These options work well and keep your dish creamy and tasty! To stop the avocado from browning, use fresh lemon juice. The acid in it slows the browning process. Store any leftover avocado sauce in an airtight container. Make sure to cover the surface with plastic wrap. This helps keep air away from the sauce. Enjoy this creamy avocado pasta fresh for the best flavor. For the full recipe, check out the [Full Recipe]. This blog post covered avocado pasta, starting with key ingredients and optional variations. I shared step-by-step instructions for making the dish, including preparation and mixing techniques. You learned tips on choosing ripe avocados and common mistakes to avoid. The section on variations showed gluten-free and vegan options. Finally, we discussed storage and reheat methods. In conclusion, this simple, tasty recipe is easy to adapt. Enjoy your avocado pasta with all its possible twists!

Creamy Avocado Pasta Easy and Delicious Wonder

Are you ready to enjoy a creamy avocado pasta that’s both easy and delicious? This dish promises to bring a

To make a delicious Peach Cobbler Dump Cake, you need these key items: - 2 cans (15 oz each) sliced peaches in syrup, drained - 1 box yellow cake mix (15.25 oz) - 1 stick unsalted butter (1/2 cup), melted - 1 teaspoon ground cinnamon - 1/2 teaspoon vanilla extract - 1/4 cup brown sugar You can add some fun twists to your dump cake with these extras: - 1 cup chopped pecans for a crunchy texture - Vanilla ice cream for serving - Whipped cream for a creamy topping If you don't have something on hand, try these swaps: - Use fresh peaches instead of canned for a fresher taste. - Substitute melted coconut oil for butter for a dairy-free option. - Try using spice cake mix instead of yellow cake mix for a unique flavor. These ingredients come together to create a sweet and easy dessert delight that everyone will love. For the full recipe, follow along and enjoy making this tasty treat! Start by preheating your oven to 350°F (175°C). This step helps your cake bake evenly. Next, grab a 9x13 inch baking dish. Grease it well with butter or cooking spray. This keeps the cake from sticking and makes serving easier. Now it is time to layer your ingredients. Take the drained peach slices and spread them evenly on the bottom of the greased dish. Drizzle the vanilla extract over the peaches to add a nice flavor. In a bowl, mix the yellow cake mix with ground cinnamon and brown sugar. Sprinkle this dry mix evenly over the peaches. Make sure to cover them completely. Then, pour the melted butter over the cake mix layer. Try to cover as much as you can without mixing it in. If you want some crunch, add chopped pecans on top. Place the dish in the preheated oven. Bake for 45 to 50 minutes. You want the top to be golden brown and the edges bubbling. Once done, take it out and let it cool for about 10 minutes. This cooling time helps the cake set up nicely. Enjoy serving your Peach Cobbler Dump Cake warm. For an extra treat, add a scoop of vanilla ice cream or a dollop of whipped cream on top. This adds a delightful touch to your dessert. For the full recipe, check out the detailed instructions. To get the best texture in your Peach Cobbler Dump Cake, follow a few key steps. First, use ripe peaches for flavor but canned ones work well too. Make sure to drain the peaches well. Too much syrup will make the cake soggy. Then, spread the cake mix evenly over the peaches. This helps the mix absorb the peach juices. Pour the melted butter on top. Don’t mix it in; let it create a nice crust. Bake until the top is golden brown. This will give you that perfect crunchy layer. Serve your dump cake warm for the best taste. A scoop of vanilla ice cream on top melts perfectly into the cake. Whipped cream is another tasty option. For a fun twist, sprinkle some cinnamon on top before serving. You can also serve it with fresh fruit or a drizzle of caramel sauce. This adds a sweet touch and makes it look fancy. Your guests will love the look and taste! Want to boost the flavors? Add a pinch of nutmeg along with the cinnamon. This gives a warm, spiced taste. For a nutty crunch, mix in chopped pecans or walnuts before baking. You can also use almond extract instead of vanilla for a unique twist. If you like a tart flavor, add some lemon juice to the peaches. This balances the sweetness of the cake. Experiment with these ideas to make the recipe your own! For the complete Peach Paradise Dump Cake recipe, check out the Full Recipe. {{image_2}} You can change the fruit in your dump cake. Try using cherries or blueberries. These fruits add their own flavor and sweetness. You can also mix fruits for new tastes. For example, combine peaches with blackberries for a fun twist. If you need a gluten-free version, use gluten-free cake mix. Many brands offer this option. Just make sure to check the label. You can still enjoy the same great taste. Ensure your peaches are also gluten-free. Try different cake mix flavors for fun. Chocolate cake mix adds a rich twist. Spice cake mix gives a warm flavor, perfect for fall. Vanilla or lemon mixes can add a light touch. Each mix brings its unique taste, making your dump cake exciting. For the full recipe, please check the recipe section above. To store your leftover peach cobbler dump cake, let it cool completely. Cover it tightly with plastic wrap or foil. You can also use an airtight container. Keep it in the fridge for up to three days. This cake stays moist and tasty even after a day or two. You can freeze peach cobbler dump cake for longer storage. First, let it cool down. Cut it into slices for easy serving. Wrap each slice in plastic wrap, then place them in a freezer-safe bag. It will stay fresh in the freezer for up to three months. When you’re ready to enjoy, just thaw it overnight in the fridge. Reheating peach cobbler dump cake is simple. You can use the microwave or the oven. For the microwave, place a slice on a plate and heat for 20-30 seconds. If you prefer the oven, preheat it to 350°F (175°C). Place the cake in an oven-safe dish and cover it with foil. Heat it for about 10-15 minutes. This keeps the top nice and crisp. Add a scoop of vanilla ice cream on top for a warm and sweet treat! Yes, you can make Peach Cobbler Dump Cake ahead of time. Prepare the cake and bake it. Let it cool completely, then cover it tightly. Store it in the fridge for up to three days. When you're ready to serve, reheat it in the oven at 350°F for about 15 minutes. This keeps the flavors fresh and warm. You can tell the dump cake is done by looking for a golden-brown top. Check the edges for bubbling, which shows it's cooked through. Use a toothpick to poke the center. If it comes out clean, your dump cake is ready! Let it cool for about 10 minutes before serving. This will help the texture set up nicely. Absolutely! Fresh peaches work great in this recipe. Use about 4 cups of sliced fresh peaches. Make sure they are ripe for the best flavor. You may want to add a bit of sugar to the fresh peaches to enhance their sweetness. This will help mimic the syrup from canned peaches. This blog post covers the key points for making Peach Cobbler Dump Cake. We discussed the ingredients you need and how to prep them. I showed you each step to bake the perfect cake. We explored ways to enhance flavor and serving tips. Plus, I highlighted storage methods and answered common questions. Now, you have all the tools to create this tasty dessert. Enjoy experimenting and sharing your results!

Peach Cobbler Dump Cake Easy Sweet Dessert Delight

If you crave something sweet and easy to make, peach cobbler dump cake is for you! This dessert combines juicy

- Firm tofu - Fresh vegetables To start, you'll need firm tofu. This type holds its shape well during cooking. You also want fresh vegetables for color and crunch. I love using red and yellow bell peppers, along with bright snap peas. These add a nice contrast to the tofu. - Sweet chili sauce - Soy sauce and sesame oil The magic of this dish lies in the sauces. Sweet chili sauce brings a perfect blend of sweetness and heat. Add soy sauce for a savory kick and sesame oil for a nutty finish. Together, they create a delicious sauce that coats the tofu and veggies. - Sesame seeds - Fresh cilantro Garnishes make your dish pop! Sprinkle sesame seeds on top for a bit of crunch. Fresh cilantro adds a bright flavor that enhances the overall taste. These simple touches make your Sweet Chili Tofu Stir Fry not just tasty but beautiful too. For the full recipe, check out the detailed steps. To start, you need to drain and press the tofu. First, take the block of firm tofu and remove it from the package. Wrap it in a clean kitchen towel or paper towels. Place a heavy plate on top of it to press out the moisture. Let it sit for about 15 minutes. This step helps the tofu absorb flavors and get crispy. Next, cut the pressed tofu into bite-sized cubes. In a bowl, toss the tofu cubes with one tablespoon of cornstarch. Make sure each piece is evenly coated. The cornstarch helps create a crispy crust when cooking. Now it's time to cook the tofu. Heat two tablespoons of vegetable oil in a large skillet or wok over medium-high heat. When the oil is hot, add the tofu cubes in a single layer. Cook for about four to five minutes. Turn them occasionally until they turn golden brown and crispy on all sides. This is the key to getting that perfect texture. For extra crispiness, avoid overcrowding the skillet. If needed, cook the tofu in batches. Once done, remove the tofu from the skillet and set it aside. In the same skillet, add the sliced red and yellow bell peppers and the snap peas. Stir-fry them for about three to four minutes. You want them to be slightly tender while keeping their vibrant colors. Next, add minced garlic and grated ginger to the skillet. Stir-fry for one more minute until fragrant. This will add a lovely depth of flavor to your dish. Now, pour in the sweet chili sauce and soy sauce. Stir well to combine the sauces with the veggies. This is where the magic happens! Finally, return the crispy tofu to the skillet. Toss everything gently to coat the tofu and vegetables in the sauce. Drizzle with sesame oil for added richness. Your Sweet Chili Tofu Stir Fry is almost ready! Enjoy it over fluffy rice for a complete meal. For the full recipe, check out the details above. To get the best sweet and spicy mix, start with the right sauce. Sweet chili sauce brings a nice sweetness. You can taste it first to check if it’s too sweet for you. If it is, add more soy sauce. This adds a savory kick. You can also add a dash of hot sauce for extra heat. This gives you a more complex flavor. If you want to control spice, keep hot sauce on the side. Each person can add what they like for their own taste. Using a good skillet or wok matters a lot. A non-stick skillet works well for crisping tofu. It helps prevent sticking. A wok is great for stir-frying, too. It heats evenly and lets you cook fast. Make sure you have a spatula that can handle high heat. A wooden or silicone spatula is best. This will help you stir without scratching your pan. Serve your sweet chili tofu stir fry over rice. White rice or brown rice works great. The rice soaks up the sauce well. You can also use quinoa for a twist. Garnish with green onions and sesame seeds for a nice look. Add fresh cilantro if you want a pop of color and flavor. Pair this dish with a simple salad for a complete meal. You can also enjoy it with spring rolls for a fun combo. Check the Full Recipe for more ideas! {{image_2}} You can switch tofu for chicken or shrimp. This keeps the dish tasty but changes the feel. If you use chicken, cut it into small pieces. Cook it until golden before adding vegetables. For shrimp, just add it when the veggies are almost done. If you want a vegan option, try tempeh or seitan. Both add protein and flavor. Tempeh has a nutty taste, while seitan can mimic meat well. Just prepare them in the same way as tofu. Mix up your veggies based on the season. In spring, try asparagus or broccoli. In summer, add zucchini or corn. In fall, sweet potatoes or Brussels sprouts are great. These options keep your stir fry fresh and fun. Adding more greens can boost the health of your meal. Spinach or kale works well. Toss them in just before serving. This keeps them vibrant and adds a nice crunch. If you like spice, add chili flakes or sriracha to the sauce. This turns up the heat and adds depth. You can also mix in some lime juice for a zesty kick. For a low-sodium version, use low-sodium soy sauce or coconut aminos. This keeps the flavor but cuts back on salt. You can also use homemade sweet chili sauce. It’s easy and much healthier. For the complete recipe, check the Full Recipe section. To keep your Sweet Chili Tofu Stir Fry fresh, store it in an airtight container. Let it cool down first. I recommend using glass containers, as they keep the flavors better. You can store it in the fridge for up to three days. After that, the veggies may lose their crunch. When you want to enjoy your leftovers, reheat them carefully. Use a skillet over medium heat. This helps keep the tofu crispy. If you microwave, do it in short bursts. Stir in between to spread the heat. To avoid sogginess, add a splash of water to the pan. This will create steam and warm it evenly. You can freeze the cooked stir fry if you want to save some for later. Place it in a freezer-safe container. It will stay good for up to a month. When you're ready to eat, thaw it in the fridge overnight. For a quick method, use the microwave on low. This helps keep the texture nice. Yes, you can use different types of tofu. Firm tofu is great for stir-frying. It holds its shape well. Extra-firm tofu is even denser. It has a chewier texture and can be crispier. If you prefer a softer bite, use soft or silken tofu. However, these types may fall apart in the stir-fry. Firm and extra-firm are best for this recipe. To make this dish gluten-free, substitute soy sauce with tamari. Tamari is a gluten-free version of soy sauce. You can also use coconut aminos as an alternative. It offers a similar taste with less salt. Always check labels to ensure your ingredients are gluten-free. This stir-fry pairs well with many side dishes. You can serve it over fluffy white or brown rice. Quinoa or cauliflower rice works too. For a crunchy side, try cucumber salad or steamed broccoli. These sides balance the sweetness of the dish. To add heat, toss in red pepper flakes or sliced fresh chili peppers. Sriracha or chili paste can work too. Add these ingredients when stir-frying the vegetables. Start small, then taste and adjust the spice level to your liking. Enjoy the kick! In this blog post, we explored how to make a delicious Sweet Chili Tofu Stir Fry. We discussed the key ingredients like firm tofu and fresh vegetables. You learned step-by-step instructions, from preparing the tofu to mixing in your sauces. Plus, I shared tips for perfecting flavors and suggested easy variations. Tackle this recipe to enjoy tasty meals at home. With these tips and tricks, you'll impress everyone with your cooking skills. Enjoy the journey of creating a dish that combines flavor and health!

Sweet Chili Tofu Stir Fry Simple and Flavorful Recipe

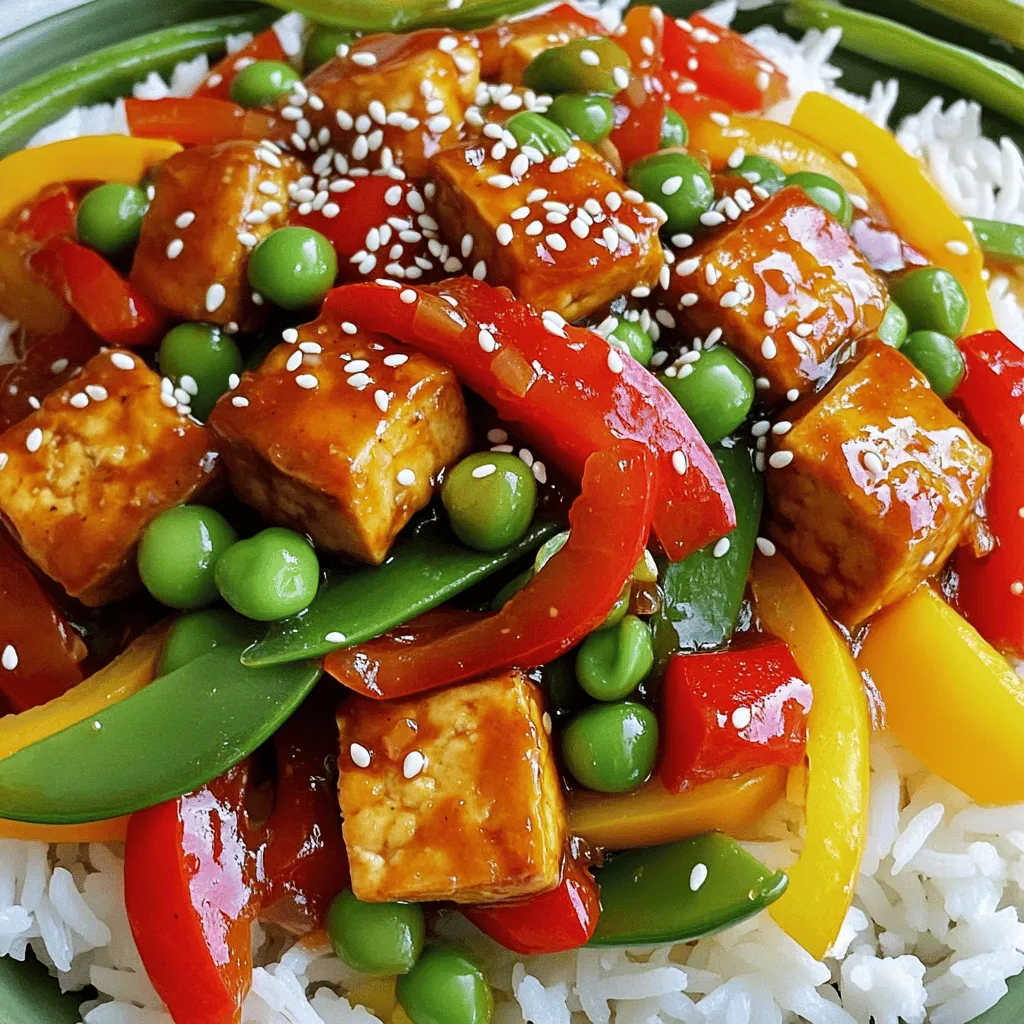
If you love bold flavors and healthy meals, you’ll adore this Sweet Chili Tofu Stir Fry! This simple recipe packs

For a tasty pineapple fried rice, you need a few key items: - 2 cups day-old jasmine rice - 1 cup fresh pineapple, diced - 1/2 cup bell pepper (red or yellow), diced - 1/2 cup peas and carrots (frozen mix is fine) - 2 green onions, thinly sliced - 2 cloves garlic, minced - 2 tablespoons soy sauce - 1 tablespoon sesame oil - 1 tablespoon vegetable oil - 1/2 teaspoon ground black pepper - Salt to taste These ingredients create a nice blend of sweet and savory flavors. The jasmine rice gives a soft texture, while the pineapple adds a bright, fruity note. If you want to jazz up your dish, consider adding: - Cooked shrimp or chicken for protein - Cashews for crunch - Red pepper flakes for heat - Fresh cilantro or additional green onions for garnish These additions can make your meal even more exciting and tailored to your taste. Don't have jasmine rice? Try using brown rice or basmati rice instead. You can swap fresh pineapple for canned pineapple, just drain it well. If you want a vegetarian dish, skip the meat and add more veggies like zucchini or broccoli. This recipe is flexible, so feel free to experiment with what you have on hand. Remember, cooking is all about creativity! For the complete cooking guide, check the Full Recipe. First, gather your ingredients. This makes cooking smooth and fun. Here’s what you need: - 2 cups day-old jasmine rice - 1 cup fresh pineapple, diced - 1/2 cup bell pepper (red or yellow), diced - 1/2 cup peas and carrots (frozen mix is fine) - 2 green onions, thinly sliced - 2 cloves garlic, minced - 2 tablespoons soy sauce - 1 tablespoon sesame oil - 1 tablespoon vegetable oil - 1/2 teaspoon ground black pepper - Salt to taste - Optional garnish: Fresh cilantro or additional green onions Make sure to use day-old rice. Fresh rice can be too sticky. If you only have fresh rice, spread it out on a baking sheet to cool. This helps it dry out a bit. Now, let’s cook! Start by heating the vegetable oil in a large skillet or wok over medium-high heat. Add the minced garlic. Sauté for about 30 seconds. This brings out a nice flavor. Next, toss in the diced bell pepper and the frozen peas and carrots. Stir-fry them for 3-4 minutes. You want them soft but still colorful. Now, add the diced pineapple. Stir gently for another minute. You want it warm but not mushy. It’s time for the rice! Add the day-old jasmine rice to the skillet. Break up any clumps with a spatula. Pour the soy sauce and sesame oil over the rice. Stir everything well to mix the flavors. Sprinkle in the ground black pepper and salt to taste. Keep stir-frying for 3-4 minutes. Make sure everything is heated and mixed nicely. Finally, add the sliced green onions. Mix well and then remove the skillet from the heat. Transfer the fried rice to a serving dish or individual bowls. For a fun twist, serve it in a hollowed-out pineapple. This makes your meal look extra special. You can garnish with fresh cilantro or more green onions for a bright touch. For more details, check the Full Recipe. Enjoy your easy pineapple fried rice! To make great fried rice, use day-old jasmine rice. It has less moisture. Fresh rice can clump together. Spread fresh rice on a baking sheet to cool. This helps keep the rice fluffy. Always heat your skillet or wok before adding oil. A hot pan gives you that nice sear. Stir-fry quickly to lock in flavors. Keep the ingredients moving to prevent burning. Chop all your veggies before cooking. This makes the process smooth and fast. You can also use a frozen mixed veggie bag. It saves time on prep. If you’re in a rush, pre-cooked shrimp or chicken can speed things up. Just toss them in during the last minute of cooking. You can have a meal ready in just 20 minutes! Add a splash of lime juice for extra zing. It brightens up the dish nicely. Fresh herbs like cilantro can boost flavor too. Don't be shy with soy sauce; it adds depth. If you like heat, consider adding sriracha or red pepper flakes. A pinch of sugar can balance the flavors well. For more ideas, check the full recipe for more tips on enhancing taste. {{image_2}} You can easily make this dish vegetarian or vegan. Simply skip the meat and focus on the vibrant veggies. Use extra peas, bell peppers, or mushrooms for a hearty meal. You can also add tofu for protein. Just sauté it until golden before adding rice. This keeps the dish light and fresh. If you want more protein, chicken or shrimp works well. Cook the chicken or shrimp first in your skillet. Once they're done, remove them and add the veggies. Then, combine everything back in when you add the rice. For a meatless option, tofu is great too. Just make sure to press it to remove excess water. This helps it fry better and adds a nice texture. Want some heat? You can easily spice it up. Add chopped jalapeños or red pepper flakes while cooking. This builds flavor and warmth. For an extra kick, drizzle some sriracha on top before serving. The sweet pineapple balances the spice perfectly, creating a mouthwatering dish. For the complete flavor experience, check the Full Recipe. Store your leftover pineapple fried rice in an airtight container. Let it cool to room temperature first. This helps keep the rice fresh and tasty. Place the container in the fridge. It will last for about 3 to 4 days. If you want to keep it longer, freezing is a good option. When you are ready to eat the leftovers, reheat them carefully. You can use the stove or microwave. If using the stove, add a splash of water or oil to keep it moist. Heat on low to avoid drying it out. Stir often to warm it evenly. For the microwave, cover the container with a damp paper towel. This helps steam the rice, keeping it fluffy. To freeze your pineapple fried rice, place it in a freezer-safe bag. Remove as much air as possible before sealing. Label the bag with the date. It can stay in the freezer for up to 2 months. When you're ready to use it, thaw it in the fridge overnight. Then, reheat it as mentioned above. Enjoy your delicious meal anytime! For the full recipe, check out the Tropical Delight: Easy Pineapple Fried Rice. Yes, you can use fresh rice, but day-old rice works better. Fresh rice holds more moisture. This moisture can make your fried rice sticky. If you use fresh rice, cool it first. Spread it on a baking sheet to dry out. This will help keep your rice fluffy. If you want to swap out pineapple, there are tasty options. Mango adds a sweet twist. You could also try diced peaches or even apples. For a tangy flavor, use diced kiwi or pomegranate seeds. Each fruit brings its unique touch, so pick what you like! To spice up your fried rice, add chili flakes or hot sauce. You can start with a little and taste as you go. If you prefer less heat, skip the spicy additions. You can also balance spice with a bit of sugar or honey. This keeps your dish flavorful and well-rounded. Easy pineapple fried rice is a simple dish packed with flavor. We covered essential and optional ingredients, plus great substitutes. The step-by-step guide made cooking easy, and serving suggestions add fun. I shared tips to ensure perfect rice and save time. You can also explore tasty variations like vegan options and spicy twists. In the end, this dish is flexible and satisfying. Create your favorite version, and enjoy its bright taste!

Easy Pineapple Fried Rice Flavorful and Quick Recipe

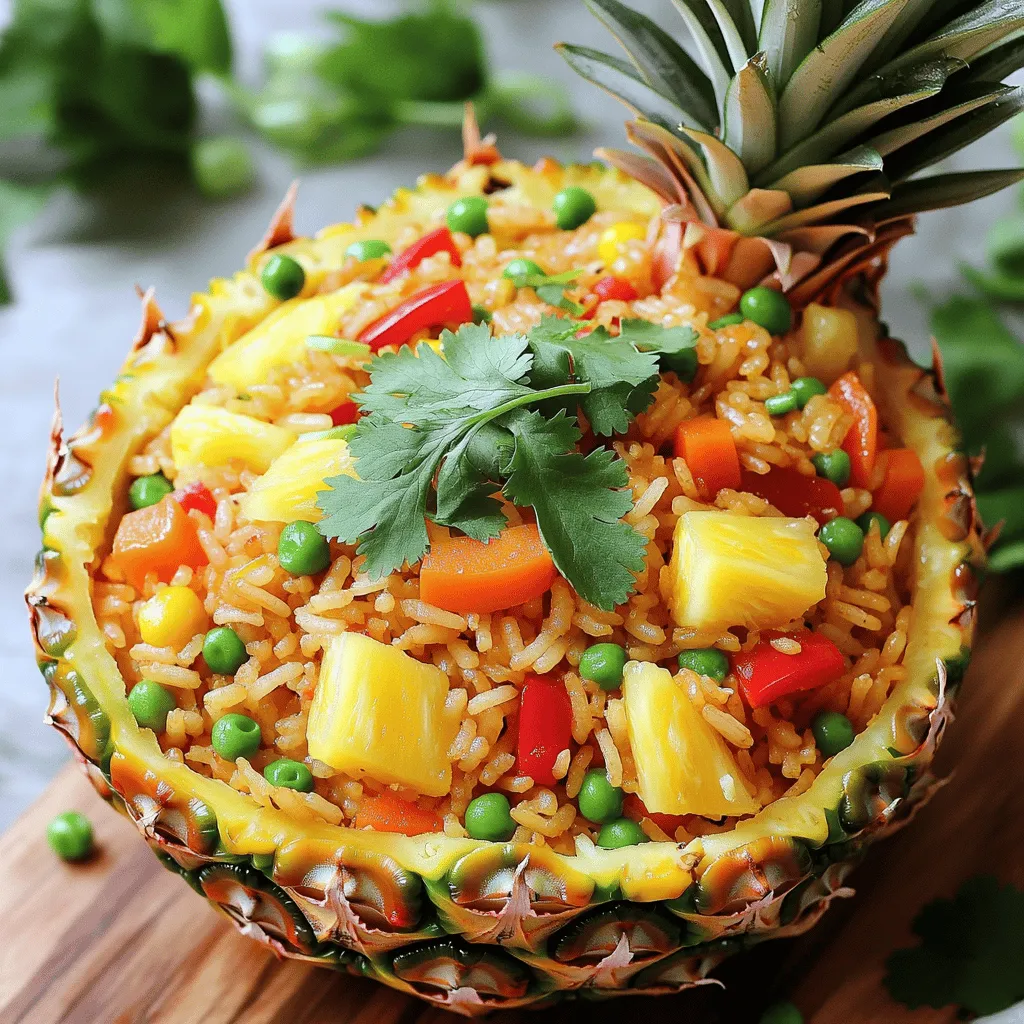
Are you ready to spice up your meal with a burst of tropical flavor? This Easy Pineapple Fried Rice recipe

Older posts
Newer posts
← Previous Page1 … Page67 Page68 Page69 … Page84 Next →

dsad

© 2026 easycookingbite • Built with GeneratePress

Our Policies

  • Copyright Policy
  • Cookie Policy
  • GDPR Policy
  • Privacy Policy
  • Disclaimer
  • Terms Of Use

More Information

  • Home
  • About
  • Contact
  • Appetizers
  • Dessert
  • Dinner
  • Drinks
©2026, easycookingbite About Back To Top