Skip to content
DisclaimerTerms Of UseGDPR PolicyCookie Policy

easycookingbite

  • Home
  • Drinks
  • Appetizers
  • Dinner
  • Dessert
  • About
  • Contact
  • Privacy Policy
DisclaimerTerms Of UseGDPR PolicyCookie Policy

NO-ING-IMG

- 1 medium head of cauliflower - 2 tablespoons sesame oil - 1 small onion - 2 cloves garlic - 1 cup mixed vegetables (peas, carrots, corn) - 2 large eggs - 3 green onions - 3 tablespoons soy sauce - Salt and pepper to taste - Fresh cilantro (optional) Cauliflower fried rice is a simple dish. It uses fresh, easy-to-find ingredients. The star is the cauliflower. I like to use a medium head of cauliflower. When you grate it, it turns into rice-sized pieces. This gives you the perfect base. Next, sesame oil adds a nice flavor. I use two tablespoons. Then, chop one small onion and mince two cloves of garlic. Both ingredients bring great taste. They also add a nice aroma to the dish. I love to add variety with mixed vegetables. A cup of peas, carrots, and corn works well. It brings color and nutrition. You can use frozen or fresh veggies. For protein, I add two large eggs. Beaten eggs mix well with the other ingredients. Finally, I use three green onions and three tablespoons of soy sauce. The green onions give a fresh crunch, and the soy sauce adds depth. Don't forget to season with salt and pepper. You can also add fresh cilantro for garnish if you like. This dish is not just tasty; it's also healthy. You can find the full recipe to make this delightful meal. - Wash and grate the cauliflower. - Set aside after grating. Start with a medium head of cauliflower. Rinse it well under cold water to remove dirt. Cut away the leaves and stem. You can use a box grater or a food processor. Grate until it looks like rice. This is the base for your dish. - Sauté onion and garlic. - Add mixed vegetables and cook until tender. - Scramble eggs and combine with vegetables. In a large skillet, heat two tablespoons of sesame oil over medium heat. Add a finely chopped onion. Cook for about three minutes until it turns clear. Now, add two minced garlic cloves. Stir for thirty seconds until you smell the garlic. Next, toss in one cup of mixed vegetables. Cook these for two to three minutes until they soften. Push the veggies to one side of the skillet. Pour in two beaten eggs on the other side. Scramble them for a minute and mix with the veggies. - Mix in grated cauliflower. - Add soy sauce, salt, and pepper. - Stir-fry until golden and tender. Now, add the grated cauliflower to the skillet. Mix everything well. Pour in three tablespoons of soy sauce. Season with salt and pepper to taste. Stir-fry this mix for five to seven minutes until the cauliflower becomes tender and a bit golden. Finally, stir in three sliced green onions. This gives a fresh kick to your dish. Enjoy your vibrant and tasty cauliflower fried rice hot! For the full recipe, check out the details above. To get the best texture, avoid overcooking the cauliflower. Cook it just until tender. This keeps it from getting mushy. High heat is your friend here. It helps the cauliflower fry nicely and stay crisp. You can add your favorite sauces or spices. Try different options like teriyaki or chili sauce. If you want more protein, add chicken or shrimp. This makes the meal heartier and even more filling. Serve your cauliflower fried rice hot. It works great as a main dish or a side. To take it up a notch, add fresh herbs like cilantro or basil. They add color and fresh flavor to your dish. For the complete recipe, check out the Full Recipe section. {{image_2}} You can add protein to make this dish heartier. Try chicken, shrimp, or tofu. Each option brings a unique flavor. For chicken or shrimp, cook them first in the pan. Set them aside once done. Then, add them back in with the cauliflower. For tofu, press it to remove water before cooking. This helps it crisp up nicely. Feel free to switch the mixed veggies for what you have. Bell peppers, broccoli, or snap peas work great. Using seasonal veggies makes this dish fresher. In summer, add zucchini or corn. In winter, try carrots or kale. The key is to keep it colorful and vibrant. If you need it gluten-free, use tamari instead of soy sauce. This keeps the taste while meeting dietary needs. For a vegan version, skip the eggs. Replace them with scrambled tofu or chickpeas. This keeps protein in the dish and makes it filling. To store your leftover cauliflower fried rice, place it in an airtight container. This keeps it fresh and prevents odors from mixing. You can keep it in the refrigerator for about three days. I recommend using glass containers. They are easy to clean and do not stain. The best method to reheat cauliflower fried rice is on the stove. Heat a little sesame oil in a skillet over medium heat. Add the rice and stir it often. This helps maintain its texture and flavor. You can also use a microwave. Just cover it with a damp paper towel. This keeps it moist and stops it from drying out. If you want to freeze your fried rice, let it cool first. Then, place it in a freezer-safe bag or container. Make sure to remove as much air as you can. This prevents freezer burn. You can freeze it for up to three months. When you are ready to eat it, thaw it in the fridge overnight. Reheat it in a skillet for the best taste and texture. You can also microwave it directly from frozen, but it may need extra time. For a complete guide on making this dish, check out the Full Recipe. Cauliflower fried rice is a tasty dish made by substituting cauliflower for regular rice. It is low in carbs and calories. This dish includes vegetables, eggs, and a bit of soy sauce. It offers a great way to enjoy the flavors of fried rice without all the carbs. You can customize it with your favorite veggies or proteins. Cauliflower is full of nutrients, making this meal healthy and filling. Yes, you can prepare cauliflower fried rice ahead of time. To store it, keep it in an airtight container in the fridge. It stays fresh for about three to four days. You can also freeze it for longer storage. Just make sure to defrost it in the fridge before reheating. When you’re ready to eat, just heat it in a pan until warm. To boost the flavor of cauliflower fried rice, try these tips: - Add more spices like ginger or chili flakes for heat. - Use different sauces, like teriyaki, for a unique taste. - Include fresh herbs like cilantro or basil for freshness. - Sauté the cauliflower until it gets a nice golden color. These steps will add depth and make your dish even more delicious. Cauliflower fried rice is very healthy. It is low in calories and high in fiber. This dish helps you feel full without adding too many carbs. Cauliflower is rich in vitamins C and K, which are great for your immune system. It also has antioxidants that help your body fight off illness. By choosing cauliflower as a base, you create a nutritious meal that supports your health goals. Enjoying it as a part of a balanced diet is a smart choice! Cauliflower fried rice is a tasty and healthy dish. We explored its ingredients, including cauliflower, eggs, and soy sauce. I shared easy steps for preparation and cooking. You can use tips to improve texture and flavor. Variations let you customize the dish with different proteins and veggies. Remember to store leftovers well for quick meals later. This dish offers good nutrition and is simple to make. I hope you feel excited to try it or create your own version!

Cauliflower Fried Rice Simple and Flavorful Meal

Looking for a quick and tasty meal? Cauliflower Fried Rice is your answer! This dish is simple to make and

- 200g feta cheese - 250g pasta (penne or fusilli) - 2 cups cherry tomatoes, halved - 1 large red bell pepper, sliced - 4 cloves garlic, minced - 3 tablespoons olive oil - 1 teaspoon dried oregano - 1 teaspoon red pepper flakes (optional) - Salt and pepper to taste - Fresh basil leaves, for garnishing - Grated Parmesan cheese, for serving Gather these key ingredients to make your baked feta pasta shine! Feta cheese is the star of this dish. It becomes creamy and rich when baked. Pasta, like penne or fusilli, holds onto the sauce well, making each bite flavorful. Cherry tomatoes burst in the oven, adding sweetness. The red bell pepper gives a nice crunch and color. Don’t forget the garlic! It adds a great aroma and flavor. Olive oil keeps everything moist and tasty. Dried oregano brings an earthy note, while red pepper flakes add a hint of heat. For seasoning, salt and pepper enhance all the flavors. Fresh basil leaves brighten the dish, and grated Parmesan cheese adds a salty finish. You can find the full recipe [here](#). Enjoy creating this creamy and simple delight! - Preheat oven to 400°F (200°C). - Grab a large baking dish. Place it on your counter. - Place the feta cheese in the center of the dish. - Surround it with halved cherry tomatoes and sliced bell pepper. - Sprinkle minced garlic over the top. - Drizzle olive oil across the dish. - Season with oregano, red pepper flakes, salt, and pepper. - Bake for 25-30 minutes. The feta should be soft and tomatoes burst. - Boil pasta according to the package instructions. - Cook until it is al dente. - Reserve 1 cup of pasta water before draining the rest. - Remove the baking dish from the oven. - Use a fork to mash the baked feta and tomatoes. - This creates a creamy sauce. - Add the cooked pasta to the baking dish. - Toss to coat the pasta in the creamy sauce. - If the sauce is too thick, add reserved pasta water. - Stir until you reach your desired consistency. Enjoy your creamy and delicious baked feta pasta! For the full details, check out the Full Recipe. To make the sauce just right, you can adjust its thickness easily. If your sauce is too thick, add a bit of the reserved pasta water. This water has starch that helps create a smooth texture. Start with a small amount and stir until you reach the perfect creaminess. Reserving pasta water is very important. It holds the key to a rich sauce. The starchy water helps bind your pasta and sauce together. Always set aside a cup before you drain your pasta. It makes a big difference in the final dish. If you can't find feta cheese, don't worry! You can use goat cheese or ricotta. Both will give you a nice flavor. Cream cheese also works well if you want a milder taste. You can also switch up the pasta type. While penne or fusilli is great, you can use spaghetti or even gluten-free pasta. Just follow the package directions for cooking time. Plating Baked Feta Pasta can enhance its appeal. Start by placing the pasta in a large bowl. Spoon the creamy sauce on top to make it look inviting. To make it even better, add fresh herbs like basil or parsley. A sprinkle of grated Parmesan cheese adds a nice touch. It gives a lovely flavor and looks beautiful on the plate. {{image_2}} You can make Baked Feta Pasta vegan. Replace the feta cheese with a plant-based cheese. Look for options made from nuts or tofu. They melt well and give a creamy texture. You can also use nutritional yeast for a cheesy flavor. For pasta, choose whole grain or lentil pasta. These add fiber and protein, making your meal heartier. To boost the flavors, add more vegetables. Spinach, zucchini, or mushrooms work great. You can even toss in some olives for a briny touch. Herbs also elevate the dish. Try adding fresh parsley, thyme, or basil. A pinch of chili flakes gives a nice kick. Experiment with your favorite spices to find your perfect blend. Baked Feta Pasta pairs well with many side dishes. Garlic bread is a classic choice. It’s great for soaking up the creamy sauce. A light salad with cucumbers and tomatoes complements the meal. You can also serve it with roasted vegetables for added nutrition. These sides balance the rich flavors, making your meal complete. To keep your Baked Feta Pasta fresh, use airtight containers. Glass or plastic containers work well. Make sure to let the pasta cool before sealing. This helps prevent moisture build-up. You can store leftovers in the fridge for up to three days. If you want to keep it longer, consider freezing it. Frozen pasta can last up to two months, but the texture may change. When it's time to reheat, avoid the microwave if you can. Instead, warm it in a skillet over low heat. Add a splash of water or olive oil to keep it moist. Stir often to prevent sticking. You can also use an oven. Preheat it to 350°F (175°C). Place the pasta in an oven-safe dish and cover it with foil. Bake for about 15-20 minutes. This method helps keep the creaminess intact. Enjoy your creamy Baked Feta Pasta again! Baked feta pasta is a simple dish that combines creamy feta cheese with pasta. You bake the feta and tomatoes together, which makes a rich sauce. The dish went viral on social media, making it popular worldwide. It’s easy to make and tastes amazing! Yes, you can make baked feta pasta in advance! To do this, cook the pasta and bake the feta and tomatoes. Let it cool, then store it in the fridge. When you’re ready to eat, just reheat it in the oven or microwave. Add a little pasta water to keep it creamy. Penne and fusilli are great choices for baked feta pasta. They hold the sauce well and add good texture. You can also use other types, like rotini or bowtie pasta. Just make sure to cook it al dente for the best results. For the full recipe and more tips, check the [Full Recipe]. Baked Feta Pasta is a simple and tasty dish you can make at home. We covered key ingredients like feta cheese, pasta, and fresh vegetables. You learned how to bake, cook pasta, and combine everything for a creamy sauce. Remember to try variations and tips for the best results. Whether you're a novice or a seasoned cook, this dish offers room for creativity. Enjoy personalizing it to fit your taste buds. You'll love impressing friends and family with this easy yet flavorful meal.

Baked Feta Pasta Creamy and Simple Delight

If you’re craving a dish that combines creamy, tangy feta with tender pasta, you’ve found it! Baked feta pasta is

- 1 cup long-grain white rice - 2 cups vegetable broth or water - 1 tablespoon olive oil - 1 lime, zested and juiced - 1/2 cup fresh cilantro, chopped - 1 clove garlic, minced - 1/2 teaspoon cumin - Salt, to taste - Pepper, to taste - Medium saucepan - Measuring cups and spoons - Fork for fluffing To make cilantro lime rice, you need simple ingredients. First, the long-grain white rice acts as the base. Use two cups of vegetable broth or water to cook it. Olive oil adds richness. The lime zest and juice give it a bright flavor. Finally, fresh cilantro adds a burst of freshness. For seasonings, minced garlic adds depth. Cumin gives it a warm touch. Salt and pepper enhance all the flavors. You will need a medium saucepan to cook the rice. Measuring cups and spoons help ensure accuracy. A fork is key for fluffing the rice at the end. Using the right tools makes the process smoother and more fun. This dish is easy to prepare, and it pairs well with many meals. Enjoy making it! {{ingredient_image_1}} - Rinse the rice: Start by rinsing 1 cup of long-grain white rice in cold water. Keep rinsing until the water runs clear. This step removes excess starch and helps the rice cook fluffy. - Sauté garlic in olive oil: In a medium saucepan, heat 1 tablespoon of olive oil over medium heat. Add 1 clove of minced garlic and sauté for about 1 minute. You want it fragrant but not browned. - Toast the rice: Add the rinsed rice to the saucepan. Stir well to coat it in the garlic oil. Cook for 2-3 minutes, stirring often. This toasts the rice and adds flavor. - Add broth and simmer: Pour in 2 cups of vegetable broth (or water) and bring it to a boil. Once boiling, reduce the heat to low. Cover the saucepan and let it simmer for 15-20 minutes. The rice should absorb all the liquid and become tender. - Let the rice rest: After cooking, take the saucepan off the heat. Let it sit covered for 5 minutes. This resting time helps the rice become even fluffier. - Fluff and mix in cilantro and lime: Use a fork to fluff the rice gently. Stir in the zest and juice of 1 lime, along with 1/2 cup of chopped fresh cilantro, and 1/2 teaspoon of cumin. Add salt and pepper to taste. Mix everything until well combined. To make fluffy cilantro lime rice, start by rinsing the rice. Rinsing helps remove excess starch. This step keeps the rice from becoming sticky. Rinse the rice until the water runs clear. Next, toast the rice in olive oil and garlic. This adds flavor and helps the grains stay separate. Cook it for 2-3 minutes before adding liquid. You can add more herbs or spices for extra flavor. Try adding fresh parsley or chopped green onions. A pinch of chili powder can add warmth. For garnishes, consider diced avocado or sliced radishes. They add color and contrast. You can cook cilantro lime rice on the stovetop or in a rice cooker. A rice cooker is easy and keeps the rice warm. Follow the same steps but adjust the water ratio based on your cooker. Different rice types need different water amounts. For brown rice, use more water and extend the cooking time. Check your rice for doneness and adjust as needed. Pro Tips Rinse the Rice: Always rinse the rice before cooking to remove excess starch, which can make the rice gummy. Toast the Rice: Lightly toasting the rice in olive oil and garlic adds a depth of flavor that enhances the dish. Let it Steam: After cooking, allow the rice to sit covered for a few minutes to finish steaming and improve texture. Fresh Ingredients: Use fresh lime and cilantro for the best flavor—dried herbs won’t provide the same vibrant taste. {{image_2}} You can switch up the rice in this recipe. Brown rice works well. It adds a nutty flavor and more fiber. You will need to cook it longer, about 40-50 minutes. Quinoa is another good choice. It cooks faster and adds protein. Rinse it well before cooking to remove its bitter coating. Want to spice it up? Add some jalapeños to the mix. They bring heat that pairs great with lime. You can chop them finely and sauté them with the garlic. If you like other citrus flavors, try using lemon or orange zest. These will give a unique twist to your rice. Cilantro lime rice pairs perfectly with tacos. The fresh flavors complement the spices in the tacos. You can also use it as a base for a bowl. Top it with grilled veggies, beans, or your favorite protein. This makes a great meal that is easy to customize. To keep your cilantro lime rice fresh, store it in an airtight container. This helps prevent moisture loss and keeps flavors intact. You can put it in the fridge for about 3 to 5 days. Make sure it cools down before sealing it. This way, it won’t steam and get soggy. You can freeze cilantro lime rice for longer storage. Spread it out on a baking sheet in a thin layer. This helps it freeze evenly and quickly. Once frozen, transfer it to a freezer bag. Squeeze out the air to prevent freezer burn. It can last up to 3 months in the freezer. To reheat, microwave it straight from the freezer. Add a splash of water to keep it moist. Heat in short bursts, stirring often, until warm. Cilantro lime rice is versatile and fun to use in new dishes. You can mix it into salads for added flavor. It works well in wraps with your favorite proteins and veggies. Try adding it to burritos for extra zest. You can even use it as a base for grain bowls topped with beans, avocado, or grilled chicken. You can use water as a substitute for vegetable broth. It works well but may lack some flavor. If you want more taste, try using chicken broth. You can also use low-sodium broth for a healthier option. For a richer flavor, add a bit of soy sauce or a splash of lemon juice. Yes, you can use dry cilantro. However, fresh cilantro gives a better taste. If you must use dry cilantro, use less. About one tablespoon of dry cilantro is equal to one-quarter cup of fresh. Remember, dried herbs are stronger, so adjust based on your preference. To make cilantro lime rice spicy, add chopped jalapeños or serrano peppers. Use one or two, depending on your heat level. You can also sprinkle in some chili powder or cayenne pepper for extra kick. - Additional spicy ingredients: - Fresh chopped chili peppers - Chili powder - Cayenne pepper - Recommended heat levels: - Mild: 1 jalapeño - Medium: 2 jalapeños or 1 teaspoon chili powder - Hot: 1 serrano pepper or 1/2 teaspoon cayenne pepper Cilantro lime rice is simple to make and adds great flavor to meals. You learned the key ingredients, cooking steps, and clever tips for perfect rice. Remember to rinse the rice for fluffiness and try different grains for variety. Get creative with flavor and pair it with your favorite dishes. Whether for tacos or wraps, this rice can enhance any meal. Enjoy your cooking and the tasty meals to come!

Cilantro Lime Rice Flavorful and Easy Recipe Guide

Looking for a simple dish that bursts with flavor? My Cilantro Lime Rice recipe is just what you need! With

- 2 ripe bananas - 1 cup rolled oats - 1/2 cup dark chocolate chips - 1/4 cup almond butter or peanut butter - 1/4 cup honey or maple syrup - 1 teaspoon vanilla extract - Chopped nuts (walnuts or pecans) - Other flavorings (e.g., nutmeg, coconut) When making Chocolate Banana Oat Cookies, you need a few key ingredients. Start with two ripe bananas. The riper they are, the sweeter your cookies will taste. Next, grab a cup of rolled oats. They provide texture and healthy fiber. Dark chocolate chips add rich flavor and a bit of sweetness. For a creamy base, choose either almond butter or peanut butter. Adding a quarter cup of honey or maple syrup adds more sweetness, while a teaspoon of vanilla extract enhances the flavor. Feel free to get creative with optional add-ins. You can mix in chopped nuts like walnuts or pecans for crunch. If you like, add spices like nutmeg or coconut for extra flavor. Gather all these ingredients to make your cookies delicious. For the complete recipe, check out the Full Recipe. - Preheat your oven to 350°F (175°C). - Line a baking sheet with parchment paper. This helps cookies not stick. - In a large bowl, mash 2 ripe bananas. They should be soft and smooth. - Add 1/4 cup of almond butter to the bananas. Mix until creamy. - Pour in 1/4 cup of honey or maple syrup. This gives sweetness to the cookies. - Add 1 teaspoon of vanilla extract. This enhances the flavor. - Sprinkle in 1/2 teaspoon of cinnamon and 1/4 teaspoon of salt. Stir until well combined. - Gradually fold in 1 cup of rolled oats. Make sure they mix well. - Gently add 1/2 cup of dark chocolate chips. You can also add chopped nuts if you like. - Scoop tablespoon-sized portions of dough onto the baking sheet. Leave space between each cookie. - Bake for 12–15 minutes. Look for golden edges to know they are ready. - Once baked, let the cookies cool on the sheet for 5 minutes. - After that, move them to a wire rack to cool completely. For the full recipe, check out the above section. Enjoy baking! To get the right texture, start with ripe bananas. Ripe bananas are sweeter and softer. They blend well into the cookie dough. This gives a nice, moist cookie. You want to mash them until smooth. Next, measure the oats correctly. Using too many oats can make cookies dry. Stick to one cup of rolled oats for the best results. This keeps your cookies chewy and soft. You can easily make these cookies vegan. Instead of honey, use maple syrup. This keeps the sweetness and is plant-based. If you want a nut-free option, replace almond butter with sunflower seed butter. This works great for those with nut allergies. For gluten-free cookies, use certified gluten-free oats. This ensures you avoid any gluten. The rest of the ingredients are naturally gluten-free. One common mistake is overmixing the dough. Mix just until the ingredients combine. Overmixing can make cookies tough. Also, keep an eye on the baking time. Bake for 12 to 15 minutes. Check for golden edges. If you bake them too long, they may become hard. Trust the timer and your eyes! {{image_2}} You can easily change the flavor of your chocolate banana oat cookies. One fun way is by adding spices like cinnamon or ginger. A sprinkle of cinnamon adds warmth and sweetness. Ginger gives a nice kick and freshness. You can also swap the type of chocolate you use. Dark chocolate brings rich flavor, while milk chocolate offers sweetness. Both options taste great! If you want to switch things up, try different nut butters. Cashew butter gives a creamy taste, while sunflower seed butter is nut-free and great for allergies. You can also change the sweetener. Agave syrup is lighter, while coconut sugar adds a hint of caramel flavor. Both work well in your cookies. You can make these cookies even more special by adding seasonal ingredients. Dried fruit like cranberries or raisins adds sweetness and chewiness. In fall, try pumpkin puree for a cozy flavor. To make them festive, add a pinch of nutmeg or even some festive sprinkles. These changes make your cookies fun for any occasion! For the full recipe, check out the section above. To keep your chocolate banana oat cookies fresh, use an airtight container. This prevents air from making the cookies dry or stale. You can store them at room temperature for a few days. If your kitchen is warm, refrigeration helps them last longer. Just make sure to seal them well to avoid extra moisture. You can freeze the cookie dough for later use. Just scoop the dough into balls and place them on a baking sheet. Freeze them for about an hour until hard, then transfer them to a freezer-safe bag. When you want to bake some, take out the dough and let it thaw in the fridge overnight. You can bake them straight from the freezer, adding a couple of extra minutes to the baking time. These cookies stay fresh for about 4 to 5 days when stored properly. Keep an eye out for signs of spoilage. If you see mold or if they smell off, it's best to toss them. Always trust your senses when it comes to food safety. Enjoy your cookies while they're at their best! Yes, you can use instant oats. They are finer and cook faster than rolled oats. This may change the texture of your cookies. Rolled oats give a chewier bite. If you use instant oats, watch the baking time closely, as they may cook quicker. To lower sugar, try using less honey or maple syrup. You can also substitute with mashed applesauce or a sugar substitute. For lower fat, use less almond butter. Try adding in more oats to balance the mix. If you're allergic to bananas, you can use unsweetened applesauce. This adds moisture and sweetness. Other options include pureed pumpkin or mashed avocado. Each option will change the flavor, but they all work well in cookies. To avoid gooey cookies, make sure your bananas are not overly ripe. You can also add a bit more oats to balance the moisture. Ensure you bake them for the full time until the edges are golden brown. These chocolate banana oat cookies are simple and fun to make. We explored key ingredients like ripe bananas and chocolate chips. You learned how to combine them for the best texture and flavor. Remember to customize your cookies and avoid common mistakes for great results. Enjoy experimenting with variations and tips we've shared. These cookies are not only tasty but also adaptable. With the right storage, they can last a while. Follow these steps, and you will surely impress with your baking!

Chocolate Banana Oat Cookies Simple and Tasty Treat

Looking for a simple treat that’s both tasty and healthy? You’ve found it! Chocolate banana oat cookies combine sweet ripe

- 2 ripe mangoes, diced - 1 red bell pepper, finely chopped - 1 small red onion, finely chopped - 1 jalapeño, seeds removed and minced - 3 tablespoons fresh lime juice - 1/4 cup fresh cilantro, chopped - Salt and pepper to taste - 1 tablespoon honey (optional for extra sweetness) You can add more fun to your salsa! Consider these options: - Diced avocado for creaminess - Chopped garlic for a robust flavor - Pineapple for extra sweetness - Black beans for added protein - Mangoes: Packed with vitamins A and C, great for skin health. - Red bell pepper: High in antioxidants and vitamin C, supports the immune system. - Red onion: Contains quercetin, which may help reduce inflammation. - Jalapeño: Boosts metabolism and adds a kick of flavor. - Lime juice: Rich in vitamin C, aids digestion, and enhances taste. - Cilantro: Offers antioxidants and may help detoxify the body. - Salt and pepper: Enhance flavor while keeping meals enjoyable. - Honey: Adds natural sweetness and can soothe sore throats. This spicy mango salsa is not just tasty; it’s also a healthy choice for summer! For the full recipe, check the section above. To make spicy mango salsa, start with the mangoes. Peel and dice two ripe mangoes into small cubes. Place them in a medium mixing bowl. Next, finely chop one red bell pepper and one small red onion. Add these to the bowl with the mango. For some heat, take a jalapeño, remove the seeds, and mince it. This step helps control the spice level. If you like it hotter, keep some seeds. Add the minced jalapeño to the mixing bowl. Now comes the fun part! Drizzle three tablespoons of fresh lime juice over the diced fruit and veggies. This adds a zesty kick. Toss in 1/4 cup of chopped fresh cilantro for that herb flavor. If you want your salsa a bit sweeter, add one tablespoon of honey. Gently stir all the ingredients together until they mix well. Season with salt and pepper to taste. Let the salsa sit for at least 15 minutes. This allows the flavors to blend perfectly. To serve, use a colorful bowl to make it pop. You can even use a carved-out mango skin for a fun twist. Spicy mango salsa pairs great with tortilla chips. It also works as a tasty topping for grilled chicken or fish. Enjoy your fresh and tangy summer dip! For the full recipe, check below. To make great spicy mango salsa, you need ripe mangoes. Look for mangoes that feel soft but not mushy. The skin should have a nice color, usually yellow or orange. A good mango will smell sweet near the stem. If you find hard mangoes, let them ripen on your counter for a few days. Check them daily. Once ripe, use them right away for the best taste. Spice levels in salsa can vary. If you want mild salsa, remove all the seeds from the jalapeño. For medium heat, leave a few seeds in. If you love heat, add more jalapeño or even a pinch of cayenne pepper. Always taste as you mix. You can adjust the heat until it feels just right for you. You can add more flavor to your salsa easily. Try adding diced avocado for creaminess. A touch of garlic can give it a nice kick. For tang, consider adding chopped tomatoes or a splash of vinegar. Fresh herbs like mint or basil can change the flavor profile completely. Experiment with these extras to find your perfect mix. For the full recipe, check back to see how these tips fit into the overall dish. {{image_2}} You can play with the ingredients in spicy mango salsa. Try adding diced pineapple for extra sweetness. Avocados can add creaminess and a nice texture. If you want a fruity twist, mix in diced peaches. You can also swap red onion for green onions for a milder taste. Adjusting the heat level in your salsa is easy. Use more jalapeños if you like it spicy. For a milder salsa, try using a sweet bell pepper instead. You can also add a pinch of cayenne pepper for warmth without the seeds. Remember, the heat builds over time, so let it sit before tasting. Get creative with flavors in your salsa. Add some fresh ginger for a zesty kick. Chopped mint can give it a refreshing twist. For a smoky flavor, try adding diced chipotle peppers. You can also mix in a splash of orange juice for a citrusy vibe. These unique combinations will make your salsa stand out! For the full recipe, check out the details above. To keep your spicy mango salsa fresh, store it in an airtight container. Glass or plastic containers work well. Always place the salsa in the fridge right after making it. This helps slow down spoilage. Make sure to cover the salsa tightly. If air gets in, it can change the taste and texture. Spicy mango salsa can last about 3 to 5 days in the fridge. You will notice the flavors will change over time. The salsa may become watery as it sits. If you see any signs of mold or off smells, it’s best to toss it out. Always trust your senses. You can freeze spicy mango salsa for longer storage. Use a freezer-safe container, leaving some space for expansion. The salsa can last up to 3 months in the freezer. When you want to use it, move it to the fridge to thaw overnight. Avoid microwaving it, as this can change the texture. Instead, let it thaw slowly for the best results. Enjoy your fresh salsa again with your favorite chips or dishes. For the full recipe, check the earlier section. Spicy mango salsa pairs well with many dishes. Try it with grilled chicken or fish. The sweet and spicy notes brighten up any meal. It also goes great with tacos or burritos. You can even use it as a dip with tortilla chips. For a fresh twist, serve it with shrimp cocktails. The flavors of the salsa enhance the taste of these dishes. Yes, you can make spicy mango salsa ahead of time. In fact, making it early helps the flavors blend. Store it in an airtight container for up to three days. Just keep it in the fridge. If you find it watery later, drain some liquid before serving. Fresh salsa tastes best, but this can save you time on busy days. Making a vegan version is easy! The full recipe already fits a vegan diet. Simply skip the optional honey or replace it with agave syrup. This keeps the sweetness without using animal products. All other ingredients are naturally vegan. Enjoy the vibrant flavors without any worries! This blog post covered how to make spicy mango salsa from start to finish. We talked about key ingredients, preparation steps, and serving tips. Remember to choose ripe mangoes for the best taste. Adjust spices to fit your heat preference and explore varied flavor options. Store your salsa properly to keep it fresh. The more you experiment, the more you’ll enjoy it. Embrace your creativity and make this salsa your own. You'll impress your friends and family at any meal or gathering. Enjoy every bite!

Spicy Mango Salsa Tangy and Tasty Summer Dip

Summer is here, and that means it’s time for fresh, zesty flavors! My Spicy Mango Salsa will light up your

To make sour cherry lemonade, you need a few key ingredients. Here’s what you will need: - 1 cup sour cherries, pitted - 1 cup freshly squeezed lemon juice (about 4-5 lemons) - 1 cup sugar - 4 cups water - 1 teaspoon vanilla extract - Fresh mint leaves for garnish - Lemon slices for garnish These ingredients create a sweet and tangy drink. The sour cherries add a unique flavor. Fresh lemon juice gives it a bright zest. Sugar balances the tartness of the cherries and lemons. You can use fresh or frozen sour cherries. Fresh cherries taste great when in season. They have a vibrant flavor and nice texture. If you cannot find fresh cherries, frozen ones work too. Just thaw and pit them before using. Frozen cherries are often picked at peak ripeness. They can still deliver that delicious taste you want. Both options will make your lemonade tasty! If you want a healthier option, there are substitutes for sugar. You can use honey or agave syrup. Both add sweetness without refined sugar. If you like, try using stevia or monk fruit sweetener. These options have fewer calories. When using substitutes, taste as you go. You may need to adjust the amount. Each sweetener behaves a bit differently. Finding the right balance can make your drink even better! For the full recipe, check out the Sour Cherry Lemonade! To start, gather your sour cherries. Use one cup of pitted sour cherries. Place them in your blender. Add one cup of water to help blend. Blend until the mixture is smooth. This step creates a vibrant cherry puree. Next, pour this mixture through a fine mesh strainer into a pitcher. Use a spatula to press down firmly. This helps extract all the juice. Discard the leftover pulp. You want a smooth cherry base for your lemonade. Now, it’s time to mix everything. In the same pitcher with the cherry puree, add freshly squeezed lemon juice. You need one cup, which comes from about four to five lemons. Next, add one cup of sugar. This gives your lemonade the right sweetness. Then, pour in three more cups of water. Stir the mixture well. Make sure the sugar dissolves completely. Finally, add one teaspoon of vanilla extract. This enhances the flavor. It adds a subtle depth that complements the sour cherries and lemons. To get the best consistency, adjust the water. If you like it thicker, add less water. For a lighter drink, add more. Taste the mixture after stirring. If it’s too sour, add a little more sugar. This will balance the flavors. Chill your lemonade for at least one hour. This step allows the flavors to meld. Serve it over ice for a refreshing drink. Garnish with fresh mint leaves and lemon slices for a beautiful presentation. For the full recipe, don’t forget to check out the details. Enjoy crafting this delightful drink! To make your sour cherry lemonade even better, try adding a few extras. You can mix in some fresh ginger for a spicy kick. Just grate a small piece and add it to the blend. Another great option is a splash of soda water. This gives your drink a fun fizz. You can also add some basil leaves for a unique twist. Each of these will brighten up the flavors. When serving your sour cherry lemonade, use tall glasses filled with ice. This keeps the drink cool and refreshing. Garnish each glass with fresh mint leaves and a lemon slice. It makes your drink look fancy and inviting. For a fun touch, consider using colorful straws. They add a playful vibe to your summer gathering. Taste is key in lemonade. If you find it too tart, add more sugar. Start with a tablespoon and stir well. Then, taste again. If you want it less sweet, add extra lemon juice. This balance is important. Remember, everyone has different tastes, so let guests adjust their own drinks as needed. {{image_2}} You can make a fun twist on sour cherry lemonade by adding alcohol. Try adding vodka or gin for a refreshing drink. Use a 1:1 ratio for the alcohol and lemonade. Pour the alcohol over ice, then add the lemonade. This drink is perfect for summer parties. You can even add a splash of club soda for a fizzy touch. For a bubbly version, replace some water with sparkling water. Mix 3 cups of still water and 1 cup of sparkling water after your lemonade is made. This adds a refreshing fizz that makes the drink even more exciting. Serve it over ice, and watch the bubbles dance! You can change the flavors by adding other fruits. Try mixing in fresh berries, like strawberries or raspberries. For a tropical twist, add diced pineapples or mangoes. You can also use peaches for a sweet touch. Just blend the fruit like you did with the sour cherries and follow the same steps in the Full Recipe. This way, you can enjoy a different flavor each time you make it! Sour cherries pack a punch of nutrients. They are low in calories but high in vitamins. A cup of sour cherries has: - Vitamin C: Boosts your immune system. - Potassium: Helps your heart and muscles. - Fiber: Aids digestion and keeps you full. These cherries also have antioxidants. Antioxidants fight free radicals in your body. This helps reduce inflammation and can lower disease risk. Fresh lemon juice adds a tangy kick to your drink. It is rich in vitamin C, which helps your body heal. Lemon juice can also: - Improve your skin health. - Aid digestion and detoxify your liver. - Freshen your breath. The acidity in lemon juice can help balance the sweetness of the sour cherries. This balance makes your lemonade taste even better. You can make your lemonade healthier with easy swaps. Instead of sugar, try using: - Honey: A natural sweetener with more nutrients. - Agave syrup: A lower glycemic index sweetener. - Stevia: A no-calorie option that is much sweeter. These options allow you to enjoy the taste without added calories. You can make your sour cherry lemonade even better for your health. Check out the Full Recipe to explore these healthy ingredients! You can use a sugar substitute, like stevia or erythritol. These sweeteners can mimic sugar's sweetness without calories. To make the lemonade, follow the same steps as in the Full Recipe, but replace sugar with your chosen substitute. Start with a small amount and taste. You can always add more to suit your taste. Yes, you can use bottled lemon juice. However, fresh lemon juice has a brighter taste. If you decide to use bottled juice, choose one with no added sugars or preservatives. Measure the same amount as fresh juice. The flavor might differ slightly, but it will still be refreshing. Sour Cherry Lemonade stays fresh for about 3 to 5 days in the fridge. Store it in an airtight container to keep it tasting good. Before serving, shake or stir it well. If you see any separation, that's normal. Just mix it again! Sour cherry lemonade is a simple, fun drink to make. We explored key ingredients, like fresh sour cherries and sugar alternatives. I provided easy step-by-step instructions for mixing the drink and tips to enhance its flavor. Additionally, we looked at tasty variations and noted its health benefits, such as vitamins from cherries and lemons. Remember, experimenting can lead to your new favorite drink. Enjoy making sour cherry lemonade your way!

Sour Cherry Lemonade Refreshing Summer Drink Recipe

Looking for a cool drink to beat the summer heat? Try my refreshing Sour Cherry Lemonade! This tasty mix of

Essential Ingredients for Spicy Sriracha Edamame To make this tasty snack, gather these key items: - 2 cups edamame in pods (fresh or frozen) - 1 tablespoon olive oil - 1 tablespoon Sriracha sauce (adjust to taste) - 1 teaspoon soy sauce - 1 teaspoon sesame oil - 1 teaspoon honey or agave syrup - 1 clove garlic, minced - 1 teaspoon fresh ginger, grated These ingredients work together to create a bold flavor. The Sriracha adds heat, while the honey balances it with sweetness. The garlic and ginger bring freshness and depth. Optional Ingredients for Customization You can make Spicy Sriracha Edamame your own by adding: - 1 tablespoon sesame seeds (optional) - Chopped green onions for garnish Sesame seeds add a nice crunch. Green onions give a pop of color and flavor. Feel free to get creative! You can adjust spice levels or add extra toppings based on your taste. For the complete recipe, check the [Full Recipe]. To start, you need to choose your edamame. You can use fresh or frozen. Fresh edamame tastes great, but frozen is often easier to find. If you choose frozen, bring a pot of salted water to a boil. Add the frozen edamame pods and cook for 5-6 minutes. This timing gives you tender edamame. If using fresh edamame, cook them for about the same time. Now, let's make the spicy sauce. In a small bowl, mix these ingredients: - 1 tablespoon Sriracha sauce (you can adjust this) - 1 teaspoon soy sauce - 1 teaspoon sesame oil - 1 teaspoon honey or agave syrup This mix gives a great balance of heat and sweetness. If you want more spice, just add more Sriracha. Taste it, and make it your own! Next, we'll combine everything. Heat 1 tablespoon of olive oil in a large skillet over medium heat. Add 1 clove of minced garlic and 1 teaspoon of grated ginger. Sauté them for 1-2 minutes. This step makes your kitchen smell amazing! Now, add the cooked edamame to the skillet. Then, pour the spicy sauce over them. Stir-fry for 2-3 minutes. Make sure the edamame is evenly coated with the sauce. If you like, sprinkle 1 tablespoon of sesame seeds on top. Toss gently to mix. Once done, transfer your spicy Sriracha edamame to a serving dish. Garnish with chopped green onions for a fresh touch. Enjoy this quick snack! You can find the complete recipe in the Full Recipe section. Enhancing the Spiciness To boost the heat in your Spicy Sriracha Edamame, try adding more Sriracha sauce. Start with a little more than one tablespoon and taste as you go. You can also mix in a pinch of red pepper flakes for an extra kick. If you like it really hot, consider using chili oil in place of olive oil. Adding Fresh Ingredients for Extra Flavor Fresh ingredients add depth to your dish. Chopped cilantro or basil can brighten the flavors. You can also squeeze fresh lime juice over the top just before serving. This adds a nice zing and balances the heat. Overcooking the Edamame Be careful not to overcook your edamame. If you cook it too long, it can become mushy. Aim for a tender bite. Remember, cooking time is about 5-6 minutes for fresh or frozen pods. Wrong Sauce Ratios Getting the sauce ratios right is key. Too much Sriracha can overpower the taste. Too little can make it bland. Follow the recipe closely, and feel free to tweak as you gain confidence. Always taste as you go to find your perfect mix. {{image_2}} I love to mix things up with my Spicy Sriracha Edamame. Adding citrus can give it a fresh kick. Try squeezing some lime or lemon juice over the top. This zesty twist brightens the dish and balances the heat from the Sriracha. You can also zest the citrus peels for an extra burst of flavor. Incorporating other sauces can also change the taste. For example, a splash of teriyaki sauce can bring a sweet note. If you like it tangy, mixing in some rice vinegar adds depth. You can even sprinkle in some chili flakes for added spice. The options are endless! Making this dish vegan and gluten-free is simple. The base ingredients are already plant-based. Just make sure to use gluten-free soy sauce or tamari instead of regular soy sauce. This way, everyone can enjoy it without worry. If you want to lower the sugar, swap honey with a sugar-free sweetener. Agave syrup is a great choice, but you can skip it altogether if you prefer. The dish will still taste great with just the Sriracha and soy sauce. Feel free to experiment with these variations to find your perfect flavor! For the complete recipe, check out the Full Recipe section. To store leftover spicy Sriracha edamame, first, let it cool down. Place it in an airtight container. You can keep it in the fridge for up to three days. If you want to store it longer, freezing is a great option. For freezing, use a freezer-safe bag or container. Squeeze out as much air as possible to avoid freezer burn. You can store it for up to three months. When you are ready to eat it again, take it out of the freezer. Let it thaw overnight in the fridge. Reheating edamame is easy. You can use a microwave or a skillet. If you use a microwave, heat it in short bursts. Stir after each burst to avoid hot spots. If you prefer a skillet, heat a little olive oil over medium heat. Add the edamame and stir until it's warm. This method also brings back some of its crunch. Fresh edamame lasts about a week in the fridge. Keep it in its pods for the best taste. Frozen edamame can stay good for six months or more. For the spicy sauce, store it in a small jar. It lasts about a week in the fridge. You can use it for other dishes too! If you want to keep it longer, consider freezing it in small portions. Edamame are young soybeans. They are often found in pods and are green in color. Edamame is a great source of protein, fiber, and healthy fats. A 1-cup serving of cooked edamame has: - 189 calories - 17 grams of protein - 8 grams of fat - 16 grams of carbohydrates - 8 grams of fiber These numbers show how healthy edamame is. It gives you energy and keeps you full. Eating edamame can help heart health. It may lower bad cholesterol levels. Edamame is also rich in antioxidants, which fight free radicals. Plus, it supports strong bones due to its calcium and magnesium content. Yes, you can prep edamame in advance. Cook it, cool it, and store it in the fridge. You can mix the spicy sauce ahead too. Just combine the sauce ingredients and keep them in a sealed container. To make meal prep easy: - Cook extra edamame for snacks or meals. - Store it in small containers for quick access. - Reheat in the microwave for a tasty treat. You can find spicy Sriracha edamame in many places. Some restaurants serve it as an appetizer. Look for Asian or sushi restaurants. They often have this dish on the menu. Ask for it next time you eat out. Most grocery stores stock frozen edamame. Check the freezer section. You can find Sriracha sauce in the condiment aisle. For the complete step-by-step instructions, check out the Full Recipe. In this post, I covered how to make Spicy Sriracha Edamame. We explored essential and optional ingredients to enhance flavor. I shared step-by-step instructions for prepping edamame and making a spicy sauce. I also included tips to avoid common mistakes and suggested variations for different tastes. Lastly, I discussed storage tips and answered common questions. With these insights, you can create a tasty snack that fits your style. Enjoy experimenting!

Spicy Sriracha Edamame Flavorful and Easy Snack

Looking for a quick and tasty snack? Spicy Sriracha Edamame is your answer! It’s simple to make, packed with flavor,

To make Ginger Peach Green Tea, you need a few key ingredients. Here's what you will need: - 2 cups water - 1 tablespoon freshly grated ginger - 2 ripe peaches, sliced - 2 teaspoons green tea leaves or 2 green tea bags - 1-2 tablespoons honey (adjust to taste) These ingredients work together for a bright and refreshing drink. The ginger adds a warm bite, while the peaches bring sweetness. The green tea provides a smooth base that ties everything together. You can change the flavor of your tea with some optional ingredients. Here are a few ideas: - A squeeze of lemon juice for a zesty kick - A dash of cinnamon for warmth - Fresh mint leaves for a cool finish These additions can make your tea unique and add more layers of flavor. Feel free to mix and match based on your mood or what you have at home. To brew this delicious tea, you need some basic kitchen tools: - A medium saucepan - A fine mesh strainer - A large pitcher - A stirring spoon These items help you brew, strain, and serve your tea with ease. Having the right tools makes the process smoother and more enjoyable. For the full recipe, check out the sections that guide you step by step! To make Ginger Peach Green Tea, start by boiling water. Use 2 cups of water in a medium saucepan. Heat it on medium until it boils gently. Once boiling, add 1 tablespoon of freshly grated ginger and 2 ripe peaches, sliced. Let this simmer for about 5 minutes. This step helps the ginger and peaches release their flavors into the water. After 5 minutes, take the saucepan off the heat. Now, add 2 teaspoons of green tea leaves or 2 green tea bags. Let it steep for 3 to 5 minutes. The longer you steep, the stronger the tea will taste. When the tea is ready, it’s time to strain it. Use a fine mesh strainer to pour the tea into a large pitcher. Press down on the peaches and ginger to get every bit of flavor out. After straining, it’s time to sweeten your tea. While the tea is still warm, add 1 to 2 tablespoons of honey. Stir until the honey fully dissolves. This step ensures that the sweetness blends well with the tea. Once sweetened, chill the tea in the fridge for at least 30 minutes. This cooling time will make your tea refreshing. Serve the Ginger Peach Green Tea over ice. You can also add fresh mint leaves as a garnish for a nice touch. This brew is perfect for warm days or any time you want something light and tasty. For the full recipe, check the earlier section. Enjoy your delicious tea! To brew green tea well, use water that is not boiling. Aim for water at about 175°F (80°C). This keeps the tea from tasting bitter. Use fresh green tea leaves or good quality tea bags. Both will work, but loose leaves often give better flavor. Steep the tea for 3 to 5 minutes. If you steep it too long, it may taste harsh. To make your Ginger Peach Green Tea even better, try adding a pinch of cinnamon. It adds warmth and spice. You can also mix in some lemon juice for a tangy kick. If you love sweetness, adjust the honey to your taste. Fresh mint leaves work great as a garnish. They add a nice pop of color and flavor. One mistake is using boiling water for green tea. This can make it bitter. Another is steeping the tea for too long. Keep an eye on the time. Don't forget to strain out the ginger and peach pieces. This keeps your drink smooth. Also, avoid skipping the honey. It helps balance the flavors. Following these tips will make your Ginger Peach Green Tea taste amazing. For the full recipe, check the section above. {{image_2}} To make a cool version, start with the same full recipe. After brewing, let the tea cool. Pour it over ice to chill. You can add a slice of peach or lemon for extra flair. If you like it sweeter, add more honey. This iced tea is perfect for hot days. You can mix in other fruits to change the flavor. Try adding berries, like raspberries or strawberries. Slice up some oranges for a citrus twist. You can even add a splash of pineapple juice. Just remember to adjust the honey based on the fruit's sweetness. If you want a caffeine-free drink, use herbal teas instead of green tea. Rooibos or chamomile work great. The ginger still adds a nice kick, while the peaches keep it fruity. This option is perfect for evening sipping or for kids. If you have leftover ginger peach green tea, store it in a clean pitcher. Use a lid to keep dust and odors out. Put it in the fridge right away. This helps keep the tea fresh and cool. To keep the flavor strong, avoid adding ice directly to the tea. Ice can water down the taste. Instead, chill the tea first. If you want it cold, pour it over ice just before serving. This method keeps the flavor rich and vibrant. Brewed ginger peach green tea lasts about 3 to 5 days in the fridge. After that, it may lose flavor and freshness. Always check for any off smells or changes in color before drinking. For best taste, enjoy your tea within a few days. If you want a detailed recipe, check out the Full Recipe for more tips. Ginger Peach Green Tea is full of good things. Ginger helps with digestion and can ease nausea. Peaches are rich in vitamins A and C, which boost your immune system. Green tea has antioxidants. These help protect your cells from damage. The blend can also keep you hydrated, which is great for overall health. Yes, you can use fresh ginger! Fresh ginger gives a strong, bright flavor. You will need a little more fresh ginger than dried ginger. Use one tablespoon of freshly grated ginger for each teaspoon of dried ginger. This change makes your tea taste fresh and lively. You can find Ginger Peach Green Tea at many grocery stores. Look in the tea aisle or specialty tea shops. Online stores also offer many brands. Some local markets may sell unique blends. Always check the label for quality and flavor. You can change the sweetness easily. Start with one tablespoon of honey. Taste the tea and add more if needed. If you prefer, try other sweeteners like agave nectar or maple syrup. You can also skip the sweetener if you want a more natural taste. Absolutely! Ginger Peach Green Tea is perfect as an iced tea. Just chill it in the fridge after brewing. Serve it over ice for a refreshing drink. Add fresh mint leaves to make it more exciting. To make this delightful tea, gather these ingredients: - 2 cups water - 1 tablespoon freshly grated ginger - 2 ripe peaches, sliced - 2 teaspoons green tea leaves or 2 green tea bags - 1-2 tablespoons honey (adjust to taste) - Fresh mint leaves for garnish (optional) Follow the Full Recipe to brew this tasty drink. Enjoy every sip! You learned how to make delicious Ginger Peach Green Tea. We covered the key ingredients, equipment, and step-by-step brewing. I shared tips to ensure great flavor and avoid common mistakes. You can customize your tea in many ways, like making it iced or adding fruits. Store leftovers properly for the best taste. Enjoy the health benefits and vibrant flavors this tea offers. With these simple steps, you can savor this refreshing drink whenever you want. Dive in and experiment with your own twist on this delightful beverage!

Ginger Peach Green Tea Refreshing and Flavorful Brew

Are you ready to refresh your taste buds? Ginger Peach Green Tea is a vibrant blend that combines zingy ginger

To make Avocado Cilantro Lime Rice, you need a few simple ingredients. Each one plays a key role in creating bright flavors. - Jasmine rice and cooking liquid options - 1 cup jasmine rice - 2 cups vegetable broth (or water) Jasmine rice gives this dish a light, fluffy texture. You can use vegetable broth for extra taste or plain water if you prefer. - Fresh produce components - 1 ripe avocado, diced - 1/4 cup fresh cilantro, chopped - Juice of 1 lime The avocado adds creaminess, while cilantro brings freshness. Lime juice brightens everything up. - Flavor enhancers and spices - 2 tablespoons olive oil - 1 clove garlic, minced - 1/2 teaspoon cumin - Salt and pepper to taste Olive oil adds richness. Garlic gives depth, and cumin adds warmth. Adjust salt and pepper to fit your taste. With these ingredients ready, you can create a dish full of flavor and freshness. For the full recipe, check the complete instructions. To make the best avocado cilantro lime rice, start by rinsing the rice. Rinse the jasmine rice under cold water. This step is key. It removes excess starch and makes your rice fluffy. Rinse until the water runs clear. Next, use a medium saucepan for cooking. Bring 2 cups of vegetable broth or water to a boil. Add the rinsed rice and a pinch of salt. Stir once to mix it well. Cover the pot, then reduce the heat to low. Cook for 15 to 20 minutes. The rice should be tender and all liquid absorbed. Fluff the rice with a fork once done. While the rice cooks, you can prepare the avocado mixture. In a large bowl, combine the diced avocado, chopped cilantro, lime juice, olive oil, minced garlic, cumin, and a pinch of salt and pepper. This mix adds vibrant flavor to your rice. When mashing the avocado, be gentle. Use a fork to mash just enough to combine. You want some small chunks for texture. Over-mashing can make it too creamy. Keep it fresh and bright! Once the rice is ready, it's time to mix it in. Gently fold the rice into the avocado mixture. Use a spatula to combine everything without breaking the avocado too much. Stir until well mixed. Now, taste your dish and adjust the seasoning. You can add more salt, pepper, or lime juice based on your preference. This step is crucial for the perfect flavor. Serve the rice in a large bowl, garnished with extra cilantro leaves and lime wedges. Enjoy this fresh and delightful dish! For the complete recipe, check out the Full Recipe. To ensure fluffy rice every time, rinse the jasmine rice well. Rinsing removes the starch. This makes the rice light and airy. After rinsing, cook the rice in boiling vegetable broth or water. This adds more flavor. For extra flavor, try adding spices. Cumin enhances the taste of the rice. You can also add a pinch of lime zest for a fresh kick. Make sure to taste as you go. Adjust salt and lime juice to your liking. Garnishing ideas for visual appeal include fresh cilantro leaves. They add vibrant color and freshness. You can also use lime wedges on the side. They look great and add to the flavor. For serving, think about occasions. This rice pairs well with grilled chicken for a summer BBQ. It also works as a side for taco night. Serve it in a large bowl or platter for a fun look. For a final touch, sprinkle some toasted sesame seeds on top. This adds a nice crunch and elevates the dish even more. For the full recipe, check out the detailed instructions. {{image_2}} You can easily make Avocado Cilantro Lime Rice vegan. Just use vegetable broth instead of water. If you want it gluten-free, ensure your broth is certified gluten-free. You can swap out cilantro for other fresh herbs. Try parsley or basil for a different taste. If you like heat, add a pinch of chili flakes or some diced jalapeños. Experimenting with spices can create unique flavors. This rice pairs well with many proteins. Serve it alongside grilled chicken or fish for a complete meal. You can also enjoy it with black beans or lentils for a plant-based option. If you have leftovers, get creative! Use the rice in burritos, tacos, or as a base for a salad. It’s great for meal prep too. Just store it in the fridge for quick meals during the week. For the full recipe, check out Avocado Cilantro Lime Rice 🥑. To keep your avocado cilantro lime rice fresh, store it in an airtight container. Make sure to let it cool to room temperature before sealing. This helps prevent moisture buildup, which can lead to soggy rice. When you want to reheat, take out only what you need. For reheating, I recommend using the microwave. Place the rice in a bowl, add a splash of water, and cover it loosely. Heat it in short bursts, stirring in between, until warmed through. This keeps the rice fluffy and avoids drying it out. In the fridge, this dish lasts about three to four days. If you want to store it longer, consider freezing it. In the freezer, avocado cilantro lime rice can last up to three months. However, the texture may change slightly upon thawing. To thaw, place it in the fridge overnight or use the microwave. Just remember, fresh avocado does not freeze well, so enjoy the dish soon after making it for the best flavor. For the full recipe, check out the details above! How to make Avocado Cilantro Lime Rice vegan? To make this dish vegan, use vegetable broth instead of chicken broth. All other ingredients are already plant-based. Enjoy the creamy avocado, fresh cilantro, and zesty lime. Can I use brown rice instead of jasmine rice? Yes, you can use brown rice. Just note that it takes longer to cook. Use the same liquid ratio but increase cooking time to about 40-50 minutes. What are the nutritional benefits of Avocado Cilantro Lime Rice? This dish offers healthy fats from the avocado. It's rich in fiber and vitamins. Cilantro adds antioxidants, while lime boosts your immune system. Overall, it’s a tasty and healthy option. How to tell when the rice is perfectly cooked? The rice is done when it’s tender and all the liquid is absorbed. Fluff it with a fork for the best texture. If it’s mushy, it may have been overcooked. Can I add other vegetables to the recipe? Absolutely! You can add cooked corn, diced bell peppers, or peas. These veggies add color and extra flavor. Just mix them in with the avocado mixture. What dishes pair well with Avocado Cilantro Lime Rice? This rice pairs nicely with grilled chicken or fish. It also works well with tacos or burrito bowls. You can serve it alongside a fresh salad for a complete meal. How to serve this dish cold or at room temperature? To serve cold, chill the rice after cooking. Mix in the avocado mixture when ready to eat. For room temperature, let it sit out for about 30 minutes after mixing. Enjoy it at your leisure! In this guide, we explored how to make Avocado Cilantro Lime Rice. We covered key ingredients and easy step-by-step cooking tips. We also shared ways to enhance flavor and ensure the perfect texture. Remember, you can customize this dish with various ingredients, making it fit your needs. Don’t forget about storage and serving tips for later enjoyment. Use this recipe to impress friends and enjoy delicious meals. Trust me, with practice, you'll master this dish!

Avocado Cilantro Lime Rice Flavorful and Fresh Delight

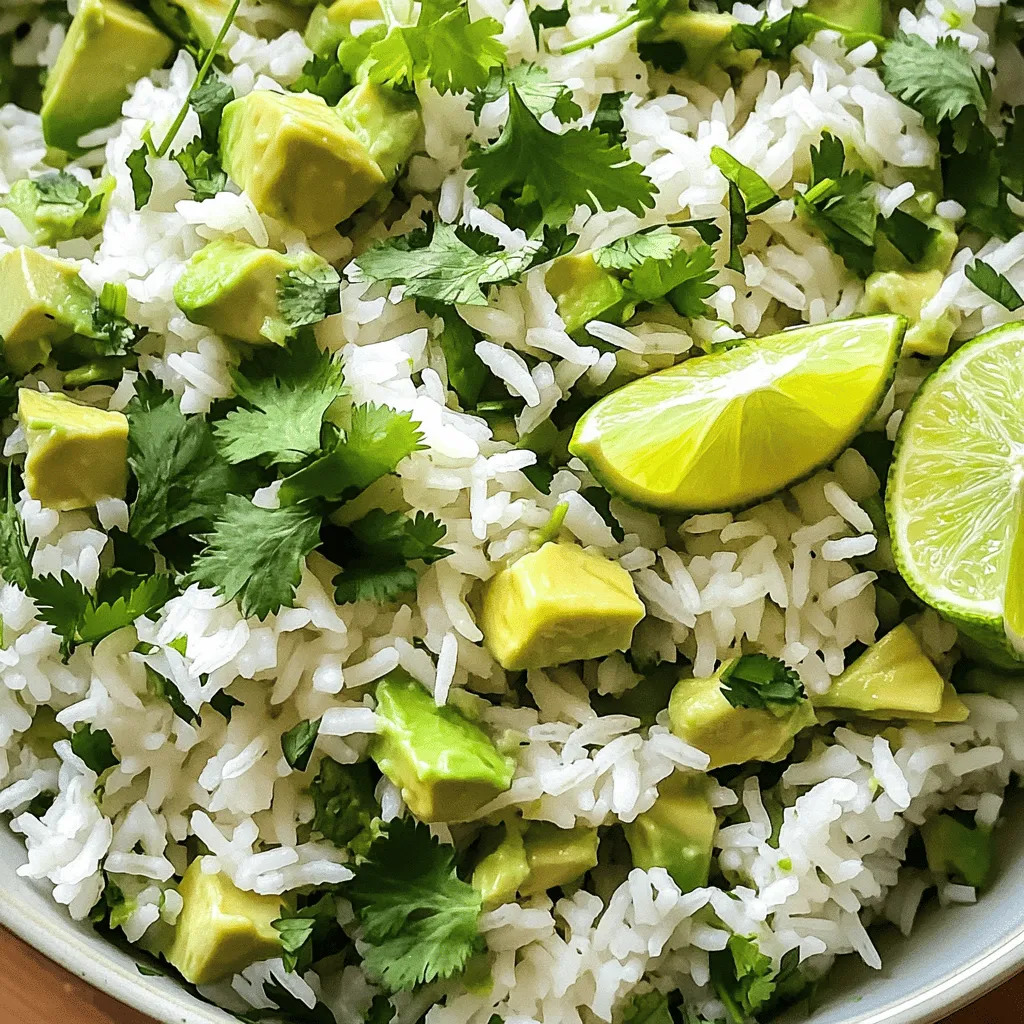
Are you ready to elevate your meals? This Avocado Cilantro Lime Rice is bursting with fresh flavor and vibrant colors.

To make these tasty Lemon Ricotta Pancakes, gather the following key ingredients: - 1 cup ricotta cheese - 1 cup all-purpose flour - 1/4 cup sugar - 1/2 teaspoon baking powder - 1/4 teaspoon baking soda - 1/4 teaspoon salt - 2 large eggs - 1 cup milk (whole or 2%) - Zest of 1 lemon - 2 tablespoons fresh lemon juice - 1 teaspoon vanilla extract - Butter or oil for cooking These ingredients come together to create a fluffy, rich pancake. The ricotta cheese adds creaminess, while the lemon zest and juice bring bright flavor. You can enhance your pancakes with a few optional ingredients. Consider adding: - Fresh berries (like blueberries or strawberries) - Chopped nuts (such as walnuts or pecans) - A sprinkle of cinnamon or nutmeg - A dollop of Greek yogurt or whipped cream These additions can add texture and flavor. They also make your pancakes look delightful. To ensure your Lemon Ricotta Pancakes are the best they can be, pick quality ingredients. Here are some tips: - Ricotta Cheese: Look for fresh, creamy ricotta. Avoid dry or grainy types. - Milk: Use whole or 2% milk for a rich texture. - Lemons: Choose firm, bright lemons. Fresh zest makes a big difference. - Eggs: Use large, fresh eggs for the best rise. Using high-quality ingredients elevates your pancake game. Good ingredients lead to delicious results, so choose wisely! For the full recipe, check the details above. To make the batter, start by gathering your ingredients. In a large bowl, whisk together the ricotta cheese, eggs, milk, lemon juice, lemon zest, and vanilla extract. Mix until it is smooth. In another bowl, sift the flour, sugar, baking powder, baking soda, and salt. This process helps to mix the dry ingredients well and adds air, making your pancakes light. Next, slowly add the dry mixture to the wet mixture. Use a spatula to fold them together gently. Stop mixing when you still see a few lumps. This helps keep the pancakes fluffy. Heat a non-stick skillet over medium heat. Add a small amount of butter or oil to the pan. Pour about 1/4 cup of batter onto the skillet for each pancake. Cook until bubbles form on the surface, and the edges look set, which takes about 3–4 minutes. When ready, flip the pancake. Cook the other side for 2–3 minutes until it turns golden brown. Repeat this process with the remaining batter, adding more butter or oil as needed. Serve your lemon ricotta pancakes warm. They taste great with fresh berries, a drizzle of maple syrup, or a light dusting of powdered sugar. You can also add a side of yogurt for creaminess. If you want to try something different, mix in some nuts or granola on top for added crunch. For the full recipe, check out the complete details above. Enjoy every bite! To make your pancakes light and fluffy, focus on the batter. Start by mixing the wet and dry ingredients separately. When you combine them, mix gently. Over-mixing can make pancakes dense. You want a few lumps in the batter. This will keep them airy. Add the ricotta at the start for creamy texture. The ricotta adds richness and moisture. The lemon zest brightens the flavor. This combination creates a delightful pancake. One common mistake is cooking on too high heat. If the heat is too high, pancakes can burn on the outside and stay raw inside. Keep the heat at medium. Another mistake is not letting the batter rest. Letting it sit for about 5 minutes helps the gluten relax. This results in a softer pancake. Also, don’t skip the baking powder. It helps the pancakes rise. Without it, they will be flat and dense. To keep your pancakes warm, use an oven. Preheat it to 200°F (90°C). Place cooked pancakes on a baking sheet in the oven. This keeps them warm while you cook the rest. You can also cover them with a clean kitchen towel. This traps heat and prevents them from drying out. Serve them warm with your favorite toppings. For more details, check the Full Recipe. {{image_2}} You can easily switch up the flavors in your lemon ricotta pancakes. For example, adding blueberries makes them fruity and sweet. Just fold in a cup of fresh or frozen blueberries into the batter. If you like chocolate, mix in some chocolate chips. They melt and create little pockets of goodness. Nuts, like chopped walnuts or pecans, add crunch to each bite. You can even add spices like cinnamon for warmth. Let your taste buds guide you! To make gluten-free lemon ricotta pancakes, simply swap the all-purpose flour. Use a gluten-free flour blend instead. These blends often include rice flour and tapioca starch. They give a similar taste and texture. Be sure to check the blend for best results. This will keep your pancakes fluffy while keeping gluten away. You won’t lose any of the deliciousness. If you want a dairy-free option, use dairy-free ricotta. You can find this in stores, or you can make your own using tofu and lemon juice. For the milk, almond or oat milk works well. Just remember to choose unsweetened versions to control the sweetness. These small changes can help you enjoy lemon ricotta pancakes without dairy. They remain delicious and enjoyable! For the complete recipe, you can refer to the Full Recipe mentioned earlier. After enjoying your lemon ricotta pancakes, you may have some left. To store them, let the pancakes cool completely. Stack them with a piece of parchment paper between each pancake. Place the stack in an airtight container. Store it in the fridge for up to three days. This way, they stay fresh and tasty. When you want to eat the pancakes again, reheating is simple. You can use a microwave or a skillet. For the microwave, place a pancake on a plate and heat it for about 20-30 seconds. If you prefer a skillet, heat it on low with a little butter. Cook each side for about a minute until warm. This keeps the pancakes fluffy and moist. Freezing pancakes is a great option for later. After cooling, stack the pancakes with parchment paper in between. Wrap the stack tightly in plastic wrap and then place it in a freezer bag. You can freeze them for up to two months. When you're ready to eat, thaw them overnight in the fridge. Then, reheat them as mentioned above. Enjoy your delicious lemon ricotta pancakes anytime! For the full recipe, check out the Lemon Ricotta Pancakes section above. You can serve lemon ricotta pancakes with many tasty options. Fresh berries add color and flavor. Try strawberries, blueberries, or raspberries for a sweet touch. Maple syrup is a classic choice. It pairs well with the lemon flavor. You might also enjoy whipped cream for extra creaminess. A dusting of powdered sugar makes them look fancy. For a health boost, add a dollop of yogurt or some nuts. Yes, you can make this recipe ahead of time. You can prepare the batter and store it in the fridge. Just cover it tightly with plastic wrap. This keeps it fresh for up to 24 hours. When you're ready to cook, just stir the batter gently. If the batter is too thick, add a bit of milk. You can also make the pancakes and store them. Just let them cool and place them in an airtight container. Lemon ricotta pancakes are special because they use ricotta cheese. This cheese adds creaminess and a rich taste. The lemon zest and juice give them a bright flavor. Regular pancakes are usually made with just flour, eggs, and milk. Lemon ricotta pancakes are lighter and fluffier. The ricotta helps them rise, making them soft. They are a delicious twist on a classic breakfast favorite. For the full recipe, check out the section above. In this post, I explored how to make lemon ricotta pancakes. I covered key ingredients and helpful tips for choosing quality items. You learned step-by-step instructions, from preparing the batter to serving ideas. I shared tricks to perfect pancake texture and how to avoid mistakes. I discussed variations, storage methods, and answered common questions. Lemon ricotta pancakes offer a tasty twist on a classic dish. Try them today for a delightful breakfast or brunch option.

Lemon Ricotta Pancakes Fluffy and Flavorful Delight

Ready to elevate your breakfast game? Lemon Ricotta Pancakes are a fluffy, flavorful delight that will impress anyone. They’re light,

Older posts
Newer posts
← Previous Page1 … Page68 Page69 Page70 … Page84 Next →

dsad

© 2026 easycookingbite • Built with GeneratePress

Our Policies

  • Copyright Policy
  • Cookie Policy
  • GDPR Policy
  • Privacy Policy
  • Disclaimer
  • Terms Of Use

More Information

  • Home
  • About
  • Contact
  • Appetizers
  • Dessert
  • Dinner
  • Drinks
©2026, easycookingbite About Back To Top