Skip to content
DisclaimerTerms Of UseGDPR PolicyCookie Policy

easycookingbite

  • Home
  • Drinks
  • Appetizers
  • Dinner
  • Dessert
  • About
  • Contact
  • Privacy Policy
DisclaimerTerms Of UseGDPR PolicyCookie Policy

NO-ING-IMG

To make a great Easy Veggie Stir Fry, you need fresh ingredients. Here’s what you’ll need: - 1 cup broccoli florets - 1 bell pepper (red or yellow), sliced - 1 carrot, julienned - 1 cup snap peas - 1 small zucchini, sliced - 3 cloves garlic, minced - 1-inch piece fresh ginger, grated - 3 tablespoons soy sauce (or tamari for gluten-free) - 1 tablespoon sesame oil - 1 tablespoon olive oil - 1 tablespoon sesame seeds (optional) - Salt and pepper to taste - Cooked rice or noodles (for serving) These ingredients bring color and flavor to your dish. You can mix and match veggies based on what you have. Just keep the basic idea of fresh, crunchy vegetables for the best taste. Enjoy creating your dish with these simple ingredients! For the full recipe, check out Easy Veggie Stir Fry. Start by washing your veggies. Rinse them under cold water to remove dirt. Use a clean cutting board and knife for chopping. Chop the broccoli, bell pepper, carrot, snap peas, and zucchini into bite-sized pieces. This helps them cook evenly. Uniform sizes mean each piece gets tender at the same time. Heat the olive oil in a large pan over medium-high heat. The oil should shimmer, not smoke. Next, add minced garlic and grated ginger. Sauté for about 30 seconds. The aroma will fill your kitchen! Now, toss in the broccoli and carrots first. They take longer to cook. Stir-fry them for 2-3 minutes. Then, add the bell pepper, snap peas, and zucchini. Drizzle soy sauce and sesame oil over them. Continue to stir-fry for another 3-4 minutes. The vegetables should be tender but still crisp. Taste your stir fry. Adjust seasoning with salt and pepper if needed. For extra flavor, sprinkle sesame seeds right before serving. Serve this vibrant mix over cooked rice or noodles for a filling meal. Remember, this is a quick and easy recipe that highlights fresh flavors! For the complete details, check the Full Recipe. For a great stir-fry, select fresh veggies. They should be crisp and bright. Here are my top picks: - Broccoli florets - Bell pepper (red or yellow) - Carrot - Snap peas - Zucchini You can also use seasonal vegetables. In spring, try asparagus or peas. In fall, add squash or kale. This keeps your dish fresh and exciting. To boost flavor, play with your seasonings. Besides soy sauce, try these: - Garlic - Ginger - Chili flakes - Fresh herbs like cilantro For added protein, toss in cooked chicken, shrimp, or tofu. You can also top with nuts or sesame seeds for crunch. This makes the meal hearty and satisfying. Using a wok gives you high heat and quick cooking. It’s great for stir-frying. If you don’t have one, a frying pan works too. Just make sure it’s large enough for all the veggies. Control the heat well. Start high to sear the vegetables. Then lower it to cook through without burning. This way, you’ll get that perfect tender-crisp texture. For the full recipe, check out Easy Veggie Stir Fry. {{image_2}} You can change the flavor of your Easy Veggie Stir Fry by using different cuisines. For Asian-inspired flavors, add soy sauce, ginger, and sesame oil. These ingredients give your dish that classic, savory taste. You can also sprinkle some chili flakes for a spicy kick. If you want a Mediterranean twist, swap the soy sauce for olive oil and lemon juice. Toss in some olives and artichokes for a fresh taste. Use herbs like oregano and basil to brighten up the dish. This variation is both light and flavorful, perfect for a sunny day. Making your stir fry fit your diet is easy. For gluten-free options, use tamari instead of soy sauce. This keeps all the flavor without the gluten. You can also check that your sesame oil is gluten-free. If you're vegan or vegetarian, skip the meat and focus on the veggies. You can add tofu or tempeh for protein. Both options soak up flavors well and add texture. These choices make your stir fry filling and nutritious. You don't have to stick to the stove when making stir fry. You can roast your veggies in the oven for a different flavor. Set the oven to 425°F (220°C) and roast for about 20 minutes. This method gives your veggies a nice caramelized taste. Another option is using an Instant Pot. Toss all your ingredients in and set it to manual for 3 minutes. This method saves time and keeps the veggies tender. It’s a quick way to enjoy a delicious meal without much fuss. For more details, check out the Full Recipe. To keep your veggie stir fry fresh, use airtight containers. Make sure the stir fry cools down before sealing. This helps prevent moisture buildup, which can make the veggies soggy. Store your leftovers in the fridge for up to three days. If you want to keep it longer, think about freezing. When reheating stir fry, I find the stove is best. Heat a pan over medium heat and add a splash of water. This method steams the veggies, keeping them crisp. Avoid microwaving, as it can make them soggy. Stir occasionally to heat evenly. Yes, you can freeze stir fry! To freeze, let it cool completely. Then, portion it into freezer bags or containers. Try to remove as much air as possible to avoid freezer burn. It can last up to three months in the freezer. When ready to eat, thaw in the fridge overnight and reheat on the stove for best results. For stir fry, cut vegetables into uniform pieces. This helps them cook evenly. Use a sharp knife for clean cuts. Aim for bite-sized pieces, about 1 inch. This size cooks quickly and keeps a nice crunch. For example, chop broccoli into florets and slice bell peppers thinly. Keep carrots julienned for fast cooking. Yes, you can use frozen vegetables. They save time and are convenient. Frozen veggies are often flash-frozen to lock in nutrients. However, they may release water when cooked. This can make the stir fry soggy. Fresh vegetables have a better crunch and flavor. If using frozen, cook them for a shorter time. You can add many proteins to your stir fry. Popular options include chicken, shrimp, tofu, or beef. For chicken, cut it into small pieces and cook it first. For shrimp, add them once the veggies are almost done. Tofu is great for a plant-based option. Just cube it and pan-fry until golden. To achieve restaurant-quality flavor, focus on sauces and seasoning. Use soy sauce or tamari for depth. Add a splash of sesame oil for a nutty taste. Consider fresh herbs like basil or cilantro for freshness. Don't forget to taste as you cook. A pinch of salt or pepper can elevate the dish. You can find more details in the Full Recipe. We explored how to create a tasty veggie stir-fry. You learned about the key ingredients like broccoli and snap peas. You now know the steps to prepare, cook, and serve your dish. Remember to choose fresh veggies and adjust flavors to your liking. Don’t forget the tips for storage and reheating. Try variations to keep your meals exciting. Enjoy your cooking and share your creations with others!

Easy Veggie Stir Fry Quick and Flavorful Meal Idea

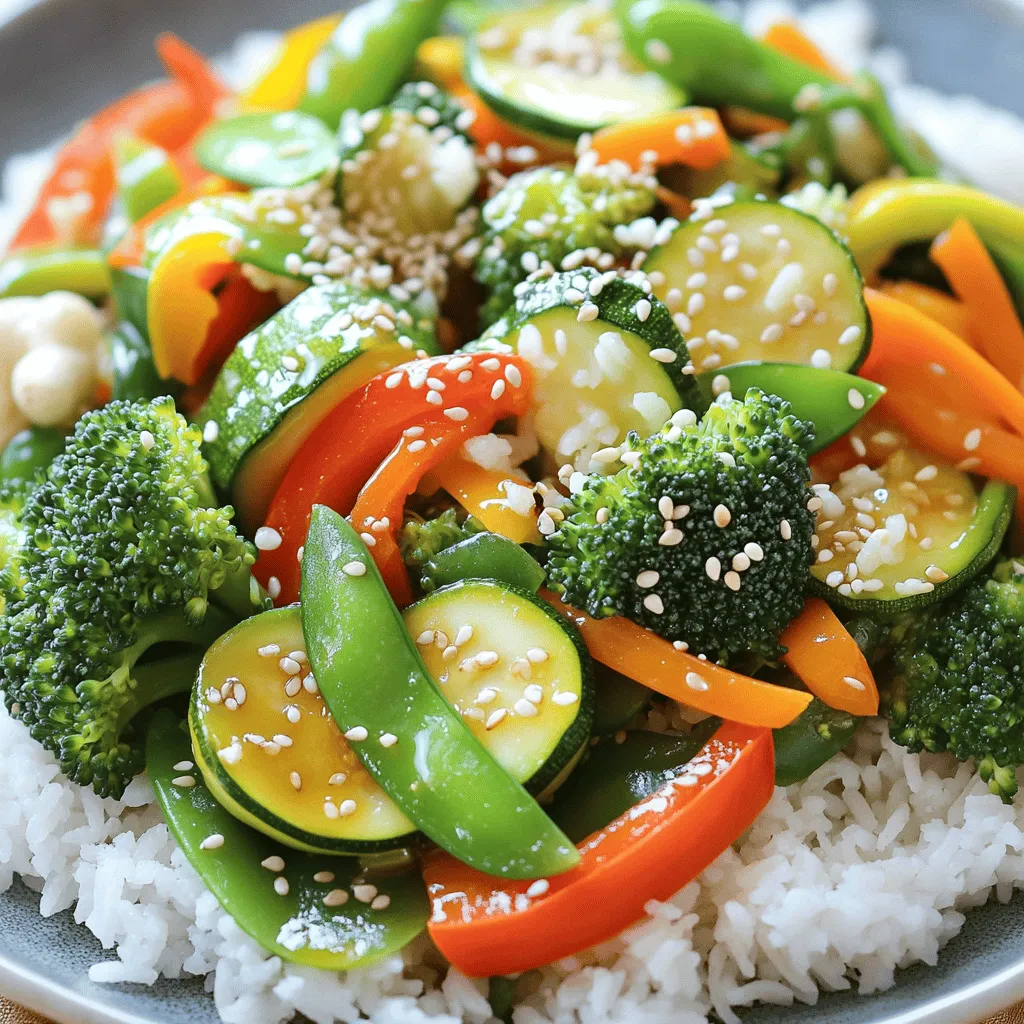
Looking for a quick and tasty meal? You’re in the right place! My Easy Veggie Stir Fry is not only

- 2 cups cooked chicken, shredded - 1 cup black beans, drained and rinsed - 1 cup corn kernels - 1 cup shredded cheese - 1 cup enchilada sauce - 8 small tortillas - Spices and seasonings: cumin, chili powder, garlic powder, salt, and pepper The base of these easy chicken enchiladas comes from simple yet tasty ingredients. You start with shredded chicken, which adds protein and flavor. Black beans bring a nice texture and extra protein. Corn kernels add a sweet crunch. Shredded cheese gives that gooey, melty goodness we all love. For the enchilada sauce, you can use store-bought or make your own. The sauce ties everything together, giving your enchiladas a rich flavor. Don't forget the tortillas! They hold all the yummy fillings. You can choose flour or corn based on your preference. - Fresh cilantro - Sour cream - Additional toppings (avocado, jalapeños, etc.) Garnishes make your dish even better. Fresh cilantro adds a pop of color and a burst of freshness. Sour cream gives a cool contrast to the warm enchiladas. You can also try adding sliced avocado or jalapeños for extra flavor and texture. These ingredients and garnishes make for a quick and delicious meal. For the full recipe, check the details above. 1. Preheat the oven and prepare the baking dish: Start by setting your oven to 375°F (190°C). This will ensure the enchiladas bake evenly. Next, take a 9x13 inch baking dish and spread a few tablespoons of enchilada sauce on the bottom. This helps prevent sticking. 2. Mix the filling ingredients together: In a mixing bowl, combine the shredded chicken, black beans, corn, cumin, chili powder, garlic powder, salt, and pepper. Stir the mixture until everything is blended well. This filling is the heart of your enchiladas. 1. Filling the tortillas: Take a tortilla and place it flat on a clean surface. Add a generous amount of the chicken mixture down the center. For extra flavor, sprinkle some shredded cheese on top of the filling. 2. Rolling and placing in the baking dish: Roll the tortilla tightly from one end to the other. Make sure the seam is facing down when you place it in the baking dish. Repeat this with the remaining tortillas until the dish is full. 1. Covering and baking the enchiladas: Once all the tortillas are in the dish, pour the remaining enchilada sauce over the top. Make sure to cover all the tortillas evenly. Then, sprinkle the rest of the shredded cheese on top. 2. Final touches before serving: Cover the baking dish with aluminum foil, then place it in the oven. Bake for 20 minutes. After that, remove the foil and bake for an extra 10 minutes. This helps the cheese get bubbly and slightly golden. Once done, let the dish cool for a few minutes. Garnish with fresh cilantro before serving. For a complete guide, check the Full Recipe. - Ideal cooking temperatures: Preheat your oven to 375°F (190°C). This heat cooks the enchiladas evenly. - How to prevent soggy tortillas: To keep tortillas from getting soggy, lightly toast them in a skillet. This adds a nice crispness and helps hold the filling. - Adding different proteins: You can swap chicken for beef, turkey, or beans. Tofu also works well for a vegetarian option. - Recommended spice levels: If you like heat, add jalapeños or use spicy enchilada sauce. For milder flavors, stick to regular sauce and adjust spices to your taste. - Pairing enchiladas with side dishes: Serve enchiladas with rice, beans, or a fresh salad. These sides round out the meal nicely. - Beverage recommendations: Pair enchiladas with a cold beer or a glass of limeade. These drinks complement the flavors well. For a full guide on making these delicious enchiladas, check out the Full Recipe. {{image_2}} You can easily make enchiladas without chicken. Use hearty vegetables instead. Try roasted bell peppers, zucchini, or mushrooms. You can also use lentils or chickpeas for protein. Instead of cheese, try dairy-free cheese or skip it altogether. This keeps the dish light and tasty. Want more flavor? Add spices like paprika or cayenne. You can mix in herbs too, like oregano or cilantro. Consider using different sauces. Green salsa or mole sauce can add a nice twist to your enchiladas. A squeeze of lime juice gives a fresh kick. You can choose between flour and corn tortillas. Flour tortillas are soft and chewy, while corn tortillas are crisp and flavorful. Try both to see which you like best. Different regions have their own styles. For example, some places use a red sauce, while others use a green sauce. Exploring these options makes the meal exciting. To store your leftover enchiladas, let them cool first. Then, place them in an airtight container. This keeps them fresh. Use them within three to four days. If you want to keep them longer, consider freezing. To freeze enchiladas, wrap them tightly in plastic wrap. Then, place them in a freezer-safe bag or container. This helps prevent freezer burn. You can freeze them for up to three months. When ready to eat, just thaw in the fridge overnight. Reheating enchiladas is easy. You can use an oven, microwave, or skillet. For the oven, preheat it to 350°F (175°C). Place the enchiladas in a baking dish. Cover with foil to keep them moist. Bake for about 20 minutes. In the microwave, heat on high for two to three minutes. Stir halfway through for even heating. Using a skillet? Add a splash of water, cover, and heat on low. Enjoy your tasty meal! For the full recipe, visit the section on ingredients. Can I make enchiladas ahead of time? Yes, you can make enchiladas ahead of time. Prepare them, then cover and chill in the fridge. Bake them when you're ready. This makes weeknight dinners a breeze! What can I use if I'm out of enchilada sauce? If you run out of enchilada sauce, you can use salsa instead. It adds great flavor. You could also mix tomato sauce with spices to create a quick sauce. How do I make my enchiladas spicier? To spice up your enchiladas, add diced jalapeños to the filling. You can also use a hotter enchilada sauce. Another option is to sprinkle some chili flakes on top before baking. What’s the best cheese for chicken enchiladas? I recommend using cheddar or a Mexican cheese blend. These cheeses melt well and provide a nice flavor. If you like a smoky taste, try adding some pepper jack cheese. Are chicken enchiladas gluten-free? Chicken enchiladas can be gluten-free if you use corn tortillas. Always check the labels to be sure. Some store-bought sauces also contain gluten, so read those too. Can I substitute beans for the chicken in this recipe? Yes, you can substitute beans for chicken. Use black beans or pinto beans. This makes a tasty vegetarian option. You can also mix in some veggies for added flavor. This blog post gives you a complete guide to making easy chicken enchiladas. We covered essential ingredients, easy steps to prepare and bake, and tips to make them perfect. You can customize these enchiladas with different proteins or flavors to suit your taste. Storage tips ensure you enjoy leftovers later. With these insights, you can now make delicious enchiladas that everyone will love. Enjoy cooking and experimenting with your meals!

Easy Chicken Enchiladas Tasty and Quick Recipe

Looking for a quick and tasty meal? These Easy Chicken Enchiladas are just what you need! With simple ingredients and

For this Summer Berry Crisp, I love using a mix of fresh berries. Blueberries, raspberries, strawberries, and blackberries all work well together. Each berry brings a unique flavor. When selecting berries, look for ones that are firm, plump, and bright in color. Avoid berries with mushy spots or mold. Fresh berries make your crisp taste best. Here’s a detailed list of ingredients for the Summer Berry Crisp: - 2 cups mixed berries (blueberries, raspberries, strawberries, blackberries) - 1 cup granulated sugar, divided - 1 tablespoon lemon juice - 1 tablespoon cornstarch - 1 teaspoon vanilla extract - 1 cup rolled oats - 1 cup all-purpose flour - 1/2 cup brown sugar - 1/2 teaspoon ground cinnamon - 1/2 cup cold unsalted butter, cubed - Pinch of salt Using fresh and high-quality ingredients is key. Fresh berries bring vibrant flavor. Good butter makes the topping rich. Always choose the best you can find. You can enhance the flavor with optional ingredients. Chopped nuts, like almonds or walnuts, add crunch. Shredded coconut can give a tropical twist. A sprinkle of spices, like nutmeg or ginger, can add warmth. If you're aiming for gluten-free, substitute oats and flour with almond flour or coconut flour. For a vegan option, replace butter with coconut oil or vegan butter. These tweaks keep the crisp delicious for everyone. Start by prepping your berries. I like to use a mix of blueberries, raspberries, strawberries, and blackberries for the best flavor. You will need 2 cups of mixed berries. Wash them gently under cold water and let them drain. This keeps the berries fresh and juicy. Next, grab a large mixing bowl. Add the washed berries along with 1/2 cup of granulated sugar, 1 tablespoon of lemon juice, 1 tablespoon of cornstarch, and 1 teaspoon of vanilla extract. Gently toss everything together. This helps coat the berries and adds natural sweetness. Once mixed, transfer the berry mixture to a greased 9x9-inch baking dish. Now, let’s make the topping. In a separate bowl, mix together 1 cup of rolled oats, 1 cup of all-purpose flour, another 1/2 cup of granulated sugar, 1/2 cup of brown sugar, 1/2 teaspoon of ground cinnamon, and a pinch of salt. Stir until well combined. Add 1/2 cup of cold, cubed unsalted butter to the dry mixture. Use your fingers or a pastry cutter to blend the butter until the mixture looks like coarse crumbs. This creates a nice, crumbly topping. Preheat your oven to 350°F (175°C). Once it's ready, sprinkle the oat mixture evenly over the berry filling in the baking dish. Bake for about 30-35 minutes. You will know it's done when the topping is golden brown and the berry filling is bubbly. The aroma will fill your kitchen, making it hard to wait. Serving this crisp is a delight. I recommend serving it warm for the best experience. Top it with a scoop of vanilla ice cream for a creamy contrast. A sprinkle of fresh mint adds a lovely touch. When plating, be sure to serve generous portions that show off the colorful berries and crunchy topping. For the full recipe, check the section above. Enjoy your delicious Summer Berry Crisp! To get a crunchy topping, use cold butter. Cold butter blends better. It helps create that nice, crumbly texture. Mix the butter into the dry ingredients until it looks like coarse crumbs. This step is key for the right texture. If your filling is too watery, don't worry! You can fix this by adding a bit more cornstarch. This thickens the juices from the berries. It keeps your filling from being runny. Remember, a little goes a long way! When choosing berries, look for ones that are ripe and colorful. Berries should smell sweet and fresh. If you can, buy them from local farms. They often taste better. Store fresh berries in the fridge but don’t wash them until you’re ready. Washing can make them mushy and spoil faster. Keep them in a container with air holes. This helps them stay fresh longer. You can prepare the crisp in advance. Just mix the berry filling and topping separately. Layer them in a baking dish, cover, and chill. When you are ready, bake it straight from the fridge. For leftovers, store the crisp in an airtight container. Reheat in the oven at 350°F (175°C) for about 10-15 minutes. This keeps it crispy. If you use a microwave, the topping may get soggy. So, the oven is best! {{image_2}} You can mix and match different berries. Try using strawberries, blueberries, or raspberries. Here are some ideas: - Strawberries and Blueberries: Sweet and juicy, great for summer. - Raspberries and Blackberries: Tart and bold, they add a punch. - Peaches and Berries: Mix peach slices with berries for a sweet twist. Mixing fruits gives your Summer Berry Crisp a unique flavor. Experiment with ratios to find your favorite blend. You can add extra flavor to your crisp. Here are a few easy ways: - Citrus Zest: Lemon or orange zest brightens the taste. Just a teaspoon adds zing. - Herbs: Consider adding fresh mint or basil for a fresh twist. - Sweeteners: Swap granulated sugar for honey or maple syrup. These can add depth to the sweetness. These enhancements will elevate your dessert and make it even more exciting. You can adapt the Summer Berry Crisp to fit different diets. Here are some options: - Gluten-free: Use almond flour instead of all-purpose flour. It works well with oats. - Vegan: Replace butter with coconut oil or vegan butter. This keeps the crisp delicious and plant-based. These dietary variations ensure everyone can enjoy this tasty treat. For the full recipe, check out the details above. To keep your Summer Berry Crisp fresh, follow these tips: - Cool completely: Allow the crisp to cool before storing. - Use an airtight container: Store leftovers in a sealed container. - Refrigerate: Place the container in the fridge for up to 3 days. - Freezing: To freeze, wrap the crisp tightly in plastic wrap and then foil. It can stay frozen for up to 3 months. When you're ready to enjoy your crisp again, here’s how to reheat it: - Oven method: Preheat your oven to 350°F (175°C). Bake the crisp for about 15-20 minutes until warm. - Microwave method: Heat individual servings in the microwave for 30-60 seconds. - Avoid sogginess: Reheat uncovered to keep the topping crunchy. Understanding how long your crisp lasts is key: - Refrigerated: It stays good for about 3 days. - Frozen: The crisp lasts up to 3 months in the freezer. - Signs of spoilage: If you see mold or if it smells bad, it’s time to toss it. How do I make a double batch? To make a double batch, simply double all the ingredients. Use a larger baking dish, like 9x13 inches. This way, you can serve more people. Just watch the baking time; it might need a bit more time. Can I use frozen berries instead of fresh? Yes, you can use frozen berries. Just thaw them first and drain excess liquid. This helps keep your filling from being too watery. Frozen berries can be just as tasty! What if I don’t have all the ingredients? No worries! You can substitute granulated sugar with brown sugar. If you lack cornstarch, try using flour instead. Get creative with what you have. Can I substitute oats with another grain? Absolutely! You can use quinoa flakes or crushed nuts. Just ensure the texture suits your taste. Each option gives a different crunch and flavor. Why did my topping turn out mushy? If the topping is mushy, you may have added too much butter. Make sure you use the right amount. Baking at the correct temperature also helps create a nice crunch. How can I fix a watery filling? To fix a watery filling, add a bit more cornstarch or flour. Mix it in with the berries before baking. This will help thicken the juices as it cooks. In this article, I covered how to make a delicious Summer Berry Crisp. You learned about choosing ripe berries, using fresh ingredients, and adding flavor with simple tips. I included easy step-by-step instructions and helpful storage advice. You now know how to serve it up right and even tweak recipes to fit your needs. Remember, enjoying fresh, delicious desserts can be simple. Get creative with your berries and enjoy the crisp, warm flavors this summer!

Summer Berry Crisp Delightful and Easy Recipe

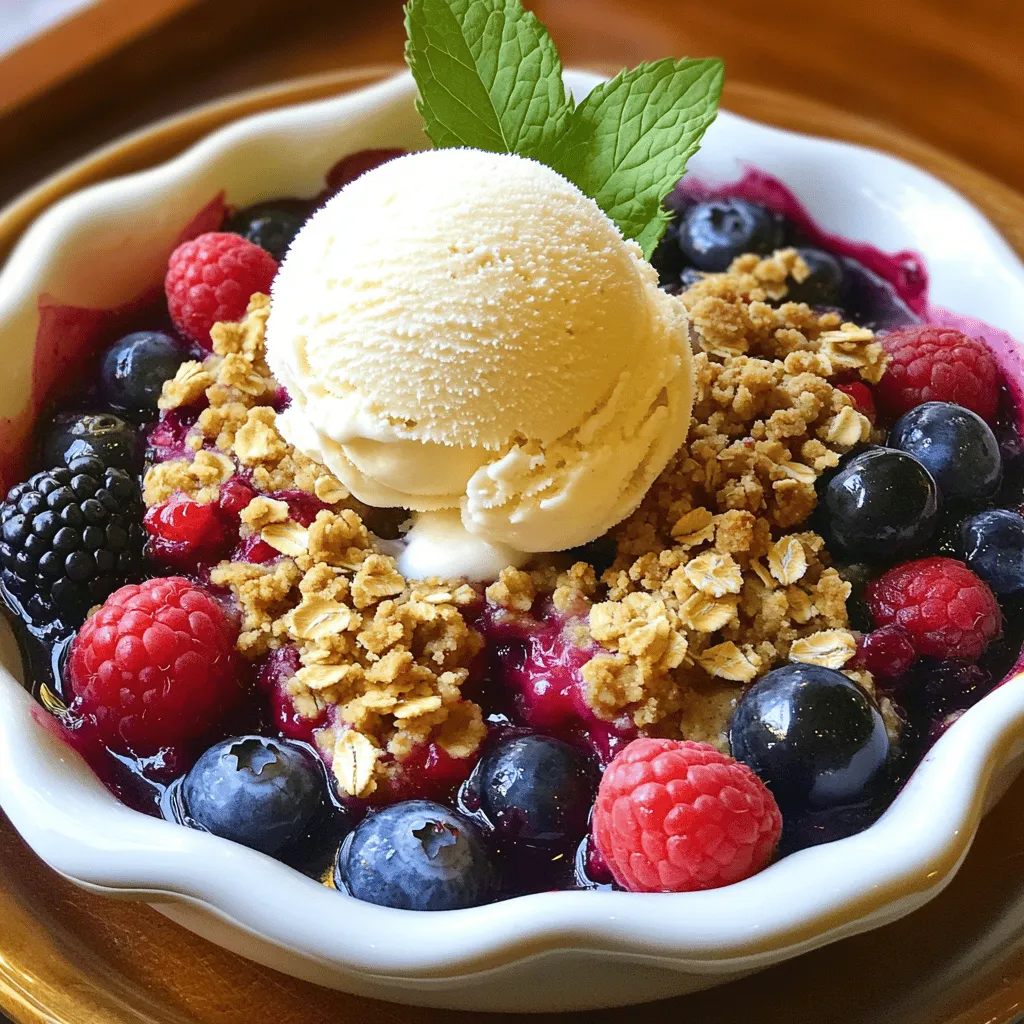
Get ready to delight your taste buds with a simple Summer Berry Crisp recipe! This dish brings together fresh berries

- 1 pound ground chicken or turkey - 1/2 cup panko breadcrumbs - 1/4 cup green onions, finely chopped - 1 teaspoon ginger, grated - 1 tablespoon garlic, minced For the meatballs, I like to use ground chicken or turkey. They stay moist and soak up flavors well. Panko breadcrumbs add a nice crunch and help keep the meatballs light. Green onions and garlic bring fresh taste and aroma to the dish. Grated ginger gives a warm zing, making each bite exciting. - 1/4 cup soy sauce (low sodium) - 2 tablespoons honey or agave syrup - 1 tablespoon sesame oil - 1 tablespoon rice vinegar In the teriyaki sauce, low sodium soy sauce is key. It gives a salty kick without being too strong. Honey or agave syrup adds sweetness, balancing the flavors. Sesame oil gives a nutty taste, while rice vinegar adds a bit of tang. Together, they create a sauce that is rich and savory. - 1 cup cooked jasmine rice (or brown rice) - 1 cup steamed broccoli florets - Sesame seeds for garnish - Extra green onions for garnish When serving, I like to use jasmine or brown rice as a base. The fluffy rice soaks up the sauce well. Steamed broccoli adds color and nutrition. For the final touch, sprinkle sesame seeds and extra green onions on top. These garnishes not only look good but also add crunch and fresh flavor. {{ingredient_image_1}} First, preheat your oven to 400°F (200°C). This makes sure the meatballs cook evenly. While the oven warms up, line a baking sheet with parchment paper. This helps with easy cleanup after baking. In a large mixing bowl, combine the ground chicken or turkey, panko breadcrumbs, chopped green onions, grated ginger, minced garlic, and one tablespoon of soy sauce. Mix everything well until it’s combined. This is where the magic begins. Shape the mixture into meatballs, about 1.5 inches wide. Place each meatball on the lined baking sheet. Bake them in the oven for 15-20 minutes. You want them golden brown and fully cooked. This step fills your kitchen with a lovely aroma. For the teriyaki sauce, take a small saucepan and add the remaining soy sauce, honey or agave syrup, sesame oil, and rice vinegar. Stir until it’s all mixed. Cook over medium heat until it simmers. This usually takes about 3-5 minutes. You’ll notice the sauce thickening up nicely. Once the meatballs are done, place them in a large bowl. Pour the teriyaki sauce over the meatballs. Toss them gently to coat each meatball well. Now, in serving bowls, add a scoop of cooked jasmine rice. Top it with those delicious teriyaki meatballs and some steamed broccoli. For the final touch, sprinkle sesame seeds and extra chopped green onions on top. This adds color and more flavor. Your teriyaki meatball bowls look fantastic and taste even better! For moist meatballs, I recommend using ground chicken or turkey. These meats keep the meatballs juicy. Add panko breadcrumbs to help with texture. They hold moisture well and give a nice bite. Keep the meatballs around 1.5 inches in size. This helps them cook evenly. Bake them at 400°F for 15-20 minutes. Check that they turn golden brown and are cooked all the way through. An instant-read thermometer should read 165°F in the center. To adjust the teriyaki sauce, start with low-sodium soy sauce. This keeps the dish from being too salty. You can add honey or agave syrup for sweetness. If you like it sweeter, add more honey. If you want less sweetness, cut back on the honey. A little rice vinegar gives the sauce a nice tang. Taste the sauce as you go. This way, you can find the right balance of sweet and salty. Stir the sauce well before pouring it over the meatballs. When serving, use colorful bowls to make the dish pop. Start with jasmine or brown rice as the base. Next, add the teriyaki meatballs on top. Place steamed broccoli beside the meatballs for color and nutrition. For extra flair, sprinkle sesame seeds and chopped green onions on top. These add flavor and a nice crunch. You can also add a lime wedge for a fresh twist. Use chopsticks for a fun touch and to make it more authentic! Pro Tips Use Fresh Ingredients: Fresh ginger and garlic can significantly enhance the flavor of your meatballs. Opt for freshly grated ginger and minced garlic rather than powdered versions for the best taste. Don't Overmix: When combining the meatball ingredients, mix just until combined. Overmixing can lead to tough meatballs. Experiment with Vegetables: Feel free to add other steamed vegetables like snap peas or bell peppers for added nutrition and color in your bowls. Make Ahead: You can prepare the meatballs and teriyaki sauce ahead of time. Store them separately in the fridge for up to 2 days, and simply reheat when ready to serve. {{image_2}} You can switch the ground chicken or turkey for other meats. Ground beef adds a rich flavor. Pork brings a nice sweetness to the dish. If you're vegan, try plant-based meat. Many brands offer great texture and taste. If you want a lighter sauce, go for low-sugar teriyaki sauces. They cut down on calories but keep the flavor. You can also make your own sauce. Just mix soy sauce, honey, and sesame oil. This way, you know exactly what’s in it. Switch up the vegetables or grains in your bowl. Try adding bell peppers or snap peas for crunch. You can also use quinoa instead of rice. It adds protein and a nutty taste. Don't be afraid to mix and match your favorites! After enjoying your teriyaki meatball bowls, store any leftovers in an airtight container. Place them in the fridge for up to three days. If you want to save them longer, freeze the meatballs and sauce separately. They can last for up to three months in the freezer. Just remember to label the containers with the date. This way, you can enjoy tasty meals later. To reheat your teriyaki meatballs, use the microwave or oven. If using the microwave, place the meatballs in a bowl with a splash of water. Cover it with a lid or wrap. Heat in short bursts for one minute. Stir and check until hot. If using the oven, preheat it to 350°F (175°C). Place the meatballs in a baking dish and cover with foil. Heat for about 10-15 minutes. This keeps them moist and tasty. For easy meals, prep your teriyaki meatballs ahead of time. Shape the meatballs and freeze them raw. This way, you can cook just what you need. For lunches, pack rice, meatballs, and veggies in meal prep containers. This makes grabbing a quick meal simple and fast. You can also add extra toppings like sesame seeds or green onions when you’re ready to eat. Yes, you can use various ground meats. Ground turkey or chicken are great choices. You can also try ground beef or pork. Each meat gives a unique flavor. For a plant-based option, use ground tofu or tempeh. Just ensure the meat is well-seasoned to keep those flavors strong. To thicken your teriyaki sauce, simmer it longer. This reduces the liquid and makes it thicker. You can also mix a tablespoon of cornstarch with water. Stir this mix into the sauce as it simmers. Cook until it thickens to your desired level. Adjust the sweetness or saltiness to keep the flavor balanced. Yes, this recipe is great for meal prep. You can make the meatballs and sauce ahead of time. Store them in separate containers in the fridge. They last for up to four days. Reheat the meatballs in the oven or microwave. This makes it easy to enjoy a tasty meal all week. You can serve teriyaki meatballs with rice and veggies. Jasmine or brown rice works well. Steamed broccoli is a perfect match, but you can also add bell peppers or snap peas. For extra flavor, consider pickled vegetables or a side salad. Add some lime wedges for a zesty kick. This post covered how to make tasty teriyaki meatballs. We discussed main ingredients, including ground chicken and panko breadcrumbs. I shared steps for baking, making sauce, and serving with rice and broccoli. You can even switch up the protein and sides to match your taste. Remember to store leftovers well and reuse them for quick meals. Enjoy creating this dish, and make it your own with the tips and variations provided!

Teriyaki Meatball Bowls Flavorful and Easy Dinner

Looking for a quick and tasty dinner? Try my Teriyaki Meatball Bowls! They are fun to make and packed with

- 2 medium zucchinis - 1 cup grated Parmesan cheese - 1 cup breadcrumbs - 2 large eggs - Olive oil spray - 1 teaspoon garlic powder - 1 teaspoon onion powder - 1 teaspoon Italian seasoning - Salt and pepper to taste - Each serving has about 150 calories. - Zucchini is low in calories and high in water. - Parmesan adds protein and calcium, giving a nutritious boost. I love using fresh zucchini for these crisps. Zucchini is light and has a great texture. It pairs well with the savory taste of Parmesan. The cheese brings a rich flavor and crispy texture. You can easily adjust the seasoning to fit your taste. With just a few simple ingredients, you can make a healthy snack that everyone will enjoy. For the full recipe, check out the detailed instructions above. - Preheat your oven to 425°F (220°C). - Line a baking sheet with parchment paper. - Slice the zucchinis into thin rounds, about 1/4 inch thick. - In a shallow bowl, mix the grated Parmesan, breadcrumbs, garlic powder, onion powder, Italian seasoning, salt, and pepper. - In another bowl, beat the eggs until well mixed. - Dip each zucchini slice into the beaten eggs, letting the excess drip off. - Coat each slice in the Parmesan mixture. Press lightly to help the coating stick. - Place the coated slices on the prepared baking sheet in a single layer. - Spray the tops of the zucchini crisps lightly with olive oil. - Bake for 20-25 minutes until they are tender and golden. - Flip the crisps halfway through to ensure even cooking. - Check for doneness; they should be crispy and golden brown. Enjoy these crispy treats straight from the oven! For the full recipe, check out the complete instructions. To make Parmesan Zucchini Crisps, you need a few key tools: - Baking sheet: A sturdy baking sheet is crucial. Choose one that is heavy-duty for even heat. - Parchment paper: Line your baking sheet with parchment. This helps prevent sticking and makes cleanup easier. - Shallow bowls: Use two shallow bowls for the egg and Parmesan mixtures. This makes coating the zucchini easy. - Cooking spray: Olive oil spray adds a light coating for crispiness without extra oil. Crispiness is key for these snacks. Here are some tips: - Egg coating: Dip each zucchini slice in the egg thoroughly. Let any extra egg drip off. This helps the cheese stick better. - Baking time: Bake for 20 to 25 minutes. Check for golden tops. Flip halfway through to cook evenly. If you want extra crunch, add a few more minutes. To make these crisps even tastier, try these ideas: - Spice variations: Add paprika or cayenne pepper for a kick. Mix in some cumin for a warm flavor. - Fresh herbs: Use basil or parsley for freshness. Chop them finely and mix them with the cheese for a bright touch. For the full recipe, check the [Full Recipe]. {{image_2}} You can switch out Parmesan for other cheeses. Try using Pecorino Romano for a sharper taste. If you want creaminess, mozzarella works well too. Combining cheeses can add depth to the flavor. Mix Parmesan with cheddar for a rich, savory bite. Feel free to add other veggies like carrots or bell peppers. You can even toss in cooked bacon for a savory twist. Instead of breadcrumbs, use crushed nuts for a crunchier texture. Almond flour is a great gluten-free option too. If you prefer air frying, set it to 375°F (190°C) for about 15 minutes. Check them halfway and shake the basket for even cooking. Baking gives a nice, even crisp, while air frying can be quicker. Both methods yield delicious results, so choose what suits you best. To keep your Parmesan zucchini crisps fresh, store them in an airtight container. Place a paper towel in the container to absorb any moisture. This helps maintain their crunch. I recommend using a glass or plastic container with a tight lid. Avoid stacking them too high, as this can cause them to lose their crispiness. When you want to enjoy leftover crisps, use your oven or air fryer. Preheat the oven to 350°F (175°C) and place the crisps on a baking sheet. Heat for about 5-10 minutes until they are crispy again. If using an air fryer, set it to 350°F (175°C) for about 3-5 minutes. Avoid microwaving; it makes them soggy. For freezing, arrange the crisps in a single layer and freeze on a baking sheet. Once frozen, transfer them to a freezer bag. To thaw, let them sit at room temperature for about 30 minutes. In the fridge, Parmesan zucchini crisps last about 3 days. Look for signs like softness or discoloration to check for spoilage. If they start to smell off or feel wet, it's best to toss them. Enjoying them fresh will give you the best taste and texture! For a delicious snack, check the full recipe for tips on making these crunchy treats. Parmesan Zucchini Crisps last about 3 days in the fridge. Store them in an airtight container. This keeps them fresh and tasty. If you want them to stay crispy, place a paper towel in the container. This helps absorb moisture. Yes, you can make these gluten-free. Instead of regular breadcrumbs, use gluten-free breadcrumbs or crushed nuts. You can also use ground oats for a healthy twist. These substitutes still give you a nice crunch. You can serve these crisps with many dips. Try marinara sauce, ranch dressing, or garlic aioli. They also go well with hummus or tzatziki. Pairing them with a refreshing dip enhances the flavors. You can prepare the zucchini slices in advance. Coat them and place them on the baking sheet. Cover the sheet with plastic wrap and store it in the fridge. Bake them just before serving for that fresh taste. To ensure crispy Parmesan Zucchini Crisps, follow a few tips. First, slice your zucchini thinly and evenly. This helps them cook at the same rate. Avoid overcrowding the baking sheet. Leave space between each slice. Flip them halfway through cooking for even crispiness. In this post, we explored the delicious world of Parmesan Zucchini Crisps. We covered everything from the main ingredients to step-by-step instructions. You learned about seasoning, baking tips, and flavor variations. These crisps are easy to make and full of flavor. Remember, cooking is all about trying new things. You can adjust recipes to fit your taste. Enjoy making these tasty snacks, and don't hesitate to experiment. They are sure to be a hit!

Parmesan Zucchini Crisps Crunchy and Healthy Snack

Looking for a tasty and healthy snack that satisfies your crunchy cravings? You’re in the right place! Parmesan Zucchini Crisps

- 1 sheet of puff pastry, thawed Puff pastry is crucial for this recipe. It creates that flaky, light texture we all love. Make sure to thaw it properly before using. - 1 medium ripe peach, sliced thin Choose a fresh peach that is firm but gives slightly when pressed. This ensures it's sweet and juicy. Avoid overripe peaches as they can be mushy. - 4 ounces Brie cheese, sliced Brie cheese adds creaminess and richness. You can use regular Brie or a flavored one for a twist. If you're looking for alternatives, consider using Camembert or goat cheese. - 2 tablespoons honey Honey enhances the sweetness of the peach and balances the richness of the cheese. - 1 teaspoon fresh thyme leaves Fresh thyme adds a nice herbal note that complements the fruit and cheese well. - 1 egg, beaten (for egg wash) The egg wash gives the pastry a lovely golden color when baked. - Pinch of salt and pepper A small amount of salt and pepper enhances all the flavors, making the dish more delicious. For the Full Recipe, follow the easy steps to create these delightful bites. 1. Prepping the puff pastry: Start with a sheet of puff pastry. Thaw it until soft. Place it on a lightly floured surface. Roll it out gently to smooth out any creases. This step helps the pastry puff up nicely when baking. 2. Arranging the ingredients on the pastry: Cut the pastry into 2-inch squares. Take a square and place it on your baking sheet. On top, place a slice of Brie cheese, then add a thin slice of peach. Drizzle a little honey over the peach. Sprinkle fresh thyme, salt, and pepper for flavor. 3. Sealing and brushing techniques: Fold the corners of the pastry square toward the center. Pinch them to seal each bite tightly. This keeps the filling inside while it bakes. For a shiny finish, brush the tops with beaten egg before baking. 1. Oven preheating details: Preheat your oven to 400°F (200°C). Line your baking sheet with parchment paper to avoid sticking. 2. Baking duration and signs of doneness: Bake the bites for 15-20 minutes. Watch for a golden brown color and puffed-up pastry. When they look perfect, remove them from the oven. Let them cool slightly before serving. To ensure perfect puff pastry texture, keep it cold. Warm pastry gets sticky. Thaw it in the fridge. Roll it out gently on a floured surface. Don’t overwork the dough. This keeps it flaky and light. Timing is key for optimal flavor blend. Bake the bites until golden brown. This takes about 15 to 20 minutes. The cheese should melt and the peach should soften. This makes each bite juicy and delicious. For presentation, serve the bites warm on a rustic wooden board. Drizzle some extra honey on top. Add a few sprigs of thyme as a garnish. This looks inviting and adds a fresh touch. Pair these bites with a light white wine like Sauvignon Blanc. It balances the sweetness of the peach. You can also serve them with a simple honey dip. This enhances the sweet and savory flavors. {{image_2}} You can switch up the fruits in this recipe. Apples and figs work great. For apples, use thin slices of tart Granny Smith. They give a nice crunch and balance the cheese. For figs, cut them in half. Their sweetness pairs well with Brie. You can also explore different cheese options. Goat cheese adds a tangy kick. Use it in place of Brie for a unique flavor. Mozzarella is another great choice. It melts beautifully and has a mild taste. Experiment to find what you love best! If you want a vegan option, use vegan puff pastry. There are many brands available now. Replace Brie with a vegan cheese that melts well. Look for cashew-based or almond-based cheeses. They can mimic the creaminess of Brie without any dairy. For gluten-free needs, choose gluten-free puff pastry. Many stores offer these now. Make sure to check the ingredients for any allergens. This way, everyone can enjoy Peach and Brie Puff Pastry Bites! For more details, check the Full Recipe. To keep your Peach and Brie Puff Pastry Bites fresh, store them in the fridge. Place them in an airtight container. This will help maintain their taste and crispness. Try to eat them within three days for the best flavor. Reheat them in the oven for a few minutes to restore some of their original crunch. If you want to save some bites for later, freezing is a great option. First, let the cooked bites cool completely. Then, place them in a single layer on a baking sheet. Freeze them until solid, usually about an hour. Once frozen, transfer them to a freezer-safe bag. They can last up to three months in the freezer. When you’re ready to eat, bake them straight from the freezer. Just add a few extra minutes to the baking time. This way, you can enjoy these delicious treats anytime! For the full recipe, check the details above. To make Peach and Brie Puff Pastry Bites, follow this simple process: - Preheat your oven to 400°F (200°C). - Roll out the thawed puff pastry and cut it into 2-inch squares. - Place a square on a lined baking sheet. - Add a slice of Brie cheese and a slice of peach on top. - Drizzle honey and sprinkle thyme, salt, and pepper. - Fold the corners of the pastry to the center and pinch to seal. - Brush with beaten egg for a shiny finish. - Bake for 15-20 minutes or until golden brown. This recipe creates a tasty mix of sweet and savory flavors. You can find the Full Recipe for detailed steps. Yes, you can make the bites ahead of time. Prepare them and store them in the fridge. Cover them tightly with plastic wrap. Bake them just before serving. This way, they stay fresh and puff up nicely. These bites taste great with various dipping sauces. Here are some ideas: - Honey mustard for a sweet and tangy kick. - Balsamic glaze for a rich flavor. - A light yogurt dip for creaminess. Feel free to experiment with your favorite sauces! This blog post detailed how to make Peach and Brie Puff Pastry Bites. We talked about choosing the right puff pastry, fresh peaches, and Brie cheese. The preparation steps and baking tips ensure perfect bites every time. I shared helpful tips for serving and suggested fun variations to try. Lastly, I covered storage options, so you can enjoy leftovers later. Follow these steps, and you’ll impress your friends with this easy, tasty dish. Enjoy your cooking journey!

Peach and Brie Puff Pastry Bites Delicious Delight

If you’re looking for a simple yet delicious appetizer, try Peach and Brie Puff Pastry Bites. With the flakiness of

To create yummy baked zucchini boats, you need these simple ingredients. Each item adds flavor and texture to your dish. Here’s what you will need: - 4 medium zucchinis - 1 cup cooked quinoa - 1 cup cherry tomatoes, halved - 1 bell pepper, finely chopped (any color) - 1 small onion, diced - 1 cup black beans, rinsed and drained - 1 teaspoon garlic powder - 1 teaspoon cumin - 1 teaspoon smoked paprika - 1 cup shredded cheddar cheese - 2 tablespoons olive oil - Salt and pepper to taste - Fresh cilantro for garnish (optional) These ingredients come together to make a colorful and tasty meal. Zucchini is low in calories and packed with nutrients. Quinoa adds protein, making this dish filling. The black beans give fiber, while the cheese adds creaminess. You can find the full recipe online to guide you through the cooking process. Preheating the Oven Start by preheating your oven to 375°F (190°C). This step is key for even cooking. Preparing the Zucchini Shells Next, take your medium zucchinis and cut them in half lengthwise. Scoop out the seeds to create boat-like shells. Place these halves on a baking sheet lined with parchment paper. This makes for easy cleanup. Combining Ingredients In a large bowl, combine one cup of cooked quinoa, halved cherry tomatoes, finely chopped bell pepper, diced onion, and black beans. Add one teaspoon each of garlic powder, cumin, and smoked paprika. Season with salt and pepper to taste. Mix these well until all the ingredients are evenly combined. Packing the Filling into Zucchini Now, take your filling mixture and spoon it into each zucchini half. Press down gently to pack it in. This ensures every bite is full of flavor. Drizzling Olive Oil Drizzle two tablespoons of olive oil over the stuffed zucchinis. This adds moisture and helps with browning. Timing for Perfectly Cooked Zucchini Bake in the preheated oven for 25 to 30 minutes. Look for tender and slightly golden zucchinis. Remove them from the oven and sprinkle half of the shredded cheddar cheese on top of the filling. Return to bake for an additional five minutes until the cheese is melted and bubbly. These steps will give you tasty and beautiful baked zucchini boats. For the full recipe, check out the instructions above. For great flavor in your baked zucchini boats, use the right seasonings. I love garlic powder, cumin, and smoked paprika. These spices add warmth and depth. You can adjust them to your taste. Feel free to add more or less. When it comes to cheese, cheddar is a classic choice. It melts well and adds creaminess. You can also try mozzarella for a stretchy texture. Feta cheese gives a nice tangy kick. Mix and match your favorites! Your oven should be set at 375°F (190°C). This temperature cooks the zucchini evenly. To be sure your oven is accurate, use an oven thermometer. This tool helps avoid undercooked or burnt boats. To check if the zucchini is tender, poke it gently with a fork. If it goes in easily, it’s done. If not, give it a few extra minutes. A beautiful dish starts with good garnishing. Fresh cilantro adds color and flavor. You can also sprinkle some crushed red pepper for a spicy touch. When serving, place the boats on a nice platter. Add some extra cherry tomatoes around them for a pop of color. This simple touch makes your dish look more inviting. {{image_2}} Alternative Fillings You can change the filling to suit your taste. Try cooked rice or lentils instead of quinoa. For a meatier option, use ground turkey or beef. Mixed veggies like spinach, corn, or mushrooms add great flavor too. Different Cheese Options If you want a cheese swap, go for mozzarella or feta. These cheeses melt well and give a nice taste. You can also use vegan cheese for a dairy-free twist. Cream cheese adds creaminess, while goat cheese brings a tangy kick. Vegan and Gluten-Free Adaptations To make this recipe vegan, skip the cheese or use vegan cheese. Ensure your beans and grains are gluten-free. Most quinoa is gluten-free, making it a great base. Low-Carb Variants For a low-carb option, replace quinoa with cauliflower rice. This change keeps the dish light and healthy. You can also skip the beans if you want fewer carbs. Adding Heat with Spices If you like heat, add red pepper flakes or cayenne pepper. A little goes a long way to spice things up. You can also try chili powder for a deeper flavor. Incorporating Herbs Fresh herbs can brighten your dish. Basil, parsley, or oregano work well. Add them to the filling or sprinkle on top before serving. They give a fresh taste and look great, too. To keep your baked zucchini boats fresh, store them in the fridge. Use an airtight container for best results. Place a paper towel inside to absorb moisture. This helps keep them from getting soggy. Enjoy your leftovers within three days for the best flavor. When reheating, use the oven for even warmth. Preheat it to 350°F (175°C). Place the zucchini boats on a baking tray. Heat for about 15 minutes or until warm. You can also microwave them in a covered dish. Heat in 30-second intervals until hot, but this may make them softer. You can freeze cooked zucchini boats if you have extras. Let them cool completely first. Wrap each boat tightly in plastic wrap. Then, place them in a freezer bag to prevent freezer burn. They stay good for up to three months in the freezer. To thaw, move the zucchini boats to the fridge overnight. For quick thawing, use the microwave on defrost mode. After thawing, reheat them in the oven at 350°F (175°C) for about 15 minutes to restore their texture. For best taste, eat your zucchini boats within three days. Proper storage helps maintain their crispness and flavor. If you notice any changes in color or smell, it’s best to discard them. Signs of spoilage include a slimy texture or a sour smell. Trust your senses; if it seems off, don’t eat it. For the full recipe, click [here](#). You can use other grains if you don’t have quinoa. Here are some options: - Brown rice - Couscous - Barley - Farro These grains cook well and add texture. You can also use protein if you prefer. Some good choices include: - Cooked lentils - Chickpeas - Ground turkey - Shredded chicken Each substitute brings a unique flavor. Experiment with what you like best! You can tell zucchini boats are done by their look and feel. Here are some signs: - They should be slightly golden. - The edges may curl a bit. You can also test with a fork. Insert it into the zucchini. If it goes in easily, the boats are ready. If not, give them a few more minutes. Yes, you can prep zucchini boats ahead of time. Here are some tips: - Cut and scoop the zucchinis a day before. - Store them in the fridge in an airtight container. For the filling, mix all ingredients and store them separately. Here’s how to store: - Keep the filling in a sealed container. - It can last up to two days in the fridge. Just assemble and bake when ready! We explored a tasty zucchini boat recipe packed with healthy ingredients. You learned how to prepare, fill, and bake these delicious boats. Tips on flavors, presentation, and dietary options enhance your cooking. Storage advice ensures you enjoy leftovers safely. Embrace the variations and find what suits you best. Cooking should be fun, so get creative and enjoy every bite!

Baked Zucchini Boats Flavorful and Easy Recipe Guide

Craving a fresh, healthy meal that’s easy to make? Baked Zucchini Boats are the answer! This flavorful recipe packs a

- 1 cup quinoa, rinsed - 2 cups almond milk (or any milk of choice) - 2 ripe peaches, diced - 1 tablespoon honey or maple syrup - 1 teaspoon cinnamon - 1/2 teaspoon vanilla extract - 1/4 cup chopped nuts (almonds or walnuts recommended) - 2 tablespoons chia seeds - Fresh mint leaves for garnish Peach Breakfast Quinoa brings joy to my mornings. It is a perfect blend of flavors and textures. The main ingredients set the foundation for this dish. Quinoa is the star, packed with protein and fiber. Almond milk gives it a creamy feel. Diced peaches add natural sweetness and freshness. You can enhance the dish with optional additions. A touch of honey or maple syrup can make it sweeter. Cinnamon adds warmth, while vanilla extract brings depth. You can play with these flavors based on your taste. When it comes to toppings, the choices are fun! Chopped nuts add crunch and healthy fats. Chia seeds boost nutrition and texture. Fresh mint leaves give a bright finish. For the full recipe, check out the details above. This meal is simple, delicious, and a great way to start your day! 1. First, combine 1 cup of rinsed quinoa with 2 cups of almond milk in a medium pot. 2. Bring this mixture to a boil over medium-high heat. 3. Once it boils, reduce the heat to low. Cover the pot and let it simmer. Cook for about 15 minutes, or until the quinoa is tender and the liquid fully absorbs. 1. While the quinoa cooks, take 2 diced peaches and place them in a bowl. 2. Add 1 tablespoon of honey or maple syrup if you want sweetness. 3. Then, mix in 1 teaspoon of cinnamon and 1/2 teaspoon of vanilla extract. 4. Stir well and set this mixture aside. Allow the flavors to meld together. 1. Once the quinoa is done, use a fork to fluff it up. 2. Stir in 2 tablespoons of chia seeds for an extra nutrient boost. 3. Serve the quinoa warm in bowls. 4. Top each bowl with the peach mixture and a sprinkle of chopped nuts for crunch. 5. For a fresh touch, garnish your dish with mint leaves. For all these steps, you can refer to the full recipe for more details. Enjoy your Peach Breakfast Quinoa! To make great quinoa, start by rinsing it. Rinse it well under cold water. This helps remove the bitter coating called saponin. It takes just a minute or two. Use a 2:1 ratio of liquid to quinoa. For this recipe, use 2 cups of almond milk for every 1 cup of quinoa. This ratio ensures the quinoa cooks well without being too dry or too watery. You can spice things up with extra flavors! Try adding nutmeg or ginger for a warm taste. You can also mix in toasted coconut for a tropical twist. To adjust sweetness, add honey or maple syrup. Start with one tablespoon, then taste. If you want it sweeter, add more. Serve this dish in pretty bowls for a fancy breakfast. You can layer the quinoa and peach mixture for a beautiful look. For garnishes, use fresh mint leaves or a sprinkle of nuts. This not only adds color but also gives a nice crunch. Your breakfast will look as good as it tastes! For the full recipe, check the Peach Breakfast Quinoa section. {{image_2}} You can switch up the fruit to keep things fresh and fun. Apples or berries work great instead of peaches. Apples give a crisp bite, while berries add a burst of color and flavor. You can also add seasonal spices. Nutmeg and cardamom bring warmth to your bowl. They give a cozy feel, perfect for chilly mornings. If you're looking for vegan options, use plant-based milk like almond or oat milk. Quinoa is naturally gluten-free, making this dish a good choice for those with gluten sensitivities. For nut-free options, skip the nuts and use seeds like pumpkin or sunflower seeds instead. These add crunch without the allergens. Want a creamier texture? Add a dollop of yogurt on top. Plain or flavored yogurt can elevate the dish. If you're not a fan of quinoa, you can swap it out for other grains. Rice or bulgur works well and cooks up nicely. Each grain brings its own flavor and texture, so feel free to experiment. For the full recipe, check out the details above and enjoy creating your perfect bowl! To keep your Peach Breakfast Quinoa fresh, use airtight containers. Glass or BPA-free plastic work well. Make sure the quinoa cools to room temperature before sealing. Store it in the fridge for up to three days. This keeps the flavors intact and helps avoid spoilage. When reheating quinoa, you can use the microwave or stovetop. For the microwave, place the quinoa in a bowl, add a splash of almond milk, and cover it. Heat for one to two minutes, stirring halfway through. On the stovetop, warm it gently over low heat. Stir in some almond milk to keep it moist. This method helps maintain texture and keeps flavors fresh. Freezing is a great option if you want to save some portions. Divide the quinoa into single servings and place them in freezer-safe containers. Make sure to leave some space at the top for expansion. When you're ready to eat, thaw it in the fridge overnight. To serve, reheat and add fresh peaches or nuts for a boost. Yes, you can prepare Peach Breakfast Quinoa ahead of time. - To make it overnight, cook the quinoa as directed. Allow it to cool, then store it in the fridge. The next day, mix in the peach mixture and warm it up. - Store the quinoa in an airtight container. It stays fresh for up to three days. When serving, heat it on low in a pot or microwave. Add a splash of milk to keep it creamy. If you don’t have quinoa, several options exist. - Brown rice has a nutty flavor and is slightly chewy. Cook it using a 2:1 water-to-rice ratio. - Oats can also work, giving a creamy texture. Use 1 cup of oats and 2 cups of almond milk, cooking for about 5 minutes. - If you want more fiber, try farro. It has a chewy bite and a mild taste. Use 1 cup of farro and 3 cups of water, cooking for about 30 minutes. You can easily make Peach Breakfast Quinoa more filling. - Add protein by including Greek yogurt or a scoop of protein powder. This boosts the meal and keeps you satisfied longer. - For extra fiber and nutrients, mix in chia seeds or flaxseeds. You could also add berries or nuts. These options enhance flavor while providing health benefits. Feel free to check the Full Recipe for more details! This blog post shared a simple, tasty recipe for Peach Breakfast Quinoa. We covered the main ingredients, optional additions, and several topping ideas. You learned every step to cook the quinoa and prepare the peach mixture. We also explored tips for perfecting your dish and creative presentation ideas. Remember, you can customize the recipe to match seasonal fruits or dietary needs. Enjoy making this wholesome breakfast that adds nutrition and flavor to your day!

Peach Breakfast Quinoa Flavorful Morning Boost

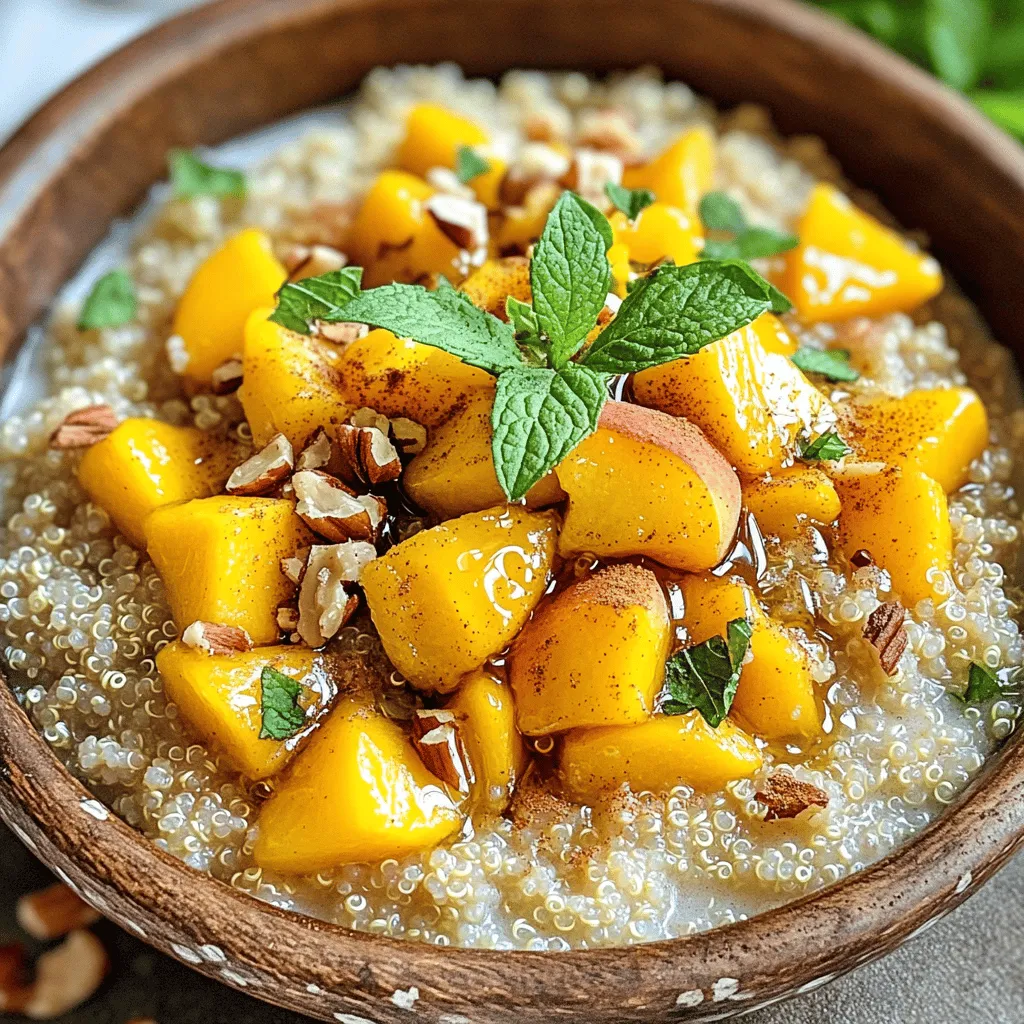
Start your day with a delicious twist by trying Peach Breakfast Quinoa! This easy recipe packs a flavorful punch and

- Grated zucchini - Granulated sugar - Unsalted butter - Large eggs - Greek yogurt - Lemon zest - Lemon juice - All-purpose flour - Baking powder - Baking soda - Salt - Vanilla extract - Glaze ingredients (powdered sugar and lemon juice) For this recipe, you will need: - 1 cup grated zucchini (about 1 medium zucchini) - 1 cup granulated sugar - 1/2 cup unsalted butter, softened - 2 large eggs - 1/4 cup Greek yogurt - 1 tablespoon lemon zest - 1/4 cup lemon juice - 1 1/2 cups all-purpose flour - 1 teaspoon baking powder - 1/2 teaspoon baking soda - 1/4 teaspoon salt - 1/2 teaspoon vanilla extract - For the glaze: - 1 cup powdered sugar - 2 tablespoons lemon juice Using high-quality ingredients matters. Fresh lemon juice gives a bright flavor. Choose a good zucchini; it should feel firm and heavy. If you want to switch things up, you can use applesauce instead of Greek yogurt. This keeps the loaf moist and adds sweetness. You can also try coconut oil for a different flavor. 1. Start by preheating your oven to 350°F (175°C). This temperature helps the loaf bake evenly. 2. Prepare your 9x5 inch loaf pan by greasing it with butter and dusting it with flour. You can also line it with parchment paper for easy removal later. 3. In a large mixing bowl, cream together 1/2 cup of softened unsalted butter and 1 cup of granulated sugar. Use a mixer to make it fluffy. 4. Add 2 large eggs to the bowl, one at a time. Mix well after each egg to ensure they blend in fully. 5. Stir in 1/4 cup of Greek yogurt, 1 tablespoon of lemon zest, and 1/4 cup of lemon juice. Mix until everything is well blended. 6. In another bowl, whisk together 1 1/2 cups of all-purpose flour, 1 teaspoon of baking powder, 1/2 teaspoon of baking soda, and 1/4 teaspoon of salt. 7. Gradually add the dry mixture to the wet mixture. Mix just until combined. Be careful not to overmix, as this can make the loaf tough. 8. Gently fold in 1 cup of grated zucchini, making sure it is evenly mixed in the batter. 1. Pour the batter into your prepared loaf pan. Smooth the top with a spatula for an even surface. 2. Bake in the preheated oven for 50-60 minutes. A toothpick inserted in the center should come out clean when done. 3. Once baked, let the loaf cool in the pan for about 10 minutes. This helps it set without falling apart. 4. Carefully transfer the loaf to a wire rack to cool completely. This keeps it from getting soggy on the bottom. Now you can drizzle the glaze over the loaf once it's cool. For the glaze, mix 1 cup of powdered sugar with 2 tablespoons of lemon juice until smooth. Enjoy this fresh and flavorful treat from the Full Recipe! To make the best Glazed Lemon Zucchini Loaf, focus on a few key steps. First, do not overmix the batter. When you add dry ingredients to wet ones, stir gently. Stop mixing as soon as you see no dry flour. This keeps the loaf light and fluffy. Next, use room temperature ingredients. Take the eggs and butter out of the fridge ahead of time. This helps them blend well and makes your batter smooth. For a moist loaf, make sure to squeeze out excess water from the grated zucchini. Too much moisture can lead to a soggy loaf. You want just the right amount of moisture for the best texture. Creating the perfect glaze is simple. Mix powdered sugar with lemon juice until smooth. Aim for a pourable consistency. If it’s too thick, add a bit more lemon juice to thin it out. You can also play with flavors in your glaze. Try adding a dash of vanilla extract for warmth. Or, mix in a bit of almond extract for a nutty twist. Both options enhance the lemon flavor in your loaf. For more baking tips, check the Full Recipe. {{image_2}} You can easily customize your glazed lemon zucchini loaf. Here are some ideas for extra flavor: - Nuts: Add 1/2 cup of chopped walnuts or pecans for crunch. - Chocolate Chips: Mix in 1/2 cup of dark or white chocolate chips for sweetness. - Spices: A pinch of cinnamon or nutmeg can enhance the flavor. To adjust the lemon flavor, try these tips: - Use more lemon zest for a stronger taste. - Add a splash of lemon extract for extra zing. If you need gluten-free options, swap the all-purpose flour with a gluten-free blend. Make sure it includes xanthan gum for the right texture. For low-sugar alternatives, here are some great swaps: - Use 1 cup of coconut sugar or a sugar substitute, like stevia. - Consider using applesauce instead of sugar for natural sweetness and moisture. These variations and substitutions allow you to make a loaf that fits your taste and dietary needs. For the full recipe, check out the detailed instructions above. To keep your glazed lemon zucchini loaf fresh, wrap it tightly in plastic wrap. Place it in an airtight container. This helps to lock in moisture and keep it soft. You can also use aluminum foil for wrapping. If you want to freeze it, slice the loaf first. Wrap each slice in plastic wrap and then place them in a freezer bag. This way, you can enjoy a slice whenever you want! Your glazed lemon zucchini loaf can stay good for about 3 to 5 days at room temperature. If you store it in the fridge, it may last a week. Look for signs like a change in color or a dry texture. If it smells sour or has mold, it’s best to toss it. Always trust your senses to know when it’s no longer good. For the full recipe, check out the earlier section. How can I make my loaf more flavorful? To boost flavor, add more lemon zest. A pinch of salt also helps. You can mix in nuts or spices like cinnamon. These additions create a lovely taste. You can even swap some sugar for brown sugar for a deeper flavor. Can I use frozen zucchini for this recipe? Yes, you can use frozen zucchini. Make sure to thaw and drain it first. Excess water can make your loaf soggy. Pat it with a towel to remove extra moisture. This way, your loaf will stay light and fluffy. What are the best ways to serve Glazed Lemon Zucchini Loaf? Serve it warm or at room temperature. Slice it thick for a hearty piece. You can add a dollop of whipped cream or yogurt. A sprinkle of fresh mint on top adds a nice touch too. Why did my loaf not rise properly? If your loaf does not rise, check your baking powder. It may be old and inactive. Also, make sure to mix the batter just enough. Overmixing can cause it to be dense. Lastly, ensure your oven is at the right temperature. What should I do if my glaze is too thick? If your glaze is too thick, add a little lemon juice. Stir it well until it becomes pourable. You want it to glide smoothly over the loaf. A thin glaze will soak in nicely. In this post, we explored how to make a delicious Glazed Lemon Zucchini Loaf. We covered the key ingredients and their measurements, stressing the need for quality. I provided step-by-step instructions for mixing and baking, along with tips for perfecting your loaf. Don't forget to try different flavor variations and dietary substitutes to make it your own. Proper storage will keep your loaf fresh for longer. With these insights, you can create a tasty treat that's sure to impress!

Glazed Lemon Zucchini Loaf Fresh and Flavorful Treat

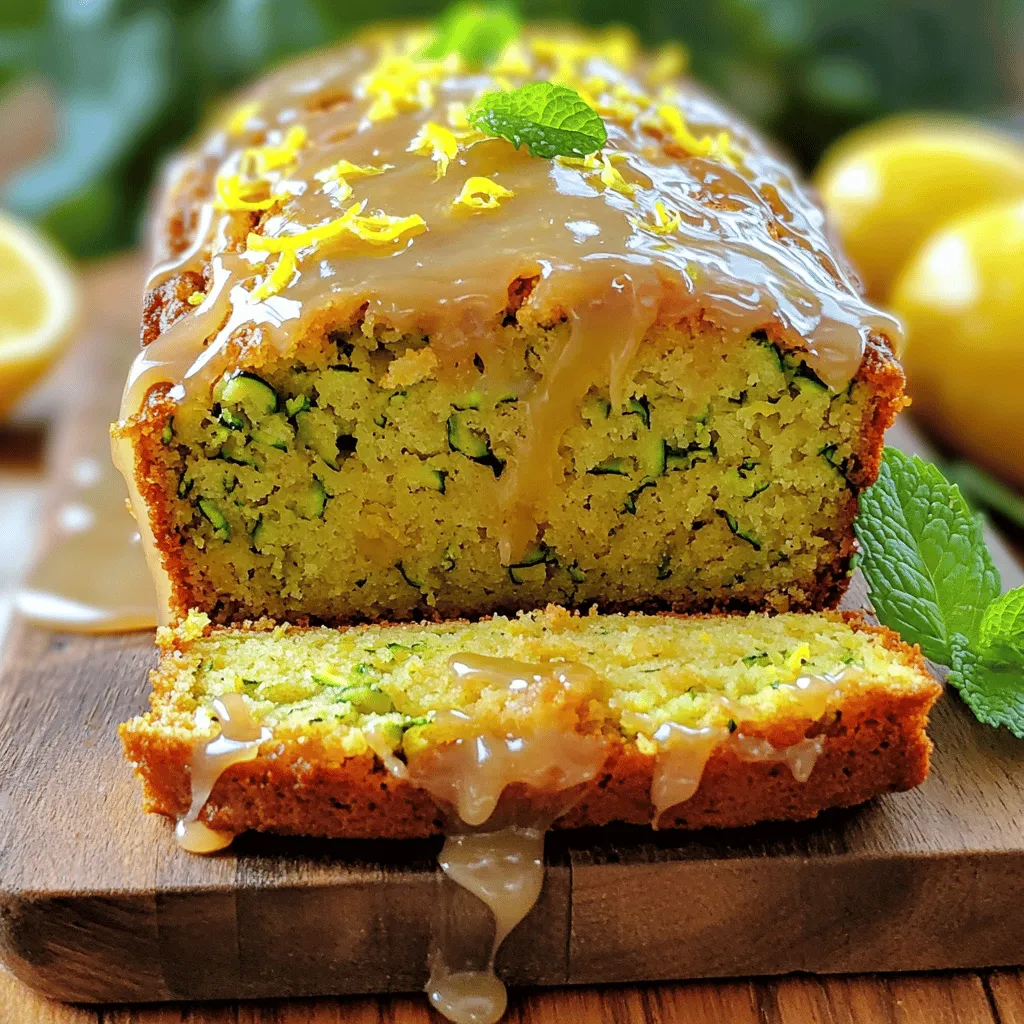
Craving a burst of freshness? This Glazed Lemon Zucchini Loaf is your answer! Packed with juicy lemon zest and moist

- 2 cups fresh strawberries, hulled and sliced - 1 large cucumber, thinly sliced - 1/4 red onion, thinly sliced - 1/4 cup fresh mint leaves, chopped - 1 tablespoon honey - 2 tablespoons balsamic vinegar - Salt and pepper to taste - Additional mint leaves - Extra sliced strawberries for garnish The key to a bright and tasty Cucumber Strawberry Salad lies in fresh ingredients. Fresh strawberries bring a sweet burst of flavor. I like to hull and slice them myself for the best taste. A large cucumber adds crunch and hydration. Thin slices work best, keeping everything light. I also include red onion for a bit of zing. The mint leaves add a refreshing touch that ties it all together. For the dressing, I mix honey with balsamic vinegar. This combo offers a sweet and tangy kick. A pinch of salt and pepper rounds out the flavors. You can adjust the amount of honey based on your taste. If you want to dress it up, consider adding extra mint leaves or more sliced strawberries on top. These optional toppings make your salad look even more inviting. Use this fresh ingredient list as your guide, and you'll create a salad that delights the senses. For the full recipe, check out the Refreshing Cucumber Strawberry Delight. How to hull and slice strawberries To hull strawberries, use a small knife. Gently cut around the green stem. Pull the stem out to leave a clean berry. After hulling, slice each berry in half or quarters. This makes them perfect for the salad. Slicing cucumbers and red onions For cucumbers, wash them well. Cut off both ends and slice them thinly. Thin slices help the cucumbers mix well with other flavors. Next, take the red onion. Peel off the skin and slice it thinly. You want small pieces to avoid overpowering the salad. Combining ingredients in a large bowl In a large bowl, add the sliced strawberries, cucumber, and red onion. Toss them gently with your hands. This helps to mix the colors and flavors evenly. Then, add the chopped mint leaves for a fresh taste. Whisking together the dressing In a small bowl, add honey and balsamic vinegar. Use a whisk to mix them until smooth. This sweet and tangy dressing is key to your salad's flavor. Drizzling the dressing and tossing Pour the dressing over the salad mixture. Use a spoon to gently toss everything together. Make sure all the ingredients are coated in the dressing. Seasoning and letting it rest Add salt and pepper to taste. Mix again to distribute the seasoning. Let the salad rest for about 10 minutes. This allows the flavors to blend well. You can find the full recipe [here](#). To make your cucumber strawberry salad even better, adjust the sweetness with honey. Honey adds a natural sweetness that pairs well with strawberries. Start with one tablespoon, but feel free to add more based on your taste. If your strawberries are very sweet, you might use less. Next, balance the acidity of the balsamic vinegar. Two tablespoons is a good start, but you can add more if you prefer a tangier taste. Mix the honey with the vinegar well. This will create a smooth dressing that enhances all the flavors in the salad. How you serve your salad matters. A large glass bowl shows off the vibrant colors of the fresh ingredients. You can also use mason jars for a fun, portable option. This is great for picnics or meal prep! For garnishing, think about adding extra mint leaves on top. You can also place a few slices of strawberry for a pop of color. These small touches make your salad look even more inviting. Using seasonal ingredients makes your salad taste even better. Strawberries are best in late spring and early summer. Cucumbers are fresh in summer. When you use them in season, they are sweeter and crunchier. If strawberries or cucumbers are out of season, don’t worry! You can substitute with other fruits like blueberries or peaches. Try different vegetables too, like bell peppers or zucchini, to keep things fresh and exciting. {{image_2}} You can make this salad even tastier with some fun add-ins. Try adding feta cheese or goat cheese for a creamy texture. These cheeses add a salty touch that pairs well with the sweet strawberries. If you want some crunch, consider adding nuts. Walnuts or almonds work great and give a nice bite to the dish. Switching up the dressing can change the whole flavor. A citrus vinaigrette brings a zesty twist to this salad. Mix some lemon juice or orange juice with olive oil for a bright taste. You can also explore yogurt-based dressings. These dressings can add creaminess while keeping it light. This salad is great on its own, but you can also pair it with other dishes. Grilled chicken is a fantastic match. The juicy chicken complements the fresh flavors of the salad. You can also serve it as a side with BBQ dishes. The sweet and cool elements of the salad balance the smoky flavors well. For the full recipe, check out the Refreshing Cucumber Strawberry Delight. To keep your cucumber strawberry salad fresh, store leftovers in the fridge. Place it in an airtight container. This helps keep moisture in and air out. You can also cover the bowl tightly with plastic wrap. Both methods work well to prevent drying out. I recommend using glass containers. They do not absorb smells. Plus, they keep the salad fresh longer. If you use plastic, choose BPA-free options for safety. Your salad will stay good in the fridge for about three days. After that, the veggies may become soggy. Always check for signs of spoilage. Look for brown or mushy strawberries. If the cucumber feels slimy, it’s time to toss it. You can freeze cucumber strawberry salad, but it’s not ideal. Freezing changes the texture of cucumbers and strawberries. If you choose to freeze it, separate the components first. Freeze the strawberries and cucumber separately. This way, you can use them later in smoothies or other dishes, but not as a salad. Yes, you can prepare this salad ahead of time. I suggest making it no more than a few hours before serving. This way, the flavors mix well without losing the salad's crunch. If you make it too early, the cucumbers may get soggy. Store it in the fridge to keep it fresh. If you need a balsamic vinegar substitute, try apple cider vinegar. It adds a nice sweetness. You can also use red wine vinegar for a sharper taste. Both options work well with the salad's fresh flavors. Each vinegar brings a unique profile, so choose based on your taste. Yes, this salad is vegan-friendly. It contains no animal products. The honey can be swapped for maple syrup if you want a fully vegan dish. This makes it easy for everyone to enjoy the fresh, vibrant flavors. This cucumber strawberry salad is fresh and easy to make. Start with lovely ingredients like strawberries, cucumbers, and mint. Combine them with a simple honey-balsamic dressing for a tasty meal. Feel free to add cheese or nuts for more flavor. Remember to serve it right or store it well for later. This dish fits in with nearly any meal. Wait until summer to use the best fresh produce. Enjoy your vibrant and healthy salad!

Cucumber Strawberry Salad Fresh and Tasty Treat

Are you looking for a fresh and tasty dish that brightens up your meals? This Cucumber Strawberry Salad is just

Older posts
Newer posts
← Previous Page1 … Page75 Page76 Page77 … Page84 Next →

dsad

© 2026 easycookingbite • Built with GeneratePress

Our Policies

  • Copyright Policy
  • Cookie Policy
  • GDPR Policy
  • Privacy Policy
  • Disclaimer
  • Terms Of Use

More Information

  • Home
  • About
  • Contact
  • Appetizers
  • Dessert
  • Dinner
  • Drinks
©2026, easycookingbite About Back To Top