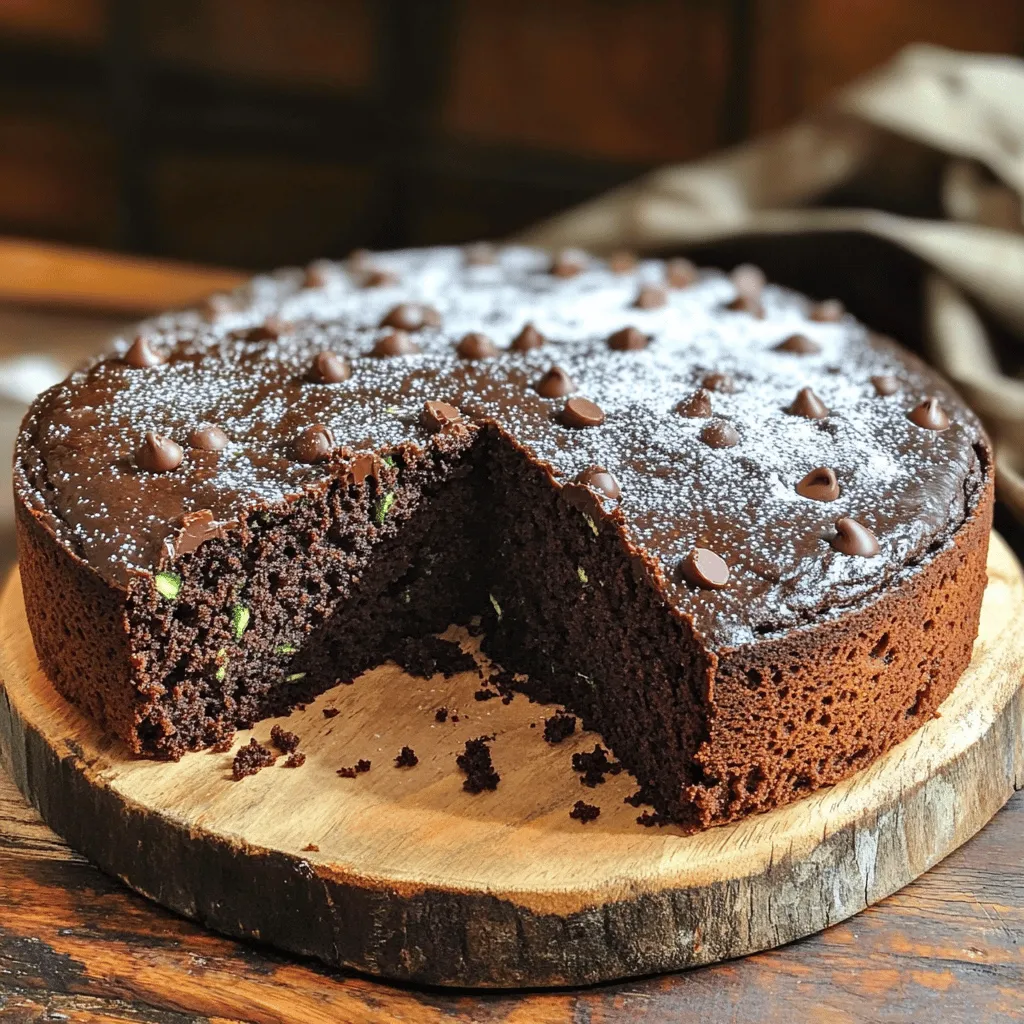
Chocolate Zucchini Cake Rich and Moist Delight
Looking for a unique dessert that combines the richness of chocolate with the health benefits of zucchini? This Chocolate Zucchini
Looking for a unique dessert that combines the richness of chocolate with the health benefits of zucchini? This Chocolate Zucchini
. To start, preheat your grill to medium heat. This helps the peaches cook evenly. A hot grill gives those lovely char marks that look great on the plate. Make sure your grill grates are clean. This helps prevent sticking and ensures even cooking. When you grill, keep the lid closed. This traps heat and cooks the peaches faster. If you want nice grill marks, don’t move the peaches around too much. Let them sit for a bit before flipping. To create the glaze, combine honey, balsamic vinegar, olive oil, cinnamon, and sea salt in a small bowl. Whisk them together until well mixed. The right balance of sweet and tangy is key. Too much honey makes it too sweet, while too much vinegar can overpower the peaches. Aim for a nice harmony of flavors. This glaze not only adds taste but also helps caramelize the peaches on the grill. Brush this mixture onto the cut sides of the peaches. Save some glaze to brush on later for extra flavor. Start by placing the peach halves cut side down on the grill. Grill for about 4-5 minutes. Look for nice grill marks and softening edges. This is how you know they are cooking well. When it’s time to flip, gently turn the peaches over. Reduce the grill heat to low. Brush the remaining honey-balsamic mixture over the cut sides of the peaches. Grill for another 2-3 minutes. You want them tender but still holding their shape. Once done, remove the peaches from the grill. Let them cool slightly before serving. Grilled peaches taste best warm. You can serve them with fresh mint leaves and crumbled feta cheese if you like. For the full recipe, check out the complete instructions above. To make the best Honey Balsamic Grilled Peaches, you need ripe peaches. Look for peaches that feel slightly soft when you press them. Their skin should have a nice, warm color. Avoid peaches that are hard or have dark spots. The best varieties for grilling include freestone peaches. These peaches pit easily, making them great for grilling. Yellow peaches are sweet and juicy, perfect for this recipe. White peaches are also tasty with a mild flavor. Creating distinct grill marks is easy. Start by preheating your grill to medium heat. Place the peach halves cut side down on the grill. Press them slightly to make good contact with the grill. Grill for about 4-5 minutes. This time gives you beautiful grill marks and a nice texture. If you use a gas grill, keep the heat steady. For charcoal grills, make sure the coals are hot. Adjust the heat to low when you flip the peaches. This helps them cook evenly and stay juicy. To boost the flavor of your peaches, try adding spices. A sprinkle of nutmeg or ginger can add warmth. You can also mix in herbs like thyme or basil for a fresh taste. For complementary flavors, pair grilled peaches with rich cheeses like feta. The creamy texture contrasts well with the sweet peaches. You can also serve them with a scoop of vanilla ice cream. This makes for a tasty dessert. Don’t forget to check the [Full Recipe] for all the details! {{image_2}} You can swap honey for maple syrup or agave. Both sweeteners add a unique taste. Maple syrup gives a rich, earthy flavor. Agave is mild and smooth. Each choice can change how sweet the peaches taste. You may like one more than the other, so try them all! Infusing the honey-balsamic mix with herbs can boost flavor. I love using rosemary for a piney note. Just add a few sprigs when mixing the glaze. This small change makes a big impact. You can also mix in other fruits like nectarines or plums. They grill well and taste great with the glaze. Grilled peaches are awesome with ice cream or yogurt. The warm peaches and cold cream make a great contrast. For a twist, mix peaches into salads or desserts. They add sweetness and a fun texture. Try them in a summer salad with arugula or feta. You can get the full recipe for more ideas! To keep your grilled peaches fresh, store them in an airtight container. Place them in the fridge. They will last about 3 to 5 days. If you want to freeze them, make sure they cool first. Wrap each peach half in plastic wrap. Then, place them in a freezer bag. They can stay frozen for up to three months. When you are ready to use them, just thaw in the fridge overnight. To reheat grilled peaches, use a microwave or a skillet. If you use a microwave, heat for just 20-30 seconds. Check to see if they are warm enough. If using a skillet, place them over low heat. This method helps keep their texture. You can serve leftovers on pancakes or in yogurt. They also taste great in salads or as a side dish. For added flavor, drizzle with extra honey or balsamic glaze. This will bring back that delicious taste! You can use canned peaches, but they may not taste the same. Fresh peaches have a juicy texture and bright flavor. Canned peaches are softer and can be sweeter. If you choose canned, drain them well. They will grill quickly, so watch them closely to avoid mushiness. Honey balsamic grilled peaches shine next to many dishes. They are great on top of salads, adding sweet flavor. Pair them with grilled chicken or pork for a tasty meal. You can also serve them with yogurt or ice cream for dessert. Try them in a cheese platter with creamy cheese. Look for grill marks on the cut side of the peaches. They should soften and smell sweet. When you press gently, they should have a little give. If they feel mushy, they are overcooked. Remember, you want them tender but not falling apart. Enjoy your peaches warm! For the full recipe, check out the details above. Grilling peaches is simple and fun. You need ripe peaches, honey, and balsamic vinegar. With easy steps for grilling and tips for flavor, you can make this treat shine. Try adding optional toppings like mint or feta. Remember to store any leftovers properly for later enjoyment. Enjoy the sweet and smoky taste of grilled peaches in your meals. Embrace creativity by trying out variations and serving ideas. Your taste buds will thank you!](https://easycookingbite.com/wp-content/uploads/2025/06/f3666fbd-827a-4fee-a171-4171cf660166.webp)
Looking for a simple yet delicious dessert that screams summer? Honey Balsamic Grilled Peaches are your answer! Juicy peaches melt
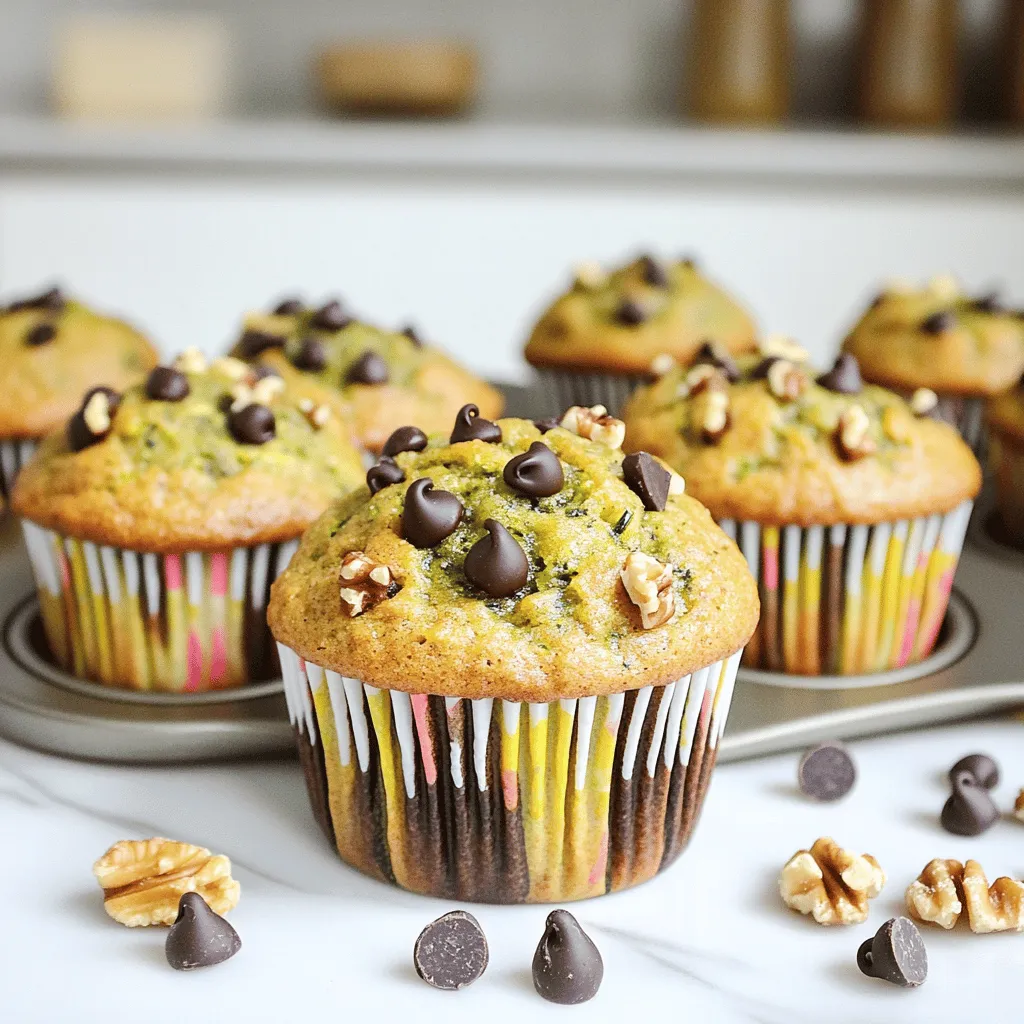
Are you ready to bake something delicious and healthy? This recipe for vegan zucchini muffins combines whole grains and fresh
![- 2 cups cooked jasmine rice (preferably day-old) - 1 cup diced chicken breast - 1 cup mixed frozen vegetables (carrots, peas, corn) - 2 tablespoons sesame oil - 1 tablespoon vegetable oil - 2 eggs, beaten - 2 green onions, finely sliced - 3 tablespoons soy sauce - 2 cloves garlic, minced - Salt and pepper to taste Using the right ingredients makes your chicken fried rice shine. Day-old jasmine rice gives the best texture. Freshly cooked rice can be too sticky. Diced chicken breast adds protein and keeps the meal light. Mixed frozen vegetables are quick and colorful. They bring nutrients and crunch. You can add sesame oil for a nutty flavor. Vegetable oil helps fry ingredients without burning. Beaten eggs give creaminess and richness. Green onions add a fresh bite and color. For flavor, soy sauce is key. It gives that savory umami taste. Minced garlic adds a lovely aroma. Finally, season with salt and pepper. This perfect blend makes a tasty chicken fried rice. For the full recipe, check out the cooking instructions. To start, use cooked jasmine rice. I recommend day-old rice. It dries out a bit, which helps the fried rice stay fluffy. If you don’t have day-old rice, cook the jasmine rice and let it cool completely. Next, take your chicken breast and dice it into small pieces. Aim for uniform sizes. This helps the chicken cook evenly. Now, heat a large skillet or wok over medium-high heat. Add vegetable oil and let it warm. This step is crucial for a nice sear on your chicken. Once the oil is hot, add the diced chicken to the skillet. Cook it for about 5 to 7 minutes. You want it browned and fully cooked. When done, remove the chicken and set it aside. In the same skillet, add minced garlic. Sauté it for about 30 seconds. You want it fragrant but not burnt. Next, push the garlic to one side. Add beaten eggs to the other side of the skillet. Scramble them until cooked, then mix them with the garlic. Now, add your mixed frozen vegetables. Stir-fry them for 2 to 3 minutes. You want them heated through but still crisp. Return the cooked chicken to the skillet. Add the cooked jasmine rice, soy sauce, and sesame oil. Stir everything together. Make sure the rice gets well-coated with the sauces. Finally, add sliced green onions. Season with salt and pepper to taste. Mix well for another minute. Your easy chicken fried rice is now ready! Check out the Full Recipe for more details. Using day-old rice is key. Freshly cooked rice can be too wet. It clumps together when you fry it. Day-old rice dries out a bit, making it perfect for stir-frying. This keeps each grain separate and fluffy. When cooking chicken, ensure it cooks evenly. Cut the chicken into small, even pieces. This helps it cook faster and more evenly. Brown the chicken for flavor. It adds depth to the dish. Soy sauce is a main ingredient. Adjust its amount to match your taste. If you like it salty, add more. For a lighter flavor, use less. Experiment with spices for extra zing. Ginger or chili flakes work well. They can change the whole dish. A little can make your fried rice exciting. High heat is essential for stir-frying. It cooks food quickly and gives a nice char. Make sure your skillet or wok is hot. This helps seal in flavors and keeps ingredients crisp. Timing is crucial when cooking each item. Cook chicken first, then add garlic and eggs. This ensures everything is cooked perfectly. Add vegetables next and stir-fry quickly. Lastly, mix in the rice and sauces. This order keeps each part tasty and fresh. {{image_2}} You can mix up the protein in your chicken fried rice. Shrimp is a great choice. It cooks quickly and adds a nice flavor. Just toss it in at the same time as you would the chicken. Tofu is another option. It’s perfect for a vegetarian meal. Use firm tofu and cube it. Sauté it until golden for the best taste. If you want something heartier, try pork or beef. Diced pork works well and has great flavor. Beef adds a rich taste, too. Just cook it until brown before adding the rice. Fresh veggies can change the flavor of your fried rice. You can add bell peppers, broccoli, or snap peas. Each veggie brings a new crunch and taste. Think about the season, too. In summer, fresh corn or zucchini is tasty. In winter, use carrots and green beans for a warm touch. Customizing your veggies keeps the dish exciting. Sauce can really boost the taste of your fried rice. You might like teriyaki sauce for a sweet twist. Just add a bit when mixing in the rice. Try new herbs and spices to create depth. Ginger adds warmth, while chili flakes give some heat. Experiment to find your perfect blend! For the full recipe, check out the [Full Recipe]. After you finish your meal, let the chicken fried rice cool. This step helps keep it fresh. Place the cooled rice in airtight containers. This way, it stays tasty for a few days. You can store it in the fridge for up to four days. If you need to keep it longer, freezing is a good option. When you want to enjoy your leftovers, there are great ways to reheat fried rice. The best method is to use a skillet. Heat it on medium heat and add a splash of water. This helps steam the rice and keep it moist. Stir it often to avoid burning. Another option is the microwave. Use a microwave-safe bowl, cover it, and heat in short bursts. To prevent sogginess, never add too much water. If you do, the rice will turn mushy. A little goes a long way! If you want to freeze chicken fried rice, start by packing it in freezer-safe bags. Make sure to remove as much air as possible. This keeps the rice from getting freezer burn. You can freeze it for up to three months. When you’re ready to eat it, take it out of the freezer. Leave it in the fridge overnight to thaw. After it’s thawed, use the skillet method to reheat. This keeps the rice fluffy and delicious. Enjoy your meal again with ease! For the full recipe, check out the details above. No, you should not use uncooked rice for fried rice. Fried rice needs pre-cooked rice. Using day-old cooked rice gives you the best texture. Fresh rice can be too sticky. It clumps together and does not fry well. When you use cold, cooked rice, it separates nicely in the pan. This makes the dish light and fluffy. You can easily add some heat to your chicken fried rice. Here are a few ways to spice it up: - Add chopped fresh chili peppers or jalapeños while cooking. - Mix in some red pepper flakes with the soy sauce. - Use spicy soy sauce or sriracha for a kick. - Stir in some chili paste to the oil before cooking. Experiment with these options to find your favorite heat level. Fried rice pairs well with many dishes. Here are some delicious options: - Serve with sweet and sour chicken for a tasty combo. - Pair it with spring rolls for a crunchy side. - Enjoy it with a bowl of hot soup. - Try it alongside grilled veggies for extra color. These sides will enhance your meal and make it even better. In this guide, we explored how to make delicious chicken fried rice. We covered essential ingredients like jasmine rice and chicken, plus tasty options like eggs and green onions. The steps included prepping and cooking, along with tips for perfecting flavors. You can also customize with different proteins and veggies. For storage, remember to cool and use airtight containers. Now, with these skills, you can create your own tasty fried rice at home! Enjoy experimenting and make it your own!](https://easycookingbite.com/wp-content/uploads/2025/06/0f7e139d-bd89-4d69-a6bd-2d2e6fd22afb.webp)
If you’re craving a quick and tasty meal, this Easy Chicken Fried Rice is perfect for you! It takes just
![To make these tasty bars, you will need: - 1 cup rolled oats - 1 cup almond flour - 1/2 cup natural peanut butter - 1/4 cup honey or maple syrup - 1/4 cup cocoa powder - 1/2 teaspoon vanilla extract - 1/4 teaspoon salt - 1/2 cup dark chocolate chips - 2 tablespoons coconut oil Converting measures can help if you need different amounts or want a precise recipe. Here are some quick conversions for the ingredients: - 1 cup rolled oats = 90 grams - 1 cup almond flour = 96 grams - 1/2 cup peanut butter = 125 grams - 1/4 cup honey = 85 grams - 1/4 cup cocoa powder = 25 grams - 1/2 cup dark chocolate chips = 90 grams - 2 tablespoons coconut oil = 28 grams If you need to adjust the recipe, here are some easy swaps: - Use gluten-free oats if you want the bars gluten-free. - Swap almond flour with oat flour for a nut-free option. - Replace honey with agave syrup for a vegan choice. - If you have a nut allergy, try sunbutter instead of peanut butter. These swaps let you enjoy the bars while fitting your diet. For the full recipe, check out the complete guide. To start, gather your ingredients. You will need rolled oats, almond flour, cocoa powder, and salt. In a large bowl, mix the oats, almond flour, cocoa powder, and salt. Stir well to combine everything evenly. Next, take another bowl and mix the peanut butter, honey, and vanilla extract. Blend until smooth. Pour this mixture over the dry ingredients. Stir until the dry mix is fully coated. You should have a sticky dough now. Line an 8x8 inch baking dish with parchment paper. Leave some paper hanging over the edges. This helps you lift out the bars later. Press the mixture firmly into the bottom of the dish. Make sure it is even across the bottom. Now it's time to melt the chocolate. In a small saucepan, add dark chocolate chips and coconut oil. Set the heat to low. Stir the mixture as it melts. Keep stirring until it is smooth and shiny. Once melted, pour the chocolate over the pressed oat mixture. Spread the chocolate evenly across the top. If needed, tap the dish gently on the counter. This helps smooth the chocolate layer. Now, place the dish in the refrigerator. Let it chill for at least 2 hours. This helps the bars set properly. After the bars have set, lift them out using the parchment paper. Cut them into squares or rectangles. You can serve them chilled for the best taste. For a nice touch, sprinkle some cocoa powder on top. For the full recipe, please refer to [Full Recipe]. To get the right texture, use natural peanut butter. It binds well and adds creaminess. Choose almond flour for a nice crumb. Rolled oats provide texture and chew. If you want a firmer bar, add more almond flour. For a softer bar, use a little less. Press the mixture firmly into the dish. This helps the bars hold their shape after cutting. One common mistake is not mixing well. Ensure the peanut butter and dry ingredients blend smoothly. Another mistake is not pressing the mixture enough. If it’s loose, the bars will break apart. Don’t skip chilling them in the fridge. This step is key for setting the bars. Lastly, watch the chocolate while melting. Stir often to prevent burning. For serving, cut the bars into even squares. Place them on a pretty plate to impress friends. You can sprinkle extra cocoa powder on top for flair. Consider adding crushed nuts or coconut flakes for a crunchy touch. These bars pair well with a glass of milk or coffee. Enjoy them chilled for the best taste and texture. For the complete recipe, check out the Full Recipe section. {{image_2}} Adding nuts or dried fruit can enhance your bars. Try using chopped walnuts, almonds, or pecans. Each nut gives a unique taste and crunch. Dried fruits like raisins or cranberries add a sweet, chewy texture. Mix and match these options to find your favorite blend. You can also swap in different nut butters. Almond or cashew butter works well too. Just keep the same amount for balance. You can use different sweeteners in this recipe. Maple syrup is a great choice. It adds a nice flavor and is a bit lighter. Agave nectar is another option. It has a lower glycemic index than honey. If you want to skip sweeteners altogether, try mashed bananas. They add sweetness and moisture without added sugar. Just remember, the texture might change based on what you choose. Want a vegan version? Use maple syrup instead of honey and choose dark chocolate chips that are dairy-free. For gluten-free bars, ensure the oats and almond flour are certified gluten-free. This way, you can enjoy these tasty treats without worry. If you want to make them grain-free, consider using coconut flour instead of almond flour. Just adjust the liquid since coconut flour absorbs more moisture. For the full recipe, check out the section above! To keep your no bake chocolate peanut butter bars fresh, store them in an airtight container. This helps maintain their texture and taste. If you cut the bars, make sure to separate layers with parchment paper. This keeps them from sticking together. You can also wrap individual bars in plastic wrap for easy grab-and-go snacks. When stored properly in the fridge, these bars can last for up to a week. If you notice any change in smell or texture, it’s best to toss them. For longer storage, freezing is a great option. To freeze the bars, cut them into squares first. Wrap each square in plastic wrap and then place them in a freezer-safe bag. They can last up to three months in the freezer. When you want to enjoy them, take out a bar and let it thaw in the fridge for a few hours. You can also leave it at room temperature for about 30 minutes. Enjoy the deliciousness of your no bake chocolate peanut butter bars anytime! For the full recipe, check out the detailed instructions above. Yes, you can use crunchy peanut butter. This change adds texture. The bars will still hold together well. Some people love the extra crunch. It gives a fun twist to the classic recipe. To make the bars firmer, try these tips: - Use less honey or maple syrup. - Add more almond flour. - Chill the bars longer in the fridge. - You can also freeze them for a firmer texture. These tricks help create a denser, more satisfying bite. If you want an alternative to honey, use maple syrup or agave nectar. Both options work well. They keep the bars sweet and sticky. You can also try brown rice syrup for a different flavor. Each option brings its own taste while keeping the bars tasty. For more details, check the Full Recipe. In this post, I shared how to make No Bake Chocolate Peanut Butter Bars. We covered ingredients, measurements, and good substitutes for diets. You learned step-by-step how to prepare, melt, and cut the bars. I also shared tips for the right texture and common mistakes. We explored flavor variations and storage best practices. These bars are tasty, easy, and perfect for many diets. Now, you can create delicious treats that suit your needs and taste. Enjoy making and sharing them!](https://easycookingbite.com/wp-content/uploads/2025/06/8e878cbd-294c-42eb-b2f4-206287b42f43.webp)
If you’re craving a sweet treat but want to skip the oven, I’ve got you covered! My No Bake Chocolate
![- 4 tilapia fillets - 1/2 cup grated Parmesan cheese - 1/2 cup breadcrumbs (preferably panko for extra crunch) - 1 teaspoon garlic powder - 1 teaspoon dried oregano - 1/2 teaspoon paprika - Salt and pepper to taste - 2 tablespoons olive oil - 1 lemon, zested and juiced - Fresh parsley, chopped (for garnish) Each serving has about 250 calories. You get 30 grams of protein and 10 grams of fat. The carbs are around 15 grams. Parmesan cheese offers calcium and protein. Tilapia is low in fat and high in protein. Garlic and lemon add vitamins and flavor. - Baking sheet - Mixing bowl - Cooking utensils Using these simple ingredients and tools, you can make a dish that looks fancy but is easy to prepare. Just follow the [Full Recipe] for step-by-step guidance. First, preheat your oven to 400°F (200°C). This step is key for a crispy crust. Next, gather your ingredients for easy access. In a mixing bowl, combine: - 4 tilapia fillets - 1/2 cup grated Parmesan cheese - 1/2 cup breadcrumbs (preferably panko for extra crunch) - 1 teaspoon garlic powder - 1 teaspoon dried oregano - 1/2 teaspoon paprika - Salt and pepper to taste Mix these dry ingredients well. This blend will give your crust a great taste. Now, pat the tilapia fillets dry with paper towels. This helps the crust stick better. Place the fillets on a baking sheet lined with parchment paper. Drizzle 2 tablespoons of olive oil over each fillet. Then, sprinkle lemon zest and juice from 1 lemon on top. Next, press the Parmesan and breadcrumb mixture firmly onto each fillet. Make sure they are covered well. Bake your tilapia in the preheated oven for 12-15 minutes. Check if the fish flakes easily with a fork. The crust should be golden brown. For easy side dishes, try steamed broccoli or a fresh salad. These pair well with the tilapia. Before serving, garnish with fresh chopped parsley. A slice of lemon on the side adds a nice touch. For the full recipe, check out the previous section. To create a perfect crust, start by drying the fish. Wet fish won’t hold the crust well. Use paper towels to pat the tilapia fillets dry. This simple step ensures a better texture. For a golden brown crust, use panko breadcrumbs. They add extra crunch and color. Make sure to press the mixture firmly onto the fish. This helps it stick during baking. Bake at 400°F for 12-15 minutes. Check for doneness when the fish flakes easily. You can switch out tilapia for other fish. Cod, haddock, or even salmon work great. Just adjust the baking time if the fillets are thicker or thinner. Spices can also change the flavor. Add cayenne for heat or lemon pepper for zest. Mix in fresh herbs like thyme or basil for a twist. These small changes create new taste experiences. You can prepare the tilapia in advance. Coat the fish and store it in the fridge for a few hours. This makes dinner easy on busy nights. Just remember to bake it fresh when ready. For reheating, place leftovers in the oven. Set it to a low temperature. This keeps the crust crispy. You can also use an air fryer for quick reheating. Enjoy your meal without losing that tasty crunch! {{image_2}} You can enhance Parmesan crusted tilapia with herbs and spices. Adding fresh basil or thyme brings a fragrant touch. For a zesty kick, try crushed red pepper flakes or lemon pepper. These spices can elevate the dish and make it more exciting. If you have dietary needs, consider cheese alternatives. Nutritional yeast offers a cheesy flavor without dairy. You can also use vegan cheese for a plant-based option. These choices keep the dish flavorful while catering to your needs. For gluten-free options, substitute regular breadcrumbs with gluten-free ones. You can find many brands that work well in this recipe. Almond flour is another great option, adding a nice crunch. If you prefer a low-carb version, skip the breadcrumbs altogether. You can use crushed pork rinds or finely chopped nuts for a crunchy topping. Both options provide texture without the carbs. When serving, consider pairing the tilapia with sauces. A light lemon butter sauce adds richness. A fresh tomato salsa can bring a bright flavor to the plate. Both sauces complement the crispy crust nicely. For creative plating, try stacking the tilapia on a bed of sautéed spinach or zucchini noodles. This adds color and texture. Garnish with lemon wedges and a sprinkle of parsley for a beautiful presentation. To store leftovers, place them in an airtight container. Make sure the container is sealed well. You can keep the tilapia in the fridge for up to three days. This way, it stays fresh and tasty for your next meal. If you want to keep the tilapia longer, freezing is a great option. Wrap each fillet tightly in plastic wrap. Then, place them in a freezer bag to prevent freezer burn. You can freeze the tilapia for up to three months. When you are ready to eat, defrost it in the fridge overnight. For reheating, bake it at 350°F (175°C) until warmed through. This keeps the crust crunchy. Always wash your hands before and after handling food. Use separate cutting boards for meat and fish to avoid cross-contamination. Cook the tilapia to an internal temperature of 145°F (63°C) for safety. Enjoy your meals without worry by following these simple tips! You can enjoy Parmesan crusted tilapia with many tasty sides. Here are some great options: - Steamed broccoli - Rice pilaf - Garlic mashed potatoes - Roasted vegetables - Mixed green salad These sides balance the dish's flavors and add color to your plate. You can also pair it with a light sauce, like lemon butter, for extra zest. Yes, you can use different fish types for this recipe. Here are some good substitutes: - Cod - Haddock - Sole - Catfish Adjust cooking times based on the thickness of the fillets. Each fish has a unique taste, but they all work well with the Parmesan crust. Check the fish for these signs of doneness: - It should flake easily with a fork. - The flesh turns from translucent to opaque. - The internal temperature should reach 145°F (63°C). Using a food thermometer helps ensure perfect cooking. This way, you can enjoy a safe and tasty meal. In this blog post, we explored a tasty Parmesan Crusted Tilapia recipe. We covered key ingredients, cooking instructions, and helpful tips. We also discussed variations and storage options. By following this guide, you can create a wonderful meal. Enjoy experimenting with flavors or making it ahead. This dish is sure to please everyone at your table. Happy cooking!](https://easycookingbite.com/wp-content/uploads/2025/06/0dad2d63-217a-444f-860e-5e634241017d.webp)
Looking for a quick and tasty dinner? You’ve just found it! This Parmesan Crusted Tilapia recipe is simple to make
. 1. Sautéing onions and garlic Start by heating olive oil in a large pot over medium heat. Add the diced onion. Cook it for about five minutes. You want it to turn translucent. Next, add minced garlic. Sauté for about two minutes. This will make your kitchen smell amazing. 2. Cooking the peppers and jalapeño Now, stir in the diced red bell pepper and minced jalapeño. Cook this mix for another two minutes. The peppers add a nice crunch and flavor that you will love. 3. Adding potatoes and broth Once the peppers are soft, add the diced potatoes and smoked paprika. Stir everything well to coat the vegetables. Pour in the vegetable broth. Bring this mixture to a boil. Reduce the heat and let it simmer for 15 to 20 minutes. You want the potatoes to be tender. 1. Simmering for flavor After the potatoes are tender, it’s time to add the corn kernels. Let everything simmer for another five minutes. This helps all the flavors blend together nicely. 2. Blending for texture Use an immersion blender to blend part of the chowder. You can also transfer half to a blender and puree it. Then, return it to the pot. This gives the soup a creamy texture while keeping some chunks for that hearty feel. 3. Incorporating cream and seasoning Stir in the heavy cream. You can also use coconut cream if you want a dairy-free option. Season with salt and pepper to taste. Heat through, but do not let it boil again. This step is key for that rich, creamy taste. 1. Serving suggestions Serve the chowder hot. It pairs well with crusty bread or a fresh salad. You can even make it a full meal. 2. Garnishing tips For a beautiful finish, garnish your chowder with fresh cilantro or parsley. This adds color and a hint of freshness. Enjoy your creamy corn chowder as a warm, comforting dish. To get the right texture in your Creamy Corn Chowder, remember these key points: - Use fresh corn for the best flavor. - Cook the potatoes until just tender. This keeps them from turning mushy. - Blend only a portion of the chowder. This gives you a mix of creamy and chunky bits. To prevent overcooking your potatoes, follow these steps: - Cut them into small, even pieces. This helps them cook evenly. - Add the potatoes to the pot after the other veggies. They need less time. - Check them often. They should be tender but not falling apart. For added flavor, consider these herbs and spices: - Fresh thyme gives a nice earthiness. - A pinch of cayenne adds heat without overpowering. - Fresh lime juice brightens the dish. You can boost protein by adding these options: - Canned beans work well for a hearty touch. - Grilled chicken adds a nice savory flavor. - Crumbled bacon gives a smoky crunch. Plating your chowder can make it more inviting: - Use a shallow bowl for a modern look. - Swirl a bit of cream on top for a nice design. - Sprinkle fresh herbs for a pop of color. Pair your chowder with these accompaniments: - Crusty bread is perfect for dipping. - A light salad balances the meal. - Cornbread adds a sweet touch that complements the chowder. For the complete recipe, check the Full Recipe section. {{image_2}} To make this chowder dairy-free, I suggest using coconut cream instead of heavy cream. Coconut cream adds a rich texture without any dairy. You can find it in cans at your grocery store. For a gluten-free version, check your vegetable broth and other ingredients. Many broths contain gluten. Look for labels that say "gluten-free." This ensures that your chowder remains hearty and tasty for everyone. Do you love heat? You can easily spice up your chowder! Add more jalapeños, or even try serrano peppers for extra kick. If you prefer it mild, skip the jalapeño or remove the seeds to lessen the heat. You can also explore different spices. Try adding cumin or chili powder for a new flavor twist. Each spice brings a unique taste that can change the chowder's vibe completely. Using seasonal corn makes this chowder even better. Fresh corn adds a natural sweetness. Summer is the best time for sweet corn. However, you can use frozen corn in winter. It still tastes great and is easy to find. In colder months, try adding root vegetables like carrots or squash. These veggies give a cozy feel to the chowder. They mix well with the corn and add more flavor. This chowder is flexible to your taste and the season. By mixing and matching, you can create your perfect bowl of Creamy Corn Chowder. For the full recipe, check out the details above. To store your creamy corn chowder, let it cool first. This keeps the texture just right. Transfer it to an airtight container. It will stay fresh for about 3 to 4 days in the fridge. Be sure to label the container with the date. This way, you won’t forget when you made it. If you want to freeze the chowder, use freezer-safe containers. Make sure to leave some space at the top. This allows for expansion as it freezes. Your chowder can last about 2 to 3 months in the freezer. To thaw, place it in the fridge overnight. This keeps it safe and tasty. You can reheat chowder on the stovetop or in the microwave. For the stovetop, warm it over low heat. Stir often to keep it from sticking. In the microwave, use a microwave-safe bowl. Heat in short bursts, stirring in between. This helps maintain the creamy texture. Add a splash of broth or cream if it looks too thick. Enjoy your delicious chowder again! Can I use frozen corn instead of fresh? Yes, you can use frozen corn. It saves time and is still sweet. Just add it directly to the pot. There’s no need to thaw it first. How to thin out the chowder if it’s too thick? If your chowder is too thick, add vegetable broth. Stir in small amounts until it reaches the right consistency. You can also add a bit of water for a lighter texture. What are some good toppings for corn chowder? Toppings can make your chowder special. Try crispy bacon bits, sour cream, or avocado. Fresh herbs like cilantro or parsley add color and flavor too. Is this recipe suitable for meal prep? Yes, this chowder is great for meal prep. It stores well in the fridge for 3-4 days. Just reheat it gently when you’re ready to eat. Can I add meat to this chowder? Absolutely! Cooked chicken or bacon works well in this chowder. You can add it during the last few minutes of cooking for extra flavor. What kitchen tools are recommended for making this chowder? You’ll need a large pot for cooking. An immersion blender helps blend the chowder smoothly. If you don’t have one, a regular blender works too. How do I adjust cooking times for larger batches? When making larger batches, keep an eye on the cooking times. You may need to simmer a bit longer to ensure all ingredients cook evenly. Adjust as needed for thicker mixtures. We explored a tasty corn chowder recipe, from ingredients to cooking tips. You learned ingredient swaps and variations to fit your needs. Storing and reheating instructions help ensure leftovers stay fresh. This chowder is easy to customize, making it perfect for everyone. With a little creativity, you can enjoy it your way. Dive into your kitchen and try this simple recipe today! Enjoy the great flavors and comforting warmth.](https://easycookingbite.com/wp-content/uploads/2025/06/502f8fea-b0ea-4a92-993f-0bd76af4bdd7.webp)
Looking for a delicious, cozy dish to warm your heart? My creamy corn chowder is just what you need! This

If you crave a sweet and salty snack, you’re in the right place! This Chocolate Covered Pretzel Bark combines crunchy
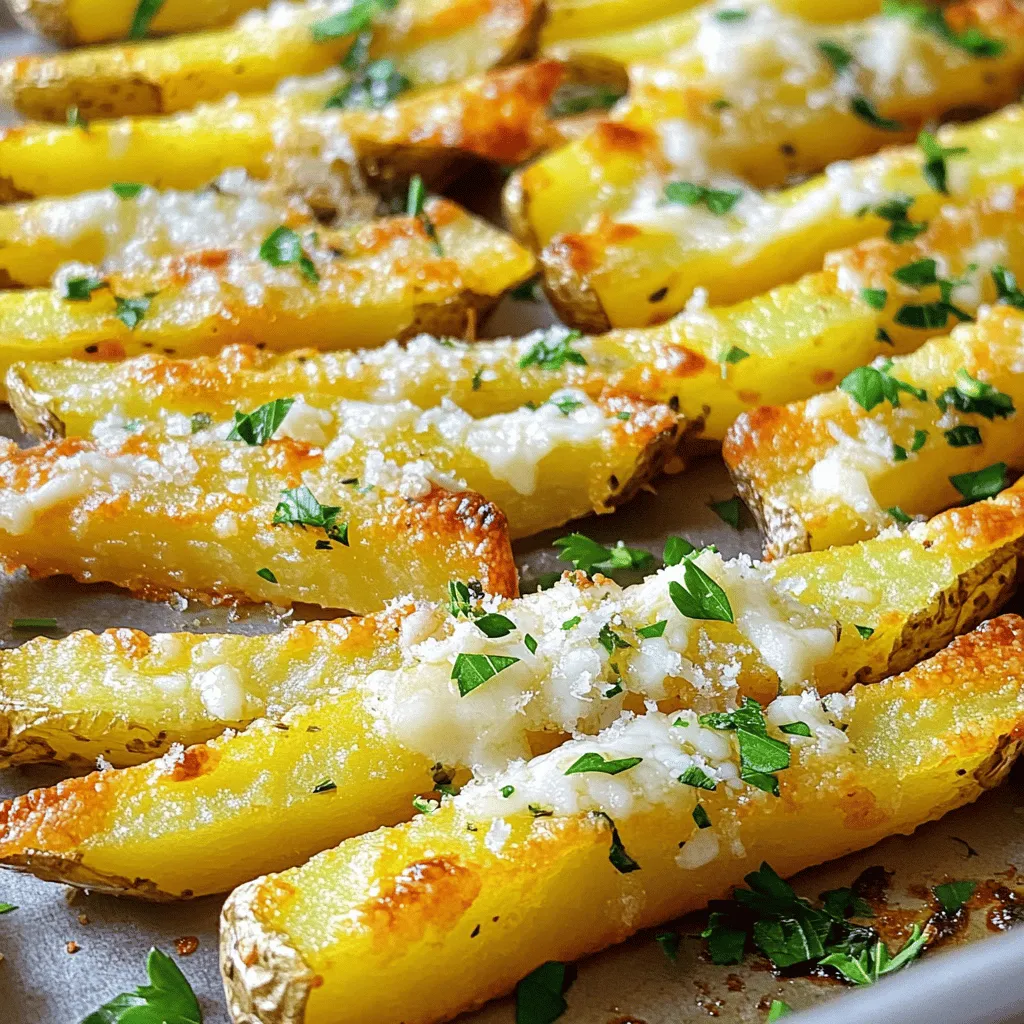
Are you ready to elevate your snack game? My baked garlic Parmesan fries are the perfect blend of crispy and
![- 2 ripe avocados - 4 slices of whole grain bread - 4 large eggs - 1 tablespoon white vinegar - 1 teaspoon lemon juice - Salt and pepper to taste - 1/2 teaspoon red pepper flakes (optional) - Fresh cilantro or parsley for garnish - Olive oil for drizzling To make this savory avocado toast with poached egg, you need simple yet fresh ingredients. The avocados should feel soft but not mushy. Look for whole grain bread that is hearty enough to hold the toppings. Eggs are key for poaching; fresh eggs work best for a clean shape. White vinegar helps the eggs set nicely in water. Lemon juice adds a bright flavor to the avocado mix. You can adjust the salt and pepper based on your taste. If you enjoy a bit of heat, add red pepper flakes. Finally, don’t skip the fresh herbs and olive oil; they bring the dish together. For the full recipe, check out the detailed instructions later in the article. Enjoy gathering your ingredients and let’s make something delicious! To start, you need to toast the bread. You can use a toaster or a skillet. If you choose the skillet, heat it over medium heat. Add the bread slices one by one. Toast until they are golden brown. Keep an eye on them, so they don’t burn. The goal is a crisp outside and soft inside. This is the base for your avocado toast. Next, let’s poach the eggs. Fill a medium pot with water and bring it to a gentle simmer. Add one tablespoon of white vinegar. This step helps keep the egg whites together. Crack each egg into a small bowl. Gently slide the eggs into the simmering water. Poach for about 3-4 minutes. This timing gives you runny yolks. If you like firmer yolks, cook a bit longer. Now it’s time to assemble your dish. Take the ripe avocados and cut them in half. Remove the pits, then scoop the flesh into a bowl. Mash it well with a fork. Stir in one teaspoon of lemon juice and season with salt and pepper. Once the bread is ready, spread a generous layer of the mashed avocado on each slice. Using a slotted spoon, remove the poached eggs from the water. Let them drain briefly. Place one egg on top of each avocado toast. For the finishing touch, sprinkle with red pepper flakes if you like a little heat. Drizzle some olive oil on top, and add fresh cilantro or parsley for color. This adds flavor and makes your dish look great. Enjoy your savory avocado toast with poached egg! For the complete recipe, check the Full Recipe section. To get the best taste from your avocados, choose ripe ones. They should yield slightly to gentle pressure. Avoid any that feel hard or have dark spots. If you cut an avocado and want to save it, sprinkle lemon juice on the flesh. Store it in an airtight container to slow browning. Common mistakes with poached eggs include cooking in water that is too hot or not using vinegar. Always keep the water at a gentle simmer. This helps the egg whites stay together. Cooking time varies based on how runny you want the yolk. For a soft yolk, cook for about three minutes. If you like it more firm, add an extra minute or two. Avocado toast pairs well with many sides. Try a fresh salad or some fruit. For drinks, a nice coffee or herbal tea complements the meal. To make it more filling, add some protein like smoked salmon or bacon. These additions turn your toast into a wholesome meal. For the full recipe, check out the section above! {{image_2}} When making avocado toast, the bread you choose can change the taste. You can use: - Sourdough: This bread has a tangy flavor and a chewy crust. - Rye: This option adds a nutty taste and is slightly dense. - Gluten-free: There are many gluten-free breads available. Look for one that you enjoy. Each bread brings a unique flavor and texture that can enhance your meal. To make your avocado toast even better, consider adding: - Feta cheese: This crumbly cheese adds a salty kick. - Cherry tomatoes: Sliced tomatoes bring sweetness and color. - Red onion: Thin slices add crunch and a mild bite. - Spices: Try smoked paprika, garlic powder, or chili flakes for extra flavor. Mix and match these toppings to suit your taste. If you follow a specific diet, you can still enjoy this dish. For vegan options: - Replace the poached egg with sliced tomato or chickpeas. - Use nutritional yeast for a cheesy flavor. For low-carb options: - Use portobello mushrooms or eggplant slices instead of bread. - Top with avocado and a sprinkle of cheese for a tasty twist. These variations will keep your avocado toast fresh and exciting! For the full recipe, visit [Full Recipe]. To keep leftover avocado fresh, store it properly. First, sprinkle lemon juice on the cut side. This helps slow down browning. Next, wrap the avocado tightly in plastic wrap. Place it in the fridge. Use it within one day for the best taste. If you want to store mashed avocado, add more lemon juice to it. Seal it in an airtight container. This will keep it from turning brown too fast. Can you refrigerate leftover toast? Yes, you can. Wrap it in foil or plastic wrap. Store it in the fridge for up to three days. To reheat, use a toaster or an oven. If you prefer, you can also use a skillet over medium heat. Heat it for about 2-3 minutes, flipping halfway through. This will help get it crispy again. Best practices for storing poached eggs include cooling them first. After poaching, place them in cold water. This stops the cooking. Store them in an airtight container in the fridge. Use within two days for the best taste. When reheating, place them in hot water for a minute. This warms them without cooking them further. To poach eggs perfectly, follow these simple steps: - Use fresh eggs; they hold their shape better. - Add a tablespoon of white vinegar to simmering water. This helps the egg whites stay together. - Crack each egg into a small bowl first. This makes it easy to slide into the water. - Simmer the water gently, not boiling. Boiling water can break the eggs apart. - Cook for 3-4 minutes for runny yolks, or longer for firmer yolks. With practice, you will master poaching eggs. Each time, your results will improve. Yes, you can prep your avocado toast ahead of time. Here are some tips: - Make the avocado mixture and store it in an airtight container. Add lemon juice to slow browning. - Toast the bread just before serving. This keeps it crunchy. - Poach the eggs shortly before eating. This way, they stay warm and runny. If you follow these steps, your toast will taste fresh even when prepped ahead. To elevate your avocado toast, try these toppings: - Crumbled feta adds creaminess. - Cherry tomatoes give a sweet burst of flavor. - Sliced radishes add a nice crunch. - A sprinkle of hemp seeds boosts nutrition. - Fresh herbs like basil or chives can enhance the taste. Mix and match to create your favorite combination! For more ideas, check out the Full Recipe. This blog shows you how to make tasty avocado toast with poached eggs. You learned about choosing ripe avocados, perfecting poached eggs, and storing leftovers. Remember, practice leads to better results. Use different breads and toppings to keep it fun. Enjoy experimenting with flavors and serving styles. With these tips, you’re set for delicious meals ahead. Now, go impress your friends or family with your new skills!](https://easycookingbite.com/wp-content/uploads/2025/06/b2c3f88f-274a-4608-a74f-06bc68d0b47a.webp)
Are you ready to elevate your breakfast game? This Savory Avocado Toast with Poached Egg recipe is quick, easy, and
