Skip to content
DisclaimerTerms Of UseGDPR PolicyCookie Policy

easycookingbite

  • Home
  • Drinks
  • Appetizers
  • Dinner
  • Dessert
  • About
  • Contact
  • Privacy Policy
DisclaimerTerms Of UseGDPR PolicyCookie Policy

NO-ING-IMG

- 4 cups fresh peaches, peeled and sliced - 1 cup granulated sugar - 1 teaspoon vanilla extract - 1 cup all-purpose flour - 1 tablespoon baking powder - 1/2 teaspoon salt - 1 tablespoon lemon juice - 1 cup milk - 1/2 cup unsalted butter, melted - 1 tablespoon brown sugar (for topping) - Whipped cream or vanilla ice cream (for serving) Gathering fresh ingredients is the first step to a great peach cobbler. I love using ripe, juicy peaches. They bring a sweet, natural flavor that makes the dish shine. The granulated sugar helps to enhance that sweetness. A touch of vanilla extract adds depth too. Next, we need the dry ingredients. All-purpose flour gives the cobbler its structure. Baking powder helps it rise and become fluffy. A pinch of salt balances out the sweetness perfectly. Now, let’s talk about the additional ingredients. Lemon juice brightens the flavor of the peaches. Milk makes the batter creamy, while melted butter adds richness. Lastly, a sprinkle of brown sugar on top creates a lovely caramelized crust. For the finishing touch, serve your warm cobbler with whipped cream or vanilla ice cream. It’s a simple and tasty dessert that everyone will love. If you want to see the complete process, check out the Full Recipe. Enjoy your baking! - Preheat the oven to 350°F (175°C). - In a large mixing bowl, combine 4 cups of sliced peaches, 1 cup of granulated sugar, 1 teaspoon of vanilla extract, 1 teaspoon of ground cinnamon, and 1 tablespoon of lemon juice. Toss these ingredients well to coat the peaches and let them sit. - In another bowl, mix together 1 cup of all-purpose flour, 1 tablespoon of baking powder, and 1/2 teaspoon of salt. - Gradually pour in 1 cup of milk and 1/2 cup of melted unsalted butter. Stir the mixture gently until just combined. The batter will be a bit lumpy, which is perfect. - Pour the batter into a greased 9x13 inch baking dish. - Carefully spoon the peach mixture over the batter. Do not stir; let the peaches float on top. - Sprinkle 1 tablespoon of brown sugar over the peaches for a sweet touch. - Bake in your preheated oven for 40-45 minutes. Look for a golden brown top and test with a toothpick; it should come out clean. This simple and tasty dessert is sure to please! For the Full Recipe, refer to the main article above. To make your peach cobbler perfect, avoid overmixing the batter. Overmixing can make it dense. You want that fluffy texture that feels light. After you bake it, let the cobbler cool for 10-15 minutes. This helps the juices settle and makes it easier to serve. A warm serving of cobbler is a treat. I love to serve it with a dollop of whipped cream or a scoop of vanilla ice cream. This adds a nice creaminess that pairs well with the warm peaches. For a fun touch, garnish each bowl with a fresh peach slice or a mint sprig. It makes the dish pop with color and looks fancy too. One big mistake is using unripe peaches. Ripe peaches bring the best flavor to your cobbler. Always check for ripeness before you start. Another issue can be baking times. Ovens can vary quite a bit. So, watch your cobbler closely. Check for doneness by inserting a toothpick. If it comes out clean and the top is golden brown, you’re good to go. {{image_2}} You can easily switch up the fruit in your cobbler. If you don’t have peaches, try using nectarines or berries. Both fruits give a nice flavor. You can also mix peaches with blueberries. This combo adds a burst of color and taste. Want a dairy-free dessert? Use almond milk instead of regular milk. It works great in the batter. If you want a healthier option, replace granulated sugar with coconut sugar. It offers a lovely caramel flavor and is less processed. To make your cobbler unique, add different spices. Nutmeg and ginger work well with peaches. They give a warm, cozy taste. For an adult twist, add a splash of bourbon. It enhances the flavor and adds a fun kick. Enjoy experimenting with these variations to make the recipe your own. For the full recipe, check out [Full Recipe]. Store leftovers in an airtight container in the refrigerator. This keeps the cobbler fresh and tasty. You can enjoy it for up to 3-4 days. Always remember that peach cobbler tastes best when it is fresh! To warm up the cobbler, use the oven or the microwave. If you use the oven, set it to 350°F (175°C) and heat until warm. For a quick option, the microwave works too. When serving, top it with fresh whipped cream or a scoop of ice cream. This adds extra flavor and fun! You can freeze the cobbler before baking or after baking in slices. If you freeze it before baking, prepare it as normal, then wrap it well. When ready to bake, thaw it overnight in the refrigerator. If you freeze it after baking, slice it first. Always thaw overnight before reheating for the best taste. Yes, drain and rinse for best results. Canned peaches can work well, but make sure they are sweet and firm. Fresh peaches give a bright flavor and nice texture, but canned ones save time. A toothpick inserted should come out clean, and the top should be golden brown. It should look bubbly and firm. If it jiggles too much, it needs more time. Substitute all-purpose flour with a gluten-free flour blend. Many blends work well in baking. Just check the blend's instructions for the best results. It lasts about 3-4 days in the refrigerator. Keep it covered to keep it fresh. If you want to enjoy it longer, consider freezing it. Serve warm with whipped cream or vanilla ice cream for extra flavor. The cold cream contrasts nicely with the warm cobbler. You can also add a sprinkle of cinnamon for a fun twist. Full Recipe: Quick & Easy Peach Cobbler Delight This peach cobbler combines fresh ingredients with simple steps for a delicious treat. You learned how to prepare, bake, and serve it perfectly. Remember to use ripe peaches for the best taste. You can also switch up flavors or fruits based on your preference. Store any leftovers properly to enjoy later. A warm slice with ice cream always hits the spot. Happy baking!

Easy Peach Cobbler Simple and Tasty Dessert Recipe

Craving a warm, sweet treat that’s easy to make? Look no further! This Easy Peach Cobbler recipe will have your

To make Easy Chicken and Broccoli Bake, you need some simple ingredients. Here is the detailed list: - 2 cups cooked chicken, shredded - 2 cups broccoli florets (fresh or frozen) - 1 cup cooked quinoa (or rice) - 1 cup shredded cheddar cheese - 1/2 cup cream cheese, softened - 1/2 cup sour cream - 1/4 cup chicken broth - 1 teaspoon garlic powder - 1 teaspoon onion powder - Salt and pepper to taste - 1/2 cup breadcrumbs (optional, for topping) - 2 tablespoons olive oil Each ingredient has a role in making the dish tasty. The chicken provides protein, while broccoli adds vitamins. Quinoa or rice gives the bake a hearty base. The cheese and cream ingredients create a creamy texture that makes this dish special. Seasonings like garlic and onion powder add flavor. Finally, breadcrumbs can give a nice crunch on top. All these ingredients work together to create a delightful meal. For the full recipe, check out the [Full Recipe]. Preheating the Oven First, you need to preheat your oven to 375°F (190°C). This step helps cook the dish evenly. While the oven heats, you can focus on the next steps. Mixing the Ingredients In a large bowl, mix the cooked chicken, broccoli florets, and quinoa. Add half of the cheddar cheese, cream cheese, sour cream, and chicken broth. Then, sprinkle in garlic powder, onion powder, salt, and pepper. Stir until everything is well combined. This mix creates a creamy and tasty base for your bake. Preparing the Baking Dish Next, grab a 9x13 inch baking dish and grease it lightly with olive oil. This helps prevent sticking and makes serving easier. Spoon the chicken and broccoli mixture into the dish, spreading it out evenly. Covering and Baking Now, cover the baking dish with aluminum foil. Place it in your preheated oven for 20 minutes. This helps the flavors meld together and keeps the dish moist. Crisping the Top After 20 minutes, remove the foil. Sprinkle the remaining cheddar cheese on top. If you want a crunchy finish, add breadcrumbs. Drizzle a little olive oil over the top to help it brown. Bake uncovered for another 10 to 15 minutes until the top is golden and bubbly. You can now enjoy a delicious Easy Chicken and Broccoli Bake. Check out the Full Recipe for more details! Choosing the Right Chicken For this dish, I prefer using cooked chicken. You can use rotisserie chicken for ease. It adds flavor and makes prep quick. Shredded chicken blends well with the sauce and other ingredients. You can also use grilled chicken for a smoky taste. Just ensure it’s cooked through and tender. Variations for Creaminess If you want a creamier texture, add more cream cheese or sour cream. You can also mix in some plain Greek yogurt. This adds a tangy flavor while keeping it rich. Consider using a mix of cheeses like mozzarella or gouda. Each will bring its own unique taste to your bake. Pairing Ideas with Sides This Easy Chicken and Broccoli Bake goes well with simple sides. Consider serving it with a fresh salad or crusty bread. You can also pair it with steamed veggies for extra nutrients. Rice or quinoa on the side adds more fiber and fills you up. Presentation Tips For a beautiful presentation, sprinkle some fresh herbs on top before serving. Chopped parsley or chives work great. Use a nice baking dish to showcase your meal. A colorful dish makes it inviting and appetizing. Remember, we eat with our eyes first! For the full recipe, check out the details above. {{image_2}} Substituting Chicken You can easily swap chicken for other meats. Turkey works well in this bake. It gives a nice flavor and is lean. You might also try cooked pork or beef. Just remember to adjust cooking times slightly. Each protein brings its own taste and texture to the dish. Vegetarian Alternatives If you want a meatless option, go for beans or tofu. Chickpeas are a great choice, adding protein and fiber. For a heartier dish, use lentils. They soak up flavors well. You can also add extra veggies like mushrooms or bell peppers. This keeps the bake satisfying and full of nutrients. Adding Herbs and Spices Herbs and spices can elevate your bake. Try adding thyme, basil, or oregano for fresh flavors. A pinch of red pepper flakes gives a nice kick. Experiment with paprika for a smoky taste. Just sprinkle to your liking; you can always add more. Different Cheese Combinations Cheese is key in this dish. While cheddar is classic, consider mixing it up. Gruyère offers a nutty flavor that melts beautifully. Mozzarella gives a stretchy, gooey texture. You can even blend different cheeses for depth. Just remember to keep the total cheese amount balanced to maintain the bake's creaminess. Explore these variations to find what your family loves best! For the complete recipe, check out the Full Recipe section. How do you store leftovers? After enjoying your Easy Chicken and Broccoli Bake, let it cool. Transfer any leftovers to an airtight container. You can keep it in the fridge for up to three days. When you're ready to eat, just reheat in the oven or microwave until warm. What are the best practices for freezing and reheating? If you want to save some for later, freezing is a great option. Allow the dish to cool completely before packing it. Use a freezer-safe container or wrap it tightly in plastic wrap. You can freeze it for up to three months. To reheat, let it thaw overnight in the fridge. Then, bake it in the oven at 350°F (175°C) until hot and bubbly. Enjoy your delicious meal again! Can I use frozen broccoli? Yes, you can use frozen broccoli. It saves time and cooks well. Just thaw the broccoli before mixing it in. This helps it blend nicely with the other ingredients. Can I prepare it in advance? Absolutely! You can make it ahead of time. Just mix all the ingredients and place them in the baking dish. Cover it and keep it in the fridge. Bake it when you are ready to eat. What to serve with Easy Chicken and Broccoli Bake? This dish pairs well with a fresh salad or garlic bread. You can also serve it with rice if you want more carbs. They add a nice contrast to the creamy bake. Can I skip the breadcrumbs? Yes, you can skip the breadcrumbs. The dish will still taste great without them. If you want some crunch, try crushed crackers or nuts instead. They can add a nice texture. For the complete recipe, check the [Full Recipe]. This dish combines simple ingredients like chicken, broccoli, and rice for a tasty meal. I shared step-by-step instructions to help you bake it perfectly. Use the tips to choose the best chicken and add your favorite flavors. Remember, you can store leftovers easily in the fridge or freezer. With these ideas, you can make this dish your own. Enjoy the process and make it a family favorite!

Easy Chicken and Broccoli Bake Simple Family Meal

Looking for a quick and tasty meal? My Easy Chicken and Broccoli Bake is perfect for busy families! In just

- 1 pound large shrimp, peeled and deveined - 4 tablespoons unsalted butter - 4 tablespoons olive oil - 6 cloves garlic, minced - 1 teaspoon red pepper flakes (adjust to taste) - 1 lemon, zested and juiced - Salt and pepper to taste - 1 pound spaghetti or linguine - Fresh parsley, chopped for garnish - Grated Parmesan cheese for serving (optional) For this Easy Garlic Shrimp Scampi, you need key ingredients. Fresh shrimp makes a big difference. You can use large shrimp, which cook quickly and taste great. Butter and olive oil create a rich sauce. Garlic adds flavor, and red pepper flakes give a nice kick. The lemon juice brightens everything up. Don't forget salt and pepper for taste. If you want alternatives, you can swap the pasta. Zoodles or gluten-free pasta work well. For garlic, use garlic powder if fresh isn't available. These swaps help make the dish fit your needs. It still tastes good and feels special. This dish serves about four people. Each serving has around 400 calories. The shrimp adds protein, and the pasta provides carbs. For dietary needs, you can make this gluten-free. You can also skip the cheese for a dairy-free option. Just adjust the ingredients to fit your diet and enjoy! You can find the full recipe in the article above for easy reference. To cook your spaghetti or linguine, fill a large pot with water. Add a pinch of salt and bring it to a boil. Once boiling, add your pasta. Cook according to the package directions, usually about 8-10 minutes. You want the pasta to be al dente, firm but not hard. This gives the best texture. Before draining, reserve a cup of pasta water. This water is like gold for your sauce. It helps adjust the sauce later. For the best garlic flavor, use fresh garlic cloves. Mince them finely. In a large skillet, add butter and olive oil. Heat them on medium heat until hot. Once hot, add the minced garlic and red pepper flakes. Sauté for 1-2 minutes. Watch the garlic closely. You want it to be fragrant but not brown. Burnt garlic tastes bitter and ruins the dish. Add your shrimp to the skillet after cooking the garlic. Season them with salt and pepper. Cook for 3-4 minutes, turning them often. You know the shrimp are done when they turn pink and opaque. Avoid overcooking them; this makes them tough. Perfectly cooked shrimp are tender and juicy, a true delight. Once the shrimp are cooked, add your lemon zest and juice to the skillet. Toss in your drained pasta and mix well. The pasta needs to soak up that lovely garlic sauce. If it seems too dry, add some of the reserved pasta water. This helps create a silky sauce that clings to the pasta. Stir until everything is well combined, and your dish is ready to serve. For the full recipe, check out [Full Recipe]. - Always use fresh shrimp for the best taste. - Thaw frozen shrimp overnight in the fridge. - Cook shrimp quickly over medium heat. - Look for shrimp that turn pink and opaque. - Don't crowd the pan; cook in batches if needed. - Add fresh herbs like parsley or basil for extra flavor. - A squeeze of lemon brightens the dish. - Use high-quality olive oil for the best taste. - Experiment with spices like paprika or oregano. - Fresh garlic gives a stronger taste than garlic powder. - Pair with a crisp green salad for freshness. - Garlic bread makes a great side for scooping sauce. - Serve with white wine, like Sauvignon Blanc, for a nice match. - Sparkling water with lemon is a fun non-alcoholic option. - Top with grated Parmesan cheese for a rich finish. For complete details on making this dish, check out the Full Recipe. {{image_2}} You can easily adjust this dish to fit your diet. To make it low-carb, try using zucchini noodles instead of pasta. Simply spiralize the zucchini and sauté it briefly. It gives you a fresh taste without the carbs. For a vegan option, use plant-based shrimp and vegan butter. These swaps keep the dish tasty, while meeting your dietary needs. Want to mix things up? You can add other ingredients to boost flavor. Toss in spinach for a pop of color and nutrients. Sun-dried tomatoes also add a nice tang. Adjust the spice level by adding more or less red pepper flakes. This way, you can make it just as spicy as you like. You can give this dish a fun twist by changing the pasta. Try different shapes like penne or farfalle for an Italian-style meal. For a Mediterranean vibe, add capers or olives. These ingredients add depth and a unique flair to your Easy Garlic Shrimp Scampi. Check out the Full Recipe for more details on how to create these variations. To keep your garlic shrimp scampi fresh, you need to store it properly. First, let the dish cool down to room temperature. Then, transfer it to an airtight container. Use glass or plastic containers that seal well. This helps keep the flavors intact. You can store it in the fridge for up to three days. When it's time to enjoy your leftovers, you want to reheat them without overcooking the shrimp. The best way is to use a stovetop. Heat a non-stick skillet over low heat. Add a splash of olive oil or butter. This helps the shrimp stay moist. Stir gently until warmed through. Microwaving can make shrimp tough. If you use a microwave, heat in short bursts and check often. You can freeze garlic shrimp scampi, but it's best to do so without the pasta. Shrimp can lose texture when frozen. To freeze, let the dish cool completely. Then, place it in a freezer-safe bag or container. Remove as much air as possible. Label the bag with the date. To thaw, place it in the fridge overnight. Reheat gently on the stovetop for the best results. Enjoy your Easy Garlic Shrimp Scampi anytime! For the full recipe, check out the provided instructions above. Yes, you can prep this dish ahead of time. Cook the shrimp and sauce first, then store it in an airtight container. Keep your pasta separate. This helps the pasta stay firm. When you’re ready to eat, reheat the shrimp and sauce. Cook the pasta fresh for the best taste. I recommend using large shrimp for this recipe. Fresh shrimp taste better, but frozen shrimp work well too. Look for shrimp that are peeled and deveined. This saves you time. Their size helps them cook evenly, giving you the best bite. To thicken your sauce, add a bit of pasta water while mixing. This water has starch that helps. Another way is to let the sauce simmer longer. This reduces the liquid, making it thicker. You can make this dish gluten-free. Use gluten-free pasta, which is widely available. Check labels to ensure no gluten is present. Prepare the sauce as usual, and enjoy your dish without worry. Yes, you can swap white wine with chicken broth or vegetable broth. This keeps the flavor rich. If you want to skip it, just add a bit more lemon juice. This keeps the dish bright and fresh. For the complete recipe, check out the [Full Recipe]. This blog post covered how to make Easy Garlic Shrimp Scampi. We explored the key ingredients needed, including shrimp, garlic, and pasta. We discussed cooking tips to get perfect shrimp and great flavor. You learned about ingredient substitutions to fit dietary needs. Finally, we looked at storage tips and common FAQs. With these steps, you can create a delicious dish. Enjoy cooking and experimenting with flavors!

Easy Garlic Shrimp Scampi Simple and Quick Recipe

If you’re craving a quick, mouthwatering meal, my Easy Garlic Shrimp Scampi recipe is for you. With just a few

- 12 large manicotti pasta tubes - 2 cups cooked chicken, shredded - 1 cup fresh spinach, chopped - 1 cup ricotta cheese - 1 cup mozzarella cheese, shredded - 1/2 cup Parmesan cheese, grated - 1 teaspoon garlic powder - 1 teaspoon onion powder - 1 teaspoon Italian seasoning - 2 cups marinara sauce - Salt and pepper to taste The ingredients for Chicken and Spinach Stuffed Manicotti are simple yet full of flavor. You need large manicotti pasta tubes to hold the filling. I use cooked chicken, which adds protein and taste. Fresh spinach gives a pop of color and nutrients. Cheese is key in this dish. Ricotta cheese makes the filling creamy. Mozzarella cheese adds a gooey texture, while Parmesan cheese gives a nice, salty bite. For flavor, garlic powder, onion powder, and Italian seasoning are perfect. They blend well with the chicken and spinach. Marinara sauce ties the whole dish together. It adds moisture and a rich tomato taste. Don’t forget to season with salt and pepper. This recipe is all about balance. Each ingredient plays a role in making a delicious meal. You can find the full recipe at the end of this article. - Preheat your oven to 375°F (190°C). - Cook manicotti pasta according to package instructions until al dente. Drain and let cool slightly. - In a large bowl, combine shredded chicken, chopped spinach, ricotta cheese, 1/2 cup of mozzarella cheese, Parmesan cheese, garlic powder, onion powder, Italian seasoning, salt, and pepper. Mix well until all ingredients are combined. - Using a small spoon or piping bag, carefully stuff each manicotti tube with the chicken and spinach mixture. This step is key for flavor in every bite. - Spread 1 cup of marinara sauce evenly on the bottom of a 9x13 inch baking dish. This helps keep the pasta moist. - Arrange the stuffed manicotti in a single layer on top of the sauce. - Pour the remaining marinara sauce over the stuffed manicotti. Sprinkle the rest of the mozzarella cheese on top for that gooey texture. - Cover the dish with aluminum foil and bake in the preheated oven for 25 minutes. - Remove the foil and bake for an additional 10-15 minutes or until the cheese is bubbly and golden. This gives that nice crisp on top. For the full recipe, refer to the provided instructions. To make the stuffing easy, use a piping bag. It fills the manicotti tubes neatly. This method saves time and keeps your hands clean. Mix the chicken, spinach, and cheeses well. Good mixing ensures every bite has balanced flavor. Trust me, a well-mixed filling makes a big difference in taste. Cover the dish with foil while baking. This helps prevent the top from getting too brown. It also keeps the cheese nice and gooey. After baking, let the dish cool for a few minutes. Cooling helps the filling set. The texture will be perfect when you serve it. Serve your manicotti with a fresh salad or warm garlic bread. Both add a nice touch to the meal. For an extra pop of flavor, garnish with fresh basil. Just a few leaves brighten up the dish. If you want to explore more, check out the Full Recipe for tasty twists! {{image_2}} You can switch up the filling to keep things fresh. Try using ground turkey or beef instead of chicken. Both options add a rich flavor. You can also mix in other veggies. Mushrooms and bell peppers work well and add more color. They bring extra nutrients too. These fillings make the dish fun and unique. The sauce can change the whole vibe of the dish. If you want something creamy, use Alfredo sauce instead of marinara. It adds a nice richness. You can also try a pesto sauce. This gives a bright and fresh taste. Both options offer a twist on the classic recipe. Cheese can change how stuffed manicotti tastes. You can play around with different types. Feta or gouda can bring new flavors. They melt well and add a nice bite. If you're looking for a healthier option, use low-fat cheese. This keeps the dish lighter but still delicious. For the best results, mix and match until you find your favorite combo. For the full recipe, check out the [Full Recipe]. After enjoying your Chicken and Spinach Stuffed Manicotti, store any leftovers in an airtight container. This keeps the dish fresh and tasty. It is best to eat the leftovers within 3-4 days. The flavors will stay nice, and the meal will still be delightful. If you want to save some manicotti for later, freeze the unbaked dish. This is a smart way to have an easy meal ready for a busy night. When you're ready to eat it, bake from frozen at 375°F for 45-60 minutes. This way, you can enjoy the same great taste without any extra work. For quick meals, you can microwave individual portions. This is fast and simple, but it may not give you the best texture. If you want the best results, reheat in the oven. This restores that lovely, bubbly cheese texture we all love. Just cover it with foil to keep it moist while warming up. You will feel like you just made it fresh! Yes, you can prepare and assemble this dish before baking. Just refrigerate or freeze it. If you choose to freeze, be sure to cover it well to avoid freezer burn. When you are ready to bake, simply thaw it overnight in the fridge. This makes meal planning simple and saves time during busy days. Bake for 25 minutes covered with foil, then remove the foil for an additional 10-15 minutes. This helps the cheese on top become nice and bubbly. Keep an eye on it during the last few minutes to avoid over-browning. You want that perfect golden finish that makes the dish look inviting. Absolutely! This recipe stores well and can be reheated easily for planned meals. You can make a big batch and divide it into portions. Store them in airtight containers in the fridge for up to four days. Just warm them in the microwave or oven when you're ready to enjoy. This makes dinner time a breeze! For the full recipe, check the section above. We covered a delicious Chicken and Spinach Stuffed Manicotti recipe. You learned about the key ingredients, step-by-step instructions, and tips for perfecting your dish. Try different fillings and sauces to make it your own. This dish not only tastes great but also stores well, making it ideal for meal prep. Enjoy cooking, and don’t hesitate to experiment with flavors. You’ll impress friends and family with this easy, tasty recipe!

Chicken and Spinach Stuffed Manicotti Delightful Meal

Ready to impress your family with a delicious dinner? My Chicken and Spinach Stuffed Manicotti recipe combines tender pasta tubes

To make a great homemade veggie pizza, you need a few key ingredients. Here is a simple list: - 2 cups all-purpose flour - 1 packet (2 ¼ teaspoons) instant dry yeast - 1 teaspoon sugar - ¾ teaspoon salt - ¾ cup warm water (about 110°F) - 1 tablespoon olive oil - ½ cup pizza sauce - 1 cup shredded mozzarella cheese - ½ cup sliced bell peppers (mix of red, yellow, and green) - ½ cup sliced mushrooms - ½ cup red onion, thinly sliced - ½ cup black olives, sliced - 1 teaspoon dried oregano - 1 teaspoon dried basil - Pinch of red pepper flakes (optional) Using quality ingredients is key to a tasty pizza. Fresh veggies and good cheese make a big difference. They add flavor and texture. For example, fresh bell peppers add crunch and color. High-quality mozzarella melts beautifully. These choices will make your pizza special. If you need to make changes, there are great options. For a gluten-free pizza, you can use almond flour or a gluten-free blend. These can work well for the crust. Always check the package for the right ratios. For a dairy-free pizza, try vegan cheese. Many brands offer tasty options that melt well. You can also use nutritional yeast for a cheesy flavor without dairy. These swaps keep your pizza delicious and friendly for all diets. To start, mix your dry and wet ingredients. In a large bowl, add 2 cups of all-purpose flour, 1 packet of instant dry yeast, 1 teaspoon of sugar, and ¾ teaspoon of salt. Stir it well. Now, gradually pour in ¾ cup of warm water and 1 tablespoon of olive oil. Use a wooden spoon until the mixture sticks together. Next, it’s time to knead the dough. Transfer the dough to a floured surface. Knead the dough for 5 to 7 minutes. You want it to be smooth and elastic. If it feels sticky, sprinkle a bit more flour until it feels just right. Once your dough is ready, let’s shape it. After the dough rises, punch it down and place it on a floured surface. Roll it out into a 12-inch circle. You can also use your hands to stretch it. Make sure it fits your pizza stone or baking sheet well. Now, it’s time to assemble the pizza. Spread ½ cup of pizza sauce evenly across the dough. This step is key for great flavor. Then, generously sprinkle 1 cup of shredded mozzarella cheese over the sauce. Next, arrange your veggies: ½ cup of sliced bell peppers, ½ cup of sliced mushrooms, ½ cup of thinly sliced red onion, and ½ cup of sliced black olives. For even more flavor, sprinkle 1 teaspoon each of dried oregano and dried basil over the toppings. If you like a little heat, add a pinch of red pepper flakes. Now, let’s get that oven ready. Preheat it to 475°F (245°C) about 15 minutes before the dough finishes rising. This ensures the crust cooks well. When the oven is hot, bake your pizza for 12 to 15 minutes. Look for a golden brown crust and bubbling cheese. That’s your sign it’s done! Once baked, remove the pizza from the oven. Let it cool for a few minutes before slicing. Slice it into wedges and serve. Enjoy your homemade veggie pizza delight! You can find the complete recipe above. Making pizza dough can be tricky. Here are some common mistakes and ways to fix them: - Too Sticky Dough: Add more flour as you knead. - Dry Dough: Mix in a bit more water. - Not Rising: Make sure your yeast is fresh. Use warm water, not hot. For rising the dough, I suggest these techniques: - Warm Spot: Find a cozy spot in your kitchen. - Cover Tightly: Use a kitchen towel to keep the warmth in. Let the dough rise until it doubles in size. This usually takes about 30 to 45 minutes. The right herbs and spices make your veggie pizza shine. Here are my favorites: - Dried Oregano: Adds a classic Italian touch. - Dried Basil: Brightens up the overall flavor. - Red Pepper Flakes: Adds a spicy kick for those who like heat. To layer flavors well, follow these tips: - Start with Sauce: Spread it evenly on the dough. - Cheese First: Add cheese over the sauce to help toppings stick. - Top with Herbs: Sprinkle herbs last for the best flavor boost. Try these tips to make your veggie pizza a delight! You can find the full recipe for Garden Delight Veggie Pizza above. {{image_2}} You can use many veggies for your homemade veggie pizza. Seasonal vegetables give the best flavor. Try adding fresh zucchini or summer squash in the summer. In fall, use butternut squash or sweet potatoes. Carrots and spinach are great in the winter. For unique toppings, think outside the box. Try artichoke hearts or roasted red peppers. Fresh arugula or pea shoots add crunch. You can even add fruits like pineapple or figs for a sweet twist. Mix and match to find your favorite combos! Changing the sauce can make a big difference. Instead of regular pizza sauce, try pesto or BBQ sauce. You can also use a spicy arrabbiata for a kick. If you want a creamy base, use Alfredo or white sauce. For cheese, there are many options to explore. Classic mozzarella works well, but you can also use feta or goat cheese for more flavor. If you are vegan, try cashew cheese or almond cheese. Nutritional yeast can add a cheesy taste too. These variations will help you create a pizza that suits your taste. For more ideas and tips, check out the Full Recipe! To keep your leftover pizza fresh, follow these steps: - Refrigeration: Place the pizza in an airtight container or wrap it tightly in plastic wrap. This helps keep moisture in and prevents drying out. - Freezing: If you want to store pizza for longer, freezing is the way to go. Wrap individual slices in foil or parchment paper before placing them in a freezer bag. Remove as much air as possible to avoid freezer burn. You want to enjoy your leftover pizza just as much as the first time. Here are some great methods: - Oven Method: Preheat your oven to 375°F (190°C). Place the pizza on a baking sheet and cover it with foil. Heat for about 10-15 minutes. This keeps the crust crispy and warms the toppings evenly. - Skillet Method: Heat a skillet over medium-low heat. Place the pizza in the skillet and cover it with a lid. This method warms the pizza while keeping the crust nice and crispy. Heat for about 5-8 minutes. By following these tips, you can enjoy your homemade veggie pizza even after the first day! For a full recipe, check out the Garden Delight Veggie Pizza recipe above. For pizza dough, you can use either all-purpose flour or bread flour. - All-purpose flour: This type works well for pizza. It has a balanced protein content. This gives you a good texture. - Bread flour: This flour has more protein. It makes a chewier crust. Many chefs prefer it for its strong structure. Using either will yield tasty results. I often use a mix for a perfect balance. Yes, you can make pizza ahead of time! Here are some tips: - Dough preparation: You can prepare your dough a day in advance. Just let it rise, then store it in the fridge. - Toppings: Chop your veggies and store them in airtight containers. This keeps them fresh. - Sauce: You can make your sauce ahead too! Just keep it sealed in the fridge. When you're ready to bake, just assemble your pizza and enjoy! To keep your pizza base crispy, follow these strategies: - Preheat the oven: Always preheat your oven to a high temperature. This helps the crust cook fast. - Par-bake the crust: Bake the dough for a few minutes before adding toppings. This helps set the base. - Use less sauce: Spread sauce lightly to avoid over-saturating the dough. - Add toppings wisely: Use drier toppings and avoid too much cheese. These tips will help you achieve a nice, crisp pizza base! For more delicious ideas, check out the Full Recipe. Making your own veggie pizza is simple and fun. We covered key ingredients and their quality for great taste. You learned about dough preparation, baking tips, and unique flavor combinations. Plus, we shared helpful storage ideas for leftovers and reheating methods. Now, you have all the tools to enjoy delicious pizza at home. Experiment with flavors and toppings. Happy pizza making!

Homemade Veggie Pizza Delightful and Easy to Make

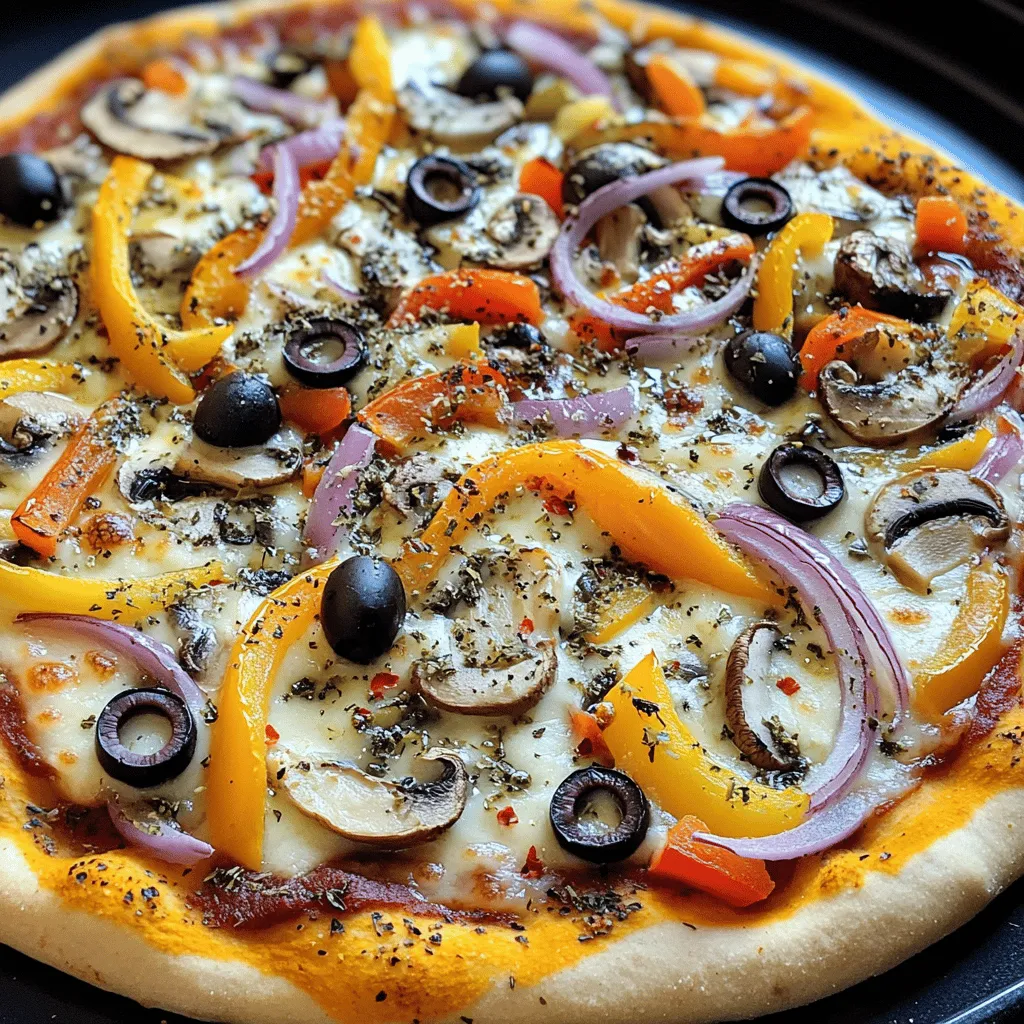
Are you ready to create a pizza that’s both tasty and simple? My Homemade Veggie Pizza is just what you

- Broccoli florets - Minced garlic - Olive oil To make this dish, start with fresh broccoli florets. I love vibrant green ones. Next, use minced garlic for a strong flavor. Finally, drizzle in olive oil to add richness. - Parmesan cheese - Red pepper flakes - Lemon zest and juice Grated Parmesan cheese brings a savory taste. If you like heat, add red pepper flakes. Zest and juice from a lemon will brighten the dish. - Salt and pepper to taste Don’t forget salt and pepper! These simple seasonings help enhance all the flavors. For the full recipe, check the details above. First, you need to preheat your oven to 425°F (220°C). This step is key for the perfect roast. Next, take a large mixing bowl and combine your broccoli florets with the minced garlic. This mix will create a great flavor base. Then, drizzle the olive oil over the broccoli and garlic. Don't forget to season with salt, pepper, and red pepper flakes if you want some heat. Toss everything well so that each piece gets coated nicely. Now, it’s time to spread the broccoli mixture onto a baking sheet. Make sure to lay it out in a single layer. This allows even cooking and browning. Roast your broccoli in the preheated oven for about 15 minutes. This initial roasting helps soften the broccoli and develop flavor. After 15 minutes, remove the baking sheet from the oven. Here comes the best part! Sprinkle grated Parmesan cheese over the broccoli. This will melt and create a delicious crust. Return the baking sheet to the oven for another 10 minutes. The cheese should become golden brown, and the broccoli should be tender. Once done, drizzle lemon juice over the top and sprinkle some lemon zest for a fresh finish. Enjoy your Garlic Parmesan Roasted Broccoli as a tasty side dish! For the complete recipe, check the Full Recipe section. To get the best texture for your Garlic Parmesan Roasted Broccoli, focus on a few key steps. First, cut the broccoli into even florets. This helps them roast evenly. Aim for pieces about the same size. Next, don’t overcrowd the baking sheet. Give each floret space to roast. This allows hot air to circulate and gives you that crispy edge we all love. When it comes to seasoning, adjust to your taste. I recommend starting with salt and pepper. You can always add more later. If you enjoy a bit of heat, try adding red pepper flakes. Just a pinch can elevate the dish. You can prepare broccoli in advance, making it easier for busy days. Simply wash and cut the broccoli into florets. Store them in an airtight container in the fridge. This way, they stay fresh for up to two days. When you're ready to cook, just toss them with garlic and oil. For reheating, the oven is your best friend. Preheat it to 350°F (175°C). Spread the broccoli on a baking sheet and heat for about 10 minutes. This helps maintain that nice crispness. Garlic Parmesan Roasted Broccoli pairs well with many main dishes. Try it alongside roasted chicken or grilled fish. It also makes a great side for pasta dishes. For presentation, think about color and texture. Use a nice plate and arrange the broccoli in a circle. Drizzle some extra lemon juice on top for a fresh look. You can even sprinkle a bit of extra Parmesan for a fancy touch. For more ideas, check out the Full Recipe and get inspired! {{image_2}} You can make Garlic Parmesan Roasted Broccoli even more exciting. Try adding other vegetables like: - Cauliflower - Carrots - Bell peppers - Asparagus This mix adds colors and flavors. You can also change the cheese. Instead of Parmesan, use: - Pecorino Romano for a sharper taste - Cheddar for a creamier flavor - Nutritional yeast for a vegan option These choices can really change the dish. If you want a vegan version, there are great alternatives for Parmesan. Use: - Nutritional yeast for a cheesy flavor - Vegan Parmesan cheese, which you can buy or make at home For gluten-free adjustments, just make sure your cheese and spices are gluten-free. Most of them already are! Using seasonal ingredients can add a special touch. In spring, try adding fresh peas or asparagus. In fall, consider roasted squash or sweet potatoes. These ingredients will enhance the flavor. If you can't find broccoli, you can substitute it with: - Green beans for a crunchy texture - Brussels sprouts for a hearty option These variations keep the dish fresh and fun! For the full recipe, check out the Garlic Parmesan Roasted Broccoli section. To keep Garlic Parmesan Roasted Broccoli fresh, store it in an airtight container. Place it in the fridge within two hours of cooking. This helps prevent bacteria growth. The broccoli will stay fresh for about 3 to 5 days. When you are ready to eat, check for any signs of spoilage. If it looks or smells off, it's best to throw it away. You can freeze Garlic Parmesan Roasted Broccoli for longer storage. First, let the broccoli cool completely. Then, spread the pieces on a baking sheet in a single layer. Freeze them for about 1 to 2 hours until firm. After that, transfer the broccoli to a freezer bag or container. Make sure to remove as much air as possible. To reheat, thaw the broccoli in the fridge overnight. Then, you can warm it in the oven or microwave until heated through. In the fridge, you can expect Garlic Parmesan Roasted Broccoli to last for about 3 to 5 days. In the freezer, it can last up to 3 months. After that, the taste and texture may decline. For the best quality, use it within these time frames. Enjoy your delicious side dish at its best by following these storage tips! For the full recipe, check the previous section. Roasting broccoli is quick and easy. At 425°F (220°C), it takes about 25 minutes. First, roast it for 15 minutes. Then, add the cheese and roast for another 10 minutes. This timing gives you tender broccoli with a nice crunch. Yes, you can use frozen broccoli. Just remember to adjust the cooking time. Frozen broccoli takes a bit longer to roast. Roast it for about 30 to 35 minutes at 425°F (220°C). Check for tenderness before serving. To reheat, use the oven for the best flavor. Preheat the oven to 350°F (175°C). Spread the broccoli on a baking sheet. Heat for about 10 minutes. This method keeps it crisp and tasty. You can also use a microwave, but it may lose some crunch. Enjoy your Garlic Parmesan Roasted Broccoli! For the full recipe, check out the earlier section. In this blog post, we explored how to make Garlic Parmesan Roasted Broccoli. We covered the main ingredients, preparation steps, and roasting process. I shared tips for the best texture and serving ideas. You can even make it ahead or use variations for different diets. Remember, storing leftovers properly helps keep them fresh. This dish is both simple and delicious, making it a great addition to any meal. Try these steps, and enjoy the great taste of roasted broccoli!

Garlic Parmesan Roasted Broccoli Flavorful Side Dish

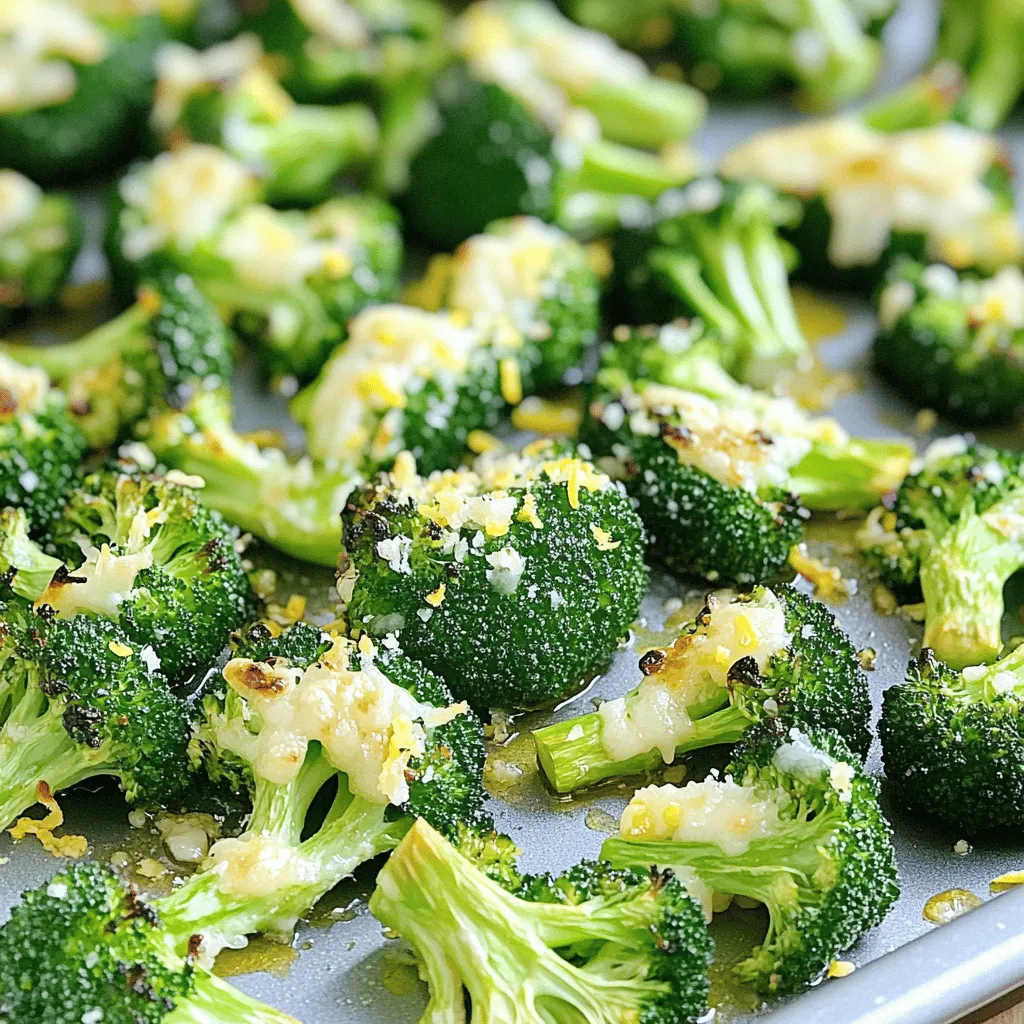
Are you ready to elevate your vegetable game? Garlic Parmesan Roasted Broccoli is the perfect side dish that combines crunchy

Here are the key items you need for the BBQ chicken flatbread: - 2 large flatbreads or naan - 2 cups cooked chicken, shredded - 1 cup BBQ sauce (your choice of flavor) - 1 red onion, thinly sliced - 1 cup shredded mozzarella cheese - 1/2 cup crumbled feta cheese - 1 cup chopped fresh cilantro (or parsley if you prefer) - 1 teaspoon garlic powder - Fresh jalapeño slices (optional for spice) - Olive oil for brushing - Salt and black pepper to taste These ingredients create a great base for your flatbread. The chicken and BBQ sauce mix well, giving it a tasty boost. To make your flatbread even better, consider these optional toppings: - Extra cheese like cheddar or gouda - Chopped bell peppers for crunch - Pineapple chunks for sweetness - Avocado slices for creaminess You can mix and match these toppings. They can add more flavor and texture to your dish. Each serving of BBQ chicken flatbread offers a balanced meal. Here’s a breakdown: - Calories: About 400-500 per serving - Protein: Around 25-30 grams - Carbohydrates: Approximately 40-50 grams - Fat: Roughly 15-20 grams The protein from the chicken and cheese helps keep you full. The flatbread adds carbs for energy. This dish is both satisfying and flavorful. For the full recipe, you can check out the detailed steps to get started on making this delicious BBQ chicken flatbread! To make BBQ chicken flatbread, start by gathering your ingredients. You will need flatbreads, cooked chicken, and BBQ sauce. Here’s how to prepare: - Preheat your oven to 400°F (200°C). - In a bowl, mix the shredded chicken with BBQ sauce. Stir until all the chicken is coated. - If desired, slice your red onion and jalapeño. Now, your ingredients are ready, and you can move on to cooking! Baking BBQ chicken flatbread is simple. Follow these steps for the best results: 1. Place the flatbreads on a baking sheet lined with parchment paper. 2. Brush the tops of the flatbreads with olive oil. This helps them crisp up nicely. 3. Spread the BBQ chicken mixture evenly on each flatbread. 4. Add the sliced red onion, shredded mozzarella, and crumbled feta. 5. Sprinkle garlic powder, salt, and black pepper over everything. 6. If you like spice, add fresh jalapeño slices now. 7. Bake in the preheated oven for 12-15 minutes. Watch for the cheese to melt and the edges to turn golden. When done, take them out and sprinkle chopped cilantro on top. Let them cool slightly before slicing. Serving BBQ chicken flatbread can be fun! Here are some ideas: - Cut the flatbread into smaller pieces for appetizers at parties. - Serve it with a fresh salad to balance the flavors. - Pair it with extra BBQ sauce on the side for dipping. - Consider adding a dollop of sour cream or yogurt for a creamy touch. For more detailed instructions, you can refer to the Full Recipe. To get a crispy and tasty flatbread, start with good quality bread. Preheat your oven to 400°F. Brush the flatbreads with olive oil before adding toppings. This step helps the bread crisp up nicely. Bake the flatbread for 12 to 15 minutes. Keep an eye on it to avoid burning. The edges should turn golden brown, and the cheese should melt perfectly. Choosing the right BBQ sauce can make a big difference. I love a sweet and tangy sauce for this flatbread. A smoky flavor adds depth, while a spicy sauce gives it a kick. You can try classic sauces like Kansas City style or a vinegar-based sauce for a tangy twist. Feel free to mix sauces for your unique blend. Using the right tools makes cooking easier. A baking sheet lined with parchment paper helps with easy cleanup. I recommend a good sharp knife for slicing the onion and jalapeños. A mixing bowl is perfect for combining the chicken and BBQ sauce. If you have a pastry brush, use it to apply olive oil evenly. For the best results, a pizza stone is great for baking flatbreads. You can find the Full Recipe in this article for more details. {{image_2}} You can play with cheese to change the taste of your BBQ chicken flatbread. Here are some great choices: - Cheddar: It adds a sharp, tangy flavor. - Pepper Jack: This cheese gives a nice kick with its spice. - Monterey Jack: A smooth choice for a creamy texture. - Blue Cheese: It gives a bold and rich taste if you like strong flavors. Mix and match these cheeses to find your favorite combo. If you want to switch up the protein, try these options: - Turkey: Shredded turkey works well with BBQ sauce. - Pulled Pork: This adds a smoky flavor that’s hard to beat. - Tofu: For a vegetarian option, use firm tofu. Just marinate and grill it. - Chickpeas: Roasted chickpeas give a nice crunch and protein boost. You can use any of these to create a tasty flatbread. To make your flatbread even better, consider these tasty add-ins: - Bell Peppers: Slice them thin for a sweet crunch. - Pineapple: Adds a sweet and tangy flavor that pairs well with BBQ. - Corn: Sweet corn gives a nice texture and flavor burst. - Fresh Herbs: Basil or mint can give a refreshing twist. Pair these with sides like a salad or coleslaw for a full meal. For the full recipe, check out the main article! To store leftover BBQ chicken flatbread, let it cool down first. Wrap the flatbread tightly in plastic wrap or foil. You can also place it in an airtight container. This keeps it fresh and tasty. Store it in the fridge for up to three days. When you are ready to eat, reheat it in the oven or microwave. If you want to freeze your flatbread, follow these steps: 1. Cool it down: Make sure the flatbread is completely cool. 2. Wrap it well: Use plastic wrap to cover the flatbread tightly. Then wrap it in aluminum foil for extra protection. 3. Label it: Write the date on the foil so you know when you froze it. 4. Freeze it: Place it in the freezer. It can stay good for up to three months. To reheat frozen BBQ chicken flatbread: 1. Thaw it: Move it to the fridge the night before. 2. Reheat: Place it in a preheated oven at 350°F (175°C) for about 10-15 minutes. This warms it up and keeps it crispy. Leftover BBQ chicken flatbread lasts about three days in the fridge. If frozen, it can last up to three months. After these times, the flavors may change, and it might not taste as good. Always check for any signs of spoilage, like odd smells or changes in texture, before eating. Yes, you can use store-bought flatbreads. They save time and are easy to use. Look for fresh options at the store. They are great in a pinch. Homemade flatbreads taste amazing but take longer to make. If you love cooking, try making your own flatbreads for a fun project. BBQ chicken flatbread is perfect for meal prep. You can make it ahead and store it in the fridge. Just cook your flatbreads and top them with the BBQ chicken mix. Keep the toppings separate until serving. This way, they stay fresh and crisp. It’s ideal for busy days when you need a quick meal. You can find BBQ chicken flatbread at many restaurants. Look for local pizza places or casual dining spots. Chains often serve this dish, too. Check online reviews for recommendations. Some food trucks also serve great BBQ chicken flatbreads. Explore your area; you might find hidden gems. Customizing your BBQ chicken flatbread is fun and easy. You can add different cheeses like cheddar or gouda. For veggies, try bell peppers or spinach. If you like heat, add more jalapeños or hot sauce. You can switch the chicken for pulled pork or even veggies for a meatless option. Get creative with your toppings! For the full recipe, check out the details above. In this post, we explored making BBQ chicken flatbread. We covered key ingredients and preparation steps, plus tips for perfecting the dish. Remember to experiment with cheeses and proteins to enhance the flavors. Storing leftovers properly helps you enjoy this meal later. Whether cooking for a crowd or prepping for a busy week, BBQ chicken flatbread is flexible and fun. Try different sauces and add your favorite toppings. Enjoy your flavorful creation!

BBQ Chicken Flatbread Delightful and Simple Recipe

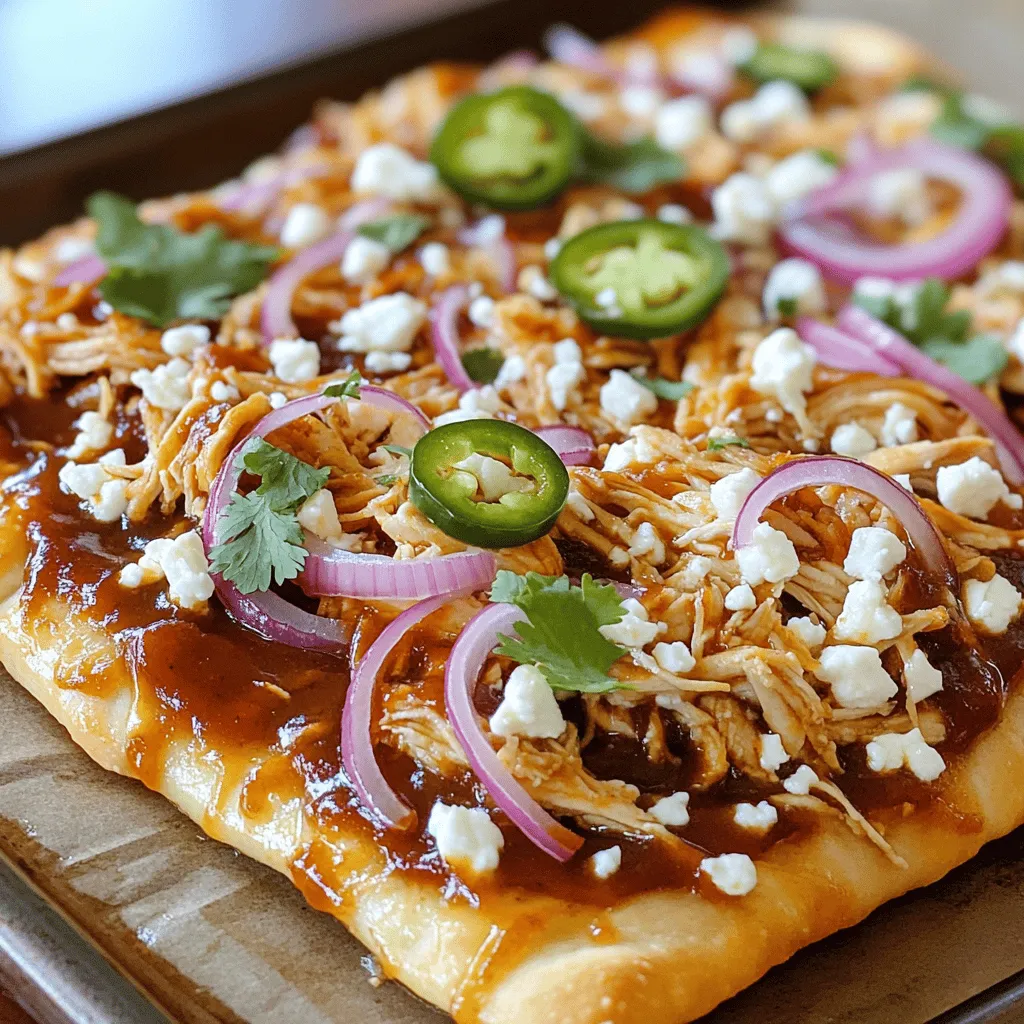
Are you ready for a tasty treat that’s quick and easy? My BBQ Chicken Flatbread recipe is just the thing!

- 4 salmon fillets (6 oz each) - 1/4 cup soy sauce - 1/4 cup honey - 2 tablespoons fresh ginger, grated - 2 cloves garlic, minced - 1 tablespoon sesame oil - 1 tablespoon rice vinegar - 1 tablespoon green onions, finely chopped - 1 tablespoon sesame seeds - Salt and pepper, to taste Gather these simple ingredients to make honey soy glazed salmon. The main ingredients are salmon, soy sauce, and honey. Each adds flavor and moisture. The soy sauce gives a salty kick, while honey brings sweetness. Together, they create a tasty glaze. Next, we add ginger and garlic for depth. Ginger adds warmth and a slight spice. Garlic gives a savory note. Sesame oil adds a nutty touch that enhances the dish. For the finishing touches, use rice vinegar. It adds a nice tang to balance the sweetness. Green onions and sesame seeds make great garnishes. They add color and texture to your dish. With these ingredients, you're ready to create a delicious meal. Check out the Full Recipe for complete details on cooking honey soy glazed salmon. Start by whisking together the following ingredients in a bowl: - 1/4 cup soy sauce - 1/4 cup honey - 2 tablespoons fresh ginger, grated - 2 cloves garlic, minced - 1 tablespoon sesame oil - 1 tablespoon rice vinegar Make sure your mixture is smooth and well blended. This is key for great flavor. Next, take your salmon fillets and place them in a shallow dish. Pour the marinade over the salmon. Make sure each fillet is fully coated. This step is crucial for flavor. Cover the dish and refrigerate for at least 30 minutes. This allows the salmon to soak up all those tasty flavors. Now, it’s time to cook! Preheat your grill or broiler to medium-high heat. If you are grilling, lightly oil the grill grates to keep the salmon from sticking. Remove the salmon from the marinade, and save it for later. Season the fillets with a pinch of salt and pepper. Grill or broil the salmon for about 5-6 minutes per side. You’ll know it’s ready when it easily flakes with a fork. To add extra flavor, baste the salmon with the reserved marinade halfway through cooking. Once cooked, place the salmon on a serving platter. Drizzle any remaining marinade over the top. Garnish with chopped green onions and sesame seeds for texture and taste. This recipe is simple yet packed with flavor. For the full recipe, check out the details above! Basting is key to a great glaze. It adds flavor and shine. When you baste, the glaze sticks better. Use a brush to coat the salmon halfway through cooking. This simple step makes a big difference. Cooking times depend on salmon thickness. Thicker fillets need more time. Thin fillets cook faster. To check doneness, use a fork. If it flakes easily, it’s ready. You can add spices or herbs to boost flavor. Consider using cayenne for heat or dill for freshness. These small changes can make your dish unique. Pair your salmon with sides for a full meal. Rice or veggies work well. You can also serve it with a light salad. This balance makes your dinner exciting. For grilling, a good grill is a must. If you broil, use a sturdy baking sheet. Both methods work well for this recipe. To maximize salmon's flavor, use a non-stick surface. This keeps the fish juicy. A meat thermometer is also useful. It ensures your salmon is cooked perfectly. For the full recipe, check out the detailed steps. Happy cooking! {{image_2}} You can cook honey soy glazed salmon in different ways. The oven and grill both work well. When using the oven, preheat it to 400°F. Place the salmon on a baking sheet and bake for about 12-15 minutes. This method keeps the fish moist. Grilling gives the salmon a nice smoky flavor. Heat your grill to medium-high. Grill the salmon for about 5-6 minutes on each side. This creates a delicious char while keeping the inside tender. You can also pan-sear the salmon for a crispy crust. Heat a non-stick pan over medium heat. Add a little oil and place the salmon skin-side down. Cook for 4-5 minutes, then flip and cook for another 3-4 minutes. This method adds a nice golden color to the fish. Want to change up the taste? Add citrus like lemon or lime to your marinade. The bright acidity balances the sweetness of honey. Squeeze some juice over the salmon after cooking for extra zing. For those who love heat, try adding chili flakes or sriracha to the marinade. This gives your dish a spicy kick that pairs well with the sweet glaze. You can adjust the heat level based on your taste. If you need gluten-free options, use tamari instead of regular soy sauce. Tamari has a similar flavor and works perfectly in this recipe. If you want a low-sugar version, try using a sugar substitute in the marinade. You can also reduce the amount of honey to keep the dish healthier. These options still keep the flavors vibrant and delicious. For the full recipe, check out the detailed steps to make this meal at home. To keep honey soy glazed salmon fresh, store leftovers in an airtight container. This helps lock in flavor and moisture. Place the salmon in the fridge right after serving. It will stay fresh for up to three days. Always check for signs of spoilage before eating. If it smells off or looks discolored, it’s best to toss it. You can freeze marinated salmon for later use. Wrap each fillet tightly in plastic wrap and then place it in a freezer bag. Try to remove as much air as possible to prevent freezer burn. This salmon can stay good frozen for up to three months. When you're ready to cook, thaw it in the fridge overnight. This slow thaw keeps the texture nice. For reheating, you can use a microwave or an oven. If using the microwave, place the salmon on a microwave-safe plate. Heat it in short bursts, checking often to avoid drying it out. The oven works well too. Preheat it to 350°F (175°C) and place the salmon on a baking sheet. Cover it with foil to keep it moist. Heat for about 10-15 minutes, or until warm. Always aim for a tender bite. Enjoy your meal! For the full recipe, check out Honey Soy Glazed Salmon. You should marinate honey soy glazed salmon for at least 30 minutes. This time allows the salmon to soak up the flavors. For best results, marinate for 1 to 2 hours. If you have more time, try overnight. The longer it sits, the more tasty it becomes. Yes, you can use other types of fish like trout or tilapia. These fish will change the flavor a bit. Trout has a richer taste, while tilapia is milder. Both options will still pair well with the honey soy glaze. Honey soy glazed salmon pairs well with many sides. Here are a few tasty options: - Steamed rice - Roasted vegetables - Spinach salad - Quinoa These sides will balance the sweet and salty flavors of the salmon. Honey soy glazed salmon is a healthy choice. Salmon is high in omega-3 fatty acids, which are good for your heart. The honey adds some natural sweetness, while the soy sauce gives you protein. In moderation, this dish can fit into a balanced diet. In this blog post, we explored how to make honey soy glazed salmon. We covered the key ingredients, from fresh salmon to flavorful marinades. I shared step-by-step instructions for marinating and cooking, along with tips for the perfect glaze. You also learned about variations, storage, and answers to common questions. With these insights, you can create a delicious meal that fits various diets. Enjoy experimenting with flavors, and impress your family and friends with your cooking skills!

Honey Soy Glazed Salmon Easy and Flavorful Recipe

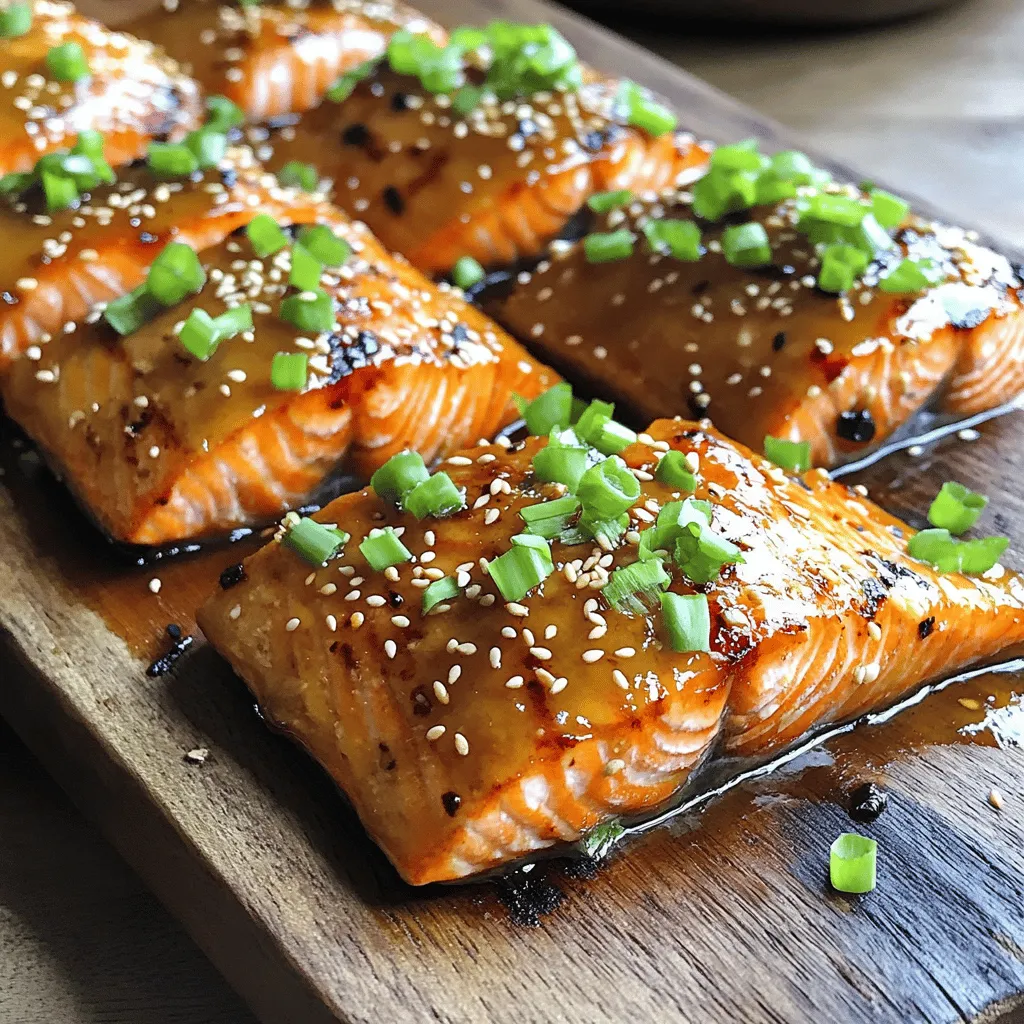
If you’re craving a dish that’s both easy and packed with flavor, you’ve come to the right place! My Honey

To make your Healthy Greek Chicken Bowls, gather these fresh ingredients. They bring great flavor and nutrition. - 2 boneless, skinless chicken breasts - 1 tablespoon olive oil - 1 teaspoon dried oregano - 1 teaspoon garlic powder - Salt and pepper, to taste - 2 cups cooked quinoa - 1 cup cherry tomatoes, halved - 1 cucumber, diced - 1/2 red onion, thinly sliced - 1/2 cup Kalamata olives, pitted and halved - 1 cup fresh spinach - 1/2 cup feta cheese, crumbled - 1/4 cup fresh parsley, chopped - Juice of 1 lemon These simple ingredients create a colorful and tasty meal. You can find the full recipe in the article. Each item plays a role in making your bowl special. The chicken gives you protein, while quinoa adds fiber. Fresh veggies and feta add crunch and creaminess. Lemon juice brings a bright, zesty finish. - Combine 1 tablespoon of olive oil, 1 teaspoon of dried oregano, 1 teaspoon of garlic powder, salt, and pepper. - Add 2 boneless, skinless chicken breasts, ensuring they are well-coated. Let marinate for at least 30 minutes for the best flavor. - Cook 2 cups of quinoa according to package instructions. - Once cooked, fluff it with a fork and let it cool slightly. - Heat a non-stick skillet over medium-high heat. - Cook the marinated chicken for about 6-7 minutes on each side until the internal temperature reaches 165°F. - Start with quinoa as the base in each serving bowl. - Layer with fresh spinach, cherry tomatoes, cucumber, red onion, and Kalamata olives. - Sprinkle the bowls with 1/2 cup of crumbled feta cheese and 1/4 cup of chopped parsley. - Drizzle with the juice of 1 lemon for a bright, fresh taste. - Enjoy your healthy Greek chicken bowls immediately. You can also refrigerate them for meal prep. For the full recipe, check out Mediterranean Bliss: Healthy Greek Chicken Bowls. To get great flavor, make sure to marinate your chicken well. Mix olive oil, oregano, garlic powder, salt, and pepper. Coat the chicken evenly in the marinade. Let it sit for at least 30 minutes. For best results, refrigerate it for up to 2 hours. This allows the flavors to soak in deeply. Also, use a meat thermometer to check the chicken's doneness. It should reach 165°F for safe eating. Rinsing quinoa is a must. It helps remove a bitter taste. Just place it in a fine mesh strainer and rinse under cold water. After rinsing, cook quinoa in vegetable broth instead of water. This adds a nice, rich flavor to your dish. Follow the package instructions for cooking time. Once done, fluff it with a fork to separate the grains. You can switch things up with your Greek chicken bowls. If you want a meat-free option, swap chicken for tofu or chickpeas. Both options are great sources of protein. You can also mix in seasonal veggies for extra color and crunch. Try adding roasted peppers, zucchini, or even some sweet corn. This will keep your meals exciting and fresh! For more ideas, check out the full recipe. {{image_2}} You can change the base of your bowl by using brown rice instead of quinoa. Brown rice has a nutty taste and chewy texture. It also offers more fiber than white rice. To make it even better, add roasted vegetables. Roasted bell peppers, zucchini, and carrots bring flavor and color to your dish. Toss them with olive oil, salt, and pepper before roasting. Enjoy this hearty version that is just as healthy and filling! For a Mediterranean twist, add hummus and roasted red peppers. Hummus adds creaminess and a rich, savory taste. Roasted red peppers bring sweetness and depth. You can also use a yogurt-based dressing for a cool finish. This adds a tangy flavor and makes your meal even more refreshing. This bowl is perfect for hot days or when you want a light yet filling meal. If you want a low-carb version, use cauliflower rice instead of quinoa. Cauliflower rice is light and absorbs flavors well. You can also increase the amount of non-starchy vegetables. Spinach, broccoli, and cucumbers work great in this option. This bowl is still packed with taste and nutrients while keeping the carbs low. You won't miss the grains at all! For more ideas and flavors, you can check the Full Recipe to explore all your options! After you enjoy your Healthy Greek Chicken Bowls, store any leftovers in an airtight container. This keeps the flavors fresh and the food safe. You can keep them in the fridge for up to 3-4 days. This makes it easy to grab a quick meal later in the week. If you want to save your bowls for later, freezing is a great option. First, allow the bowls to cool completely before freezing. This prevents ice crystals from forming. You can store them in the freezer for up to 3 months. When you're ready to eat, just thaw them overnight in the fridge. To enjoy your Greek chicken bowls again, you can use the microwave or stovetop. If using the microwave, heat in short intervals until warm. On the stovetop, warm them gently over low heat. Be sure to reheat until heated through for the best taste. Yes, you can make this dish ahead of time. It is great for meal prep. Just follow storage guidelines to keep it fresh. Store each bowl in an airtight container in the fridge. It will stay good for 3-4 days. Yes, the ingredients in this recipe are gluten-free. You can enjoy this meal without worry. Always check labels when buying products. This ensures you avoid any hidden gluten. You can easily make a vegan version. Substitute chicken with chickpeas or tempeh for protein. Omit feta cheese or use a vegan alternative. This will keep the flavors but change the ingredients. You can pair these bowls with tzatziki dip or a fresh Greek salad. Both options add flavor and make a complete meal. You can also include pita bread for extra texture. This recipe offers a tasty and simple way to enjoy healthy Greek chicken bowls. You have learned how to marinate chicken, cook quinoa, and assemble your bowls. Remember, you can customize with a variety of toppings and ingredients to match your taste. Whether prepping for the week or serving a meal, these bowls shine with flavor and freshness. Enjoy making them your own and share with friends and family for next-level meals!

Healthy Greek Chicken Bowls Flavor-Packed and Nutritious

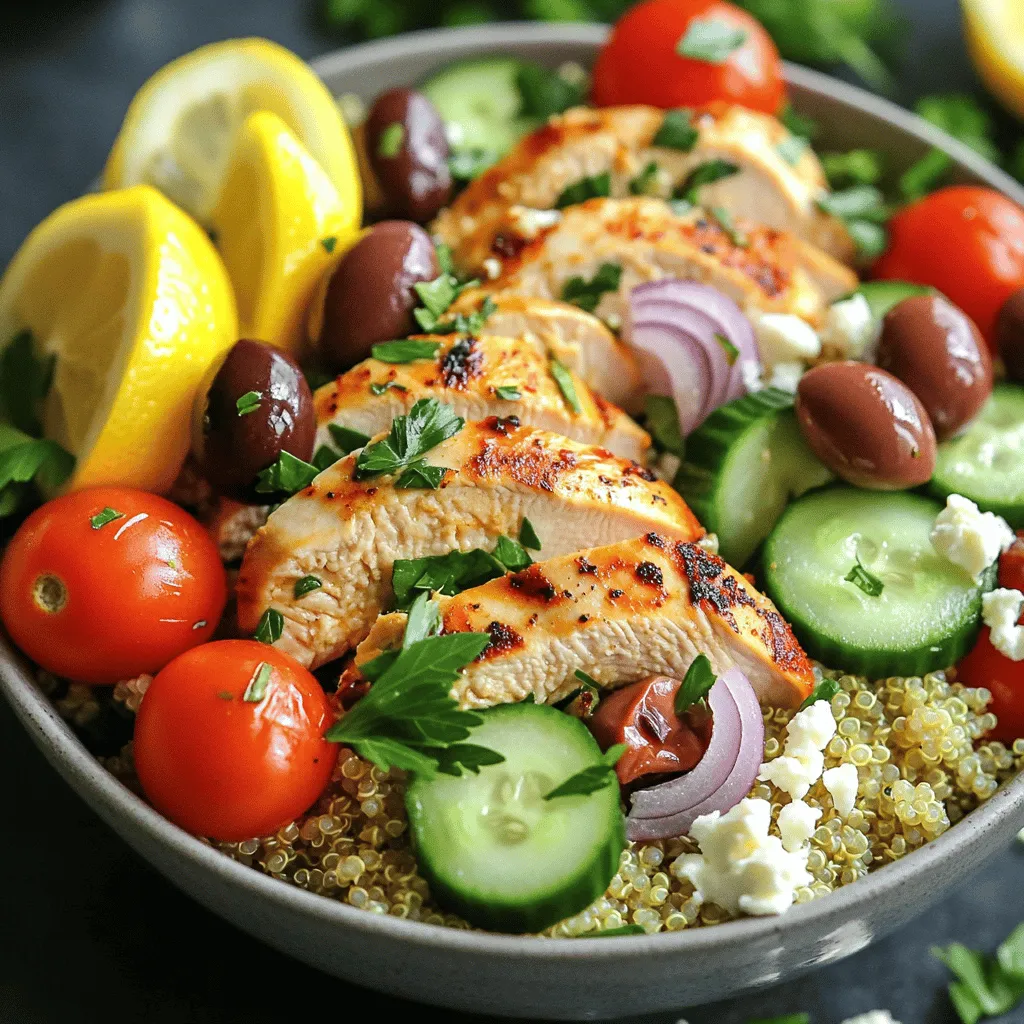
Looking for a meal that’s both tasty and healthy? Try my Healthy Greek Chicken Bowls! This dish is packed with

- 2 cups cooked chicken, shredded - 1 bag (12 oz) tortilla chips - 1 cup black beans, drained and rinsed - 1 cup corn kernels (fresh or canned) - 1 cup diced tomatoes - 1 cup shredded cheddar cheese - 1 cup shredded Monterey Jack cheese These ingredients form the base of your loaded chicken nachos. The shredded chicken adds protein and flavor. Tortilla chips provide the crunchy base. Black beans and corn add texture and nutrition. The cheese varieties melt beautifully, creating a gooey topping. - 1 jalapeño, sliced (optional) - 1 avocado, diced - ½ cup sour cream - ¼ cup fresh cilantro, chopped These toppings elevate your nachos. Jalapeños give heat, while avocado adds creaminess. Sour cream offers a cool contrast to the spices. Cilantro brings freshness and color. - Spices: 1 tablespoon olive oil, 1 teaspoon cumin, 1 teaspoon chili powder, salt and pepper to taste Adding spices makes a big difference. Olive oil helps cook the chicken mixture. Cumin and chili powder enhance the overall flavor. Adjust salt and pepper to your taste, making your nachos truly yours. - Calories per Serving: Approximately 400-500 - Protein: About 25 grams - Fiber: Around 6 grams - Allergen Information: Contains dairy and may have gluten This dish is filling and tasty, making it a great game day snack. The protein and fiber help keep you satisfied. Just be mindful of allergens if you're serving guests with dietary restrictions. For the full recipe, check out the [Full Recipe]. - Cooking the Chicken Start by heating olive oil in a skillet over medium heat. Add 2 cups of shredded chicken, along with 1 cup of black beans and 1 cup of corn. Sprinkle in 1 teaspoon of cumin and 1 teaspoon of chili powder. Add salt and pepper to taste. Stir the mixture for about 5 minutes. Cook until everything is hot and well mixed. This step builds the tasty base for your nachos. - Blending in Other Ingredients Next, mix in 1 cup of diced tomatoes. This adds freshness and color to the chicken mixture. Stir gently to avoid breaking the tomatoes. Be sure to blend all the ingredients well. This step is key to ensuring every bite of nachos is full of flavor. - Layering Chips and Chicken Take a large baking sheet and spread out 1 bag (12 oz) of tortilla chips in an even layer. This gives a good base. Next, evenly distribute the chicken mixture over the chips. Make sure every chip gets some chicken. This ensures every bite is loaded with goodness. - Cheese Distribution Now comes the fun part! Sprinkle 1 cup of shredded cheddar cheese and 1 cup of Monterey Jack cheese over the chicken. This melty goodness is what makes nachos irresistible. Do not hold back on the cheese; it’s a star player in this dish. - Oven Temperature and Timing Preheat your oven to 350°F (175°C). Once your nachos are assembled, place the baking sheet in the oven. Bake for 10-15 minutes. You want the cheese to melt and get bubbly. Keep an eye on them to avoid burning. - Checking for Doneness After about 10 minutes, check the nachos. The cheese should look melted and slightly golden. If it looks good, remove the baking sheet from the oven. This is where the magic happens; the whole kitchen will smell amazing! Now you can add your favorite toppings like diced avocado, sour cream, and cilantro, and enjoy your cheesy fiesta! For full details on the recipe, check the Full Recipe. Preventing Sogginess To keep your nachos crispy, layer them right. Start with a base of chips. Spread the chicken mixture evenly over them. This helps the chips stay dry. Add cheese last to create a barrier. It melts and protects the chips from moisture. Ensuring Even Melting For even melting, use a mix of cheeses. I like using cheddar and Monterey Jack. They melt well together. Spread the cheese in a thin, even layer. This way, every bite has cheese goodness. Ideal Sides and Accompaniments Pair your nachos with fresh sides. I recommend guacamole and salsa. They add great flavor. You can also serve them with a side of beans. This makes your meal even heartier. Presentation Tips For a nice look, use a large, colorful platter. Scatter fresh cilantro on top for a pop of green. Place the sour cream in a bowl on the side. This makes it easy for everyone to dip. Overloading Toppings Less is often more. Avoid piling on too many toppings. This can make your nachos soggy and hard to eat. Focus on a few key toppings for best flavor and texture. Skipping the Broiling Step Don’t skip the broiling step! This is key for melting the cheese. Broil for a few minutes at the end. Watch closely to prevent burning. Broiling gives you that perfect, gooey texture. For the full recipe, check out the Cheesy Fiesta Loaded Chicken Nachos. {{image_2}} Substituting Protein If you want a meat-free option, swap the chicken for black beans or lentils. These add protein and taste great. You can also use tofu or tempeh for a hearty bite. Alternative Cheese Options Try different cheeses like pepper jack or smoked gouda for a fun twist. Vegan cheese can work well too. Look for options that melt nicely to keep your nachos creamy. Southwest Style Add some roasted corn, diced red onion, and a sprinkle of lime juice for a fresh twist. You can also mix in some salsa verde for a zesty kick. This gives your nachos a bright, vibrant taste. BBQ Chicken Nachos Use BBQ sauce instead of spices for a sweet and tangy flavor. Mix shredded chicken with the sauce before layering it on your chips. Top with coleslaw for crunch and extra flavor. Taco Night Variation Load your nachos with taco toppings like seasoned ground beef, pico de gallo, and guacamole. This makes a perfect taco night meal and is easy to share. Game Day Loaded Nachos For game day, add extra toppings like sliced olives, pickled jalapeños, or even a drizzle of ranch dressing. This creates a fun, crowd-pleasing snack everyone will love. Feel free to explore these variations to create your own loaded chicken nachos masterpiece! For a full recipe, check out the details above. To keep your loaded chicken nachos fresh, store them in an airtight container. Make sure to cover them tightly to avoid air exposure. You can keep them in the fridge for up to three days. After that, the chips may become too soggy. When reheating nachos, I recommend using an oven. Preheat it to 350°F (175°C). Place the nachos on a baking sheet for about 10 minutes. This helps restore their crispiness. If you use a microwave, they may turn soft. If you have no other choice, heat them for 30 seconds at a time until warm. You can prep some ingredients ahead of time. Cook and shred your chicken a day before. Store it in the fridge. You can also chop your veggies and mix the spices in advance. Just assemble the nachos right before serving for the best taste. Store any assembled nachos in the fridge for up to two days. For the freshest crunch, it’s best to add chips just before serving. For the complete journey to flavor, refer to the Full Recipe. You can make Loaded Chicken Nachos healthier with simple swaps. Try these ingredient substitutions: - Use whole grain tortilla chips for more fiber. - Swap regular cheese for low-fat cheese options. - Add more veggies like bell peppers or spinach. - Use Greek yogurt instead of sour cream. - Opt for grilled chicken instead of fried. These changes help cut calories and boost nutrition without losing flavor. Yes, you can freeze Loaded Chicken Nachos. Follow these best practices: - Assemble the nachos without toppings like avocado and sour cream. - Wrap them tightly in plastic wrap and place in a freezer bag. - Label the bag with the date for easy tracking. - To thaw, move them to the fridge overnight. When ready to eat, bake them until hot and add fresh toppings. Loaded Chicken Nachos pair well with many dishes and drinks. Here are some ideas: - Serve with a side of fresh salsa or guacamole. - Pair with a chilled beer or a fruity mocktail. - Offer a light salad to balance the meal. - Try a bowl of chili for a hearty combo. These sides enhance your nacho experience and keep the game day fun! You now have all the tools to make perfect loaded chicken nachos. We covered essential ingredients, cooking steps, and best practices. Remember to balance toppings to keep your nachos crispy. Try not to overload them, and follow our serving tips for a standout dish. Get creative with variations like vegetarian options and fun themes. With these tips, you can impress everyone at your next gathering. Enjoy every bite and share your nacho journey with friends!

Loaded Chicken Nachos Tasty and Easy Game Day Snack

Looking for a game day snack that packs flavor and fun? Loaded Chicken Nachos are your answer! With crispy tortilla

Older posts
Newer posts
← Previous Page1 … Page79 Page80 Page81 … Page84 Next →

dsad

© 2026 easycookingbite • Built with GeneratePress

Our Policies

  • Copyright Policy
  • Cookie Policy
  • GDPR Policy
  • Privacy Policy
  • Disclaimer
  • Terms Of Use

More Information

  • Home
  • About
  • Contact
  • Appetizers
  • Dessert
  • Dinner
  • Drinks
©2026, easycookingbite About Back To Top