Skip to content
DisclaimerTerms Of UseGDPR PolicyCookie Policy

easycookingbite

  • Home
  • Drinks
  • Appetizers
  • Dinner
  • Dessert
  • About
  • Contact
  • Privacy Policy
DisclaimerTerms Of UseGDPR PolicyCookie Policy

NO-ING-IMG

For these tasty zucchini fries, you need: - 2 medium zucchini, cut into fry shapes - 1 cup breadcrumbs (preferably panko for extra crunch) - 1/2 cup grated Parmesan cheese - 1 teaspoon garlic powder - 1 teaspoon Italian seasoning - 2 large eggs - Salt and pepper to taste - Olive oil spray or 2 tablespoons of olive oil These ingredients create a crunchy and flavorful snack. The zucchini gives a fresh taste, while the Parmesan brings a rich flavor. Panko breadcrumbs add that extra crunch you want. You can mix it up with different seasonings. Here are some ideas: - Paprika for a smoky flavor - Cayenne pepper for heat - Lemon zest for brightness - Herbs like thyme or rosemary for a fresh touch Feel free to get creative! You can also swap Parmesan for other cheeses like cheddar or mozzarella. Each choice changes the taste and keeps things interesting. To make this dish easy, gather these tools: - A sharp knife for cutting zucchini - Two shallow bowls for coating - A baking sheet lined with parchment paper - A whisk for beating the eggs - A spatula for flipping fries Having the right tools makes cooking fun and simple. You’ll enjoy making these crispy fries with ease! For the full recipe, check out the details above. To start, wash your zucchini well. Then, cut each zucchini into fry shapes. Aim for uniform sizes. This helps them cook evenly. You want them about a half-inch thick. Thinner fries may burn, while thicker ones may not cook through. Next, gather your ingredients for coating. In a shallow bowl, mix breadcrumbs, grated Parmesan, garlic powder, Italian seasoning, salt, and pepper. This blend gives great flavor. In a separate bowl, beat two large eggs. Dip each zucchini fry into the egg first. Make sure it’s well-coated. Then, roll it in the breadcrumb mix. Press gently to ensure full coverage. This method helps create that irresistible crunch. Now, preheat your oven to 425°F (220°C). Line a baking sheet with parchment paper. Place the coated zucchini fries on the sheet. Make sure they are not touching. This allows hot air to circulate. For added crunch, lightly spray them with olive oil. Bake for 20 to 25 minutes. Flip them halfway through for even browning. Look for a golden brown color. Once done, let them cool for a few minutes. Serve them warm for the best taste. For a full recipe, check the earlier section. To get that amazing crunch, use panko breadcrumbs. They create a light, airy texture. Make sure the zucchini is dry before coating. Excess moisture can make them soggy. Spray the fries lightly with olive oil spray. This helps them brown evenly without adding too much fat. Bake them on parchment paper to avoid sticking and promote crisping. Flip them halfway through baking for even cooking. One common mistake is overcrowding the baking sheet. If the fries touch, they won’t crisp up. Another mistake is skipping the egg wash. The egg helps the coating stick better. Don’t skip seasoning either. A little salt and pepper can make a big difference. Lastly, avoid opening the oven too soon. This lets heat escape and can affect the fry's crunch. Crispy Parmesan Zucchini Fries pair well with many dips. Marinara sauce adds a nice tangy flavor. Ranch dressing gives a creamy touch that many love. You can also try garlic aioli for a gourmet twist. For a spicy kick, serve with sriracha mayo. Each dip brings out the flavor of the fries, making them even more enjoyable. For the full recipe, check out the details above. {{image_2}} You can make crispy Parmesan zucchini fries in an air fryer. This method gives a great crunch. First, follow the same prep steps. After coating the zucchini, place them in your air fryer basket. Set the air fryer to 400°F (200°C) for about 10-12 minutes. Shake the basket halfway through. This method uses less oil and still gives you that crispy texture. If you need a gluten-free option, you can swap out the breadcrumbs. Use crushed gluten-free cornflakes or almond flour instead. These options will still give you a nice crunch. Just mix them with Parmesan and seasonings like garlic powder and Italian herbs. You will still enjoy that tasty flavor without gluten. You can change up the cheese and spices to suit your taste. Try using cheddar or mozzarella for a different flavor. Add spices like paprika or cayenne for a kick. Mixing in some Italian herbs can also make your fries even more delicious. Experiment with these ideas to make your fries your own. Check out the full recipe to get started on these tasty variations! To keep your leftover zucchini fries fresh, let them cool first. Then, place them in an airtight container. Make sure to layer them with parchment paper to avoid sticking. Store the container in the fridge. They stay good for about 2-3 days. When you want to enjoy your leftover fries, reheating is key. Preheat your oven to 375°F (190°C). Spread the fries on a baking sheet. Bake them for 10-15 minutes until they are hot and crispy again. You can also use an air fryer for this. It makes them crispy in just 5-7 minutes. If you want to save zucchini fries for later, freezing works well. After baking, let the fries cool completely. Place them on a baking sheet in a single layer and freeze for 1-2 hours. Once frozen, transfer them to a freezer-safe bag. They can last up to 3 months in the freezer. When ready to eat, bake them directly from the freezer until crispy. For more details, check the Full Recipe. Crispy Parmesan Zucchini Fries stay fresh in the fridge for about 3-4 days. Store them in an airtight container. This helps keep them from getting soggy. When you’re ready to eat them, you can reheat them in the oven for the best crispiness. Yes, you can make these zucchini fries in advance! You can prep them and coat them ahead of time. Just store them in the fridge until you’re ready to bake. This saves time and still gives you that tasty crunch when baked. Zucchini fries taste great with many dips. Some popular options include: - Marinara sauce - Ranch dressing - Garlic aioli - Spicy ketchup - Honey mustard Try different dips to find your favorite! Each sauce adds its unique flavor to the crispy zucchini fries. For the full recipe and more tips, check out the details above. Crispy Parmesan zucchini fries are fun and easy to make. We covered main ingredients, step-by-step instructions, and helpful tips. With right tools and techniques, you can create perfect fries every time. Think about trying different cooking methods or flavors. Store any leftovers correctly for later. Enjoy them with your favorite dips for a tasty snack. You now have everything you need to impress friends and family with your zucchini fries!

Crispy Parmesan Zucchini Fries Irresistibly Crunchy Snack

If you’re searching for a deliciously crunchy snack, look no further! Crispy Parmesan Zucchini Fries deliver both flavor and texture.

- 4 chicken thighs, bone-in and skin-on - 1/4 cup honey - 1/4 cup soy sauce (low-sodium recommended) - 3 cloves garlic, minced - 1 tablespoon fresh ginger, grated - 1 tablespoon rice vinegar - 2 green onions, chopped - Sesame seeds (optional) When preparing honey garlic glazed chicken thighs, you need quality ingredients to make the dish shine. The chicken thighs are juicy and flavorful, thanks to the skin and bone. Honey adds a sweet touch, while low-sodium soy sauce gives a savory flavor. Garlic and ginger bring warmth and depth to the dish. Rice vinegar adds a bit of tang, balancing the sweetness. For a pretty finish, you can use chopped green onions and sesame seeds. They bring color and a nice crunch. Always choose fresh ingredients for the best taste. This dish is simple yet packed with flavor, making it a favorite in my kitchen. If you want to dive deeper into the recipe, check the Full Recipe for more details. To start, you’ll whisk together these simple ingredients: - 1/4 cup honey - 1/4 cup soy sauce - 3 cloves garlic, minced - 1 tablespoon fresh ginger, grated - 1 tablespoon rice vinegar - 1 teaspoon sesame oil - Salt and pepper to taste Mix them well in a medium bowl. This creates a sweet and savory marinade. The honey gives a nice glaze. The garlic and ginger add a punch of flavor. Next, grab a zip-lock bag or a shallow dish. Place your chicken thighs inside. Pour the marinade over the chicken. Seal the bag or cover the dish tight. Refrigerate for at least 1 hour. If you have time, let it sit overnight. This makes the chicken super tasty. Now it’s time to cook. Preheat your oven to 400°F (200°C). Take the chicken out of the marinade, but keep the marinade for later. In a large oven-safe skillet, heat a tablespoon of oil on medium-high. Place the chicken thighs skin-side down. Sear for 5-7 minutes until the skin is golden brown. This step helps to get a crispy skin. Flip the chicken thighs over. Pour the reserved marinade on top. Now, transfer the skillet to the oven. Roast the chicken for 25-30 minutes. You want it to reach an internal temperature of 165°F (75°C). Once done, let the chicken rest for a few minutes. This helps keep it juicy. Drizzle the pan juices over the chicken before serving. You can garnish with chopped green onions and sesame seeds if you want. For the full recipe, check out the earlier section. Enjoy your meal! To get a crispy skin and rich glaze, start by searing the chicken thighs. Use medium-high heat in a hot skillet to brown the skin well. This step locks in juices and creates that nice texture. After searing, pour the marinade over the chicken. This helps the glaze stick as it cooks. For the best results, bake the chicken skin-side up. This keeps the skin crispy and allows the glaze to caramelize perfectly. When it comes to cooking chicken, two methods stand out: searing and baking. Searing gives you a great crust and flavor. It also helps keep the meat juicy inside. After searing, you finish cooking in the oven. Baking ensures even cooking and lets the chicken soak up the marinade. I find that this combo results in the best flavor. Searing first adds depth, while baking allows the glaze to shine. Marinating chicken is key to great flavor. For a subtle taste, marinate for at least one hour. If you have more time, try marinating overnight. This will deepen the flavor and make it even better. The honey and garlic blend nicely over time, enhancing the dish. Just remember, the longer you marinate, the stronger the flavor. With this honey garlic glaze, you can’t go wrong! For the full recipe, refer to the section above. {{image_2}} You can switch up the sweetener in this dish. Instead of honey, try maple syrup. It gives a nice, rich flavor. Brown sugar is another great option. It adds a hint of caramel taste. Each choice brings its own twist to the dish. Just remember to keep the same amount, so the glaze stays perfect. Oven roasting is classic, but you have other choices. Grilling adds a smoky flavor that many love. Just marinate the chicken as you would for roasting. Then, cook it on a preheated grill for about 6-8 minutes per side. Slow cooking is another fun method. Use a slow cooker to let the chicken soak in the flavors. Cook it on low for 4-6 hours for a tender result. Pair your honey garlic glazed chicken thighs with tasty sides. Steamed rice soaks up the glaze well. You can also serve it with sautéed vegetables for color and crunch. A fresh salad offers a nice balance to the dish. Don’t forget to garnish with green onions and sesame seeds for added flair. For a unique twist, try serving it with a tangy coleslaw or sweet potato fries. To store leftover honey garlic glazed chicken thighs, let them cool first. Place the chicken in an airtight container. This helps keep the chicken moist and tasty. Store it in the fridge for up to three days. If you want to enjoy the chicken later, remember to keep it sealed. Freezing is a great option if you want to keep the chicken longer. Wrap each piece in plastic wrap or aluminum foil. Then, place the wrapped chicken in a freezer bag. Squeeze out as much air as you can. This helps prevent freezer burn. You can freeze the chicken for up to three months. When you're ready to eat, thaw it in the fridge overnight. Reheating your honey garlic glazed chicken thighs can be simple. To keep the flavor and texture, use the oven. Preheat it to 350°F (175°C). Place the chicken on a baking sheet. Cover it with foil to keep it moist. Heat for about 15-20 minutes. You can also use a microwave if you're in a hurry, but the oven gives better results. Enjoy your delicious leftovers! This delightful recipe takes about 1 hour and 15 minutes from start to finish. You will spend around 10 minutes on prep. The chicken needs about 25 to 30 minutes in the oven. Marinating the chicken adds flavor, so let it sit for at least 1 hour or overnight. This will enhance the taste and make the chicken juicy. Yes, you can use boneless chicken thighs. Boneless thighs cook faster, so check them after 20 minutes. They may not be as juicy as bone-in thighs. The bones add flavor and moisture, so keep that in mind. If you prefer boneless, adjust the cooking time for best results. To check if the chicken is cooked, use a meat thermometer. The chicken should reach an internal temperature of 165°F (75°C). Insert the thermometer into the thickest part of the thigh. If you don’t have a thermometer, cut into the chicken. The juices should run clear, not pink. Always ensure your chicken is fully cooked for safety and taste. In this blog post, I shared a simple recipe for honey garlic glazed chicken thighs. We explored the key ingredients, steps to prepare the marinade, and cooking methods. I also provided tips for achieving crispy skin and variations to customize your dish. Remember, you can store leftovers properly and reheat them to keep the delicious flavor. Enjoy making this easy meal that brings great taste to your table. Happy cooking!

Honey Garlic Glazed Chicken Thighs Delightful Recipe

Get ready to elevate your dinner game with my Honey Garlic Glazed Chicken Thighs! This recipe features juicy chicken thighs

- 2 medium eggplants - Mozzarella and Parmesan cheese Eggplants are the star of this dish. They bring a nice texture. I love using two medium eggplants. Slice them into ½-inch rounds for even cooking. Next, you need cheese. Mozzarella gives a creamy taste, while Parmesan adds a sharp flavor. Together, they create a delicious blend. - All-purpose flour - Olive oil You can’t forget the basics. All-purpose flour helps the eggplants get a crispy outside. Use it to coat each slice. Olive oil is great for frying. It adds flavor and keeps the eggplant moist. These staples make the dish easy and tasty. - Fresh basil leaves - Homemade marinara sauce For a fresh touch, add basil leaves as a garnish. They bring brightness to the dish. You can also use homemade marinara sauce. It adds depth and rich flavor. If you’re short on time, store-bought works too. Check out the Full Recipe for more tips! First, you need to salt and drain the eggplant. Slice the eggplants into ½-inch rounds. Sprinkle salt on both sides of each slice. Let them sit in a colander for about 30 minutes. This step helps to draw out the moisture and bitterness. After 30 minutes, rinse the slices under cold water. Pat them dry with paper towels to remove excess moisture. Now, set up your breading station. You will need three shallow dishes. Place flour in the first dish, beaten eggs in the second, and breadcrumbs mixed with oregano in the third. This setup keeps things organized and makes the breading process smooth. Next, it’s time to bread the eggplant. Take one slice and dredge it in the flour first. Be sure to shake off any extra flour. Then, dip it into the beaten eggs, letting the excess drip off. Finally, coat the slice with breadcrumbs. Press gently to help the breadcrumbs stick well. Repeat this with all the slices to ensure even coating. Heat olive oil in a large skillet over medium heat. You want enough oil to cover the bottom of the pan. To test if the oil is hot enough, you can drop a small piece of bread in. If it sizzles, you are good to go. Fry the breaded eggplant slices in batches. Cook each slice for about 3-4 minutes on each side. They should be golden brown and crispy. Once done, remove them and let them drain on paper towels. Now, let’s assemble the dish. Preheat your oven to 375°F (190°C). Start by spreading a thin layer of marinara sauce at the bottom of a baking dish. Layer half of the fried eggplant slices over the sauce. Add half of the remaining marinara sauce on top. Then, sprinkle half of the mozzarella and Parmesan cheeses. Repeat this layering process with the rest of the eggplant, sauce, and cheeses. Finish with a generous layer of mozzarella on top. Cover the baking dish with aluminum foil. Bake for 25 minutes. After that, remove the foil and bake for another 15-20 minutes. You want the cheese to be bubbly and golden. Let the dish cool for a few minutes before slicing. How to avoid soggy eggplant To keep your eggplant crisp, you must salt it first. Slice the eggplants and sprinkle salt on both sides. Let them sit in a colander for 30 minutes. This draws out moisture and bitterness. After that, rinse and pat them dry. This simple step makes a big difference. Adjusting salt and seasonings Taste your marinara sauce before using it. If it’s too bland, add more salt or herbs. You can also mix in some garlic or red pepper flakes for extra flavor. Always season each layer as you build your dish for great taste. Best side dishes to accompany Eggplant parmesan pairs well with a fresh salad. A simple mix of greens, tomatoes, and a light dressing works best. Garlic bread is another great choice. It soaks up the sauce and adds a nice crunch. Serving presentation ideas When serving, slice the eggplant parmesan into squares. Arrange them on a rustic wooden board. Add fresh basil leaves on top for color. Drizzle a bit of olive oil for a touch of elegance. Importance of rest time before serving Let the eggplant parmesan sit for 10 minutes before slicing. This helps it hold its shape. If you cut it too soon, it may fall apart. Resting allows the cheese to set for perfect slices. Cheese selection tips Use fresh mozzarella for a gooey texture. You can mix it with low-moisture mozzarella for a nice blend. For a stronger flavor, add more Parmesan. Try different cheeses to find your ideal mix. {{image_2}} You can add more veggies to your eggplant parmesan. Spinach works great in this dish. You can also use zucchini or mushrooms. These veggies add flavor and color. Try mixing in different cheeses too. Ricotta or goat cheese can give a smooth taste. This makes your dish even more special. If you need a gluten-free option, you can swap the breadcrumbs. Use crushed cornflakes or gluten-free panko instead. This will still give you that nice crunch. For the flour, almond flour or coconut flour works well. These options keep the taste rich without gluten. For meat lovers, adding cooked ground meat makes this dish heartier. You can use beef, turkey, or sausage. Just cook the meat first and layer it with the eggplant. You can also add cooked chicken for extra protein. This twist makes it a full meal. These variations keep the spirit of the classic dish while adding new flavors. For the full recipe, check out the main article. To store leftovers, let the eggplant parmesan cool first. Then, cover it with plastic wrap or foil. You can also keep it in an airtight container. This helps keep the flavors fresh. For reheating, preheat your oven to 350°F (175°C). Place the dish in the oven for about 20 minutes. You can also use the microwave if you’re in a hurry. Heat it on medium for about 3-4 minutes. Just watch it closely to avoid drying out. You can freeze eggplant parmesan before or after baking. If you freeze it before baking, assemble the dish as normal. Cover it tightly with foil. You can store it for up to three months. To freeze after baking, let it cool completely first. Wrap it well in plastic wrap, then in foil. This will prevent freezer burn. When you're ready to eat, thaw it in the fridge overnight. Then, bake it at 375°F (190°C) for about 30-40 minutes. This ensures it heats evenly. In the fridge, eggplant parmesan lasts about 3-5 days. Make sure it stays covered. In the freezer, it can last for about three months. Just remember to label the date. This way, you’ll know when to eat it! Yes, you can make eggplant Parmesan ahead of time. Start by cooking the eggplant as directed. Then, layer it with sauce and cheese in a baking dish. Cover it tightly with foil and store it in the fridge for up to a day. When you're ready to eat, bake it straight from the fridge. This helps the flavors blend. If you want to reheat leftovers, warm it in the oven at 350°F (175°C) until hot. Look for a golden-brown color on your eggplant slices. This means they are crispy and cooked well. The edges should be firm, and the center should feel soft when you press them. If you see bubbles in the oil while frying, that’s a good sign! Fry each side for about 3-4 minutes for the best texture. Salting eggplant is helpful. It draws out excess moisture and bitterness. This step makes the eggplant taste better. If you skip this step, the eggplant might be soggy. An alternative to salting is to soak the slices in milk for 30 minutes. This also helps reduce bitterness and keeps them tasty. In this post, we explored how to make eggplant Parmesan, from choosing ingredients to serving tips. You learned about key ingredients, preparation, and frying techniques that create great flavor and texture. Remember to salt the eggplant for a better taste and avoid sogginess. With these steps, variations, and storage tips, you can enjoy this dish at any time. Making eggplant Parmesan can be fun and rewarding. Give it a try, and impress your friends and family with your cooking skills!

Easy Eggplant Parmesan Flavorful and Simple Recipe

If you love hearty meals that are easy to make, then this Easy Eggplant Parmesan recipe is for you! I’ll

- 1 can (15 oz) chickpeas, drained and rinsed - 1/4 cup vegan mayonnaise - 1 tablespoon Dijon mustard - 1 tablespoon lemon juice - 1/4 cup red onion, finely chopped - 1/4 cup celery, finely diced - 1/4 cup red bell pepper, diced - 1 tablespoon fresh dill (or 1 teaspoon dried dill) - Salt and pepper to taste - 4 slices of whole grain bread - Lettuce leaves for serving - Optional: Sliced avocado or tomato for extra toppings When it comes to making a chickpea salad sandwich, you'll want to gather some simple ingredients. First, chickpeas are the star. They give this dish its hearty base. You can use canned chickpeas, which are easy and quick. Just drain and rinse them well. Next, vegan mayonnaise adds creaminess. I like to use about a quarter cup for a nice texture. Dijon mustard adds a tangy kick. Just one tablespoon is all you need. A splash of lemon juice brightens the flavors and keeps everything fresh. Now, for some crunch, add red onion, celery, and red bell pepper. Each of these veggies brings its own flavor. I recommend finely chopping them for the best bite. Fresh dill adds a lovely herb taste. If you don't have fresh dill, dried will work too. Finally, don't forget to season. A pinch of salt and pepper will enhance all the flavors. You will also need whole grain bread to serve your salad. Lettuce leaves make a nice, crisp layer. If you want something extra, sliced avocado or tomato can make it even better. For the full recipe, check out the Chickpea Delight Salad Sandwich. - First, open a can of chickpeas and drain them well. Rinse them under cold water. - Use a fork or potato masher to mash the chickpeas. Aim for a chunky texture, not smooth. - Next, add 1/4 cup of vegan mayonnaise, 1 tablespoon of Dijon mustard, and 1 tablespoon of lemon juice to the bowl. Combine these ingredients well. - Now, add in 1/4 cup of chopped red onion, 1/4 cup of finely diced celery, and 1/4 cup of diced red bell pepper. - Toss in 1 tablespoon of fresh dill, or use 1 teaspoon of dried dill if fresh isn't available. - Season with salt and pepper to taste. Mix everything until all the ingredients are well-coated. - Toast 4 slices of whole grain bread to your liking. - On two of the toasted slices, layer a generous amount of your chickpea salad mixture. - For extra creaminess, add optional toppings like sliced avocado or tomato. - Place a lettuce leaf on top of the salad mixture, then close the sandwiches with the other slices of toast. - Finally, cut the sandwiches in half and serve them fresh. Enjoy your meal! For the full recipe, be sure to check out Chickpea Delight Salad Sandwich. To make your chickpea salad sandwich shine, use ripe avocado. It adds creaminess and rich flavor. You can also adjust the mustard and lemon juice to suit your taste. A bit more mustard gives a tangy kick, while extra lemon juice brightens the dish. Serve your sandwich with pickle slices or crunchy carrot sticks. They add a nice contrast and make your meal more fun. For a lovely touch, garnish your plates with fresh dill. It looks pretty and adds a burst of flavor. You can prepare the chickpea salad ahead of time. Just store it in the fridge until you’re ready to eat. When it’s time to serve, toast the bread for the best texture. Freshly toasted bread makes the sandwich even better! {{image_2}} You can easily change the taste of your chickpea salad. Try adding chopped pickles or relish for a tangy crunch. This little tweak can make your sandwich pop with flavor. You can also include spices like cumin or paprika for extra warmth. These spices bring depth and make each bite exciting. If you want a different twist, swap vegan mayo for tahini. This swap gives your salad a nutty flavor and creamy texture. Also, feel free to use different types of bread. Ciabatta or wraps work well and provide a fresh take on the classic sandwich. Seasonal veggies can add fun to your salad. In summer, toss in fresh cucumber for a light and crisp bite. In winter, roasted veggies can make your sandwich hearty and warm. Using seasonal produce not only tastes great but also helps support local farmers. You should store any leftover chickpea salad in an airtight container in the fridge. This keeps it fresh and prevents odors from mixing. It's best to keep the bread separate. This way, it stays fresh and does not get soggy. If stored properly, you can enjoy the chickpea salad for 3-4 days. After this time, the flavors may fade, and the texture can change. Avoid freezing the assembled sandwich. Freezing may alter the texture, making it less enjoyable. This sandwich is best enjoyed cold. However, if you want a warm touch, you can toast the bread again. This refreshes the sandwich and gives it a nice crunch. Just be careful not to over-toast it! You can use hummus or avocado as a tasty substitute. Hummus adds a nice creaminess and flavor. Avocado gives a rich texture and healthy fats. Both options keep the sandwich moist and delicious. You might enjoy experimenting with these choices to find your favorite. Yes, this sandwich works well for meal prep. You can make the chickpea salad ahead of time. Just store it in an airtight container in the fridge. Keep the salad separate from the bread. This way, your bread stays fresh and crisp. When you’re ready to eat, just toast the bread and assemble your sandwich. Absolutely! This sandwich is a great option for kids. It is packed with nutrients and flavors they usually love. The chickpea salad is fun to eat and easy to customize. You can add extra toppings like sliced tomatoes or avocado. Kids enjoy making their sandwiches just how they like them! This blog post shared a simple and tasty chickpea sandwich recipe. We covered key ingredients, step-by-step instructions, and tips for making it even better. You can customize the flavor and storage options to fit your needs. Chickpea sandwiches are not only easy to make but also packed with nutrients. Enjoy this recipe for a quick lunch or meal prep. Try it out and taste the goodness for yourself!

Vegan Chickpea Salad Sandwich Simple and Tasty Meal

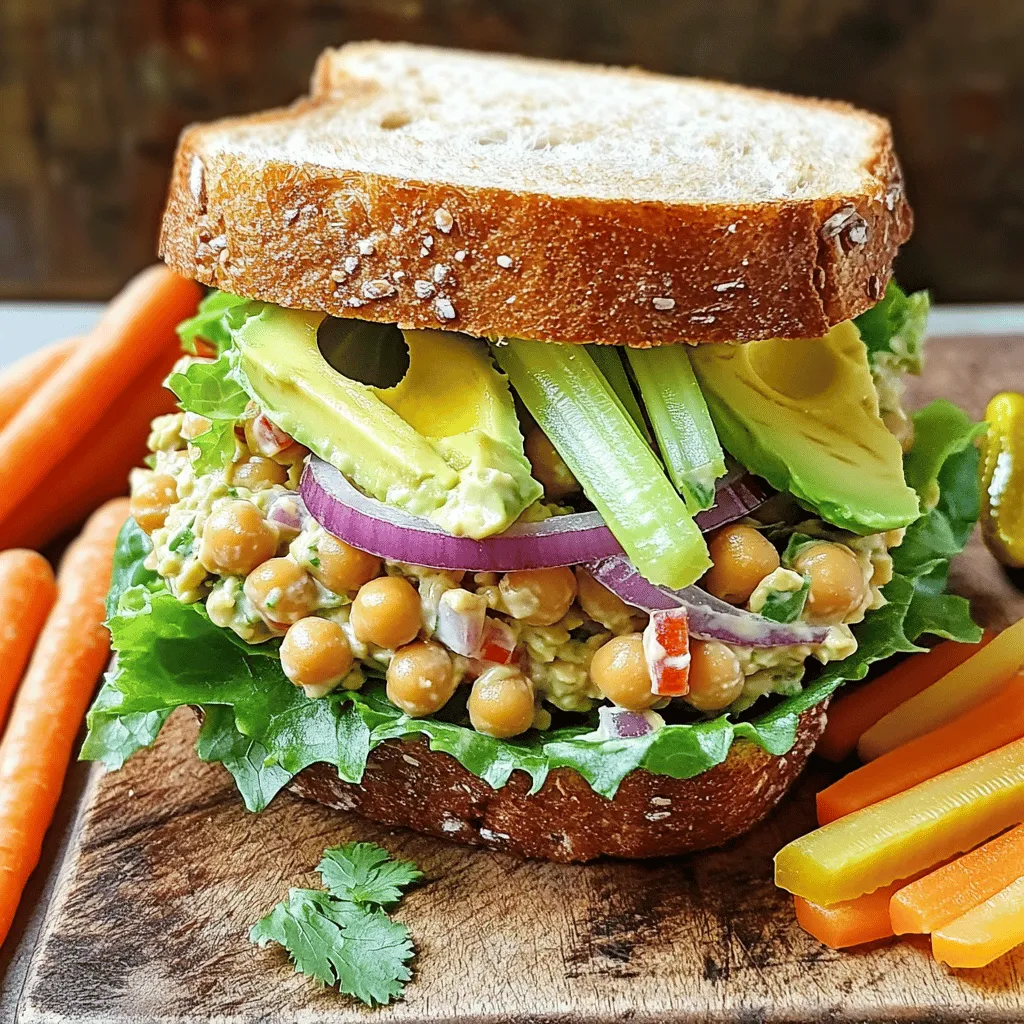
Looking for a tasty, simple meal that’s perfect for lunch? Try my Vegan Chickpea Salad Sandwich! This nutritious dish packs

- Fresh spinach leaves - Strawberries - Feta cheese - Almonds - Red onion - Balsamic vinegar - Honey - Olive oil - Salt and pepper When I create a Strawberry Spinach Salad, I always choose fresh ingredients. Fresh spinach leaves serve as the base of the salad. They provide a crisp texture and a vibrant green color. Strawberries add a sweet and juicy touch that brightens up the dish. Feta cheese brings a creamy and tangy flavor. It pairs well with the sweet strawberries. I like to use crumbled feta for an even spread of flavor. Sliced almonds add a nice crunch and nutty taste. They also enhance the salad's texture. Red onion gives a mild bite to the salad. I recommend slicing it thin for best results. The dressing consists of balsamic vinegar, honey, and olive oil. This mix balances sweetness and acidity. A touch of salt and pepper brings out all the flavors. - Health benefits of spinach - Nutritional value of strawberries - Feta cheese and its pros Spinach is a powerhouse of nutrients. It's rich in vitamins A, C, and K. It also has iron and antioxidants. Eating spinach may help improve bone health and boost immunity. Strawberries are low in calories and high in fiber. They provide vitamin C, which is great for your skin. These sweet berries may also support heart health and reduce inflammation. Feta cheese is lower in fat than many other cheeses. It offers calcium and protein. The creamy texture enhances the salad while adding essential nutrients. - Mixing bowls - Whisk - Salad spinner (optional) - Serving platter To make this salad, you need a few simple tools. Mixing bowls help combine the dressing and salad. A whisk is great for mixing the dressing smoothly. If you want to dry your spinach, a salad spinner is useful but not required. Finally, a serving platter presents the salad beautifully. It makes the vibrant colors pop and invites you to dig in. If you want to impress guests, use a nice platter for serving. For the complete recipe, check out the Full Recipe. To make the dressing, start by whisking together balsamic vinegar, honey, and olive oil. Add a pinch of salt and pepper for taste. Mix until smooth. This blend gives the salad a nice zing and a touch of sweetness. You can adjust the sweetness and acidity to your liking. If you want it sweeter, add more honey. If you prefer a tangy taste, add extra balsamic vinegar. It's all about what you enjoy! Next, grab a large mixing bowl. Add fresh spinach leaves as your base. This leafy green packs a punch of nutrients. Layer in the sliced strawberries, crumbled feta cheese, sliced almonds, and thinly sliced red onion. Gently fold in the ingredients. This keeps your spinach nice and crisp. You don’t want to bruise the leaves. Each bite should be fresh and full of flavor! Now, drizzle your prepared dressing over the salad. Toss gently until everything is evenly coated. This step makes sure each ingredient shines. Taste your salad, and adjust with more salt or pepper if needed. Transfer the salad to a serving platter or individual bowls. For a lovely presentation, garnish with whole strawberries and a sprinkle of feta on top. Serve chilled for the best flavor. Enjoy your fresh and colorful strawberry spinach salad! For the complete recipe, check out the Full Recipe. Choosing ripe strawberries Look for strawberries that are bright red with no white spots. They should feel firm but slightly soft to the touch. Smell them too! Ripe strawberries have a sweet fragrance. You want the best flavor for your salad. Storing spinach properly Keep spinach fresh by storing it in the fridge. Use a paper towel to wrap the leaves. Place them in a plastic bag, but don't seal it tight. This way, the spinach gets air and stays crisp longer. Overdressing the salad Less is more with dressing. If you add too much, it can drown the fresh flavors. Start with a small amount and add more if needed. Remember, you can always add more, but you can't take it out! Cutting ingredients too large Cut strawberries and onions into small pieces. This helps them mix well with spinach. Large pieces can be hard to eat and may not blend the flavors right. Adding herbs like basil or mint Fresh herbs bring a new level of flavor. Try adding chopped basil or mint leaves to your salad. They add a cool taste that pairs well with the strawberries. Using flavored oils or vinegars Switch up your dressing! Use flavored olive oils or vinegars for a twist. Try garlic-infused oil or raspberry vinegar to make your salad pop. These small changes make a big difference in taste. For a full guide on making this salad, check out the [Full Recipe]. {{image_2}} You can switch up the cheese in your salad for new flavors. Goat cheese adds a creamy, tangy taste. It pairs well with strawberries. Blue cheese gives a bold flavor; it adds a nice contrast to the sweet fruit. Each cheese brings its unique touch, making the salad even more special. Want to make your salad heartier? Adding proteins is a great way. Grilled chicken or shrimp brings a savory element. They also provide great texture. For a vegetarian option, toss in chickpeas. They are filling and add a nice crunch. This way, you can enjoy a balanced meal all in one bowl. Fruits can really change the game! In addition to strawberries, think about adding blueberries or peaches. They add sweetness and color. You can also use citrus fruits like mandarin oranges. Their bright flavor cuts through the richness of the cheese and dressing. This adds a refreshing twist, perfect for any season. Don't forget to check the Full Recipe for all the details you need to create your delightful Strawberry Spinach Salad! To keep your strawberry spinach salad fresh, store it in an airtight container. This will help prevent it from wilting. Place it in the fridge right after serving. The salad stays good for about 1 to 2 days. If you notice the spinach gets soggy, toss the salad before eating. You can make parts of the salad ahead of time. Wash and dry the spinach, then store it in the fridge. Slice the strawberries and store them separately. You can crumble the feta cheese in advance, too. Just keep all the components separate. Assemble the salad just before serving. This keeps everything fresh and crunchy. You cannot freeze the entire salad. Freezing salad will ruin the texture. However, you can freeze some individual parts. For example, you can freeze sliced strawberries or crumbled feta. Just remember to use them within 3 months. Thaw them in the fridge before adding to your salad. This helps maintain flavor and texture. For the best taste, refer to the Full Recipe before freezing. To make this salad without feta, you can use other cheeses. Goat cheese works well. If you want a dairy-free option, try avocado or tofu. Both add creaminess and nutrition. You can also skip the cheese altogether. The salad will still taste great. Yes, you can prepare this salad ahead of time. To keep it fresh, store the dressing separately. Mix the spinach, strawberries, and other toppings in a bowl. Add the dressing only when you are ready to serve. This will prevent the salad from getting soggy. You can use many nuts in this salad. Walnuts or pecans are great alternatives to almonds. They add a nice crunch and flavor. Each type of nut has health benefits. Walnuts are high in omega-3s, while pecans are full of antioxidants. Feel free to mix and match to find your favorite! This blog post covered a delicious Strawberry Spinach Salad. We explored its fresh ingredients, like spinach, strawberries, and feta. The salad is not only tasty, but it also offers great health benefits. I shared tips for making it, from mixing dressing to assembling the salad. Variations can boost your meal, like adding proteins or using different fruits. Remember to store leftovers properly for later enjoyment. Now you can make this salad with confidence and creativity. Enjoy your healthy eating journey!

Strawberry Spinach Salad Fresh and Flavorful Delight

Are you ready to brighten up your meal with a fresh and flavorful Strawberry Spinach Salad? This vibrant dish packs

To make garlic butter green beans, you need a few simple ingredients. Here’s what you will need: - 1 lb fresh green beans, trimmed - 4 tablespoons unsalted butter - 4 cloves garlic, minced - 1 teaspoon lemon zest - 1 tablespoon fresh lemon juice - 1/2 teaspoon red pepper flakes (optional) - Salt and pepper to taste - 1/4 cup toasted almond slivers (for garnish) These ingredients come together to make a tasty side dish. Fresh green beans are crisp and bright. The unsalted butter gives a rich flavor. Garlic adds a nice kick, while lemon zest and juice brighten the dish. Red pepper flakes add a touch of heat if you like spice. Finally, almond slivers add a nice crunch. You can find the full recipe in the section above. Blanching the green beans Start by bringing a large pot of salted water to a boil. This step is key to keeping the green beans bright and crisp. Once the water boils, carefully add the trimmed green beans. Blanch them for about 3 to 4 minutes. You want them tender but still firm. Ice bath method After blanching, drain the beans quickly. Transfer them to a bowl filled with ice water. This ice bath stops the cooking process and helps keep their vibrant color. Let the beans cool for a few minutes, then drain them again. Set the beans aside for later. Melting the butter Next, grab a large skillet. Place it over medium heat and add the unsalted butter. Watch it closely as it melts. It should foam and become slightly bubbly. This is when you know it’s ready for the garlic. Sautéing garlic Add the minced garlic to the hot butter. Stir it gently and cook for about 2 minutes. You want the garlic to be fragrant and lightly golden. Be careful not to burn it, as burnt garlic can taste bitter. Tossing in green beans Now, it’s time to add those blanched green beans to the skillet. Toss them in the garlic butter, ensuring they get coated evenly. Cook for another 3 to 4 minutes, stirring often. This step allows the beans to absorb all that rich flavor. Adding lemon zest and juice Finally, add the lemon zest and fresh lemon juice. If you like a little heat, sprinkle in some red pepper flakes. Toss everything well to combine. Season with salt and pepper to taste. For the final touch, garnish with toasted almond slivers before serving. For a complete guide, check the Full Recipe. To get the best green beans, timing is key. Blanching them for 3-4 minutes gives a tender-crisp feel. The beans should be bright green. If you overcook them, they will turn mushy. To keep the crunch, plunge them into ice water right after blanching. This stops the cooking process and locks in that vibrant color. Want to add a twist? Try spices like smoked paprika or cumin. These can give your beans a unique kick. You can also explore garlic variations. Instead of fresh, use roasted garlic for a sweeter taste. For a bolder flavor, try adding garlic powder or garlic oil. Garnishing can turn your dish into a feast for the eyes. Sprinkle toasted almond slivers on top for a nutty touch. You can also add a few lemon wedges for color. For serving sizes, aim for 1/4 of the dish per person. Pair these beans with grilled chicken or fish for a complete meal. For the full recipe, check the earlier section! {{image_2}} You can change the green beans for other veggies. Try using asparagus or broccoli. Both add a nice crunch. You can also use snap peas for a sweet twist. Each veggie gives its own taste and texture. If you want to add a nutty flavor, swap almonds for walnuts or pecans. These nuts bring a different taste. You can even use sunflower seeds for a nut-free option. They add great crunch and flavor too. To change the flavor, think about adding cheese or herbs. A sprinkle of parmesan cheese adds richness. Fresh herbs like thyme or basil can brighten the dish. Just chop them and mix in at the end. If you want more heat, add more red pepper flakes. You can also try cayenne pepper for a kick. Adjust to your taste, and make it as spicy as you like. Making this dish vegan is easy. Just replace butter with olive oil or vegan butter. It keeps the rich flavor without dairy. For a dairy-free option, skip the cheese and use plant-based toppings. If you are following a low-carb plan, skip the nuts. You can add more green beans or other low-carb veggies. This keeps the dish light and healthy without losing flavor. For the full recipe, check out the steps to make these garlic butter green beans. To store leftover garlic butter green beans, place them in an airtight container. Make sure to cool them down first. This helps keep them fresh. Store them in the fridge for up to three days. Always check for any off smells before you eat them. This is key for food safety. If you see any signs of mold, throw them away. Freezing garlic butter green beans is a great way to save them for later. First, let them cool completely. Then, place them in a freezer-safe bag or container. Remove as much air as possible. This prevents freezer burn. You can freeze them for up to three months. To reheat, thaw them in the fridge overnight. Then, heat them in a skillet over low heat until warm. Garlic butter green beans last about three days in the fridge. If you freeze them, they can last up to three months. Always label your containers with the date. This helps you keep track of freshness. Enjoy your delicious green beans while they are still at their best! To make garlic butter green beans, follow these simple steps: 1. Boil a large pot of salted water. 2. Add 1 lb of trimmed green beans and blanch for 3-4 minutes. 3. Drain the beans and place them in ice water to cool. 4. In a skillet, melt 4 tablespoons of unsalted butter over medium heat. 5. Add 4 minced garlic cloves and sauté for 2 minutes. 6. Toss in the green beans and cook for another 3-4 minutes. 7. Stir in 1 teaspoon of lemon zest and 1 tablespoon of lemon juice. 8. Season with salt and pepper to taste, and top with toasted almond slivers. This recipe is quick, easy, and full of flavor. You can find the full recipe above. Yes, you can use frozen green beans! However, fresh green beans have a better texture and flavor. Frozen beans may become mushy if overcooked. If using frozen beans, skip the blanching step. Just sauté them directly in the garlic butter. This saves time but may change the taste slightly. Fresh beans are crispier and have a brighter flavor. Garlic butter green beans pair well with many dishes. Here are some ideas: - Grilled chicken or fish - Roast beef or pork - Quinoa or rice dishes - Mashed potatoes or sweet potatoes These sides enhance the meal and add nutrition. Feel free to mix and match as you like! Garlic butter can be part of a healthy diet. Butter adds flavor but also calories. A tablespoon has about 100 calories. Garlic offers health benefits, like boosting your immune system. Lemon adds vitamin C, which is great for you. Use butter in moderation for a balanced diet. You can also substitute with olive oil for a healthier option. In this post, we explored how to make delicious garlic butter green beans. We covered the ingredients, preparation, and cooking steps. I shared tips for perfect texture and flavor, along with variations for special diets. Remember, you can make this dish your own by changing ingredients or spices. Follow the storage tips to keep leftovers fresh. Garlic butter green beans are easy, flavorful, and a great addition to any meal. Enjoy creating your own version!

Garlic Butter Green Beans Simple and Flavorful Side

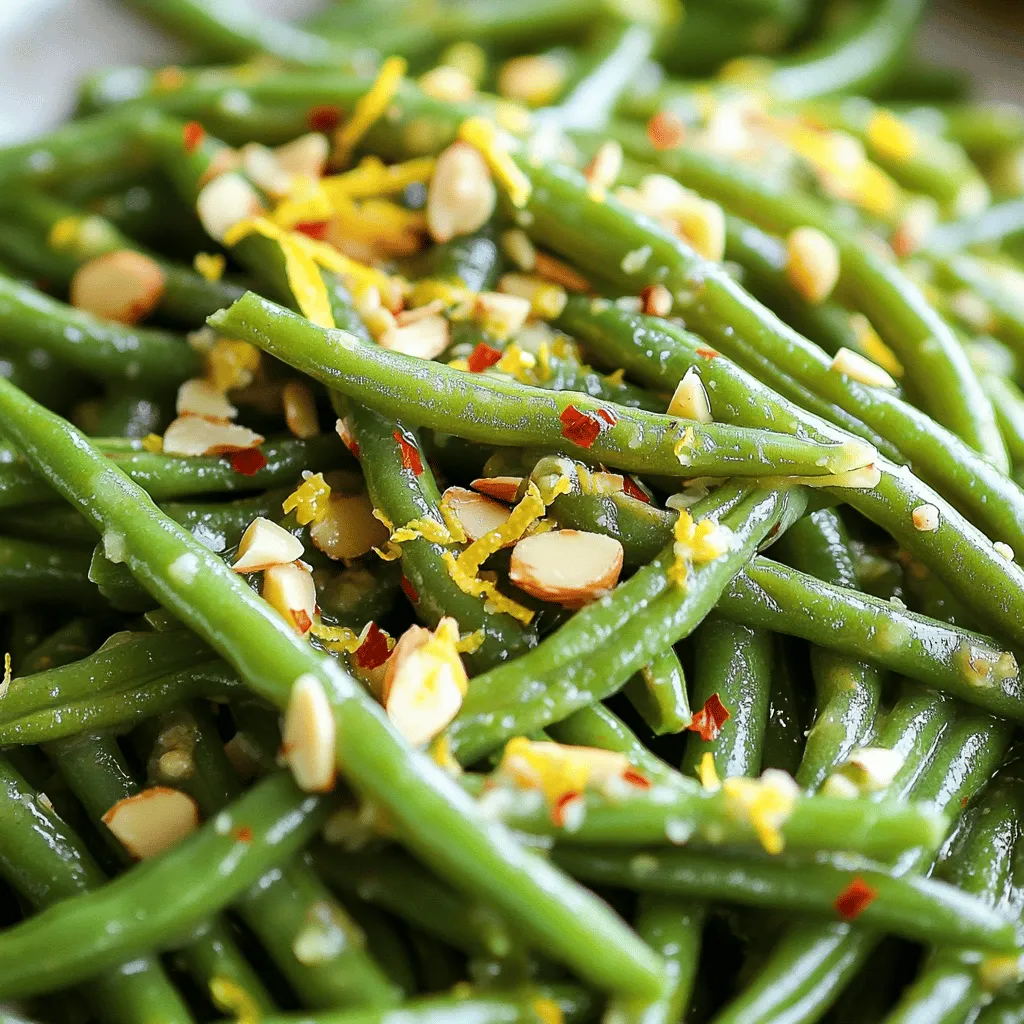
Looking for a side dish that’s simple yet bursting with flavor? Garlic Butter Green Beans are the answer! These fresh

To make these fluffy lemon ricotta pancakes, you need a few key items: - 1 cup ricotta cheese - 1 cup all-purpose flour - 2 large eggs - 1/2 cup milk (or almond milk) - 1/4 cup sugar - Zest of 1 lemon - 2 tablespoons fresh lemon juice - 1 teaspoon baking powder - 1/2 teaspoon baking soda - 1/4 teaspoon salt - Butter or oil for cooking These ingredients work together to create a light and fluffy texture. Ricotta cheese adds moisture and richness. The lemon zest and juice give a fresh, bright flavor. You can enhance your pancakes with a few optional ingredients: - 1 teaspoon vanilla extract - 1/2 teaspoon cinnamon - Fresh berries for topping Adding vanilla or cinnamon can give a warm, inviting taste. Fresh berries bring extra flavor and color. If you need to substitute, here are some great options: - Replace ricotta with cottage cheese for a lower-fat choice. - Use whole wheat flour for a healthier pancake. - Almond milk can be swapped with any plant-based milk. These swaps keep the pancakes tasty while catering to dietary needs. Remember, every change can add a unique twist! For the full recipe, check out the details above. To make the batter, start with a large mixing bowl. Combine the ricotta cheese, eggs, milk, sugar, lemon zest, and lemon juice. Whisk them together until smooth. In another bowl, mix the all-purpose flour, baking powder, baking soda, and salt. Stir them until they are mixed well. Carefully fold the dry ingredients into the ricotta mixture. Be gentle! The batter should stay a bit lumpy. This helps keep the pancakes fluffy. Next, heat a non-stick skillet over medium heat. Add a small amount of butter or oil to coat the surface. Pour 1/4 cup of batter onto the skillet for each pancake. Watch for bubbles to form on the surface, about 2-3 minutes. When you see bubbles, it’s time to flip. Cook for another 2 minutes until golden brown. Repeat this with the rest of the batter, adding more butter or oil as needed. These pancakes are best served warm. Drizzle some maple syrup on top for sweetness. Fresh berries make a great addition, too. You can also dust them with powdered sugar for extra flair. Enjoy your delightful lemon ricotta pancakes! For the full recipe, check the earlier section. To make lemon ricotta pancakes fluffy, use fresh ricotta. The texture adds air. Mix the wet ingredients first, then fold in the dry ones. Go easy on the mixing. A few lumps are okay. This keeps the pancakes light and airy. Heat your skillet on medium. Add just enough butter or oil to coat it. Use a 1/4 cup to measure each pancake. Watch for bubbles on the surface. This shows they are ready to flip. Cook until golden brown on both sides. If you have leftovers, let them cool. Place them in an airtight container. Refrigerate for up to three days. For longer storage, freeze them. Layer with parchment paper to prevent sticking. When ready to eat, reheat in a toaster oven or skillet for best results. For the full recipe, check out the detailed instructions above! {{image_2}} You can change up your lemon ricotta pancakes easily. Try mixing in blueberries for a sweet twist. Chopped strawberries give a fresh taste. For a nutty flavor, add some crushed walnuts or pecans. If you like spice, a pinch of cinnamon brightens the flavor. You could also use orange zest instead of lemon for a new citrus burst. You can make these pancakes gluten-free. Just swap the all-purpose flour for a gluten-free blend. Make sure it has a good binding agent. For a dairy-free option, use almond milk and a dairy-free ricotta. This way, everyone can enjoy this tasty breakfast treat. Toppings can take your pancakes to the next level. Drizzle warm maple syrup on top for that classic flavor. Fresh berries add a burst of color and taste. You can even use yogurt for a creamy touch. For a fun twist, try a sprinkle of toasted coconut or a dollop of whipped cream. Each topping brings its own joy to the meal. Lemon ricotta pancakes stay fresh in the fridge for about three days. Place them in an airtight container. This keeps the pancakes moist and prevents them from drying out. When you want to enjoy them again, simply take out the pancakes you need. You can freeze these pancakes for up to two months. Let them cool completely before you freeze them. Stack the pancakes with parchment paper in between each one. Use a freezer-safe bag or container to store them. This helps keep them from sticking together. To reheat, you have a few options. A microwave works fast but may make them a bit soggy. Instead, use a skillet or toaster oven. Heat on low for a few minutes, flipping them until warm. This method keeps them fluffy and delicious. For the best taste, serve with fresh toppings like syrup or berries. For the full recipe, check out the complete guide on making these delightful pancakes! Lemon ricotta pancakes stand out due to the creamy ricotta cheese. This cheese adds richness and moisture, making the pancakes extra fluffy. The lemon zest and juice bring a bright, fresh flavor that regular pancakes lack. These pancakes offer a unique texture and taste, which makes them a delightful twist on the classic. You will love how light and airy they feel, melting in your mouth. You can easily make lemon ricotta pancakes without eggs. Replace each egg with a mix of 1/4 cup unsweetened applesauce or 1/4 cup mashed banana. Both options add moisture and bind the batter. You can also use flaxseed meal. Mix one tablespoon of flaxseed meal with three tablespoons of water. Let it sit for a few minutes to thicken. This swap will keep the pancakes fluffy and delicious. Yes, you can prepare the batter in advance! Just mix the ingredients and store it in the fridge. Cover the bowl with plastic wrap or transfer it to an airtight container. Use the batter within 24 hours for the best results. When you are ready to cook, give the batter a gentle stir. It may thicken, but that is okay. This makes it easy to enjoy lemon ricotta pancakes any day of the week. For the full recipe, check out the details provided. Lemon ricotta pancakes are a tasty twist on a breakfast favorite. We covered necessary ingredients, some fun options, and substitutions to fit your tastes. The step-by-step guide made it easy to prepare the batter, cook the pancakes, and serve them well. I shared tips to help you make them fluffy and store leftovers properly. Plus, we explored fun variations and answered common questions. Enjoy these pancakes on your next brunch day! You’ll impress everyone with this simple yet delicious recipe.

Lemon Ricotta Pancakes Fluffy Breakfast Delight

Start your morning with a burst of bright flavor! Lemon Ricotta Pancakes are light, fluffy, and a perfect twist on

To make shrimp fried rice, you need a few key items. Here's what to gather: - 1 cup jasmine rice (cooked and cooled) - 200g shrimp (peeled and deveined) - 2 tablespoons soy sauce - 1 tablespoon sesame oil - 1 tablespoon vegetable oil - 2 eggs (beaten) - 1 cup peas and carrots (frozen or fresh) - 1 small onion (finely chopped) - 2 garlic cloves (minced) - 2 green onions (sliced) - Salt and pepper to taste These ingredients create a flavorful dish. The shrimp adds protein, while the rice provides a hearty base. You can use fresh or frozen ingredients for this recipe. Fresh shrimp offers a sweet, tender taste. Frozen shrimp is convenient and often just as good. For peas and carrots, frozen options save time and keep the dish simple. Fresh veggies add crunch and flavor but require more prep. Use what you have on hand to make this dish quick and easy. Seasoning is crucial for great flavor. Soy sauce adds a salty and savory taste. Sesame oil brings a nutty aroma that elevates the dish. I also recommend adding salt and pepper to enhance all the flavors. You can adjust seasonings based on your taste. For a spicy kick, try adding some chili flakes or hot sauce. These small changes can make your shrimp fried rice even more delicious. For a complete recipe, check out the Full Recipe. To start, gather your rice. I prefer jasmine rice for its flavor and texture. If you cook it fresh, let it cool first. The ideal time is overnight in the fridge. This step keeps the rice from getting mushy. Cold rice works best for fried rice. Next, heat the vegetable oil in a large skillet. Use medium-high heat for the best results. Once hot, add the chopped onion and minced garlic. Cook them until fragrant and the onion turns soft. This takes about two minutes. Now, add the shrimp to the skillet. Cook them for about 2-3 minutes until they turn pink. Then, remove the shrimp and set them aside. In the same skillet, push the onion and garlic to one side. Pour the beaten eggs into the other side. Scramble the eggs until fully cooked. Then mix them with the onion and garlic. Next, add the cold rice, breaking up any lumps. Stir it all together well. Now, add in the peas and carrots. Cook everything for 3-4 minutes until the vegetables warm up. Finally, return the shrimp to the skillet. Pour in the soy sauce and sesame oil. Season with salt and pepper to taste. Mix everything well and heat for another 2-3 minutes. Sprinkle sliced green onions on top, then turn off the heat. Let it rest for a minute before serving. Enjoy your shrimp fried rice! For a detailed recipe, check the Full Recipe section. To get the best texture, use cold rice. If you cook rice fresh, let it cool before using. Cold rice helps keep each grain separate. This prevents your fried rice from being mushy. You can refrigerate it overnight for great results. A large skillet or wok works best for shrimp fried rice. A flat surface helps heat evenly. Use a wooden spoon or spatula for stirring. This keeps the rice from sticking. If you have a non-stick pan, that’s even better. It makes cleanup easy and helps with cooking. To enhance flavor, try adding garlic and ginger. They bring a warm taste that blends well. For a pop of color, add bell peppers or snap peas. You can top your dish with fresh herbs like cilantro or basil. A squeeze of lime juice adds a fresh kick. This makes your shrimp fried rice not only tasty but also eye-catching. For the full recipe, check the details above! {{image_2}} You can add many veggies to your shrimp fried rice. This boosts flavor and nutrition. Try bell peppers for crunch. Broccoli adds a nice green touch. Spinach wilts down well and packs vitamins. You can also use corn for sweetness. Just chop the veggies small. Add them when cooking the onions and garlic. This way, they cook evenly and stay vibrant. If you want to switch up proteins, you have options. Chicken works great in fried rice. Just cook it until it's no longer pink. Tofu is another good choice for a plant-based meal. It soaks up flavors well. You can also use beef or even pork. Just make sure to cut them into small pieces. Cook them first, then set aside before adding rice. Making shrimp fried rice gluten-free is simple. Use tamari instead of soy sauce. It tastes similar but has no gluten. For a vegan version, skip the shrimp and eggs. Use extra tofu or mushrooms for protein. You can also add more vegetables to fill the dish. The flavors remain rich and tasty, keeping everyone happy with a great meal. For the full recipe, check out the Shrimp Fried Rice Delight. To keep your shrimp fried rice fresh, place it in an airtight container. Make sure it cools to room temperature first. You can store it in the fridge for up to three days. If you want to keep it longer, consider freezing it. When you are ready to eat your leftover rice, you can reheat it on the stove or in the microwave. For the stove, add a splash of water or oil in a pan. Heat it over medium heat, stirring often until warm. In the microwave, cover the rice with a damp paper towel. Heat in short intervals, stirring in between, until hot. If you want to freeze shrimp fried rice, divide it into portions. Use freezer-safe bags or containers for best results. Be sure to remove as much air as possible. This helps prevent freezer burn. Your rice can last up to three months in the freezer. When ready to eat, thaw it overnight in the fridge before reheating. For more details, check out the Full Recipe. The best way to cook shrimp for fried rice is to sauté them in a hot pan. Start by heating vegetable oil in your skillet. Add minced garlic and chopped onions first. Cook until they smell great. Then, add the shrimp. Cook them until they turn pink and opaque, about 2-3 minutes. This way, they stay juicy and tender. Remember not to overcook them; that makes shrimp rubbery. Yes, using day-old rice is perfect for fried rice. When rice cools, it dries out a bit. This helps the grains stay separate when you cook them again. Fresh rice can be too sticky and clump together. For best results, store your cooked rice in the fridge overnight before using it in your shrimp fried rice recipe. It helps you achieve that perfect texture. Shrimp fried rice is filling and tasty on its own, but you can add sides for more fun! Here are some great ideas: - Spring rolls: Crispy and light, they add a nice crunch. - Steamed dumplings: These are soft and savory for a nice contrast. - Asian slaw: A fresh salad with cabbage and carrots gives a great crunch. - Hot and sour soup: This adds a warm and spicy touch. Feel free to mix and match your favorites! Shrimp fried rice is simple and fun to make. We covered ingredients, from shrimp to seasonings, and shared easy steps for cooking. I shared tips for the best texture and cooking tools. We also explored variations, like adding veggies and proteins. Finally, I provided storage tips for your leftovers. Now you can enjoy a tasty dish anytime. Happy cooking!

Savory Shrimp Fried Rice Quick and Easy Recipe

Are you ready to whip up a dish that’s quick, tasty, and sure to impress? In this post, I’ll show

To make your homemade cinnamon rolls soft and buttery, you need a few simple ingredients. Here’s what you will need: - 4 cups all-purpose flour - 1 packet (2 1/4 teaspoons) instant yeast - 1/2 cup granulated sugar - 1 teaspoon salt - 1 cup warm milk (110°F) - 1/3 cup unsalted butter, melted - 2 large eggs - 1 tablespoon vanilla extract - 1 tablespoon ground cinnamon - 1/2 cup brown sugar, packed - 1/4 cup unsalted butter, softened (for filling) - Cream cheese icing (for drizzling) These ingredients work together to create a fluffy, sweet treat. The flour gives structure, while the instant yeast helps the dough rise. Warm milk and melted butter make the rolls tender and rich. The eggs add moisture and richness, and the sugar sweetens the dough. Ground cinnamon and brown sugar provide the warm, cozy flavor we all love. When gathering your ingredients, make sure they are fresh. This step helps ensure that your cinnamon rolls turn out perfect every time. For the best results, use real butter and high-quality vanilla extract. These small choices will make a big difference in taste. If you want to try the Full Recipe, just follow the steps on how to mix and bake these delightful rolls. Each bite will be soft, buttery, and filled with sweet cinnamon goodness. To start, gather your ingredients. In a large bowl, combine warm milk, melted butter, and sugar. Mix them well. Next, sprinkle the instant yeast over the top. Let it sit for about 5 minutes until it gets foamy. This shows the yeast is alive. Now, add the eggs, vanilla extract, and salt. Mix these in until combined. Gradually add flour, one cup at a time, until you form a soft dough. Now, it’s time to knead. Dust your counter with flour and place the dough on it. Knead the dough for about 5 to 7 minutes. You want it smooth and elastic. Once done, place it in a greased bowl. Cover it with a clean cloth. Let it rise in a warm spot until it doubles in size. This usually takes about an hour. Once the dough has risen, punch it down gently. Roll the dough into a rectangle, about 1/4 inch thick. Spread the softened butter evenly across the surface. In a small bowl, mix brown sugar and ground cinnamon. Sprinkle this mixture over the buttered dough. Starting from one edge, roll the dough tightly into a log. Pinch the seam to seal it. Cut the rolled dough into 12 equal pieces. Place the rolls in a greased baking dish. Cover them again and let them rise for about 30 minutes. In the meantime, preheat your oven to 350°F (175°C). Bake the rolls for 20 to 25 minutes, or until they turn golden brown. While they bake, prepare the cream cheese icing. Mix softened cream cheese with powdered sugar and milk until smooth. Adjust to your taste. Once the rolls are done, let them cool for a few minutes. Drizzle the icing over the warm rolls for a sweet finish. For the full recipe, feel free to check out the details provided earlier. - Ensure milk is at the right temperature: Use warm milk at about 110°F. This helps activate the yeast. If the milk is too hot, it can kill the yeast. If it’s too cold, the dough won’t rise well. - Knead thoroughly for the best texture: Knead your dough for about 5 to 7 minutes. This makes the dough smooth and stretchy. A well-kneaded dough traps air, which helps it rise nicely. - How to achieve golden brown rolls: Bake your rolls at 350°F (175°C). Keep an eye on them around 20 minutes. A golden brown top means they are done. If they brown too fast, cover them with foil. - Best served warm with icing: Serve your cinnamon rolls fresh from the oven. Drizzle them with cream cheese icing while they are warm. This makes the icing melt into the rolls, creating a delicious treat. - Optional garnishes for presentation: For a beautiful look, sprinkle a little cinnamon on top. You can also add whole cinnamon sticks around the plate for a nice touch. This makes the rolls look as good as they taste! {{image_2}} For those who follow a vegan diet, you can make simple swaps. Use plant-based milk, like almond or oat milk, instead of regular milk. Replace the eggs with flaxseed meal or applesauce. For the butter, a vegan butter works just as well. These changes keep the cinnamon rolls soft and tasty. If you're gluten-free, there are options too. Use a gluten-free all-purpose flour blend. Make sure it includes a binding agent like xanthan gum. This helps the rolls hold together and rise properly. With these swaps, you can enjoy delicious cinnamon rolls without worry. Adding nuts or dried fruits can take these rolls to a new level. Chopped walnuts or pecans add crunch and richness. Dried cranberries or raisins bring a sweet and tangy flavor. Just sprinkle them over the filling before rolling up the dough. You can also play with the icing. Instead of cream cheese icing, try a simple sugar glaze. Mix powdered sugar with milk and vanilla extract. For something different, melt dark chocolate or white chocolate for drizzling. Each variation adds a unique twist to your cinnamon rolls. Explore these options to find your favorite. The full recipe is a great base for all your creative ideas! To keep your homemade cinnamon rolls fresh, store them at room temperature. Place the rolls in an airtight container. This helps keep them soft. If you don't have a container, wrap them tightly in plastic wrap. Make sure to avoid leaving them uncovered. They can last at room temperature for up to three days. If you want to refrigerate your rolls, first let them cool completely. Then, place them in a container with a lid. They can stay fresh in the fridge for about a week. Just remember, refrigeration may make them a bit firmer. To reheat your cinnamon rolls, use the microwave. Heat them for about 15 to 20 seconds. This warms them up nicely. If you prefer, you can also use the oven. Preheat it to 350°F (175°C) and bake for about 5-10 minutes. This helps restore their soft texture. For freezing, wrap each roll in plastic wrap. Then, place them in a freezer bag or container. They can last for up to three months in the freezer. When you want to enjoy them, thaw them overnight in the fridge. After that, reheat them as mentioned before. This way, they taste almost as fresh as the day you made them. How long do homemade cinnamon rolls last? Homemade cinnamon rolls stay fresh for about 2 to 3 days at room temperature. Store them in an airtight container. If you want them to last longer, put them in the fridge for up to a week. You can also freeze them for about 2 months. Just wrap them well to prevent freezer burn. Can you make the dough ahead of time? Yes, you can make the dough ahead of time! Prepare the dough and let it rise. Once it doubles, punch it down and shape your rolls. Instead of rising again, cover them tightly and place them in the fridge overnight. When ready, let them sit at room temp for 30 minutes before baking. What can I substitute for cream cheese in the icing? If you want to swap out cream cheese, use mascarpone cheese or ricotta cheese. Both options give a rich taste. You can also mix powdered sugar and milk for a simple glaze. Just adjust the sugar for sweetness. What to do if the dough doesn’t rise? If your dough doesn’t rise, check the yeast. It needs to be fresh and activated properly. Make sure your wet ingredients are warm, not hot. If the dough is too cold, it won’t rise well. Place it in a warm spot, like near an oven. Why are my cinnamon rolls dense? Dense cinnamon rolls often come from using too much flour or not kneading enough. Make sure to measure flour correctly. Too little yeast can also cause density. Always check that your yeast is alive before using it. How can I make my icing smoother? To make smoother icing, mix it well and add a splash of milk. If it’s too thick, add more milk, a little at a time. Use a whisk or electric mixer for a creamy texture. Making cinnamon rolls from scratch is rewarding. You learned the essential ingredients, clear steps, and useful tips. Remember to knead well and let your dough rise properly. Explore variations for dietary needs or flavors. Store rolls correctly to keep them fresh. These rolls can impress anyone at your next gathering. Enjoy the process and delight in the warm, sweet results!

Homemade Cinnamon Rolls Soft and Buttery Delight

There’s nothing quite like the smell of warm, homemade cinnamon rolls filling your kitchen. Imagine sinking your teeth into a

To make these tasty sweet potato black bean tacos, gather these ingredients: - 2 medium sweet potatoes, peeled and diced - 1 can (15 oz) black beans, rinsed and drained - 1 tablespoon olive oil - 1 teaspoon cumin - 1 teaspoon smoked paprika - 1/2 teaspoon chili powder - Salt and pepper to taste - 8 small corn tortillas - 1 avocado, sliced - 1/4 cup fresh cilantro, chopped - 1 lime, cut into wedges - Optional: Hot sauce for drizzling These tacos are not only delicious but also nutritious. Each serving contains: - Calories: 350 - Protein: 12g - Carbohydrates: 60g - Dietary Fiber: 15g - Fat: 10g This mix of ingredients provides a balanced meal. The sweet potatoes offer vitamins, while the black beans add protein and fiber. These tacos fit many diets. They are: - Vegetarian - Vegan - Gluten-free (if using corn tortillas) - Dairy-free If you have allergies, double-check each ingredient. You can also swap out items to meet your needs. For example, use quinoa instead of black beans for a different twist. This way, you can enjoy the flavors and stay true to your diet. For the full recipe, check out the details above. Start by gathering your ingredients. You need sweet potatoes, black beans, and spices. First, peel and dice two medium sweet potatoes. Place them in a large bowl. Add one tablespoon of olive oil. Then, sprinkle in one teaspoon of cumin, one teaspoon of smoked paprika, and half a teaspoon of chili powder. Season with salt and pepper to your taste. Mix everything well until the sweet potatoes are fully coated. Preheat your oven to 400°F (200°C). Spread the seasoned sweet potatoes on a baking sheet lined with parchment paper. Roast them in the oven for 20 to 25 minutes. Stir them halfway through for even cooking. While the sweet potatoes roast, heat one can of black beans in a small saucepan over medium heat. Let them warm through. Add a pinch of salt and pepper for extra flavor. Once the sweet potatoes are tender and slightly crispy, take them out of the oven. Allow them to cool for a short time. Now, it's time to assemble your tacos. Warm eight small corn tortillas in a dry skillet for about 30 seconds on each side. This makes them soft and easy to fold. Spoon a generous amount of roasted sweet potatoes onto each tortilla. Next, add the warm black beans on top. Slice an avocado and place a few slices on each taco. Finish with a sprinkle of fresh cilantro. Serve your tacos with lime wedges on the side. If you like heat, drizzle some hot sauce over them. Enjoy your savory sweet potato black bean tacos! For more detailed cooking instructions, check the Full Recipe. Roasting sweet potatoes brings out their natural sweetness. Start by peeling and dicing them into small, even pieces. This helps them cook evenly. When you toss them with olive oil and spices, make sure every piece is coated well. Lay them flat on a baking sheet. This allows for better roasting and helps them get crispy. To boost the flavor of your tacos, try adding toppings. Fresh avocado adds creaminess. Chopped cilantro gives a bright kick. You can also squeeze fresh lime juice over the tacos for a zesty touch. If you like heat, drizzle hot sauce on top for an extra kick. These flavors work well with the sweet potatoes and black beans. Serve the tacos warm for the best taste. You can place each taco on a plate with lime wedges. This way, everyone can add lime juice as they like. You might also serve them with a side of simple rice or a fresh salad. This balances the meal and adds more color to your plate. For the full recipe, check out the Sweet Potato Black Bean Tacos section. {{image_2}} You can change the sweet potatoes. Try butternut squash or pumpkin instead. Both add great flavor. If you want a protein boost, use quinoa or lentils. They mix well with black beans. For a spicy twist, add jalapeños or chipotle peppers. They bring heat and depth to your tacos. Toppings can change your taco game. Use fresh toppings like diced tomatoes or shredded lettuce. These add crunch and freshness. Try different cheeses, like feta or queso fresco. They melt nicely and add creaminess. You can also add a dollop of Greek yogurt instead of sour cream. It gives a tangy twist. You can roast, grill, or sauté the sweet potatoes. Roasting gives them a nice caramelized flavor. Grilling adds a smoky taste. Just cut them into larger pieces for easy grilling. If you’re in a hurry, sauté them in a pan. This method cooks them faster but may not be as sweet. Each method will change the taco taste, so feel free to experiment! For the full recipe, check out the Sweet Potato Black Bean Tacos. To keep your tacos fresh, place leftovers in an airtight container. Make sure the sweet potatoes and black beans are cooled down first. This helps keep the tortillas from getting soggy. Store them in the fridge for up to three days. When you're ready to eat, take out the leftovers. Heat the sweet potatoes and beans in a skillet over medium heat. Stir them until they are warm. For the tortillas, warm them in a dry skillet for 30 seconds on each side. This makes them soft and tasty again. If you want to save tacos for later, freezing works well. Wrap each taco in foil or parchment paper. Place them in a freezer-safe bag. They can last up to three months in the freezer. When you are ready to eat, thaw them overnight in the fridge. Reheat them as stated above for the best taste. For the full recipe, you can refer back anytime. You can use butternut squash or pumpkin. Both have a sweet taste and soft texture. They roast well and blend nicely with black beans. You can also try regular potatoes, but they will taste different. Yes, you can easily make these tacos gluten-free. Just use corn tortillas, which are naturally gluten-free. Check the label to ensure they are certified gluten-free. This way, everyone can enjoy the tacos. You can prepare the sweet potatoes and black beans in advance. Roast the sweet potatoes and store them in the fridge. You can also warm the black beans and keep them ready. Assemble the tacos just before serving for the best taste. These tacos go well with a simple salad or Mexican rice. You can add corn on the side for sweetness. Guacamole or salsa also makes a great dip. Fresh fruit like mango or pineapple adds a nice touch, too. This article covered everything you need for tasty sweet potato tacos. We explored the key ingredients, how to prepare and cook them, and ways to assemble your tacos. You learned tips for roasting sweet potatoes and flavor pairings. We also looked at variations and how to store leftovers. Sweet potato tacos are fun and flexible. You can try new twists and flavors. Enjoy your cooking adventure and discover your favorite combinations.

Savory Sweet Potato Black Bean Tacos Recipe

If you’re craving a tasty, healthy meal, look no further! My Savory Sweet Potato Black Bean Tacos are packed with

Older posts
Newer posts
← Previous Page1 … Page82 Page83 Page84 Next →

dsad

© 2026 easycookingbite • Built with GeneratePress

Our Policies

  • Copyright Policy
  • Cookie Policy
  • GDPR Policy
  • Privacy Policy
  • Disclaimer
  • Terms Of Use

More Information

  • Home
  • About
  • Contact
  • Appetizers
  • Dessert
  • Dinner
  • Drinks
©2026, easycookingbite About Back To Top