Skip to content
DisclaimerTerms Of UseGDPR PolicyCookie Policy

easycookingbite

  • Home
  • Drinks
  • Appetizers
  • Dinner
  • Dessert
  • About
  • Contact
  • Privacy Policy
DisclaimerTerms Of UseGDPR PolicyCookie Policy

NO-ING-IMG

For a tasty Chicken Tikka Masala, you need these key items: - 500g boneless chicken thighs, cut into bite-sized pieces - 1 cup plain yogurt - 2 tablespoons lemon juice - 2 tablespoons garam masala - 1 tablespoon ground cumin - 1 tablespoon ground coriander - 1 teaspoon turmeric powder - 1 teaspoon red chili powder - 4 cloves garlic, minced - 1 inch ginger, grated - 2 tablespoons vegetable oil - 1 large onion, finely chopped - 1 can (400g) crushed tomatoes - 1 cup heavy cream - Salt to taste - Fresh cilantro, for garnish If you don’t have some ingredients, here are swaps you can try: - Use chicken breast for a leaner option. - Substitute Greek yogurt for plain yogurt if you like a thicker sauce. - Lime juice works if you don’t have lemon juice. - For heat, try cayenne pepper instead of red chili powder. - Coconut cream can replace heavy cream for a dairy-free version. Chicken Tikka Masala is flavorful but also rich. Here’s a quick look at the nutrition: - Calories: About 450 per serving - Protein: 25g - Fat: 30g - Carbohydrates: 15g - Fiber: 2g This dish is hearty but can fit into a balanced diet, especially when paired with rice or naan. For the complete cooking guide, check the Full Recipe. First, you need to make the marinade. In a large bowl, mix together the yogurt, lemon juice, garam masala, ground cumin, ground coriander, turmeric powder, red chili powder, minced garlic, and grated ginger. This mix will give the chicken great flavor. Next, add the chicken pieces to the bowl. Make sure every piece gets coated in the marinade. Cover the bowl and let it sit in the fridge. You should let it marinate for at least one hour. For the best taste, let it sit overnight. When you're ready to cook, heat vegetable oil in a large skillet over medium heat. Add the finely chopped onion and sauté it until it turns golden brown. This should take about five to seven minutes. Now, add the marinated chicken to the skillet. Don't forget to include all the marinade too. Cook the chicken for about ten to twelve minutes. Stir occasionally to make sure it cooks evenly. After the chicken is done, pour in the crushed tomatoes. Stir well to combine everything. Let this mixture simmer for another ten minutes. Finally, lower the heat and stir in the heavy cream. This makes the dish rich and creamy. Cook for another five minutes and add salt to taste. Once your Chicken Tikka Masala is ready, it's time to serve. Garnish it with fresh cilantro for a pop of color. You can serve this dish in a large bowl. For a complete meal, pair it with fragrant basmati rice or warm naan. This adds a nice touch and balances the flavors. You can find the full recipe above to guide you through each step. Enjoy your cooking! For great Chicken Tikka Masala, start with the marinade. Use plain yogurt to keep the chicken moist. Add lemon juice for zest and a bit of tang. The spices are key. Garam masala, cumin, and coriander give the dish depth. Use turmeric for color and red chili for heat. Don't forget garlic and ginger; they add flavor. Mix everything well, then coat the chicken pieces. Cover the bowl and let it sit in the fridge for at least an hour. For the best taste, let it marinate overnight. When cooking chicken, heat is crucial. Start by heating oil in a large skillet. Make sure it’s hot enough before adding the chicken. This helps create a nice sear. Cook the chicken for about 10-12 minutes. Stir it occasionally to cook evenly. You want it fully cooked, but still tender. Don't rush this step. Once the chicken is done, add the crushed tomatoes. This keeps the chicken juicy and flavorful. To bring out the best flavor in your Chicken Tikka Masala, focus on the simmer. After adding the tomatoes, let everything cook together for about 10 minutes. This allows the spices to meld. Then, add heavy cream for richness. It balances the spices and makes the sauce smooth. Season with salt to taste. For a fresh touch, garnish with cilantro. This adds color and a burst of flavor. Serve with basmati rice or naan to soak up the sauce. For the full recipe, check the provided details. {{image_2}} If you want a vegetarian or vegan dish, try using tofu or paneer. Both work well with the same marinade. For a vegan option, use coconut yogurt instead of regular yogurt. It gives a nice creaminess without dairy. You can also add more veggies like bell peppers and zucchini to your dish. They add color and taste. Want a milder dish? Reduce the red chili powder in the recipe. You can also remove the chili altogether if you prefer no heat. If you like it spicy, add extra chili powder or fresh green chilies. Just remember, you can always add more spice, but it’s hard to take it out once it’s in! Try different sauces to change the flavor. For example, you can swap crushed tomatoes for tomato puree for a smoother sauce. Another option is to add a splash of coconut milk for a tropical twist. You can also mix in spinach or peas for extra nutrition and color. These small changes can make your Chicken Tikka Masala feel new and exciting! For the full recipe, check the details provided. To keep your Chicken Tikka Masala fresh, store it in an airtight container. Make sure it cools down first. Place it in the fridge for up to three days. Label the container with the date. This way, you know when to eat it. If you want to save it longer, freezing is a great option. First, let the dish cool completely. Then, transfer it to a freezer-safe container. You can also use freezer bags. Squeeze out the air to avoid freezer burn. This dish will last for about three months in the freezer. Reheating Chicken Tikka Masala is easy. You can use the microwave or stove. If using the microwave, heat in short bursts. Stir in between to heat evenly. If reheating on the stove, add a splash of water or cream. This keeps it moist. Warm it over low heat until hot. Enjoy your flavorful meal again! For the complete recipe, check out the Full Recipe. Chicken Tikka Masala has roots in Indian and British kitchens. Some say it started in India. Others believe it began in the UK. The dish combines marinated chicken and a rich tomato sauce. It became popular in the 1960s. The blend of spices and creamy sauce makes it unique. People around the world now love this dish. It shows how food can bring cultures together. Yes, you can use chicken breast. Chicken breast is leaner than thighs. It cooks quickly and stays juicy. If you use chicken breast, cut it into smaller pieces. Marinate it like you would with thighs. Just be careful not to overcook it. This way, you keep the chicken tender and flavorful. To make Chicken Tikka Masala gluten-free, focus on the ingredients. Use gluten-free yogurt and check your spices. Most spices are naturally gluten-free. Also, ensure your canned tomatoes do not have additives. Serve it with gluten-free rice or quinoa. You can enjoy this dish without worry! For the full recipe, check out the section above. In this post, we explored the key ingredients and steps to make Chicken Tikka Masala. We discussed marinade prep, cooking tips, and serving ideas. You learned about substitutions, storage, and how to tweak flavors for your taste. Finally, we answered common questions about this dish's origins and variations. Enjoy making this flavorful meal that can satisfy everyone, whether they’re meat lovers or vegetarians. Experiment and find your favorite version. Happy cooking!

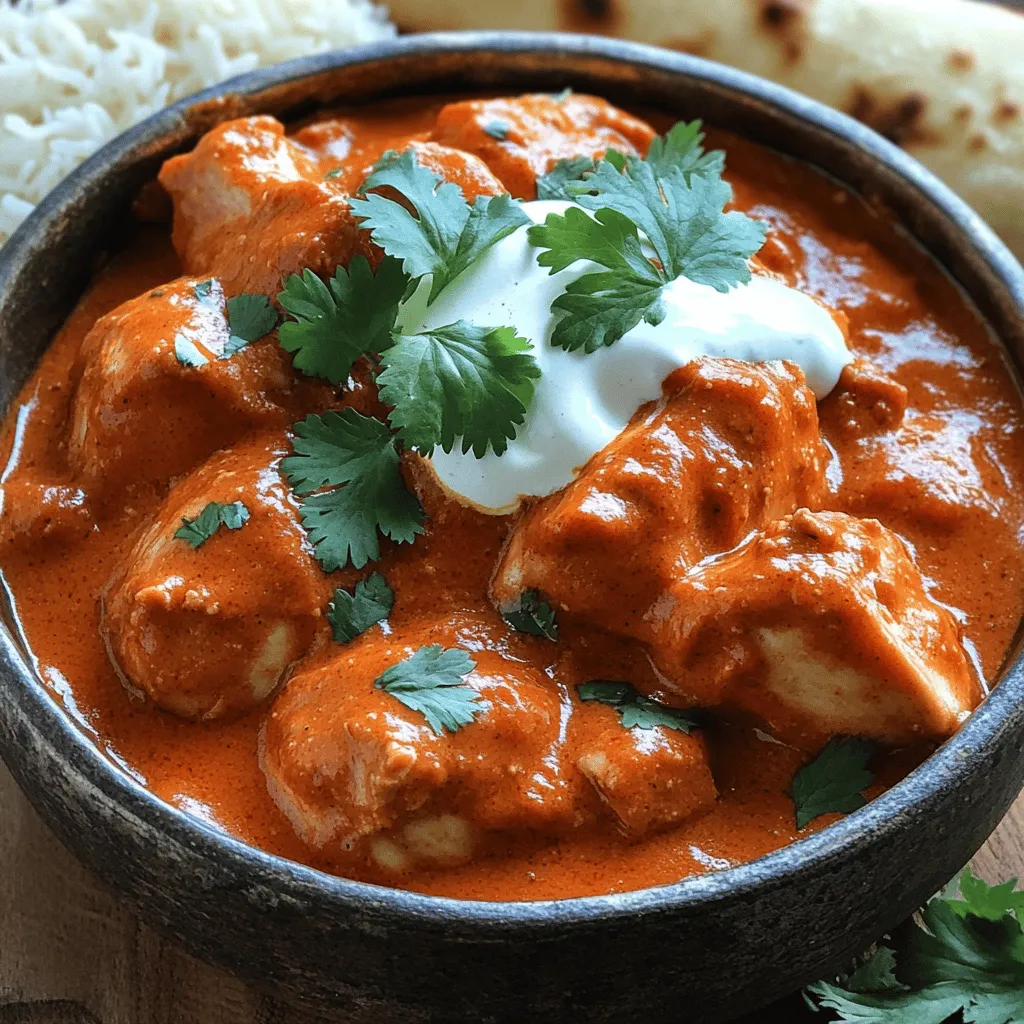
Chicken Tikka Masala Flavorful and Easy Recipe

Are you ready to bring the rich flavors of Chicken Tikka Masala into your kitchen? This vibrant dish is not

Here’s what you need to make creamy pesto pasta: - 8 oz (225 g) pasta (fettuccine or penne) - 1 cup basil pesto (store-bought or homemade) - 1 cup heavy cream - 1 cup cherry tomatoes, halved - ½ cup grated Parmesan cheese - 2 tablespoons olive oil - Salt and pepper to taste - Fresh basil leaves for garnish When measuring ingredients, use dry measuring cups for solids. For liquids, use a liquid measuring cup. Level off dry ingredients with a knife for accuracy. If a recipe calls for "1 cup," it means you fill the cup to the top, then level it off. This simple step ensures your dish turns out great every time. You can swap some ingredients if needed: - For pasta, use any shape you like, such as spaghetti or rotini. - Instead of heavy cream, you can try half-and-half or coconut milk for a lighter option. - If you don’t have cherry tomatoes, diced regular tomatoes work too. - For a dairy-free version, use nutritional yeast in place of Parmesan. These easy swaps let you customize the dish to your taste, making it even more enjoyable. For the full recipe, check out the detailed instructions linked above. First, grab a large pot and fill it with water. Add a good pinch of salt. Bring the water to a boil. Once boiling, toss in 8 oz of pasta. You can use fettuccine or penne. Cook it according to the package instructions. Aim for al dente texture. This means the pasta should be firm but not hard. After cooking, drain the pasta in a colander. Save about ½ cup of the pasta water for later. Next, take a large skillet and heat 2 tablespoons of olive oil over medium heat. Add in 1 cup of halved cherry tomatoes. Sauté them for about 3-4 minutes. You want them to blister and soften a bit. Now, lower the heat to medium-low. Pour in 1 cup of heavy cream. Then add 1 cup of basil pesto. Stir well until the mixture is combined. Heat it through but do not let it boil. After your sauce is ready, add in ½ cup of grated Parmesan cheese. Stir until it melts and the sauce is smooth. If the sauce feels too thick, mix in some reserved pasta water. Add the cooked pasta to the skillet. Gently toss it in the creamy pesto sauce. Make sure the pasta is evenly coated. Season with salt and pepper to taste. Now, your creamy pesto pasta is ready to serve! To make great pasta, start with a large pot. Use plenty of water and add salt. This helps flavor the pasta. Bring the water to a boil before adding the pasta. Stir occasionally to prevent sticking. Cook until al dente, which means firm to the bite. Remember to save some pasta water. It helps when mixing with the sauce. Using fresh basil makes a big difference. If you can, try making your own pesto. Blend fresh basil, garlic, pine nuts, Parmesan, and olive oil for a vibrant taste. When you mix the pesto with cream, do it slowly. This ensures a smooth blend. For an extra kick, add a pinch of red pepper flakes. It gives the dish a nice warmth. When serving creamy pesto pasta, presentation matters. Use a large bowl or individual plates. Top with fresh basil leaves for color. A sprinkle of extra Parmesan brings a nice touch. For a fun twist, add halved cherry tomatoes on top. They add sweetness and brightness to each bite. Enjoy your meal with a side of garlic bread or a fresh salad. {{image_2}} You can easily add protein to your creamy pesto pasta. Chicken and shrimp are great choices. For chicken, use grilled or sautéed pieces. Cook them until golden brown, then mix them in with the pasta. Shrimp cooks quickly and adds a nice touch. Sauté shrimp until they turn pink, then add them to the dish. You can also try cooked sausage or even tofu for a meat-free option. These protein additions make the meal hearty and satisfying. Adding vegetables boosts nutrition and flavor. Spinach is a perfect choice; it wilts nicely in the sauce. Broccoli florets also work well. Steam them slightly before adding to the pasta. For a burst of color, consider bell peppers, zucchini, or even peas. These veggies not only taste great but also give your dish more texture. You can mix in roasted veggies for a smoky flavor too. This way, you create a vibrant meal that is both tasty and healthy. You can adapt this creamy pesto pasta for different diets. For a vegan version, use plant-based cream and nutritional yeast instead of Parmesan. This keeps the creamy texture while removing dairy. For gluten-free pasta, choose options like rice or quinoa pasta. They cook similarly and work well with the sauce. Always check labels to ensure your ingredients fit your dietary needs. With these simple swaps, you can enjoy creamy pesto pasta without missing out on flavor. For the full recipe, check out the details above! To store your creamy pesto pasta, let it cool first. Place it in an airtight container. Make sure to seal it well to keep out air. You can store it in the fridge for up to 3 days. If you want to keep it longer, freezing is a great option. When you are ready to eat, reheating is easy. You can use the microwave or the stovetop. If using the microwave, place the pasta in a bowl. Add a splash of water to keep it moist. Heat in short bursts, stirring in between. If using the stovetop, add the pasta to a pan. Use low heat and stir often. Add a bit of cream or water if the sauce is too thick. Freezing creamy pesto pasta is simple. First, let it cool completely. Then, place it in a freezer-safe container. You can also use freezer bags. Remove as much air as possible before sealing. This helps prevent freezer burn. It can last in the freezer for about 2 months. To enjoy, thaw it overnight in the fridge before reheating. For quick meals, this makes creamy pesto pasta a go-to choice! Check out the Full Recipe for all the details. Yes, you can use store-bought pesto. It saves time and tastes great. Many brands offer quality pesto. Look for one with fresh ingredients like basil, olive oil, and nuts. If you want a richer flavor, try adding some extra cheese or nuts to the dish. Fettuccine and penne work best with creamy pesto. Fettuccine's flat shape holds the sauce well. Penne's tubes catch the sauce inside. Other options include rotini or spaghetti. Choose your favorite shape for a fun twist. To lighten the dish, use half-and-half instead of heavy cream. You can also add more veggies like spinach or zucchini. Reducing the cheese amount helps too. You still get great flavor without all the calories. For a fresh taste, add a squeeze of lemon juice. This post covered how to make creamy pesto pasta. We discussed key ingredients and measurements. I shared tips for perfect cooking and flavor. You learned about protein and vegetable options for variety. We covered storage methods and warm-up tips for leftovers. To sum it up, creamy pesto pasta is easy and fun. You can tweak it to fit your taste and needs. Enjoy cooking and experimenting with this delicious dish!

Creamy Pesto Pasta Simple and Savory Meal

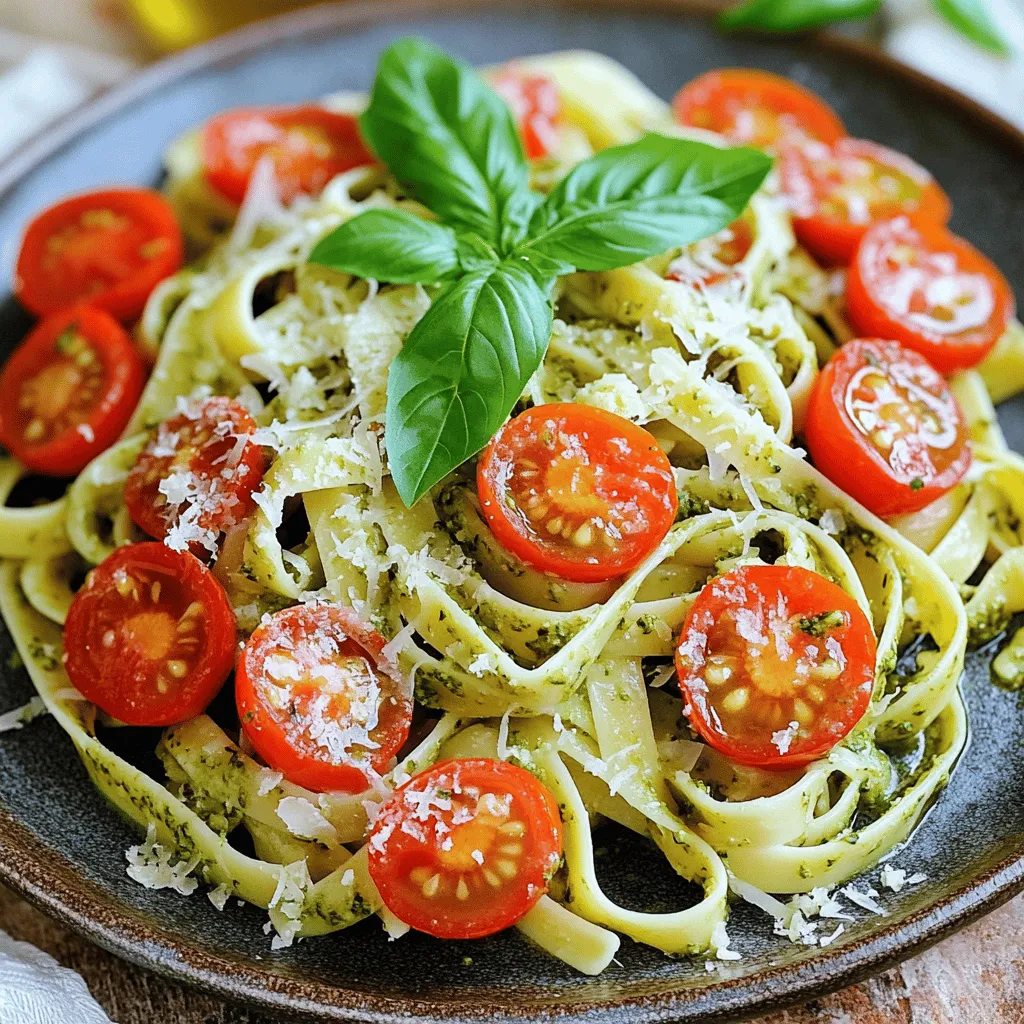
Looking to whip up a quick, delicious meal? I’ve got the perfect recipe for you: Creamy Pesto Pasta! This dish

- 4 salmon fillets (6 oz each) - 4 tablespoons unsalted butter, softened - 4 cloves garlic, minced - 2 tablespoons fresh parsley, chopped - 1 tablespoon fresh dill, chopped - 1 tablespoon lemon juice - Salt and pepper to taste - Lemon slices for garnish - Additional fresh herbs for serving When I make Garlic Herb Butter Salmon, I love using fresh ingredients. The salmon fillets are the star here. They’re rich, flaky, and full of flavor. The butter adds creaminess, while garlic brings a punch. I always choose unsalted butter. This way, I can control the salt. Fresh garlic is a must. It gives a nice kick. I chop fresh parsley and dill for a bright touch. These herbs make the dish fresh and vibrant. Lemon juice adds a zesty twist. It enhances the flavors of the salmon and herbs. I also use salt and pepper to bring balance. These simple ingredients work together beautifully. For optional garnishes, I like to add lemon slices. They look pretty and add more flavor. Fresh herbs on top make the dish pop. This meal is not just tasty; it looks great too! You can find the full recipe for Garlic Herb Butter Salmon [Full Recipe]. - Preheat your oven to 400°F (200°C). - Line a baking sheet with parchment paper. Start by getting your oven nice and hot. This helps the salmon cook evenly. Next, grab a baking sheet and line it with parchment paper. This keeps the salmon from sticking and makes cleanup easy. - Combine butter, garlic, parsley, dill, lemon juice, salt, and pepper. Now, let’s make that tasty garlic herb butter. In a small bowl, mix together softened butter, minced garlic, chopped parsley, chopped dill, lemon juice, salt, and pepper. Stir it well until it’s all blended. This butter adds rich flavor to the salmon. - Arrange salmon on the baking sheet. - Spread garlic herb butter over the salmon. - Bake and check for doneness (145°F internal temperature). Place the salmon fillets skin-side down on the lined baking sheet. Then, use a spoon or spatula to spread the garlic herb butter over each fillet. Make sure to cover them well. Bake the salmon in your preheated oven for 12-15 minutes. You can check if it’s done by ensuring it reaches an internal temperature of 145°F. The salmon should flake easily when it’s fully cooked. Enjoy your meal! For the full recipe, don’t forget to check out the complete details. To cook salmon just right, pay attention to thickness. Thicker fillets take longer to cook. For fillets around 1 inch thick, bake for 12 to 15 minutes. Check for doneness by gently flaking the fish with a fork. When the salmon flakes easily and is opaque, it’s ready. The internal temperature should be 145°F (63°C). To enhance flavor, try using different herbs. Basil, thyme, or tarragon can add new tastes. Adding spices like paprika or cayenne gives it a kick. A squeeze of fresh lemon juice brightens the dish. You can also zest the lemon for more zest! For plating, use a large white plate to show off your salmon. Arrange the fillet at an angle for style. Add lemon slices beside the salmon and sprinkle fresh herbs on top. This makes the dish pop with color! A touch of olive oil can add shine for a beautiful finish. For the complete recipe, check the Full Recipe link. {{image_2}} You can make garlic herb butter salmon in many ways. Grilling is a fun option. It gives the salmon a smoky taste. To grill, preheat your grill to medium-high heat. Place the salmon skin-side down on the grill. Cook for about 5-7 minutes per side. You want that nice char and juicy inside. Another method is pan-searing. This method creates a crispy skin. Heat a skillet over medium heat with a bit of oil. Place the salmon skin-side down. Sear for 4-5 minutes, then flip it. Cook for another 4-5 minutes until the salmon is done. You can change the taste of your garlic herb butter salmon easily. Try using different herbs like thyme or tarragon. These herbs give a fresh twist. You can also add a pinch of red pepper flakes for some heat. This makes the dish more exciting. Flavored butter is another fun idea. You can find garlic herb butter with lemon or even truffle. These butters add unique flavors to the salmon. Just spread it on before cooking to enjoy a new taste. Now, let’s think about what to serve with your salmon. Fresh veggies like asparagus or green beans pair nicely. They add color and crunch. You can also serve it with rice or quinoa. These grains soak up the tasty butter sauce. For salads, consider a simple green salad with a light vinaigrette. The freshness of the salad balances the rich salmon. Another option is a citrus salad with oranges and avocados. This adds a bright flavor that complements the dish well. You can find the full recipe [here](#). To keep your garlic herb butter salmon fresh, store it in an airtight container. Place it in the fridge right after it cools. This helps prevent bacteria growth. Properly stored, your salmon lasts up to three days. Always check for any off smells or changes in texture before eating. When reheating salmon, keep it moist. The best way is to use the oven. Preheat your oven to 275°F (135°C). Place the salmon on a baking sheet and cover it with foil. Heat for about 10-15 minutes. You can also use the microwave, but it may dry out the fish. If you choose the microwave, use a lower power setting. Heat for short bursts, about 30 seconds at a time. This helps to keep it tender. You can freeze leftover salmon to enjoy later. First, let it cool completely. Wrap each piece tightly in plastic wrap. Then, place them in a freezer-safe bag. When you are ready to eat it, thaw the salmon in the fridge overnight. Avoid thawing it at room temperature to keep it safe. To maintain flavor and texture, reheat it gently after thawing, using methods mentioned above. This way, your salmon will still taste great! Cooking salmon at 400°F takes about 12 to 15 minutes. This time works best if your fillets are about 6 ounces each. The key is to check that the salmon flakes easily with a fork. This ensures it’s done but not overcooked. The internal temperature of salmon should be 145°F. Checking this temperature keeps your meal safe to eat. You can use a meat thermometer to get an accurate reading. This step is crucial for both taste and safety. Yes, you can use frozen salmon. Just make sure to thaw it first for even cooking. If you cook from frozen, add a few extra minutes to your cook time. This helps to ensure the salmon cooks fully and stays moist. Salmon is a great choice for protein. It is rich in omega-3 fatty acids, which are good for your heart. Salmon also contains vitamin D and B vitamins, which support your immune system. Eating salmon can help with brain health, too. You can make garlic herb butter in advance. Mix the butter, garlic, herbs, and lemon juice, then store it in the fridge. Keep it in an airtight container for up to a week. This way, you save time when making your garlic herb butter salmon. For the full recipe, check the earlier sections. In this post, we explored how to make garlic herb butter salmon. We covered essential ingredients, step-by-step instructions, and helpful tips. You can customize your dish with fresh herbs and different cooking methods. Remember, the key is to check the internal temperature for perfect results. Enjoy your delicious salmon, knowing you've made a healthy choice! Feel free to experiment with flavors and presentation to make this meal truly yours. Happy cooking!

Garlic Herb Butter Salmon Tasty and Simple Meal

Looking for a quick and tasty dinner option? Garlic Herb Butter Salmon is here to save the day! This dish

- 1 package of instant ramen noodles (discard the seasoning packet) - 2 tablespoons chili paste (adjust based on spice preference) - 1 tablespoon sesame oil - 3 cups vegetable broth To start, the basic ingredients give your ramen its spicy flavor. The instant ramen noodles are quick and easy. I love using chili paste for heat. Sesame oil adds a rich, nutty taste. Vegetable broth enhances the overall flavor. - 1 cup bok choy, chopped - 1 carrot, julienned - 1 scallion, chopped Fresh vegetables bring color and texture to the dish. Bok choy adds crunch and a mild flavor. Carrots give a sweet touch that balances the spice. Scallions add a fresh bite. These veggies make the dish not just tasty but also nutritious. - 1 large egg - 1 tablespoon soy sauce - 1 teaspoon ginger, grated - Toppings: sesame seeds, nori sheets, sliced chili peppers Toppings make your ramen special. A soft-boiled egg adds creaminess. Soy sauce gives depth to the broth. Ginger brings warmth and spice. Sesame seeds and nori sheets add extra flavor. Sliced chili peppers let you control the heat. You can find the Full Recipe for more details on how to combine these ingredients into a savory bowl of spicy ramen noodles. Start by heating sesame oil in a pot over medium heat. Add grated ginger and sauté it for about one minute. This will make your kitchen smell amazing! Next, pour in three cups of vegetable broth. Bring it to a gentle simmer. Stir in two tablespoons of chili paste and one tablespoon of soy sauce. Mix everything well. This broth is the heart of your spicy ramen. Now, add one cup of chopped bok choy and one julienned carrot to the broth. Cook them for about three to four minutes. You want them tender but still crispy. The bright colors will make your dish pop. The veggies add freshness to your spicy ramen. While the broth simmers, take a separate pot and bring water to a boil. Gently place one large egg into the water. Boil for six to seven minutes. This timing will give you a perfect soft-boiled egg. After boiling, transfer the egg to an ice bath to stop the cooking. Once cool, peel the egg and set it aside. Once your broth and veggies are ready, it’s time for the noodles. Add the instant ramen noodles to the pot. Cook them according to the package instructions, usually about three minutes. They will soak up that spicy broth, making them delicious. Make sure to stir gently so they don’t stick together. Now for the fun part! Ladle the soup, noodles, and veggies into bowls. Slice the soft-boiled egg in half and place it on top of the ramen. Garnish with chopped scallions, sesame seeds, and sliced chili peppers. If you want, add nori sheets for extra flair. Your spicy ramen noodles are now ready to enjoy! For the full recipe, check the earlier section. To make your spicy ramen just right, adjust the chili paste. Start with 2 tablespoons for a good kick. If you want it milder, use less. You can also add more if you love heat. Taste as you go. This way, you'll find the perfect balance that suits your taste. For a soft-boiled egg, boil it for 6-7 minutes. This time gives you a nice, runny yolk. After boiling, cool the egg in an ice bath. This stops the cooking quickly and makes peeling easier. When ready, cut the egg in half and place it on top of your ramen. It adds a rich flavor. You can boost the flavor of your spicy ramen with extra ingredients. Consider adding sliced mushrooms or baby corn for more texture. A splash of lime juice can brighten the dish. Fresh herbs like cilantro or basil add a nice touch. Try different toppings like grilled chicken or tofu. These changes can make each bowl unique. For the full recipe, refer to the [Full Recipe]. {{image_2}} You can make spicy ramen vegan by using plant-based proteins. Try adding tofu or tempeh for a protein boost. You can also use chickpeas or lentils. These options keep the dish hearty and full of flavor. For broth, stick with vegetable broth. You can still enjoy the same spicy taste without any meat. If you love heat, go for extra spice! You can add more chili paste for a fiery kick. Hot chili oils also work great. Just drizzle some on top before serving. You can even add fresh sliced chili peppers for more heat. Adjust the spice to match your taste! Want a creamier ramen? Try adding coconut milk or peanut butter. Coconut milk makes it rich and smooth. Just stir it into the broth. Peanut butter gives a nutty flavor. Mix a spoonful in with the broth for a unique twist. Both options create a delicious, creamy texture that changes the whole dish. For the full recipe, check out the complete guide to making spicy ramen noodles. Store leftover spicy ramen noodles in an airtight container. Keep the noodles and broth separate. This way, the noodles stay firm and do not get mushy. Refrigerate both for up to three days. When you reheat the soup, add a splash of water to the broth. This helps to keep the noodles from drying out. Warm the broth on the stove over medium heat. Stir gently to mix flavors. If you use a microwave, heat in short bursts. Check often to avoid overheating. You can freeze the broth and noodles, but not together. Use freezer-safe containers. Pour the cooled broth into one container. Place the noodles in another. They can last up to three months in the freezer. When ready to eat, thaw the broth overnight in the fridge. Cook the noodles fresh for the best texture. Enjoy your spicy ramen noodles again! For more on this dish, check the Full Recipe. To make spicy ramen noodles healthier, you can reduce sodium and add more greens. Here are some tips: - Use low-sodium vegetable broth instead of regular broth. - Skip the seasoning packet that comes with instant ramen. - Add more vegetables, like spinach or kale, to boost nutrients. - Choose whole grain or rice noodles for more fiber. - Limit the amount of chili paste you use to control spice and sodium. These changes keep the dish tasty while making it better for you. Yes, you can substitute instant ramen with other noodle types. Here are some options: - Soba noodles: These buckwheat noodles have a nice nutty flavor. - Udon noodles: Thick and chewy, they hold broth well. - Rice noodles: Perfect for a gluten-free option. - Zucchini noodles: A great low-carb alternative. Each type brings its own texture and taste, so feel free to experiment. Many restaurants serve amazing spicy ramen. Here are some popular spots: - Ippudo: Known for its rich broth and bold flavors. - Santouka: Famous for its creamy tonkotsu ramen. - Ramen Tatsu-Ya: Offers a variety of spicy options and unique toppings. - Jinya Ramen Bar: Great for customizing spice levels and toppings. These places often have loyal fans for a reason. Check them out if you can! Yes, you can make spicy ramen milder for kids. Here are some techniques: - Use less chili paste or a milder version. - Add coconut milk to the broth for a creamy texture. - Serve the ramen with plain noodles on the side. - Offer extra toppings like cheese or avocado to balance the heat. These steps help create a kid-friendly dish while keeping it delicious. For the full recipe, check the section above! In summary, you’ve learned how to create a delicious spicy ramen noodle dish. We covered essential ingredients, like instant ramen, broth, and fresh veggies. We then walked through each cooking step, from preparing the broth to final assembly. You also found tips to tweak flavors and enjoy variations, such as vegan options or creamy twists. Now, it’s time to get creative in your kitchen. Enjoy your ramen adventure and impress your friends!

Spicy Ramen Noodles Savory and Flavorful Delight

Are you ready to spice up your mealtime? In this post, I’ll guide you through making deliciously spicy ramen noodles

- 1 pound fresh strawberries - 8 ounces semi-sweet chocolate (or dark chocolate) - 1 tablespoon coconut oil (optional) - 1/4 cup crushed nuts (e.g., almonds, hazelnuts) - 1/4 cup shredded coconut - Parchment paper To make chocolate dipped strawberries, you’ll need fresh ingredients. Fresh strawberries are key for the best taste. I suggest using larger strawberries. They hold more chocolate and look better too. Next, you will need semi-sweet or dark chocolate. The choice depends on your taste. Semi-sweet gives a nice balance of sweet and rich. If you want a deeper flavor, dark chocolate is perfect. Coconut oil is optional but helps with a smooth melt. It makes the chocolate easier to dip. If you like crunch, crushed nuts work great as a topping. Almonds and hazelnuts are my favorites. Shredded coconut adds a nice touch too. It gives a tropical flavor. Lastly, don’t forget parchment paper! It keeps the strawberries from sticking. For the full recipe, combine these ingredients with a few simple steps. Enjoy the process and have fun! First, rinse the strawberries under cold water. Make sure to wash them well to remove any dirt. Next, gently pat them dry with a paper towel. It is very important that they are completely dry. Any moisture can cause the chocolate to slide off. Grab a microwave-safe bowl. Add the semi-sweet chocolate and coconut oil if you want a smoother melt. Heat the bowl in the microwave in 30-second bursts. Stir the chocolate between each interval. This method helps avoid burning. Stop when the chocolate is fully melted and smooth. Hold each strawberry by the green stem. Dip it into the melted chocolate, covering about two-thirds of the berry. Let any extra chocolate drip off. This step is key to a nice finish. Place the dipped strawberries on parchment paper. While the chocolate is still wet, you can add toppings. Try crushed nuts or shredded coconut; they add great texture. Sprinkle them on before the chocolate hardens. This way, they will stick well. Now, put the tray in the refrigerator. Let the strawberries chill for about 30 minutes. Cooling is crucial because it helps the chocolate set properly. This makes the chocolate firm and ready to eat. After the chocolate has hardened, they are ready to serve. You can arrange them on a nice plate. For a fun twist, pair them with whipped cream or ice cream. Enjoy your delicious treat! For the full recipe, check the complete instructions above. To melt chocolate well, avoid overheating. Many people microwave it too long. I suggest using short bursts, about 30 seconds at a time. Stir after each round. This helps you see if it’s smooth yet. If it’s not, keep going. Add a tablespoon of coconut oil for a smoother finish. It helps the chocolate glide over the strawberries. Make sure to use a microwave-safe bowl. Glass or ceramic works best. The type of chocolate matters a lot. I love semi-sweet chocolate for its balance of sweetness. Dark chocolate offers a richer taste and pairs well with the tartness of strawberries. Milk chocolate is sweeter but may not suit everyone’s taste. For great quality, I recommend brands like Ghirardelli or Callebaut. They both melt well and taste delicious. Look for chocolate labeled as “baking chocolate” for the best results. You can make your chocolate special by adding flavors. A few drops of vanilla extract can enhance the taste. Want something different? Try adding orange zest for a citrus twist. Toppings also add fun! Use crushed nuts, sprinkles, or even sea salt. If you want something tropical, sprinkle on some shredded coconut. Don’t wait too long to add these. They stick better when the chocolate is still wet. For the full recipe, see the section above. {{image_2}} To make white chocolate dipped strawberries, you need a few special ingredients. Here’s what you’ll need: - 1 pound fresh strawberries - 8 ounces white chocolate - 1 tablespoon coconut oil (optional) Start by rinsing your strawberries and drying them well. For white chocolate, I like to use a microwave-safe bowl. Heat the white chocolate in the microwave in 30-second bursts. Stir well after each burst. This helps avoid burning. If you want a smoother finish, add the coconut oil before melting. Once melted, dip your strawberries just like in the regular recipe. Let them cool on parchment paper. If you prefer a vegan version, simply swap out the chocolate. Use dark chocolate that is dairy-free. Here’s what you’ll need: - 1 pound fresh strawberries - 8 ounces dairy-free dark chocolate - 1 tablespoon coconut oil (optional) Follow the same steps as before. Melt the dairy-free chocolate in intervals, stirring well. The result is still delicious and creamy! Enjoy these treats without any animal products. You can get creative with seasonal flavors. Try using flavored chocolate, like strawberry or mint. You can also add other seasonal fruits. For example, think about dipping banana slices or orange segments. These can add fun colors and tastes to your treats. Experimenting with different toppings can also change the game. Add crushed pretzels for a salty crunch or drizzle some caramel for extra sweetness. The possibilities are endless, and each bite can surprise you! To keep your chocolate dipped strawberries fresh, store them in the fridge. Place them in a single layer on a plate or in a container. Cover them lightly with plastic wrap or a lid. This keeps them safe from drying out. Avoid stacking them to prevent smudging the chocolate. Make sure they are cool before you store them. This helps keep the chocolate hard. Keep moisture away from your chocolate. Water can make the chocolate sticky or ruin the texture. If you see any moisture, dry the strawberries before dipping. This ensures a smooth chocolate finish. You can freeze chocolate dipped strawberries for later. Here’s how: 1. Prepare: Place the strawberries on a parchment-lined tray. Make sure they do not touch each other. 2. Freeze: Put the tray in the freezer for about one hour. This helps them freeze evenly. 3. Store: After freezing, place the strawberries in a freezer bag. Remove as much air as possible before sealing. When you want to eat them, take out the strawberries. Allow them to thaw in the fridge for best results. This way, the chocolate stays smooth and tasty. Enjoy your treat anytime! Chocolate dipped strawberries taste best when fresh. They last about 1-2 days in the fridge. Keep them in an airtight container. This helps prevent moisture. If you leave them out, they can spoil quickly. Always eat them soon after making for the best flavor and texture. Yes, you can! You can use semi-sweet, dark, or white chocolate. Each type brings a unique taste. Dark chocolate has a rich flavor and less sugar. Semi-sweet chocolate is sweet and creamy. White chocolate is sweet and buttery. Experiment to find your favorite! Start by rinsing strawberries under cold water. Avoid using soap or any chemicals. After rinsing, gently pat them dry with a paper towel. Make sure they are completely dry. Any moisture can cause the chocolate to slide off. Clean berries lead to better results! You can find high-quality chocolate at specialty stores or online. Brands like Ghirardelli and Callebaut are great choices. Look for chocolate that has a high cocoa content. This gives a richer taste. Local markets often carry gourmet chocolate too. Always check for freshness! You learned how to make delicious chocolate dipped strawberries. We covered choosing fresh strawberries, melting chocolate, and adding fun toppings. I shared tips on storage and even some tasty variations. These treats are easy to prepare and sure to impress anyone. Remember to enjoy experimentation with flavors and toppings. Now, gather your ingredients and start dipping! You’ll love the sweet results.

Chocolate Dipped Strawberries Sweet and Simple Treat

Are you ready to treat yourself with a simple yet delicious dessert? Chocolate dipped strawberries are both sweet and easy

Newer posts
← Previous Page1 … Page83 Page84

dsad

© 2026 easycookingbite • Built with GeneratePress

Our Policies

  • Copyright Policy
  • Cookie Policy
  • GDPR Policy
  • Privacy Policy
  • Disclaimer
  • Terms Of Use

More Information

  • Home
  • About
  • Contact
  • Appetizers
  • Dessert
  • Dinner
  • Drinks
©2026, easycookingbite About Back To Top