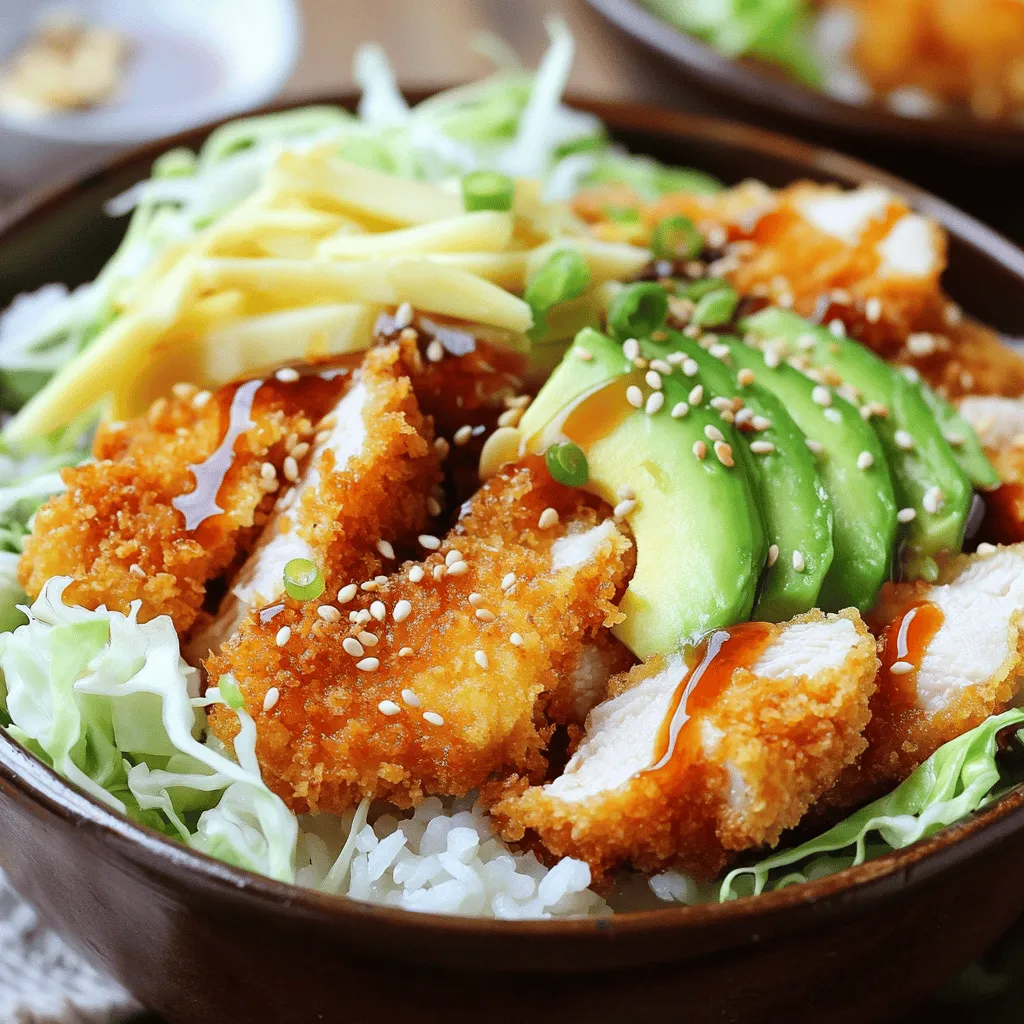
If you’re craving a meal that’s both tasty and easy to make, Japanese Katsu Bowls are perfect! These bowls combine crispy, breaded chicken with fluffy rice and flavorful toppings. In this post, I’ll guide you through the ingredients, cooking steps, and some fun variations to suit your taste. Let’s dive into this delicious world that combines comfort and flavor in every bite!
Ingredients
Main Ingredients for Katsu Bowls
– 2 boneless, skinless chicken thighs
– 1 cup panko breadcrumbs
– 2 cups cooked Japanese rice
Katsu bowls are hearty and full of flavor. The main star is the chicken thighs, which I find juicier and more tender than other cuts. The panko breadcrumbs give a nice crunch that contrasts well with the soft rice. You need Japanese rice for its stickiness, which holds everything together.
Essential Seasonings and Toppings
– 1 tablespoon soy sauce
– 1 tablespoon Dijon mustard
– 1/4 cup pickled ginger
– 2 tablespoons teriyaki sauce
– Sesame seeds for garnish
– Green onions, chopped for garnish
Soy sauce and Dijon mustard bring out the umami taste. I love adding pickled ginger for a tangy kick. The teriyaki sauce adds sweetness, while sesame seeds and green onions finish the dish with a fresh touch. These ingredients make every bite a delight.
Optional Ingredients for Variations
– Tofu or pork as protein alternatives
– Vegan options using plant-based sauces
– Gluten-free substitutes for flour and breadcrumbs
You can switch the protein if you want. Tofu works great for a veggie version, while pork is classic for katsu. If you need vegan or gluten-free options, there are many great substitutes available. These variations let you enjoy katsu bowls no matter your diet.
Step-by-Step Instructions
Preparing the Chicken
To start, you need to pound the chicken. Take the boneless, skinless thighs and place them between two sheets of plastic wrap. Use a meat mallet or a rolling pin to pound them evenly to about 1/2 inch thick. This makes sure they cook evenly. After that, season both sides with salt and pepper. This adds great flavor to the meat.
Setting Up the Breading Station
Next, create a breading station. You need three shallow dishes. In the first dish, add the flour. In the second dish, mix a large egg with soy sauce and Dijon mustard. In the last dish, pour in the panko breadcrumbs. This three-part breading system helps the chicken get that perfect crispy coating.
When you dredge the chicken, do it in order. First, coat it in flour. Shake off any extra flour. Then, dip it in the egg mixture, making sure every part gets covered. Finally, press it into the panko breadcrumbs. This step is key for a crunchy crust.
Cooking and Frying the Chicken
Now it’s time to fry the chicken. In a large skillet, heat about 1/2 inch of vegetable oil over medium-high heat. To know if it’s hot enough, you can drop a small piece of bread in the oil. If it sizzles, you’re ready. Carefully add the breaded chicken to the skillet. Fry for about 3-4 minutes on each side. Look for that golden-brown color. The chicken should reach an internal temperature of 165°F. Once done, place the chicken on paper towels to drain excess oil.
This process gives you a delicious, crispy chicken katsu that will make your bowl truly special.
Tips & Tricks
Perfecting the Katsu
To keep your chicken moist, choose thighs over breasts. Thighs have more fat, so they stay juicy. Pound the chicken evenly. This helps it cook at the same rate. Season with salt and pepper before you bread it. This adds flavor throughout the meat.
For even frying, heat the oil properly. Aim for 350°F to 375°F. If the oil is too cool, the katsu will soak up grease. Fry in small batches. This keeps the oil hot and helps achieve that perfect golden color.
Presentation Tips
When you arrange your katsu bowls, think visually. Start with a base of rice. Then, layer the toppings on top. Place the chicken katsu in the center. Add shredded cabbage around it for crunch. Sliced avocado adds creaminess and color. Finally, drizzle teriyaki sauce over everything. This adds shine and flavor.
Use contrasting colors. Bright green onions and pink pickled ginger make the dish pop. A sprinkle of sesame seeds adds texture. You can even add a lime wedge for a nice touch.
Alternative Cooking Methods
You can bake katsu if you want a healthier option. Preheat your oven to 400°F. Place the breaded chicken on a baking sheet. Spray lightly with oil. Bake for about 20 minutes or until golden. This method reduces oil but still gives a nice crunch.
An air fryer is another great choice. It cooks the katsu quickly with less oil. Set it to 375°F and cook for about 12 minutes. Flip halfway through for even cooking. This gives you crispy katsu with less mess.

Variations
Vegetarian and Vegan Katsu Bowls
You can use tofu or tempeh instead of chicken for a veggie version. Both absorb flavor well. For the breading, follow the same steps as with chicken. You can also try different sauces. A vegan mayo or spicy miso can add a unique twist.
Gluten-Free Katsu Bowl Options
If you need a gluten-free option, swap all-purpose flour with rice flour. Use gluten-free breadcrumbs instead of panko. For sauces, look for gluten-free teriyaki or soy sauce. Always check labels to ensure they are safe.
Regional Katsu Variations
Katsu varies by region. Tonkatsu is a pork version, often served with a special sauce. Chicken katsu is lighter and crispier. Some regions add unique toppings like grated daikon or spicy mayo. Experiment with local flavors to make your bowl special.
Storage Info
Storing Leftovers
To keep your Katsu bowls fresh, store leftovers right away. Place the food in airtight containers. This will help keep moisture in and odors out. Make sure to refrigerate within two hours of cooking. This keeps your meal safe to eat later. I recommend using glass containers. They help avoid stains and odors from strong flavors.
Reheating Katsu Bowls
When it’s time to enjoy leftovers, you have a few good options. The microwave is fast and easy. Just cover the bowl with a damp paper towel to keep it moist. Heat for about one to two minutes. If you prefer a crispier texture, use the oven. Preheat it to 350°F. Place the bowl on a baking sheet and heat for about 10 minutes. This helps maintain the crunch of the katsu.
Freezing Options
If you want to save Katsu bowls for later, freezing is a great choice. First, freeze the katsu and rice separately. Wrap the katsu in plastic wrap, then place it in a freezer bag. For rice, use a freezer-safe container. When you’re ready to eat, thaw the katsu in the fridge overnight. Heat it up in the oven or microwave, and serve with fresh rice. This keeps your meal tasting great!
FAQs
What is Katsu?
Katsu is a Japanese dish made with breaded and fried meat. It often uses pork or chicken. The meat gets coated in flour, egg, and panko breadcrumbs. When cooked, it becomes crispy and golden. Katsu is usually served with rice and a tangy sauce. Tonkatsu is the pork version, while chicken katsu is popular too. Both are delicious and easy to make!
Can I make Katsu in advance?
Yes, you can prepare katsu ahead of time. You can bread the chicken and store it in the fridge for a day. Just make sure to keep it covered. When ready, fry it fresh for best taste. You can also cook the katsu and store it in the fridge. Reheat it just before serving. This keeps it crispy and tasty.
What can I serve with Katsu Bowls?
Katsu bowls are great with many sides. You can add steamed veggies or a salad for color. Miso soup complements the meal well. Pickled vegetables add a crunchy contrast. You might also enjoy some edamame or seaweed salad on the side. Each of these pairs well with the rich flavors of katsu.
Is Katsu Bowl healthy?
Katsu bowls can be part of a balanced diet, but watch the portion sizes. The chicken provides protein, while rice gives carbs. However, frying adds extra fat and calories. You can make it healthier by using less oil or baking the chicken instead. Adding fresh veggies boosts nutrition too. Enjoy katsu in moderation for a tasty treat!
Katsu bowls are simple to make and packed with flavor. We’ve covered key ingredients like chicken thighs and panko breadcrumbs, along with essential seasonings and toppings. The steps to prepare and cook are important for a great meal. I also shared tips for perfecting your katsu and creative variations. Remember, you can customize your bowl to fit dietary needs. This dish offers tasty options and the chance to impress at your table. Enjoy making and sharing delicious katsu bowls with family and friends!