Go Back
To make these tasty granola bars, gather the following items: - 2 cups rolled oats - 1 cup mixed nuts (almonds, cashews, walnuts, roughly chopped) - 1/2 cup honey or maple syrup - 1/4 cup peanut butter or almond butter - 1/2 cup dried fruits (cranberries, apricots, or raisins) - 1/4 cup mini dark chocolate chips (optional for a touch of sweetness) - 1/2 teaspoon vanilla extract - 1/4 teaspoon sea salt - 1/4 teaspoon cinnamon You will need a few tools to make this recipe: - An 8x8 inch baking dish - Parchment paper - Mixing bowls - A spatula - A microwave-safe bowl You can easily swap some ingredients. Here are a few ideas: - Use agave syrup instead of honey or maple syrup. - Sunflower seed butter is a great option in place of peanut butter. - For nut-free bars, skip the nuts and add seeds like pumpkin or sunflower seeds. - You can replace dried fruits with chocolate chips or seeds for different flavors. Feel free to mix and match based on what you like! These swaps keep your homemade granola bars fun and tasty. Check the Full Recipe for more details. Start by preheating your oven to 350°F (175°C). Grab an 8x8 inch baking dish. Line the dish with parchment paper. Leave some paper hanging over the sides. This helps you lift the bars out later. In a large bowl, add 2 cups of rolled oats. Toss in 1 cup of mixed nuts. I like almonds, cashews, and walnuts. Add 1/4 teaspoon of sea salt and 1/4 teaspoon of cinnamon. Mix these dry ingredients well. This blend gives your bars flavor and crunch. Next, take a microwave-safe bowl. Add 1/2 cup of honey or maple syrup and 1/4 cup of peanut butter or almond butter. Heat these together for about 30 seconds. Stir until the mixture is smooth. Then, add 1/2 teaspoon of vanilla extract. This adds a lovely scent and flavor. Pour the wet mixture over the dry ingredients. Mix everything until the dry ingredients are well-coated. Fold in 1/2 cup of dried fruits and 1/4 cup of mini dark chocolate chips, if you want some sweetness. Transfer this mixture to the lined baking dish. Press it down firmly using the back of a spatula or your damp hands. Bake for 20 to 25 minutes until the edges turn golden. Let the bars cool completely in the dish. Once cool, lift them out using the parchment paper. Cut them into bars or squares. You can find the Full Recipe to guide you through this process. Store the bars in an airtight container at room temperature for about a week. To get the best texture in your granola bars, stick to the right mix. Use rolled oats for chewiness. Chopped nuts add crunch. The honey or maple syrup acts as glue, holding everything together. Want chewier bars? Add more nut butter or honey. This keeps them soft. For crunchier bars, bake them a bit longer. You can also use less nut butter. The choice is yours! Pressing the mixture is key. Use damp hands or a spatula to pack it down. Make sure it is even across the dish. A tight press helps the bars stay together. If they’re loose, they may crumble when cut. {{image_2}} If you or someone you know has nut allergies, don't worry! You can still make tasty granola bars. Replace the mixed nuts with seeds like pumpkin or sunflower seeds. These seeds add crunch and good nutrients. You could also use puffed rice or oats for extra texture. This nut-free version keeps the bars safe and delicious. Want to mix things up? You can add fun flavors! For a chocolate twist, stir in mini chocolate chips. They melt and add a sweet touch. If you love coconut, add shredded coconut. This gives your bars a tropical flavor. You can even blend the two! Try half chocolate and half coconut for a fun treat. Need more protein in your snack? Add protein powder to the mix. A scoop of vanilla or chocolate protein powder works well. You can also use additional nut or seed butters. This gives the bars a creamy texture and boosts protein. Another option is to include hemp seeds or chia seeds. They are small but pack a protein punch! For a complete guide, check out the Full Recipe. After you bake your granola bars, let them cool completely. Once cool, cut them into bars or squares. Place them in an airtight container. This keeps them fresh for up to one week. You can store them at room temperature. If your kitchen is warm, the fridge is a good option. Freezing is a great way to keep granola bars longer. Wrap each bar in plastic wrap. Then, place them in a freezer-safe bag. This helps keep out air and moisture. You can freeze them for up to three months. When you want a bar, take one out and let it thaw. You can enjoy it cold or heat it for a few seconds in the microwave. Check your granola bars for signs of spoilage. If they smell off or look moldy, it's best to toss them. If they feel very hard or crumbly, they may not taste good anymore. Always trust your nose and eyes. Fresh bars should be chewy and smell yummy. Homemade granola bars last about one week at room temperature. If you store them in the fridge, they can stay fresh for two weeks. Use an airtight container to keep them safe from air. This helps maintain their taste and texture. Yes, you can use maple syrup or agave syrup. Both options add sweetness and work well in the recipe. If you are vegan, these sweeteners are great choices. Just remember that the flavor might change a bit based on what you choose. Making your own granola bars has many benefits. You control the ingredients, which means no hidden sugars or additives. Homemade bars are often healthier than store-bought ones. They can also fit your taste and dietary needs. Plus, they are easy to make and fun to customize. To customize for dietary needs, swap out nuts for seeds if you have a nut allergy. Use gluten-free oats for a gluten-free option. You can also choose different sweeteners or add protein powder. Dried fruits can be replaced with seeds or fresh fruits. This makes the bars fit your diet perfectly. Making homemade granola bars is easy and fun. We covered the basic ingredients, equipment, and how to substitute items. I shared detailed steps for mixing and baking, plus tips for texture and flavor. You can try many variations, from nut-free options to protein-packed bars. Remember to store them well for freshness. Homemade granola bars are tasty and offer many health benefits. Enjoy creating your own unique snacks!

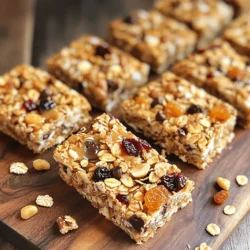
Homemade Granola Bars: Easy Recipe

Discover the joy of making your own granola bars with this easy and delicious recipe! With wholesome ingredients like rolled oats, mixed nuts, and a hint of honey or maple syrup, these granola bars are perfect for on-the-go snacking or a nutritious breakfast. Learn how to whip up a batch that will keep your family satisfied and energized. Click through to explore all the details and enjoy your homemade granola bar bliss!

Ingredients
  

2 cups rolled oats

1 cup mixed nuts (almonds, cashews, walnuts, roughly chopped)

1/2 cup honey or maple syrup

1/4 cup peanut butter or almond butter

1/2 cup dried fruits (cranberries, apricots, or raisins)

1/4 cup mini dark chocolate chips (optional for a touch of sweetness)

1/2 teaspoon vanilla extract

1/4 teaspoon sea salt

1/4 teaspoon cinnamon

Instructions
 

Preheat your oven to 350°F (175°C). Line an 8x8 inch baking dish with parchment paper, leaving some overhang for easy removal later.

    In a large bowl, combine the rolled oats, chopped nuts, sea salt, and cinnamon. Mix until well combined.

      In a microwave-safe bowl, heat the honey (or maple syrup) and peanut butter together for about 30 seconds until warm. Stir until smooth and blended. Add the vanilla extract.

        Pour the honey-peanut butter mixture over the dry ingredients. Mix thoroughly, ensuring all the dry ingredients are well-coated.

          Fold in the dried fruits and chocolate chips if using.

            Transfer the mixture to the prepared baking dish. Using the back of a spatula or your hands (dampened with water to prevent sticking), press the mixture firmly and evenly into the dish.

              Bake in the preheated oven for 20-25 minutes until the edges are slightly golden.

                Remove from the oven and let cool completely in the baking dish. Once cooled, lift out using the parchment paper and cut into bars or squares.

                  Store in an airtight container at room temperature for up to a week or refrigerate for an extended shelf life.

                    Prep Time: 10 min | Total Time: 35 min | Servings: 12 bars