Go Back
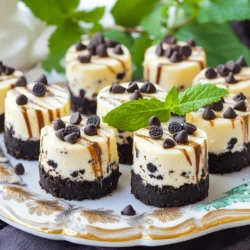
To make No-Bake Cookies and Cream Cheesecake Bites, you need the right ingredients. Here’s what you will need: - 1 cup Oreo cookies, crushed - 2 tablespoons unsalted butter, melted - 8 oz cream cheese, softened - 1/2 cup powdered sugar - 1/2 teaspoon vanilla extract - 1 cup whipped cream (or whipped topping) - 1/4 cup mini chocolate chips (optional) - Extra crushed Oreos for topping These ingredients come together to create a creamy, cookie-filled treat. The Oreo cookies give a rich flavor, while the cream cheese adds creaminess. The whipped cream makes it light and fluffy. I love using fresh ingredients. Make sure your cream cheese is at room temperature. This helps it mix smoothly. If you want a little crunch, toss in the mini chocolate chips. They add fun texture to each bite. Remember, you can adjust the toppings. If you want to go wild, add some extra crushed Oreos on top. They make for a great presentation and taste. Enjoy the process of gathering your ingredients; it sets the stage for your delicious creation! Start by mixing the crushed Oreo cookies with melted butter in a bowl. Make sure the crumbs are well coated. This step is key to a tasty crust. Next, take about a tablespoon of this mixture and pack it into mini muffin liners or silicone molds. Press down firmly to form a solid base. This will hold your cheesecake bites together. In a clean bowl, beat the softened cream cheese until it is smooth. This will be the creamy heart of your bites. Once smooth, add the powdered sugar and vanilla extract. Mix until everything is well combined. This creates a sweet and flavorful cheesecake mix. Now, gently fold the whipped cream into the cream cheese mixture. This makes the filling light and fluffy. If you'd like, you can also fold in mini chocolate chips at this point. They add a nice crunch! Carefully spoon the cheesecake mixture on top of the Oreo crusts. Fill each one to the top and smooth the surfaces with a spatula. For a fun touch, sprinkle extra crushed Oreos on each cheesecake bite. Place the filled molds in the refrigerator. Chill for at least 2-3 hours until they are firm. Once set, carefully remove the cheesecake bites from the molds. For a beautiful presentation, arrange them on a decorative platter. You might drizzle chocolate sauce over them and add fresh mint leaves for color. This will wow your guests! To get a smooth and creamy cheesecake, start by properly softening your cream cheese. Leave it at room temperature for about 30 minutes. This helps it blend well. After softening, beat it in a bowl until it is nice and smooth. When you add the whipped cream, fold it into the cream cheese mix. This keeps it light and fluffy. Do not mix it too hard; you want to keep all the air in. If you mix too much, the texture will be dense. Garnishing makes your cheesecake bites look amazing. Adding mint leaves gives a fresh look and taste. Place a mint leaf on top of each bite for color. You can also drizzle chocolate sauce on the bites. Melt some chocolate and use a spoon to swirl it over the cheesecake. This adds sweetness and style. The best way to serve these cheesecake bites is on a pretty platter. Arrange them neatly and drizzle with chocolate for a stunning view. Pair your cheesecake bites with cold milk or coffee. Both drinks enhance the sweet flavors and make a perfect match. Enjoy sharing these bites with friends or family! {{image_2}} You can switch up the base by using different cookies. Try Nutter Butter for a peanut butter twist or graham crackers for a classic taste. Each cookie brings a unique flavor to the bites. You can also add flavored extracts. For example, a hint of almond extract makes a nice change. Toppings can also enhance the flavor. Use crushed peppermint candies for a festive touch or drizzle with caramel sauce for extra sweetness. For gluten-free options, use gluten-free cookies. There are many brands available that taste great. For those who need dairy-free alternatives, opt for dairy-free cream cheese and whipped cream. Make sure to check the labels to find suitable products. These adjustments keep the bites delicious and safe for everyone to enjoy. You can make larger cheesecake bites for a more filling treat. Use regular muffin liners instead of mini ones. If you want to create mini cheesecakes, use small molds. Silicone molds can shape them into fun designs. No matter the size, these bites stay delightful and fun. To keep your no-bake cookies and cream cheesecake bites fresh, store them in the fridge. Use an airtight container to prevent them from drying out or absorbing other flavors. They will last for about 5 to 7 days. If you want to enjoy them later, consider freezing them. Freezing these cheesecake bites is easy. First, let them chill in the fridge until firm. Then, remove them from the molds and place them in a single layer on a baking sheet. Freeze until solid, then transfer them to a freezer-safe bag or container. When you're ready to eat, thaw them in the fridge for a few hours. Avoid thawing at room temperature to keep the texture smooth. Yes, you can make these cheesecake bites a day or two in advance. Just chill them well. This lets the flavors blend nicely. Store them in the fridge until you are ready to serve. You can use half-and-half or whole milk as a substitute. For a lighter option, try Greek yogurt. Each will change the texture a bit but will still taste great. Absolutely! You can use any cookies you like. Try chocolate chip cookies, graham crackers, or even peanut butter cookies. Each choice gives a new flavor twist. To prevent sticking, use silicone molds or line plastic ones with parchment paper. Also, lightly grease the molds with cooking spray before adding the crust. This makes it easier to pop them out later. You can now create tasty cheesecake bites using simple ingredients like Oreos and cream cheese. This recipe guides you through each step, from mixing the cookie base to chilling the bites. I've shared tips for texture and decoration to help you impress your guests. Feel free to explore different flavors and adjust for dietary needs. Remember to store any leftovers correctly or freeze them for later. Enjoy your delicious creations and share them with friends!

No-Bake Cookies and Cream Cheesecake Bites

Indulge in the delightful world of no-bake cookies and cream cheesecake bites with this simple and delicious recipe! Perfect for parties or a sweet treat at home, these cheesecake bites combine creamy goodness with crunchy Oreo crust. In just 20 minutes of prep, you’ll have a dessert that’s ready to chill. Click through to discover how to make these irresistible bites that are sure to impress your friends and family!

Ingredients
  

1 cup Oreo cookies, crushed

2 tablespoons unsalted butter, melted

8 oz cream cheese, softened

1/2 cup powdered sugar

1/2 teaspoon vanilla extract

1 cup whipped cream (or whipped topping)

1/4 cup mini chocolate chips (optional)

Extra crushed Oreos for topping

Instructions
 

In a mixing bowl, combine the crushed Oreo cookies and melted butter. Stir until all the crumbs are moistened.

    Pack about a tablespoon of the cookie mixture into mini muffin liners or silicone molds, pressing down firmly to create a base. Set aside.

      In another bowl, beat the softened cream cheese until smooth.

        Add in the powdered sugar and vanilla extract, mixing until combined.

          Gently fold in the whipped cream until fully incorporated, ensuring a light and fluffy mixture. If desired, fold in the mini chocolate chips for extra texture and sweetness.

            Spoon the cheesecake mixture on top of the Oreo crusts in the molds, filling each to the top. Smooth the surfaces with a spatula.

              Sprinkle extra crushed Oreos on top of each cheesecake bite for decoration.

                Place the molds in the refrigerator and chill for at least 2-3 hours or until set. Once firm, gently remove the cheesecake bites from the molds.

                  Prep Time: 20 minutes | Total Time: 3 hours 20 minutes | Servings: about 12 bites

                    - Presentation Tips: Arrange the cheesecake bites on a decorative platter, drizzled with chocolate sauce for an appealing look. Garnish with fresh mint leaves for a touch of color!